Hema SM-6000HU User manual

Instructions for use
Rice Cooker
Gebruiksaanwijzing
Rijstkoker
Mode d’emploi
Séche-cheveux 2000 Watts
Gebrauchsanleitung
Haartrockner 2000 Watt
Instrucciones de uso
Haartrockner 2000 Watt
Instructions for use
Sewing machine
Gebruiksaanwijzing
Naaimachine
Mode d’emploi
Machine à coudre
Gebrauchsanleitung
Nähmaschine
Instrucciones de uso
Máquina de coser

2

3
EN Sewing machine
Article number 45.10.0002
Technical specifications
Supply voltage: 220 - 240 V - 50Hz
Power consumption: 9 Watt
Type: SM-6000HU
2 year full warranty
Complies with directives 89/336/EC and 73/23/EC
1
10
4
11
12
13
14
2
3
7
8
9
6
5
15 16 20 21 22
191817

4
Safety instructions
• Read all instructions before use.
• Do not touch hot surfaces. Use handles or knobs.
• To protect against electric shock, do not immerse cord, plug or appliance in
water or any other liquid.
• Unplug from outlet when not in use and before cleaning. Allow the device to cool
before putting on or taking off parts. Do not operate any appliance with a dam-
aged cord or plug or after the appliance malfunctions, or has been damaged in
any manner.
• The use of accessory attachments not recommended by the appliance manu-
facturer may cause injuries and invalidate any warranty you may have.
• Do not use outdoors, or on or near direct heat sources
• Do not let cord hang over edge of table or counter, or touch hot surfaces or
come into contact with the hot parts or allow the product to be situated under-
neath or close to curtains, window coverings etc.
• This appliance is for household use only and only for the purpose it is made for.
• The appliance must be placed on a stable, level surface.
• This appliance is an attended appliance, and as such should never be left ON
or whilst hot without adult supervision.
SAVE THESE INSTRUCTIONS FOR FUTURE REFERENCE
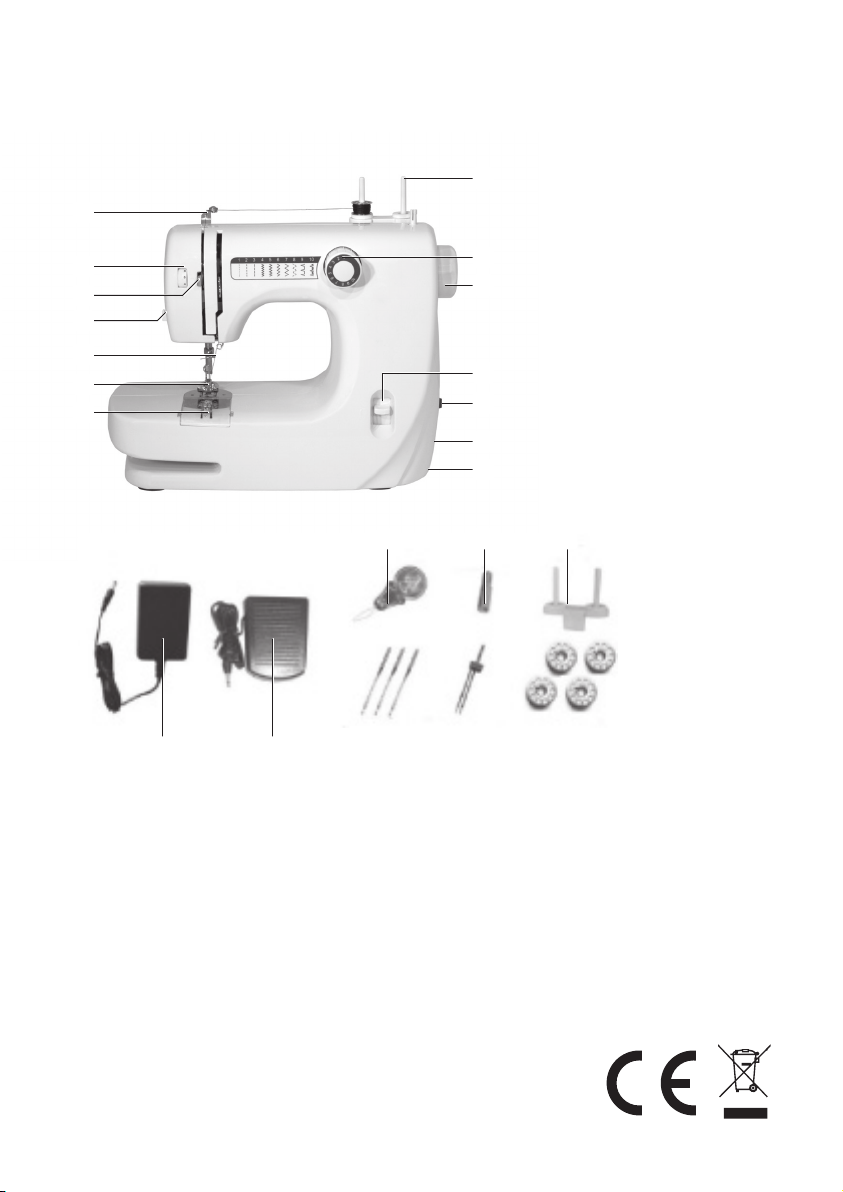
Parts description
1. Spool pin 11. Handwheel
2. Winding thread guide 12. On/Off switch
3. Thread tension dial 13. Foot pedal receptacle
4. Pattern selector 14. Transformer receptacle
5. Thread tension release bar 15. Adaptor
6. Thread cutter 16. Foot pedal
7. Needle clamp screw 17. Threader
8. Presser foot 18. Bobbin winding pin
9. Transparent cover 19. Spool pin Needles (3x)
10. Reserve sewing lever 21. Twin needle Bobbins (4x)
Before first use
• Remove all packaging of the device.
• Check if the voltage of the appliance corresponds to the main voltage of your
home. Rated voltage : AC220-240V 50Hz.
Connecting to the power source
Get the adaptor (no. 15) and the foot pedal (no. 16).
• Connect plug “A” to the machine and plug “B” into the wall outlet
• Turn on power switch “ON”.
• Connect the foot control “C” to the machine.
• The speed of the machine can be regulated by applying pressure to the foot controller.
Press the on/off switch to “ON” for power, the sewing light will burn.
5
Insert or change the needle
Attention: Turn power to “off” position before inserting the needle, to avoid electrical
shock! Change the needle regularly, especialy if it is showing signs of wear and caus-
ing problems.
Insert the needle as follows:
• Turn the handwheel (no. 11) to top position.
• Loose the needle clamp screw(no.7) and tighten again after inserting the new needle.
• The flat side of the needle should be towards the back. Insert the needle as far up
as it will go.
Take out of the needle Inserting the needle
Twin needle (figure 1)
• Take out the single needle, then put the twin needle. Put two bobbins onto the wind-
ing thread guide, same as picture. Two stitches separately insert into two pinpole
of twin needle.
• Other steps are same as threading the single needle.
• Note: Twin needle is only suitable for straight stitch. It can sew two straight stitches
in parallel.
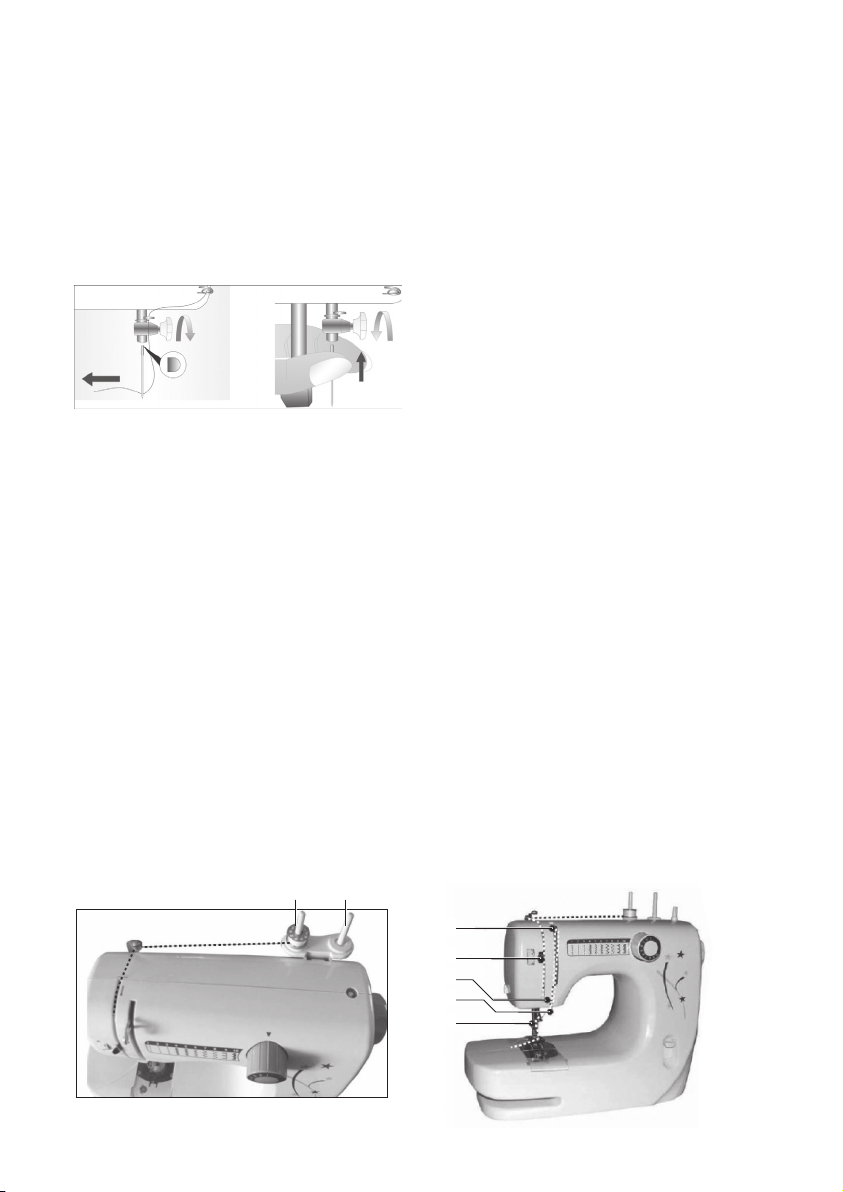
Upper thread (figure 1+2)
For quick and easy installation of the upper thread follow the steps below.
The open line in the picture below, suggests the thread which goes through the de-
vice. The enlargements can be a clarification of the step.
• Put the bobbin on the bobbin winder and guide the thread over the winding thread
guide from right to left. Push thread tension release bar (A) to left, then guide the
thread down between the tension disc making sure that the thread has been in-
serted into the tension disc.
• Continue to draw the thread down and around the thread pulling bar fixed holder
spring (B) from left to right.
• Draw the thread up, through the take-up lever draw (C) from left to right.
• Continue to draw the thread down through the upper guide (D) from front to back.
• Drawing down the thread and through the lower guide from back to front.
• Continue to draw down the thread through the thread protector (E).
• Finally thread the needle from front to back (important !)
21
(figure 1) (figure 2)
C
A
B
D
E
6
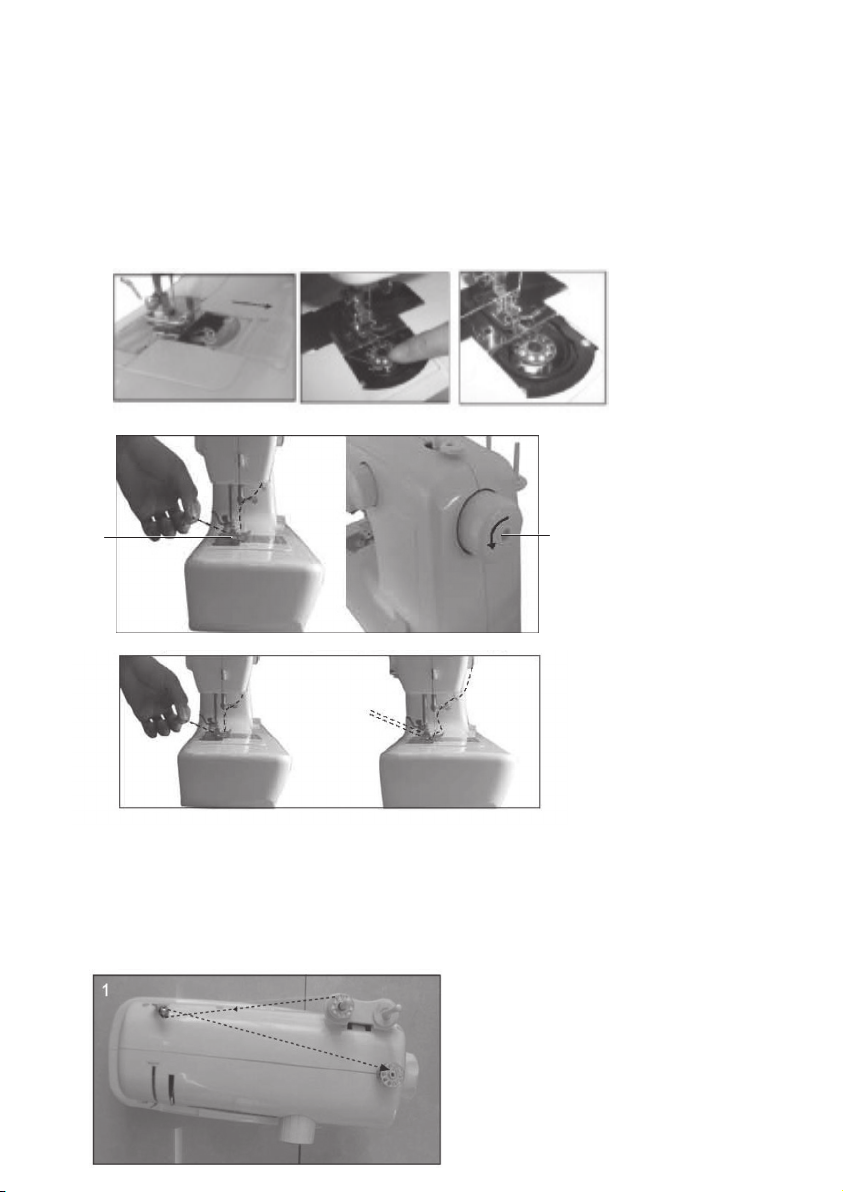
Lower thread
• When inserting or removing the lower bobbin, the needle must be fully raised.
• Turn the hand wheel (no.11). Pull out the plastic transparent cover (no. 9).
• Insert the bobbin in the bobbin case, so that the thread rund in a clockwise direction.
• Replace the transparent cover (no. 9)
• Raise the presser foot, hold the upper thread with the left hand, right hand turn the
handwheel anticlockwise until the needle is raised.
• When the needle reach the bottom, the hook tray will hook the upper thread, ro-
tate the hook tray to pull the lower thread out.
• Pull the lower and upper thread under presser foot (no. 8), pull out 10 cm to the back.
11
8
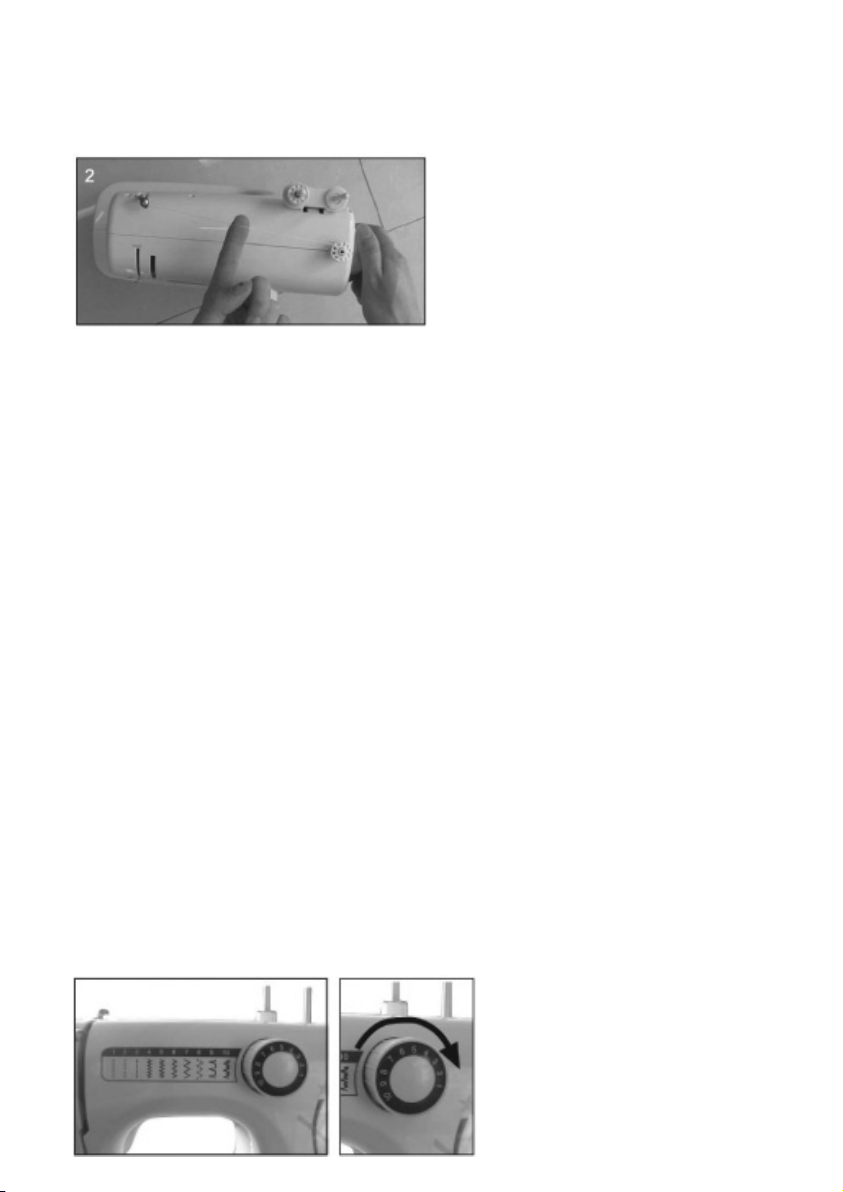
Winding of the bobbins
Figure 1
• Place a yarn pin on the spool pin (no.1).
• Guide the thread through the winding thread guide (no. 2) to the empty bobbin.
• Place the bobbin winding pin (no.18) on the machine.
• Wind the thread several times clockwise to the empty bobbin and place it on the
bobbin winding pin (no.18).
7
Figure 2
• Turn the hand wheel (no. 11) clockwise until the thread is tightened.
• Start electric winding by pressing the foot control.
• When the bobbin is full, release the foot pedal, cut the thread, then remove bobbin
Reverse sewing
• Reverse sewing is suitable for fastening the seam when start seam or finish seam to
avoid stitches loose.
• Stop the machine firstly, then press the reserve sewing lever (no.10), the machine
can sew reverse.
• Release the reserve button, the machine can recover to sew forward. The reverse
trace shouldn’t beyound 5 cm.
Release of the fabric
• Set the needle at the highest position by turning the hand wheel (no. 11) anticlockwise.
• Raise the presser foot (no. 8) and remove the fabric backwards. Cut the threads by
using the thread cutter (no. 6) at the side of the machine.
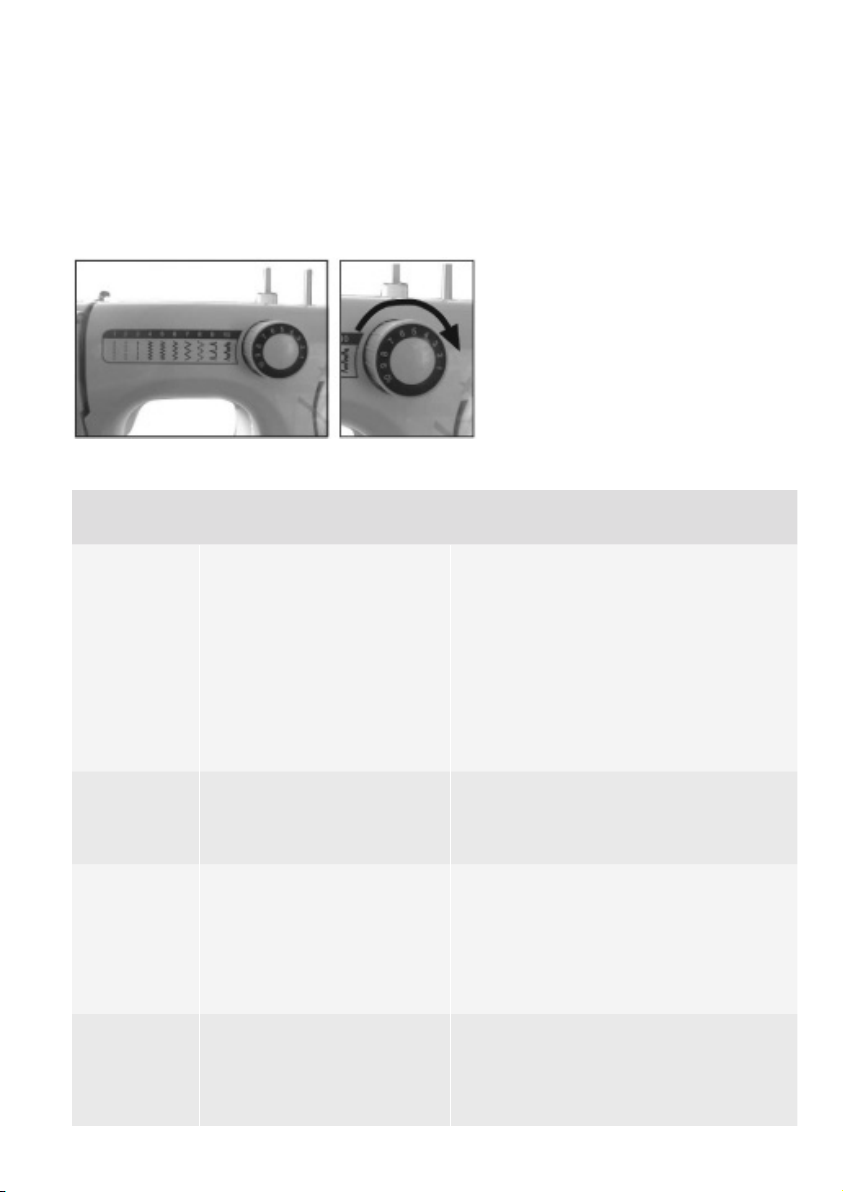
Straight and other stitching
• There are three kinds of straight stitches for your choise.
• Turn the pattern selector (no. 4) to the one you need.
• Set the needle at the highest position by turning hand wheel anticlockwise.
• Gently pull both threads (about 10 cm) towards rear, raise the presser foot (no. 8),
place the fabric under the presser foot.
• Gently press down the foot pedal (no. 16) to start sewing.
• Guide fabric gently by hand.
• Stop the needle in its top position, and thread can be pulled out easily.
• Raise the presser foot (no. 8) and remove the fabric. This is for all the patterns of your
choise.
Notice
When turning the pattern selector, assure the needle tip is at the upper position, other-
wise it will be bent or damaged or fail to sewing.
When selecting the pattern, set the position correctly, otherwise it will hurt the needle
or sew over the the selected stitch trace. It will be different from the selected pattern.
Thread tension adjustment
For a correct stitch the upper and the lower thread should be even. By turning the
thread tension dial the upper thread can be switched from the left to the right. Use this
dial to get the two threads even.

8
Trouble shooting
Problem Cause Correction
Upper
thread
breaks
• The machine is not
threaded correctly.
• The thread tension is
too tight
• The thread is too thick
for the needle.
• The needle is not
inserted correctly.
• The thread is round
wound the spool pin.
• The needle is dam-
aged.
• Rethread the machine.
• Reduce the thread tension (lower
number).
• Select a larger needle.
• Remove and reinsert the needle
(flat side towards the back).
• Remove the bobbin and rewind the
bobbin.
• Replace the needle.
Lower
thread
breaks.
• The lower thread is not
inserted correctly.
• The upper thread ten-
sion is too loose.
• Check the threading carefully.
• Adjust the upper thread tension.
Skipped
stitches
• The needlenis not
inserted correctly.
• The needle is dam-
aged.
• The wrong size needle
has been used.
• The foot is not at-
tached correctly.
• Remove and reinsert needle (flat side
towards the back).
• Insert a new needle.
• Choose a needle to suit the the thread
and fabric.
• Check and attach correctly.
Needle
breaks
• The needle is dam-
aged.
• The needle is not
inserted correctly.
• Wrong needle size for
the fabric.
• Insert a new needle.
• Insert the needle correctly (flat side
towards the back).
• Choose a needle to suit the thread
and fabric.
• Check and attach correctly
Loose
stitches
• The machine is not
threated correctly.
• The bobbin case is not
correctly threated.
• Needle/fabric/thread
combination is wrong.
• Thread tension wrong.
• Check the threading.
• Thread the bobbin case as illustraded.
• The needle size must suit the fabric
and thread.
• Correct the thread tension.
Seams
pucker-
ing
• The needle is too large
for fabric.
• The stitch length is
wrongly adjusted.
• The thread tension is
too tight.
• Select a finer needle.
• Readjust the stitch length.
• Loosen the thread tension.

9
Cleaning
• Before cleaning, unplug and wait for the appliance to cool down.
• Wipe the inside and the edges of the appliance with a paper towel or a soft cloth.
Wipe the outside with a damp cloth only, ensuring that no moisture, oil or grease
enters the cooling slots.
• Do not clean the inside or outside with any form of abrasive scouring pad or steel
wool as this will damage the non-stick finish.
• Never immerse the appliance in water or any other liquid.
Disposal at end of working life
Discarded electrical and electronic devices often still contain valuable materials, there-
fore do not throw them away, instead hand them in to the store where you buy a new
device or to your local council recycling depot.
According to the waste guideline for electrical and electronic equipment,
this type of waste must be collected separately. If you wish to dispose of
this product in the future, do NOT throw it away with household waste, but
hand it in at your local council recycling depot.
The packaging material should also be disposed of separately.
Quality
Safety and quality are very important to . We have our own laboratory which as-
sesses all equipment in terms of electrical safety and ease of use before they are included
in our range. also monitors product quality in collaboration with the manufacturer.
Security
This article may be fitted with a plastic anti-theft strip. You will find the strip on
the bottom of the product. This strip does not affect the quality or operation of the
product and can be removed without problem.
Faults and repairs
If a fault develops, you should return the device to a Hema branch.
Do not try to repair the equipment yourself. Ensure that the device is well packaged
before returning it, preferably using the original packaging. If the device is within the
terms of the warranty, bring the warranty document with you.

10
Warranty conditions
We guarantee quality
B.V. fully guarantees the product named on the warranty receipt against all
defects caused by material and manufacturing errors.
All domestic electrical appliances come with a 2-year warranty effective from
the date of purchase.
The warranty on this article is invalidated if
a. the defect occurs through incorrect or improper use, neglect, connection to the
wrong power voltage, or if dropped or knocked;
b. you have attempted to repair the article yourself, or have had it repaired by a re-
pair service other than during the warranty period.
If you wish to make a claim under the warranty terms
You will need to take the article to one of our branches together with the warranty
receipt. Under normal circumstances the article will be repaired free of charge within
14 workdays.
Extra certainty for the right choice
If, after purchasing this article, you are in any way dissatisfied (because it is not exactly
what you expected or you already have this article), you can return it within 30 days
of purchase, on condition that it is undamaged and in the original packaging.
Remember that you must always bring your sales receipt with you.
You can either exchange the article or request a refund.
The warranty conditions apply in all countries where there are branches.
1 November 2010
Hema BV
PO Box 37110
1030 AC Amsterdam
The Netherlands
These warranty conditions do not affect the your statutory rights.
Hema B.V. Postbus 37110 1030 AC Amsterdam NL 020 3114800 BE 0800 73595
DE 0180 577077
11
NL Naaimachine
Artikelnummer45.10.0002
Technische gegevens
Voedingsspanning: 220 - 240 V - 50Hz
Opgenomen vermogen: 9 Watt
Type: SM-6000HU
2 jaar volledige garantie
Voldoet aan de eisen vastgelegd in de richtlijnen 89/336/EEG en 73/23/EEG
1
10
4
11
12
13
14
2
3
7
8
9
6
5
15 16 20 21 22
191817

12
Veiligheidsvoorschriften
• Lees alle instructies voor gebruik.
• Raak geen hete oppervlakken aan. Gebruik handvatten of knoppen.
• Om u te beschermen tegen een elektrische schok, snoer, stekker of het appa-
raat niet onderdompelen in water of een andere vloeistof.
• Haal de stekker uit het stopcontact als het apparaat niet in gebruik is of voor
reiniging.
• Laat het apparaat afkoelen alvorens onderdelen te verwijderen of te monteren.
• Het apparaat niet gebruiken met een beschadigd snoer of stekker of indien
het toestel beschadigd is op enigerlei wijze.
• Het gebruik van accessoires die niet zijn aanbevolen door de fabrikant van het
apparaat kan schade veroorzaken en beëindigt iedere garantie die u heeft.
• Gebruik het apparaat niet buitenshuis of op of in de buurt van directe warm-
tebronnen.
• Laat het snoer niet over de rand van de tafel hangen, tegen hete oppervlak-
ken of in contact komen met het apparaat. Plaats het product niet onder of
dicht bij de gordijnen, raambekleding enz.
• Dit apparaat is alleen voor huishoudelijk gebruik en voor het doel waar het
voor bestemd is.
• Het apparaat dient te worden geplaatst op een stabiele, vlakke ondergrond.
• Dit apparaat mag alleen worden gebruikt onder toezicht van volwassenen.
• Dit apparaat is niet bedoeld om gebruikt te worden door personen (waaron-
der kinderen) met verminderde fysieke, zintuiglijke of mentale capaciteiten of
een gebrek aan ervaring en kennis, tenzij zij onder toezicht staan of aanwij-
zingen hebben gekregen m.b.t. het gebruik van dit apparaat door iemand die
verantwoordelijk is voor hun veiligheid.
• Om kinderen te beschermen tegen de gevaren van elektrische apparatuur
mag u ze nooit zonder toezicht bij het apparaat laten. Selecteer daarom een
plek voor uw apparaat op dusdanige wijze dat kinderen er niet bij kunnen.
Zorg er voor dat de kabel niet naar beneden hangt.
BEWAAR DEZE INSTRUCTIES VOOR LATERE RAADPLEGING
Onderdelenbeschrijving
1. Spoelhouder 12. Aan/uit schakelaar
2. Draadgeleider 13. Voetpedaal aansluiting
3. Draadspanning schakelaar 14. Stroom aansluiting
4. Patroon schakelaar 15. Stroomadaptor
5. Draad spanningsschijf 16. Voetpedaal
6. Draadsnijder 17. Draadbegeleider
7. Naaldklem schroef 18. Spoel opwinder
8. Drukvoet 19. Spoelhouder
9. Afdekgaasje 20.Naalden (3x)
10. Terug naaien schakelaar 21. Dubbele naald
11. Handwiel 22.Spoelen (4x)

13
Voor het eerste gebruik
• Verwijder alle verpakkingen van het apparaat.
• Controleer of alle onderdelen zijn meegeleverd en uit de verpakking zijn verwijderd.
• Controleer of de spanning van het apparaat overeenkomt met de netspanning
van uw huis. Voltage 220V-240V 50Hz.
Aansluiten op de netspanning
Pak de adapter (nr.15) en het voetpedaal (nr.16)
• Sluit plug “A” aan op de machine en de stekker “B” in het stopcontact.
• Zet de schakelaar op “AAN”.
• Sluit de voetpedaal “C” aan op de machine.
• Afhankelijk van de druk op het voetpedaal wordt de snelheid van de machine
geregeld.
Het lampje gaat aan zodra u de aan/uit schakelaar op “AAN” zet.
Het plaatsen of verwisselen van de naald
Let op!: Om een elektrische schok te voorkomen, moet u de machine uit zetten alvo-
rens u een naald plaatst of verwijdert.
Verwissel regelmatig de naald, zeker wanneer deze tekenen van slijtage vertonen.
Plaats de naald als volgt:
• Draai met het handwiel (nr.11 ) de naald in de hoogste positie.
• Draai naaldklemschroef (nr.7) los. De vlakke zijde van de naald moet naar achteren
wijzen.
• Duw de naald zo ver als mogelijk naar boven en draai de naaldklem schroef weer vast.
Demonteren van de naald Plaatsen van de naald
Plaatsen van de dubbele naald (figuur 1)
Verwijder de enkele naald en plaats de meegeleverde dubbele naald. Plaats 2 spoe-
len op de spoel winders zoals aangegeven op de afbeelding. De dubbele naald kan
alleen voor rechte steken gebruikt worden.
Aanbrengen van de bovendraad (figuur 1+2)
Voor het snel en gemakkelijk aanbrengen van de bovendraad dient u onderstaande
stappen te volgen. De stippellijn is de lijn die de draad over en door de machine volgt.
Op de uitvergrotingen treft u een verduidelijking aan van de betreffende stap.
• Zet de spoel op de spoelwinder en geleid de draad over de draadgeleider van
rechts naar links en volg met de draad de richting van de stippellijn.
• Druk de draaddrukplaat (A) naar links en geleid de draad naar beneden en zorg
dat de draad tussen de drukplaat zit
• Ga verder naar beneden met de draad om de vaste draadgeleider (B) van links
naar rechts en ga weer omhoog.

14
• Geleid de draad door de draadhendel (C), van links naar rechts.
• Ga verder en voer de draad door de draadgeleider (D) van voor naar achter.
• Geleid de draad over de lage geleider van achter naar voor
• Breng de draad door de draadprotector (E).
• Tenslotte voer de draad door de naald van voor naar achter. Belangrijk!
21
(figuur 1) (figuur 2)
C
A
B
D
E
Aanbrengen van de onderdraad
• Indien u de onderste spoel wilt aanbrengen of verwijderen moet de naald zich in de
bovenste positie bevinden. Draai daarvoor aan het handwiel (nr.11). Tevens dient de
drukvoet (nr. 8) op de hoogste stand te staan. Schuif het afdekglaasje (nr. 9) naar voren.
• Leg de spoel zodanig in de cassette zodat de draad met de klok mee loopt.
• Schuif het afdekglaasje weer terug op haar plaats.
• Pak de bovendraad in uw linkerhand en houd enige spanning op de draad.
• Gebruik de rechter hand om het handwiel (nr.11) tegen de klok in te draaien totdat
de naald weer in de bovenste stand is.
• Als de naald de bodem bereikt zal de bovendraad de onderdraad meenemen.
• Trek de boven- en onderdraad onder de drukvoet (nr.8) door (ongeveer 10 cm).
11
8

15
Opwinden van de spoel
Figuur 1
• Plaats een klosje garen op de spoelhouder (nr.1).
• Geleid de draad via de draadgeleider (nr. 2) naar een lege spoel.
• Plaats de losse spoelwinder (nr. 18) op de machine.
• Wind de draad enkele keren met de klok mee om de lege spoel en plaats deze op
de spoelwinder( nr.18)
Figuur 2
• Draai enkele malen aan het handwiel (nr. 11) en voel of de draad strak staat.
• Druk op het voetpedaal (nr.16) totdat de spoel vol is. Verwijder de spoel door de
draad door te snijden.
Achteruit naaien
• Stop de machine, aan het eind van een naad moet u de knop voor achteruit
naaien (nr. 10) indrukken.
• Houd deze knop ingedrukt en naai een paar steken achteruit om de naad vast te
zetten.
• De achteruit naad mag niet langer zijn dan 5 cm.
Verwijderen van uw werk.
• Draai het handwiel (nr. 11) naar u toe en breng de draadhendel in de hoogste positie.
• Breng de drukvoet (nr. 8) omhoog en verwijder uw werk naar achteren. Snijd de
draden door met de draadsnijder (nr. 6) aan de zijkant van de machine.
Rechte steek en andere steken
• Er zijn drie verschillende rechte steken.
• Selecteer met de patroonschakelaar (nr. 4) de steek die u wenst.
• Zet de naald in de hoogste positie door het handwiel tegen de klok in te draaien.
• Trek voorzichtig beide draden (±10 cm) naar achteren.
• Zet de drukvoet (nr. 8) omhoog en breng uw naaiwerk onder de drukvoet en breng
deze weer naar beneden.
• Druk voorzichtig op het voetpedaal (nr. 16) en begin te naaien.
• Begeleid het naaiwerk met de hand.
• Stop met de naald in de bovenste positie waardoor de draad eenvoudig kan
worden uitgetrokken.
• Zet de drukvoet omhoog en verwijder uw naaiwerk.
• Dit geldt voor alle door u gewenste patronen.
16
Opmerking
Als u de patroonschakelaar verdraait, overtuig u er dan van dat de naald zich in de
bovenste positie bevindt om verbuigen of beschadiging te voorkomen.
Als u het patroon selecteert zet de knop dan op de juiste positie anders beschadigt de
naald of u naait een verkeerd patroon.
Instellen van de draadspanning
Voor een juist resultaat dienen de bovenste en de onderste draad gelijk te staan. Met de
draadspannings schakelaar (nr. 3) kan de bovenste draad van links naar rechts worden
gesteld. Draai aan deze schakelaar totdat de 2 draden gelijk achter elkaar staan.
Problemen oplossen
Problemen
oplossen Oorzaak Oplossing
Bovenste
draad
breekt
• De bovenste draad is
niet goed aangebracht.
• De draad spanning is te
groot.
• De draad is te dik voor
de naald.
• De naald is niet correct
geplaatst.
• De draad is om de spoel
gedraaid
• De naald is beschadigd.
• Voer de bovendraad opnieuw in.
• Verminder de spanning van de
draad (verlaag het getal).
• Gebruik een dikkere naald.
• Verwijder en plaats denaald
opnieuw (platte kant achter).
• Verwijder de spoel en wind hem
opnieuw op.
• Vervang de naald.
De on-
derdraad
breekt.
• De onderdraad is niet
goed gepositioneerd.
• De bovenste draad
spanning is te laag.
• Controleer de onderdraad nau-
wkeurig.
• Pas de bovenste draad spanning
aan.
Overgesla-
gen steken • De naald is niet correct
geplaatst.
• De naald is beschadigd.
• De maat van de naald is
onjuist.
• De voet is niet goed
geplaatst.
• Verwijder en plaatsde naald
opnieuw
(platte kant naar achteren).
• Plaats een nieuwe naald.
• Kies een goede naald voor het
garen en de stof.
• Controleren en goed plaatsen.
Naald
breekt • De naald is beschadigd
• De naald is niet correct
geplaatst.
• Verkeerde naald voor
deze stof gebruikt.
• Plaats een nieuwe naald.
• Plaats de naald op de juiste manier
(platte zijde naar achteren).
• Kies de juiste naald voor deze stof.
Controleren en goed monteren.
17
Problemen
oplossen Oorzaak Oplossing
Losse
steken • De draden zijn niet goed
aangebracht
• De spoel is niet goed
opgewonden.
• De combinatie van
naald / sof / draad
komen niet overeen.
• De draad spanning is
verkeerd.
• Breng de draden op de juiste manier
aan.
• De draad goed op de spoel winden.
• Kies een goede naald voor de
draad en stof.
• Corrigeer de draad spanning.
Reiniging
• Haal voor de reiniging de stekker uit het stopcontact en wacht tot het apparaat
afgekoeld is.
• Veeg de randen van het apparaat af met een papieren doekje of een zachte
doek. Veeg de buitenzijde af met een licht bevochtigde doek en zorg er daarbij
voor dat geen vocht, olie of vet de afkoelgaten binnen kan dringen.
• Reinig de binnen- of buitenzijde van de wokpannetjes niet met een schuurspons of
staalwol; dit beschadigt de beschermlaag.
• Dompel het apparaat niet onder in water of een andere vloeistof.
Weggooien na einde levensduur
Afgedankte elektrische en elektronische apparaten bevatten vaak nog waardevolle
materialen, gooi ze daarom niet weg maar lever ze in, of in de winkel waar u een
nieuw apparaat koopt, of bij het KCA depot in uw gemeente.
Volgens de richtlijn afval van elektrische en elektronische apparatuur,
moet dit soort afval apart worden ingeleverd. Indien u in de toekomst van
dit product af wilt, plaats het dan NIET bij het huishoudafval, maar lever het
in bij het KCA depot van uw gemeente.
Lever ook het verpakkingsmateriaal gescheiden in.
Kwaliteit
hecht grote waarde aan veiligheid en kwaliteit. We beschikken over een
eigen laboratorium. Dit laboratorium beoordeelt vóór opname in het assortiment,
alle apparaten op elektrische veiligheid en gebruikseigenschappen. Daarnaast
bewaakt samen met de fabrikant de productkwaliteit.
Beveiliging
Het is mogelijk dat dit artikel voorzien is van een kunststof beveiligingsstrip. U vindt
de strip dan aan de onderzijde van het apparaat. Deze strip heeft geen invloed op de
kwaliteit of werkwijze van het artikel en kan zonder problemen worden verwijderd.

18
Storingen en reparatie
Bij een defect toestel, het apparaat ter reparatie aanbieden bij een Hema-vestiging.
Voer zelf geen reparaties uit aan het toestel. Ingeval reparatie nodig is, kunt u het
apparaat goed verpakt, bij voorkeur in de originele verpakking, inleveren bij een He-
ma-vestiging. Indien binnen de garantietermijn, de garantiebon meebrengen.
Garantiebepalingen
Wij garanderen de kwaliteit
Hema B.V. garandeert het op de garantiebewijsbon vermelde artikel volledig tegen
gebreken als gevolg van materiaal- en fabricagefouten. Voor alle elektrisch huishou-
delijke apparaten is de garantietermijn 2 jaar na de datum van aankoop.
De garantie op het artikel vervalt indien
a. het defect is ontstaan door ondeskundig of oneigenlijk gebruik, verwaarlozing,
aansluiten op de verkeerde netspanning of door vallen of stoten;
b. u, gedurende de garantieperiode, het artikel zelf of door een niet- repara-
teur heeft geprobeerd te herstellen.
Als u aanspraak kunt en wilt maken op garantie
Dient het artikel, vergezeld van de garantiebewijsbon, te worden aangeboden in één
van onze vestigingen. In het algemeen zal, behoudens bijzondere omstandigheden,
de reparatie binnen 14 werkdagen geheel gratis worden uitgevoerd.
Extra zekerheid voor een goede keus
Als u met de aankoop van het artikel achteraf toch niet gelukkig bent (bijvoorbeeld
omdat de uitvoering tegenvalt of een dubbele aankoop heeft plaatsgevonden), kunt
u binnen 30 dagen na aankoop, mits onbeschadigd en in originele verpakking, het
artikel terugbrengen. Neem dan wel altijd de kassabon mee. U kunt het artikel dan
ruilen of desgewenst uw geld terug krijgen.
Deze garantiebepalingen zijn van toepassing in alle landen waar Hema
vestigingen heeft. 1 november 2010
Hema B.V.
Postbus 37110
1030 AC Amsterdam
Nederland
Deze garantiebepalingen gelden onverminderd de wettelijke rechten of vorderingen
van de klant.
B.V. Postbus 37110 1030 AC Amsterdam NL 020 3114800 BE 0800 73595

19
FR Machine à coudre
N° art. 45.10.0002
Spécifications techniques
Alimentation : 220 - 240 V - 50Hz
Puissance absorbée : 9 Watt
Type: SM-6000HU
2 ans de garantie complète
Conforme aux directives européennes 89/336/CEE et 73/23/CEE
1
10
4
11
12
13
14
2
3
7
8
9
6
5
15 16 20 21 22
191817

20
Consignes de Sécurité
• Lisez toutes les instructions avant utilisation.
• Ne touchez pas les surfaces chaudes, servez-vous des poignées et des boutons.
• Pour vous protéger des risques d’électrocution, n’immergez ni le cordon
d’alimentation ni l’appareil dans l’eau ou dans tout autre liquide.
• Débranchez la prise lorsque vous ne vous en servez pas et avant de procéder
au nettoyage. Laissez refroidir l’appareil avant d’en retirer ou d’y ajouter des
éléments. N’utilisez jamais un appareil dont le cordon d’alimentation ou la
fiche est endommagé, ou bien après qu’il ai subit un dysfonctionnement ou ait
été endommage d’une quelconque façon.
• L’utilisation d’accessoires non recommandés par le fabriquant de l’appareil
est susceptible de provoquer des blessures ainsi que l’annulation de la garan-
tie dont vous bénéficiez.
• Ne pas utiliser à l’extérieur ou sur ou à proximité de sources de chaleur.
• Ne laissez pas le cordon pendre depuis le rebord d’une table ou d’un plan
de travail, ne le laissez pas entrer en contact avec des surfaces chaudes ou
avec les éléments de l’appareil qui chauffent durant l’utilisation. Ne placez pas
l’appareil sous ou à proximité de rideaux ou des garnitures de fenêtres.
• Cet appareil est exclusivement destiné à une utilisation domestique dans le but
pour lequel il a été prévu.
• L’appareil doit être placé sur une surface stable et plane.
• Cet appareil nécessite la présence constante d’un utilisateur adulte lorsqu’il est
en marche ou qu’il est chaud.
• Cet appareil n’est pas prévu pour être utilisé par des personnes (y compris les en-
fants) don’t les capacities physiques, sensorielles ou mentales sont réduites, oou
des personnes dénuées d’expérience ou de connaissance, sauf si elles ont pu
bénéficier, par l’intermédiaire d’une personne responsable de leur sécurité, d’une
surveillance ou d’instructions préalables concernant l’utilisation de l’appareil.
• Il convient de surveiller les enfants pour s’assurer qu’ils ne jouent pas avec
l’appareil.
• Afin de protéger les enfants des dangers des appareils électriques, ne les laissez
jamais sans surveillance à proximité de l’appareil. En conséquence, lorsque vous
choisissez l’emplacement de l’appareil, faites-le de telle manière que l’enfant n’aura
pas accès à l’appareil. Vérifiez et assurez-vous que les câbles ne pendent pas.
• Pour plus de sécurité, il est conseillé de brancher l’appareil sur une prise de
courant protégée par un disjoncteur différentiel de 30 mA dans la salle de
bains. Demandez conseil à votre électricien.
CONSERVEZ CES INSTRUCTIONS POUR REFERENCE ULTERIEURE
Parts description
1. Broche à bobine 12. Interrupteur On/Off
2. Œillet de guidage du fil 13. Prise de raccordement de la pédale
3. Molette de réglage de la tension du fil 14. Prise de raccordement du transformateur
4. Sélecteur de points 15. Adaptateur
5. Barre de relâchement de la
tension du fil 16. Pédale de commande
6. Coupe fil 17. Régulateur de tension du fil
7. Vis de serrage de l’aiguille 18. Dévidoir
8. Pied-de-biche 19. Broche à canettes
9. Couvercle transparent 20. Aiguilles (3x)
10. Levier de marche arrière 21. Double aiguille
11. Volant 22. Canettes (4x)
Table of contents
Languages:
Other Hema Sewing Machine manuals


