Hena CB116 User manual

USER MANUAL CB116
Delete

1Enjoy your media library anywherePortable powerhouse plays popular music, video,and photo formats TF card increases your storage capacity(up to 32 GB supported)Built-in cameraConvenient front-facing and rear cameraAutomatic orientation detectionRead any way you want; the display adjusts automatically!FeaturesBrowse the Web.Visit your favorite websitesCheck your e-mailKeep in touch with friends and familyWatch YouTube™ videosBrowse the world’s most popular video-sharing communityRead your favorite booksDownload thousands of books .Discover many Windows appConnect to the Internet wirelesslyHigh-speed Wi-Fi 802.11 b/g/n networking
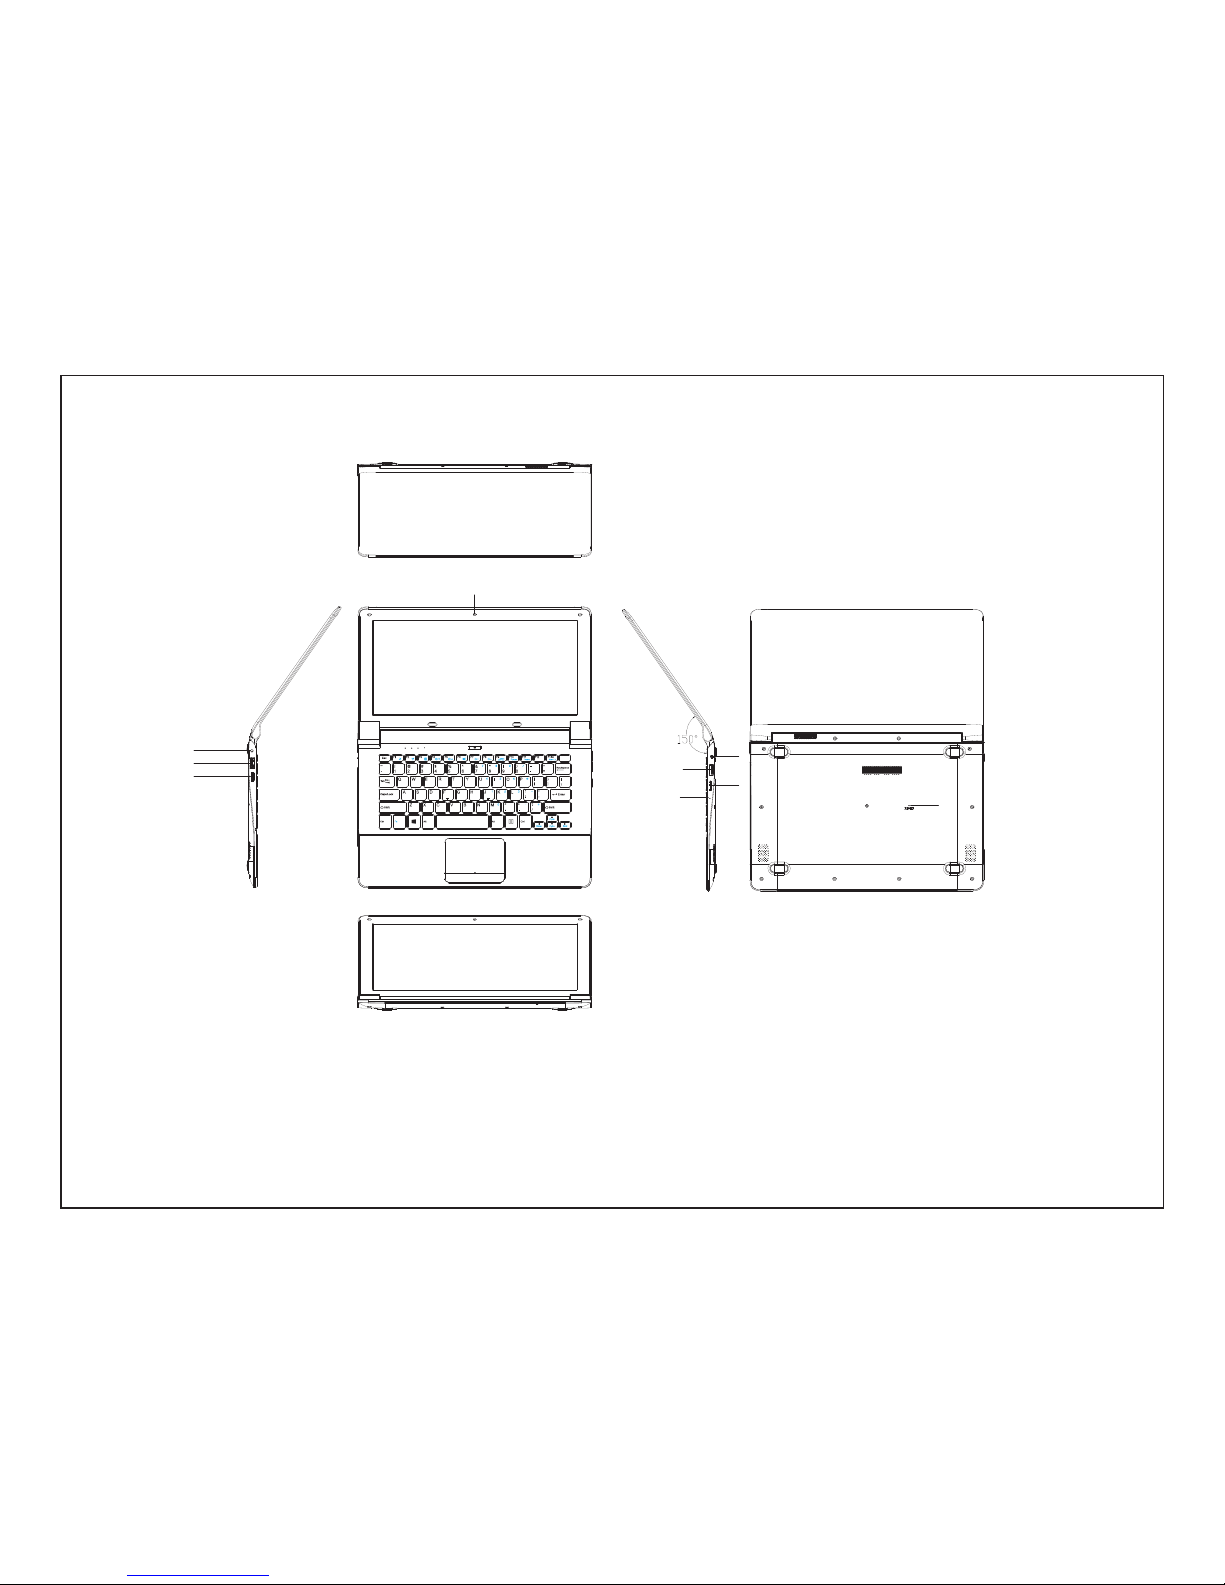
Unit at a Glance21.POWER3. 2. DC INUSB 4. HDMI5. Headphone123456786. USB7. TF CARD8. MIC9. REAR CAMERA10.REST109
Delete

Safety Informationwitch off in restricted areasSwitch the device off when mobile PC use is not allowed or when it may cause interference or danger, for example, in aircraft, in hospitals or near medical equipment, fuel, chemicals, or blasting areas. Obey all instructions in restricted areas.road safety comes firstObey all local laws. Always keep your hands free to operate the vehicle while driving. Your first consideration while driving should be road safety.interferenceAll wireless devices may be susceptible to interference, which could affect performancequalified serviceOnly qualified personnel may install or repair this product.batteries, chargers, and other accessoriesUse only batteries, chargers, and other accessories approved by S805Gfor use with thisdevice. Third-party chargers that comply with the IEC/EN 62684 standard, and that can connect to your device micro USB connector, may be compatible. Do not connect incompatible products.keep your device dryYour device is not water-resistant. Keep it dry.glass partsThe device screen is made of glass. This glass can break if the device is dropped on a hard surface or receives a substantial impact. If the glass breaks, do not touch the glass parts of the device or attempt to remove the broken glass from the device. Stop using the device until the glass is replaced by qualified service personnel.3Read the safety information before using the tablet.

4Charging the Battery The tablet has a built-in battery and the battery comes partially charged. You must fully charge the battery before using your device for the first time. After the first charge, you can use the device while charging. Always charge the battery using the 5V/2.5A power adapter provided.Charging via power adapter Connect the standard USB end of the USB cable to the power adapter. Connect the Micro-USB end of the USB cable to your tablet. Then plug the power adapter into the mains socket. ORCharging via the USB cable Connect the standard USB end of the USB cable to your PC. Then connect the Micro-USB end of the USB cable to the port of the tablet. An indicator light above the power button will illuminate, indicating charging is in progress. If the battery is completely discharged, you cannot turn on the device, even with the USB power adapter connected. Allow a depleted battery to charge for a few minutes before you try to turn on the device.Note: You cannot sufficiently charge the battery using the USB cable and your PC due to incorrect current.To check the battery status, tap the battery icon on the bottom of the screen. Charging the Battery Indicator lightPower button

5The following screen drawings are only for reference and please refer to actual screen drawings.To turn on your tablet 1. Press and hold for about 2 seconds to turn on your tablet.2. If the lock screen image displays, swipe your finger from the bottom of the displayto switch to the login screen, and then enter password to log in to Windows.·Please first create a Microsoft account.The tablet is ready for use after the Windows Start screen displays.To turn off the screen·When the tablet is turned on, press to turn off the screen to save batterypower.·Or you can swipe from the right edge of the display to access the menu. Tap AllSettings to display the settings. Tap System→Power &Sleep to set the screen tobe turned off after a set time period.NOTE: If your tablet is in a sleep state, press or tap home button to turn on the screen.To turn off the tablet·Press and hold until you see “Slide to shut down your PC” on the screen.Slide to shut down your tablet.Turning the Tablet On or Off·tablet modes:You can also turn off the tablet in desktop and
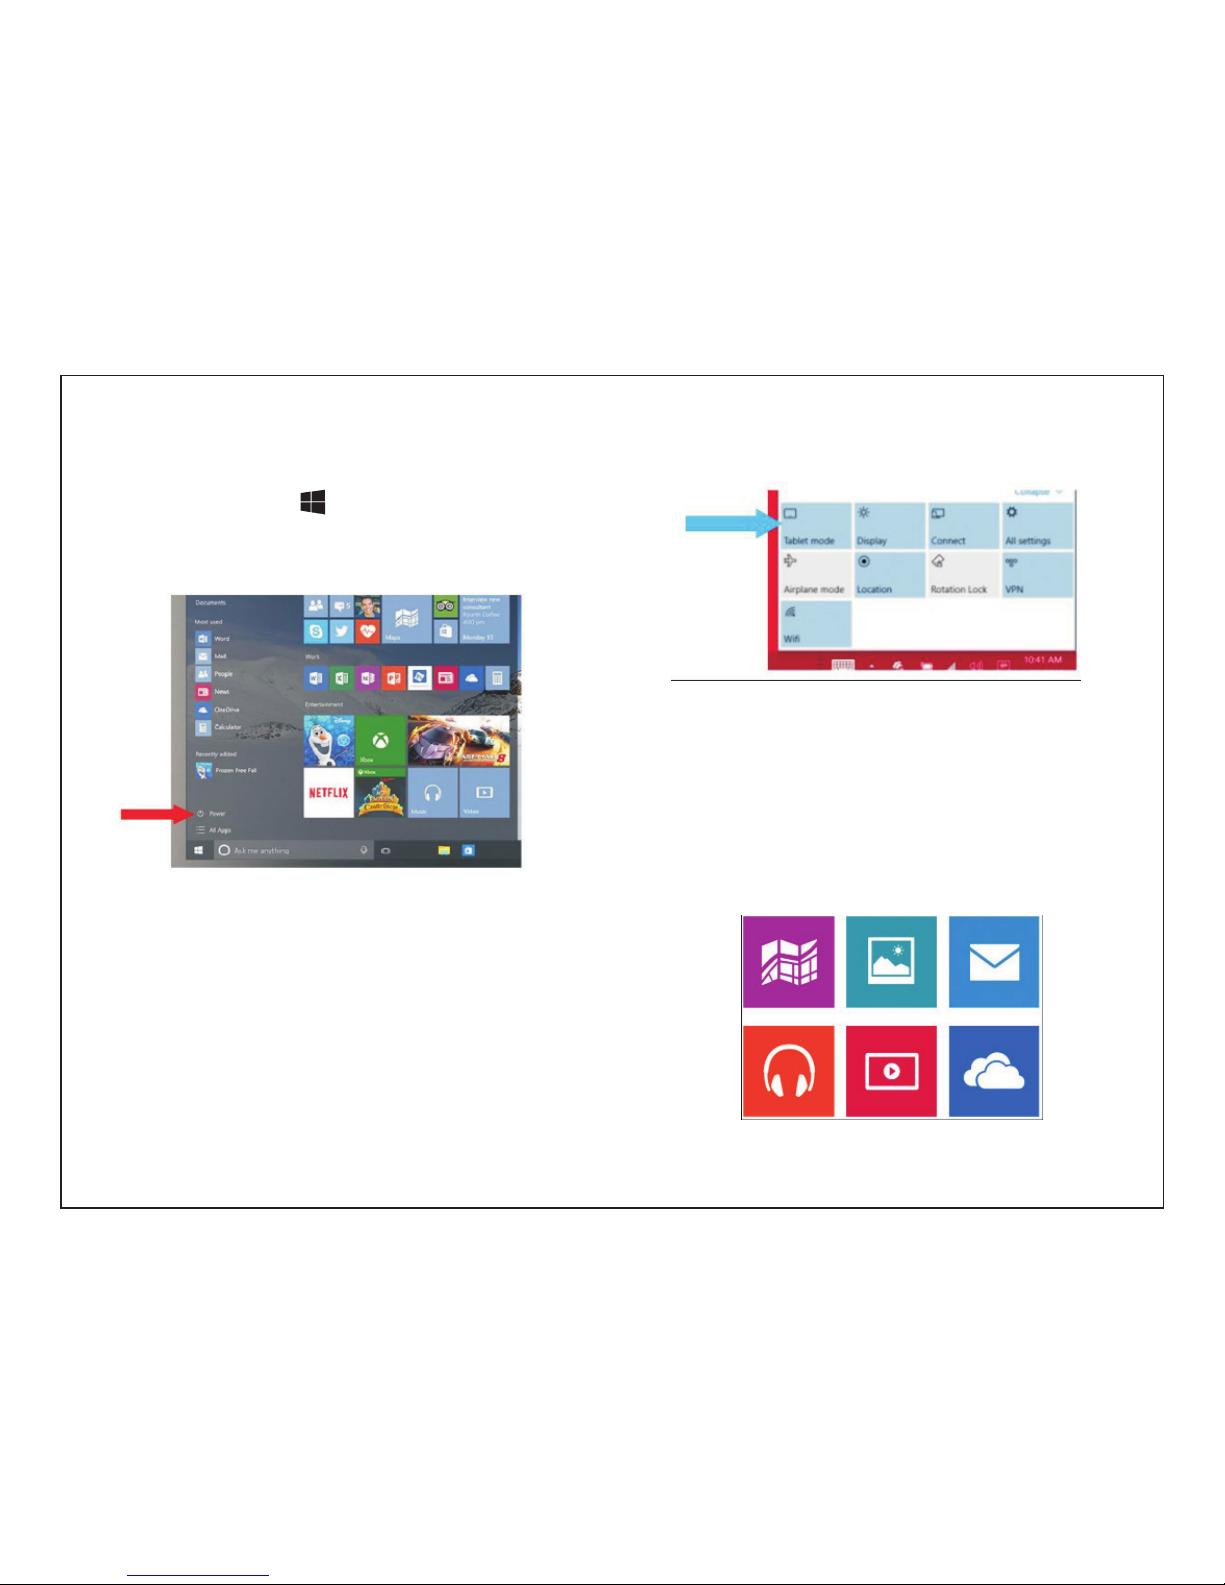
6In desktop mode, tap on the bottom of the screen to access the menu.Tap Power→Shut down to turn off the tablet.To turn off the tablet in tablet mode, first enable the tablet mode by swipingthe screen from the right to access the menu. In addition to the action center, italso allows access to general settings like airplane mode, rotation lock, andWi-Fi.Tap Table mode to enable the tablet mode. Tap Power→Shut down to turn offthe tablet.Built-in ApplicationsWindows 10 comes with built-in apps like Map, Photos, Mail & Calendar, Music andVideo. And these apps use OneDrive to back up your information and syncseamlessly across your Windows 10 devices, so you’re never far from what you need.

7Connecting Your Tablet to a Wi-Fi Network1. Tap the Wi-Fi symbol on the bottom of the screen. Tap Wi-Fi to enable the Wi-Fifunction.·A list of available wireless networks will appear.2. Tap a network to connect to it.3. If you want your tablet to automatically connect to the network when it’savailable, tap Connect automatically.4. Tap Connect.5. If prompted, type your network security key (network password), and then tapNext.6. Choose whether or not you want to share with other computers and devices onthe network.·Choose No if you’re connecting to a network in a public place like a Café.To disconnect from a wireless network1. Tap the Wi-Fi symbol and then tap the network with a connected status.2. Tap Disconnect.

8Troubleshooting 1.1 Device can not connect to Wi-Fi-- Ensure the wireless network is working by testing it using another wireless device.-- Ensure the device and the wireless router is withinthe range of the wireless network to be connectedtoo. Walls or other obstructions will reduce thepossible distances between wireless devices.-- Ensure the security password being used iscorrect. 1.2 Device doesn’t turn on-- You can not turn on the device when the batterycharge is below the critical level, please charge thebattery.-- Press the Power button for 10s times on thedevice and check if it is restarting is normally or not.-- Check if the charger is connected correctly.1.3 Heat Issues-- When running multiple applications, using thescreen on its brightest setting, or when beingcharged, this device can get quite hot. This is normaland should not cause any inconvenience when inuse.1.4 System has anomalies and doesn’t workcorrectly-- Installing some third-party applications may causethe system not to operate correctly. Press the Powerbutton for 10s times device will Re-boot.1.5 Cannot set E-mail or registration application– network and can connect to the Internet.-- Ensure you E-mail settings have been enteredcorrectly for the account being accessed.-- Make sure your system time and local time arecorrect. 1.6 Can not record-- Press the Power button for 10s times, thencheck if the record function works correctly.1.7 The stand-by time of the device is too short-- The duration of the lithium battery varies withenvironmental temperature changes and theservice conditions. If the environmenttemperature is too low or too high, the durationof the battery will be affected. It isrecommended to use this device at normaltemperature.-- Battery life is dependent on usage. Highvolume, WIFI, and the frequent use may causethe battery to be drained at a higher rate. 1.8 No sound via earphone– Please check if the volume setting is 0-- Please check if audio file is broken, and try toplay another audio file to confirm. If the audiofile is broken, it may cause severe noise orstatic.1.9 The color distortion of video or picture displayEnsure that the MID is connected to a Wi-Fi

– Press the Power button for 10s times on thedevice to resolve this issue.1.10 Can not copy files-- Please check if the device is connected to thecomputer correctly.– Please check if the memory space is full-- Please check if the USB cable is broken.1.11 Other troublesPlease follow up the next step to fix the othertroubles before you return the MID/Tablet PC to us:-- Step 1: Press the Power button for 10s times,then check if the function works correctly;-- Step 2: Upgrade the firmware from the CD andrestart the MID/Tablet PC, then check if thefunction works correctly.9SpecificationsDisplay 11.6” TN LCD (1366X768)Wi-Fi Networking IEEE 802.11 b/g/nAudio Output 3.5mm headphonePC Interface USB 2.0 high speedRearWINDOWS 10Rechargeable Li-poly battery power Adapter(DC IN 5V,2.5A)Processor INTEL 3735F WINDOWSStorage Operating System Power Camera Troubleshooting RAMROM2G32 GB0.3 MPSpeakers2x2W sperker

Warning:
Any Changes or modifications not expressly approved by the party responsible for compliance
could void the user's authority to operate the equipment.
This device complies with part 15 of the FCC Rules. Operation is subject to the following two
conditions: (1) This device may not cause harmful interference, and (2) this device must
accept any interference received, including interference that may cause undesired operation.
Note: This equipment has been tested and found to comply with the limits for a Class B digital
device, pursuant to part 15 of the FCC Rules. These limits are designed to provide
reasonable protection against harmful interference in a residential installation. This
equipment generates, uses and can radiate radio frequency energy and, if not installed and
used in accordance with the instructions, may cause harmful interference to radio
communications. However, there is no guarantee that interference will not occur in a
particular installation. If this equipment does cause harmful interference to radio or television
reception, which can be determined by turning the equipment off and on, the user is
encouraged to try to correct the interference by one or more of the following measures:
—Reorient or relocate the receiving antenna.
—Increase the separation between the equipment and receiver.
—Connect the equipment into an outlet on a circuit different from that to which the receiver is
connected.
—Consult the dealer or an experienced radio/TV technician for help.
SAR tests are conducted using standard operating positions accepted by the FCC with the
phone transmitting at its highest certified power level in all tested frequency bands, although
the SAR is determined at the highest certified power level, the actual SAR level of the phone
while operating can be well below the maximum value, in general, the closer you are to a
wireless base station antenna, the lower the power output.
Before a new model phone is a available for sale to the public, it must be tested and certified to
the FCC that it does not exceed the exposure limit established by the FCC, Tests for each
phone are performed in positions and locations (e.g. at the ear and worn on the body)as
required by the FCC.
For body worn operation, this equipment has been tested and meets the FCC RF exposure
guidelines when used with an accessory designated for this product or when used with an accessory that
Contains no metal,
Non-compliance
with
the
above
restrictions
may
re sult
in
violation
of
RF
exposure
guidelines.
This equipment complies with FCC radiation exposure limits set forth for an uncontrolled environment .
This transmitter must not be co-located or operating in conjunction with any other antenna or transmitter.
Table of contents
Other Hena Laptop manuals


