HENX H36GC16A User manual

Original Instructions
36-Volt Cordless Lawn Mower
H36GC16A, H36GC16B & H36GC16C& A36GC16B01
OPERATOR’S MANUAL
Ningbo AOSHENG Machine Co., Ltd
No.77 West Nantang Road, Linshan
Industrial Park, 315462, Yuyao City,
Zhejiang , P.R. China
Tel: 0574-62078293 Fax:0574-62037800
WARNING: Read all safety rules and
instructions carefully before operating this tool.
Improper use can cause serious or fatal injury.

2
TABLE OF CONTENTS
Safety Symbols .......................................................................................................................................... 3
Safety Instructions........................................................................................................................ 4-5
Safety Rules for Cordless Lawn Mower .................................................................................................. 6-9
Specifications........................................................................................................................... 10-11
Assembly...................................................................................................................................................11
Description................................................................................................................................12-13
Operation..............................................................................................................................................14-24
Maintenance ............................................................................................................................ 25-33
Troubleshooting ....................................................................................................................... 34-35
Warranty................................................................................................................................................... 36
Parts List.............................................................................................................................................. 37-39
IMPORTANT
Read and understand this manual before assembling or
operating this appliance. Improper use of this appliance
can cause severe injury or death. Keep this manual for
future reference.
SAFETY SYMBOLS
This page depicts and describes safety symbols that may appear on this product. Read, understand, and follow all instructions on
the machine before attempting to assemble and operate.

3
Safety Alert
Indicates a potential personal injury hazard.
Eye Protection
Always wear safety goggles or safety glasses with side shields and a
full face shield when operating this product.
Read Operator’s Manual
To reduce the risk of injury, user must read and understand operator’s
manual before using this product.
Maintain Safety Devices
Do not open or remove safety shields while the tool is running.
Look Behind While
Backing
Look down and behind first to avoid tripping when pulling back.
DANGER —Keep Hands
and Feet Away
To reduce the risk of injury, keep hands and feet away from rotating
parts. Do not operate unless discharge cover or grass bag is in its
proper place. If damaged, replace immediately.
DANGER —Keep
Bystanders Away
Do not mow when children or others are nearby.
DANGER —Steep Slope
Hazard
Use extra caution on slopes. Do not mow slopes greater than 15
degrees.
Beware of sharp blades
Blades continue to rotate after the motor is switched off-Remove
disabling device before maintenance.

4
CE
This product complies with applicable EC directives.
Recycle Symbols
This product uses lithium-ion (Li-ion) batteries. Local, state, or federal
laws may prohibit disposal of batteries in ordinary trash. Consult your
local waste authority for information regarding available recycling and/or
disposal options.
Do not expose to rain
Do not expose to rain.
Charging/Store the battery
pack
Charging and Store the battery pack only in dry rooms with an ambient
temperature of 50°F to 104°F (+10°C to +40°C).
V
Volt
Voltage
A
Amperes
Current
Hz
Hertz
Frequency (cycles per second)
W
Watt
Power
min
Minutes
Time
Alternating Current
Type of current

5
Direct Current
Type or a characteristic of current
n0
No Load Speed
Rotational speed, at no load
... /min
Per Minute
Revolutions per minute
WARNING: To ensure safety and reliability, all repairs should be performed by a qualified service technician.
SAFETY INSTRUCTIONS
WARNING: Read these instructions carefully, be familiar with the controls and the proper use of the
machine. Please keep the instructions safe for later use.
For battery
a) Use only the following type and size battery
b) Do not dispose of the battery in a fire. The cell may explode. Check with local codes for possible special disposal instructions.
c) Do not open or mutilate the battery. Released electrolyte is corrosive and may cause damage to the eyes or skin. It may be toxic
if swallowed.
d) Exercise care in handling batteries in order not to short the battery with conducting materials such as rings, bracelets, and keys.
The battery or conductor may overheat and cause burns.
For Mower
1) Avoid Dangerous Environment –Don’t use lawn mowers in damp or wet locations.
2) Don’t Use In Rain.
3) Dress Properly –Do not wear loose clothing or jewelry. They can be caught in moving parts. Use of rubber gloves and footwear
is recommended when working outdoors.
4) Use Right Appliance –Do not use lawn mower for any job except that for which it is intended.
5) Don’t Force Lawn Mower – It will do the job better and safer at the rate for which it was designed.
6) Don’t Overreach – Keep proper footing and balance at all times.
7) Stay Alert –Watch what you are doing. Use common sense. Do not operate lawn mower when you are tired.
8) Store Idle Lawn Mower Indoors –When not in use, lawn mower should be stored in an indoor dry and locked-up place –out of
reach of children.
9) Maintain Lawn Mower With Care –Keep cutting edges sharp and clean for best and safest performance.
10) Keep guards in place and in working order.
11) Keep blades sharp.

6
12) Keep hands and feet away from cutting area.
13) Objects struck by the lawn mower blade can cause severe injuries to persons. The lawn should always be carefully examined
and cleared of all objects prior to each mowing.
14) If lawn mower strikes a foreign object, follow these steps:
i) Stop lawn mower. Release the switch.
ii) Unplug power cord.
iii) Inspect for damage.
15) Use identical replacement blades only.
DANGER: This machine was built to be operated according to the rules for safe operation included in this manual. As with
any type of power equipment, carelessness or error on the part of the operator can result in serious injury. This machine is capable
of amputating hands and feet and throwing objects. Failure to observe all safety instructions could result in serious injury or death.
WARNING: When using electric lawn mowers, basic safety precautions should always be followed to reduce the risk of fire,
electric shock, and personal injury. These basic precautions include the following:
CHILDREN
Tragic accidents can occur if the operator is not alert to the presence of children. Children are often attracted to the mower and
mowing activity. They do not understand the dangers. Never assume that children will remain where you last saw them.
◼Keep children out of the mowing area and under the watchful care of a responsible adult other than the operator.
◼Be alert and turn the mower off if a child enters the area.
◼Use extreme care when approaching blind corners, doorways, shrubs, trees, or other objects that may obscure your vision of a
child who may run into the mower.
◼Never allow children under 15 years old to operate a power mower. Children 15 years old and over should read and understand
the operation instructions and safety rules in this manual and should be trained and supervised by a parent. Only responsible
individuals who are familiar with these rules of safe operation should be allowed to use this machine.
OPERATION
General Operation:
◼
Read this operator’s manual carefully in its entirety before attempting to assemble this machine. Read, understand, and follow
all instructions on the machine and in the manuals before operation. Be completely familiar with the controls and proper use of
this machine before operating it. Keep this manual in a safe place for future and regular reference and for ordering
replacement parts.
◼Never allow children or people unfamiliar with these instructions to use the machine. Local regulations may restrict the age of
the operator. When not in use store the machine out of reach of children.
◼This appliance is not intended for use by persons (including children) with reduced physical, sensory or mental capabilities, or
lack of experience and knowledge, unless they have been given supervision or instruction concerning use of the appliance by
a person responsible for their safety. Children should be supervised to ensure that they do not play with the appliance.
◼Never mow while people, especially children or pets, are nearby.
◼The operator or user is responsible for accidents or hazards occurring to other people or their property.
◼While mowing, always wear substantial footwear and long trousers.
◼Do not operate the machine when barefoot or wearing open sandals, always wear substantial footwear and long trousers.
◼Thoroughly inspect the area where the machine is to be used and remove all stones, sticks, wires, bones and other foreign
objects.

7
◼Before using, always visually inspect to see that the blades, blade bolts and cutter assembly are not worn or damaged. Replace
worn or damaged blades and bolts in sets to preserve balance.
◼Mow only in daylight or in good artificial light.
◼Avoid operating the machine in wet grass, where feasible.
◼Always walk, never run.
◼Never operate the appliance with defective guards, or without safety devices, for example deflectors and/or grass catchers, in
place.
◼Working on banks can be dangerous.
◼Do not mow excessively steep slopes.
◼Always be sure of your footing on slopes or wet grass.
◼Mow across the face of slopes, Never up and down.
◼Exercise extreme caution when changing direction on slopes.
◼Use extreme caution when stepping back or pulling the machine towards you.
◼Never mow by pulling the mower towards you.
◼Stop the blades if the machine has to be tilted for transportation when crossing surfaces other than grass and when
transporting the machine to and from the area to be mowed.
◼Switch on the motor according to instructions and with feet well away from the blade(s).
◼Do not tilt the machine when starting or switching on the motor, except if the machine has to be tilted for starting in long grass.
In this case, do not tilt if more than absolutely necessary and tilt only the part which is away from the operator. Always ensure
that both hands are in the operating position before returning the machine to the ground.
◼Switch on the motor according to the instructions with feet well away from rotating parts.
◼Do not put hands or feet near or under rotating parts. Keep clear of the discharge opening at all times.
◼Always stand clear of the discharge zone when operating the machine.
◼Never pick up or carry the machine while the motor is running.
◼Use the right appliance –Do not use the lawn mower for any job except that for which it is intended. Your lawn mower has been
designed to perform only one job: to mow grass.
◼Don’t overreach – Keep proper footing and balance at all times.
◼Objects struck by the lawn mower blade can cause severe injuries to persons. The lawn should always be carefully examined
and cleared of all objects prior to each mowing.
◼Keep the area of operation clear of all persons, particularly small children, and pets.
◼Before and while moving backwards with the mower, look behind and down for small children and other people.
◼Keep clear of the discharge opening at all times.
◼This machine is a precise piece of power equipment, not a plaything. Therefore, exercise extreme caution at all times. Your unit
has been designed to perform one job: to mow grass. Do not use it for any other purpose.
◼Don’t force the lawn mower – it will do the job better and more safely at the rate for which it was designed.
◼Plan your mowing pattern to avoid discharge of material toward roads, sidewalks, bystanders and the like. Also, avoid
discharging material against walls or obstructions, which may cause discharged material to ricochet back toward the operator.
◼To help avoid blade contact or an injury from thrown objects, stay in the operator zone behind the handles and keep children,
bystanders, helpers and pets at least 100 feet (30m) from the mower while it is in operation. Stop the machine if anyone enters
the area.
◼Always wear safety glasses or safety goggles during operation and while performing an adjustment or repair to protect your
eyes. Thrown objects that ricochet can cause serious injury to the eyes. Always use a face or dust mask if the operation is

8
dusty.
◼Dress properly –Do not wear loose clothing or jewelry. They can be caught in moving parts. Use of rubber gloves and footwear
is recommended when working outdoors. Wear sturdy, rough-soled work shoes and close-fitting slacks and shirts. Shirts and
pants that cover the arms and legs and steel-toed shoes are recommended. Never operate this machine in bare feet, sandals,
slippery or lightweight (e.g., canvas) shoes.
◼Do not put hands or feet near rotating parts or under the cutting deck. Contact with the blade can amputate hands and feet.
◼A missing or damaged discharge cover can cause blade contact or injuries from thrown objects.
◼Many injuries occur as a result of the mower being pulled over the foot during a fall caused by slipping or tripping. Do not hold
onto the mower if you are falling; immediately release the handle.
◼Never pull the mower back toward you while you are walking. If you must back the mower away from a wall or obstruction, first
look down and behind you to avoid tripping, and then follow these steps:
◼Step back from mower to fully extend your arms.
◼Be sure you are well balanced with sure footing.
◼Pull the mower back slowly, no more than half way toward you.
◼Repeat these steps as needed.
◼Do not operate the mower while under the influence of alcohol or drugs.
◼Stay alert –watch what you are doing. Use common sense. Do not operate the lawn mower when you are tired.
◼The motor/blade control handle is a safety device. Never attempt to bypass its operation. Doing so makes the safety device
inoperative and may result in personal injury through contact with the rotating blade. The motor/blade control handle must
operate easily in both directions and automatically return to the disengaged position when released.
◼Avoid dangerous environments –Don’t use lawn mowers in damp or wet locations so as to avoid slipping and falling during
operation.
◼Always be sure of your footing. A slip and fall can cause serious personal injury. If you feel you are losing your footing, release
the motor/blade control handle immediately and the blade will stop rotating within three seconds.
◼Stop the blade when crossing gravel drives, walks or roads.
◼If the equipment should start to vibrate abnormally, immediately stop the motor, remove the battery and check for the cause.
Vibration is generally a warning of trouble.
◼Before cleaning the machine, unclogging the chute or removing or replacing the grass bag, mulching insert, or side discharge
chute, turn the motor off and wait until the blade comes to a complete stop, then remove the battery pack. The cutting blade
continues to rotate for a few seconds after the motor is shut off. Never place any part of the body in the blade area until you
are sure the blade has stopped rotating.
◼Never operate the mower without the proper trailing shield, discharge cover, grass bag, mulching insert, side discharge chute,
motor/blade control handle or other safety protective devices in place and working. Never operate the mower with damaged
safety devices. Failure to do so can result in personal injury.
◼If situations occur that are not covered in this manual, use care and good judgment. Contact HENX Customer Service for
assistance.
◼Use only with the battery packs and chargers listed below:
Lawn Mower
BATTERY PACK
CHARGER
H36GC16A
H20B40(2pcs)
H20KC40,H20MC10

9
H36GC16B
H36B25, H36B50 or
H36B75(1pc)
H36MC100(XVE129-
4200300)
H36KC400
H36GC16C
H36B25, H36B50 or
H36B75(1pc)
H36MC100(XVE129-
4200300)
H36KC400
A36GC16B01
A36B50B01
A40KC250B01,
A36MC75B01
OPERATION ON A SLOPE:
Slopes are a major factor related to slip-and-fall accidents, which can result in severe injury. Operation on slopes requires extra
caution. If you feel uneasy on a slope, do not mow it. For your safety, use the slope gauge on page 23 to measure slopes before
operating this unit on a sloped or hilly area. If the slope is greater than 15 degrees, do not mow it.
Do:
◼Mow across the face of slopes; never mow up and down. Exercise extreme caution when changing direction on slopes.
◼Watch for holes, ruts, rocks, hidden objects, or bumps which can cause you to slip or trip. Tall grass can hide obstacles.
Do not:
◼Do not mow near drop-offs, ditches or embankments; you could lose your footing or balance.
◼Do not mow slopes greater than 15 degrees, as shown on the slope gauge.
◼Do not mow on wet grass. Unstable footing could cause slipping.
SERVICE
WARNING: Grass bag components, the discharge cover, side discharge chute, mulching insert and trailing shield are subject
to wear and damage, which could expose moving parts or allow objects to be thrown and could increase the risk of injury. For
safety protection, frequently check all components and replace damaged components immediately with identical replacement parts,
listed in this manual.
◼Examine the machine and replace worn or damaged parts for safety.
◼Ensure replacement cutting means of the right type are used.
◼If the mower’s built-in overload protection switch frequently trips, contact AOSHENG Customer Service or your Closest service
center.
◼Do not wash the mower with a hose; avoid getting water in the motor and electrical connections.
◼Remove the battery and store the idle lawn mower in a covered area when not in use. Allow the motor to cool before storing it
in any enclosure. The lawn mower should be stored in a dry, high, or locked-up enclosure, out of reach of children.
◼When servicing, use only identical replacement parts listed in this manual. Use of parts that do not meet the original equipment
specifications may lead to improper performance and compromised safety.
◼Remove or disconnect the battery pack before servicing, cleaning, or removing material from the lawn mower.
◼Follow instructions for lubricating and changing accessories.
◼Keep handles dry, clean and free from oil and grease.
◼To reduce a fire hazard, keep the motor cover free of grass, leaves and debris build-up.

10
◼Check the blade and motor mounting bolts at frequent intervals for proper tightness. Also, visually inspect the blade for damage
(e.g., bending, cracking and wear.). Replace the blade only with the identical replacement blade, as listed in this manual.
◼Maintain your mower with care –keep the mower blade sharp and clean for the best and safest performance. Mower blades
are sharp and can cut. Wrap the blade or wear gloves and use extra caution when servicing it.
◼Keep all nuts, bolts, and screws tight to be sure the equipment is in safe working condition.
◼Never remove or tamper with safety devices. Regularly check their proper operation. Never do anything to interfere with the
intended function of a safety device or to reduce the protection provided by a safety device.
◼Always stop the motor before making adjustments to a wheel or a cutting-height adjustment.
◼After striking a foreign object, stop the motor, remove the battery pack, allow the blade to stop rotating, and thoroughly inspect
the mower for any damage. Repair the damage before operating the mower.
◼Maintain or replace safety and instruction labels, as necessary.
◼Ensure that batteries are charged using the correct charger recommended by the manufacturer. Incorrect use may result in
electric shock, overheating or leakage of corrosive liquid from the battery.
◼Always wear gardening gloves when handling or working near the sharp blades.
◼SAVE THESE INSTRUCTIONS. Refer to them frequently and use them to instruct others who may use this tool. If you
lend this tool to someone else, also lend these instructions to them to prevent misuse of the product and possibly injury.
Recommendations for Optimal Handling of the battery
◼Ensure the switch is in the off position before inserting battery. Inserting the battery into machines that have the switch on
invites accidents.
◼Keep the battery charger away from rain or moisture. Penetration of water in the battery charger increases the risk of an electric
shock.
◼Recharge only with the charger specified by the manufacturer. A charger that is suitable for one type of battery may create a
risk of fire when used with another battery.
◼Do not charge other batteries. The battery charger is suitable only for charging lithium ion batteries within the listed voltage
range. Otherwise there is danger of fire and explosion.
◼Keep the battery charger clean. Contamination can lead to danger of an electric shock.
◼Before each use, check the battery charger, cable and plug. If damage is detected, do not use the battery charger. Never open
the battery charger yourself. Have repairs performed only by a qualified technician and only using original spare parts.
Damaged battery chargers, cables and plugs increase the risk of an electric shock.
◼Do not operate the battery charger on easily inflammable surfaces (e.g., paper, textiles, etc.) or surroundings. The heating of
the battery charger during the charging process can pose a fire hazard.
◼Use only batteries intended specifically for the machine. Use of any other batteries may create a risk of injury and fire.
◼When battery is not in use, keep it away from other metal objects like paper clips, coins, keys, nails, screws, or other small
metal objects that can make a connection from one terminal to another. Shorting the battery terminals together may cause
burns or a fire.
◼Do not open the battery. Danger of short-circuiting.
◼Protect the battery against heat, e.g., also against continuous sun irradiation and fire. There is danger of explosion.
◼Do not short-circuit the battery. There is danger of explosion.
◼In case of damage and improper use of the battery, vapors’ may be emitted. Provide for fresh air ,The vapors’ can irritate the
respiratory system.
◼Protect the battery against moisture and water.

11
◼Store the battery only within a temperature range between 0°C and 50°C. As an example, do not leave the battery in the car in
summer.
Intended use
Lawn mower is a pedestrian controlled tool used to cut grasses or weeds on lawns, gardens and pastures and turn recycled dry
grass into forage. It is mainly used for landscaping, courtyard maintenance and road cleaning etc.
INTRODUCTION
Congratulations on your selection of a new generation of 40V Lithium-ion powered lawn mower. It has been designed, engineered
and manufactured to give you the best possible dependability and performance.
Should you experience any problem you cannot easily remedy, please contact HENX customer service center 86 571-87248935.
This manual contains important information on the safe assembly, operation and maintenance of your mower. Read it carefully
before using the mower. Keep this manual handy so you can refer to it at any time.
SERIAL
NUMBER
DATE OF
PURCHASE
THE MODEL AND SERIAL NUMBERS WILL BE FOUND
ON A LABEL ATTACHED ON THE REAR DISCHARGE
DOOR.
YOU SHOULD RECORD BOTH SERIAL NUMBER AND
DATE OF PURCHASE AND KEEP IN A SAFE PLACE FOR
FUTURE REFERENCE
SPECIFICATIONS
Model Number
H36GC16A / H36GC16B /
H36GC16C/A40GC16B01
Voltage
36 V DC
No-Load Speed
3000rpm (low speed)
3800rpm (high speed)
Approximate Cutting Height Setting
7 different cutting heights from 1inch(25mm) to
3inches(75mm) are available.
Deck Cutting Size
16”(400mm)
Grass Bag Volume
45L
Mower Weight (Without battery pack)
31 lb. (14Kg)
Ingress Protection Degree
IPX1
Battery pack
Lithium-Ion
Models
H20B40(2pcs)
H36B50(1pc)
A36B50B01(1pc)
Voltage
36 VDC
36 VDC
36 VDC
Capacity
2*4.0Ah
2.5Ah,5.0Ah&7.5Ah
2.5Ah,5.0Ah&7.5Ah

12
APPROXIMATE RUNNING TIME
Battery pack type
Lithium-ion
H20B40(2pcs)
50 min.
H40B50
45 min.
A40B50B01
45min
NOTICE: The actual running time will vary with grass condition: species, density, moisture, etc.
ASSEMBLY
WARNING:
To prevent accidental starting that could cause serious personal injury, always remove the battery pack
from the
tool when assembling parts.
WARNING:
Do not attempt to modify this tool or create accessories not recommended for use with this mower. Any
such
alteration ormodificationismisuse andcouldresultinahazardouscondition leadingtoseriousinjury.
UNPACKING
◾
First remove all the accessories from the carton, then grasp the front handle and rear handle at the same time to
carefully lift the mower up and out of the carton. Make sure that all items listed in the parts list are included.
◾
Inspect the product carefully to make sure that no breakage or damage occurred during shipping.
◾
Do not discard the packing material until you have carefully inspected and satisfactorily operated the mower.
◾
If any parts are damaged or missing, please return the mower to the place of purchase.
Charger (model)
H20KC40
H36KC400
A40MC75B01
Input
100-240VAC 50/60Hz
120-240VAC 50/60Hz,
400W
120-240VAC 50/60Hz 75 W
Output
21Vdc/2.3A
40VDC, 8A
40VDC 1.8A
Allowable charge
temperature range
0-40°C
0 - 40 °C
4-40°C
Charger (model)
H20MC10
XVE129-4200300
A40KC250B01
Input
100-240Vac 50/60Hz
100-240VAC, 50/60Hz, 2.5A
Max;
/
Output
21Vdc/0.5A
42.0VDC, 3A
/
Allowable charge
temperature range
0-40°C
0 - 40 °C
/

13
1b
LIST OF CONTENTS
PART NAME
QUANTITY
Lawn mower
1
Grass bag
1
Grass bag frame
1
Side Discharge Chute
1
Operator’s manual
1
DESCRIPTION
control panel
power indicator
high/low
Speed
button
Safety button
on/off button
side rail
Handle-locking clamp
quick-adjustment
lever
grass bag
battery-pack cover
cutting height
adjustment lever
front wheel
rear wheel
1a
Model: H36GC16C

14
side discharge
chute(available
separately)
control panel
high/low
speed button
rear discharge door
power indicator
handle
bail switch
On/off switch
Quick-
adjustment
lever(upper)
wire clamp
Quick-adjustment
lever (lower)
Battery-pack
cover
front wheel
cutting height
adjustment lever
rear discharge door
grass bag
1b
Model:H36GC16A, H36GC16B & A36GC16B01
1c
1d
15
WARNING: The safe use of this product requires an understanding of the information on the tool and in this operator’s
manual, as well as knowledge of the project you are attempting. Before use of this product, familiarize yourself with all operating
features and safety rules.
SAFETY BUTTON
The safety button must be pressed down before the motor can be started.
WARNING: The bail switch and the safety button are safety devices. Never attempt to bypass their operations.
ELECTRIC BRAKE
Quickly stops blade rotation when the bail switch is released.
HANDLE-LOCKING CLAMP
Locks/unlocks the side rails in the extended or the recessed position.
SIDE RAILS
Can be extended and locked for operation or recessed for storage.
QUICK-ADJUST LEVER
Locks/unlocks the handle position when adjusting the angle of the mower handle:
1. Locked Storage Position
2. Upper Operating Position
3. Middle Operating Position
4. Lower Operating Position
TRAILING SHIELD & REAR DISCHARGE DOOR
The trailing shield is designed to minimize stones or other objects being thrown backward by the mower blade. The shield and the
rear door minimize the possibility of accidental foot contact with the blade. DO NOT operate the mower without the trailing shield
and rear door in place.
SPRING-LOADED CUTTING-HEIGHT ADJUSTMENT LEVER
One-handed cutting-height adjustment
battery release button
dual-battery port
Single-battery port
1e
1f

16
OPERATION
ADJUSTING THE HEIGHT OF
HANDLE(H40GC16A&H40GC16B&A40GC16B01)
WARNING: Do not attempt to start the mower until the handle has been
locked at one of the three preset operating positions (lower/middle/higher).
1. LOCKED STORAGE POSITION: Your mower is shipped with the upper
and the lower side rails in the compact, locked position (Fig. 1.1).
2. UNFOLD : unfold both the upper and the lower side rails and securely lock
the two upper quick-adjustment levers and two lower quick-adjustment
levers by turning them in clockwise.
3. Adjusting the height of handle: loosen the two lower quick- adjustment levers by turning them in counterclockwise; LOWER
OPERATING POSITION: adjust the angle between side rails and the
ground by hand until the arrow (see Figure 2.1)points to the 1st calibration
tail (see Figure 2.1)(the angle is approximately 41 degree),tighten the two
lower quick-adjustment levers by turning them in clockwise; MIDDLE
OPERATING POSITION: adjust the angle between side rails and the
ground by hand until the arrow(see Figure 2.1) points to the 2nd calibration
tail(see Figure 2.1)(the angle is approximately 50 degree),tighten the two
lower quick-adjustment levers by turning them in clockwise; HIGHER
OPERATING POSITION:adjust the angle between side rails and the ground
by hand until the arrow(see Figure 2.1) points to the 3rd calibration tail(see
Figure 2.1)(the angle is approximately 59 degree),tighten the two lower
quick-adjustment levers by turning them in clockwise.
NOTE: The motor cannot be started unless:
a. The side rails are fully extended
b. Both green handle-locking clamps are securely closed
c. The handle is locked into one of the three operating positions
1.1
Quick-adjustment
lever(lower)
Quick-adjustment
lever(upper)
2.1
arrow
calibration tails

17
ADJUSTING THE HEIGHT OF HANDLE(H36GC16C)
WARNING: Do not attempt to start the mower until the handle has been
locked at one of the three preset operating positions(lower/middle/higher).
LOCKED STORAGE POSITION: Your mower is shipped with the handle in the
compact, locked position (Fig. 1).
EXTEND THE SIDE RAILS: move the side rails to the back of mower, release
the handle-locking clamps(see Fig.3) and then fully extend the upper side rails
by stretching them out (see Fig.2) before any operation.
ADJUSTING THE HEIGHT OF HANDLE: loosen the two lower quick-adjustment
levers by turning them in counterclockwise; LOWER OPERATING POSITION:
adjust the angle between side rails and the ground by hand until the arrow (see
Fig.2 in previous page)points to the 1st calibration tail(see Fig.2 in previous
page)(the angle is approximately 41 degree),tighten the two quick-adjustment
levers by turning them in clockwise; MIDDLE OPERATING POSITION: adjust
the angle between side rails and the ground by hand until the arrow (see Fig.2 in
previous page)points to the 2nd calibration tail(see Fig.2 in previous page)(the angle is approximately 50
degree),tighten the two quick- adjustment levers by turning them in clockwise; UPPER OPERATING POSITION: adjust the angle
between side rails and the ground by hand until the arrow(see Fig.2 in previous page) points to the 3rd calibration tail(see Fig.2 in
previous page)(the angle is approximately 59 degree),tighten the two quick-adjustment levers by turning them in clockwise.
NOTE: The motor cannot be started unless:
a. The side rails are fully extended
b. Both green handle-locking clamps are securely closed
c. The handle is locked into one of the three operating positions
ATTACHING/REMOVING THE GRASS BAG
WARNING: Do not at any time make any adjustment to the lawn mower
without first stopping the motor, removing the battery pack and waiting for the
blade to stop rotating.
NOTICE: Remove the side discharge chute before attaching the grass bag on
the mower;
1. Remove the battery.
2. Lift the rear discharge door up.
3. Hang the grass bag assembly on the hook (Fig. 4). Release the discharge door so that it rests on the grass bag.
4. To remove the grass bag, lift the rear-discharge door up. Lift the grass bag off the hook.
5.
Release the rear discharge door.
WARNING: When using the grass bag, never operate the mower unless the grass bag are firmly seated on the hooks and
the rear-discharge door rests firmly against the top of the grass bag.
WARNING: Under normal usage, bag material is subject to wear. To reduce the risk of injury, frequently inspect the bag
assembly and replace if there are any signs of wear or deterioration. Use only grass bags manufactured for this mower.
1
2
3
4
hooks

18
ATTACHING/REMOVING THE SIDE DISCHARGE CHUTE(available separately) (Fig. 5a & 5b)
WARNING: Do not at any time make any adjustment to the lawn
mower without first stopping the motor, removing the battery pack and
waiting for the blade to stop rotating.
1. Remove the battery.
2. Lift the rear-discharge door up.
3. Align the lower edge of the discharge with the groove of the door sill
and insert it into the slot.
4. Push the top of the discharge and insert it into the mower. Check to
see that it is securely seated in the deck.
5. To remove the side discharge chute, lift the rear-discharge door, grasp
the side discharge chute and pull it out.
6. Release the discharge door and make sure that it rests firmly against
the discharge chute.
SPRING-LOADED CUTTING-HEIGHT ADJUSTMENT (Fig. 6)
WARNING: Do not at any time make any adjustment to the lawn
mower without first stopping the motor, removing the battery pack and
waiting for the blade to stop rotating.
WARNING: Keep your feet away from the deck when adjusting its
height.
The mower can be set to 7 cutting heights between 1-1/2” (25mm) and 3”
(75mm). Choose the proper cutting height according to the type and
condition of the grass.
To raise the blade height
1. Grasp the height-adjustment lever, and move it outwards.
2. Move the lever toward the back of the mower and engage the lever in
the desired cutting-height position on the mower deck.
To lower the blade height
1. Grasp the height adjustment lever, and move it outwards.
2. Move the lever toward the front of the mower and engage the lever in
the desired cutting-height position on the mower back.
5a
5b
6
cutting height
adjustment lever
grooves
19
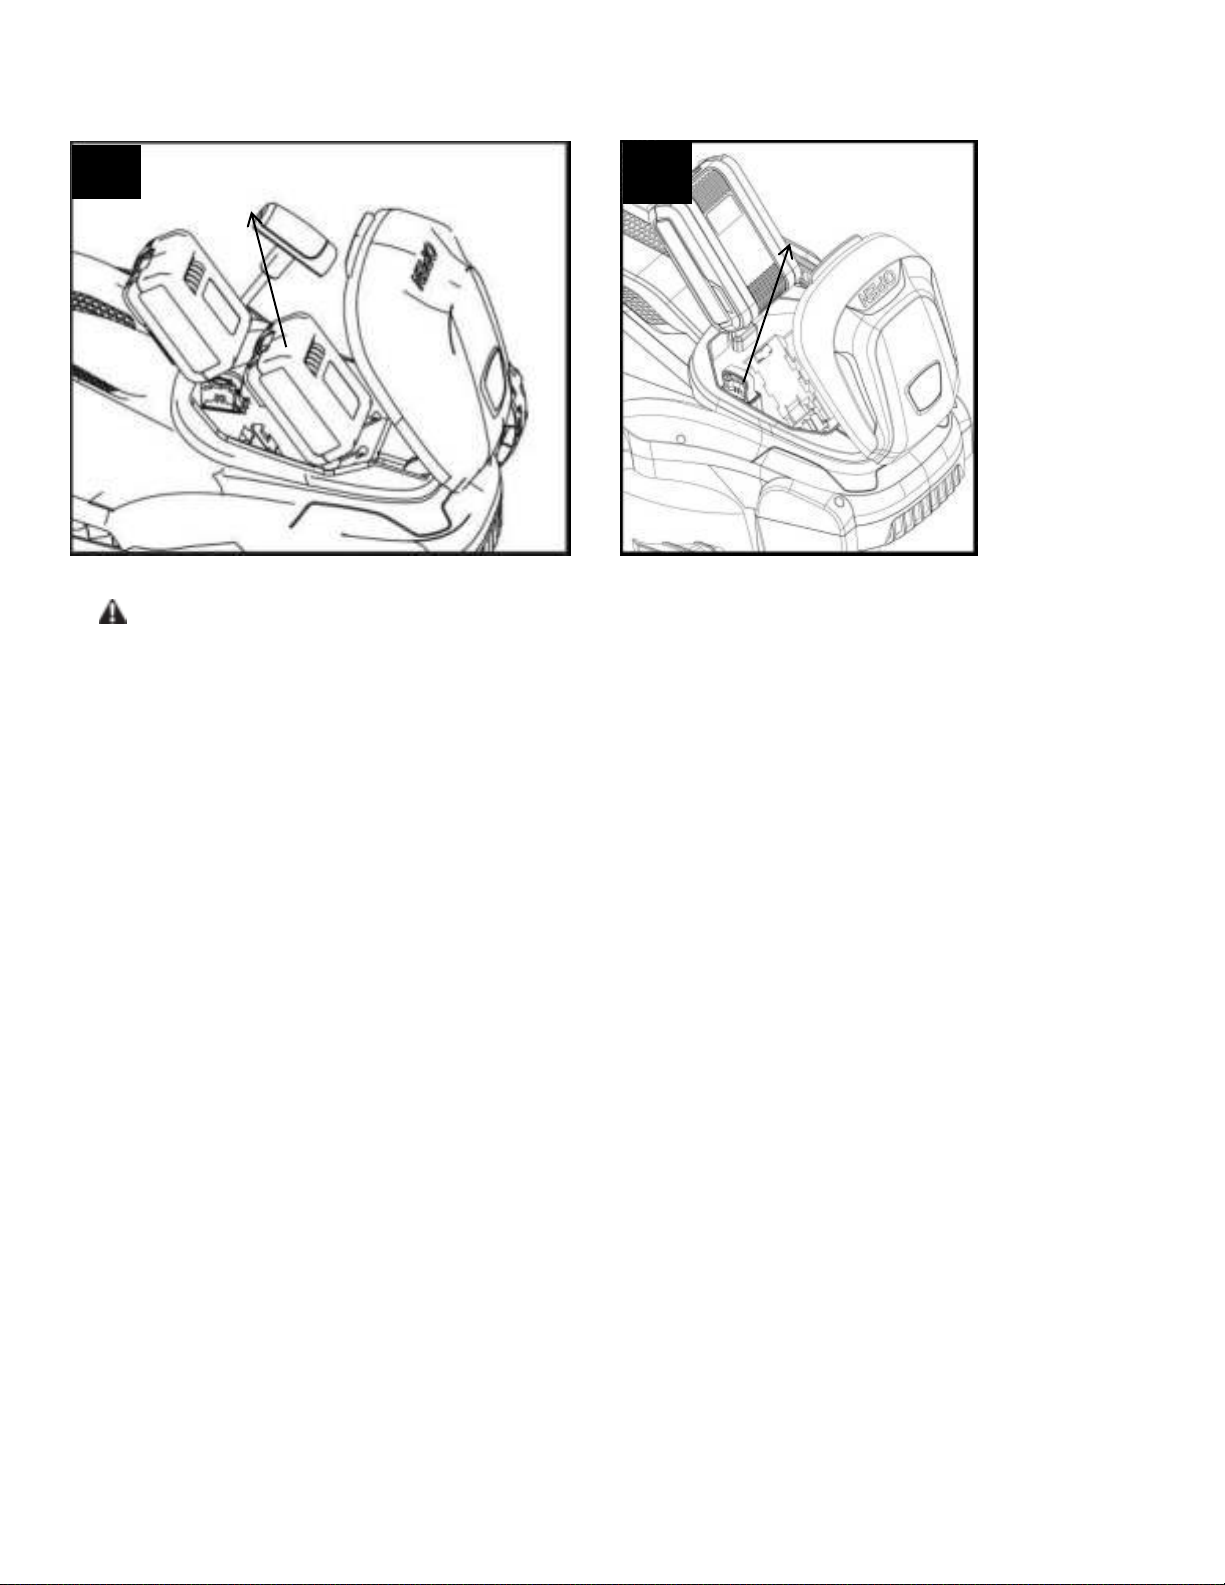
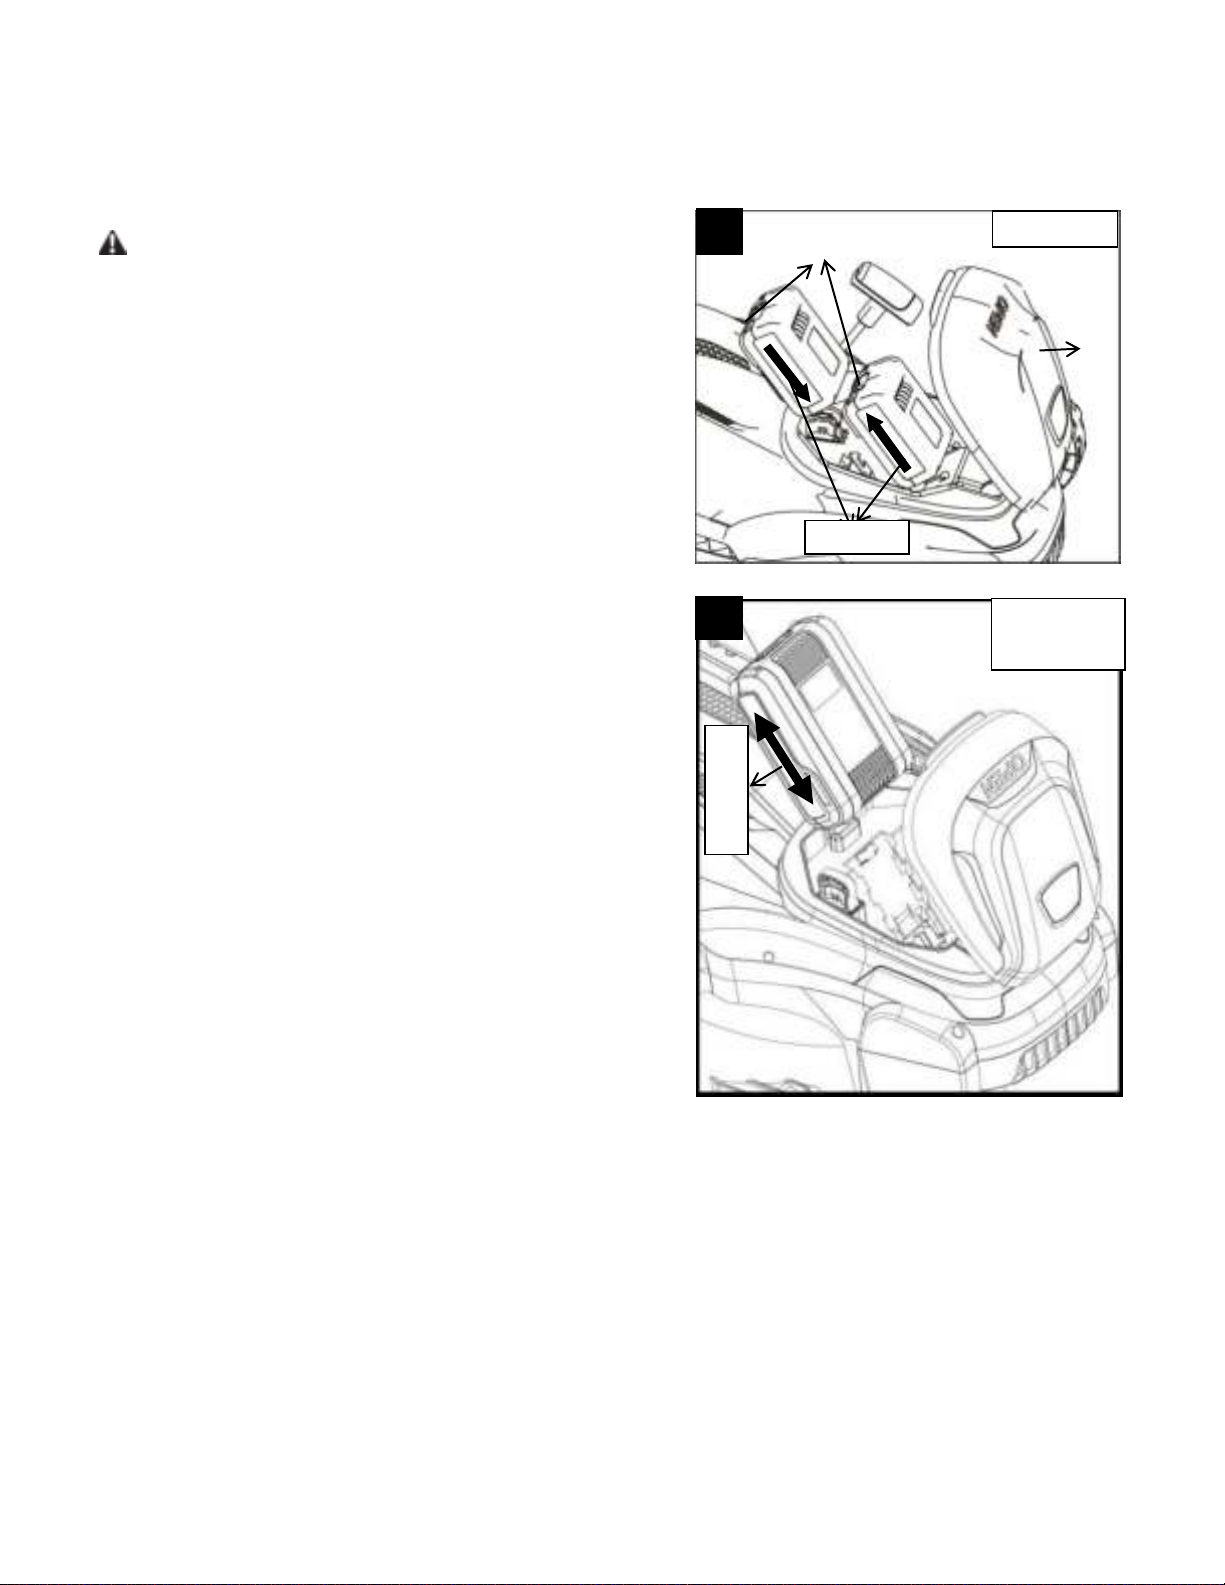
TO ATTACH/DETACH THE BATTERY PACK (Fig. 7 &8)
CHARGE BEFORE FIRST USE.
WARNING: If any parts are broken or missing, do not attempt to
attach the battery pack to the mower or operate the mower until the
broken or missing parts are replaced. Failure to do so could result in
serious injury.
1. Align the grooves in the battery pack, with the raised ribs in the
battery compartment, and then insert the battery pack into the
compartment.
2. Push the battery pack until you hear a “click”. The battery- release
button will spring up when the battery pack is securely attached.
3. To detach the battery pack, depress the battery-release button to
release the battery pack, and then lift it out of the compartment.
4. Close the battery cover.
NOTICE: Make sure that the latch on the mower snaps into place and
that the battery pack is secured to the mower before starting operation.
7
H36GC16B
H36GC16C
A36GC16B01
battery release button
H36GC16A
push
8
grooves
g
r
o
o
v
e
s

20
STARTING/STOPPING THE MOWER (Fig. 9 & 10)
(
H36GC16A&H36GC16B&A36GC16B01)
WARNING: The operation of any lawn mower can result in foreign objects being thrown into your or others’ eyes, which can
damage eyes severely. Always wear safety glasses while operating the mower or while performing any adjustments or repairs on
the mower.
WARNING: Ensure that other people and pets remain at least 100 feet (30m) away from the mower when it is in use.
WARNING: The blade will continue to rotate for a few seconds after the mower is turned off. Allow the motor/blade to stop
rotating before starting it again. Do not rapidly turn the mower off and on.
CAUTION: Do not attempt to override the operation of the safety button and
bail switch.
NOTE: The motor cannot be started unless:
◼The side rails are fully extended
◼Both green handle-locking clamps are securely closed
◼The handle is locked into one of the three operating positions
To start the mower
1. Attach the battery pack to the mower and close the battery cover.
NOTICE: Make sure that the latch on the mower snaps into place and that the battery pack is secured to the mower before
operation.
2. Depress the safety button (Fig. 9).
3. With the safety button depressed, pull the bail switch upward to meet the
handle and release the safety button (Fig. 10).
4. The mower will start.
To stop the mower
1. Fully release the bail switch.
2. The electric brake in the Automatic Braking Mechanism will stop the blade
rotation within 3 seconds of the bail switch release.
on/off button
9
10
This manual suits for next models
3
Table of contents
Other HENX Lawn Mower manuals


Popular Lawn Mower manuals by other brands


sunjoe
sunjoe MJ408E user manual

Powersmart
Powersmart DB2321CR instruction manual

FLORABEST
FLORABEST FRM 1800 C3 Translation of the original instructions

EarthWise
EarthWise 60220 Operator's manual

IKRAmogatec
IKRAmogatec BRM 1751 SSM TL Operating instruction

Powersmart
Powersmart PSM2521SR instruction manual


