HeroSpeed LongPlus User manual

1. Packing list
2. Product appearance
3. Quick start
4. Power on/off and network congiguration
5. Set up the camera
6. Install the camera
7. Share the camera
8. Charge the camera
9. Indicator light status
10. Product specitication
11. Firmware upgrade
12. FCC warning
13. FAQ
Contents
01
02
05
06
07
12
15
17
18
18
19
20
21
Quick Start Guide
Please read the Quick Start Guide carefully before using the product and keep it.
Related tools and documents of product, please download from
www.herospeed.net

Packing list
1. Camera*1
2. Bracket*1
3. 3M Adhesive tape*1
4. Mounting kit*1
5. USB charging cable *1
6. Operation instruction*1
01
0302
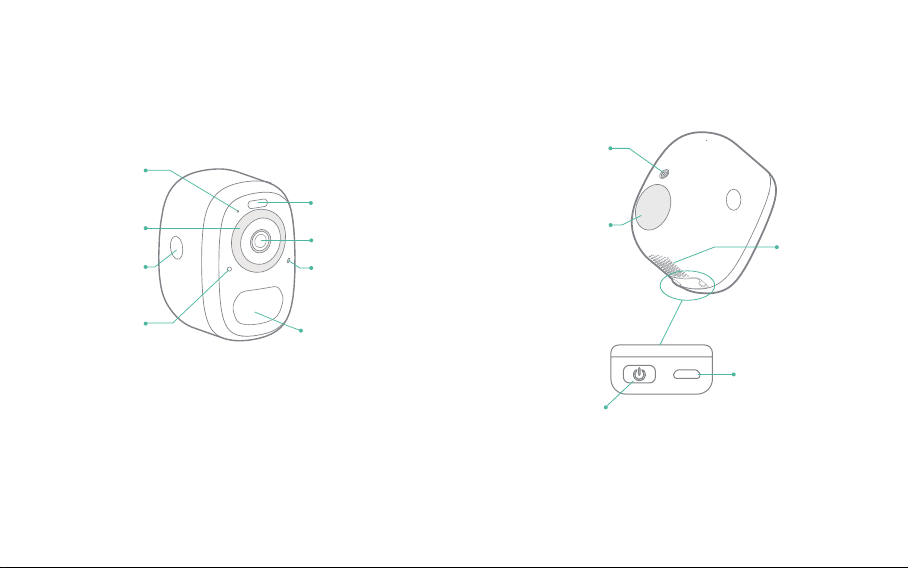
Product appearance
Microphone
Infrared light
Backshell
open button
Ambient light
sensor
Spotlight
Lens
Strong magnetic
chuck
Indicator light
Human body
infrared sensor
Threaded bracket
interface
Speaker
Power button
Micro-USB port
0504
Quick start
The wireless smart battery camera supports battery-
powered supply and AC-powered supply.
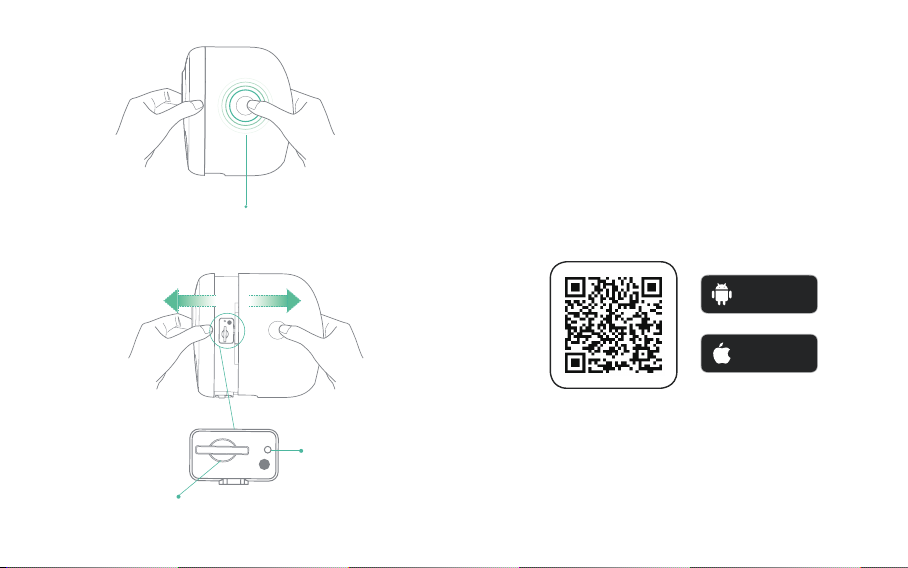
1. Download and install the App
The wireless smart battery camera supports Android and
iOS App. For your best experience, please scan the QR
code below with your mobile phone, install the app, and
follow the instruction to complete the user registration.
Press buttons on both sides, and pull out
the back cover.
Reboot hole
Micro-SD card slot
Android
Download
Download
App Store
0706
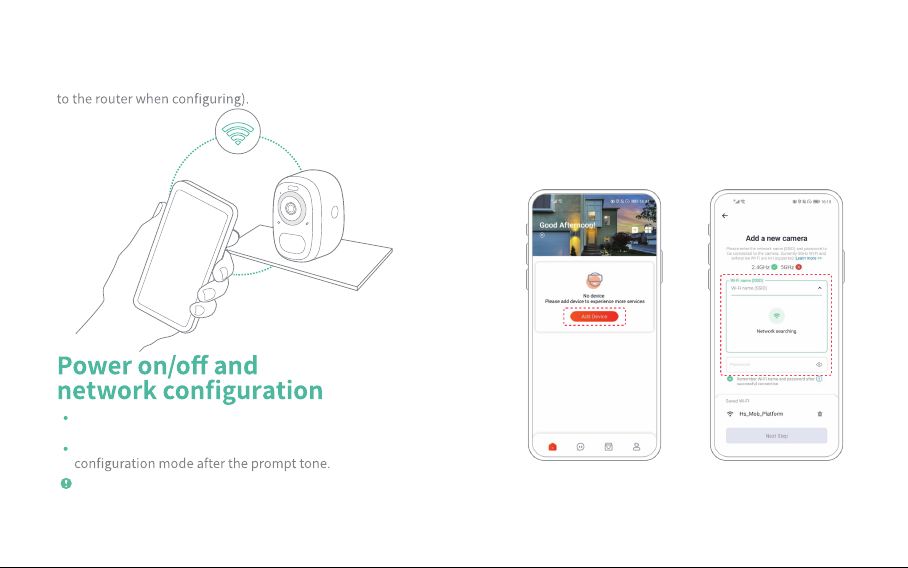
2. Add the device
Sign in to App,connect to Wi-Fi and add the device
according to the prompts (please bring the device close
Long press the power button for 3s to power on/off
the device.
krowten eht retne ot nottub rewop eht kcilc elbuoD
When connecting the camera for the first time, use the
App and follow the instruction to configure the camera
network.
Set up the camera
1) Click the "Add device" in the App and enter the
Wi-Fi network name and password that you want the
camera to connect.
0908
To ensure a longer distance connection, the camera only
supports the 2.4Ghz Wi-Fi with stronger wall penetration
capability and does not support Wi-Fi for enterprise-
level authentication currently. Please ensure that the
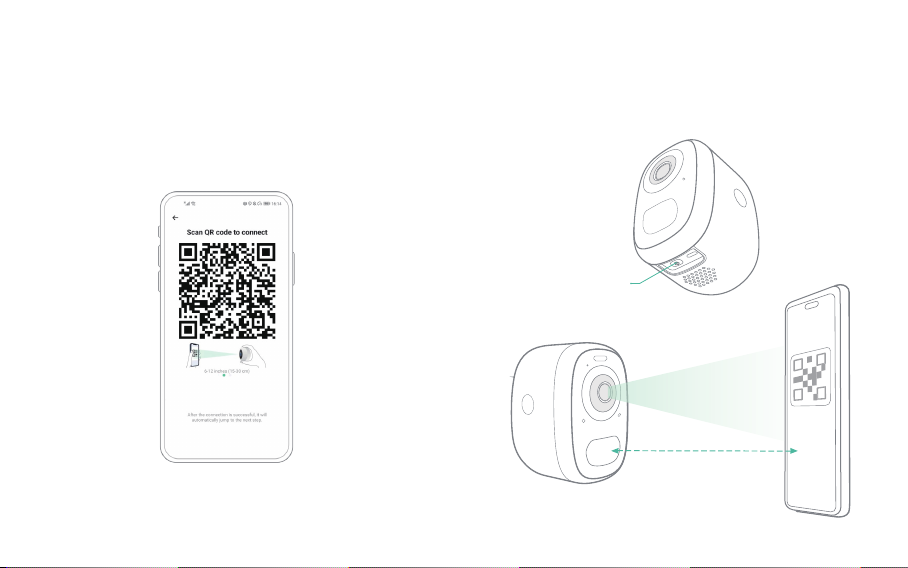
entered Wi-Fi meets the requirements. After completion,
click "Next Step" to generate the QR code for pairing the
camera.
09
2) After pressing the camera switch for 3 seconds, the
camera will turn on. At this moment, target the camera
at the QR code of the mobile App, with a distance of
about 20cm (about 7 inches) until the camera emits a
"Di" sound, which represents the scanning is succeeded
and the pairing is started.
Power button
about 7 inches (20cm)
1110
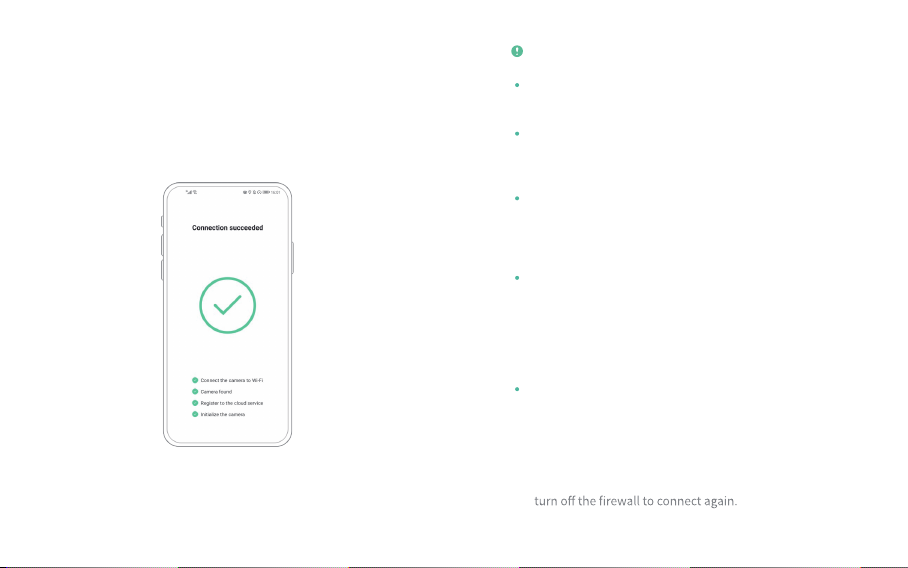
3) After a while, the camera will give out a prompt sound
of a successful connection. At this moment, please
set the name for the device on the App and select the
location you want to place the device. Click "Done" to
complete the pairing.
Possible problems with binding:
When you hear the "Wi-Fi Password Error", please
check whether the Wi-Fi password you entered in the
App is correct;
When you hear the "Authentication error", please
ensure that your Wi-Fi network is not an enterprise-
level network, and the device supports only the
network with the security level below WPA-2;
When you hear the "Wi-Fi not found", please check
whether you select or enter the correct Wi-Fi name, and
place the device near the Wi-Fi router and ensure that
the router is powered on. Please note that 5Ghz Wi-Fi
cannot be searched by the device;
When you hear the "Retrieving IP timeout", it
indicates that the number of devices connected to
the router in your home is too many to connect more
devices. Please remove some of the connected devices
that are not commonly used or restart the router
to clear the unconnected devices. You may need to
contact the router administrator;
When you hear the "Cloud service connection fail",
please check whether your router is connected properly
to the external network. When you hear this error
prompt, it is common on the condition of network
disconnection or that the selected router in your home
is a local area network server. Please ensure that the
network connection is normal, and try to temporarily

12 13
(2) Install the bracket
Remove the protective film on one side of the 3M
adhesive and stick it to the mounting surface of the
bracket. Then remove the protective film on the other
side to fix the mounting bracket in the installation
position. (The installation surface must be clean,
smooth, and dry. It is not suitable for uneven wood,
leather, or stucco walls. Please press and hold the
bracket on the installation position for 3 minutes to
achieve the best gluing performance)
Use the drilling tool to punch holes on the wall according
to the hole distance of the base. It is recommended to
mark the holes on the wall with a pencil before drilling.
Screw the expansion nut into the holes on the wall, and
then connect the bracket to the expansion nut with
Install the camera
You can place the camera on a shelf or other surfaces to
use, or you can install it on a wall to use.
(1) Select a good spot for your camera
About 15° downward
Recommended
height About 6 ft
Select a good spot for your camera, please install the
camera in a position where its view is not blocked and
ensure that it is within the coverage of the Wi-Fi network.
The PIR infrared sensor is more sensitive to movements
across the camera's field of view than movements
toward or away from the camera.
1514
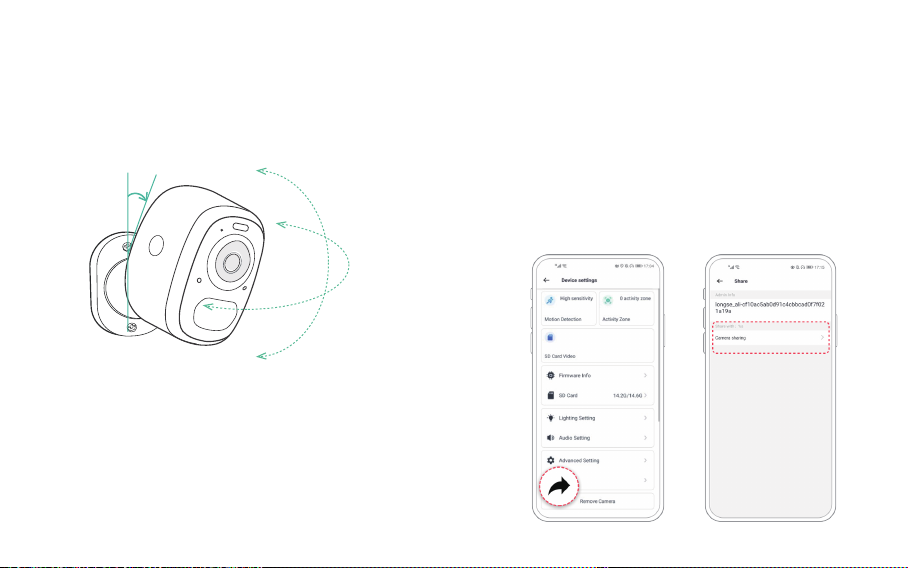
(3) Adjust the angle
Attach the camera to the magnetic bracket, the best
angle is about 15 degrees downward, then adjust the
surveillance angle.
Share the camera
When you need to view the camera with other family
members or friends, you can use this function. Only the
administrator whose account is bound with the camera
for the first time can share and set the device. Other
members can only view the live or playbacks of the
device.
1) Find the camera you want to share on the App
camera setting page. Find the button and enter the
sharing page.
About 15 ° downward

1716
2) Click "Camera sharing", and a QR code will be generated for
sharing.
Charge the camera
App will remind you to charge your camera when the
battery is low. Please use the Micro USB cable to plug
into the 5V/1.5A charging adapter to charge the camera.
During charging, the camera's indicator light is solid
yellow, and when the camera is fully charged, the
indicator light will turn into solid green. It will take
10 hours to fully charge the camera.
4) Scan the QR code on your mobile phone, and you will
sharing will be completed after you agree.
Other manuals for LongPlus
3
Table of contents
Other HeroSpeed Digital Camera manuals


