Herschel R1 User manual

Key features How to Install
The Herschel IQ R1 wireless receiver is
specifically designed to control Herschel
infrared panel heaters. The R1 will operate with
the Herschel IQ T1 wireless thermostat range
and the Herschel IQ WH1 Controller .
The R1 incorporates an internal temperature
sensor, a 1 hour “Boost” function and the latest
open window technology.
When paired with the T1, the T1 will sense the
room temperature and will override the R1’s
built in temperature sensor. When paired with
the WH1 , the R1 will act as the thermostat.
Please read all instructions fully before
installing and retain for future reference.
IMPORTANT
Mounting onto a recessed box Mounting onto a wall surface
Maximum load is 10A / 2.3kw at 230v. The R1
can be used to control several Herschel panel
heaters but the maximum wattage of 2.3kw
(2,300w) must not be exceeded. Do not use
for any other non-Herschel heating devices.
INDOOR USE ONLY.
The Herschel IQ R1 is capable of being
installed by competent DIY persons but if in
any doubt please consult a suitably qualified
electrician or Herschel Accredited Installer.
The R1 must be used in conjunction with a
fused spur. The unit must not be used as a
fused spur itself.
The R1 can be fitted directly onto a cable box
where both mains and heater cables are
already recessed.
In cases where either the heater cable or mains
cable (or both) are surface-mounted on a wall,
the supplied baseplate must also be used.
Prior to installing, ensure that the power supply
is OFF.
Remove the front using a small screwdriver.
• Built in temperature sensor
• On / Off button
• 1 hour “Boost” function
• Open window technology
• “Heating on” and “Power” on indicators
• RF frequency: 433Mhz
• Wireless distance: 200m unobstructed
• Surface mounting
• 12 month warranty
• CE, Rohs,R&TTE approved
R1
WIRELESS
RECEIVER
R1WIRELESS RECEIVER
heating controls
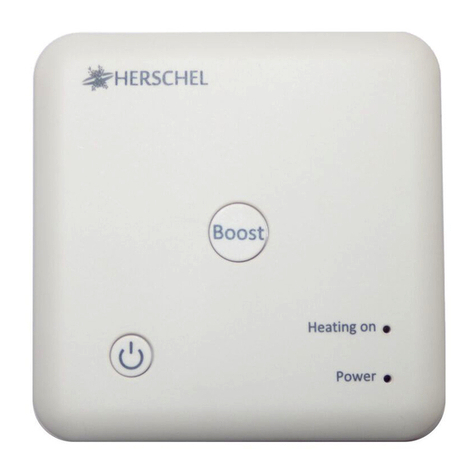
On/off button
Heating on indicator (LED 1)
Power supply
indicator (LED 2)
Boost button/code pairing button
1 2
3 4
5 6
1 2
3 4

Wiring
Connect the live and neutral AC mains
(marked AC230v). This feed should come from
the fused spur.
Remove the fitted mains plug from the Herschel
heater and connect to the terminals marked
10A.
Insert the earth wire from the mains and the
earth wire from the heater into the terminal
marked as
The Herschel R1 receiver needs to be “paired” with a WH1 or T1 Controller.
More than one R1 may be paired to any controller using the procedure below.
To Pair with Herschel IQ master controller
WH1
On the WH1
To Pair with Herschel IQ T1 Wireless room
thermostat controller
On the R1
Turn master controller to “zones” page, select
the icon of which room or heater/receiver you
want to pair with and press and hold until it
goes to the pairing page.
On the R1
Press and hold the “Boost” button on the R1
receiver until the “Heating on” indicator(LED1)
is flashing quickly. Wait for 5 seconds and a
4 digit code will be displayed on the controller
screen. The “Heating on” indicator should
then stop flashing. The receiver is now paired
to the controller.
WH1 will pair only with R1 receivers.
WH1 will not pair with T1 controllers.
To pair with a different control unit
1) Repeat the pairing process above for the new controller/receiver combination you wish to pair.
2) To avoid accidental re-pairing please note that after pushing the boost button on the R1 for 5
seconds, if no further pairing instructions are received from a new controller within one minute,
the R1 will revert to its orginal pairing.
Turn the T1 off by pressing “ ” .
Press and hold the “MENU” button for 5
seconds until a code is displayed, then press
the MENU button again. LED1 will stop
flashing when paired.
Once paired, the receiver will receive
commands from the controller. When the
heater is on, the “Heating on” indicator will
turn green. The “Power” indicator is
illuminated at all times when the receiver
has mains power.
Press and hold the “Boost” button on the R1
receiver until the “Heating on” indicator (LED1)
is flashing quickly.
On the T1
If the receiver fails to receive any commands
from the master controller WH1 within a 30
minute period the receiver will operate the
heater at a regulated temperature of 18℃until
a command is received. This feature ensures
that the heater can still operate in case of
failure of the controller or signal issues.
At room temperatures above 14℃, whilst the
unit is in “Heating on” mode (including boost
mode), if the unit senses a temperature
decrease of 2℃or more the receiver will stop
heating for one hour and the power indicator
will change from green to red. During this one
hour, if the user presses the “Boost” button or
adjusts the temperature higher than the current
room temperature the receiver will override this
mode and work according to the latest
command. This function is designed to save
energy and ensure compliance with European
energy reduction directives.
Operating Instructions
Special Functions
1.Boost mode
2.Failsafe mode
3.Herschel open window technology
TECHNICAL DIMENSIONS
R1WIRELESS RECEIVERR1WIRELESS RECEIVER
heating controls
Pressing the “Boost” button will turn the
Herschel heater on constant for one hour. The
“Heating on” indicator will turn red to indicate
“Boost” mode. To cancel “Boost” mode press
the “Boost” button twice quickly.
Table of contents
Other Herschel Receiver manuals
