HHG Thomasville Whitney 48in Desk with Powerstrip... User manual

Whitney 48in Desk with Powerstrip
Model # SPLS-WH48D-TV
ADULT ASSEMBLY REQUIRED DUE TO THE PRESENCE OF SMALL PARTS, SHARP
POINTS, SHARP EDGES AS RECEIVED
If you have any questions regarding assembly or if parts are missing, DO NOT return this item to the
store where it was purchased. Please call our toll-free customer service number and have your
instructions and parts list ready to provide the model name, part name or factory number:
1-866-942-5362
Pacific Standard Time: 8:30 a.m. - 4:30 p.m., Monday - Friday
Or visit our web site 24 hours a day, 7 days a week for product assistance at
www.whalenfurniture.com
Or e-mail your request to parts@whalenfurniture.com
LOT NUMBER:
DATE PURCHASED: / /
Thomasville™ is a trademark of HHG IPCo, LLC. ©HHG IPCo, LLC. thomasville.com
THIS INSTRUCTION BOOKLET CONTAINS IMPORTANT SAFETY INFORMATION.
PLEASE READ AND KEEP FOR FUTURE REFERENCE.
Date 2021-02-23 Rev. 0001-A
2
MANUFACTURER: Whalen Furniture Manufacturing
CATALOG: Whitney 48in Desk with Powerstrip
MODEL # SPLS-WH48D-TV
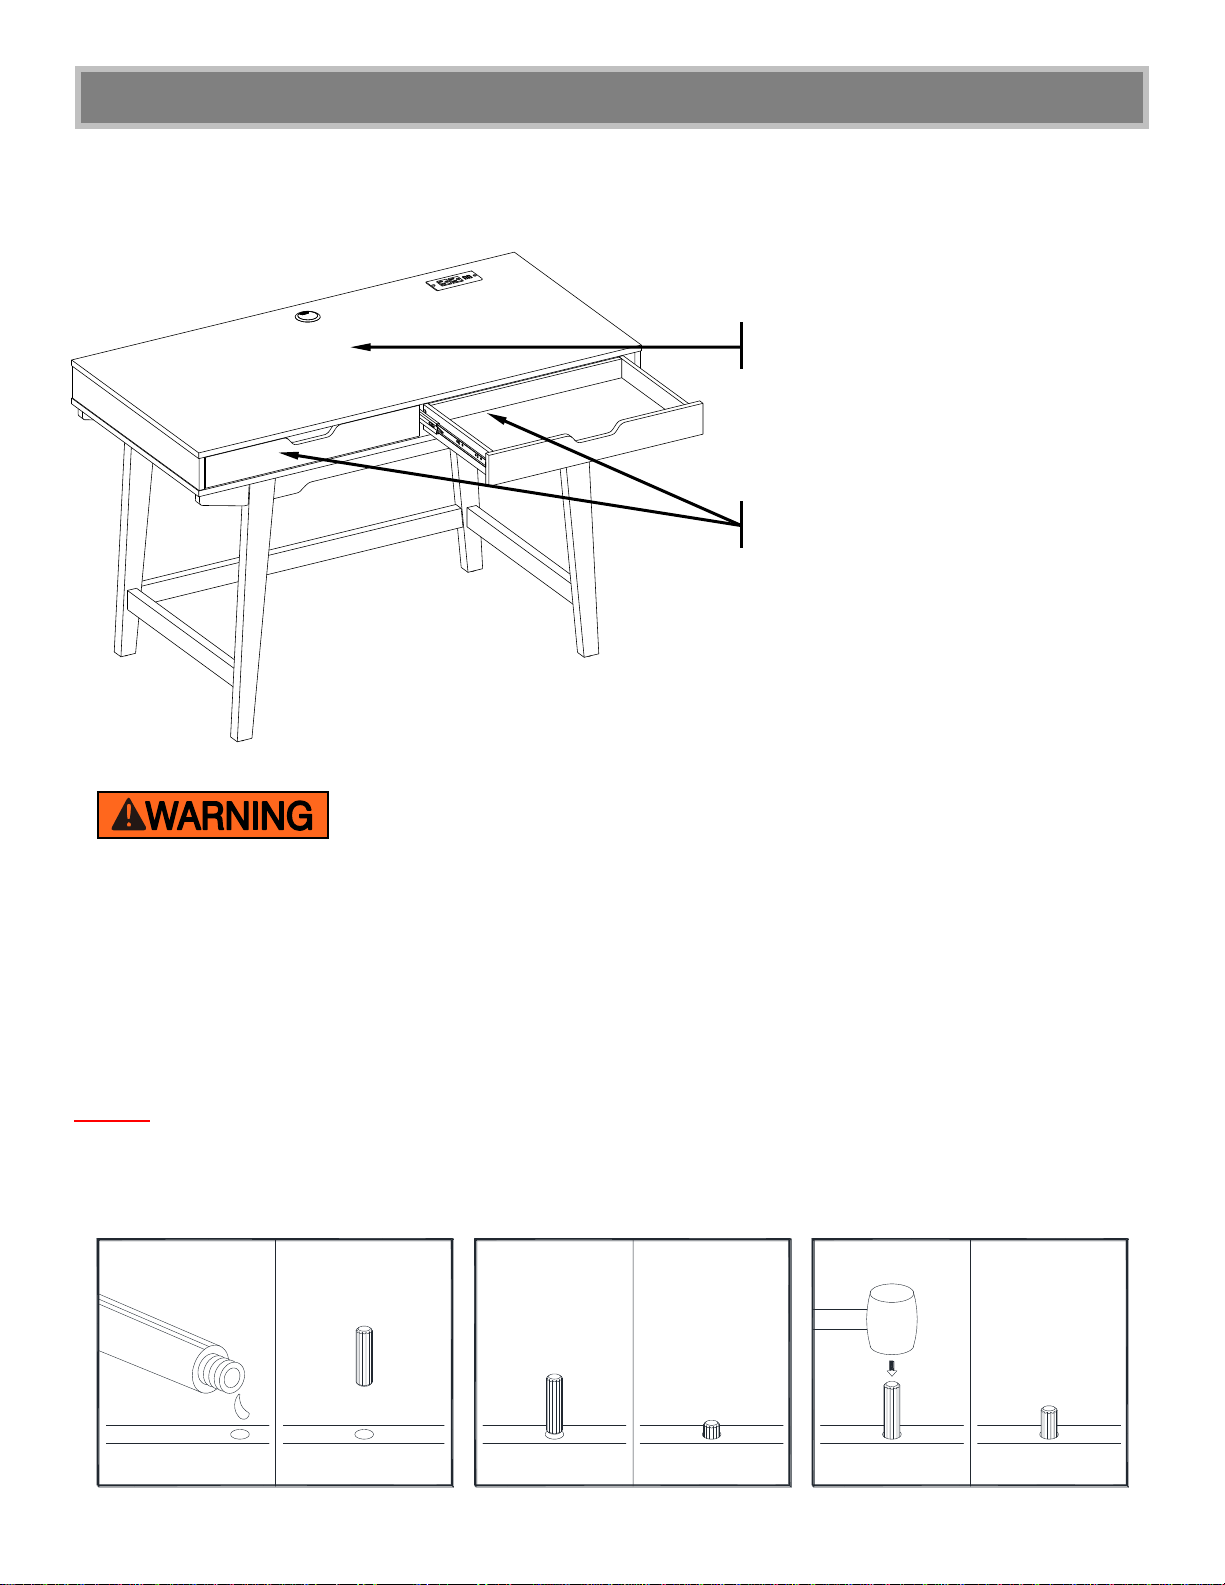
IMPORTANT
Before you begin: Open, identify and count all parts prior to assembly. Lay out parts on a flat and non-
abrasive surface. You will need the parts identified on page 6 and 7 of this instruction manuals.
NOTE: IT IS VERY IMPORTANT TO USE GLUE WITH DOWELS. EXCESS GLUE CAN BE WIPED
OFF WITH DAMP CLOTH.
Insert the Dowel at least half way by tapping lightly with a rubber mallet, IF NECESSARY.
MAXIMUM RECOMMENDED WEIGHT LOADS
THIS UNIT IS INTENDED ONLY FOR USE WITHIN THE MAXIMUM
WEIGHTS INDICATED. USE WITH LOAD HEAVIER THAN THE MAXIMUM WEIGHTS
INDICATED MAY RESULT IN INSTABILITY, CAUSING POSSIBLE INJURY.
GLUE
XXFINAL
1 2 43
MAXIMUM LOAD 90.7 kg / 200 lb.
MAXIMUM LOAD 4.54 kg / 10 lb.

3
FURNITURE TIPPING RESTRAINT
YOUNG CHILDREN MAY BE INJURED BY TIPPING FURNITURE AND YOU
MUST USE THIS TIPPING RESTRAINT TO ATTACH THIS UNIT TO THE WALL,
TO PREVENT ACCIDENTS AND/OR INJURIES.
THIS HARDWARE MUST BE PROPERLY INSTALLED (FOLLOW ALL
DIRECTIONS IN ORDER ON THIS INSTRUCTIONS), TO PROVIDE PROTECTION
AGAINST THE UNEXPECTED TIPPING OF FURNITURE DUE TO IMPROPER USE.
THIS PRODUCT IS ONLY A DETERRENT. IT IS NOT A SUBSTITUTE FOR
PROPER ADULT SUPERVISION. USE OF TIP-OVER RESTRAINTS MAY ONLY
REDUCE, BUT NOT ELIMINATE, THE RISK OF TIP-OVER.
Children have died from furniture tipover.
To reduce the risk of furniture tipover:
⚫ALWAYS install tipover restraint provided.
⚫NEVER put a TV on this product.
⚫NEVER allow children to stand, climb or hang
on drawers, doors, or shelves.
⚫NEVER open more than one drawer at a time.
⚫Place heaviest items in the lowest drawers.
Use of tip-over restraints may only reduce,
but not eliminate, the risk of tip-over.
WARNING
4
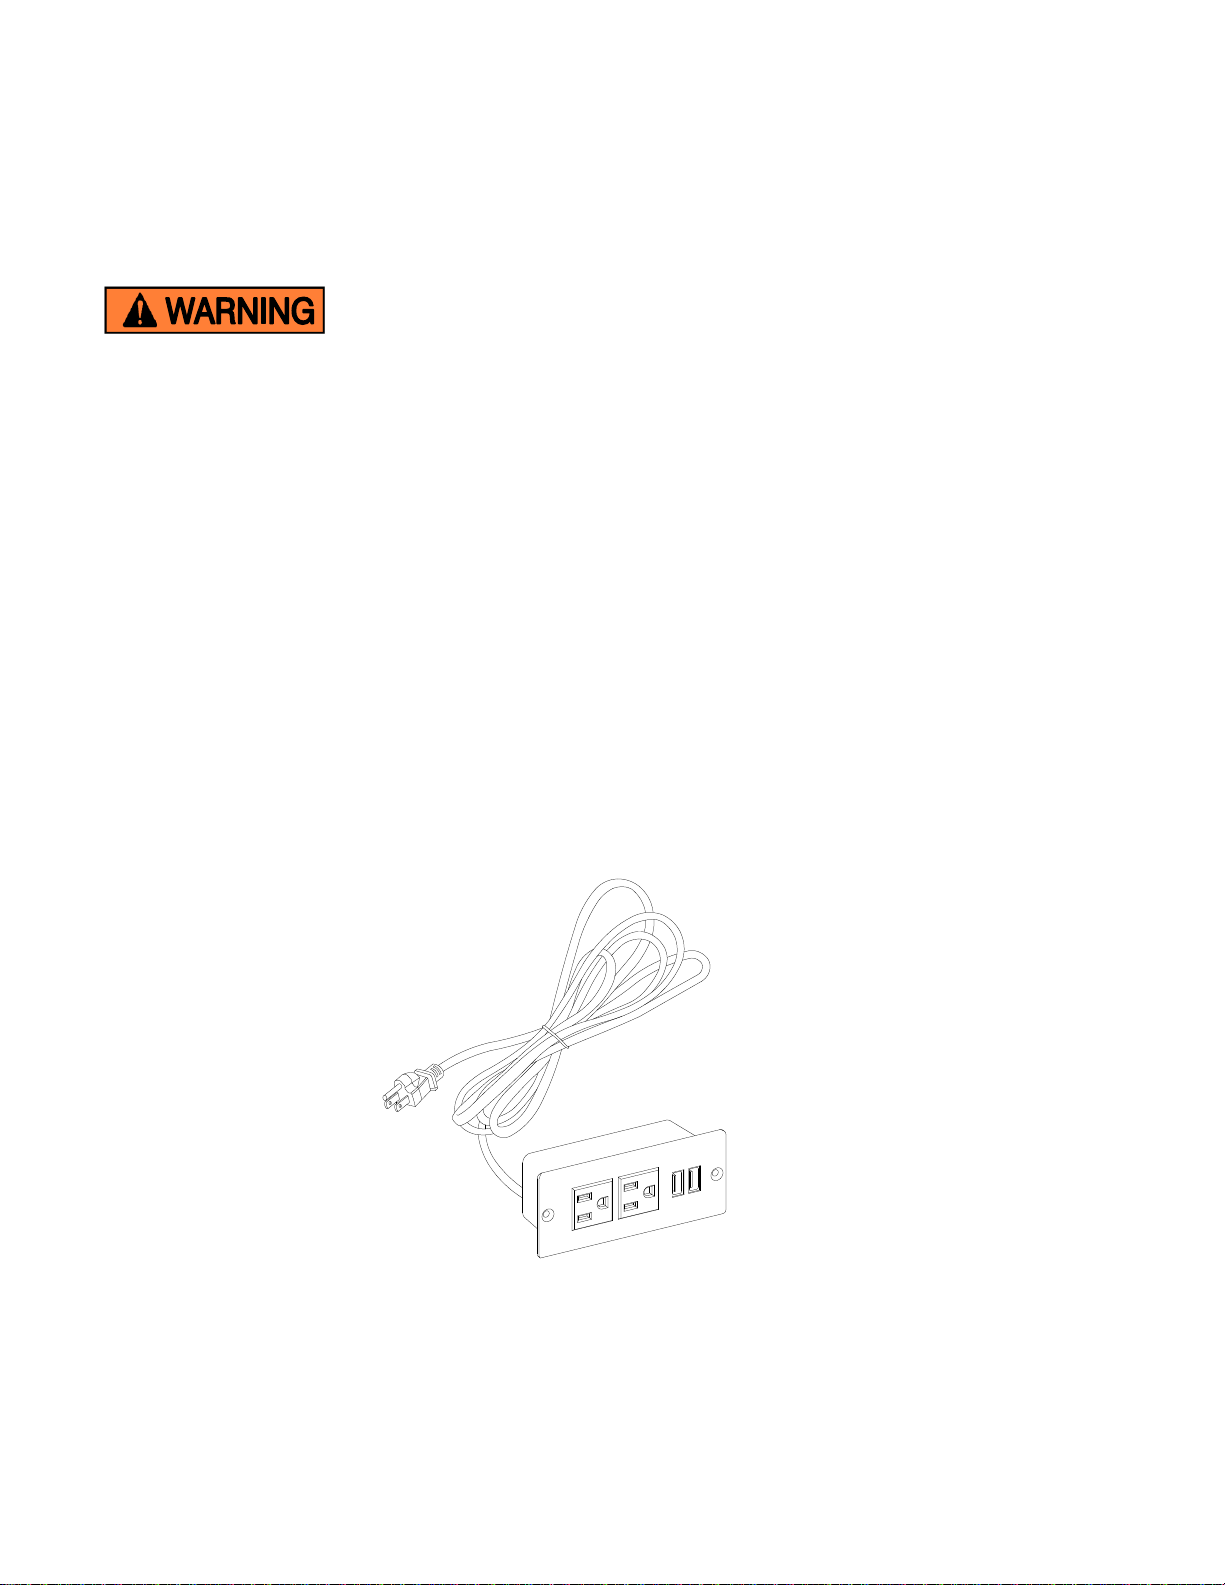
FURNITURE POWER DISTRIBUTION CENTER
IMPORTANT SAFETY INSTRUCTIONS
Carefully read all instructions installing and operating fixture
IF YOU HAVE ANY QUESTIONS REGARDING THE PROPER INSTALLATION
CONSULT A QUALIFIED ELECTRICIAN.
TO REDUCE THE RISK OF FIRE, ELECTRICAL SHOCK OR
INJURY TO PERSONS, PLEASE FOLLOW THE NEXT:
•Use only insulated staples or plastic ties (not included) to secure the cords.
•Route and secure cords so that they will not be pinched or damaged when the desk is pushed up against
the wall.
•Make sure cord is not pinched between desk and floor.
•Use the unit indoors only.
•Do not use an extension cord to connect this unit to a wall outlet.
•Use power strip with integral over-current protection to supply other electrical devices or accessories in
desk.
•This unit must be plugged into a properly grounded outlet.
•The socket outlet should be installed near the equipment and should be easily accessible.
•Maximum load of connected equipment cannot exceed a total of 12 amps and 120 volts.
•Do not open or disassemble this unit for any reason.
SAVE THESE INSTRUCTIONS

5
Furniture Power Distribution Unit User Guide
Please read this user guide before installing and using your power distribution Center.
INTRODUCTION
The integrated power and USB center offer 480 Mbps
high transmission rate and can connect up to three
devices, such as a digital camera, MP3 player, cell
phone or wireless mouse.
SPECIFICATIONS
cULus listed, rated for: 120 V AC, 12 A, 60 HZ
NOTES
•To reach USB 2.1 high speed, your computer or host
adapter card must support USB 2.1. This hub is also
backwards compatible with USB 1.1.
•When using the hub with a computer that has a
version 1.1 USB interface, all of the devices attached
to the hub will run at USB 1.1 speed.
NOTE: This equipment has been tested and found to
comply with the limits for a Class B digital device,
pursuant to part 15 of the FCC Rules. These limits are
designed to provide reasonable protection against harmful
interference in a residential installation. This equipment
generates, uses and can radiate radio frequency energy and,
if not installed and used in accordance with the instructions,
may cause harmful interference to radio communications.
However, there is no guarantee that interference will not
occur in a particular installation.
If this equipment does cause harmful interference to radio
or television reception, which can be determined by turning
the equipment off and on, the user is encouraged to try to
correct the interference by one or more of the following
measures:
•Reorient or relocate the receiving antenna.
•Increase the separation between the equipment and receiver.
•Connect the equipment into an outlet on a circuit
different from that to which the receiver is connected.
•Consult the dealer or an experienced radio/TV
technician for help.
This device complies with Part 15 of the FCC Rules.
Operation is subject to the following two conditions: (1)
This device may not cause harmful interference, and (2)
this device must accept any interference received,
including interference that may cause undesired
operation.
CAN ICES-3 (B)/NMB-3(B)
This Class B digital apparatus complies with Canadian
ICES-003.
Whalen Furniture Manufacturing
1578 Air Wing Road, San Diego, CA 92154, USA
1-866-942-5362
WARNINGS
! Your hub automatically shuts off any port with a low
or excessive current.
! If USB Hub Current Limit Exceeded appears on your
screen, disconnect the affected USB device, click
Reset on the screen, and reconnect the device.
! If one of your hub ports is disabled, but USB Hub
Current Limit Exceeded does not appear:
•Disconnect and reconnect the affected device.
•If the port still does not work, disconnect the hub
and the device, and then reconnect.
! Keep your desktop hub dry; if it gets wet, wipe it dry
immediately.
! Do not modify or tamper with your desktop hub’s
internal components. It may cause a malfunction and
invalidate its warranty.
! Modifications not approved by the party responsible
for compliance could void user’s authority to operate
the equipment.
Product: Furniture Power Distribution Unit
Model No: HG2000-DBU
Company: Whalen Furniture Manufacturing

6
Parts and Hardware List
Please read completely through the instructions and verify that all listed parts and hardware are present
before beginning assembly.
A- Desk Top (Qty. 1) B- Left Front Leg (Qty. 1) C- Right Front Leg (Qty. 1)
D- Left Back Leg (Qty. 1) E- Right Back Leg (Qty. 1) F- Back Stretcher (Qty. 1)
G- Side Stretcher (Qty. 2) H- Apron Decoration (Qty. 4)
I- Cable Wheel (Qty. 1) J- Power Center (Qty. 1)

7
Parts and Hardware List
Please read completely through the instructions and verify that all listed parts and hardware are present
before beginning assembly.
(1) 5/16”x 70 mm Bolt (2) Large Lock Washer (3) Large Flat Washer
(Qty. 8+1 extra) (Qty. 8+1 extra) (Qty. 8+1 extra)
(4) M3.5 x 12 mm Screw (5) M4 x 45 mm Screw (6) 5/32”x 12 mm Bolt
(Qty. 2+1 extra) (Qty. 6+1 extra) (Qty. 2+1 extra)
(7) M8 x 30 mm Wood Dowel (8) 1/4”x 38 mm Bolt (9) Small Lock Washer
(Qty. 10+1 extra) (Qty. 8+1 extra) (Qty. 8+1 extra)
(10) Small Flat Washer (11) Grommet 4mm Hex Wrench
(Qty. 8+1 extra) (Qty. 1) (Qty. 1)
5mm Hex Wrench Glue Tipping Restraint Hardware Kit (Qty. 1)
(Qty. 1) (Qty. 1) (Included in plastic bag)
Tools required: Hex wrench (provided) and Phillips screwdriver (not provided).

8
A
D
B
G
G
B/D 5
B/D
1
23
A
Assembly Instructions
NOTE: Please do not fully tighten all bolts until you finish assembling all parts. Once assembled, go back
and fully tighten all bolts. This will make the assembly easier.
1. Unpack the unit and confirm that you have all the hardware and required parts. Assemble the unit on a
carpeted floor or the empty carton to avoid any scratch.
2. Glue the 30 mm Wood Dowels (7) into the end holes on the Stretchers (F and G) and the Apron
Decorations (H). Make sure that you use a small amount of glue with both ends of all dowels.
NOTE: It is very important to use a small amount of glue on both ends of dowels.
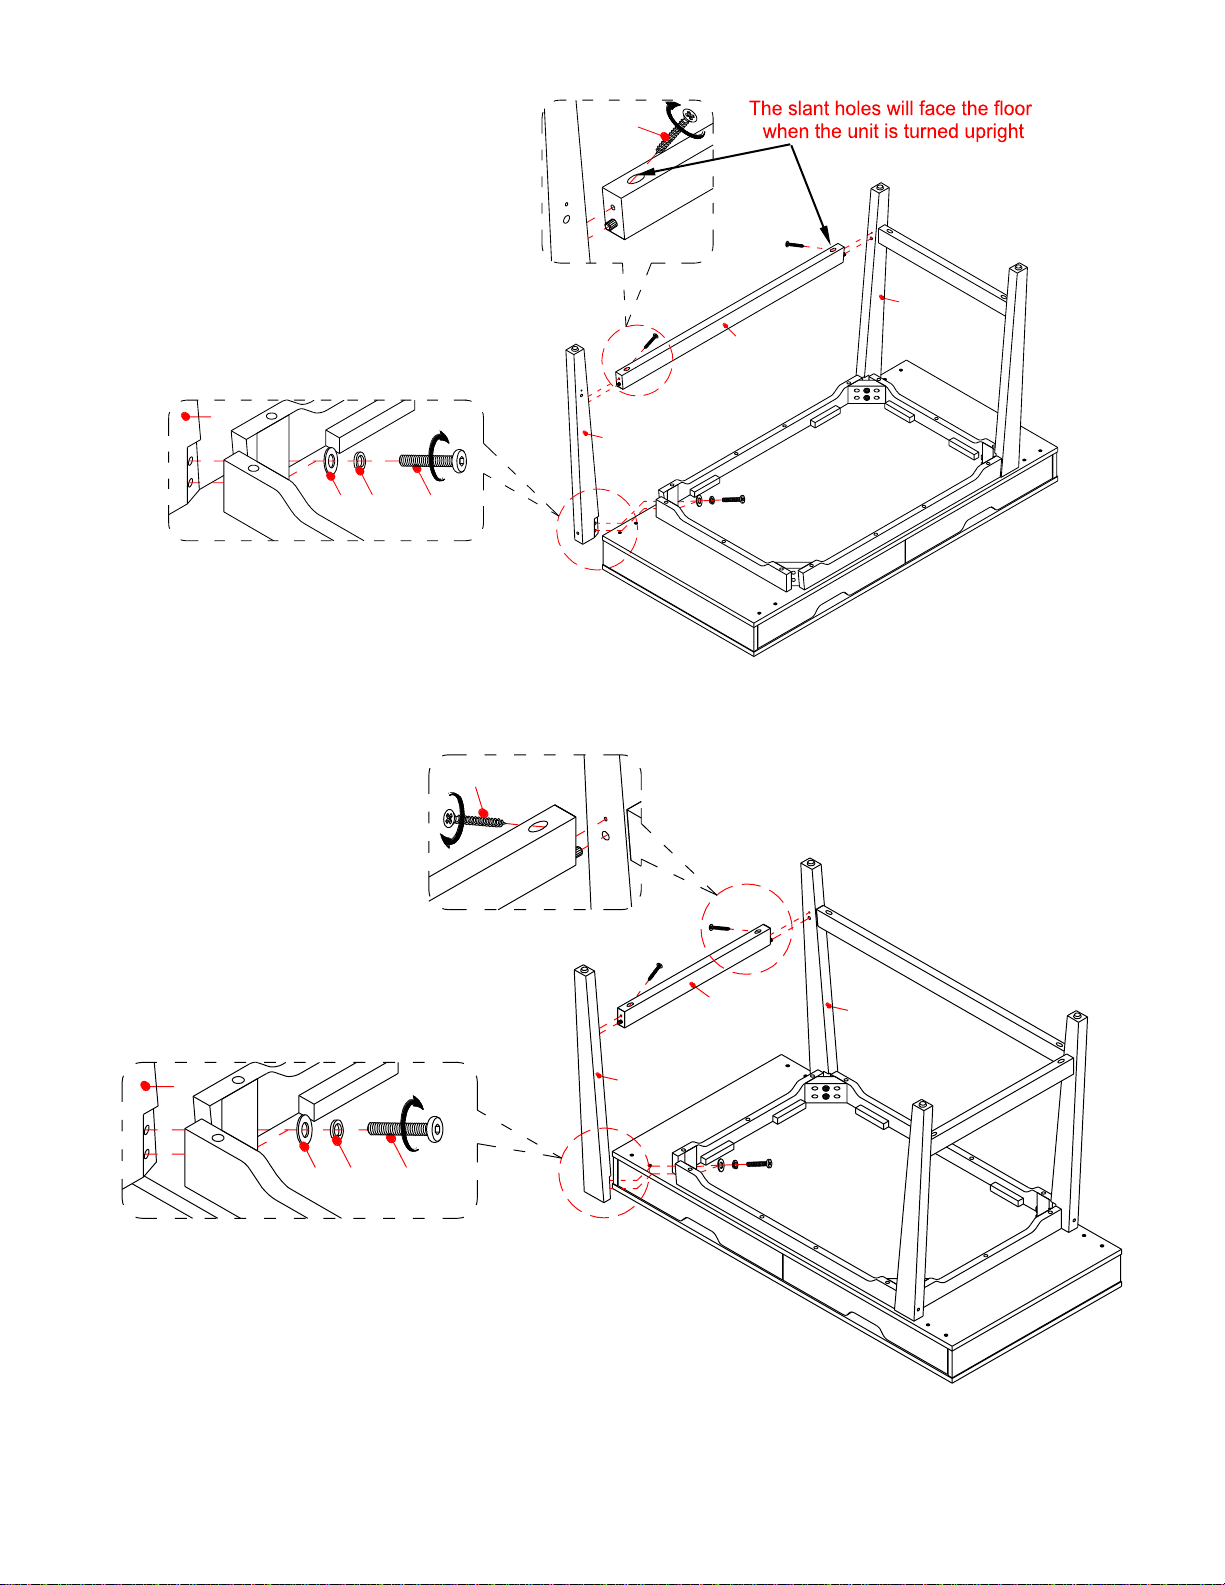
3. Attach the Left Front Leg (B) to the left front corner block of the Desk Top Apron (A) with two 70 mm
Bolts (1) and two Large Washers (2 and 3).
NOTE: DO NOT fully tighten all the bolts until the desk has been adjusted and level all the legs so that
they do not wobble. Once adjusted, go back and tighten while making sure that the unit remains level.
4. Insert the dowel of one Side Stretcher (G) into the hole of the Left Front Leg (B).
5. Repeat the same procedure to attach the Left Back Leg (D) at the opposite end. Fasten the Side Stretcher
(G) to the Legs (B and D) with the 45 mm Screw (5).
7
7
7
7
7
7
7
7 7 7
FGG
H
H
H
H
9
F
D
E
A
EA
5
F
D/E
31
2
Assembly Instructions
6. Repeat steps 4 through 5 to attach the Back Stretcher (F) and the Right Back Leg (E).
7. Repeat the same procedure to attach the other Side Stretcher (G) and Right Front Leg (C) at the opposite
end.
C
E
C
G
A
A
5
GC/E
31
2

10
Assembly Instructions
8. Fasten the Apron Decorations (H) to the bottom of Desk Top (A) with the end dowels fully inserted by
using two 38 mm Bolts (8) and the Small Washers (9 and 10) in each.
9. Ask for assistance to stand the unit upright.
10. Attach the Cable Wheel (I) to the backside of the Desk Top (A) with two 12mm Bolts (6).
NOTE: You can use the Cable Wheel to help keep your entertainment center’s cables and cords
organized.
Shorten Route
A
I
6
I
A
A
H
H
H
H
H
B/C/D/E
D
E
C
B
10
9
8
H
11
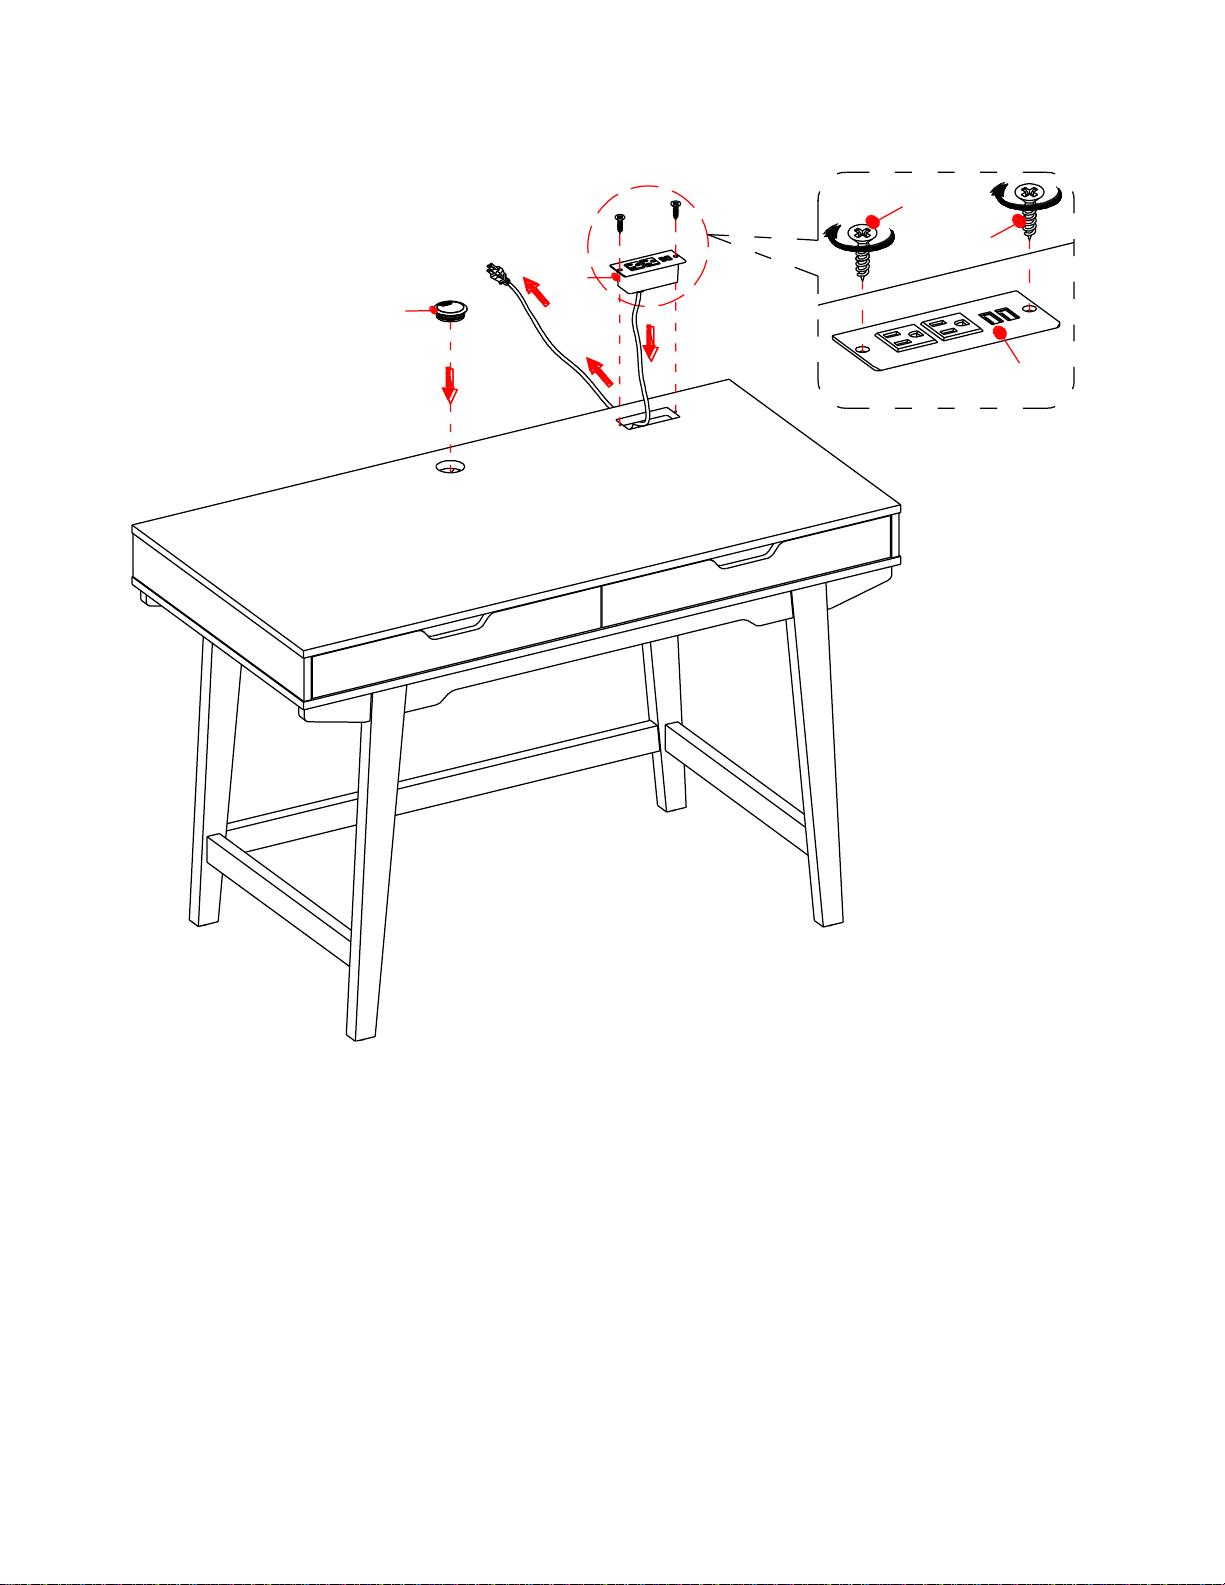
Assembly Instructions
11. Feed the wire of Power Center (J) through the cutout of the Desk Top (A) and push into the cutout from
top of Desk Top, secure it in place with two 12 mm Screws (4). Make sure the wire are not pinched.
12. Place the Grommet (11) over the hole of the top panel.
A
11 J
44
J
12
B
C
D
E
Assembly Instructions
Tools required (not provided): Phillips screwdriver, stud finder, tape measure, pencil, power drill and 1/8”
drill bit.
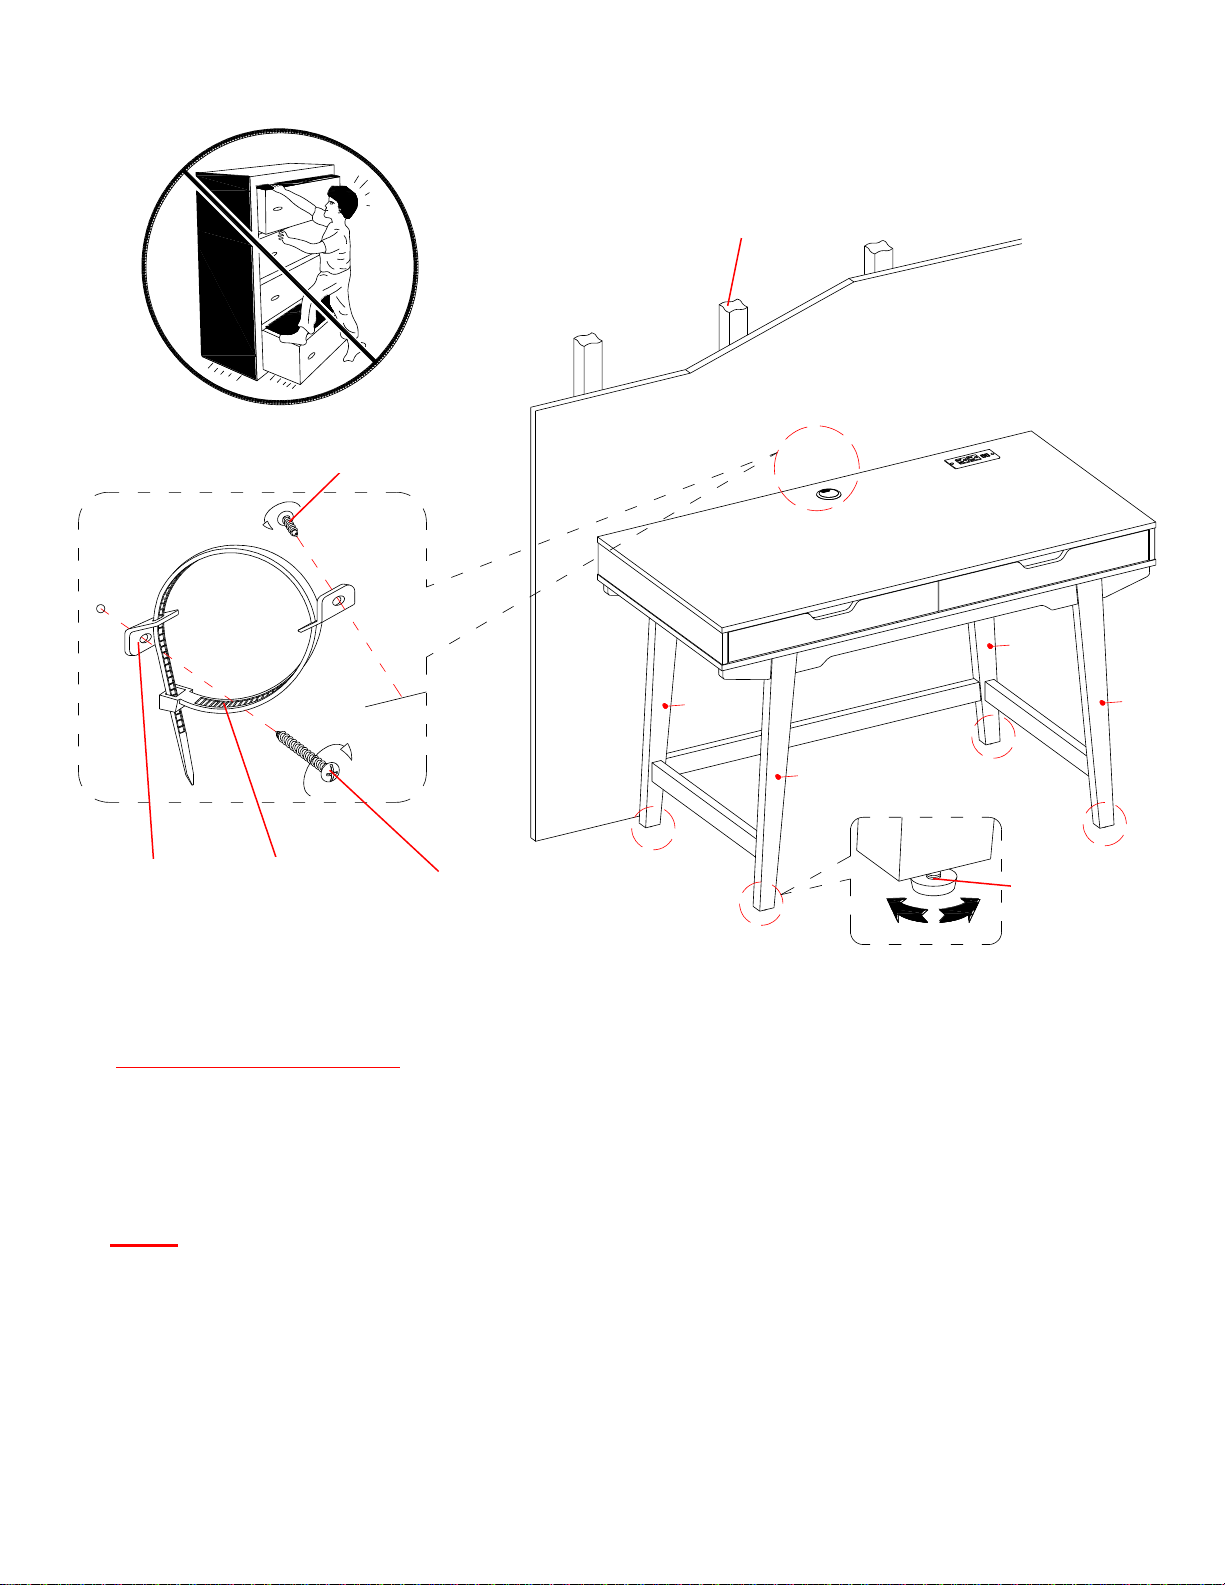
13. Position the unit at the desired location against a wall. If necessary, adjust the Floor Levelers at the
bottom of the Legs to level the unit.
14. Now, follow the instructions printed on the plastic bag containing the Tipping Restraint Hardware to
attach the tip-over restraints to the unit and the wall.
NOTE: The tipping restraint hardware included is for wooden stud wall construction. It must be attached
to a wall stud. Depending upon your wall construction, different anchor hardware maybe required. Please
contact your local hardware store for assistance. Young children can be seriously injured by tipping
furniture. You must install the tipping restraint hardware with the unit to prevent the unit from tipping,
causing any accidents or damage. The tipping restraints are intended only as a deterrent, they are not a
substitute for proper adult supervision. The tipping restraints are not earthquake restraints. If you wish to
add the extra security of earthquake restraints, they must be purchased and installed separately.
Wooden stud
Wall
Wall
Long screw
Short screw
Floor leveler
Metal bracket
Nylon strap

13
Care and Maintenance
⚫Use a soft, clean cloth that will not scratch the surface when dusting.
⚫Gently rub the surface with a soft dry cloth, soft damp cloth, or soft damp cloth with neutral detergent, and
then dry it well.
⚫Strong Alkaline detergents or acidic detergents are not recommended to use.
⚫Sponges containing abrasive agents or fibers are not recommended to use.
⚫Use of furniture polish is not necessary. Should you choose to use polish, test first in an inconspicuous area.
⚫Using solvents of any kind on your furniture may damage your furniture’s finish.
⚫Never use water to clean your furniture as it may cause damage to the finish.
⚫Always use coasters under beverage glasses and flowerpots.
⚫Liquid spills should be removed immediately. Using a soft, clean cloth, blot the spill gently. Avoid rubbing.
⚫Always use protective pads under hot dishes and plates. Heat can cause chemical changes that may create
spotting within the furniture finish.
⚫In the event that your furniture is stained or otherwise damaged during use, we recommend that you call a
professional to repair your furniture.
⚫Check bolts/screws periodically and tighten them if necessary.
Further Advice about Wood Furniture Care
It is best to keep your furniture in a climate-controlled environment. Extreme temperature and humidity
changes can cause fading, warping, shrinking and splitting of wood. It is advised to keep furniture away from
direct sunlight as sun may damage the finish.
Proper care and cleaning at home will extend the life of your purchase. Following these important and helpful
tips will enhance your furniture as it ages.
We hope you enjoy your purchase for many years.
Thank you for your purchase!
QUALITY GUARANTEE
We are confident that you will be delighted with your Whalen Furniture purchase.
Should this product be defective in workmanship or materials or fail under normal use, we will repair or
replace it for up to one (1) year from date of purchase. Every Whalen Furniture product is designed to meet
your highest expectations. We guarantee that you will immediately see the value of our fine furniture.
This warranty gives you specific legal rights and you may also have other rights which vary from state to state
or province to province.
Whalen Furniture Manufacturing
1578 Air Wing Road, San Diego CA, 92154, USA
Customer Service: 866-942-5362
8:30 a.m. - 4:30 p.m., PST, Monday to Friday
www.whalenfurniture.com
Table of contents
Popular Indoor Furnishing manuals by other brands

Regency
Regency LWMS3015 Assembly instructions

Furniture of America
Furniture of America CM7751C Assembly instructions

Safavieh Furniture
Safavieh Furniture Estella CNS5731 manual

PLACES OF STYLE
PLACES OF STYLE Ovalfuss Assembly instruction

Trasman
Trasman 1138 Bo1 Assembly manual

Costway
Costway JV10856 manual


