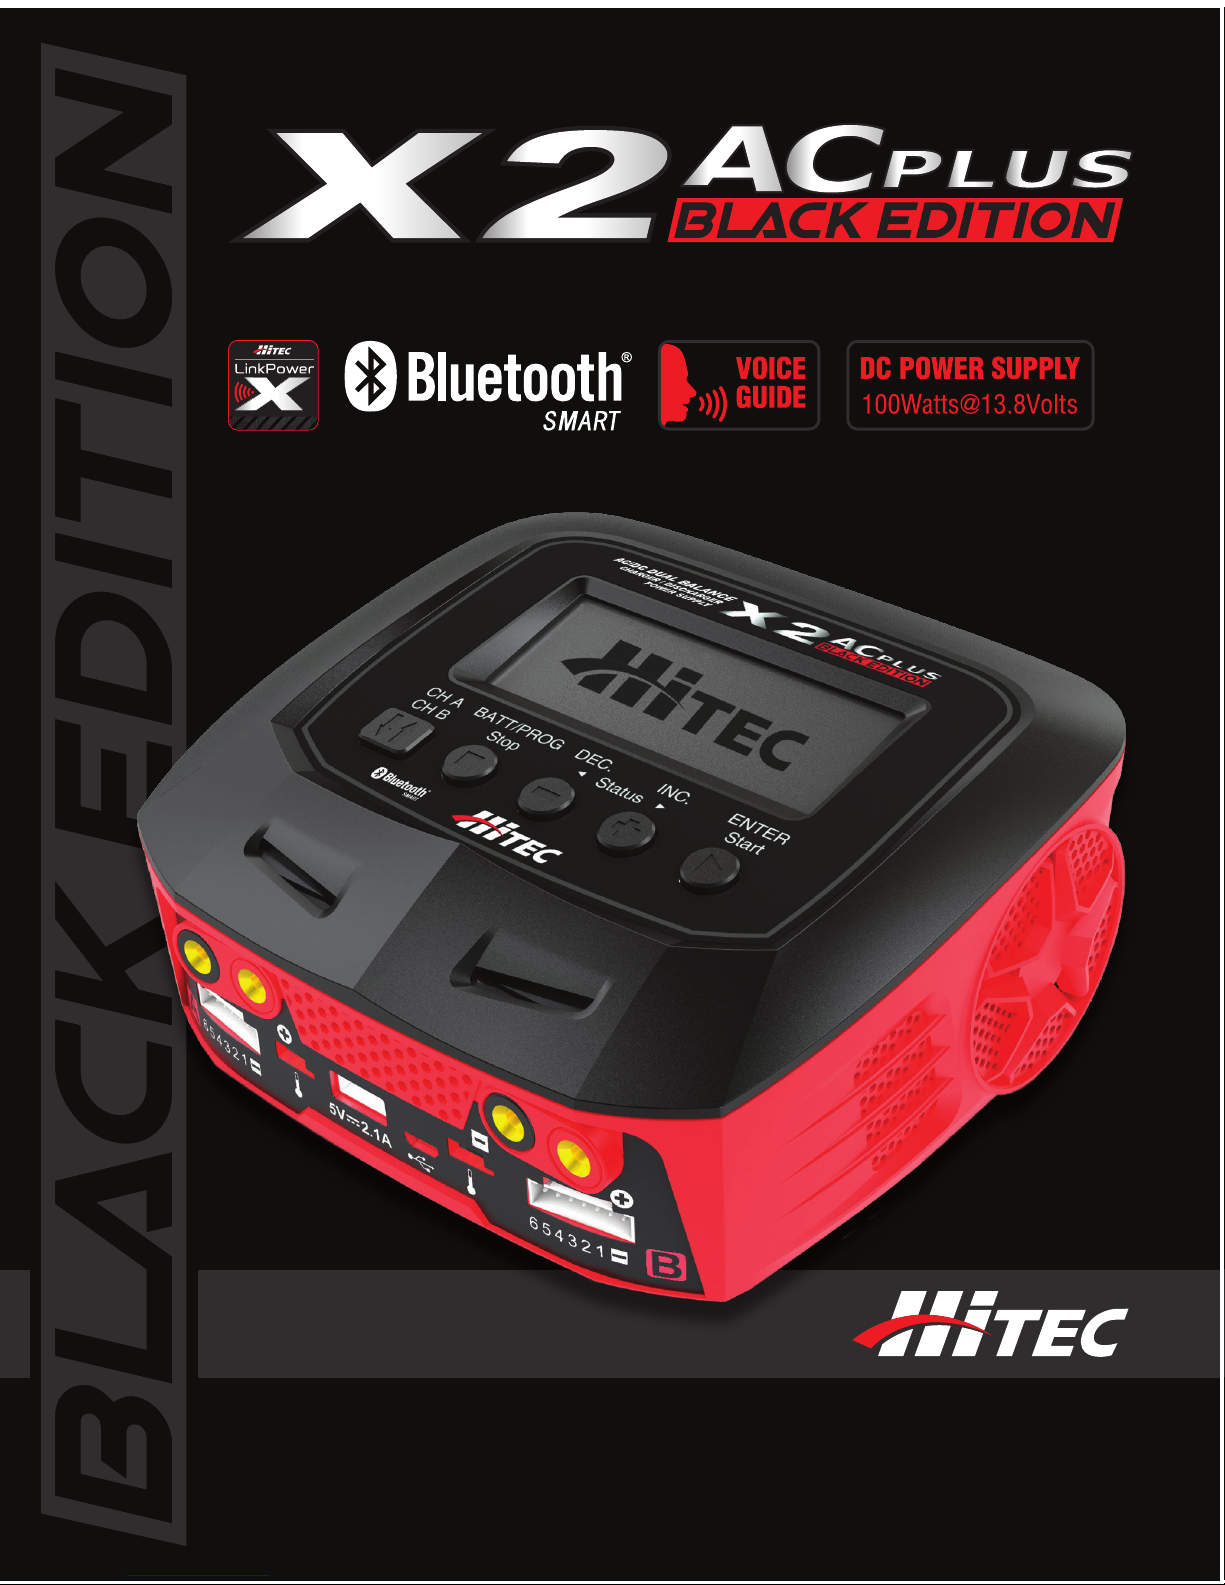
Hi-Tec X2 AC Plus Black Edition User manual
WARNING: THE CHARGING AND DISCHARGING OF RC HOBBY BATTERIES CAN BE
DANGEROUS. FAILURE TO FOLLOW THE INSTRUCTIONS AND WARNINGS IN THIS MANUAL
MAY RESULT IN PROPERTY DAMAGE AND/OR LOSS OF LIFE.
AC/DC DUAL BALANCE CHARGER/DISCHARGER POWER SUPPLY

2
Table of Contents:
Introduction..................................................................................................................................03
Warning and Safety Notes.....................................................................................................04
Product Layout............................................................................................................................08
Charger Content / Specications.........................................................................................09
Features..........................................................................................................................................10
Battery & Power Supply Connections..............................................................................13
Power Distribution....................................................................................................................13
Operation.......................................................................................................................................14
Program Flow Chart..................................................................................................................17
Charger Operation....................................................................................................................18
Lithium Battery Program [LiPo/LiHV/LiFe/Lilon]..................................................................19
NiMH/NiCd Battery Program.................................................................................................27
Pb Lead-Acid Battery Program............................................................................................31
DC Power Supply........................................................................................................................34
Battery Voltage Meter..............................................................................................................35
Battery Resistance Meter........................................................................................................36
Memory Preset - Data Store/Load......................................................................................37
Advanced System Set Up........................................................................................................38
Warning and Error Messages................................................................................................41
Using the Charge Control Software [CHARGE MASTER]..................................................42
Recommended Accessory......................................................................................................42
Charger Operation Using the App......................................................................................43
Commonly Used Terms............................................................................................................48
Conformity Declarations.........................................................................................................49
Disposal and Prop 65 Warning............................................................................................50
Warranty and Service...............................................................................................................51
Table of Contents

3
Congratulations on purchasing your new X2 AC Plus Black Edition Charger!
This latest addition to our innovative charger line oers expanded capacity and
compatibility in a portable and compact package. With dual inputs aording
exible battery charging at home and in the eld, the X2 AC Plus Black Edition
also boasts Hitec’s innovative power distribution mode which allows you to
eciently assign output power based on individual battery requirements.
Capable of charging all battery chemistries (including the new generation LiHV),
this powerhouse has a built-in 10-amp power supply, internal balancing circuits
and 10 dierent charge/discharge proles. Additional features include our“SCAN
TO GO” and Smartphone control via Bluetooth.
As with all Hitec products, please read the OPERATING INSTRUCTIONS, WARNING
and SAFETY NOTES in their entirety before you attempt to use your new product.
THE CHARGING AND DISCHARGING OF RC HOBBY BATTERIES CAN BE
DANGEROUS. FAILURE TO FOLLOW THESE EXPLICIT WARNINGS CAN
RESULT IN PROPERTY DAMAGE AND/OR LOSS OF LIFE.
ANEVER LEAVE YOUR CHARGER UNATTENDED WHILE IN OPERATION.
ANEVER CHARGE ON OR AROUND COMBUSTIBLE MATERIALS.
ANEVER CHARGE A DAMAGED BATTERY PACK.
ALOW COST, NO-NAME BATTERY PACKS POSE THE MOST DANGER. WE
RECOMMEND YOU ONLY USE BATTERY PACKS THAT ARE SOLD AND
WARRANTIED BY A REPUTABLE COMPANY.
AIT IS HIGHLY RECOMMENDED THAT YOU UTILIZE A SAFETY DEVICE SUCH
AS A STEEL CASE OR LiPo SACK™ WHILE CHARGING LITHIUM CHEMISTRY
BATTERIES.
AIT IS HIGHLY RECOMMENDED THAT YOU KEEP AN OPERABLE “CLASS A” FIRE
EXTINGUISHER IN THE CHARGING AREA.
FAILURE TO FOLLOW THESE WARNINGS CAN BE CONSIDERED
NEGLIGENCE BY THE OPERATOR AND MAY NEGATE ANY CLAIMS
FOR DAMAGES INCURRED.
Hitec RCD USA will not be held responsible for any damages or injuries that may
occur by persons who fail to follow these warnings or who fail to properly follow
the instructions in this manual.
Warning
Introduction
Warning

4
These warnings and safety notes are of the utmost importance. You must follow
these instructions for maximum safety. Failure to do so can damage the charger
and the battery and in the worst cases, may cause a re.
NEVER LEAVE THE CHARGER UNATTENDED WHILE IT IS CONNECTED TO
ITS POWER SOURCE. IF ANY MALFUNCTION IS FOUND, TERMINATE THE
PROCESS AT ONCE AND REFER TO THE OPERATION MANUAL.
AThe allowable DC input voltage is 11-18V DC.
AThe allowable AC input voltage is 100-240V AC.
AKeep the charger away from dust, damp, rain, heat, direct sunlight and
excessive vibration.
AIf the charger is dropped or suers any type of impact, it should be inspected
by an authorized service station before using it again.
AThis charger and the battery should be put on a heat-resistant, non-
ammable and non-conductive surface.
ANever place a charger on a car seat, carpet or similar surface. Keep all
ammable volatile materials away from the operating area.
AMake sure you know the specications of the battery to be charged or
discharged to ensure it meets the requirements of this charger. If the
program is set up incorrectly, the battery and charger can be damaged.
AFire or explosion can occur due to overcharging.
ATo avoid a short circuit between the charge lead, always connect the charge
cable to the charger rst, then connect the battery. Reverse the sequence
when disconnecting.
Warning
Warning: Be sure to read this section for your own safety.
Caution: Be sure to read this section to prevent accidents
and damage to your charger.
Tip: This section will help you maximize the performance of
your charger.
Note: This section will provide more detailed explanations.
Caution
TipWarning
Note
Warning and Safety Notes

5
ANever attempt to charge or discharge the following types of batteries:
• A battery tted with an integral charge circuit or a protection circuit
• A battery pack which consists of dierent types of cells (including
dierent manufacturer’s cells)
• A battery that is already fully charged or just slightly discharged and
non-rechargeable batteries (these pose an explosion hazard)
• A faulty or damaged battery
• Batteries installed in a device or which are electrically linked to other
components
• Batteries that are not expressly stated by the manufacturer to be
suitable for the currents the charger delivers during the charge process
PLEASE BEAR IN MIND THE FOLLOWING POINTS BEFORE YOU
COMMENCE CHARGING:
• Did you select the Appropriate program suitable for the type of battery you
are charging?
• Did you set up the adequate current for charging or discharging?
• Have you checked the battery voltage? Lithium battery packs can be wired
in parallel and in series, i.e. a 2-cell pack can be 3.7V (in parallel) or 7.4V (in
series).
• Have you checked that all connections are rm and secure?
• Make sure there are no intermittent contacts at any point in the circuit.
Warning and Safety Notes [cont.]
6
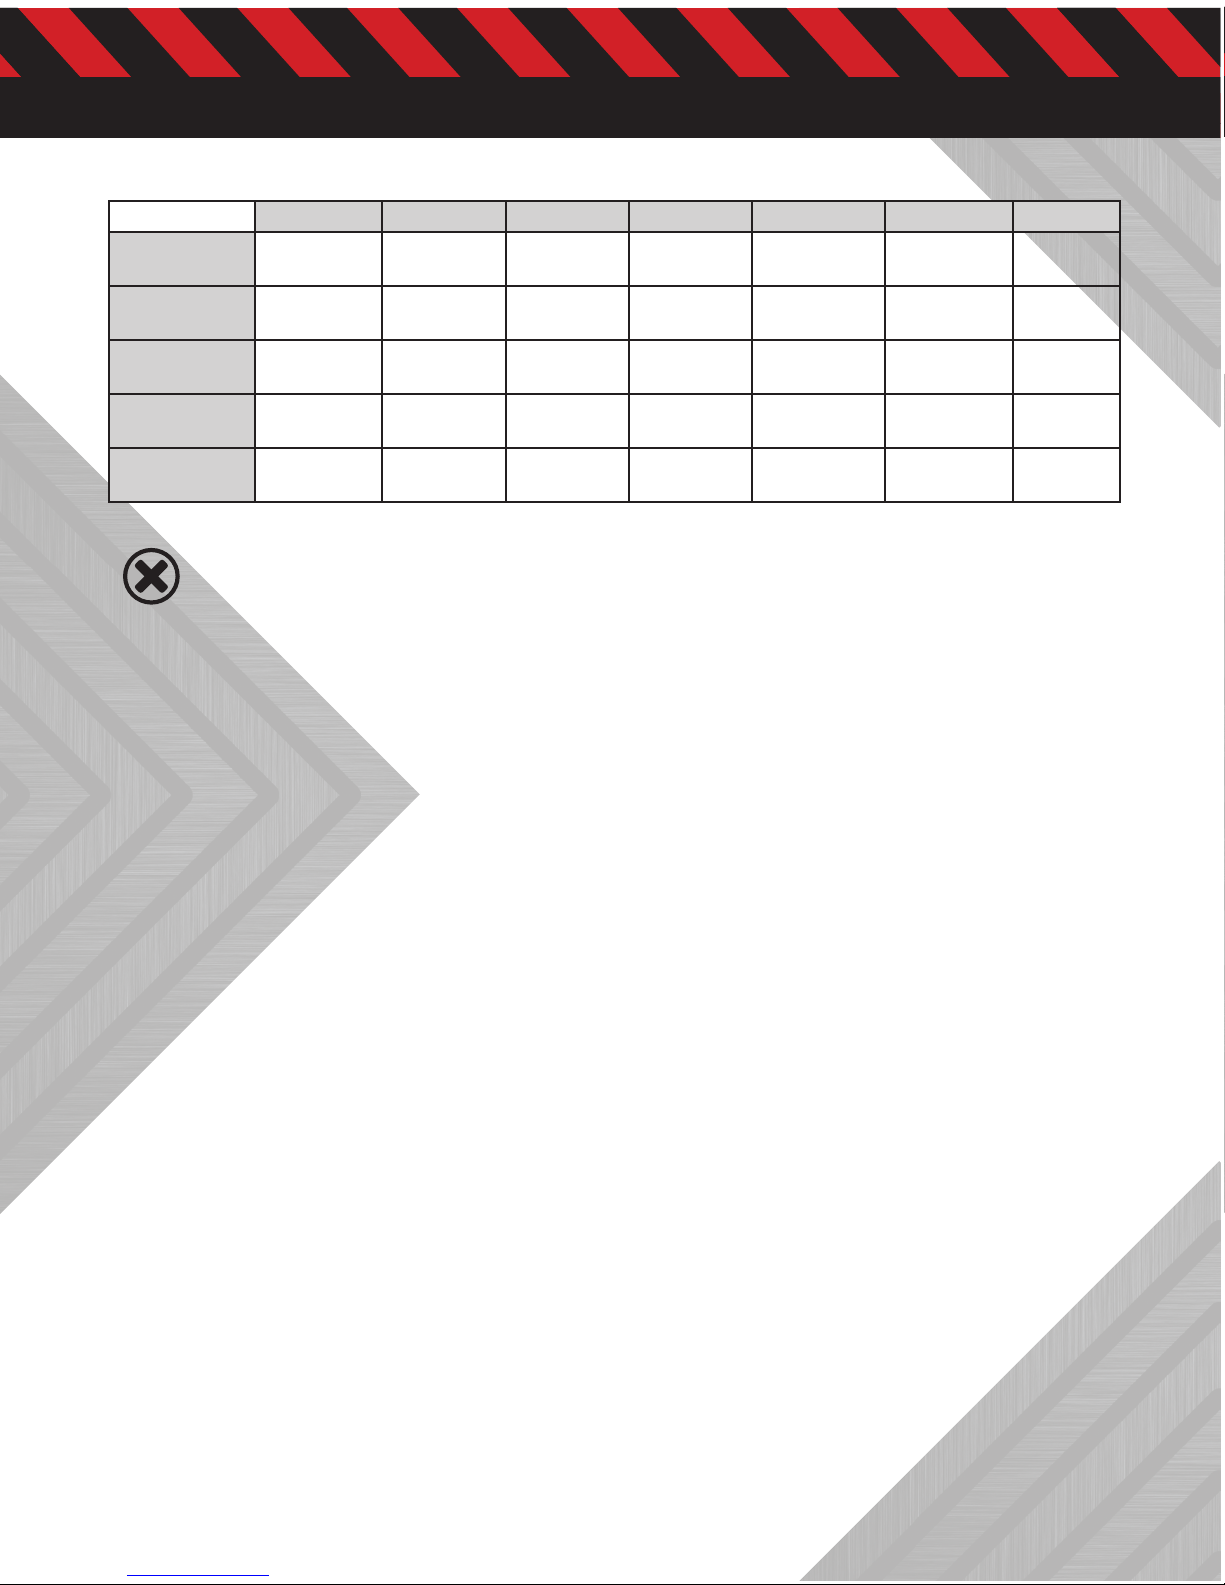
LiPo LiHV LiIon LiFe NiCd NiMH Pb
Nominal
Voltage
3.7V/cell 3.8V/cell 3.6V/cell 3.3V/cell 1.2V/cell 1.2V/cell 2.0V/cell
Max. Charge
Voltage
4.2V/cell 4.35V/cell 4.1V/cell 3.6V/cell 1.5V/cell 1.5V/cell 2.46V/cell
Storage
Voltage
3.8V/cell 3.85V/cell 3.7V/cell 3.3V/cell n/a n/a n/a
Allowable Fast
Charge
≤ 1C ≤ 1C ≤ 1C ≤ 4C ≤ 1-2C ≤ 1-2C ≤ .04C
Min. Discharge
Voltage
3.0-3.3V/cell 3.1-3.4V/cell 2.9-3.2V/cell 2.6-2.9V/cell 0.1-1.1V/cell 0.1-1.1V/cell 1.8V/cell
Standard Battery Parameters
WHEN ADJUSTING YOUR X2 AC PLUS BLACK EDITION CHARGING
PARAMETERS, BE SURE YOU SELECT THE PROPER BATTERY TYPE AND
CELL VOLTAGE FOR THE TYPE OF CELL YOU ARE CHARGING. CHARGING
BATTERIES WITH THE WRONG SETTINGS MAY CAUSE THE CELLS TO
BURST, CATCH FIRE OR EXPLODE.
Charging
Before charging your batteries, it is critical that you determine the maximum
allowable charge rate for your batteries. The X2 AC Plus Black Edition is capable
of charging at high rates that may not be suitable or safe for your particular
batteries. For example, Lithium cells are typically safe to charge at 1C, or the
total mAh÷1000. A 1200mAh battery would have a 1C charge rate of 1.2 amps. A
4200mAh battery would have a 1C charge rate of 4.2 amps. Some manufacturers
are oering Lithium cells that can be charged at greater than 1C but this should
ALWAYS be veried before charging a Lithium battery at rates higher than 1C.
Voltage is just as critical as the charging amperage rate and this is determined
by the number of cells in series, or “S”. For example, a 3S LiPo is rated at 11.1 volts
(“S”multiplied by a single LiPo cell with a nominal voltage of 3.7 volts DC. 3 cells
x 3.7 volts each equals 11.1 volts DC).
Connect the battery’s main leads to the charger output: red is positive and black
is negative. Keep in mind that the gauge or thickness of your charging leads
from the X2 AC Plus Black Edition to your battery must be of an acceptable
current rating to handle the Applied charge current. For maximum safety and
charging eectiveness, always match or exceed the main battery lead rating
when assembling or selecting your charging leads. If you charge a battery at
a high current rate (amperage) with a charging lead not rated for the chosen
amperage, the wire could get hot, catch re, short out and/or potentially destroy
your battery and the charger.
Warning
Warning and Safety Notes [cont.]

7
When in doubt, always use a higher gauge wire (lower AWG number). It is
common to see charging leads constructed of 14AWG, 16AWG or 18AWG wire.
Always refer to recommendations from your battery manufacturer for your
specic battery type and size before initiating a charge or discharge process.
Do not attempt to disassemble or modify Lithium or Lead-Acid battery packs.
Discharging
The X2 AC Plus Black Edition discharging functions are for two specic purposes:
• Refreshing the capacity of a Nickel-based battery that has lost capacity over
time (NiMH or NiCd).
• Reducing the voltage of a Lithium battery for safe storage.
LITHIUM CHEMISTRY BATTERY PACKS SHOULD ONLY BE DISCHARGED
TO THEIR MINIMUM SAFE VOLTAGE, NO LOWER. DEEP DISCHARGING
A LITHIUM CELL WILL DO PERMANENT DAMAGE. REFER TO THE
STANDARD BATTERY PARAMETERS TABLE ON PAGE 6 OF THIS MANUAL
FOR MINIMUM DISCHARGE VOLTAGES.
LiPo & LiHV Charge/Discharge Cycling
Lithium batteries are known to reach full capacity after a break-in period of
about 10 charge/discharge cycles. We do not recommend you use the X2 AC
Plus Black Edition charger to do this; normal use and recharging will achieve
the same results. If you wish to perform a Lithium break-in on the bench with
the X2 AC Plus Black Edition, discharging to minimum acceptable voltages
and performing a balance charge at 1C maximum rate is recommended. If you
choose to break in your Lithium batteries under normal use, charging at only 1C
for the rst ten cycles will help ensure full performance and service life from your
Lithium cells.
Warning and Safety Notes [cont.]
Note

8
Product Layout
Dot Matrix 128 x 64
LCD Display
Output Socket
4mm Banana Plug
Temperature
Sensor Port Output Socket
4mm Banana Plug
Balance Lead Socket
Cooling Fan
Micro USB Port for PC Link &
rmware upgrade
Alter Values, See the Status
of Individual Cells in Balance
Charge Mode Scroll Through the
Main Menu, Stop Any
Charge Processes
Switch from
Channel A to B or
Channel B to A
Speaker
AC Input
100-240V
DC Input: 11-18V
DC Output: 13.8V
DC Power
LED Light
Resume or Start
Charge Processes
Balance Lead Socket
Temperature Sensor Port
USB Port

9
Specications
Charger Contents
X2 AC Plus Black Edition Specications
AC Input 100 - 240 Volts AC
DC Input 11 - 18 x Volts DC
Total Charge Circuit Power 100 Watts AC Input / 200 Watts DC Input
DC Power Supply Output Max 100 Watts
Charge Current Range 0.1 - 10.0 Amps x 2
Discharge Current Range 10 Watts x 2
Discharge Current Power 0.1 - 5.0 Amps x 2
Current Drain for LiPo Balancing 200mA per cell
NiCd/NiMH Battery Cell Count 1 - 15 Cells
- Capacity Range 100 - 50000mAh
LiPo/LiHV/LiFe/Lilon Cell Count 1 - 6 Cells
- Capacity Range 100 - 50000mAh
Pb Battery Voltage 2 - 20 Volts
- Capacity Range 100 - 50000mAh
Net Weight 2.15 lbs / 975g
Dimensions 6.42 x 6.02 x 2.83 in / 163 x 153 x 72mm
5
5
1
12
2
3
3
The Set Contains:
X2 AC Plus Black Edition Charger
Two (2) x XH Adaptor
Power Cord
Two (2) x Banana Connectors with
XT60 Connector Charging Cable
Two (2) x 2 Pin T-Type Charging Cables
Two (2) x Bare Charge Cables
Alligator Clip Charge Cable
4
4
6
6
7
7

10
Features
Twin-channel Charger
X2 AC Plus Black Edition allows you to plug 2
batteries into one charger simultaneously, and
it will intelligently and automatically charge 2
batteries at once to their maximum capacity. To top
of it, the batteries being charged do not even need
to have the same conguration. You can connect
dierent chemistry (LiPo/LiFe/Lilon/LiHV/NiMH/
NiCd/Pb) batteries into any of the charging ports.
Dual Input and Power Distribution:
The X2 AC Plus Black Edition has a dual AC/DC input comprised of AC 100-240V
and DC 11-18V. In DC mode, the power of each channel is 100W with an overall
power of 200W. Power distribution is supported in AC mode. For example, if
Channel A is 70W and Channel B is 30W, total power is 100W.
Optimized Operating Software:
The X2 AC Plus Black Edition features an AUTO function that sets the feeding
current during charging or discharging. For lithium batteries especially,
this function helps prevent overcharging and its consequences. It can also
disconnect the circuit automatically and sound an alarm if an abnormal
reaction has been detected. Each programming feature of your X2 AC Plus Black
Edition is controlled by two way linkage and communication and is completely
customizable to the user’s preferences.
Battery Memory (Data Store/Load):
The charger can store up to 10 unique charge/discharge proles for each
channel and lets you recall the data from each program setting at any time.
PC Control Software“Charge Master”:
Equipped with free“Charge Master” software, the X2 AC Plus Black Edition gives
you unparalleled ability to operate the charger via your personal computer. You
can monitor pack voltage, cell voltage, and other data during battery charging
or view the charge data in real-time graphs. The “Charge Master”gives you the
option to initiate and update rmware as well.
With the“Charger Master” software and a single computer connection, you are
able to operate and update two channels at the same time.
LiPo
NiMH

11
Smartphone Control via Bluetooth w/Scan to Go (iOS and Android):
The X2 AC Plus Black Edition uses its built-in Bluetooth and the Hitec LinkPower X
App to allow the user to control the charger via their iOS or Android Smartphone.
This App also oers a unique SCAN TO GO automatic charging system. Users
with many dierent types of batteries will nd this feature very useful. The
revolutionary SCAN TO GO provides a solution to this problem by allowing the
user to assign a QR code which contains all the relevant data for the battery
for charging or discharging. The user can create and print a unique QR code by
using the Hitec LinkPower X App. Attach the QR code to your battery, then using
your Smartphone, launch the Hitec LinkPower X App. All the essential setup
information is stored in the QR code. All you need to do is press the Scan button
and the charge or discharge process will start automatically.
DC Power Output Port:
The X2 AC Plus Black Edition has a DC output port capable of delivering up to 100
watts @ 13.6 volts DC. This eliminates the need to bring a separate power supply
to the racing track or ying led.
Internal Independent Lithium Battery Balancer:
Hitec’s X2 AC Plus Black Edition employs an individual cell-voltage balancer. It is not
necessary to connect an external balancer for balance charging and discharging.
Terminal Voltage Control (TVC):
For experienced users, the charger’s end voltage can be reset.
Voice Guide:
This feature makes the charger more intuitive and user friendly.
Fast Charge and Storage Mode of Lithium Batteries:
The function of these two modes diers from one another. “FAST CHG”minimizes
the battery charge time, while “STORAGE”has the capacity to control the nal
battery voltage, which is necessary and helpful for a rarely used battery.
Re-Peak Mode of NiMH/NiCd Battery:
In re-peak charge mode, the charger can peak charge the battery once, twice,
or three times in a row automatically. This function is useful for ensuring a full
battery charge.
Features [cont.]

12
Delta-Peak Sensitivity for NiMH/NiCd:
This automatic charge termination program is based on the principle of the Delta-
peak voltage detection. When the battery’s voltage exceeds the threshold, the
process will be terminated automatically.
Cyclic Charging/Discharging:
1 to 5 cyclic and continuous charge > discharge or discharge > charge sessions
are optimal for battery performance and balancing.
Automatic Charging Current Limit:
You can set the upper limit of the charging current when charging your NiMH
or NiCd battery. The ‘AUTO’ charging mode, however, is recommended when
charging NiMH batteries with low impedance and capacity.
Battery Voltage Meter:
The user can check the battery’s total voltage, the highest voltage, the lowest
voltage and the voltage of each cell.
Battery Internal Resistance Meter:
The user can check the battery’s total internal resistance and the internal
resistance of each cell.
Capacity Limit:
The charging capacity is always calculated as the charging current multiplied by
time. If the charging capacity exceeds the limit, the process will automatically
terminate according to the maximum value previously set.
Temperature Threshold*:
The battery’s internal chemical reaction will cause the temperature of the battery
to rise. If the temperature limit is reached, the process will be terminated.
* This function is available by connecting an optional temperature probe which is
available as a separate purchase.
Processing Time Limit:
Protect your battery by setting a maximum time limit for charging and discharging.
USB Power 5V/2.1A
You can charge your phone and
tablet using the built-in USB
power output port.
Features [cont.]

13
BATTERY
DC 11-18V BALANCE
SOCKET
X1 CHARGER
Battery & Power Supply Connections
TO AVOID SHORT CIRCUITS, ALWAYS CONNECT THE CHARGE LEADS
TO THE CHARGER FIRST, AND THEN TO THE BATTERY. REVERSE THE
SEQUENCE WHEN DISCONNECTING THE PACK.
Warning
Battery Connection with Balance Adaptor.
Battery Connection without Balance Adaptor.
2S 3S 4S 5S
6S
1
2
3
4
5
6
BATTERY
DC 11-18V BALANCE
SOCKET
BALANCE ADAPTOR
X1 CHARGER
BALANCE
LEAD
Channel A Channel BChannel A Channel B
XT60
12VDC Battery / DC Power
Supply Connection.
14
Operation
Here is the detailed procedure to operate the X2 AC Plus Black Edition. All screens
and operations will take LiPo BALANCE CHARGE program for example,
Connection
Connecting to power source
There are two kinds of inputs for X2 AC Plus Black Edition, DC 11-18V and AC 100-240V.
A. Operating in AC mode
X2 AC Plus Black Edition comes with built-in switching power supply. You can
connect the AC power cord directly to the main AC socket. (100-240V AC).
Note: The output power in AC mode is 100W totally for Channel A, Channel B
and Power supply.
In AC mode, it supports Power Distribution. The total power for Channel A,
Channel B and power supply is 100W. You could set the Max Power for one output
port (Take Channel A for example) as following,
Then, the channel B and DC power supply will take the rest power automatically
(For example, if you set DC power supply as 20W and Channel A as 50W, the
Channel B will take the rest power of 30W. If Channel A / Channel B and DC power
supply are both working, you can’t change the power for them. If DC power
supply is working, you can change the power of Channel A and Channel B. Thus,
the DC power supply will take the rest power automatically.
B. Operating in DC mode
Please connect X2 AC Plus Black Edition with AC / DC power supply by
supplied DC input cable. You can also use terminal clips with DC connectors to
attach directly to 12V car batteries. It is critically important that you use either
a fully charged 13.8V car battery or a high-quality AC / DC power supply in
the range of 11-18V DC output with a minimum power of 300W or higher to
insure reliable performance.
Note: We will explain the operating procedure of one channel as the
procedure for channel A and B is identical.
A
B
DC SUPPLY : 20W
CHA:50 W CHB:30W
DC SUPPLY : 20W
CHA:50 W CHB:30W
15
Operation [cont.]
Connecting the battery
IMPORTANT: Before connecting a battery it is absolutely essential to check one
last time that you have set the parameters correctly. If the settings are incorrect,
the battery may be damaged and could potentially burst into ames or explode.
To avoid short circuits between the banana plugs, always connect the charge
leads to the charger rst and then to the battery. Reverse the sequence when
disconnecting the pack.
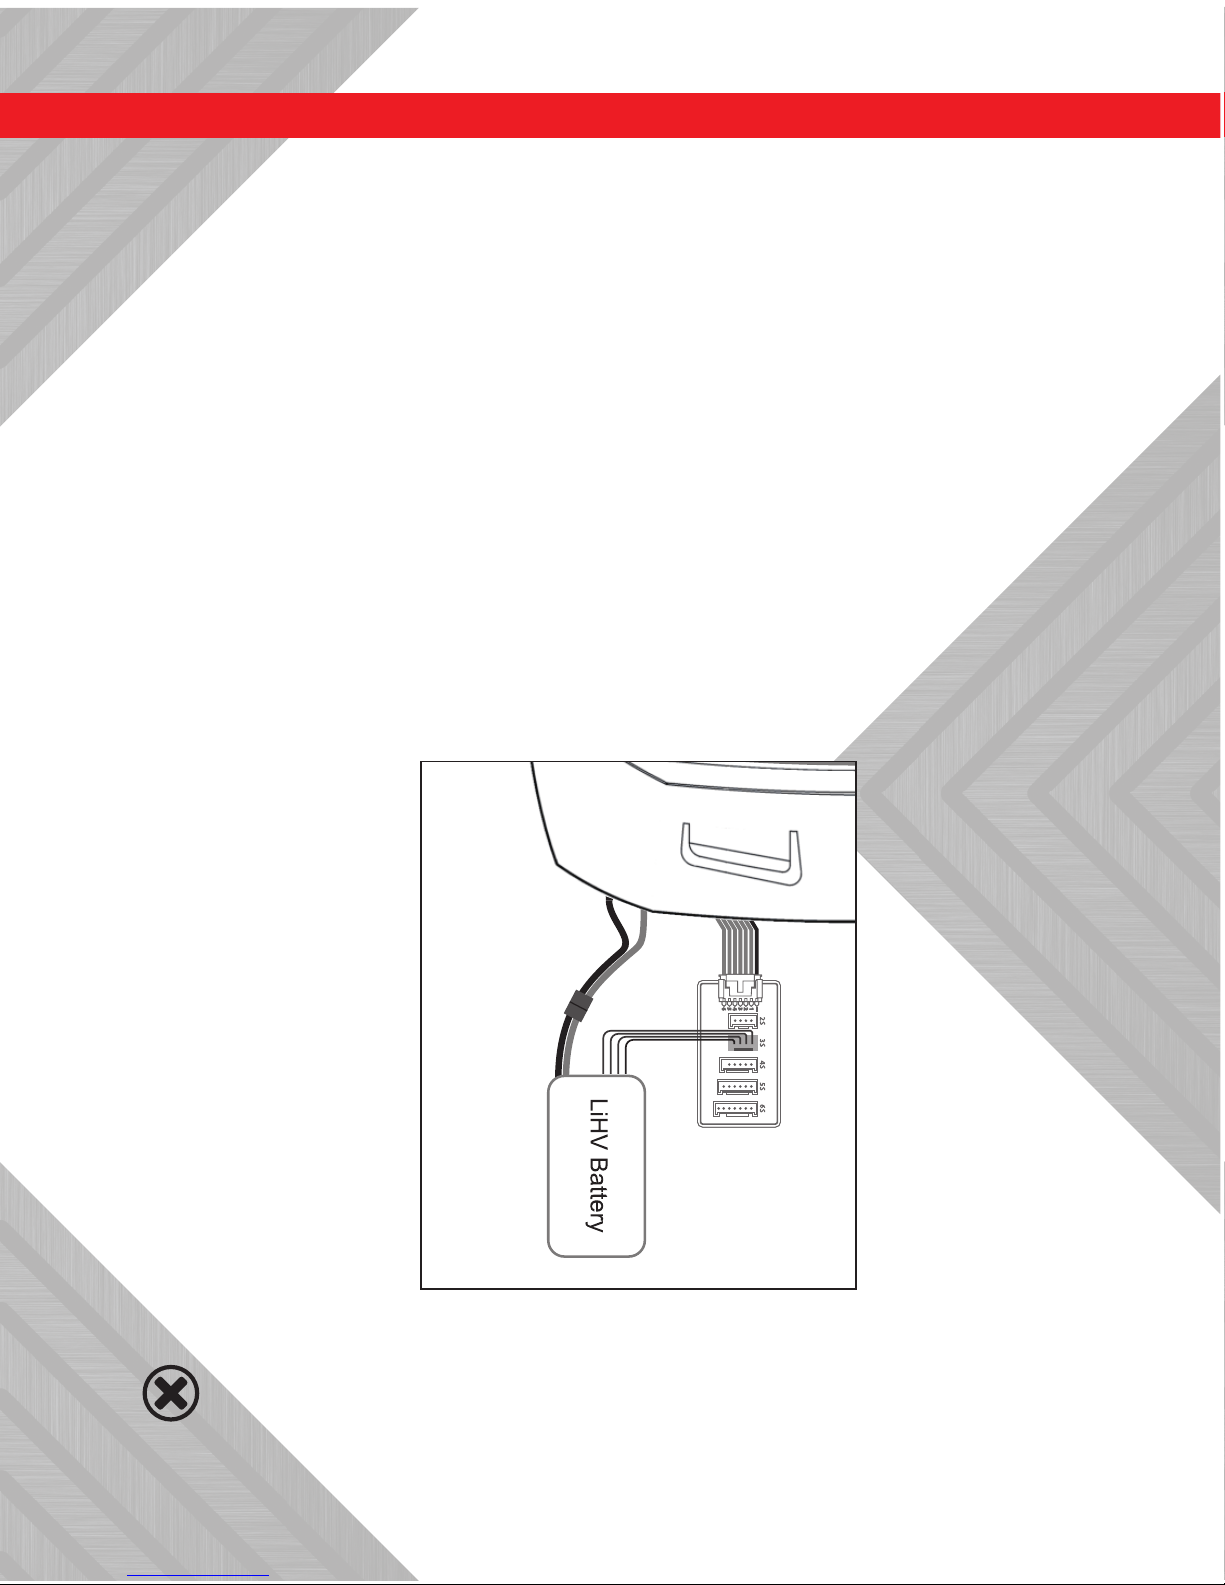
Balance Socket
The balance wire attached to the battery must be connected to the charger
with the black wire aligned with the negative marking. Take care to maintain
correct polarity!
(See the wiring diagram below.)
This diagram shows the correct way to connect your battery to the X2 AC Plus
Black Edition while charging.
TO AVOID SHORT CIRCUIT BETWEEN THE CHARGE LEAD ALWAYS
CONNECT THE CHARGE CABLE TO THE CHARGER FIRST, THEN
CONNECT THE BATTERY. REVERSE THE SEQUENCE WHEN
DISCONNECTING.
Warning

16
CH A / CH B:
Switch from Channel A to B or from Channel B to A.
BATT PROG / STOP Button:
Stop a function in- progress or to go back to previous step/screen.
DEC Button:
Scroll through menus or decrease the parameter value.
INC Button:
Scroll through the menus or increase the parameter value.
ENTER / START Button:
Enter parameters or store parameters on-screen.
When changing a parameter value in the program, press the START/ENTER
button to make it blink, then change the value by pressing the DEC and INC
button. The value will be stored by repressing the START/ENTER button. If there
is a second parameter to edit on the same screen, it will begin blinking after you
conrm the rst parameter value.
When you power the charger on, it will automatically enter the LiPo Battery
balance program screen. You can change the mode (balance mode, normal
charge mode, fast charge mode, store mode, or discharge mode), enter the
desired charging/discharging mode, or set the preferred parameter to begin. If
there are no changes to make in the LiPo Battery program, press the BATT PROG/
STOP button to enter the BATT PROGRAM screen.
Operation [cont.]
Resume or Start
Charge Processes
Conrm Any Action
Alter Values, See the Status
of Individual Cells in Balance
Charge Mode
Scroll Through the Main Menu ,
Stop Any Charge Processes
Switch from Channel A
to B or Channel B to A

17
The ow chart depicts one channel as the example for both channels.
Channel A and Channel B are identical.
Program Flow Chart
For larger version visit www.hitecrcd.com
Note
BATT/PROGRAM
Pb BATT
ENTER
START
Pb CHARGE
2.0A 2.0V (1P)
DEC
INC
Pb DISCHARGE
0.1A 2.0V (1P)
BATT/PROGRAM
NiCd BATT
NiCd CHARGE
CURRENT 2.0A
ENTER
START
DEC
INC
NiCd DISCHARGE
0.1A CUT: 1.0V
DEC
INC
NiCd CYCLE
CHG>DCHG 1
BATT/PROGRAM
NiMH BATT
ENTER
START
NiMH CHARGE
CURRENT 2.0A
DEC
INC
NiMH DISCHARGE
0.1A CUT: 1.0V
NiMH CYCLE
CHG>DCHG 1
DEC
INC
BATT/PROGRAM
LiPo BATT
LiPo BALANCE
2.0A 7.4V (2S)
LiPo CHARGE
2.0A 7.4V (2S)
LiPo FAST CHG
2.0A 7.4V (2S)
LiPo STORAGE
2.0A 7.4V (2S)
LiPo DISCHARGE
2.0A 7.4V (2S)
ENTER
START
DEC
INC
DEC
INC
DEC
INC
DEC
INC
DECINC
DECINC
BATT/PROGRAM
LiFe BATT
Lilo BALANCE
2.0A 7.2V (2S)
Lilo CHARGE
2.0A 7.2V (2S)
Lilo FAST CHG
2.0A 7.2V (2S)
Lilo STORAGE
2.0A 7.2V (2S)
Lilo DISCHARGE
2.0A 7.2V (2S)
ENTER
START
DEC
INC
DEC
INC
DEC
INC
DEC
INC
BATT/PROGRAM
LiIo BATT
LiFe BALANCE
2.0A 6.6V (2S)
LiFe CHARGE
2.0A 6.6V (2S)
LiFe FAST CHG
2.0A 6.6V (2S)
LiFe STORAGE
2.0A 6.6V (2S)
LiFe DISCHARGE
2.0A 6.6V (2S)
ENTER
START
DEC
INC
DEC
INC
DEC
INC
DEC
INC
DECINC
BATT/PROGRAM
BATT METER
4.20 4.19 4.19 V
0.00 0.00 0.00 V
MAIN 0.00V
H0.000V L0.000V
DEC
INC
DECINC
DECINC
DEC
INC
NiCd RE-PEAK
1
DEC
INC
NiMH RE-PEAK
1
DEC
INC
NiMH Auto CHARGE
CURRENT 2.0A
DEC
INC
NiCd Auto CHARGE
CURRENT 2.0A
DECINC
DECINC
DECINC
LiHV BALANCE
2.0A 7.6V (2S)
LiHV CHARGE
2.0A 7.6V (2S)
LiHV FAST CHG
2.0A 7.6V (2S)
LiHV STORAGE
2.0A 7.6V (2S)
LiHV DISCHARGE
2.0A 7.6V (2S)
BATT/PROGRAM
LiHV BATT
ENTER
START
DEC
INC
DEC
INC
DEC
INC
DEC
INC
DECINC
BATT/PROGRAM
BATT MEMORY
ENTER
START
[ BATT MEMORY 1 ]
ENTER SET->
ENTER
START
BATT TYPE
LiPo
DEC
INC
BATT VOLTAGE
7.4V ( 2S )
DEC
INC
CHARGE CURRENT
4.9A
DEC
INC
DISCHG CURRENT
2.2A
DISCHG VOLTAGE
3.0V/CELL
TVC=YOUR RISK !
4.20V
DEC
INC
ENTER
START
ENTER
START
BATT/PROGRAM
SYSTEM SETTING->
ENTER
START
Stop
Batt Type
DECINC
SAVE PROGRAM
ENTER
SAVE PROGRAM
SAVE….
[ BATT MEMORY 1 ]
LiPo 7.4V (2S )
[ BATT MEMORY 1 ]
C:4.9A D:2.2A
ENTER CHARGER
LOAD……
LiPo BALANCE CHG
4.9A 7.4V(2S)
LiPo CHARGE
4.9A 7.4V(2S)
DEC
INC
LiPo FAST CHARGE
4.9A 7.4V(2S)
DEC
INC
LiPo STORAGE
4.9A 7.4V(2S)
LiPo DISCHARGE
2.2A 7.4V(2S)
DEC
INC
DEC
INC
BATT TYPE
MiMH
DEC
INC
BATT VOLTS
2.4V (2S)
ENTER
START
CHARGE CURRENT
3.3A
DEC
INC
DEC
INC
TRICKLE
100mA
DEC
INC
PEAK DELAY
1Min
DECINC
DSCH CURRENT
2.2A
DEC
INC
DSCH VOLTAGE
1.1V/CELL
SAVE PROGRAM
ENTER
ENTER
START
BATT TYPE
Pb
BATT VOLTS
4.0V (2P)
DEC
INC
CHARGE CURRENT
3.3A
DEC
INC
DSCH CURRENT
1.5A
DEC
INC
DSCH VOLTAGE
1.7V/CELL
DEC
INC
SAVE PROGRAM
ENTER
DECINC
DEC
INC
DEC
INC
DECINC
BATT/PROGRAM
BATT RESISTANCE
DECINC
ENTER
START
005 003 003 m¡
005m¡
DEC
INC
TATAL16m¡
H5m¡L3m¡
ENTER
START
STARG/ENTER>3 Seconds
SAVE PROGRAM
SAVE….
ENTER
START
[ BATT MEMORY 2 ]
NiMH 2.4V (2S )
[ BATT MEMORY 2 ]
C:1.0A D:1.0A
STARG/ENTER>3s
ENTER CHARGER
LOAD……
NiMH CHARGE
CURRENT 1.0A
NiMH Auto CHARGE
CURRENT 1.2A
DEC
INC
DEC
INC
DEC
INC
DEC
INC
NiMH DISCHARGE
1.0A CUT: 2.0V
NiMH RE-PEAK
2
NiMH CYCLE
DCHG>CHG 1
[ BATT MEMORY 2 ]
ENTER SET->
[ BATT MEMORY 3 ]
ENTER SET->
SAVE PROGRAM
SAVE….
ENTER
START
[ BATT MEMORY 3 ]
Pb 4.0V (2S )
[ BATT MEMORY 3 ]
C:3.3A D:1.5A
ENTER CHARGER
LOAD……
Pb CHARGE
3.3A 4.0V(2P)
Pb DISCHARGE
1.5A 4.0V(2P)
DECINC
Version
HW:1.00 FW: 2.00
Load Factory Set
Enter
DEC
INC
DEC
INC
Rest Time
CHG>DCHG 10Min
DEC
INC
Safety Timer
ON 120Min
DEC
INC
Capacity Cut-Off
ON 5000mAH
DEC
INC
DEC
INC
Temp Cut-Off
ON 50°C 122°F
Temperature Unit
Celsius
NiCd
Sensitivity
D.Peak
4mV
Key Beep ON
Voice ON
DEC
INC
DC Input Low
CUT-OFF 11.0V
DEC
INC
ENTER
START
START ENTER > 3s
NiMH Sensitivity
D.Peak 4mV
DEC
INC
DEC
INC
DC SUPPLY: OFF
CH1: 50 CH2:50W

18
Charger Operation
Note: You should set up the upper limit of the charge current to
avoid damage by excessive feeding current. Some batteries of low
resistance and capacity can lead to higher current.
lithium battery which
NiMH
NiCd
RE-PEAK
CYCLE
Pb
Batt
Type
Operation
Program Description
This charging mode is for charging LiPo/LiFe/LiIon/LiHV battery in normal mode.
This program is for charging or discharging
will not be used for long time.
The charging capacity may be less than normal charging but the
process time will be reduced.
This mode is for balancing the voltage of lithium-polymer battery
cells while charging.
The charger will charge NiMH and NiCd batteries using the
charge current set by the user.
In this program the charger detects the condition of the battery
which is connected to the output and automatically charges the
battery.
In re-peak charge mode, the charger can peak charge the
battery once, twice or three times in a row automatically. This is
good for confirming the battery is fully charged, and for checking
how well the battery receives fast charges.
1 to 5 cyclic and continuous process of charge>discharge or
discharge>charge is operable for battery refreshing and
balancing to stimulate the battery's activity.
LiPo
Lilon
LiFe
LiHV
CHARGE
DISCHARGE
STORAGE
FAST CHG
BAL CHARGE
CHARGE
AUTO CHG
DISCHARGE
CHARGE
DISCHARGE
This mode is for discharging LiPo/LiFe/LiIon/LiHV battery.
This mode is for discharging NiMH/NiCd battery.
This mode is for charging Pb battery.
This mode is for discharging Pb battery.
The following section contains detailed procedures that must be followed to
make the charger work. When you power the charger on, it will automatically
enter the LiPo Battery balance program screen. Use the CHA/CHB button to
toggle between channels A and B and the BATT PROG/STOP button to enter the
BATT PROGRAM screen. Once in the Battery Programming section use the < or
> to select the desire battery or function then press ENTER/Start to make your
parameter adjustments. The X2 AC Plus Black Edition is capable of the following
processes based on the type of battery chosen.

19
Lithium Battery Program [LiPo/LiHV/LiFe/Lilon]
Lithium:
This program is only suitable for charging/discharging Lithium chemistry
batteries (LiPo, LiHV, LiIon and LiFe).
The X2 AC Plus Black Edition oers the following lithium charge modes: Charge,
Balance Charge, Fast Charge, Storage and Discharge.
BEFORE SELECTING A CHARGE MODE, IT IS CRITICAL THAT YOU SELECTTHE
CORRECT TYPE OF LITHIUM BATTERYTO BE CHARGED. FAILURETO DO SO
CAN RESULT IN DAMAGE TOTHE BATTERY AND POSSIBLE EXPLOSION.
Selecting a Lithium Battery Type:
From the “BATT/PROGRAM” screen, press the INC. – or
DEC + button to scroll through the battery type selections.
Once you have selected the correct battery type, press the ENTER/Start ►
button to enter the charge/discharge menu.
Lithium Charge Mode:
BEFORE YOU BEGIN CHARGING YOUR BATTERY, MAKE SURE YOU
HAVE READ AND UNDERSTAND ALL OF THE WARNINGS AND SAFETY
INFORMATION CONTAINED ON PAGES 0207.
IN THE CHARGE MODE, LITHIUM BATTERIES CAN BE CHARGED WITHOUT
THE USE OF A BALANCE ADAPTOR. A BALANCE ADAPTOR CAN BE USED,
BUT IT IS NOT REQUIRED. BALANCE CHARGE MODE IS RECOMMENDED
FOR ANY BATTERY WITH A BALANCE LEAD.
See page 12 for the Appropriate charging connections setup for this operation.
First, select the correct battery type by following the instructions page 16.
Once you have set the correct battery type, press the ►button once to enter
the charge mode and battery settings screen, use the INC. – or DEC + to select
“CHARGE” mode. Press the ►button again and the amp rate value will begin
ashing. Use the + or ▬buttons to adjust the value to the desired rate. Follow
the instructions provided with your battery when setting the charge amperage
rate.
Press the ►button again and the voltage value will begin
ashing. Use the +or ▬buttons to adjust the value to the
desired rate. The voltage and cell count should match the values listed on the
battery label.
Warning
BATT/PROGRAM
LiPo BATT
Note
Warning
LiPo Charge
2.7A 11.1V (3S)
20
Lithium Battery Program [LiPo/LiHV/LiFe/Lilon cont.]
You are now ready to begin charging. Press and hold the
ENTER/Start ►button until you see“BATTERY CHECK.”
followed by the “CONFIRM (ENTER) / CANCEL (STOP)“
screen. This screen displays the number of cells you set up
as ”R” and the number of cells detected by the processor as“S”. If both numbers
are identical, you may press and hold the ENTER/Start ►button to conrm and
begin charging. If these numbers do not match, press the BATT/PROG Stop ■
button to return to the previous screen and carefully check the number of cells
of the battery pack before proceeding.
DURING CHARGING/DISCHARGING, THE BATTERY SHOULD BE PLACED
INSIDE A FIRE PROOF/RETARDANT BAG AND ON A FIRE PROOF SURFACE
AWAY FROM OTHER COMBUSTIBLE OBJECTS.
Once charging has commenced, the charger will display
the following real-time information: battery type/cell
count, charging current, battery voltage, charging time and charged capacity.
If you are using a balance adaptor during charging,
you may press the + button to view the voltage of each
individual cell. You can also view a variety of other information as detailed on
page 13.
Once the battery is fully charged the screen will read “FINISHED” and the charger
will emit a chiming sound. Press the ■button to stop charging. You may also
press the ■button at any time during the charging process to stop charging.
Lithium Balance Charge Mode:
This function is for balancing the voltage of individual Lithium-polymer battery
cells while charging. In order to use the Balance Mode, the battery must have a
balance lead. Charging in this mode is dierent from the normal modes because
the built-in processor monitors the voltage of each individual cell and controls
the discharge of each individual cell in order to equalize the voltage. Use of
a balance adaptor with any battery that has a balance lead will improve the
performance and lifespan of your battery.
BEFORE YOU BEGIN CHARGING YOUR BATTERY, MAKE SURE YOU
HAVE READ AND UNDERSTAND ALL OF THE WARNINGS AND SAFETY
INFORMATION CONTAINED ON PAGES 0207.
Warning
R:3SE R S:3SER
CANCEL(STOP)
R:3SE R S:3SER
CONFIRM(ENTER)
Caution
LP3s 2.7A 11.88V
CHG 005:39 00256
4.07 4.06 4.11V
0.00 0.00 0.00V
Other manuals for X2 AC Plus Black Edition
1
Table of contents
Other Hi-Tec Power Supply manuals


Popular Power Supply manuals by other brands

Delta Electronics
Delta Electronics PMC-12V150W1BA instruction manual

Pulsar
Pulsar PSBEN 3024C/LCD manual

Block
Block POWER VISION PVSL 400 Series manual

Rockwell Automation
Rockwell Automation Allen-Bradley 1606-XLE260F Original instructions

Altronix
Altronix eFLOW EF102NBV-32715 installation guide

urmet domus
urmet domus IPerVoice 1039 manual

Regulus
Regulus PG 600 SX Installation and operation manual

nextys
nextys NPSM85 Series instruction manual

Huawei
Huawei UPS2000-A-RTL Series user manual

Pulsar
Pulsar PSBEN 10A12E/LCD instruction manual

Tektronix
Tektronix TM 515 instruction manual

TSI Instruments
TSI Instruments DUSTTRAK 854030 installation manual


