manuals.online logo
Brands
  1. Home
  2. •
  3. Brands
  4. •
  5. HiB
  6. •
  7. Fan
  8. •
  9. HiB Hush Series User manual

HiB Hush Series User manual

FI #05 003 R160509 Ver No. 1.0 Jan 2016
Hush & Breeze Wall Mounted Fans
Thank you for purchasing this HiB product.
Please read through these instructions carefully and refer back to them during
installation to ensure that your product is fitted safely and that it retains its high
quality finish.
Please retain this leaflet for future reference.
Before drilling, ensure there are no hidden cables or pipes in the wall
Please see Fig. 1 on the back page for details
Suitable for installation in zones: 2 & Outside Zones
Breeze Chrome
Timer Art no.32800
Timer & Humidity Sensor Art no.32900
Breeze Matt Silver
Timer Art no.31300
Timer & Humidity Sensor Art no.31400
Breeze White
Timer Art no.31100
Timer & Humidity Sensor Art no.31200
Hush Chrome
Timer Art no.33100
Timer & Humidity Sensor Art no.33200
Hush Matt Silver
Timer Art no.31700
Timer & Humidity Sensor Art no.31800
Hush White
Timer Art no.31500
Timer & Humidity Sensor Art no.31600
2hib.co.uk 3
Electrical Connection
1
4
5
23
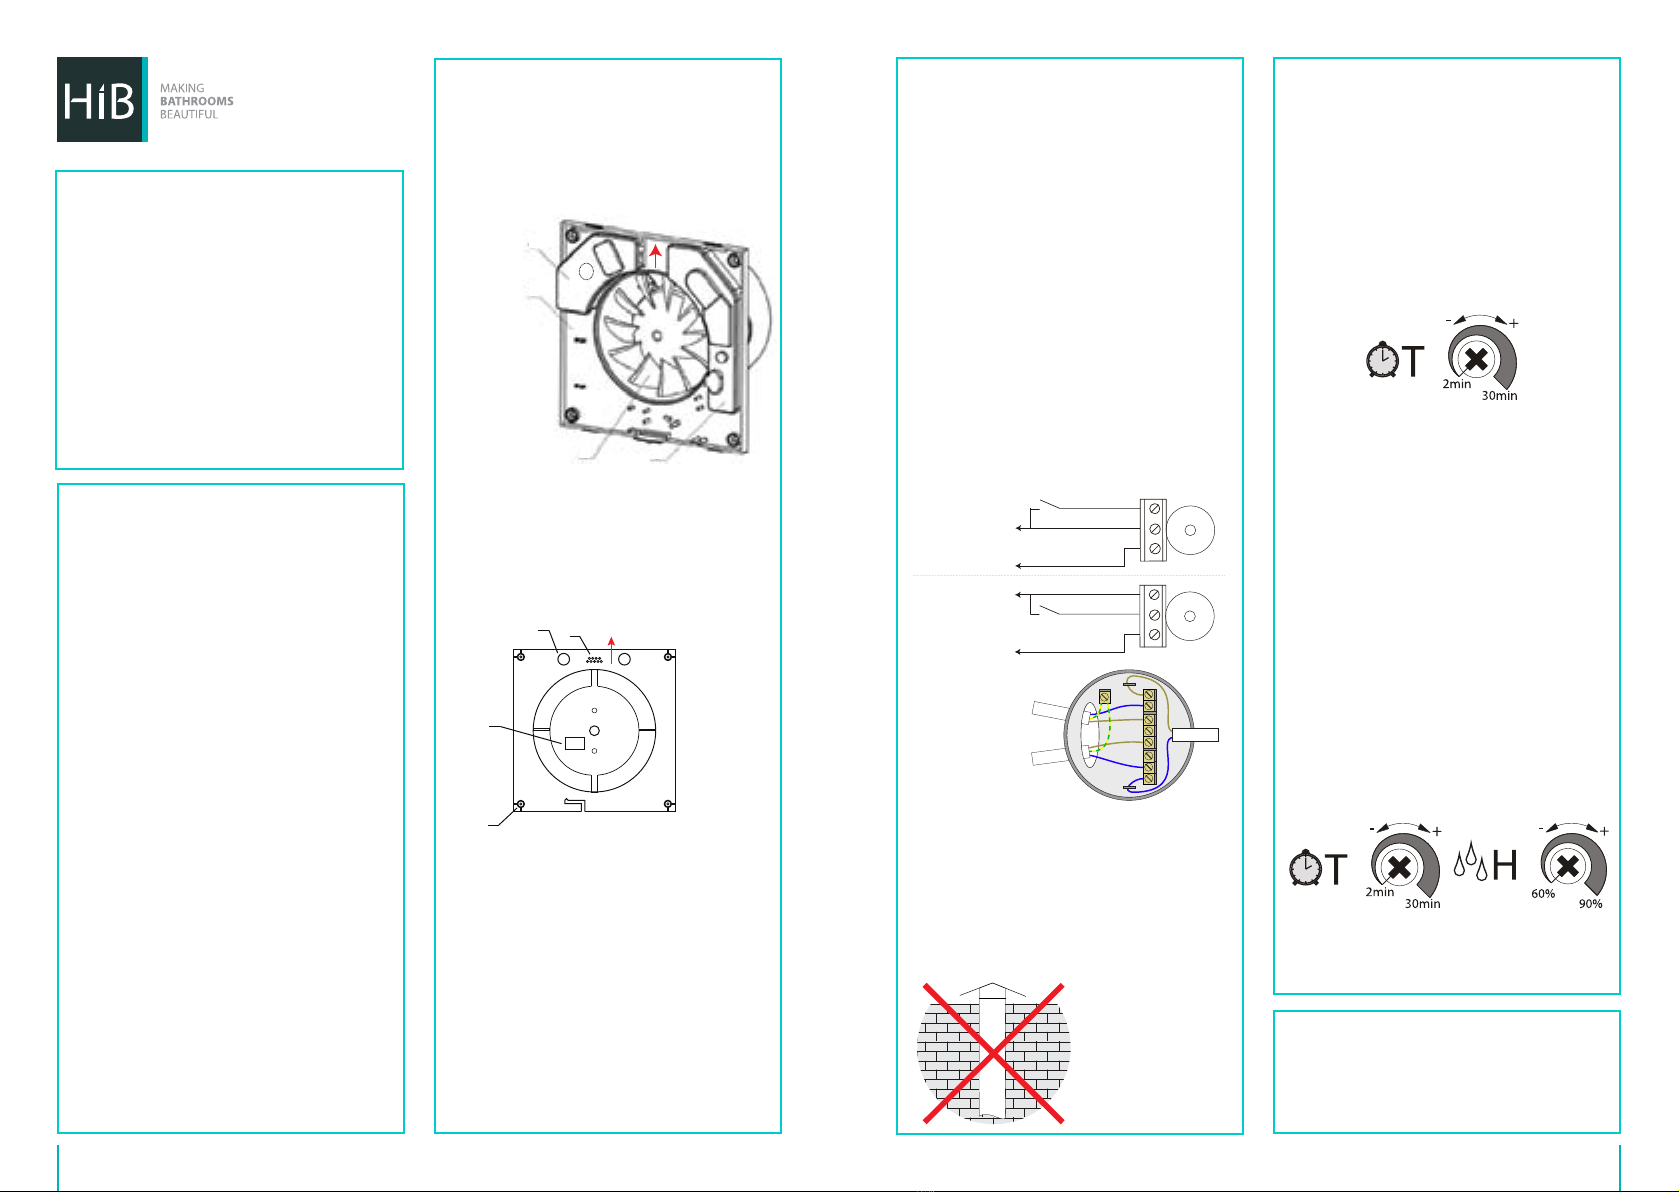
Please ensure that the fan unit is positioned in
accordance with the diagram below i.e. With
the electrical access point (5) top le.
Fitting
1) Choose a suitable position for your fan
according to Figure 1 on the back page. Use
a cable finder to check if there are any buried
cables or pipes in the wall or ceiling. Draw
around the outside of the fan with a pencil to
determine it’s exact position.
2) Make a suitable sized hole in the wall/
ceiling with the appriopiate tools.
N.B. If wall mounted ensure the hole is
angled slightly downward to stop any
moisture running back into the motor.
If mounted in the ceiling ensure the hole is
between the joists.
3) Fit flexible ducting into the hole, flush
with both sides of the wall. Ensure the
duct slopes slightly downwards towards
the outside. Make good any plasterwork
around the duct.
4) Position the fan back into place, and mark
the four fixing points. Drill the required
holes in the marked positions. If drilling
through tile, use a ceramic drill bit. Insert
wall plugs into the drilled holes.
5) Follow a similar procedure for the outside
wall grille.
6) If ceiling mounted the ducting should be
routed to the nearest soffit.
1) Ensure the domestic electrical mains supply
to which the fan is being connected is turned
off. This product is designed to be connected
to an on/off switch outside the bathroom, or
to a ceiling mounted pull cord switch.
2) Hush Only: Remove the front panel and
protective cover (4). Pass the power wire
through the hole in the rubber plug (beneath
protective cover) at the fan casing flange.
3) Breeze Only: Remove the protective grille.
Cut out blanking plug of electrical access
point (3) and lead the power supply cords
through the hole.
4) Make the electric connections according
to the relevant wiring diagram below. See
diagram of ceiling rose to ensure correct
feeds are used. Please note that the
fan may operate immediately when
connected, this is normal and due to a
residual charge left during testing.
Operating Instructions
1) For Art Nos. 33100/31700/31500/
32800/31300/31100
Fan with timer option switches on as control
voltage is supplied to LT terminal. Aer
voltage is off, the fan continues operating
within the set time period T, adjustable
between 2 and 30 min. The time is regulated
by turning the potentiometer T clockwise to
increase and anticlockwise to decrease the
run time.
2) For Art Nos. 33200/31800/31600/3290
0/31400/31200
Fan with timer and humidity sensor will
operate when a control voltage is applied
to the LT terminal OR when the humidity
exceeds that set on the potentiometer.
If this is set at its lowest (60%) the fan
will run most of the time. When set at the
highest setting (90%) the fan will only
operate at higher level humidity. Once
humidity has been reduced the fan will
run until the required setting on the timer
is reached. Time T and humidity H values
are regulated by turning the appropriate
potentiometers T and H clockwise to
incr ease and anticlockwise to decrease
the running-out time and humidity level
respectively. To set the maximum humidity
level set the potentiometer in H max (90%)
position.
1) Maintenance
Fan maintenance is to be performed only aer
the fan is disconnected from the mains power
supply. Maintenance means periodic clearing
of the surfaces from dust and dirt.
1
2
4
3
1 Holes for fan mounting (x4)
2 Terminal block
3 Electrical access points
4 Wire fixing rack
5) Fix the fan to the wall using 4 screws.
6) Replace the cover and protective grille.
Breeze
Hush
Hush
Breeze
Ceiling Rose
1 Casing
2 Fan propeller
3 Function module
4 Protective cover of terminal block
5 Electrical access point
Fascia removal
Hush - Depress plastic nodule on the side of the
fascia and gently prise away from the casing.
Breeze - In order to remove the fascia for
maintenance, please remove the small retaining
screw and gently prise the fascia away from the
casing.
N.B. Always use the plastic screwdriver provided
to adjust the settings to avoid damaging the
control unit.
Ceiling mounted...
For ceiling mounting follow procedure for wall
mounting making sure ducting isn’t mounted
vertically to the outside. This is to ensure
moisture doesn’t come back into the motor.
Do not
mount vertically
LT (Switch Live)
L
N
S
220 - 240 V
LT (Switch Live)
L
N
S
220 - 240 V
MAINS IN
SWITCH
EARTH
NEUTRAL LOOP LINE
LAMP/FAN
Technical Information -
Hush
Power input: 220-240 V, 50 Hz
Maximum ventilation volume: 97 m3/hr (±5%)
Power consumption: 7.5W
Dimensions: W158 x H158 x D107mm
Breeze
Power input: 220-240 V, 50 Hz
Maximum ventilation volume: 88 m3/hr (±5%)
Power consumption: 14W
Dimensions: W152 x H152 x D126mm
These products are suitable for installation in zones: 2 &Outside Zones
All installations must comply with guidelines which are based on a zonal concept. The diagram above
illustrates this concept and must be followed to ensure the safe installation of electrical appliances in
the bathroom. These regulations apply to domestic installations only. Installations must be made in
accordance with the current IEE wiring regulations and relevant building regulations. HiB recommends
that all electrical bathroom products should only be fitted by a suitably qualified, Part P registered
electrician.
©HiB Copyright: No part of this document may be reprinted or duplicated without HiB consent. All sizes and measurements are approximate, but we do try and
make sure they are as accurate as possible. In the interest of continuous product development, HiB reserves the right to alter specifications as necessary. E & OE.
T: +44 (0)20 8441 0352 F: +44 (0)20 8441 0219 E: sales@hib.co.uk hib.co.uk
Building 3, North London Business Park, Oakleigh Road South, New Southgate, London. N11 1GN
(Fig 1)
Electrical Safety Information
Ensure mains power supply is switched off before starting installation. Before
drilling, ensure there are no hidden cables or pipes in the wall.
Care Instructions
All surfaces should be cleaned with diluted detergent (i.e. washing up liquid) and a
so cloth. Do not use abrasives or solvents when cleaning this product.
Wipe off all water spillages as soon as possible using a so, damp cloth.
Aercare Service
In the unlikely event that this product should fail please contact HiB customer
services, details shown below.
WEEE compliance
Must not be mixed with general household waste

This manual suits for next models

19

Other HiB Fan manuals

HiB Cyclone 33300 User manual

HiB

HiB Cyclone 33300 User manual

HiB Turbo Manual

HiB

HiB Turbo Manual

HiB 31500 Manual

HiB

HiB 31500 Manual

HiB 33100 User manual

HiB

HiB 33100 User manual

HiB SELV Hush Chrome User manual

HiB

HiB SELV Hush Chrome User manual

HiB Air-Star Series User manual

HiB

HiB Air-Star Series User manual

HiB Hush 33100 User manual

HiB

HiB Hush 33100 User manual

HiB 31100 Manual

HiB

HiB 31100 Manual

HiB 33400 User manual

HiB

HiB 33400 User manual

HiB 33600 User manual

HiB

HiB 33600 User manual

HiB 32600 User manual

HiB

HiB 32600 User manual

HiB Air-Star Manual

HiB

HiB Air-Star Manual

HiB Turbo 33500 User manual

HiB

HiB Turbo 33500 User manual

Popular Fan manuals by other brands

Dyson AM01 operating manual

Dyson

Dyson AM01 operating manual

Commercial Electric BF24TFCE Use and care guide

Commercial Electric

Commercial Electric BF24TFCE Use and care guide

Dimplex DCPF40CH instruction manual

Dimplex

Dimplex DCPF40CH instruction manual

Craftmade Provision PRV52 installation guide

Craftmade

Craftmade Provision PRV52 installation guide

SODECA CJTHT-40-2/4T-1,5 user manual

SODECA

SODECA CJTHT-40-2/4T-1,5 user manual

REMKO RAV 35 operating instructions

REMKO

REMKO RAV 35 operating instructions

Vortice CA-V0 Instruction booklet

Vortice

Vortice CA-V0 Instruction booklet

Hammond SDVN4XN2 installation instructions

Hammond

Hammond SDVN4XN2 installation instructions

Ebmpapst R2E220-AA44-C5 operating instructions

Ebmpapst

Ebmpapst R2E220-AA44-C5 operating instructions

Ebmpapst G2E140-AE77-97 operating instructions

Ebmpapst

Ebmpapst G2E140-AE77-97 operating instructions

Ebmpapst G4E180-AB01-01 operating instructions

Ebmpapst

Ebmpapst G4E180-AB01-01 operating instructions

ProKlima TFN-111449.2 instruction manual

ProKlima

ProKlima TFN-111449.2 instruction manual

EWT OSCILLOR 40 CHROME user manual

EWT

EWT OSCILLOR 40 CHROME user manual

LTG VFC Instructions for installation, use and maintenance

LTG

LTG VFC Instructions for installation, use and maintenance

Americ Corporation VAF-1500 owner's manual

Americ Corporation

Americ Corporation VAF-1500 owner's manual

Ebmpapst W3GZ50-FB02-01 operating instructions

Ebmpapst

Ebmpapst W3GZ50-FB02-01 operating instructions

Air King AK150LS Series Specifications

Air King

Air King AK150LS Series Specifications

Canarm IDL series Operation instructions and parts manual

Canarm

Canarm IDL series Operation instructions and parts manual

manuals.online logo
manuals.online logoBrands
  • About & Mission
  • Contact us
  • Privacy Policy
  • Terms and Conditions

Copyright 2025 Manuals.Online. All Rights Reserved.