Hidrotermal Hidro-SS Series User manual

STEAM GENERATOR
Hidro-SS Series
USER MANUAL

BEFORE YOU BEGIN
CHECK ALL ELECTRICAL CONNECTIONS TO ALL COMPONENTS
WITHIN THE HEATER FOR TIGHTNESS. CONNECTIONS CAN
BECOME LOOSE DURING SHIPMENT AND HANDLING.
WARNING
Only qualified personnel should install and maintain this equipment.
Unauthorized alteration or improper maintenance of this unit may release the
manufacturer from any warranty claims. The installation must be in accordance
with the instructions in this manual and applicable local plumbing and electrical
codes.

1. Electrical shock hazard------there are no user serviceable parts in the generator. All installations
and relevant services shall be performed by qualified personnel to avoid electrical shock hazard,.
2. Steam bathing time should be less than half an hour. Bathing too long may cause heart beating
too fast, light heartache, feeling weak or dizzy. Should the bather stop bathing immediately as
soon as the above symptoms occur.
3. Steam bath may cause tension to the bather. Thus, one who is one of the followings should be
directed by physician:
A. Being pregnant E. After drinking
B. Having heart disease F. After taking medicine
C. Having high blood pressure G. Diabetes
D. Having circulation system disease H. Not feeling well
4. Children must be accompany of adult in taking sauna bath.
5. Risk of scald: Must not touch the steam head or trim during operation , Stay at least 30cm away
from the hot steam escaping head. It is recommended that one should not use the generator
continuously for a long time, because:
A. The building materials may get damaged under an overheated environment.
B. Overheating will present a scald hazard. Must be careful while entering the steam bathroom. If
the steam room is overheated, the bather shall get out of the room immediately.
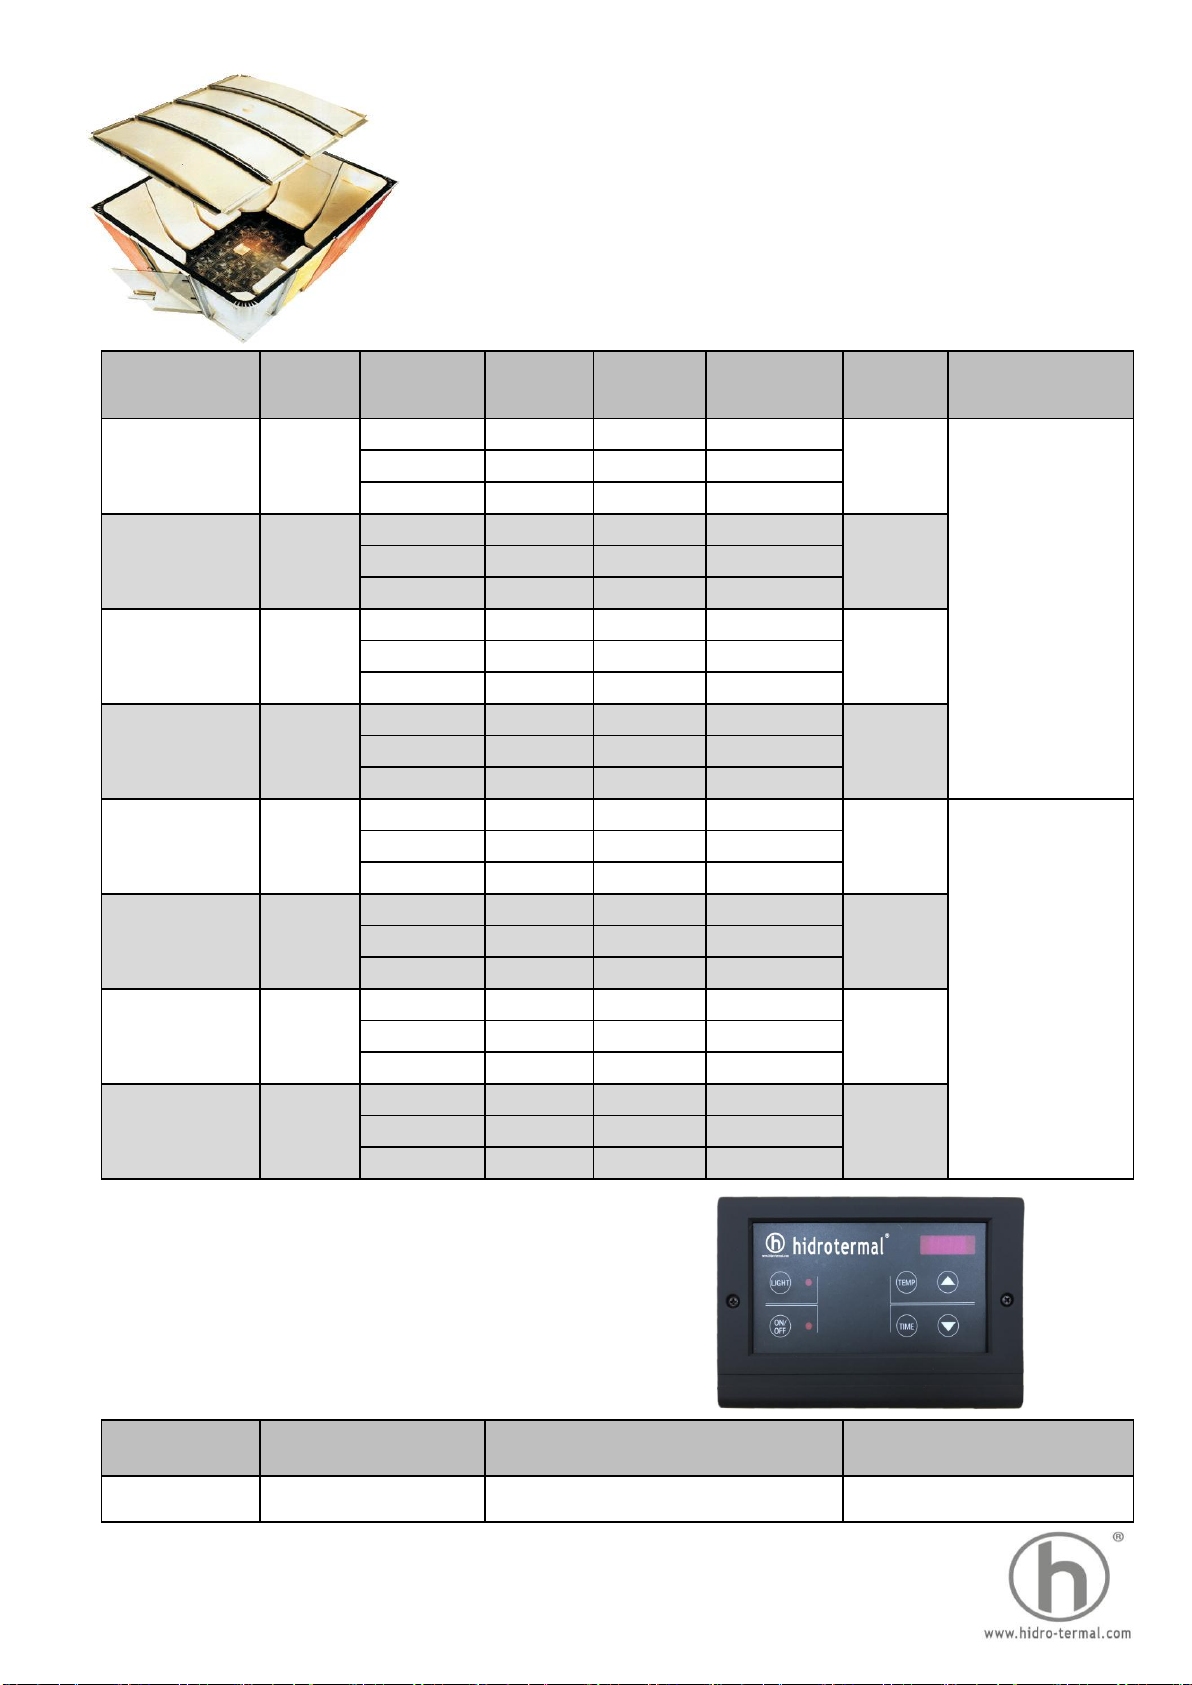
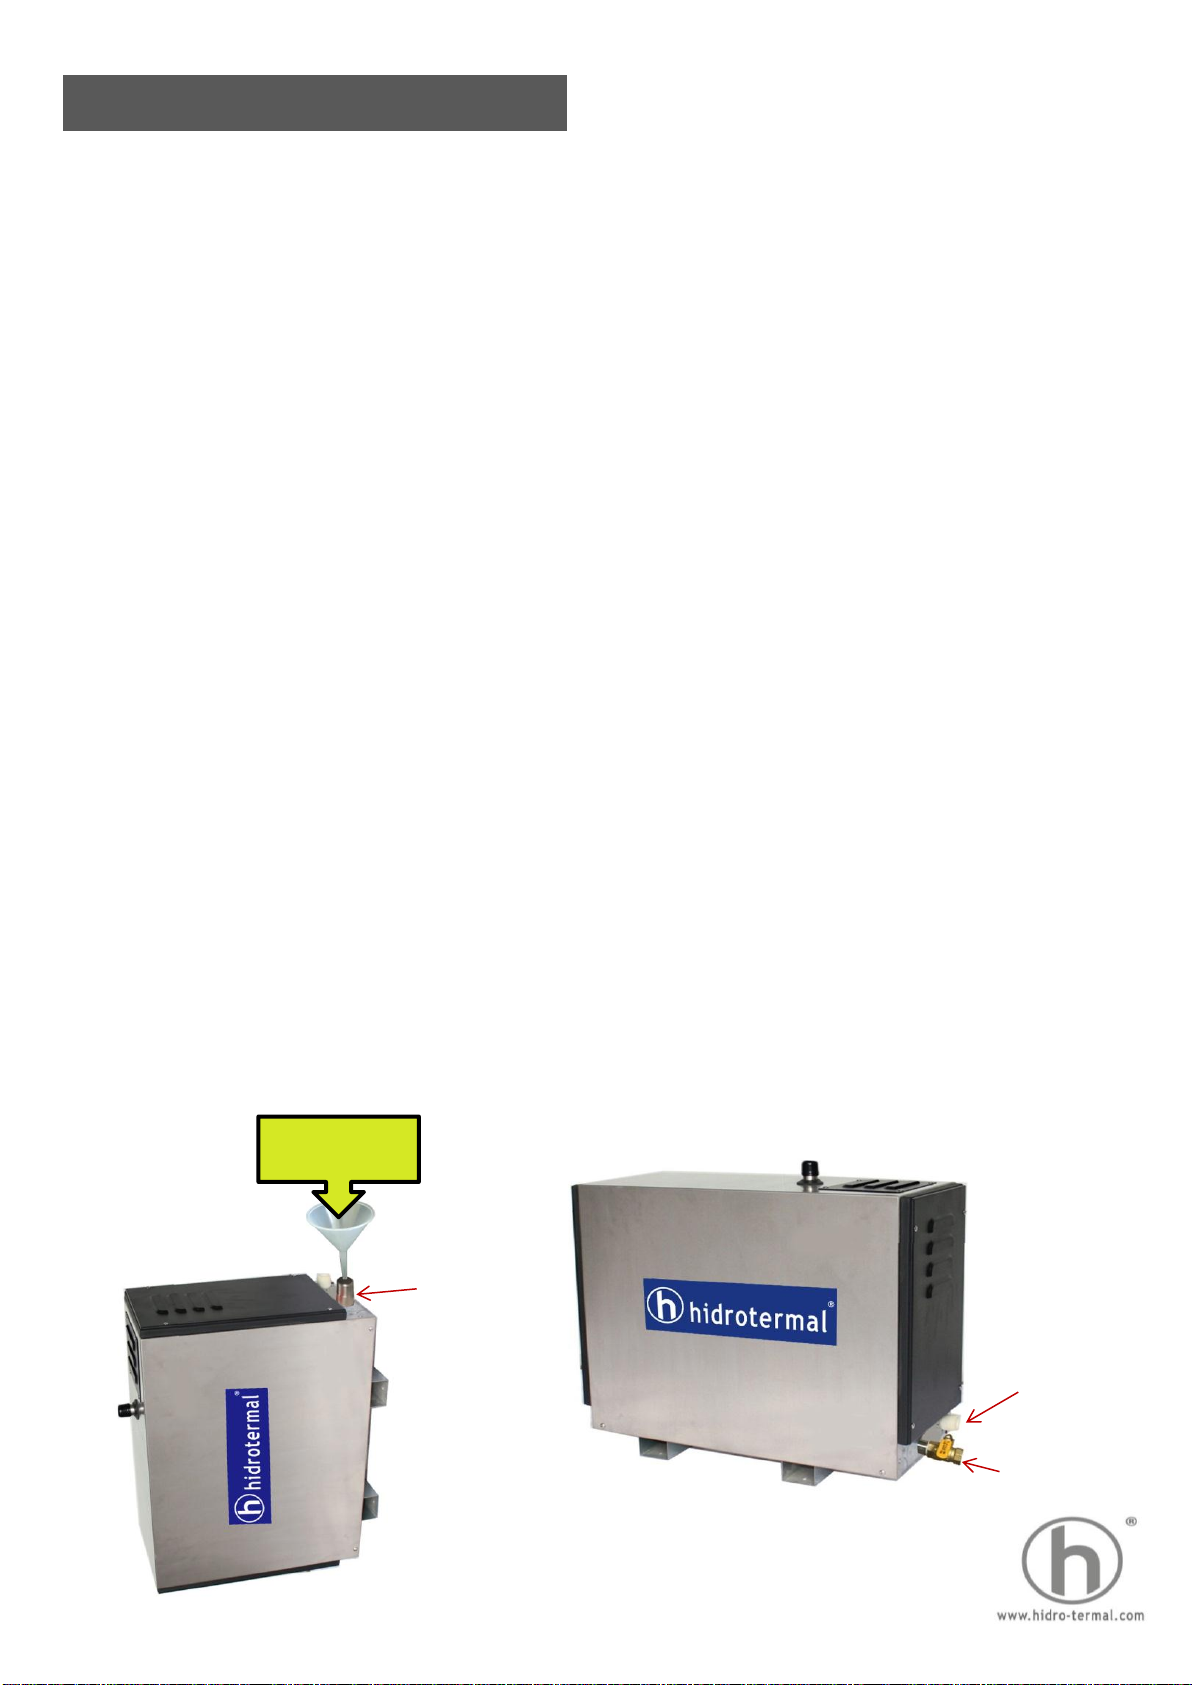
Thank you for selecting our stainless steel steam generator. It has rational structure, reliable
performance, steady effort, convenient installation, easy control, slinky exterior. There are
different specifications of generator for different size of pool, such as Hidro-SS45, Hidro-SS60,
Hidro-SS80, Hidro-SS90, Hidro-SS120, Hidro-SS150, Hidro-SS180.
Introduction
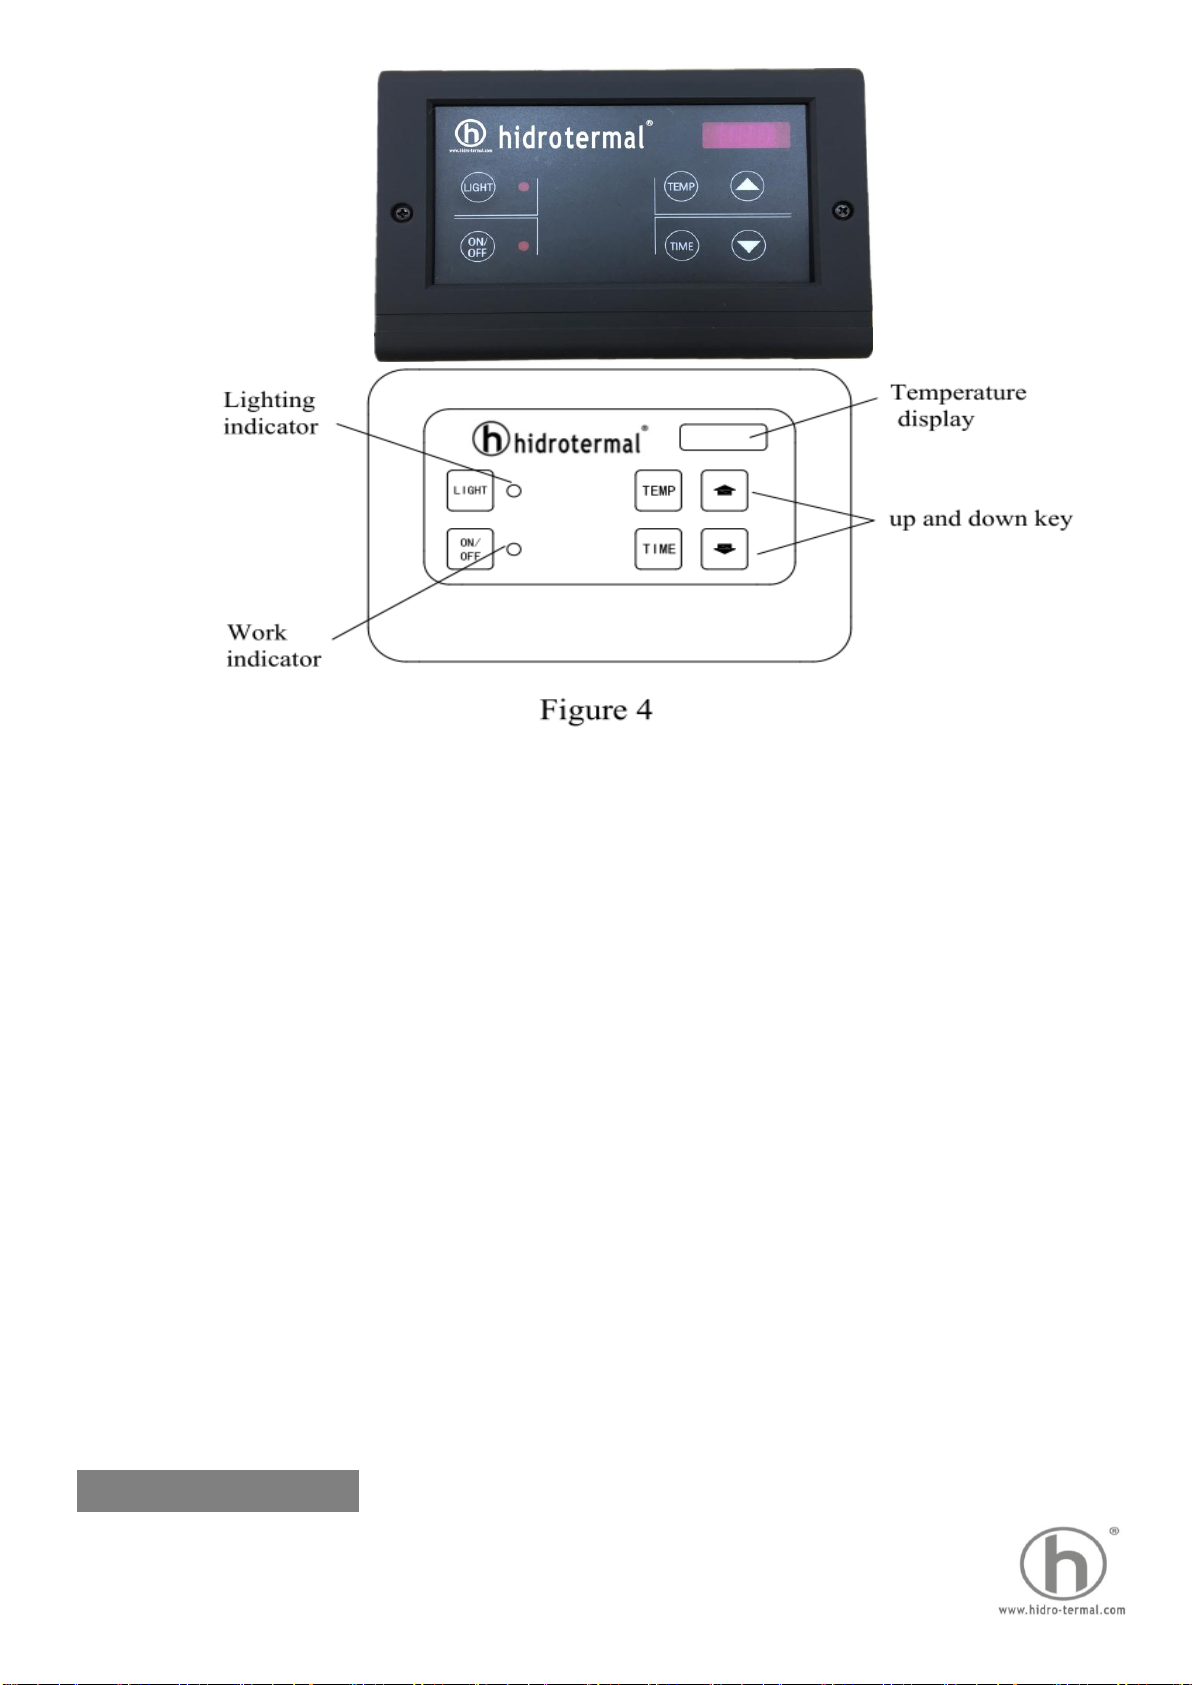
The controller -HD135T is combined with multiple functions. The heating elements are coated with
Teflon and heating in subsection, machine equipped with automatic draining, that can make the
machine more stable and improve durability.
Steam Bath Notification:

Steam Generator Specifications
Model Power
(kw) Voltage
(V) Phase Current
(A) Wire
(N×mm²) Room
(CBM) Dimensions
(mm)
220V 1 20.5 3*4
220V 3 11.8 4*2.5
380V 3 6.8 5*2.5
220V 1 27.3 3*6
220V 3 15.7 4*4
380V 3 9.1 5*2.5
220V 1 31.8 3*6
220V 3 18.4 4*6
380V 3 10.6 5*4
220V 1 36.4 3*6
220V 321 4*6
380V 3 12.2 5*4
220V 1 40.9 3*10
220V 3 23.6 4*10
380V 3 13.8 5*4
220V 1 54.5 3*10
220V 3 31.5 4*10
380V 3 18.2 5*6
220V 1 68.2 3*16
220V 3 39.4 4*16
380V 3 22.8 5*6
220V 1 81.8 3*16
220V 3 47.2 4*16
380V 3 37.3 5*6
Controller Specifications
Model
HD135T
Hidro-SS90 9 11
530×230×470
Hidro-SS120 12 13
Hidro-SS150 15 16
Hidro-SS180 18 20
Hidro-SS45 4.5 4
500×230×400
Hidro-SS60 6 6
Hidro-SS80 8 9
Hidro-SS70 7 7
Adjust temperature
(℃)
35-55
Dimension (mm)
(L×W×H)
190*130
Control time
(Hours)
1-12

1. Installation and Procedure
Please select the best mounting location under being satisfied to the above requirement.
F) Should not be install in the cold area or the place easy to ice up.
G) The steam spout, water inlet, and the drainer are installed on left, it can exchange the position
depend on the locale.
A) The steam generator should be installed in a dry, well ventilated location, and provided
adequate drainage. You can install the steam generator under a closet, attic, shelf, or basement.
And it must be locked without movement. Please See Figure1.
B) This series steam generator can be installed on the wall or on the floor, but the unit must be
level precisely. There are two mounting holes on the back of the generator, the screws must set
in with strong expansion bolts or equivalent supports.
C) The steam pipe should enter into the steam room and total length less than 6meter. and set it
at least 300mm above the floor or 150mm far away from the seat.
D) The generator should be mounted in a minimum 0.25m³ space.
E) The mounting location should minimize the number of bends and elbows in the steam lines.
Figure 1: Location of Installation

2. Install the pipe ( See Figure 2):
All plumbing shall be installed by a qualified plumber.
A.Connect the water inlet via ball valve by 1/2” metal hose pipe for water supply.
B. Connect the steam line with 1/2"copper tube for steam release. (CANNOT use the metal or
zincification pipe to replace the copper tube).
C. After working one hour, the generator will stop and drain automatic to wash the steamer tank,
so the drain pipe should be connected a 1/2" water pine for discharge.
D. The connection of steam tube need to be coated by silicone caulk to prevent the leakage.
A. If the generator is mounted in a place where is difficult to access, the water supply shut-off
valve should be located where it can be quickly accessed in emergency.
B. The max pressure of magnetic valve is 2Pa, the higher pressure will damage the valve. Need
to install a decompress valve or turn down the water inlet valve to prevent the damage.
C. Do not use a saddle valve or saddle fitting for the water inlet valve, flush water supply line
before final connection.
D. CANNOT install a valve in steam line.
E. Generator can not be installed outside, or the place easy to ice up.
F. If water supply pipe have sediment, it should install one filter on metal hose.
Warning:
Figure 2: Pipe Installation

3. Installation of controller and temperature probe.
Warning:
4. Operational Test and Setting
4-1. Steam Generator Set up Test
A. Make sure that the power supply switch and water supply valve of the steam generator are at
"ON" position.
B. Press the electric power button (on/off), turn on the magnetic valve, supply the water to water
tank.
C. The steam start to come out in 4-5 minutes.
D. Once the steam starts press the power button (on/off), the steam should stop.
E. Tum on the machine again, steam come out in one minute. When water level lower than level
probe, the magnetic valve opens and supplys water to water tank, the steam stops and comes out
again in about 10 seconds.
F. If the steam generator operate normally after the above test. The unit can be used by
customers.
A) The controller should be installed outside of the steam room with convenience access for
operations. Please install it as near as possible to the room's door. The recommended height is
1.5meter above from the ground. See Figure 3
B) Dig a hole in the wall with size 40x80mm before installation. The wires should be inserted and
connected with the controller. Hang the controller on the wall, fix the controller and then seal the
sides with sealant or silicone.
C) Connect the TEMP probe on the controller.
A. Control wire should be set away from other electric wire to avoid interfere.
B. TEMP Sensor should not be installed by the side of door, the temperature will be wrong
detected by opening and closing the door. And do not install too high, the best height is
1.2m~1.5m.
Check all the connections and make sure everything is correct before turning on.
All the functions of steam generator is controlled by the controller. See figure4.

4-2. Temperature and time preset
Warning:
A) Please read the manual, the notice and warning carefully before operating.
B) Do not open the cover when main power switch is on.
C) Do not turn on the steam generator when there is lack of water.
Check all the connections and make sure everything is correct before turning on.
All the functions of steam generator is controlled by the controller. see figure4.
A) ON/OFF: Power light. Turn on the steam generator by power button. The function light is on,
temperature window indicates the steam room temperature.
B) LIGHT: Illuminating light switch: open or close the lights in the steam room. When turn on the
light, the function light beside is on too.
C) TEMP: Temperature setting: press the TEMP key to temperature setting mode, then press ▲
or ▼to indicate your desired temperature. 35℃and 55℃(95-131℉) can be adjusted.
D) TIME: Working time settings: press the TIME key to the TIME set mode, then press ▲or ▼
to indicate your desired time. 1-12 hours can be adjusted.
E) If the steam room temperature is higher than the desired temperature, the machine will stop
generating steam. The constant temperature indicator light is on and the heat indicator light is
off. When the temperature lower the desired temperature, the machine will continue to heat
water until reach target again. The heat indicator light is on and the constant temperature
indicator light is off. The steam generator will automatic control the steam room temperature
within the range of +/- 2degree.

5. Auto-draining System
5-1. Installation
5-2. Operation
New strong automatic draining system, it can auto-back flush to wipe out scale completely,
reduce the mineral accumulation and extension the service life extremely.
A) Set up the Two-ways valve and Actuator together, then install it to the water outlet -rinse
valve.
B) Connect the Actuator cable with that on steamer.
A) Set the control mold at "AUTO" position, when the machine stop working for 15mins, the
mainboard sends signal to open the drainer, and after 3mins, water inlet valve opens, and let
the water flush 1min to wipe out scale. Then the water inlet valve and drainer valve close.
B) If set the control mold to "MAN" , then need to drain the water by manual.
Actuat
Two-
Rinse
valve Water inlet Auto-draining
current
Control Mode AUTOMATIC
MANUAL

6. Maintenance
6-1. Daily Maintenance
6-2. Periodic Maintenance
Ⅰ. Water rinse
Rinse once for each few days or after 3 time's using steam bathing, depends on different
situations.
1. Remove the Auto-draining system from the Steam Generator, and set up a ball valve to the
Steam Generator. (Refer to the Figure 6)
2. Disconnect the electricity power.
3. Turn on the rinse valve and water supply valve.
4. Connect the electricity power.
5. Rinse for 10 minutes.
6. Switch off the electricity power, close the water supply valve and the rinse valve.
Ⅱ.Citric acid cleansing
1. Mix 50-80 grams of citric acid with one liter water.
2. Remove the Auto-draining system from the Steam Generator.
3. Put the steamer upside down with the pipe up, then inject the blend citric acid into the steam
tank through a funnel, as figure 5 showed.
4. Set up the ball valve and turn it off, then put the steam on a flat ground for motionless for 20
minutes. As figure 6.
5. After 20 minutes, turn on the ball valve and let the citric acid flowing out.
6. Open the water supply valve.
7. Connect the electricity power.
8. Rinse for 5 minutes.
9. Switch off the electricity power, shut off the water supply valve and the rinse valve.
During daily operation, the auto-draining system will let the water flush the water tank for 1 minute
each time when machine stops working.
Regular checking is requested to avoid the leakage or parts damage for the steam head, pressure
relief valve, accessories, connections of hermetic parts.
Clean the steam generator regularly according user’s water quality and using frequency:
Citric acid
water outlet
Figure 5
Figure 6: Remove the Auto-
draining system and then set
up a ball valve.
water inlet
water outlet

7. Trouble Shooting Guide
SYMPTOMS
Steam not stop after
turn off the controller
Water leak out from
the steam head
The steam generator fails to function.
1. Switch off circuit protector.
2. Shut off water supply valve.
3. Call our maintenance service
center.
There are user serviceable parts in the generator. All repairs should be performed by a
qualified service person. The Trouble Shooting Guide below is for general reference
only.
1. The controller fails to function
1. Switch off circuit protector.
2. The steam generator fails to function.
2. Call our maintenance service
center.
2. Check if the circle protector is on
the "ON" position.
3. The steam generator fails to function.
3. Check if the power is on and the
water supply valve is open.
4. Rinse valve hasn't been shut off
4. Check if the rinse valve of
generator is closed. Close the circuit
protector and call our maintenance
service center of the above four steps
failed.
PROBABLE CAUSES
ACTION TO BE TAKEN
No steam while
controller has been
turned ON.
1. Steam generator hasn't been
connected with the water supply
1. At least wait 10 minutes after the
opened the controller.
2. The controller fails to function

8. Chart of Connection
Steam Generator
Live wire
1
Live wire
2
220-240V 1ph~
Max 9kW
Steam 4.5~9kW 220-240V 1ph~ / 2x110V 1ph ~
2x110V 1ph~
Max 9kW
Live wire
1
Live wire
2
220-240V 1ph~ 2x110V 1ph~
Steam 12-18kW 220-240V 1ph~ / 2x110V 1ph ~
L1
L2
L3
N
N
Steam Generator
L1
L2
L3
N
N

Steam 4.5~18kW 220-240V 3ph~
Steam 4.5~18kW 380-400V 3ph~
380-400V 3ph~

9. Choose a Right Steam Generator
A. Considerations in Choosing a Model
1. Water Quality
More impurities or minerals in water, should the steam generator be rinsed more often. Automatic
cleaning should be taken into consideration so as to save manual labors if the water quality is
poor.
2. Heat Control
A model, which has a temperature control, will be the best choice if steam generator is used
frequently, or if you want to keep a comfortable temperature constantly in steam room for a longer
time.
3. Digital Indicate
Steam bather can choose a simple operation way or a complex feedback control to set the
temperature, steam bathing time and procedures.
4. Lamps
lamps in sauna-bath room must be of safe low voltage type
B. Considerations in Choosing Power Ratio and Voltage of the Steam Generator
1. The volumes and the surface of the steam bath room.
2. The quality and heat transmitting of the materials of all surfaces in sauna bath room.
3. The height of the ceiling and the benches.
4. If the outer wall of the steam room can be able to withstand the great temperature changes.
5. Voltage of electric source and phase electricity(220V, 380V, a single phase electricity or three
phases electricity). Lower voltage causes less steam.
6.When installing the steam generator, we recommend using a larger size cable than normally
used.
For comfort and leisure, to choose a correct steam generator is same important as to design the
steam room.
C. Announcement
The above messages are recommendations only. These recommendations may not be suitable
as the conditions of installation and areas are different. The effect of the steam generator can not
get guaranteed if one chooses the building materials and builds rooms only depending on the
above information.
D. Preparations
1.To calculate the volumes of a closed steam bathroom: length X width X height=volume. If there
are outshoot surfaces need heating, their volumes shall be added: length X width X
height=volume
2.The above calculations should take the following factors into consideration:
a). Tiles, polypropylene or fiber glass steel
b). The mortar bed for tiles or concrete foundation
c). Cast-iron pipe
d). If temperature declining is possible, to add10% to100% to each glass or glass wall and to the
outer wall
e). Natural stones e.g. marble.
Totals=1 + 2 a+2 b+2c+2d+2e
3. Compare the size chart of first page and choose models
according to the above calculating results.

10. How to build a steam bath room
Considerations in Designing a Steam Room
Generally, steam rooms are built with glass steels or acrylic materials and building materials. Easy installation
and good insulation characterize both the glass steels and acrylic materials. However, they are sufficiently poor
heat resistant, especially easily break and get damaged, while the cost is high. They are only suitable for
temporary entertainment centers. For the steam room built with building materials, the only need is to take some
measures to keep insulated. They are not only low in cost with excellent heat resistance and long service life,
but also can be made according to your needs with no building space limits. In such case, a safe, comfortable
and low cost steam bath room with long service life will be a real thing for you. Steam bath room in most of
counties and regions are made in the way.
Chief Instruction
The following messages are aimed to help the person who install steam generator or build steam bath room
only. Subject to the complexity of the building and the climate varies etc., this chief instruction is a
recommendation only.
Aims
When you plan to build a steam room, keep comfort and leisure as an aim in your mind. A room with correct
designs and structures should be installed comfortable seats and in which the temperature can be reached to30-
40℃in 15 to 20 minutes. If the space allows, it will be better to install seats with backrest or reclining benches,
these sorts of seats will make more comforts.
1. Avoid using decay building materials because the steam room is highly humid and wet.
2. All surfaces in steam bathroom must be protected with water proof materials, e.g. tiles.
3. Both seats and ceiling should have a certain slope, 15cm for each meter. Such kind of design reduces the
space of the steam bathroom.
4. Easy cleaning and drainage must be taken into consideration when designing the floor drainage. For the
consideration of safety, the floor must be slipping proof.
5. The heights of steam bathroom must be limited to 2.4m or below. Heights over 2.4m will cause a high or
adequate temperature around the ceiling, while the temperature around the floor is low.
6. The place for installation of the steam generator should satisfy the following conditions:
a) Have enough space for sufficient operation and for being in the situation that the steam generator needs
maintenance or fails to function and needs spare parts replacements.
b) The steam generator must not be frozen or moistened, and the temperature must not exceed 40°C (Never
install the generator inside the steam bathroom or outdoors.)
c) The steam pipe from steam bathroom to generator should be less than 6m. The steam pipe shall slope to
the steam bathroom and be higher than the position of the steam head, so that condensation shall drain into the
steam room and will not gather in the tube. Furthermore, the steam pipe should be well insulated.
d) To install the steam head complying with the instructions. The owner shall not touch the steam head.
e) The water drainage channel must be unblocked when you are installing the steam generator.
7. When you decide to use a certain materials for the inner walls of your steam bathroom, please take a contact
with the manufacturer to make sure that this material is of heat resistant and anti-humidity type.
8. Steam bathroom must be completely closed.
9. Situating a window at the ceiling is not recommended. If do so, the materials must be of waterproof type and
the window shall be tightly closed when in use.
10. Window and natural lights are not recommended either. If do so, must be sure the height and
size of the window in the steam bathroom will not affect keeping a comfortable temperature in a
long period of time.
Table of contents
Other Hidrotermal Iron manuals