Hidrotermal CrayFish User manual

CrayFish®Automated
Cleaner Robot
USER MANUAL
Note: Subject to update by manufacturer without notice in advance

1
Important Precautions
1. In order to prevent severe damage to the cleaner, never power on the unit when it is
outside of the swimming pool.
2. The power cord must be connected to an appropriate earthed socket.
3. Do not operate the cleaner when people are in the pool.
4. Hold the top handle when putting the cleaner into water or lifting out of the water, do not
pull the cable.
5. Before power on, make sure to empty the trapped air inside the cleaner (no more air
bubbles coming from the cleaner and the cleaner is fully submersed on the pool bottom).
6. Before power on, make sure the filter be assembled in position and cable be fully released
to avoid any winding, which could affect the cleaner’s performance or cause damage.
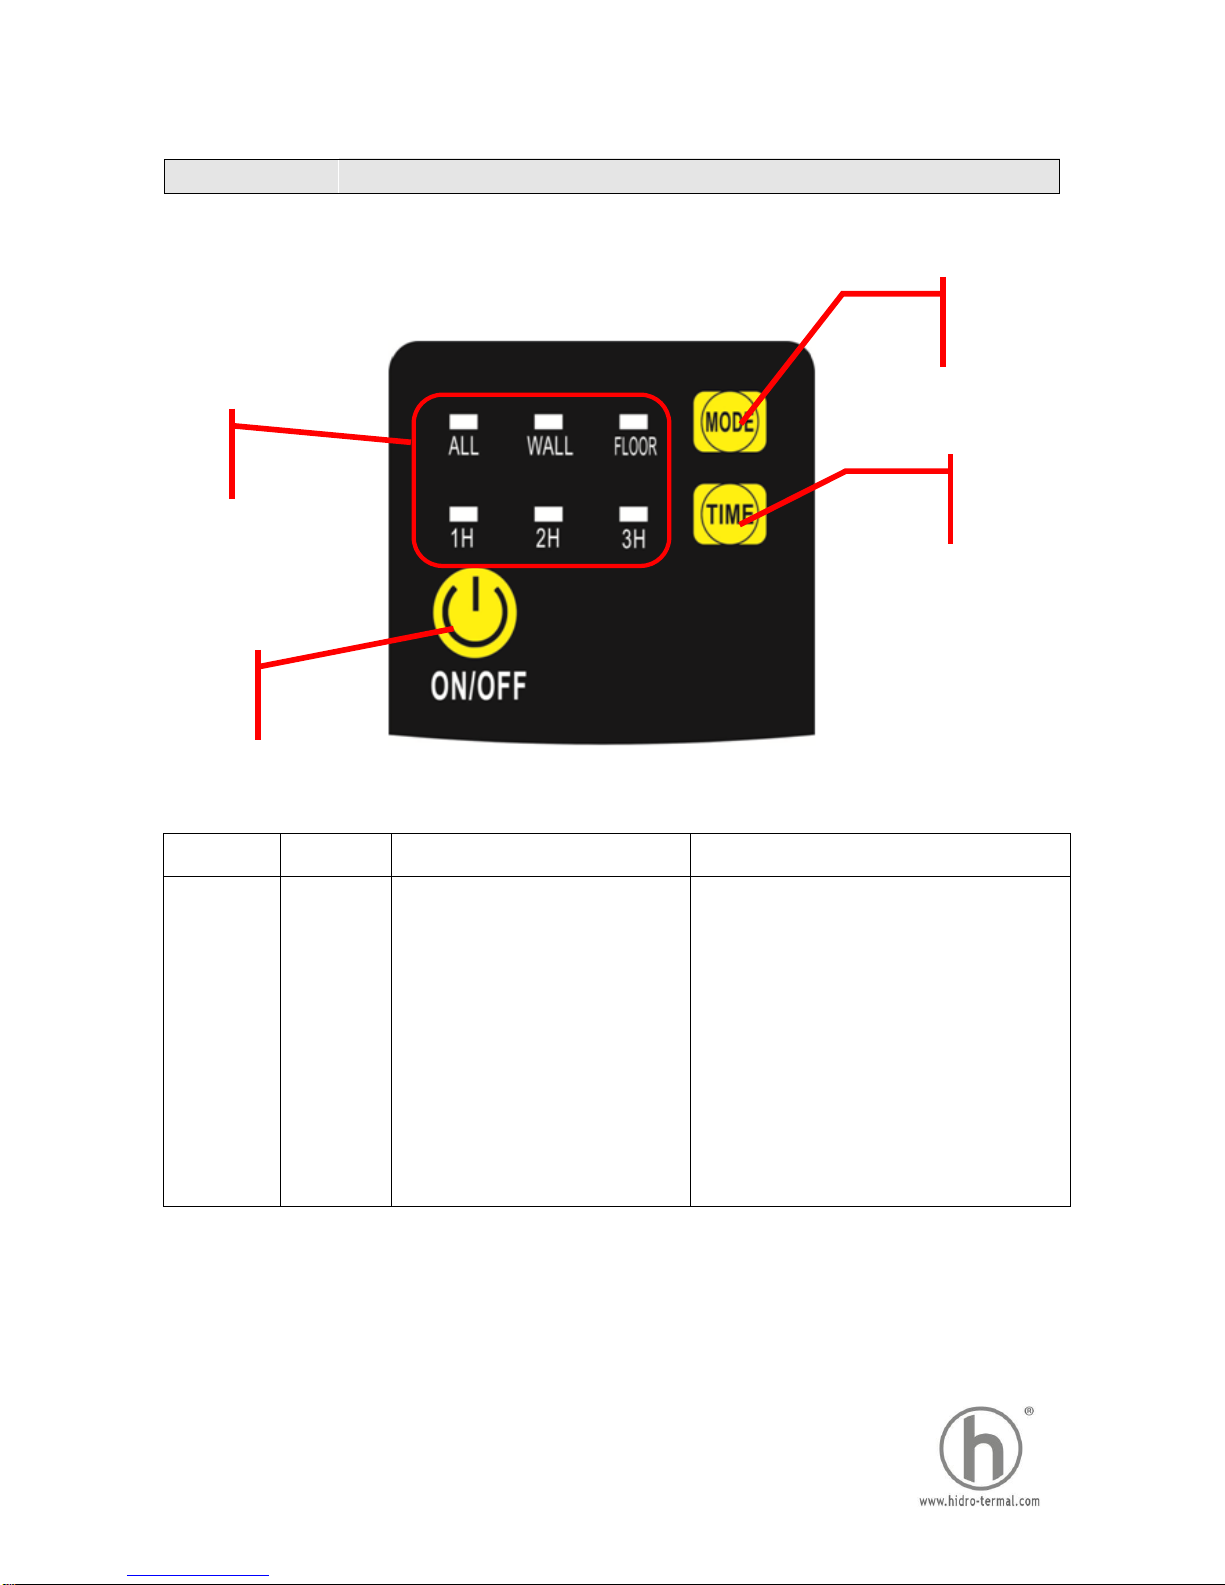
7. Remote control should be hold vertically for a maximum control distance.
8. Please clean and wash the filter bag every time after use.
9. The cleaner should be stored in a cool and ventilated place, away from direct sunlight when
not in use.
10. The power supply unit should be placed in a shaded area during working. In order to
avoid overheating and potential damage of components, never cover the power supply
unit.
11. Only authorized after sales service personnel should open the cleaner’s power supply unit
and motor assembly, otherwise the warranty will be invalidated.
12. In order to avoid any accident/damage, it is strongly recommended to connect the caddy
with a fixed holder beside the swimming pool by using the safety rope (included in the
package).
13. Do not use the cleaner beyond the working environment/conditions stated in this manual.
14. After power off the machine, must wait until at least 30 seconds to restart it.
15. For different season different density of the filter net need to be chosen. More detail please
contacts your local distributor.
16. This machine is for clean the pool only not for other purpose.

2
17. It may cause minor pollution in case of the leaking from the oil seal.
When put the cleaner into the water please make sure hold the top handle make sure to
empty the trapped air inside, then the cleaner can immerse into the pool floor.
When pulling cleaner out of water suspend the cleaner above water for about 10-15 seconds to
empty the water inside. Please holds the top handle only, never pull the cable.
1 2
3 4
1 2

3
Content
I. Introduction··························································································P 4
II. Safety···································································································P 4
III. Specifications························································································P 5
IV. Operation······························································································P 6
V. Instruction of installing the caddy····························································P14
VI. Packing List···························································································P15
VII. Warranty ····· ·························································································P16

4
I. Introduction
The Hidrotermal crayfish®automated cleaner robot is a new type of highly efficient
and energy-saving swimming pool cleaning system. Through its advanced computer controlled
program, it can clean the pool walls and bottom automatically. At the same time, it filters the pool
water and gets rid of suspended particles without replace the pool water. It’s total environmental-
friendly.
For safe operation, the cleaner works on 24V direct current. Please read this user manual carefully
before use.
II. Safety
1. Power supply unit position:
Power supply unit need to be placed in proper position so as to reach the distal end of pool
for the cleaner, meanwhile as least 3.5m from pool edge.
2. Important:
Before power on, make sure local voltage/frequency matches the rated voltage/frequency
of the cleaner.

5
III. Specifications
1. Rated input voltage: 220VAC (230VAC)/ 110VAC (120VAC)
2. Frequency: 50Hz/60Hz
3. Output voltage: DC24V
4. Power: 200W
5. Remote control frequency: 433M
6. Cable length: 20/30/40M
7. Roller length: 465mm
8. Roller Style: PVC Roller, PVC+ Sponge Roller
9. Max cleaning area: Appr. 270 ㎡
10. Flow rate: 20m³/h
11. Filter net density: 180um (250um optional)
12. Pool water temperature: 10℃-40℃
13. Moving speed: MAX 12.5m/min
14. IP grade: Cleaner IPX8
Power supply unit IPX5
15. Cleaner weight: 12.5kg (Without cable)

6
IV. Operation
4.1 Panel
Fig 4-1
NO. SIGN INDICATE FUNCTION
1 ON/ OFF Switch on or Switch off
Press this button machine will be
switched on.
Press this button twice machine will
work under selected mode.
Press this button third time machine
will be switched off.
1
2
3
4

7
2 MODE
Mode options Choose different mode for different
purpose.
“ALL” mode is let machine clean
swimming pool floor wall and water
line together.(once wall then once
floor)
“WALL” mode is let machine clean
swimming pool wall only.
“FLOOR” mode is let machine clean
swimming pool floor only.
“ALL + FLOOR” mode is let machine
clean the swimming pool floor three
times then climb wall once.

8
3 TIME
Working duration option
Different working
duration for
different purpose.
1H 2H 3H
indicate different
working duration
4 Indicator
Indicate the machine status
Working
status
Two or three indicators on Machine stopped
1H flash slowly Machine running for 1 hour
2H flash slowly Machine running for 2 hour
3Hflash slowly Machine running for 3 hour
ALL light on Working under mode ALL
WALL light on Working under mode WALL
FLOOR light on Working under mode FLOOR
ALL+ FLOOR light on Working under mode
ALL-FLOOR
ALL>>WALL>>FLOOR flash
in order Manual: forward
FLOOR>>WALL>>ALL flash
in order Manual: backward
3H>>2H>>1H flash in order Manual: left turn
1H>>2H>>3H flash in order Manual: right turn
All lights flash slowly Auto run finish

9
4.2 Diagnose:
INDICATOR MEANING SUGGESTION
Diagnose
1Hflash quickly with buzz. Machine out of water
Put machine back into
water or wait until machine
restart automatically
All lights flash quickly with
buzz
Control box over
load
Stop machine contact after
sale service person
1H+2H+3H flash quick with
buzz Seal box leaking Stop machine contact after
sale service person
ALL+1H flash quick with buzz Pump over load Stop machine check the
impeller and pump
WALL+2H flash quick with
buzz
Walking motor 1
over load
Stop machine check belt
and transmission system
FLOOR+3H flash quick with
buzz
Walking motor 2
over load
Stop machine check belt
and transmission system
ALL+WALL+1H+2H
flash quick with buzz
Cleaner present
abnormal voltage
Stop machine contact after
sale service person
ALL+WALL+FLOOR
flash quick with buzz
Abnormal
communication
Check the cable between
cleaner and control box or
contact the after sale
service person
WALL+FLOOR+2H+3H
flash quick with buzz
Machine out of water
and could not restart
Stop machine restart
machine manually after
cleaner sink
WALL flash quick with buzz Machine turned over Turn over machine
manually

10
4.3 Remote control
NO. SIGN INDICATE FUNCTION
1 ANTENNA
Signal reception
2 Indicator light
3 RUN Working
automatically
Press this button machine will working
automatically
4 ▶Right turn Keep press this button machine will turn right
5 STOP Stop working Press this button machine will stop working
6 ▲Walking forward Press this button machine will stop walking
forward
7 ◀Left turn Keep pressing this button machine will turn left
8 ▼Walking backward Press this button machine will stop walking
backward
attention: ▶&◀button need to be pressed constantly
Fig4-3 remote control

11
4.4 Clean the filter tray
Lift the tray handle up (Fig:4-5)Take out the filter tray(Fig4-6)
Slide the clip to open the tray(Fig 4-7)Take the slides off(Fig4-8)
Clean the tray(Fig4-9;Fig4-10)
Fig4-8
open open
Fig4-7
Lift handle up
Fig4-5 Fig4-6
Fig4-9 Fig4-10

12
4.5 Put the filter tray back
Machine have a slide way to lead filter tray back into the cleaner, and clip the handle in
position perfectly (Fig 4-11、4-12、4-13).
Fig4-13
Fig4-11 Fig4-12

13
Ⅴ.Instruction of installing the caddy
1. Open the package for assembling 2. Put the Connection part onto the plate
3. Insert the wheel axle,4. Assemble the protecting cover and axle cover
5. Assemble wheel 6. Put on the nut
7. Tighten the nut。8. Assemble the top handle
9. Assemble power unit holder 10. Assemble cable holder

14
Ⅵ.Packing list
Item Name Model Quantity
(pc) Note
1
Cleaner
Cleaner 1 In Carton
2 Power supply unit 1 In Carton
3 Manual and certificates, etc. 1 Big Plastic Bag
4 Filter bag 2 Big Plastic Bag
5 Safety rope 1 Big Plastic Bag
6 Battery 23A 1 Mini Plastic Bag
7 Antenna 1 Mini Plastic Bag
8 Remote control 1 Mini Plastic Bag
9
Plastic
caddy (As
required)
Top handle 1 In Carton
10 Connection part 1 In Carton
11 Plate 1 In Carton
12 Power supply holder 1 In Carton
13 Cable holder 1 In Carton
14 Wheel axle 1 In Carton
15 Wheel 2
16 Nut M10 2 Mini Plastic Bag
17 Axle cover 2 Mini Plastic Bag
18 Protecting cover 2 Mini Plastic Bag

15
Foam installation
Attention: This foam is an extra assistant device which uses only for very specific situation: in case
the robot in water is too weight to climb wall. if your robot is in good performance, please ignore
this instruction.
Solution 1: Dismantle the top cover and stick two foams on its reverse surface (see picture 1),
make sure the two foams are on the diagonal of the middle part of top cover. No need to stick more
if the cleaner could clean the water line after this step.
Solution 2: Stick two more foams (see picture 2) if the cleaner still cannot clean the water line after
the operation according to solution 1.
Steps to stick foams:
1. Peel off the paper from the foam (picture a).
2. Pay attention to the dimension of foam (picture b).
3. Press the foam from edge B to edge A to finish the installation (see picture c).

16
Ⅶ. Warranty
This product has passed all quality control and safety tests, conducted by the technical department
of the factory.
Warranty information:
1. Warranty period is 2 years from the date of delivery and is settled in accordance with the
terms established by Directive 1999/44/EC of 25th of May regarding guarantees on the sale
of consumer goods as well as the local law in the Country of Purchase within the European
Union.
2. This warranty is void if the product has been altered, misused, or has been repaired by
unauthorized personnel.
3. The warranty extends only to manufacturing defects and does not cover any damage
resulting from mishandling of the product by the owner.
4. The sales invoice must be presented for any claim or repair during the warranty period .
Please contact your local dealer for any warranty issues.
Environmental Programmes, WEEE European Directive
Please respect the European Union regulations and help to protect the
environment.
Return non-working electrical equipment to a facility appointed by your
municipality that properly recycles electrical and electronic equipment. Do not
dispose them in unsorted waste bins.
For items containing removable batteries, remove batteries before disposing
of the product.
Table of contents