HIGH ONE FBI 12S49 E W929C User manual

EN
WARRANTY CONDITION
This product has a 2-year warranty as of the date of purchase*, covering any fault
resulting from a manufacturing or material defect. This warranty does not cover defects
or damage resulting from incorrect installation, improper use or abnormal wear of
the appliance.
*upon presentation of the sales receipt.
FR
CONDITION DE GARANTIE
Ce produit est garanti pour une période de 2 ans à partir de la date d’achat*, contre
toute défaillance résultant d’un vice de fabrication ou de matériau. Cette garantie ne
couvre pas les vices ou les dommages résultant d’une mauvaise installation, d’une
utilisation incorrecte ou de l’usure anormale du produit.
*sur présentation du ticket de caisse.
NL
GARANTIEVOORWAARDEN
Dit product wordt gegarandeerd voor een periode van 2 jaar vanaf de aankoopdatum*,
voor elke storing die het gevolg is van een fabricagefout of het materiaal. Gebreken of
schade door slechte installatie, onjuist gebruik of abnormale slijtage van het product
worden niet gedekt door deze garantie.
*op vertoon van kassabon.
ES
CONDICIONES DE GARANTÍA
El certificado de garantía de este producto tiene una duración de 2 años a partir de la
fecha de compra* que se limita a los defectos de fabricación y averías del material.
Se excluyen de la garantía deficiencias o daños originados por una mala instalación,
errores en la manipulación o por un uso inadecuado.
*previa presentación del comprobante de compra.
Made in PRC
ELECTRO DEPOT
1 route de Vendeville
59155 FACHES-THUMESNIL
FRANCE

976767 - FBI 12S49 E W929C
INSTRUCTIONS FOR USE .....................02
CONSIGNES D'UTILISATION .....................48
GEBRUIKSAANWIJZINGEN .....................96
INSTRUCCIONES DE USO ...................144
01/2023 - V2
Dishwasher
Lave-vaisselle
Vaatwasmachine
Lavavajillas

1
2
4
5
6 7 8
BA
3

2 FR
A
2
Thanks!
Thank you for choosing this HIGHONE product.
Chosen, tested and recommended by ELECTRO DEPOT,
HIGHONE branded products are easy to use, reliable,
and of an impeccable standard.
With every use of this appliance, you can be sure of
complete satisfaction.
Welcome to ELECTRO DEPOT.
Visit our website: www.electrodepot.fr
EN

3 FR
Aperçu de l’appareil
A
3
Table of contents
AOverview of the
appliance
CUseful information
BUsing the appliance Using your dishwasher
Installation instruction
Loading the baskets
Quick user guide
Using your dishwasher
Wash cycle table
Maintenance and cleaning
Troubleshooting tips
Error codes
Product overview
EN

4EN
Preview of the appliance
A
Product overview
IMPORTANT
To get the best performance from your dishwasher, read
all operating instructions before using it for the first time.
1Inner pipe
2Salt container
3Dispenser
4Lower spray arm
5Filter assembly
6Cutlery rack
7Upper basket
ACup rack
BUpper spray arm
8Lower basket
NOTE
Pictures are only for reference, different models may be
different.
5EN
Using the appliance
B
Using your dishwasher
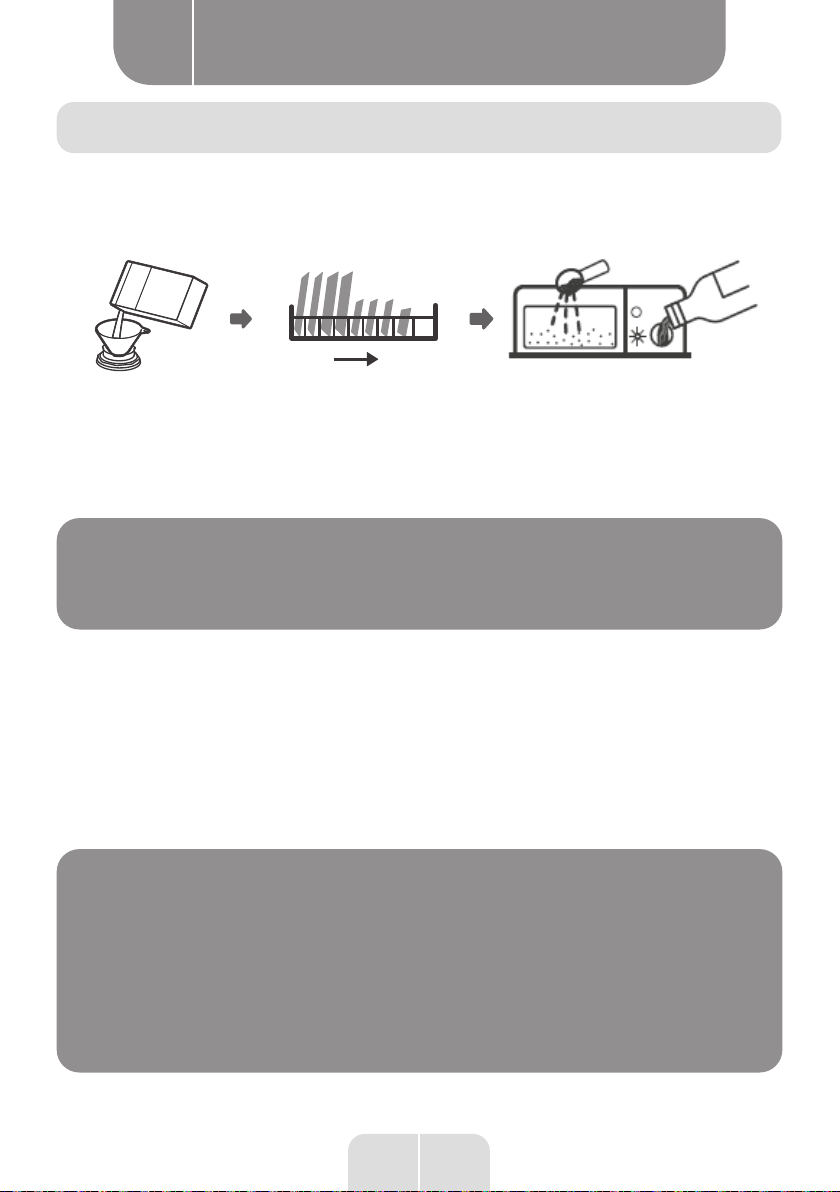
• Before using your dishwasher :
OutsideInside
SALT
1. Set the water softener
2. Loading the salt Into the softener
3. Loading the basket
4. Fill the detergent dispenser
NOTE
Please check the section «Water Softener», if you need to
set the water softener.
Loading the salt into the softener
• If your model does not have any water softener, you may skip this section.
• Always use salt intended for dishwasher use.
• The salt container is located beneath the lower basket and should be filled as explained in
the following:
WARNING
Only use salt specifically designed for dishwashers use!
Every other type of salt not specifically designed for
dishwasher use, especially table salt, will damage the water
softener. In case of damages caused by the use of unsuitable
salt the manufacturer does not give any warranty nor is
liable for any damages caused.

6EN
Using the appliance
B
WARNING
Only fill with salt before running a cycle.
This will prevent any grains of salt or salty water, which may
have been spilled, remaining on the bottom of the machine
for any period of time, which may cause corrosion
• Please follow the steps below for adding dishwasher salt:
SALT
1. Remove the lower basket and unscrew the reservoir cap.
2. Place the end of the funnel (if supplied) into the hole and pour in about 1.5 kg of
dishwasher salt.
3. Fill the salt container to its maximum limit with water, It is normal for a small amount of
water to come out of the salt container.
4. After filling the container, screw back the cap tightly.
5. The salt warning light will turn off after the salt container has been filled with salt.
6. Immediately after filling the salt into the salt container, a washing program should be
started (We suggest to use a short program). Otherwise the filter system, pump or other
important parts of the machine may be damaged by salty water. This is out of warranty.

7EN
Using the appliance
B
NOTE
• The salt container must only be refilled when the salt
warning light in the control panel comes on. Depending
on how well the salt dissolves, the salt warning light may
still be on even though the salt container is filled. If there is
no salt warning light in the control panel (for some models),
you can estimate when to fill the salt into the softener by
the cycles that the dishwasher has run.
• If salt has spilled, run a soak or quick program to remove
it.

8EN
Using the appliance
B
Installation instruction
WARNING
Electrical shock hazard
Disconnect electrical power before installing dishwasher.
Failure to do so could result in death or electrical shock.
WARNING
The installation of the pipes and electrical equipments
should be done by professionals.
About power connection
WARNING
For personal safety:
• Do not use an extension cord or an adapter plug with this
appliance.
• Do not, under any circumstances, cut or remove the
earthing connection from the power cord.
Electrical requirements
Please look at the rating label to know the rating voltage and connect the dishwasher to
the appropriate power supply. Use the required fuse 10A/13A/16A, time delay fuse or circuit
breaker recommended and provide separate circuit serving only this appliance.
Electrical connection
Ensure the voltage and frequency of the power being corresponds to those on the rating
plate. Only insert the plug into an electrical socket which is earthed properly. If the electrical
socket to which the appliance must be connected is not appropriate for the plug, replace the
socket, rather than using a adaptors or the like as they could cause overheating and burns.
WARNING
Ensure that proper earthing exists before use

9EN
Using the appliance
B
Water supply and drain
Cold water connection
• Connect the cold water supply hose to a threaded 3/4(inch) connector and make sure that
it is fastened tightly in place.
• If the water pipes are new or have not been used for an extended period of time, let the
water run to make sure that the water is clear.
• This precaution is needed to avoid the risk of the water inlet to be blocked and damage the
appliance.
ordinary supply hose
safety supply hose
About the safety supply hose
• The safety supply hose consists of the double walls. The system guarantees its intervention
by blocking the flow of water in case of the supply hose breaking and when the air space
between the supply hose itself and the outer corrugated hose is full of water.
WARNING
A hose that attaches to a tap can burst if it is installed on
the same water line as the dishwasher. If your sink has
one, it is recommended that the hose be disconnected and
the hole plugged.
10 EN
Using the appliance
B
How to connect the safety supply hose
1. Pull the safety supply hoses out from storage compartment located at rear of dishwasher.
2. Tighten the screws of the safety supply hose to the faucet with thread 3/4inch.
3. Turn the water fully on before starting the dishwasher.
How to disconnect the safety supply hose
1. Turn off the water.
2. Unscrew the safety supply hose from the faucet.
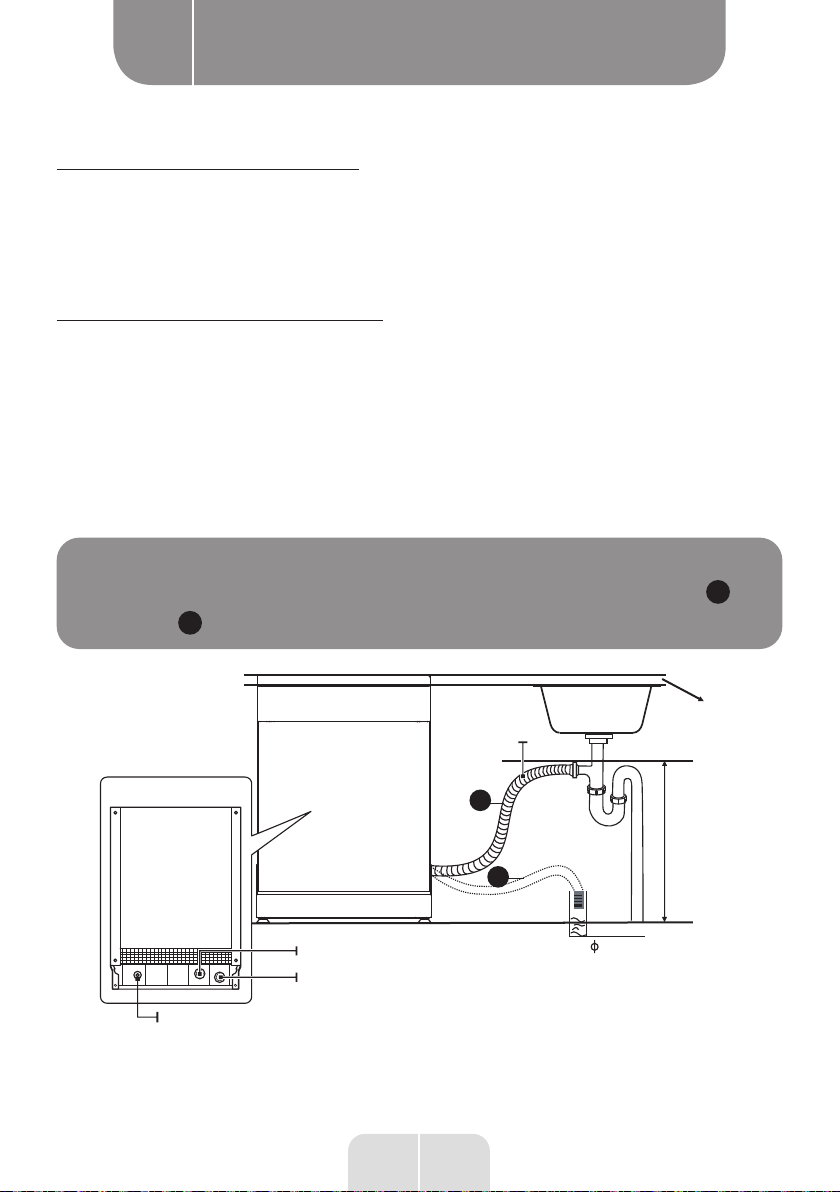
Connection of drain hoses
Insert the drain hose into a drain pipe with a minimum diameter of 4 cm, or let it run into
the sink, making sure to avoid bending or crimping it. The height of drain pipe must be less
than 1000 mm. The free end of the hose must not be immersed in water to avoid the back
flow of it.
WARNING
Please securely fix the drain hose in either position
A
or
position B
A
B
Water Inlet
Mains Cable
Back of dishwasher
Drain Pipe
Drain hose
40 mm
MAX 1000 mm
Drain Pipe Counter
11 EN
Using the appliance
B
How to drain excess water from hoses
If the connection to the drain pipe is positioned higher than 1000 mm, excess water may
remain in the drain hose. It will be necessary to drain excess water from the hose into a bowl
or suitable container that is held outside and lower than the sink.
Water outlet
• Connect the water drain hose. The drain hose must be correctly fitted to avoid water leaks.
• Ensure that the water drain hose is not kinked or squashed.
Extension hose
• If you need a drain hose extension, make sure to use a similar drain hose.
• It must be no longer than 4 meters, otherwise the cleaning effect of the dishwasher could
be reduced.
Syphon connection
The waste connection must be at a height less than 1000 mm (maximum) from the bottom
of the dishwasher.
Positioning the appliance
• Position the appliance in the desired location. The back should rest against the wall behind
it, and the sides, along the adjacent cabinets or walls.
• The dishwasher is equipped with water supply and drain hoses that can be positioned
either to the right or the left sides to facilitate proper installation.
Levelling the appliance
Once the appliance is positioned for levelling, the height of the dishwasher may be altered via
adjustment of the screwing level of the feet. In any case, the appliance should not be inclined
more than 2°.
12 EN
Using the appliance
B
Free Standing Installation
Fitting between existing carbinets
The height of the dishwasher, 845 mm, has been designed in order to allow the machine to be
fitted between existing cabinets of the same height in modern fitted kitchens.
The laminated top of the machine does not require any particular care since it is heatproof,
scratchproof and stainproof.
Built-In Installation (for the integrated model)
Step 1. Selecting the best location for the dishwasher
The installation position of dishwasher should be near the existing inlet and drain hose and
power socket.
Illustrations of cabinet dimensions and installation position of the dishwasher.
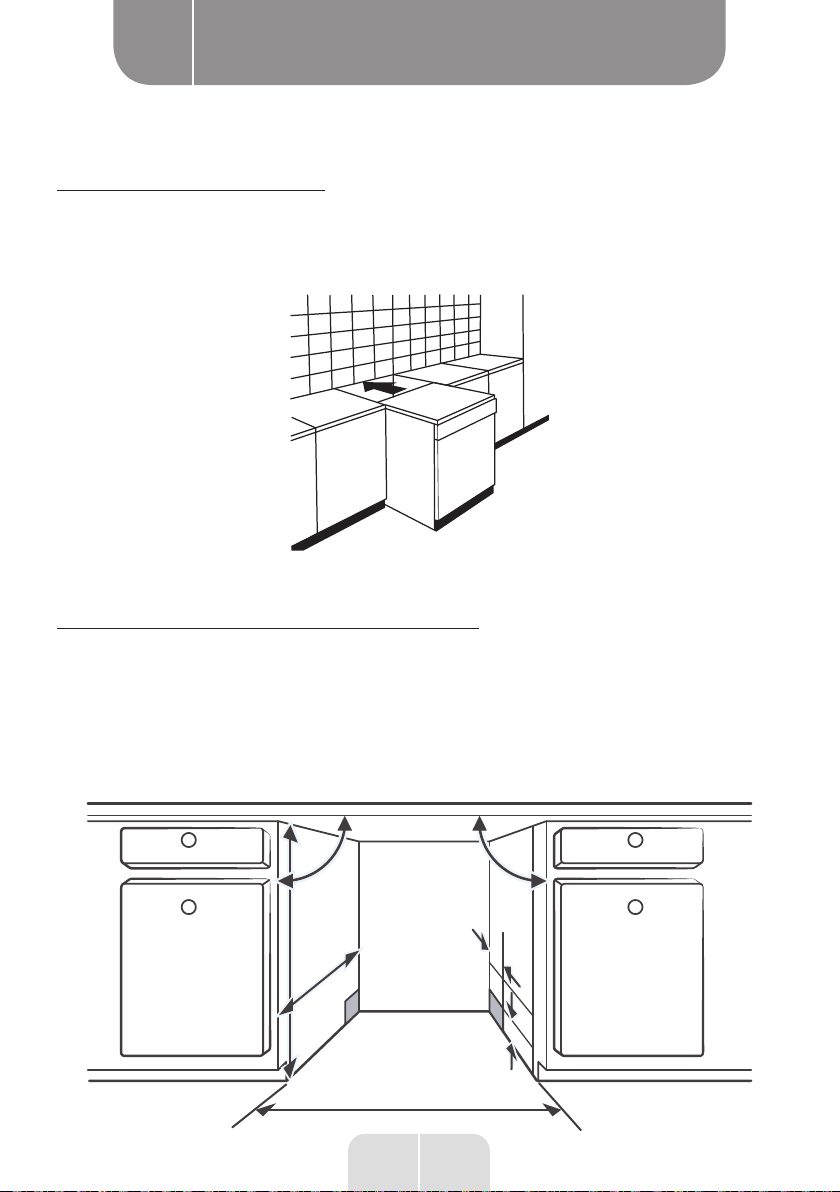
1. Less than 5 mm between the top of dishwasher and cabinet and the outer door aligned to
cabinet.
Electrical, drain and
water supply line
connection
Space between cabinet
bottom and floor
600 mm(for 60cm model)
450 mm(for 45cm model)
100
80
90 °90 °
820mm
580mm

13 EN
Using the appliance
B
2. If dishwasher is installed at the corner of the cabinet, there should be some space when
the door is opened.
NOTE
Depending on where your electrical outlet is, you may need
to cut a hole in the opposite cabinet side.
Step 2. Aesthetic panel’s dimensions and installation
Seperate velcro stripe Aand velcro stripe Band attach velcro stripe Aon the inner side
of the aesthetic panel. Attach the felted velcro stripe Bon the outer door of dishwasher
(see figure A). After positioning of the panel, fix the panel onto the outer door by screws
and bolts (See figure B).
AVelcro stripe
Velcro stripe
Dishwasher
Door of
dishwasher
Cabinet
Minimum space
of 50mm

14 EN
Using the appliance
B
1.Take away the four short screws
2.Pin up the four long screws
B
Fully-integrated model
Install the hook on the aesthetic panel and put the hook into the slot of the outer door of
dishwasher (see figure A). After positioning of the panel, fix the panel onto the outer door
by screws and bolts (See figure B).
A
1.Take away the four short screws
2.Pin up the four long screws
B
15 EN
Using the appliance
B
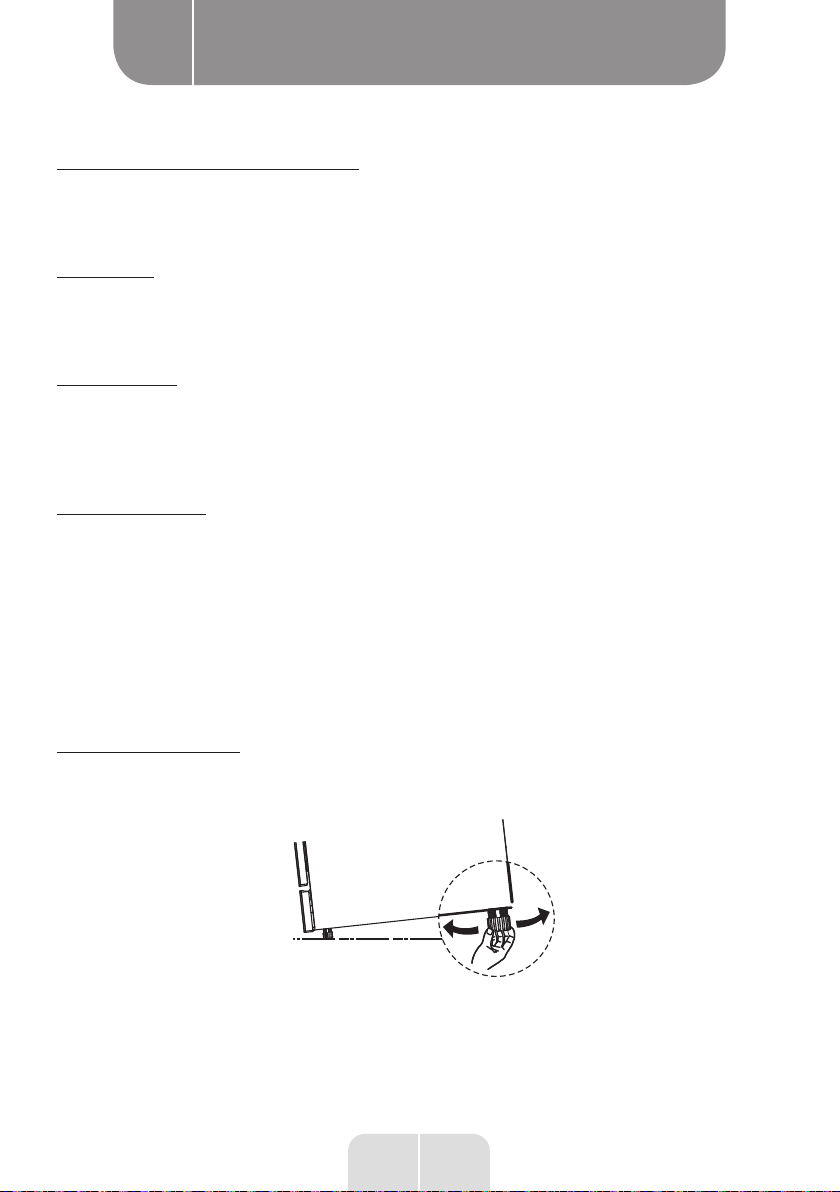
Step 3. Tension adjustment of the door spring
1. The door springs are set at the factory to the proper tension for the outer door. If aesthetic
panel are installed, you will have to adjust the door spring tension. Rotate the adjusting
screw to drive the adjustor to strain or relax the steel cable.
2. Door spring tension is correct when the door remains horizontal in the fully opened
position, yet rises to a close with the slight lift of a finger.
Step 4. Dishwasher installation steps
NOTE
Please refer to the specific installation steps in the
installation drawings.
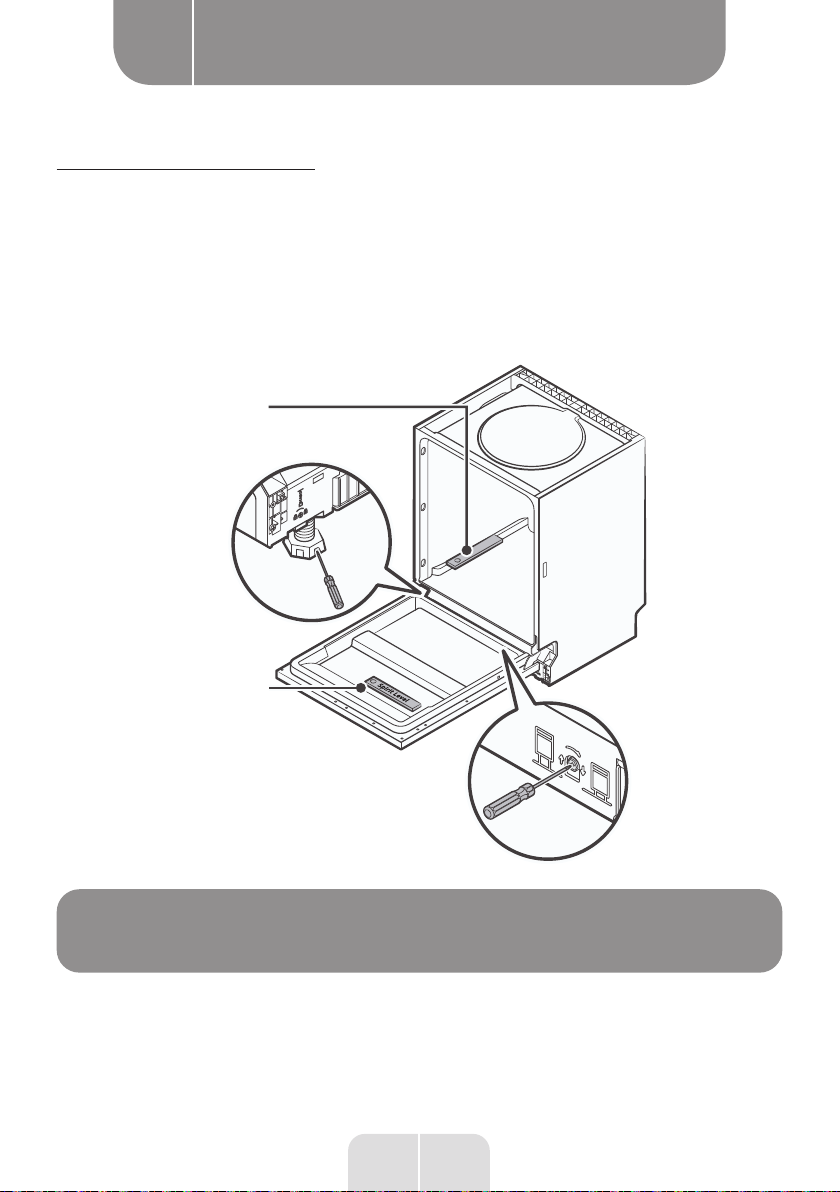
1. Affix the condensation strip under the work surface of cabinet. Please ensure the
condensation strip is flush with edge of work surface. (Step 2)
2. Connect the inlet hose to the cold water supply.
3. Connect the drain hose.
4. Connect the power cord.
5. Place the dishwasher into the cabinet.
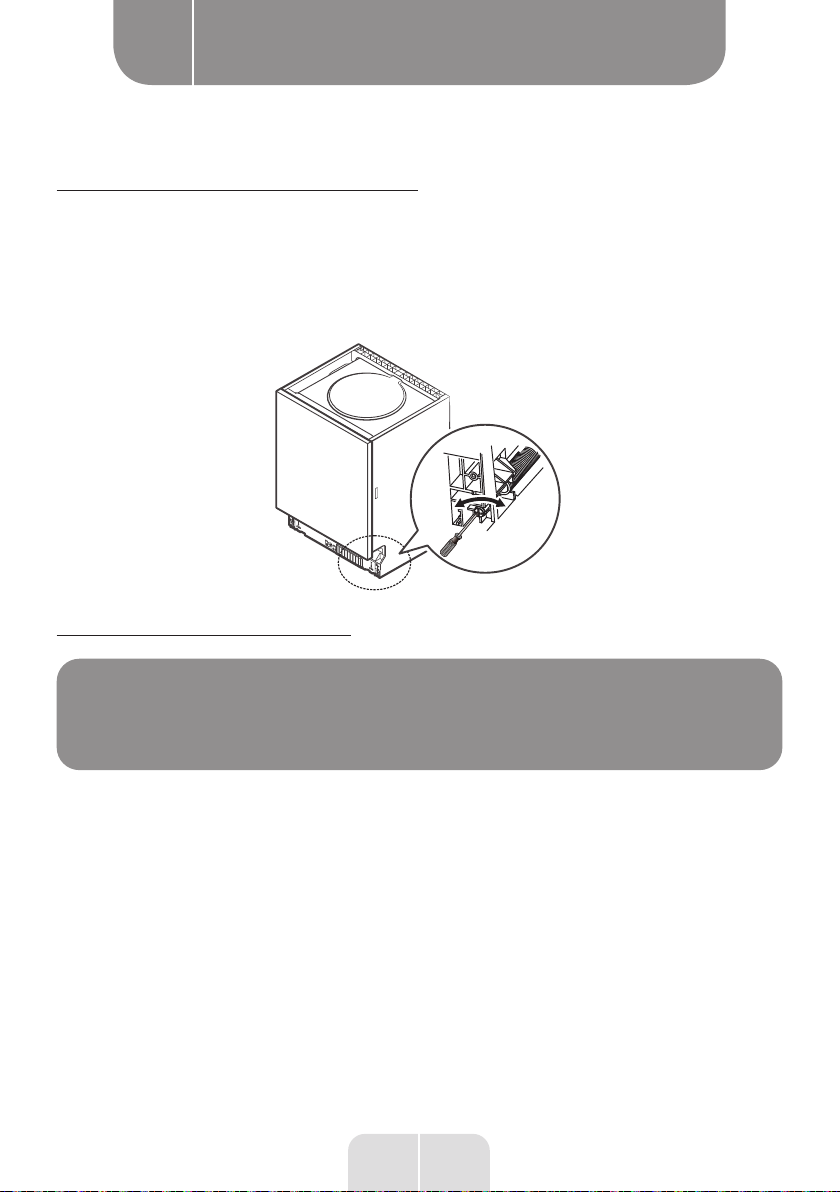
6. Level the dishwasher. The rear foot can be adjusted from the front of the dishwasher by
turning the Philips screw in the middle of the base of dishwasher use a Philips screw driver.
To adjust the front feet, use a flat screw driver and turn the front feet until the dishwasher is
level. (Step 5 to Step 6)

16 EN
Using the appliance
B
7. Install the furniture door to the outer door of the dishwasher. (Step 7 to Step 10)
8. Adjust the tension of the door springs by using a Philips screw driver turning in a clockwise
motion to tighten the left and right door springs. Failure to do this could cause damage to
your dishwasher. (Step 11)
9. The dishwasher must be secured in place. There are two ways to do this:
ANormal work surface: Put the installation hook into the slot of the side plane and secure
it to the work surface with the screws.
BMarble or granite work top: Fix the side with screws.
A
B
17 EN
Using the appliance
B
Step 5. Levelling the dishwasher
Dishwasher must be level for proper dish rack operation and wash performance.
1. Place a spirit level on door and rack track inside the tub as shown to check that the
dishwasher is level.
2. Level the dishwasher by adjusting the three levelling feet individually.
3. When level the dishwasher, please pay attention not to let the dishwasher tip over.
UP
DOWN
Check level
front to back
Check level
side to side
NOTE
The maximum adjustment height of the feet is 50 mm.

18 EN
Using the appliance
B
Loading the baskets
According to EN60436:
Loading the dishwasher to its full capacity
will contribute to energy and water savings.
Upper basket:
Lower basket:
Number Item
1Cups
2Saucers
3Glass bowls
4Dessert bowls
5Glasses
6Mugs
Number Item
7Oval platter
8Small pot
9Dessert plates
10 Soup plates
11 Cutlery basket
12 Melamine bowls
13 Oven pot
14 Melamine dessert plates
15 Dinner plates
This manual suits for next models
1
Table of contents
Languages:
Other HIGH ONE Dishwasher manuals


