HIKOKI UC 18YTSL User manual
Handling instructions
使用說明書
취급 설명서
Petunjuk pemakaian
UC 18YTSL
en
zh
ko
vi
th
id
ar
en
zh
ko
vi
th
id
ar

2
1
2 3
4

3
5
a b
6
7

4
8
9
a b
10 11
5
English 中國語 한국어
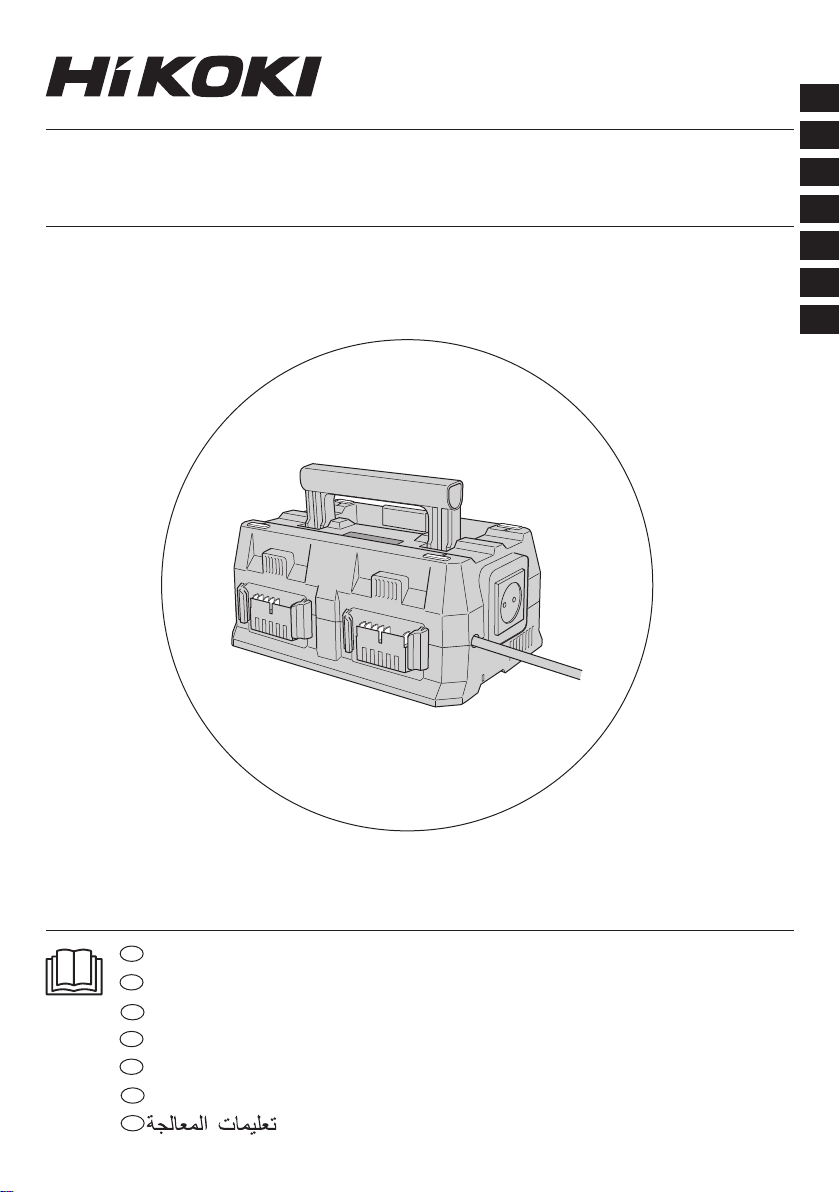
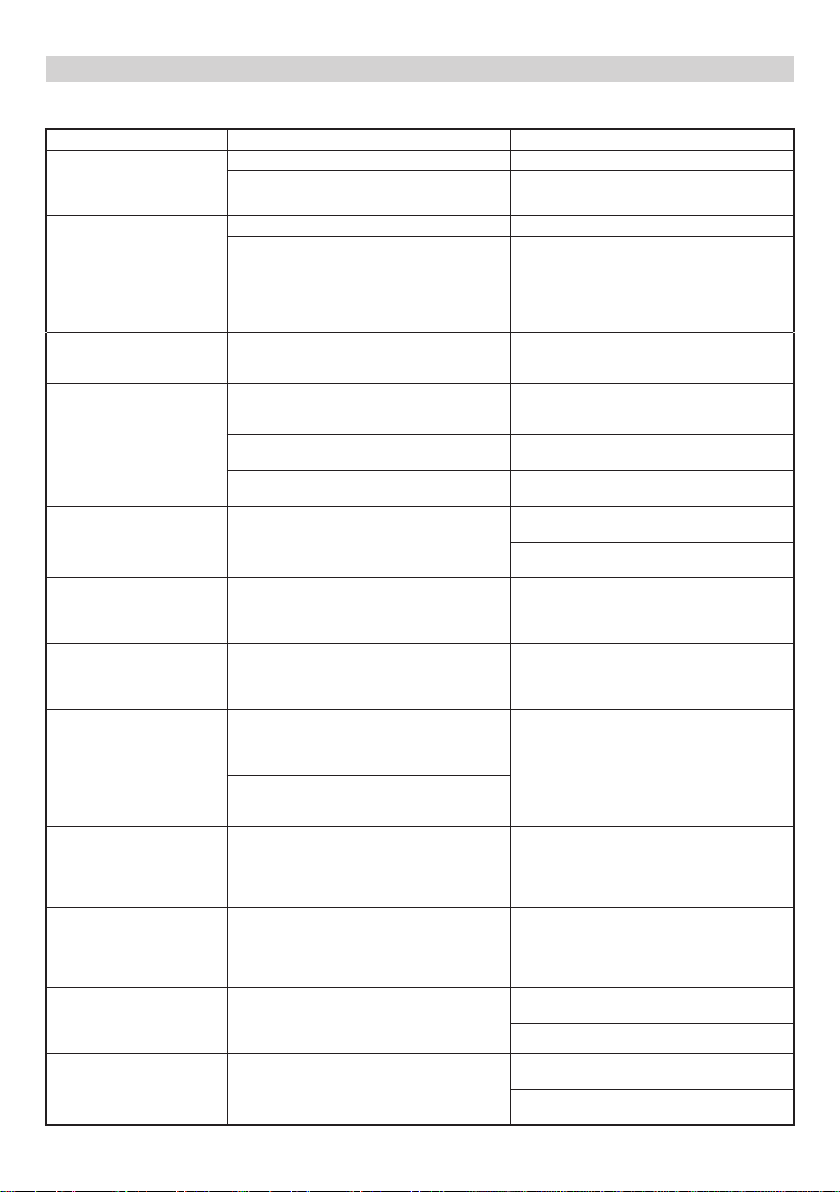
Rechargeable battery 充電式電池 재충전 배터리
Charge indicator lamp 充電信號燈 충전 표시 램프
Guide rail 導軌 가이드 레일
Ventilation holes 散熱孔 통풍구
Nameplate 銘牌 네임 플레이트
Rubber cover 橡膠蓋 고무 커버
USB port USB 端口 USB 포트
USB cable USB 電纜 USB 케이블 Cáp USB
Carrying handle 搬運手柄 운반 손잡이
AC outlet 交流電插座 AC 콘센트
Plug 插頭 플러그
Mode selector switch 模式選擇器開關 모드 선택 스위치
Mode indicator lamp 模式信號燈 모드 표시등
Switch panel 開關面板 스위치 패널
AC device 交流電設備 AC 장치
AC device plug 交流電設備插頭 AC 장치 플러그
Battery charging port
number 電池充電端口編號 배터리 충전 포트 번호
Bahasa Indonesia
Baterai isi ulang
Lampu indikator
pengisian daya
Rail pemandu
Lubang ventilasi
Plat nama
Penutup karet
Port USB
Kabel USB
Pegangan jinjing
Stopkontak AC
Steker
Sakelar pemilih mode
Lampu indikator mode
Panel sakelar
Perangkat AC
Steker perangkat AC
Nomor port pengisian
daya baterai

6
English
GENERAL OPERATIONAL
PRECAUTIONS
1. Keep work area clean. Cluttered areas and benches
invite accidents.
2. Avoid dangerous environment. Don’t expose power
tools and charger to rain. Don’t use power tools and
charger in damp or wet locations. And keep work area
well lit.
explosive materials.
liquids or gases.
3. This appliance can be used by children aged from 8
years and above and persons with reduced physical,
sensory or mental capabilities or lack of experience
and knowledge if they have been given supervision or
instruction concerning use of the appliance in a safe
way and understand the hazards involved. Children
shall not play with the appliance. Cleaning and user
maintenance shall not be made by children without
supervision.
4. Store idle tools and charger. When not in use, tools
and charger should be stored in dry, high or locked-
up place — out of reach or children. Store tools and
charger in a place in which the temperature is less
than 40°C.
5. Don’t abuse cord. Never carry charger by cord or yank
it to disconnect from receptacle. Keep cord from heat,
oil and sharp edges.
6. When the charger is not in use or when being
maintained and inspected, disconnect the power cord
of the charger from the receptacle.
charger.
8. Use only genuine HiKOKI replacement parts.
9. Do not use power tools and charger for applications
10. To avoid personal injury, use only the accessories
or attachment recommended in these handling
instructions or in the HiKOKI catalog.
11. If the supply cord is damaged, it must be replaced
by the manufacture or its service agent or a similarly
Let only the authorized service center do the
repairing. The Manufacture will not be responsible
for any damages or injuries caused by repair by the
unauthorized persons or by mishandling of the tool.
12. Make absolutely sure that the terminal area of the
charger is free of any adhering foreign material or
liquid. If there is any foreign material or liquid, remove
before use.
13. To ensure the designed operational integrity of power
tools and charger, do not remove installed covers or
screws.
nameplate.
15. Always charge the battery before use.
connect a usual dry cell, a rechargeable battery other
17. Do not use a transformer containing a booster.
18. Do not charge the battery from DC power supply.
19. Always charge indoors. Because the charger and
battery heat slightly during charging, charge the
battery in a place not exposed to direct sunlight;
where the humidity is low and the ventilation is good.
20. Use the exploded assembly drawing on this handling
instructions only for authorized servicing.
PRECAUTIONS FOR CHARGER
1. Always charge the battery at an ambient temperature
of -10–40°C. A temperature of less than -10°C will
result in over charging which is dangerous. The
battery cannot be charged at a temperature greater
than 40°C.
The most suitable temperature for charging is that of
20–25°C.
2. Do not allow foreign matter to enter the hole for
connecting the rechargeable battery.
3. Never disassemble the rechargeable battery or
charger.
4. Never short-circuit the rechargeable battery.
Short-circuiting the battery will cause a great electric
current and overheat. It results in burn or damage to
the battery.
If the battery is burnt, it may explode.
6. Using an exhausted battery will damage the charger.
7. Bring the battery to the shop from which it was
purchased as soon as the post-charging battery life
becomes too short for practical use. Do not dispose of
the exhausted battery.
8. Do not insert objects into the air ventilation slots of the
charger.
air ventilation slots will result in an electrical shock
hazard or damage to the charger.
USB DEVICE CONNECTION
PRECAUTIONS
When an unexpected problem occurs, the data in a USB
device connected to this product may be corrupted or
lost. Always make sure to back up any data contained in
the USB device prior to use with this product.
Please be aware that our company accepts absolutely no
responsibility for any data stored in a USB device that is
corrupted or lost, nor for any damage that may occur to a
connected device.
SYMBOLS
WARNING
The following show symbols used for the
machine. Be sure that you understand their
meaning before use.
Read all safety warnings and all instructions.
SPECIFICATION
Model UC18YTSL
Charging voltage 14.4 V – 18 V
Weight 1.6 kg
APPLICATION
BSL18 series, and MV series.
7
English
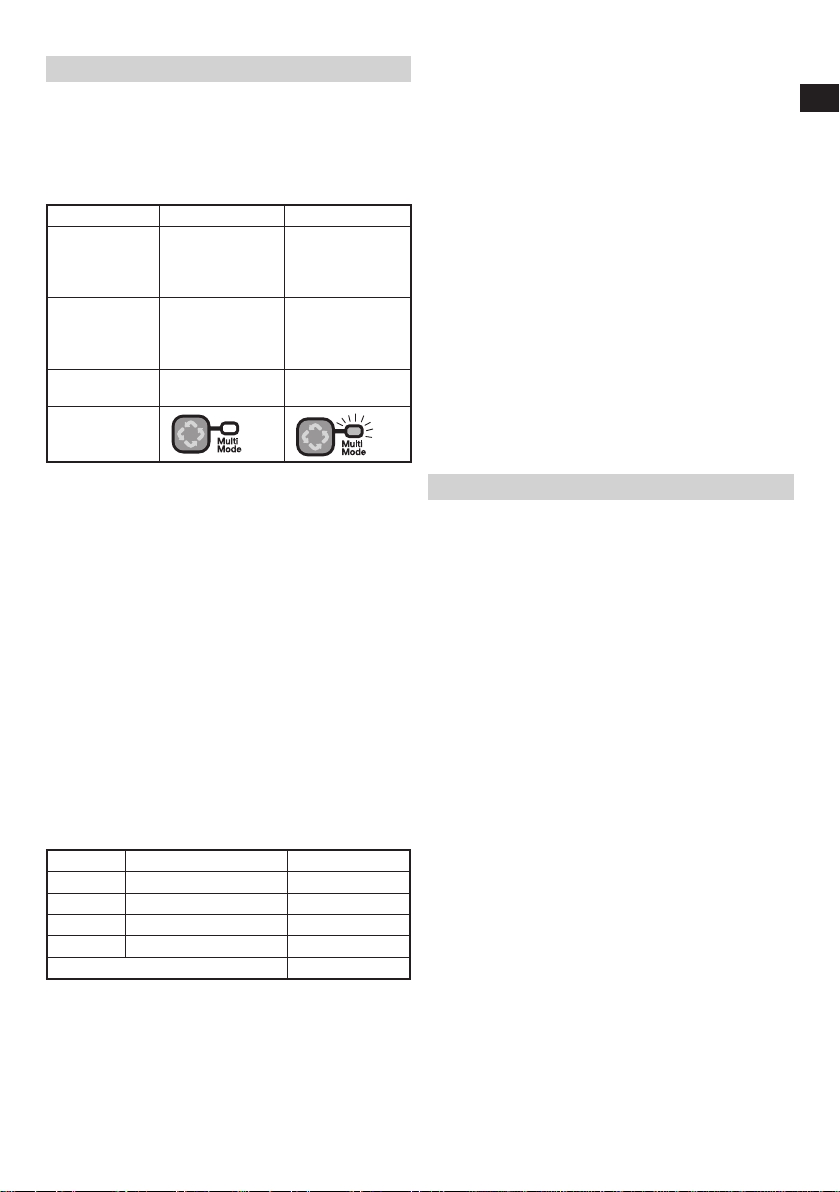
CHARGING MODE SELECTION
This device is capable of charging up to four rechargeable
batteries with a choice of two modes.
Rechargeable batteries can be charged in any of the
ports, both in normal mode and in Multi Mode.
charged in normal mode. When the switch is on, they are
charged in Multi Mode. (Fig. 2)
Mode Normal Multi
Purpose
To charge
a number of
batteries in
sequence.
To charge
all batteries
simultaneously.
Charging
method
Charges in
sequence from
port numbers 1
to 4.
Charges all
batteries
uniformly.
Mode selector
switch ON
Mode indicator
lamp
ON
Normal Mode (Mode selector switch o)
Rechargeable batteries are charged in the order of the
Fig. 3)
The charge indicator lamp turns green when the
corresponding rechargeable battery is fully charged, and
the buzzer emits a beep to notify the user.
The time taken to fully charge all batteries will be the total
of the charging time for each battery.
In the example shown in Table 1, the time taken to fully
charge the battery in port number 2 will be the total time
taken to charge the batteries in port numbers 1 and 2 (32
minutes + 52 minutes = 84 minutes).
Tip
Rechargeable batteries you wish to use soon should
be inserted in order from port number 1.
Multi Mode (Mode selector switch on)
All batteries will be charged simultaneously. The charge
indicator lamps turn green when all rechargeable
batteries are fully charged, and the buzzer emits a beep
to notify the user.
In the example shown in Table 1, it will take 152 minutes
to fully charge all four batteries simultaneously.
Table 1 Charging example
Port No. Rechargeable battery Charging time*
1BSL 36A18 32 minutes
2BSL 36B18 52 minutes
3BSL 1860 38 minutes
4BSL 1430C 30 minutes
Total charging time 152 minutes
* Charging time will vary depending on the residual
capacity of the batteries.
General points applying to both modes
indicated by the steady red illuminated charge
indicator lamp.
cold due to low-temperature conditions take longer
to charge, so they are skipped and charged after the
other batteries.
switch twice.
This resets the charger, reassesses batteries that
are either hot immediately after use or cold due to
low-temperature conditions, and skips them before
resuming charging.
Normal mode
(i.e., higher priority) port while other batteries are
being charged, charging of the newly inserted battery
will start after the battery currently being charged has
been fully charged.
Multi mode
charged, the level of charging may vary from battery to
battery.
other batteries are being charged will increase the
time taken to charge all the batteries.
CHARGING
Before using the power tool, charge the battery as follows.
1. Connect the charger’s power cord to the
receptacle.
When connecting the plug of the charger to a
receptacle, the charge indicator lamp will blink in red
(At 1-second intervals).
2 Select the charging mode.
Select the charging mode to suit requirements.
(Fig. 2) (See “CHARGING MODE SELECTION” on
page 7.)
3. Insert the battery into the charger.
Fig. 4.
NOTE
The charging lamps next to each of the four ports
indicate the charging status of the corresponding
battery being charged.
4. Charging
When inserting a battery in the charger, the charge
indicator lamp will light up in red.
When the battery becomes fully recharged, the charge
indicator lamp will light up in green. (See Table 2)
(1) Charge indicator lamp indication
The indications of the charge indicator lamp will be
as shown in Table 2, according to the condition of the
charger or the rechargeable battery.
8
English
Table 2
Indications of the charge indicator lamp
Charge
indicator
lamp
(RED /
GREEN)
Before
charging Blinks
(RED)
Lights for 0.5 seconds. Does not light
Plugged into power source
While
charging Lights
(RED) Lights continuously
Charging
complete Lights
(GREEN)
Lights continuously
(Continuous buzzer sound: about 6
seconds)
Overheat
standby Blinks
(RED)
Lights for 0.3 seconds. Does not light
Battery overheated. Unable to
charge. (Charging will commence
when battery cools)
Charging
impossible
(RED)
Lights for 0.1 seconds. Does not light
(Intermittent buzzer sound: about 2
seconds)
Malfunction in the battery or the
charger
(2) Regarding the temperatures and charging time of the rechargeable battery
The temperatures and charging time will become as shown in Table 3.
Table 3
Charger UC18YTSL
Battery
Type of battery Li-ion
Temperatures at which
the battery can be
recharged 0°C – 50°C
Charging voltage V14.4 18
Charging time,
approx. (At 20°C)
BSL14xx series BSL18xx series Multi volt
series
(4 cells) (8 cells) (5 cells) (10 cells) (10 cells)
min.
BSL1415S : 15
BSL1415 : 15
BSL1415X : 15
BSL1420 : 20
BSL1425 : 25
BSL1430C: 30
BSL1430 : 20
BSL1440 : 26
BSL1450 : 32
BSL1460 : 38
BSL1815S : 15
BSL1815 : 15
BSL1815X : 15
BSL1820 : 20
BSL1825 : 25
BSL1830C : 30
BSL1830 : 20
BSL1840 : 26
BSL1850 : 32
BSL1860 : 38
BSL36A18 : 32
BSL36B18 : 52
USB ×2 Charging voltage V 5
Charging current ATotal 2
NOTE
on the ambient conditions and battery conditions.
The battery charging times apply to charging one
battery on its own. When charging multiple batteries,
the total charging time will be the sum of the individual
charging times.
is below 0°C.
5. Disconnect the charger’s power cord from the
receptacle.
6. Hold the charger rmly and pull out the battery.
NOTE
Be sure to pull out the battery from the charger after
use, and then keep it.
Regarding electric discharge in case of new
batteries, etc.
As the internal chemical substance of new batteries
and batteries that have not been used for an extended
period is not activated, the electric discharge might be
a temporary phenomenon, and normal time required
for recharging will be restored by recharging the
batteries 2 – 3 times.
How to make the batteries perform longer.
(1) Recharge the batteries before they become
completely exhausted.
When you feel that the power of the tool becomes
weaker, stop using the tool and recharge its battery. If
you continue to use the tool and exhaust the electric
current, the battery may be damaged and its life will
become shorter.

9
English
(2) Avoid recharging at high temperatures.
A rechargeable battery will be hot immediately after
use. If such a battery is recharged immediately after
use, its internal chemical substance will deteriorate,
and the battery life will be shortened. Leave the
battery and recharge it after it has cooled for a while.
CAUTION
has been left for a long time in a location subject to
direct sunlight or because the battery has just been
used, the charge indicator lamp of the charger lights
then start charging.
0.2-second intervals), check for and take out any
foreign objects in the charger’s battery connector.
If there are no foreign objects, it is probable that the
battery or charger is malfunctioning. Take it to your
authorized Service Center.
with UC18YTSL is taken out, wait for a minimum of
3 seconds before reinserting it to continue charging. If
the battery is reinserted within 3 seconds, the battery
may not be properly charged.
HOW TO RECHARGE USB DEVICE
WARNING
defect or damage.
Using a defective or damaged USB cable can cause
smoke emission or ignition.
port with the rubber cover.
Buildup of dust etc. in the USB port can cause smoke
emission or ignition.
NOTE
USB device and battery are being simultaneously
charged.
recharging.
USB device from the charger.
of a USB device, but may also result in unexpected
accidents.
depending on the type of device.
2 A for the two USB charging ports.
Doing so may cause the charger to malfunction.
(1) Select a charging method
Depending on the charge method selected, either the
battery is inserted into the charger or the power cord
is plugged into an outlet.
(Fig. 5-a)
electrical outlet (Fig. 5-b)
(2) Connect the USB cable. (Fig. 6)
commercially available USB cable (appropriate to the
device being charged) into the USB port.
(3) When charging is completed (Fig. 7)
USING AS AN AC POWER SUPPLY
The product includes a convenient AC outlet for use as a
power supply for AC devices. (Current capacity is 8 A.)
AC devices can be used by plugging them into the AC
outlet on the charger with the charger power supply plug
plugged into an electrical outlet. (Fig. 8)
NOTE
exceed 8 A.
Doing so may cause the charger to malfunction.
Read the instruction manual carefully for the device to
be used, and check the current rating before use.
into an electrical outlet while using an AC device.
electrical outlet. (Fig. 9-a)
power supplied from an electrical outlet. (Fig. 9-b)
MAINTENANCE AND INSPECTION
1. Inspecting the mounting screws
Regularly inspect all mounting screws and ensure that
they are properly tightened. Should any of the screws
could result in serious hazard.
2. Cleaning of the charger
When the charger is stained, wipe with a soft dry cloth
or a cloth moistened with soapy water. Do not use
chloric solvents, gasoline or paint thinner, for they melt
plastics.
3. Transportation after use
WARNING
Detach any batteries from the charger before
transporting.
(Fig. 10)
A carrying handle is provided for easy carrying after
use. The handle can be stowed in the main unit for
compactness when not in use. (Fig. 11)
4. Store idle charger
When not in use, the charger should be stored in dry,
high or locked-up place — out of reach of children.
CAUTION
In the operation and maintenance of power tools, the
safety regulations and standards prescribed in each
country must be observed.
NOTE
Due to HiKOKI’s continuing program of research and
change without prior notice.
10
English
TROUBLESHOOTING
Use the inspections in the table below if the tool does not operate normally. If this does not remedy the problem,
consult your dealer or the HiKOKI Authorized Service Center.
Symptom Possible cause Remedy
The charge indicator lamp
battery charging doesn’t
begin.
The battery is not inserted all the way.
There is foreign matter in the battery
terminal or where the battery is attached. Remove the foreign matter.
The charge indicator lamp
blinks red, and battery
charging doesn’t begin.
The battery is not inserted all the way.
The battery is overheated. If left alone, the battery will automatically
begin charging if its temperature
decreases, but this may reduce battery
life. It is recommended that the battery be
cooled in a well-ventilated location away
from direct sunlight before charging it.
Battery usage time is short
even though the battery is
fully charged.
The battery’s life is depleted. Replace the battery with a new one.
The battery takes a long
time to charge. The temperature of the battery, the
charger, or the surrounding environment is
extremely low.
Charge the battery indoors or in another
warmer environment.
The charger’s vents are blocked, causing
its internal components to overheat. Avoid blocking the vents.
The cooling fan is not running. Contact a HiKOKI Authorized Service
Center for repairs.
The USB power lamp
USB device has stopped
charging.
The battery’s capacity has become low. Replace the battery with one that has
capacity remaining.
Plug the charger’s power plug into an
electric socket.
USB power lamp does not
charging.
The USB power lamp lights up green to
indicate that USB charging is possible. This is not a malfunction.
It is unclear what the
charging status of a USB
device is, or whether its
charging is complete.
even when charging is complete. Examine the USB device that is charging
Charging of a USB device
pauses midway. The charger was plugged into an electrical
socket while the USB device was being
charged using the battery as the power
source.
This is not a malfunction.
The charger pauses USB charging for
between power sources.
A battery was inserted into the charger
while the USB device was being charged
using a power socket as the power source.
Charging of the USB
device pauses midway
when the battery and the
USB device are being
charged at the same time.
The battery has become fully charged. This is not a malfunction.
The charger pauses USB charging for
about 5 seconds while it checks whether
the battery has successfully completed
charging.
Charging of the USB
device doesn’t start when
the battery and the USB
device are being charged
at the same time.
The remaining battery capacity is
extremely low. This is not a malfunction.
When the battery capacity reaches a
certain level, USB charging automatically
begins.
AC devices cannot be
used even when they are
plugged into the AC outlet
on the charger.
The charger fuse has tripped due to
excessive load from the AC device. Contact a HiKOKI Authorized Service
Center for repairs.
AC devices should not exceed 8 A.
Devices do not charge
even when they are
connected to the USB
ports.
The charger fuse has tripped due to
excessive load from the USB device. Contact a HiKOKI Authorized Service
Center for repairs.
USB devices should not exceed a total of
2 A.
11
中國語
使用充電器的注意事項
1. 務必在 -10 ∼ 40℃的溫度環境下進行充電。溫度
低於 -10℃會導致充電過度,非常危險。電池不
能在高於 40℃的溫度下充電。
最適合充電的溫度是 20 ∼ 25℃之間。
2. 勿讓雜質進入充電池連接口內。
3. 切勿拆卸充電式電池或充電器。
4. 切勿使充電式電池短路。造成過大電流和過熱,
從而燒壞電池。
5. 請勿將電池丟入火中。
燃燒電池將引起爆炸。
6. 請勿使用耗竭電力的電池,否則將會損壞充電器。
7. 充電後電池壽命若太短不夠使用,請儘快將電池
送往經銷店。不可將用過的電池丟棄。
8. 請勿將異物插入充電器的通風口。
若將金屬異物或易燃物插入充電器的通風口,將
引起觸電事故或使充電器受損。
連接 USB 裝置的注意事項
發生未預期的問題時,連接到本產品的 USB 裝置內
的數據可能會損壞或丟失。使用本產品之前,請務
必將 USB 裝置內的所有數據進行備份。
請注意,本公司對任何存儲於 USB 裝置內已損壞或
丟失的數據以及任何可能發生於連接裝置的損害,
恕不負任何責任。
符號
警告
以下為使用於本機器的符號。請確保您在使用前
明白其意義。
閱讀所有安全警告和說明。
規 格
型式 UC18YTSL
充電電壓 14.4V-18V
重量 1.6kg
用 途
○用於為 HiKOKI 電池 BSL14 系列、BSL18 系列和
MV 系列充電。
○用於為 USB 設備充電。
○用作交流電源插座。
一般操作注意事項
1. 保持工作場所清潔。雜亂無章的工作區域易發生
意外。
2. 避免危險的環境。請勿讓電動工具與充電器淋到
雨,不可在潮濕場所使用電動工具和充電器。工
作區域要保持明亮。切勿在易燃或爆炸性物質附
近使用電動工具和充電器。不可在存放易燃液體
或氣體的地方使用電動工具和充電器。
3. 8 歲以上的兒童以及體弱、感官能力欠佳或精神
耗弱者,或缺乏經驗和知識者,若在有人以安全
的方式監督或指示有關使用該設備,並了解所涉
及的危害的情況下,可以使用本設備。兒童不得
玩耍本設備。未經監督的兒童不得進行清潔和用
戶維護。
4. 存放不使用的電動工具和充電器。不使用時,電
動工具和充電器應存放在乾燥的高處或加鎖保管
的場所-兒童接觸不到的地方。請將電動工具和
充電器存放在溫度低於 40℃的地方。
5. 勿濫用電源線。絕勿使用電源線搬運充電器或將
電源線從插座中使勁拔出。不可讓電源線受熱、
沾油、及碰到銳利的棱角。
6. 充電器不使用時或維修檢查時,務必請將充電器
的電源線從插座拔出。
7. 請勿使用未經指定的充電器以免發生危險。
8. 只能使用 HiKOKI 指定的正廠更換零件。
9. 不得使用電動工具和充電器去進行使用說明書規
定以外的作業。
10.為了避免人體受傷,只能使用本說明書或 HiKOKI
牌產品目錄中所推薦的附件或配件。
11.如果電源線損壞,必須由廠商或其維修代理店或
具有同等資格的技術人員更換,以避免發生危險。
只能請經過授權的服務中心修理本工具。對於經
由未授權者的修理或因錯誤使用本工具而造成的
損失或人體傷害,廠商概不負責。
12.確保充電器的端子區域沒有任何黏附的異物或液
體。如果有任何異物或液體,請在使用前將其移
除。
13.為了確保設計的完整性,電動工具和充電器的蓋
罩和螺釘類不可任意拆除。
14.務必在銘牌上規定的電壓下使用充電器。
15.使用前請務必將電池充電。
16.請勿使用規定種類以外的電池。請勿將未經指定
的一般乾電池、充電式電池或汽車蓄電池連接於
電動工具上。
17.請勿使用含有昇壓器的變壓器。
18.請勿從直流電源進行電池的充電。
19.務請在室內進行充電。充電過程中,充電器和電
池會稍微變熱,因此,不要在陽光直射處充電,
而應在濕度低、通風良好的陰涼處進行充電。
20.進行授權服務時,請使用本說明書中的組裝分解
圖。

12
中國語
充電模式選擇
本裝置可通過選擇兩種模式,為最多四個充電式電
池充電。
可以正常模式和多模式在任何端口給充電式電池充
電。
當模式選擇器開關關閉時以正常模式給電池充電。
當開關開啟時以多模式充電。(圖 2)
模式 正常 多
目的 按順序為多個電
池充電。
同時為所有電池
充電。
充電方法 從端口號1至4按
順序充電。
為所有電池均勻
充電。
模式選擇器
開關 關 開
模式信號燈
關
開
正常模式(模式選擇器關閉)
按端口號順序(1→2→3→4)給充電式電池充電。
(圖3)
當相應的充電式電池充滿電時,充電信號燈變綠,
同時蜂鳴器發出「嗶」聲通知使用者。
給所有電池充滿電所需的時間是各電池充電時間的
總和。
在表 1所示的範例中,給端口2中電池充滿電所需的
時間是給端口1和2中電池充電所需時間的總和(32
分鐘 + 52分鐘= 84分鐘)。
提示
應從端口號1開始按序將希望立即使用的充電式
電池插入。
多模式(模式選擇器開啟)
同時給所有電池充電。當給所有充電式電池均充滿
電時,充電信號燈變綠,同時蜂鳴器發出「嗶」聲
通知使用者。
在表 1所示的範例中,同時給所有四個電池充滿電所
需的時間為152分鐘。
表1 充電範例
端口編號 充電式電池 充電時間*
1 BSL36A18 32分鐘
2 BSL36B18 52分鐘
3 BSL1860 38分鐘
4 BSL1430C 30分鐘
總充電時間 152分鐘
* 充電時間因電池的剩餘電量而異。
適用於兩種模式的通用點
○ 目前正在充電的電池是穩定亮起為紅色的充電信
號燈所指示的端口。
○ 剛使用後溫度很高或者受低溫條件影響而溫度較
低的電池充電耗時較長,因此會將其跳過並後於
其他電池充電。
○ 如果充電耗時較長,請按選擇器開關兩次。
這樣可重置充電器,重新評估剛使用後溫度很高
或者受低溫條件影響而溫度較低的電池,並在重
新充電前將其跳過。
正常模式
○ 如果正在給其他電池充電時在編號較小(如優先
級較高)的端口中插入了電池,則會在將目前正
在充電的電池充滿電後開始給新插入的電池充
電。
多模式
○ 如果充電式電池的電未充滿即使用,則充電等級
可能視電池而異。
○ 正在給其他電池充電時在空閑端口中插入已耗盡
的電池會使給所有電池充電所需的時間延長。
充 電
使用電動工具之前,按下述方法將電池進行充電。
1. 將充電器的電源線連接到插座。
當充電器的插頭連接到插座時,充電信號燈會閃
爍紅燈(間隔為 1 秒)。
2. 選擇充電模式。
選擇符合要求的充電模式。(圖 2)(參閱第12頁
的「充電模式選擇」。)
3. 將電池裝入充電器。
將電池牢固地裝入充電器,如圖4所示。
註:
四個端口中的每一個旁邊的充電信號燈標示正在
充電的相應電池的充電狀態。
4. 充電
將充電器中插入電池時,充電信號燈亮起為紅
色。當電池完全充電時,充電信號燈會亮起綠燈。
(見表 2)
(1)充電信號燈指示
依據充電器或充電池的狀態,充電信號燈會有不
同的指示,如表 2 所示。
13
中國語
註:
○ 電池充電時間可能因環境溫度和電池情況而延
長。
電池充電時間適用於單獨給一個電池充電。給多
個電池充電時,總充電時間是各充電時間的總和。
○ 如果環境溫度低於 0℃,那麼充電時間將延長。
5. 將充電器的電源線從插座拔下。
6. 拿穩充電器並取出電池。
註:
充電結束後,務必從充電器取出電池,然後妥善
存放。
使用新電池或其他電池,產生電量較弱的問題時
由於新電池及長時間未使用之電池的內部化學物
質未活化,因此初次及第二次使用時的電量會較
弱。此為暫時現象;在充電2至3次後,電量
就會恢復正常。
怎樣讓電池使用時間更長
(1)在電池電量完全耗盡之前給電池充電。
在感覺工具的動力變弱時,停止使用工具並為電
池充電。如果繼續使用工具消耗電流,可能會造
成對電池的損壞,電池使用壽命會縮短。
表 2
充電信號燈的指示
充電信
號燈
(紅/綠)
充電前 閃爍
(紅)
亮起0.5秒,熄滅0.5秒。(熄滅
間0.5秒) 插入電源
充電時 亮起
(紅)
持續亮起
充電完成 亮起
(綠)
持續亮起
( 連續的蜂鳴聲:約 6 秒 )
過熱待機 閃爍
(紅)
亮起0.3秒,熄滅0.3秒。(熄滅
間0.3秒)
電池過熱。
無法充電。
(待電池降溫後便會開始充電)
無法充電 快速閃爍
(紅)
亮起0.1秒,熄滅0.1秒。(熄滅
間0.1秒)
( 間歇的蜂鳴聲:約 2 秒 )
電池或充電器故障
(2)關於充電池的溫度和充電時間
溫度和充電時間如表3中所示。
表3
充電器 UC18YTSL
電池
電池類型 Li-ion
電池可充電的溫度 0℃–50℃
充電電壓 V 14.4 18
依電池容量的大
約充電時間
(於20℃ 時)
BSL14xx 系列 BSL18xx 系列 多伏特系列
(4 個電池芯)(8 個電池芯)(5 個電池芯)(10 個電池芯)(10 個電池芯)
分鐘
BSL1415S:15
BSL1415 :15
BSL1415X:15
BSL1420 :20
BSL1425 :25
BSL1430C:30
BSL1430 :20
BSL1440 :26
BSL1450 :32
BSL1460 :38
BSL1815S:15
BSL1815 :15
BSL1815X:15
BSL1820 :20
BSL1825 :25
BSL1830C:30
BSL1830 :20
BSL1840 :26
BSL1850 :32
BSL1860 :38
BSL36A18:32
BSL36B18:52
USB×2 充電電壓 V5
充電電流 A總計2

14
中國語
(2)避免在高溫下充電
充電電池在剛使用後會發熱。如果在電池剛使用
後為電池充電,電池的內部化學物質的性能會下
降,電池使用壽命會縮短。請先將電池放置一會
兒,待電池冷卻後再進行充電。
注意
○ 電池因長時間放置在直射陽光處遭到日曬或剛使
用後會發熱,若在此時進行充電,充電器的信號
燈會亮起0.3秒,非亮起0.3秒(熄滅0.3秒)。
此時您必須先待電池冷卻,再進行充電。
○ 充電信號燈快速閃爍時(間隔時間為 0.2秒),
請檢查充電器的電池連接處是否有異物並加以清
除。若沒有異物,則表示電池或充電器可能發
生故障,請將其送往當地授權服務中心。
○ 由於 UC18YTSL 內置微電腦需要約 3 秒的時間確
認進行充電的電池已被取出,請等待至少 3 秒後
再將電池重新插入繼續充電。如果電池在 3 秒之
內重新插入,電池可能無法正常充電。
USB 裝置的充電方法
警告
○ 使用前,請檢查連接的 USB 電纜是否有缺陷或損
壞。
使用有缺陷或損壞的 USB 電纜可能會導致冒煙或
起火。
○ 使用短於 2 公尺的 USB 連接線。
○ 產品不使用時,請用橡膠蓋蓋住 USB 端口。
USB 端口堆積灰塵可能會導致冒煙或起火。
註:
○ 當 USB 設備和電池同時充電時,充電所需的時間
會更長。
○ USB 充電期間有可能偶爾停頓。
○ 當 USB 裝置未被充電時,請從充電器取出 USB
裝置。
若未進行此動作,不僅可能減少 USB 裝置的電池
壽命,並可能導致意外事故的發生。
○根據裝置的類型,可能無法對某些USB裝置進行
充電。
○兩個USB充電端口的USB充電總電流不應超過
2A。
否則可能會導致充電器出現故障。
(1)選擇充電方式
根據所選擇的充電方式,無論是電池插入充電器
或電源線插入插座。
○ 從電源插座進行 USB 裝置的充電( 圖 5-a)
○從電源插座進行USB裝置和電池的充電
(圖 5-b)
(2)連接 USB 電纜。( 圖6)
放回橡膠蓋,並將市售的 USB 電纜 ( 適合要充電
的裝置 ) 牢牢插入 USB 端口。( 圖7)
(3)充電完成時
○ 要查證充電狀態,請檢查 USB 裝置。
○ 將電源線從插座拔出。
○ 將橡膠蓋放在 USB 端口。
用作交流電源
本產品含有一個便利的交流電插座,可用作交流電
設備的電源。(電流容量為 8A。)
在充電器電源插頭插入電源插座的情況下,可以通
過將交流電設備插入充電器的交流電插座來使用交
流電設備。( 圖8)
註:
○ 連接至充電器的交流電設備不應超過 8A。
否則可能會導致充電器故障。
請仔細閱讀待使用裝置的使用說明書,並在使用
前檢查額定電流。
○ 使用交流電設備時,請確保充電器電源插頭已插
入電源插座。
(1)選擇使用配置
○ 使用從電源插座供電的交流電設備。(圖 9-a)
○ 通過電源插座供電使用交流電設備並為電池
充電。(圖 9-b)
維 修 和 檢 查
1. 檢查安裝螺釘
要經常檢查安裝螺釘是否妥善緊固。若發現螺釘
鬆了,應立即重新扭緊,否則會導致嚴重的事故。
2. 清潔充電器
充電器髒汙時,請使用乾的軟布或沾肥皂水的布
擦拭。切勿使用氯溶液、汽油或稀釋劑,以免塑
膠部分溶化。
3. 使用後的運輸
警告
在運輸之前,請從充電器中取出所有電池。
如果電池脫落,可能會造成損壞或人身傷害。(圖
10)
附帶搬運手柄,以便在使用後進行便捷搬運。手柄
可以存放在主機中,以便在不使用時保持設備的緊
湊。(圖 11)
4. 存放不使用的充電器
不使用時,充電器應存放在乾燥的高處或加鎖保
管的場所-兒童接觸不到的地方。
注意
在操作和維修電動工具中,必須遵守各國的安全規
則和標準規定。
註:
為求改進,本手冊所載規格可能不預先通告而徑予
更改。
15
中國語
疑 難 排 解
若電動工具無法正常運作,請參閱下表的檢查項目。若問題仍無法解決,請洽當地經銷商或 HiKOKI 所認可
的維修中心。
情況 可能原因 解決方法
充電指示燈迅速閃爍紅
色,且電池不開始充電。
電池未完全插入。 牢固地插入電池。
電池端子內或電池安裝處有異物。 移除異物。
充電指示燈閃爍紅色,
且電池不開始充電。
電池未完全插入。 牢固地插入電池。
電池過熱。 若放著不管,當電池溫度降低後就會自
動開始充電,但這可能會縮短電池的壽
命。建議在充電前將電池放在遠離陽光
直射且通風良好的位置進行冷卻。
即使電池已充滿電,電
池的使用時間仍然很短。
電池壽命已耗盡。 更換新的電池。
電池的充電時間很長。
電池、充電器或周圍環境的溫度非常低。
在室內或其他較溫暖的環境進行電池的
充電。
充電器的通風口被堵塞,造成其內部組
件過熱。
避免堵塞通風口。
冷卻風扇未運轉。 聯繫 HiKOKI 授權服務中心以進行修理。
USB 電源燈已關閉,且
USB 裝置已停止充電。
電池容量已變低。 更換為有剩餘電量的電池。
將充電器的電源插頭插入電源插座。
即使 USB 裝置已完成充
電,USB 電源燈仍無法
關閉。
USB 電源燈亮起綠色,表示可以進行
USB 充電。
這不是故障。
不清楚什麼是 USB 裝置
的充電狀態,或充電是
否完成。
即使充電完成,USB 電源燈仍無法關
閉。
檢查正在充電的 USB 裝置以確認其充
電狀態。
USB 裝置途中暫停充電。 當使用電池作為電源對 USB 裝置進行
充電時,充電器被插入電源插座。
這不是故障。
當充電器正在區別電源時,會暫停 USB
充電約 5 秒鐘。
當使用電源插座作為電源對 USB 裝置
進行充電時,電池被插入充電器。
當電池和 USB 裝置同時
充電時,USB 裝置的充
電會在途中暫停。
電池已充滿電。 這不是故障。
充電器在檢查電池是否已成功完成充電
時,會暫停 USB 充電約 5 秒鐘。
當電池和 USB 裝置同時
充電時,USB 裝置的充
電不會啟動。
剩餘電池容量極低。 這不是故障。
當電池容量達到一定的水平時,USB 充
電會自動開始。
即使將交流電設備插入
充電器的交流電插座仍
無法使用。
由於交流電設備過載,充電器保險絲熔
斷。
聯繫 HiKOKI 授權服務中心以進行修理。
交流電設備不應超過 8A。
即使設備連接至 USB 端
口,設備仍不會充電。
由於 USB 設備過載,充電器保險絲熔斷。 聯繫 HiKOKI 授權服務中心以進行修理。
USB 設備總電流不應超過 2A。

한국어
16
충전기의 안전 예방 수칙
1. 항상 -10-40℃ 사이의 적절한 온도에서 충전하십시오.
-10℃ 이하에서는 과도하게 충전되어 위험할 수
있습니다. 40℃이상에서는 충전되지 않습니다.
가장 적절한 충전 온도는 20-25℃ 사이 입니다.
2. 충전식 배터리 연결 구멍에 이물질이 들어가지 않게
하십시오.
3. 재충전 배터리, 충전기를 분해하지 마십시오.
4. 재충전 배터리가 합선되지 않도록 하십시오. 전류의
증가 및 과열로 인해 배터리가 손상됩니다.
5. 배터리를 불 속에 버리지 마십시오.
배터리가 타면 폭발할 수 있습니다.
6. 소모된 배터리를 사용하시면 충전기가 망가질 수
있습니다.
7. 사용 중 배터리의 수명이 짧아지면 배터리를 구매처로
가져가십시오. 소모된 배터리를 버리지 마십시오.
8. 충전기의 통풍구에 이물질을 넣지 마십시오.
금속성 물질이나 가연성 물질을 충전기의 통풍구로
넣으면 전기충격의 위험이 있을 수 있으며 배터리가
망가질 수 있습니다.
USB 장치 연결 시 주의사항
예기치 않은 문제가 발생할 경우 본 제품에 연결된 USB
장치의 데이터가 손상되거나 손실될 수 있습니다. 본
제품에 USB 장치를 사용하기 전에 항상 USB 장치에
포함된 데이터를 백업하십시오.
당사는 USB 장치에 저장된 데이터의 손상 또는 손실과
연결된 장치에 발생할 수 있는 손상에 대해 어떠한 책임도
지지 않습니다.
기호
경고
다음은 기기에 사용되는 기호입니다. 기호의 의미를
이해한 후에 기기를 사용해 주시기 바랍니다.
모든 안전 경고 사항과 지침을 읽어 주십시오.
사양
모델 UC18YTSL
충전전압 14.4 V – 18 V
무게 1.6 kg
적용
HiKOKI BATTERY BSL14 시리즈, BSL18 시리즈, MV
시리즈 충전용.
충전용 USB 장치.
AC 전원 콘센트.
안전을 위한 일반 사용 수칙
1. 작업 환경을 깨끗하게 하십시오. 작업장, 작업대가
어지러우면 사고를 가져올 수 있습니다.
2. 위험한 장소를 피하십시오. 파워툴, 충전기를 비에 노출
시키지 마십시오. 파워툴, 충전기를 습한 장소에서
사용하지 마십시오. 작업장을 밝게 하십시오.
가연성 물질 옆에서 파워툴, 충전기를 사용하지
마십시오.
가연성 액체, 가스 옆에서 사용하지 마십시오.
3. 이 기기는 8세 이상의 어린이와 육체적, 감각적, 정신적
능력이 떨어지거나 사용 경험 및 지식이 부족한 자가
안전한 기기 사용에 관한 감독이나 지도를 받았고
이에 수반되는 위험을 이해하고 있을 경우 사용할
수 있습니다. 어린이는 이 기기를 가지고 놀아서는
안 됩니다. 어린이는 감독 없이 청소와 유지보수를
수행해서는 안 됩니다.
4. 사용하지 않는 도구, 충전기는 보관하십시오. 사용하지
않으실 때는 도구와 충전기는 건조하고 어린이의 손이
닿지 않는 곳에 보관하십시오. 40℃ 이하의 온도에서
보관하십시오.
5. 코드가 망가지지 않도록 하십시오. 줄을 잡아당겨서
플러그를 빼지 마십시오. 열, 기름, 날카로운 물건을
피하여 보관해 주십시오.
6. 충전기를 사용하지 않거나 보관할 때, 검사 할 때는
충전기의 파워코드를 콘센트에서 빼 주십시오.
7. 위험을 방지하기 위하여, 명시된 충전기만
사용하십시오.
8. 정품 HiKOKI 부품만 사용하십시오.
9. 본 사용 설명서에 명시되지 않은 파워툴, 충전기를
사용하지 마십시오.
10. 상해를 예방하기 위하여, 본 사용설명서 혹은 HiKOKI
카탈로그에서 추천된 액세서리, 부품을 사용하여
주십시오.
11. 공급코드가 망가지면 제조자, 서비스 에이전트 혹은
관련 기술자에게 교체하십시오.
공식 서비스 센터만 수리 할 수 있습니다. 제조사는
비공식 서비스 센터의 수리, 부주의로 인한 손해,
상해에 대해 책임지지 않습니다.
12. 충전기의 단자 부분에 이물질이나 액체가 붙어 있지
않음을 반드시 확인하십시오. 이물질이나 액체가 붙어
있는 경우 사용하기 전에 제거하십시오.
13. 파워툴과 충전기가 온전히 작동할 수 있도록 설치된
커버와 스크류를 제거하지 마십시오.
14. 네임플레이트에 명시된 볼트의 충전기를 사용하십시오.
15. 사용 전 항상 배터리를 충전 하십시오.
16. 명시된 배터리 이외에 사용하지 마십시오. 건전지,
명시되지 않은 재충전 배터리, 자동차 배터리에
연결하지 마십시오.
17. 승압변압기를 사용하지 마십시오.
18. DC 전원장치로 배터리를 충전하지 마십시오.
19. 항상 실내에서 충전하십시오. 충전하는 동안 약간의
열이 발생합니다. 햇빛에 노출 되지 않는 곳에서
충전하십시오. 습기가 적고, 통풍이 잘 되는 곳에서
충전 하십시오.
20. 본 설명서의 조립도는 공인된 서비스용으로만 사용해
주십시오.

한국어
17
충전 모드 선택
이 장치는 두 가지 모드 중 하나를 선택하여 최대 4개의
재충전 배터리를 충전할 수 있습니다.
충전식 배터리는 일반 모드와 멀티 모드 모두에서 포트에
충전할 수 있습니다.
모드 선택 스위치가 꺼지면 배터리가 일반 모드로
충전됩니다. 스위치가 켜지면 멀티 모드로 충전됩니다.
(그림 2)
모드 일반 멀티
목적
여러 개의
배터리를 순서대로
충전하려면.
든 배터리를
동시에
충전하려면.
충전 방법
포트 번호 1번부터
4번까지 순서대로
충전됩니다.
모든 배터리가
균일하게
충전됩니다.
모드 선택
스위치 꺼짐 켜짐
모드 표시 램프
꺼짐
켜짐
일반 모드 (모드 선택 스위치 꺼짐)
재충전 배터리는 포트 번호 순서대로 충전됩니다
(1→2→3→4). (그림 3)
해당 재충전 배터리가 완전히 충전되면 충전 표시 램프가
녹색으로 켜지고 부저가 사용자에게 경고음을 울립니다.
모든 배터리를 완전히 충전하는 데 걸리는 시간은 각
배터리의 충전 시간의 합계입니다.
표 1에 표시된 예에서 포트 번호 2의 배터리를 완전히
충전하는 데 걸리는 시간은 포트 번호 1과 2(32분 + 52분
= 84분)에서 배터리를 충전하는 데 걸리는 총 시간입니다.
팁
곧 사용할 재충전 배터리는 포트 번호 1부터 순서대로
삽입해야 합니다.
멀티 모드 (모드 선택 스위치 켜짐)
모든 배터리가 동시에 충전됩니다. 모든 재충전 배터리가
완전히 충전되면 충전 표시 램프가 녹색으로 켜지고 부저가
사용자에게 경고음을 울립니다
표 1에 표시된 예에서는 4개의 배터리를 모두 완전 충전
하는 데 152분이 걸립니다.
표 1 충전 예제
포트 번호 재충전 배터리 충전 시간*
1BSL 36A18 32분
2 BSL 36B18 52분
3BSL 1860 38분
4 BSL 1430C 30분
총 충전 시간 152분
*충전 시간은배터리의 잔존 용량에 따라 달라집니다.
두 가지 모드에 적용되는 일반 사항
현재 충전중인 배터리는 충전 표시 램프가 지속적인
적색 점등으로 표시된 포트입니다.
사용 직후에 뜨거운 배터리나 저온 상태로 인해 차가운
배터리는 충전하는 데 시간이 오래 걸리기 때문에 건너
뛰고 다른 배터리를 충전한 이후에 충전됩니다.
충전 시간이 오래 걸리면 선택 스위치를 두 번
누르십시오.
이렇게 하면 충전기가 재설정되고, 사용 직후 뜨거운
배터리나 저온 상태로 인해 차가운 배터리를 재검토하여
충전을 다시 시작하기 전에 이 배터리를 건너뜁니다.
일반 모드
다른 배터리를 충전하는 동안 낮은 번호의 포트(
우선 순위 높음)에 배터리를 삽입하면, 현재 충전중인
배터리가 완전히 충전된 후에 새로 삽입된 배터리의
충전이 시작됩니다.
멀티 모드
재충전 배터리를 완전히 충전하기 전에 사용하면 충전
수준은 배터리에 따라 달라질 수 있습니다.
다른 배터리를 충전하는 동안 빈 포트에 방전된
배터리를 넣으면 모든 배터리를 충전하는 데 걸리는
시간이 길어집니다.
충전
파워툴을 사용하기 전에 아래의 순서대로 배터리를 충전해
주십시오.
1. 충전기의 전원코드를 소켓에 연결하십시오.
충전기의 플러그를 콘센트에 연결하면 충전 표시
램프가 빨간색으로 깜박입니다(1초 간격).
2. 충전 모드를 선택하십시오.
요구 사항에 맞게 충전 모드를 선택하십시오.(그림 2)
(17 페이지의 “충전 모드 선택” 참조)
3. 배터리를 충전기에 삽입합니다.
그림 4과 같이 배터리를 충전기안에 정확히
삽입하십시오.
참고
4개의 각 포트 옆에 있는 충전 램프는 충전 중인
배터리의 충전 상태를 나타냅니다.
4. 충전
충전기에 배터리를 삽입하면 충전 표시 램프가
빨간색으로 켜집니다.
배터리가 완전히 재충전되면, 충전 표시 램프가
녹색으로 켜집니다. (표 2 참조)
(1) 충전 표시 램프의 표시
충전 표시 램프의 표시는 충전기 또는 충전식 배터리의
상태에 따라 표 2과 같이 나타납니다.
한국어
18
표 2
충전 표시 램프의 표시
충전 표시
램프
(빨간색/
녹색)
충전 전 깜박임
(빨간색)
0.5초 동안 켜집니다. 0.5초 동안
켜지지 않습니다. (0.5초 동안 꺼짐) 전원에 연결됨
충전 중 켜짐
(빨간색)
계속 켜짐
충전 완료 켜짐
(녹색)
계속 켜짐
(지속적인 버저음: 약 6초)
과열 대기 깜박임
(빨간색)
0.3초 동안 켜집니다. 0.3초 동안
켜지지 않습니다. (0.3초 동안 꺼짐)
배터리 과열.
충전 불가능.
(배터리가 냉각되면 충전이 시작됨)
충전 불가능 깜박임
(빨간색)
0.1초 동안 켜집니다. 0.1초 동안
켜지지 않습니다. (0.1초 동안 꺼짐)
(간헐적인 버저음: 약 2초)
배터리 또는 충전기의 고장
(2) 충전식 배터리의 온도 및 충전 시간 관련
온도 및 충전 시간은 표 3와 같습니다.
표 3
충전기 UC18YTSL
배터리
배터리 유형 Li-ion
배터리를 충전할
수 있는 온도 0℃ – 50℃
충전 전압 V 14.4 18
배터리
용량에 따른
개략적 충전
소요 시간
(20℃에서)
BSL14xx 시리즈 BSL18x x 시리즈 다중 볼트
시리즈
(4셀) (8셀) (5셀) (10셀) (10셀)
최소
BSL1415S : 15
BSL1415 : 15
BSL1415X : 15
BSL1420 : 20
BSL1425 : 25
BSL1430C : 30
BSL1430 : 20
BSL1440 : 26
BSL1450 : 32
BSL1460 : 38
BSL1815S : 15
BSL1815 : 15
BSL1815X : 15
BSL1820 : 20
BSL1825 : 25
BSL1830C : 30
BSL1830 : 20
BSL1840 : 26
BSL1850 : 32
BSL1860 : 38
BSL36A18 : 32
BSL36B18 : 52
USB × 2 충전 전압 V 5
충전 전류 A 총 2개
참고
배터리 충전 시간은 주변 조건 및 배터리 상태에 따라
증가할 수 있습니다.
배터리 충전 시간은 배터리 하나만 충전할 때
적용됩니다. 여러 개의 배터리를 충전 할 때 총 충전
시간은 개별 충전 시간의 합계가 됩니다.
주위 온도가 0℃ 이하이면 충전 시간이 길어집니다.
5. 충전기의 파워코드를 소켓에서 빼주십시오.
6. 충전기를 잡고 배터리를 빼주십시오.
주의
사용 후 배터리를 충전기에서 분리하여 보관하십시오.
새 배터리의 방전
새 배터리, 혹은 오랫동안 사용하지 않은 배터리의
내부 화학 현상에 따라 처음 한 두번 성능이 떨어질 수
있습니다. 이것은 일시적인 현상이며 2-3회 재충전
하시면 회복됩니다.
배터리 수명을 길게 하려면
(1) 배터리가 완전히 소모되기 전에 재충전 하십시오.
공구의 파워가 약해 졌다고 느끼면 사용을 멈추고
재충전 하십시오. 계속해서 사용할 경우 배터리가
망가지거나 수명이 짧아질 수 있습니다.
(2) 고온에서의 재충전은 피하십시오.
재충전 배터리는 사용 즉 후 과열됩니다. 이 상태에서
재충전으로 하면 내부 화학 물질이 망가지고 수명이
짧아집니다. 배터리를 식힌 후 재충전 하십시오.
주의
직사광선에 노출된 곳에 장시간 놓아 두었거나
방금 사용하여 뜨거워진 상태에서 배터리를 충전할
경우 충전기의 충전 표시 램프가 0.3초 동안 켜지고
0.3초 동안 켜지지 않습니다(0.3초 동안 꺼짐). 이런
경우에는 배터리를 식힌 후에 충전을 시작하십시오.
충전 표시 램프가 깜박이면(0.2초 간격) 충전기의
배터리 커넥터에 이물질이 없는지 확인 후 제거해
주십시오. 이물질이 없는 경우, 배터리나 충전기의
오작동입니다. 공인 서비스 센터에 문의 하십시오.
내장 마이크로 컴퓨터가 UC18YTSL 에서 배터리가
충전이 완료된 것을 확인하는데 3초가 걸립니다.
연속적으로 충전할 때 재 삽입 전 최소 3초 기다려
주십시오. 배터리가 3초 이내 재 삽입 되면 배터리는
제대로 충전되지 않은 것입니다.

한국어
19
USB 장치 충전 방법
경고
사용하기 전에 USB 연결 케이블에 결함이나 손상이
있는지 확인하십시오.
결함이 있거나 손상된 USB 케이블을 사용할 경우
연기가 나거나 불이 붙을 수 있습니다.
2m 미만의 USB 연결 케이블을 사용하십시오.
제품을 사용하지 않을 때는 고무 커버로 USB 포트를
막아 두십시오.
USB 포트에 먼지 등이 쌓이면 연기가 나거나 불이
붙을 수 있습니다.
주의
USB 장치와 배터리를 동시에 충전하는 경우 충전에
필요한 시간이 길어집니다.
USB 충전 중에 때때로 멈춤 현상이 발생할 수
있습니다.
USB 장치가 충전되고 있지 않으면 USB 장치를
충전기에서 분리하십시오.
그러지 않으면 USB 장치의 배터리 수명이 줄어들 뿐
아니라 예기치 않은 사고가 발생할 수 있습니다.
장치 유형에 따라 일부 USB 장치가 충전이 안 될 수도
있습니다.
USB장치의 충전은 2군데 합쳐서 2 A 이하로
사용하십시오.
초과하면 충전기에서 오작동이 발생할 수 있습니다.
(1) 충전 방법을 선택합니다
선택한 충전 방법에 따라 배터리를 충전기에 끼우거나
전원 코드를 콘센트에 연결하십시오.
○ 전기 콘센트에서 USB 장치 충전하기(그림 5-a)
○ 전기 콘센트에서 USB 장치와 배터리 충전하기
(그림 5-b)
(2) USB 케이블을 연결합니다.(그림 6)
고무 커버를 당겨서 뺀 다음 시중에서 판매되는 USB
케이블(충전할 장치에 적합한 케이블)을 USB 포트에
단단히 연결하십시오.
(3) 충전이 완료된 경우(그림 7)
충전 상태를 확인하려면 USB 장치를 살펴보십시오.
전기 콘센트에서 전원 코드를 뽑으십시오.
고무 커버를 USB 포트 위에 씌우십시오.
AC 전원 공급 장치로 사용
이 제품에는 AC 장치용 전원 공급 장치로 사용하기에
편리한 AC 콘센트가 포함되어 있습니다. (전류 용량은 8A
입니다.)
충전기 전원 플러그를 전기 콘센트에 꽂은 상태에서 다른
AC 장치의 전원 플러그를 충전기의 콘센트에 접속하면 AC
장치를 사용할 수 있습니다. (그림 8)
참고
충전기에 연결되는 AC 장치는 8 A 이하로 사용하십시오.
초과하면 충전기에서 오작동이 발생할 수 있습니다.
사용할 장치의 사용 설명서를 주의 깊게 읽고 사용하기
전에 현재의 등급을 확인하십시오.
AC 장치는 충전기 전원 플러그가 전기 콘센트에 연결된
상태에서 사용하십시오.
(1) 사용 방법 선택
전기 콘센트에서 AC 장치를 사용. (그림 9-a)
전기 콘센트에서 AC 장치를 사용 및 배터리 충전.
(그림 9-b)
유지보수 및 검사
1. 스크류 검사
정기적으로 모든 스크류가 잘 조여져 있는지 검사하고
확인하십시오. 스크류가 느슨해진 경우 즉시
조여주십시오. 그렇지 않으면 큰 위험을 초래할 수
있습니다.
2. 충전기 청소
충전기가 녹슨 경우 부드러운 마른 천이나 비눗물을
묻힌 천으로 닦아주십시오. 염소계 솔벤트, 가솔린,
페인트 신나는 플라스틱을 녹이므로 사용하지
마십시오.
3. 사용 후 운반
경고
운반하기 전에 충전기에서 배터리를 분리하십시오.
배터리가 떨어지면 파손되거나 부상을 입을 수
있습니다. (그림 10)
사용 후 쉽게 운반할 수 있도록 운반 손잡이가 붙어
있습니다. 사용하지 않을 때는 손잡이를 본체에 수납할 수
있습니다. (그림 11)
4. 사용하지 않는 충전기는 보관하십시오.
충전기를 사용하지 않는 경우, 건조하고 어린이의 손이
닿지 않는 높은 곳에 보관하십시오.
경고
파워툴의 사용, 유지보수는 안전 수칙 및 규정을
따라야 합니다.
주의
HiKOKI의연구 개발 프로그램에 의해 본사용 설명서의
규격은 사전 안내 없이 변경될 수있습니다.

한국어
20
문제 해결
전동 툴이 정상적으로 작동하지 않을 경우 아래 표에 나와 있는 검사 방법을 사용하십시오. 이렇게 해도 문제가 해결되지
않을 경우 대리점 또는 공식 HiKOKI 서비스 센터에 문의하십시오.
고장 증상 추정 원인 추정 원인
충전 표시 램프가
빨간색으로 빠르게
깜박이고 배터리 충전이
시작되지 않습니다.
배터리가 끝까지 삽입되지 않았습니다. 배터리를 확실하게 삽입하십시오.
배터리 단자 또는 배터리가 장착된 부분에
이물질이 있습니다.
이물질을 제거하십시오.
충전 표시 램프가
빨간색으로 깜박이고
배터리 충전이 시작되지
않습니다.
배터리가 끝까지 삽입되지 않았습니다. 배터리를 확실하게 삽입하십시오.
배터리가 과열되었습니다. 그대로 둘 경우 온도가 내려가면 배터리가
자동으로 충전을 시작하지만 배터리 수명이
단축될 수 있습니다. 충전하기 전에 바람이
잘 통하고 직사광선이 비치지 않는 곳에서
배터리를 식히는 것이 좋습니다.
배터리가 완전히
충전되었는데도 배터리
사용 시간이 짧습니다.
배터리 수명이 다 되었습니다. 배터리를 새 것으로 교체하십시오.
배터리를 충전하는 데
시간이 오래 걸립니다.
배터리, 충전기 또는 주변 환경의 온도가
매우 낮습니다.
실내 또는 더 따뜻한 환경에서 배터리를
충전하십시오.
충전기의 통풍구가 막혀 있어 내부 부품이
과열되었습니다.
통풍구 막힘을 제거하십시오.
냉각 팬이 작동하지 않습니다. HiKOKI 공인 서비스 센터에 수리를
요청하십시오.
USB 전원 램프가 꺼지고
USB 장치 충전이
중지되었습니다.
배터리의 용량이 부족합니다. 용량이 남아 있는 배터리로 교체하고.
충전기의 전원 플러그를 전기 콘센트에
끼우십시오.
USB 장치가 충전을
마쳤는데도 USB 전원
램프가 꺼지지 않습니다.
USB 전원 램프가 녹색으로 켜지면서 이제
USB를 충전할 수 있음을 알려줍니다.
이는 고장이 아닙니다.
USB 장치의 충전
상태가 어떤지, 충전이
완료되었는지 알 수가
없습니다.
충전이 완료되어도 USB 전원 램프가
꺼지지 않습니다.
충전 중인 USB 장치를 살펴봐서 충전
상태를 확인하십시오.
USB 장치의 충전이 중간에
멈춥니다.
배터리를 전원으로 사용해 USB 장치를
충전하는 중에 충전기를 전기 콘센트에
끼웠습니다.
이는 고장이 아닙니다.
충전기는 전원 간에 차이가 있으면 USB
충전을 5초 정도 멈춥니다.
전원 소켓을 전원으로 사용해 USB
장치를 충전하는 중에 배터리를 충전기에
삽입했습니다.
배터리와 USB 장치를
동시에 충전하면 USB 장치
충전이 중간에 멈춥니다.
배터리가 완전히 충전되었습니다. 이는 고장이 아닙니다.
충전기는 배터리가 충전을 성공적으로
완료했는지 여부를 확인하는 동안 5초 정도
USB 충전을 멈춥니다.
배터리와 USB 장치를
동시에 충전하면 USB 장치
충전이 시작되지 않습니다.
배터리 잔량이 매우 부족합니다. 이는 고장이 아닙니다.
배터리 용량이 일정한 수준에 이르면 USB
충전이 자동으로 시작됩니다.
AC 장치 전원 플러그를
충전기의 AC 콘센트에
꽂아도 사용할 수 없다.
AC 장치의 과도한 부하로 인해 충전기
퓨즈가 용단되었다.
HiKOKI 공인 서비스 센터에 수리를
요청하십시오.
AC 장치는 8 A 이하로 사용하십시오.
USB케이블을USB 포트에
연결해도 충전되지 않는다.
USB 장치의 과도한 부하로 인해 충전기
퓨즈가 용단되었다.
HiKOKI 공인 서비스 센터에 수리를
요청하십시오.
USB 장치는 2군데 합쳐서 2 A 이하로
사용하십시오.
Other manuals for UC 18YTSL
1
Table of contents
Languages:
Other HIKOKI Camera Accessories manuals


