Hinari LifeStyle compact DW002 User manual


Read all the safety instructions before first use of your Dishwasher DW002.
Safety instructions
!
2
Electrical information
Make sure that the voltage of your electricity
supply is the same as that indicated on the
rating plate. This appliance may be fitted with
a non-rewireable plug. If you need to change
the fuse in a non-rewireable plug, the fuse
cover must be refitted. If the fuse cover is lost
or damaged, the plug must not be used until a
replacement is obtained (available from the
appliance manufacturer). It is important that
the colour of the replacement fuse cover
corresponds with the colour marking on the
base of the plug.
If the plug has to be changed because it is not
suitable for your socket, or becomes damaged,
it should be cut off and an appropriate plug
fitted following the wiring instructions below.
The plug removed must be disposed of safely
as insertion into a mains socket is likely to
cause an electrical hazard.
If a 13 Amp (BS1363) plug is used, a 13 Amp
fuse (BS1362) must be fitted, or if any other
type of plug is used a 13 Amp fuse must be
fitted, either in the plug, adaptor or on the
distribution board.
Important: This appliance must be
earthed
As the colours of the wires in the mains lead
of this appliance may not correspond with the
coloured markings identifying the terminals
in your plug, proceed as follows:-
• The blue wire must be connected to the
terminal marked with the letter N or
coloured black.
• The brown wire must be connected to the
terminal marked with the letter L or
coloured red.
• The green/yellow
wire must be
connected to the
terminal marked
with the letter E
or coloured
green.
ower source
You should only plug your dishwasher into a
230V to 240VAC, 50Hz 10A supply.
Using your dishwasher
•The dishwasher is for household use only
and must not be used outside.
• Do not immerse the electrical cable or
plug in water.
• Do not install the dishwasher in an
unventilated cupboard.
• Close supervision is required when used
near children.
• Do not use attachments or accessories not
recommended by the manufacturer.
• Do not use the dishwasher with a damaged
cable or plug or after the appliance has
malfunctioned or has been damaged.
Return it to the nearest authorised service
centre for repair.
Servicing
• There are no user serviceable parts in your
dishwasher.
• Consult your dealer if you are ever in
doubt about the installation, operation or
safety of your dishwasher.
CAUTION
RISK OF ELECTRIC SHOCK

3
Getting started
Remove your Hinari DW002
carefully from the box. You may
wish to store the packaging for
future use.
Thank you for purchasing the Hinari DW002
dishwasher.
Please Note
This dishwasher has been factory tested using
water. Whilst every effort has been made to
remove all the water, some traces may still
remain. This will have no detrimental effect
on your dishwasher.
In the box
Inside your dishwasher package you should
have:
• Dishwasher
• Dish rack
• Cutlery basket
• Detergent measure (inside the cutlery
basket)
• Rubber seal (inside the cutlery basket)
• User guide
Should any of these items be missing please
call the helpline on 020 8787 3111.
Read these instructions before use.
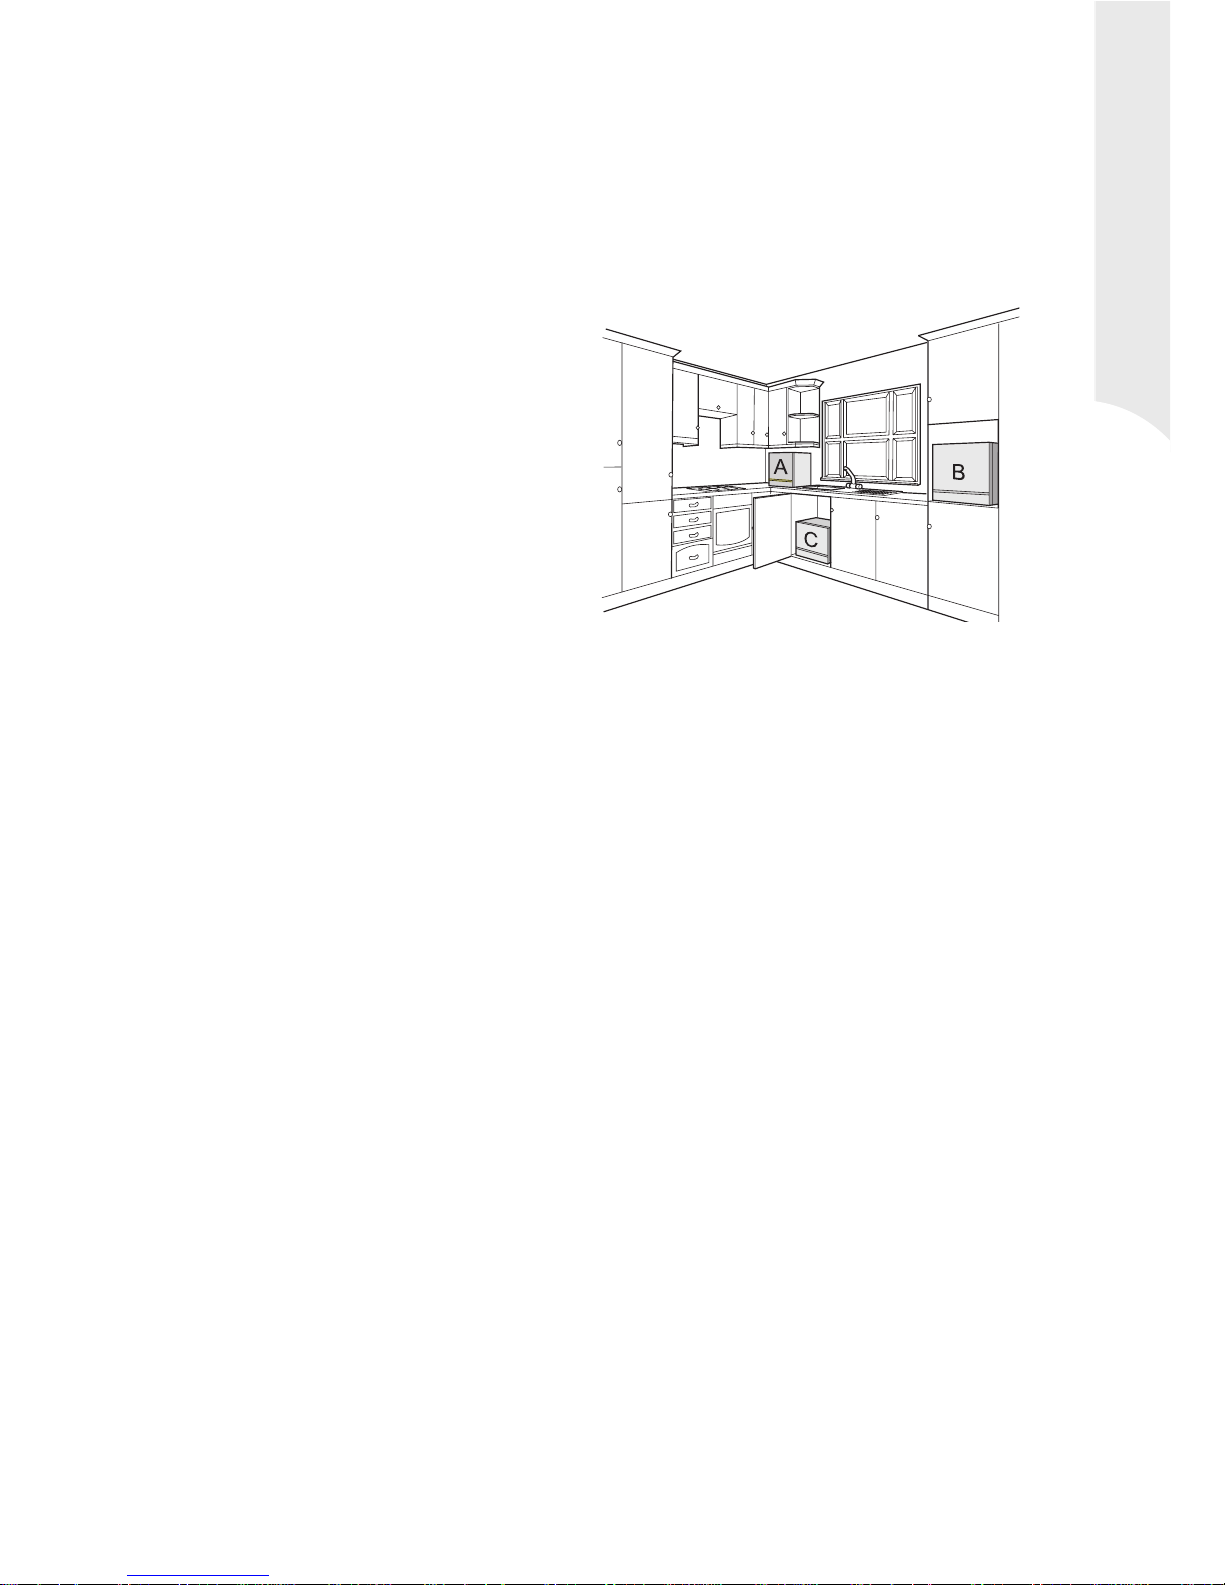
Dishwasher installation
The dishwasher can be installed on a flat
surface either:-
• On a work surface next to the sink ‘A’
• Built into a cabinet without a door ‘B’
• Built into a ventilated cabinet with
a door ‘C’
Important
Do not install the dishwasher in a cabinet
without ventilation as the door must remain
open at the end of the wash cycle and the
released steam could damage the cabinet.
To ensure the stability of the dishwasher
secure it to the wall or rear of the cabinet
with a 6mm screw (not supplied) through the
bracket attached to the back of the
dishwasher.
Please Note
Do not turn the dishwasher on its side or
upside down at any time during
transportation or installation.
Water supply
Your dishwasher is supplied with a 9mm bore
fill hose fitted with a ¾ inch BSP female
connector for connection to a cold/hot water
supply. The water pressure must be between
0.5 and 10 bar (50 and 1000 kPa).
If the dishwasher is connected to a hot water
supply the water temperature must not exceed
65°C.
Please Note
As the wash cycle requires the water to be at
65°C, the cycle time will be reduced if
connected to a hot water supply. However,

4
the cold water rinse temperature will no
longer be cold but at the hot water
temperature.
WARNING
INSTANTANEOUS GAS AND
ELECTRIC WATER HEATERS MUST
NOT BE USED.
lumbing
The water supply can be either a permanently
plumbed supply, in which case a tap must be
incorporated which can completely shut off
the water supply, or from your sink tap.
ermanent
Please Note
Permanent plumbing must be carried out by
an experienced plumber and must comply
with the regulations of your water supplier.
Put the rubber seal into the ¾ inch BSP
female connector and screw the connector to
the permanent water supply outlet. Do not
shorten the fill hose. If it is too long coil it up
behind the dishwasher.
Mobile
It is essential, if you are operating from a sink
tap, that the tap is in good condition. If not,
you may have leakage problems when the tap
is turned full on.
To operate from a sink tap you will need a tap
adapter with a ¾ inch BSP connection (not
supplied). These are readily available from
DIY suppliers.
Put the rubber seal into the ¾ inch BSP
female connector and screw the connector to
the tap adapter. Do not shorten the fill hose.
If it is too long coil it up behind the
dishwasher.
Please Note
Mixer taps are not suitable for use with your
dishwasher. In this case the dishwasher will
have to be permanently plumbed in.
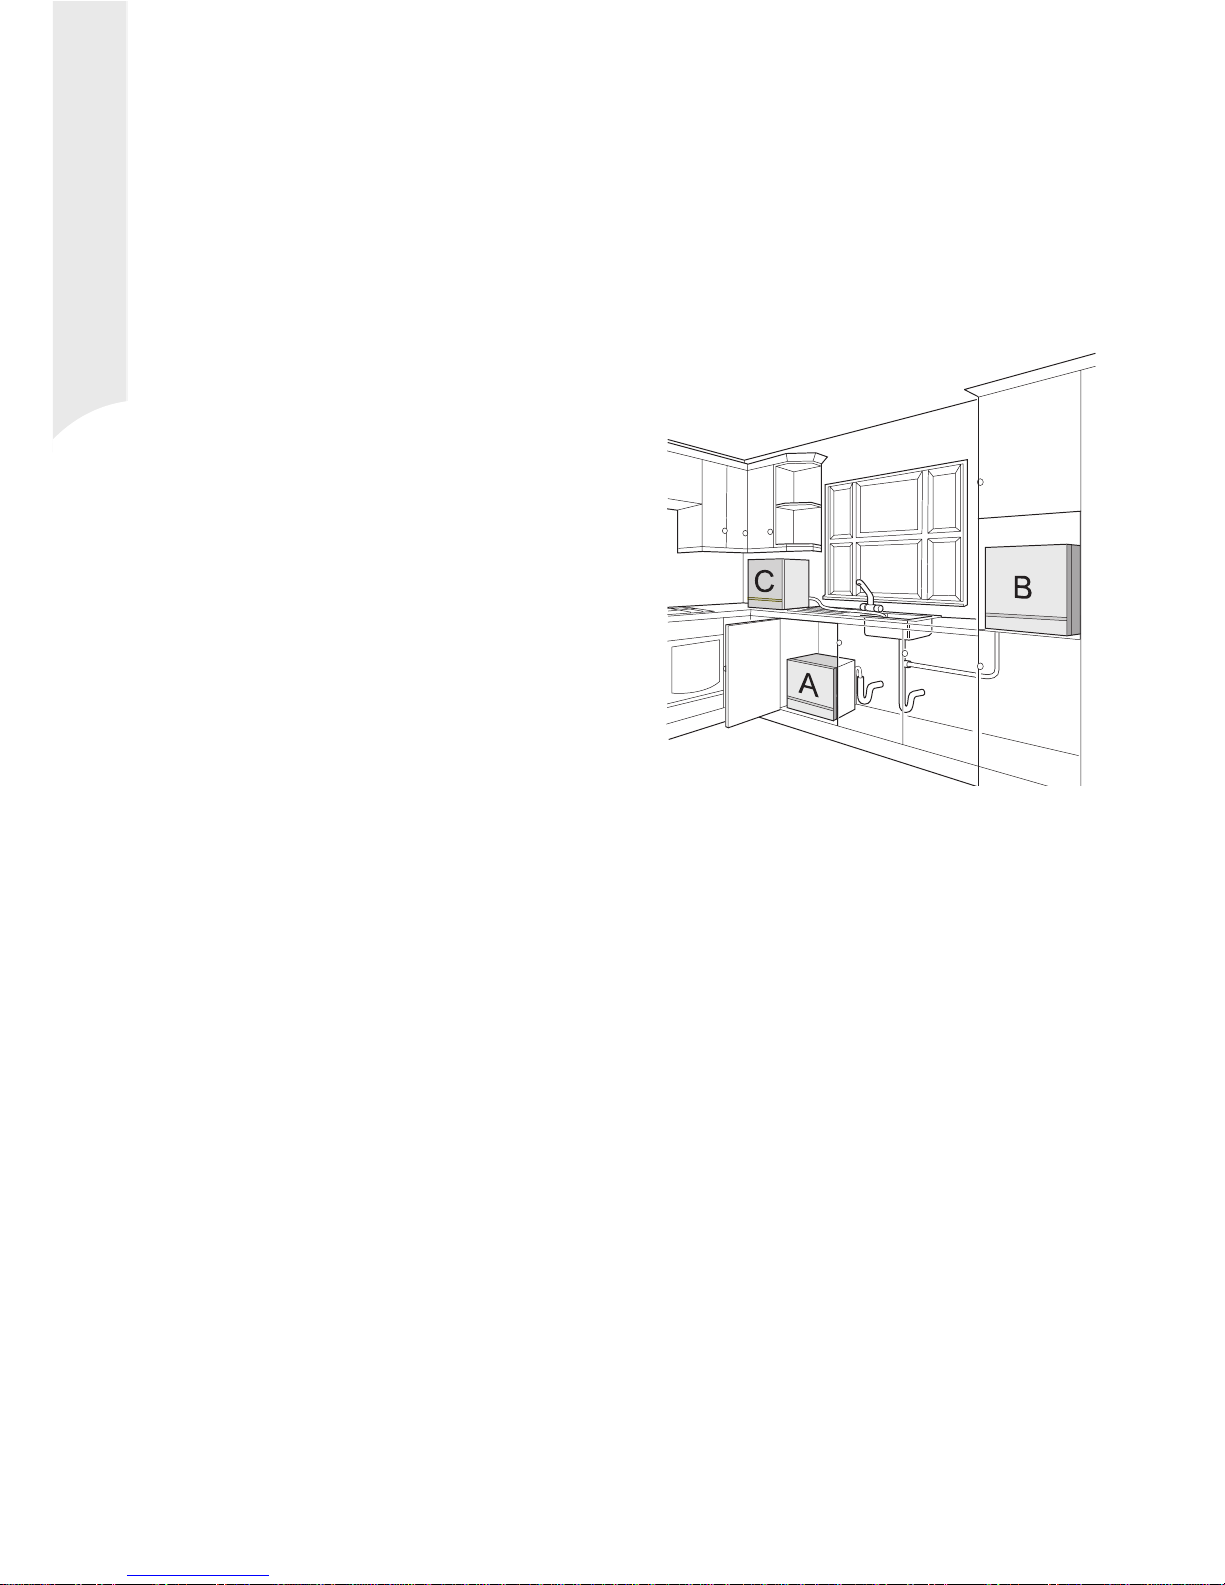
Drainage requirements
Drainage can be:
• Into a standpipe ‘A’
• To your sink waste pipe ‘B’
• Into your sink ‘C’
Standpipe - A
To allow an airbreak between the discharge
hose and the standpipe, the standpipe must
have a diameter of at least 38mm. The height
of the standpipe is dependent on the position
of the dishwasher. No part of the discharge
hose can be higher than the top of the
dishwasher. The discharge hose can be
shortened if required. Make sure the hooked
end support is positioned near the end of the
hose.
The standpipe should have a trap fitted and
must be connected to the foul or combined
drain from your house but NOT a surface
water drain. If in doubt ask your plumber or
local authority.
Sink waste pipe - B
You can connect the discharge hose to your
sink waste pipe with an adapter (not
supplied). The adaptor fits into the waste
pipe and the discharge hose is connected to a
T-piece on the adapter. Remove the hooked

5
end support and cut the discharge pipe to the
required length.
Sink - C
The discharge hose should be fixed over the
edge of the sink. The dishwasher must be
positioned so that the top of the dishwasher is
higher than the discharge hose.
The sink must have an outlet pipe of a
minimum of 32mm to prevent overfilling the
sink.
Always remove the sink plug when using the
dishwasher.
WARNING
IF YOU ARE USING THE SINK FOR
OTHER UR OSES AT THE SAME
TIME BE CAREFUL, THE DISCHARGE
WATER FROM THE MACHINE MAY
BE VERY HOT.

6
Cutlery
basket
Fill hose
Dish rack
Rinse aid dispenser
outlet
Door handle
Door
Quick view
Detergent
dispenser
Spray arm
Mains cable
Bracket
Rinse aid
dispenser
filler cap
Discharge
hose
Door latch
Control panel
Control panel
Timer knob
Heater
activating
temperature
button
n/ ff
button
Menu
programs
Filter

7
Safety devices
Your dishwasher has safety devices to protect
you and itself.
Overflow protection
If, during the wash cycle, the water flow into
the dishwasher is not cut off by the
programmer and the dishwasher continues to
fill with water, a pressure switch will
automatically switch on the discharge pump
and empty the dishwasher.
Overheat protection
The overheat protection thermostat turns off
the electricity supply if the heating element
overheats due to lack of water or some other
cause.
Doors security
The dishwasher stops working when the door
is opened during a wash cycle. It will
continue when the door is closed.
Opening the door
Press the door handle all the way down to
release the door and then pull the door
outwards.
WARNING
IF YOU ARE O ENING THE DOOR AT
THE END OF THE WASH CYCLE HOT
STEAM MAY BE RELEASED.
Lower the door to the horizontal position.
Do not allow the door to drop open.
Rinse aid dispenser
The dishwasher is fitted with an adjustable
automatic rinse aid dispenser.
The dispenser is located in the inside of the
door.
Using your dishwasher
To fill the dispenser, unscrew the transparent
cap. Pour the rinse aid into the dispenser,
making sure it does not overflow. Screw the
cap back on tightly. Wipe off any spilt rinse
aid.
The transparent cap allows you to check the
amount of rinse aid in the dispenser. When
the cap is dark the dispenser is full. When the
cap is clear the dispenser is empty or nearly
empty and needs refilling. The capacity of the
dispenser is 125 ml and is sufficient for 60
wash cycles when set to position 2 (normal).
Adjusting the rinse aid
dose
If your dishes are still wet or blotchy at the
end of the cycle the rinse aid dose is too low.
If your dishes are greasy and dull the rinse aid
dose is too high.
To adjust the dose, unscrew the cap of the
dispenser. At the top of the dispenser neck is
a scale of 1 to 5. At the base of the dispenser
neck is a screwdriver slot. Turn the
screwdriver counter-clockwise to increase the
dose and clockwise to decrease the dose. The
manufacturers preset is position 2.
Screw the dispenser cap back on tightly.

8
Adding detergent
Using the measuring cup, place the
dishwasher detergent (liquid or powder) in
the detergent dispenser in the door. Close the
cover by rotating it clockwise until it locks in
the closed position.
The cover opens automatically when the
water temperature in the dishwasher reaches
40°C.
Please Note
Only use detergent specifically for
dishwashers. Do not use hand washing
detergent as it produces too many suds.
Do not use more than the measured amount
of detergent as this will adversely affect the
efficiency of the dishwasher.
General advice on
dishwashing
Avoid washing the following articles in the
dishwasher:
• Aluminium coated pans. They can be
discoloured by the detergents alkalinity.
• Hand painted china.
• Silver cutlery. It can be discoloured when
in contact with certain foods (e.g. eggs).
• Utensils with wood, bone or certain plastic
handles as they cannot stand the high
temperatures.
Loading the dishwasher
The dish rack can be loaded with plates,
glasses and cups or pots and pans or a
combination of them both.
The dishwasher has a capacity for a full set of
16 dishes for four persons.

9
Dishes must be cleaned of all food remains
before loading into the machine. Load the
dish rack from the back forward with the
larger dishes to the back. Load all the dishes
so that they face forward.
Place the cutlery in the cutlery basket with
their handles downwards. Do not allow the
handles to protrude through the base of the
basket as they will obstruct the spray arm.
Glasses and cups should be placed upside
down.
When loading pots and pans make sure they
do not cover each other or touch as this will
obstruct the water flow around the machine.
Do not overload the dishwasher as this will
reduce the cleaning efficiency.
Operating the dishwasher
Make sure the dishwasher is connected to
both electricity and water and the discharge
hose is in its standpipe or the sink. Turn the
water supply on.
Load the dishwasher.
Add the detergent to the dispenser and close
the lid.
Check there is rinse aid in the rinse aid
dispenser and close the door.
Consult the Wash Programme Table and set
the timer knob and heat setting.
Press the n/ ff button to the ON
position. If, during the programme
you wish to add a dish, open the
door. The machine will stop and
start again when you close the door.
At the end of the programme the
door opens automatically to release
all the steam. Press the n/ ff
button to the OFF position.
WARNING
WHEN YOU O EN THE DOOR AT
THE END OF THE WASH CYCLE,
HOT STEAM MAY BE RELEASED.
Open the door fully, unload the dishes and
turn off the water supply.

10
Programme
Description
Normal Wash
65°C
Cold Rinse
Cold Rinse
Hot Rinse
65°C
Timer
1
2
3
4
Heat
n
ff
ff
ff
Powder
Yes
No
No
Yes
Water
Consumption
13.5L
3.5L
3.5L
3.5L
Cycle
Description
Wash at 65°C
Cold rinse
Cold rinse
Hot rinse at 65°C
Please Note:
Cold rinse depends on the water supply
temperature. If you connect to a hot tap, the
rinse will be hot. However, this will have no
deteramental effect.

11
Caring for your
dishwasher
Cleaning
In order to keep your dishwasher working
efficiently carry out the following regularly:
• Clean the interior of the dishwasher with a
damp cloth to remove grease and food
remains. Do not use abrasive cleaners.
• Clean the filter after each wash. If
necessary remove the filter and rinse. To
remove the filter, move the retaining clip
off the filter and lift the filter out. Replace
the filter and make sure the retaining clip
is locked in place.
• Make sure none of the holes in the spray
arm are blocked. Remove the dish rack,
remove the spray arm retaining clip and lift
off the spray arm. If any holes are clogged,
rinse the spray arm until all the holes are
clear. Refit the spray arm and retaining
clip.
• Check the inside panels and heating
element under the filter for scale build up.
To remove any scale, run the dishwasher
programme with the dishwasher empty.
Add one cup of vinegar instead of
detergent. If necessary repeat the process.
• Check the condition of the supply and
discharge hoses. The supply hose must be
changed every six years.
• If the dishwasher has not been used for
sometime, pour about 4L of boiling water
into it to dissolve any grease that may have
accumulated.
• Clean the exterior with a damp cloth.

12
Help and advice
The dishwasher does not work
• Is the dishwasher plugged in to the power
supply and is the fuse OK?
• The water supply and discharge hoses are
not kinked?
• The door is shut properly.
oor washing results
• The spray bar can move freely, not
obstructed by dishes etc.
• The spray bar holes are not blocked.
• The dishwasher is loaded properly with
space for the water to circulate.
• The filter is not clogged and is fitted
properly.
• Have the dishes been left dirty for a long
time and the food remains have dried on?
Dishes do not shine
• No rinse aid in the dispenser.
• Water in your area is very hard, increase
the rinse aid dose.
Water leaks
• The water connections are loose.
• The filter is clogged.
• The spray arm cannot revolve freely.
• The spray bar holes are blocked.
• The discharge hose is flattened or kinked.
Excessive suds in the dishwasher
• Use of hand wash detergent instead of
dishwasher detergent.
• Drops of rinse aid spilt when filling the
rinse aid dispenser.
If this happens allow the dishwasher to finish
its cycle and drain out the water. Open the
door and clean out the rest of the suds.
Helpline number: 020 8787 3111

13
Guarantee
This product is guaranteed for twelve months from the date of original purchase. If any defect
arises due to faulty materials or workmanship, the unit will either be replaced, a refund given or
repaired free of charge (where possible) during this period, by the dealer from whom you
purchased the unit.
The guarantee is subject to the following provisions:
•The guarantee is only valid within the boundaries of the country of purchase.
•The product must be correctly installed and operated in accordance with the instructions
contained in this manual.
•It must be used solely for domestic purposes.
•The guarantee will be rendered invalid if the product is re-sold or has been damaged by
inexpert repair.
•The manufacturer disclaims any liability for incidental or consequential damages.
•The guarantee is in addition to, and does not diminish, your statutory or legal rights.

14
Technical specifications
ower source .................................... 230V-240V AC 50 Hz
ower consumption ........................... 1100W Max
Water pressure requirement ............. 0.5-10bar
Water consumption per wash ............ 13.5 L max.
Dimensions ........................................ 470 x 435 x 508mm
Weight .............................................. 17kg

15
Issue 1 Jul 01

The Hinari logo is a trademark of Hinari PLC.
Hinari PLC reserves the right to amend the
specification without prior notice.
© 2001 Hinari LC
Table of contents
Popular Dishwasher manuals by other brands

Hotpoint
Hotpoint HDA2000VBB Energy guide

Fisher & Paykel
Fisher & Paykel DishDrawer DD24DA installation instructions

Blanco
Blanco BFD10XP Instructions for use

Electrolux
Electrolux GA60SLVSA user manual

CMA Dishmachines
CMA Dishmachines L-1C Quick setup instructions

Zanussi
Zanussi ZDI 6054 QX Instruction book