HIVILUX RXN Series User manual

Fixed Frame screen

Contents
3.Contents in the Box
…………………………………3
1.To the Owner
…………………………………1
2.General Notes
…………………………………2
4.Prepare works before installation
…………………………………4
5.Frame assembly
…………………………………5
6.Attaching Screen Surface to Frame
…………………………………7
7.Mounting the Screen
…………………………………11
8.Screen Care
…………………………………13
9.Warranty
…………………………………13

1
Thank you for choosing a Hivilux fixed frame screen for your home.
This deluxe model delivers superior performance for video.
Please take a moment to review this manual; it will help ensure you easy
and quick installation. Some important notes will help you understand
how to maintain the screen so that prolong the service life of the product.
To the owner

2
1.P lease read the user manual carefully, this will help you finish installation
quickly.
2. Please make sure that no other objects such as power switches, outlets,
furniture, ladders, windows,etc. occupy the space designated to hang the
screen.
3. Regardless if the screen is installed inside or on the wall, make sure that
the proper mounting anchors are used and that the weight is supported
appropriately by a strong and structurally sound surface just as any large
and heavy picture frame should. (Please consult a home improvement
specialist for the best advice on installation.)
4. Frame parts are made of high quality velour-surfaced aluminum and
should be handled with care.
5. When not in use, cover the screen with a furniture sheet to protect from
dirt, grime, paint or any other impurities.
6. When cleaning, use a damp soft cloth with warm water to remove any
marks on the frame or screen surface.
7. Never attempt to use any solutions, chemicals or abrasive cleaners on
the screen surface.
8. To avoid damaging the screen, do not touch the material directly with
your fingers, tools or any other abrasive or sharp objects.
9.S pare parts should be placed out of reach for small children in accordance
with household safety.
General Notes

3
Open the box, you will find the following parts, Please make sure all parts
listed below are included before proceeding with the installation.
Contents in the Box
No. Name
Glassfiberstick
1
2
3
4
5
Frame
Screenfabric
6
Quantity
6
1
1
1
Accessoriesbox
Installationinstructions
Picture
Fixed Frame screen
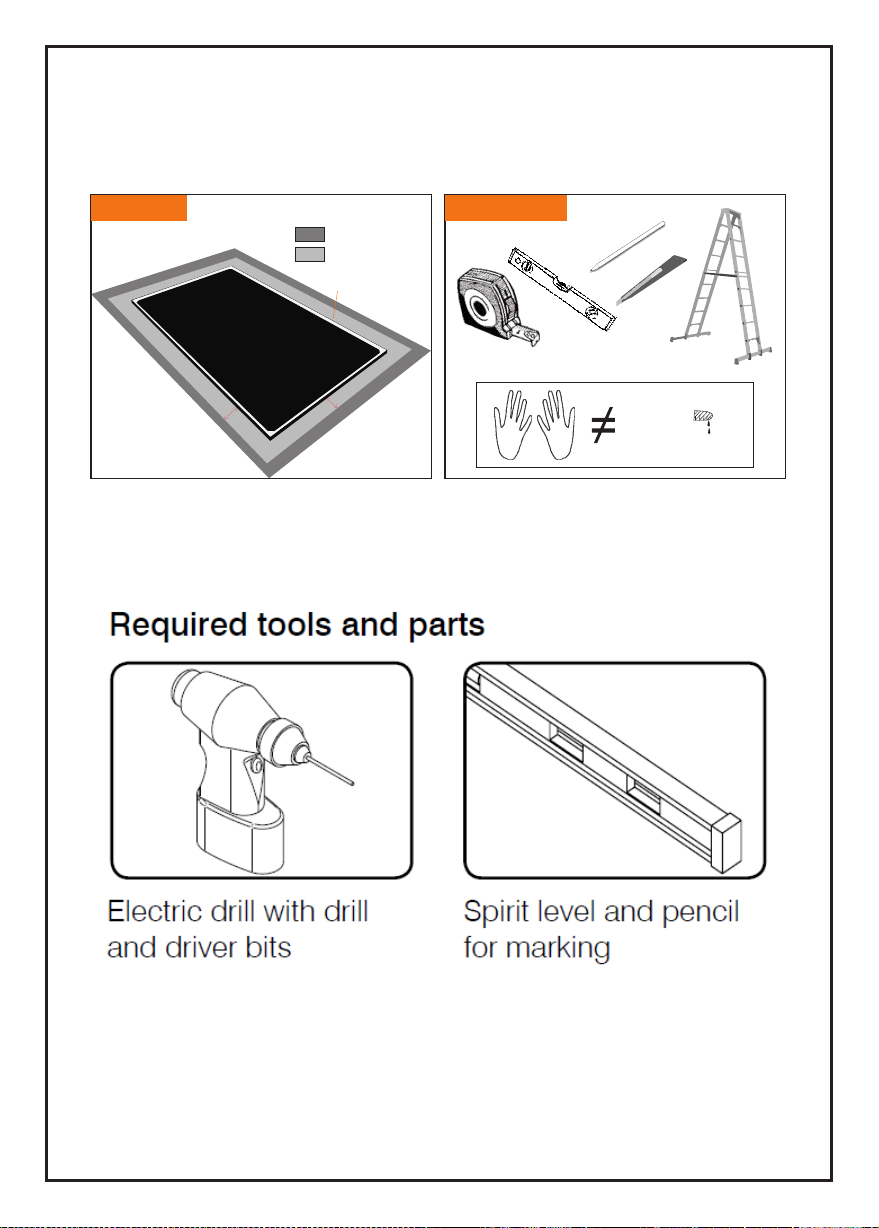
Prepare works before installation
Work area Tools needed
△
!
☞
Protectedareas
Operatingareas
Protective clothing
50cm
50cm
4
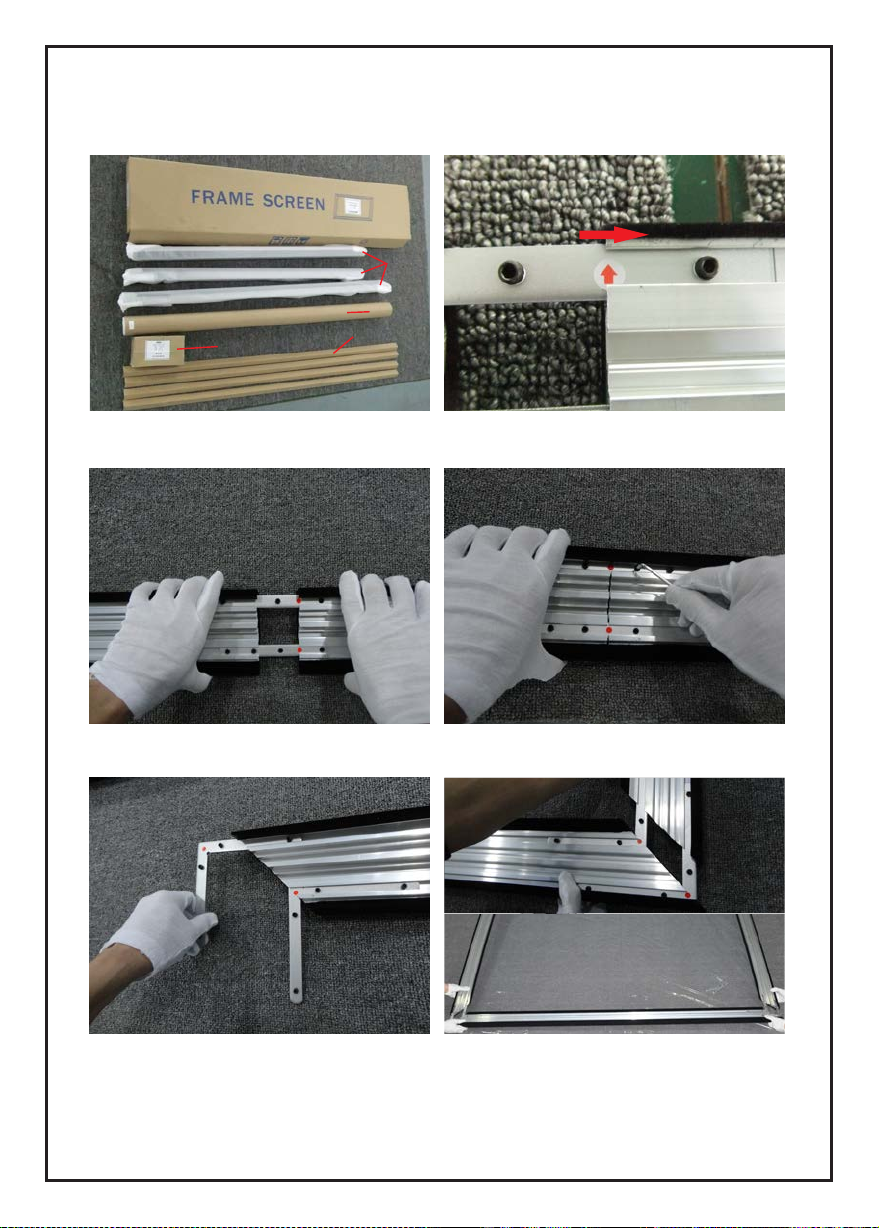
5
2)Insert 2pcs center joint connectors to the channels
of horizontal frame piece (don’t tighten the screws at
this time.
Frame assembly
Frames
ScreenMaterial
Accessories box
Paper Corner
1)O pen up the box, take out all the parts inside.
3)I nsert the other horizontal frame piece to the center joint connectors and then fasten it with screws.
4)P lace two flat corner braces in each corner in the dedicated channels on the two short straight frame
rails first. Do not tighten the set screws at this time. Attach the short straight frame rail (with the flat corner
braces in place) to the two long frame rails.

Note:
Once all eight corner braces and frame rails are in place you want to check
each corner to make sure the corners are aligned properly. There should
be an even point at each corner where the frame rails jointogether. You will
have a 1mm gap at the miter cuts in the back where the frame rails join
together. This gap is caused by the velvet wrapping around the front ends
of each frame rail. This gap is only in the back of the frame and is not seen
in front of the frame.
Please read the step 4 directly for the non center joint model.
6

Protective clothing
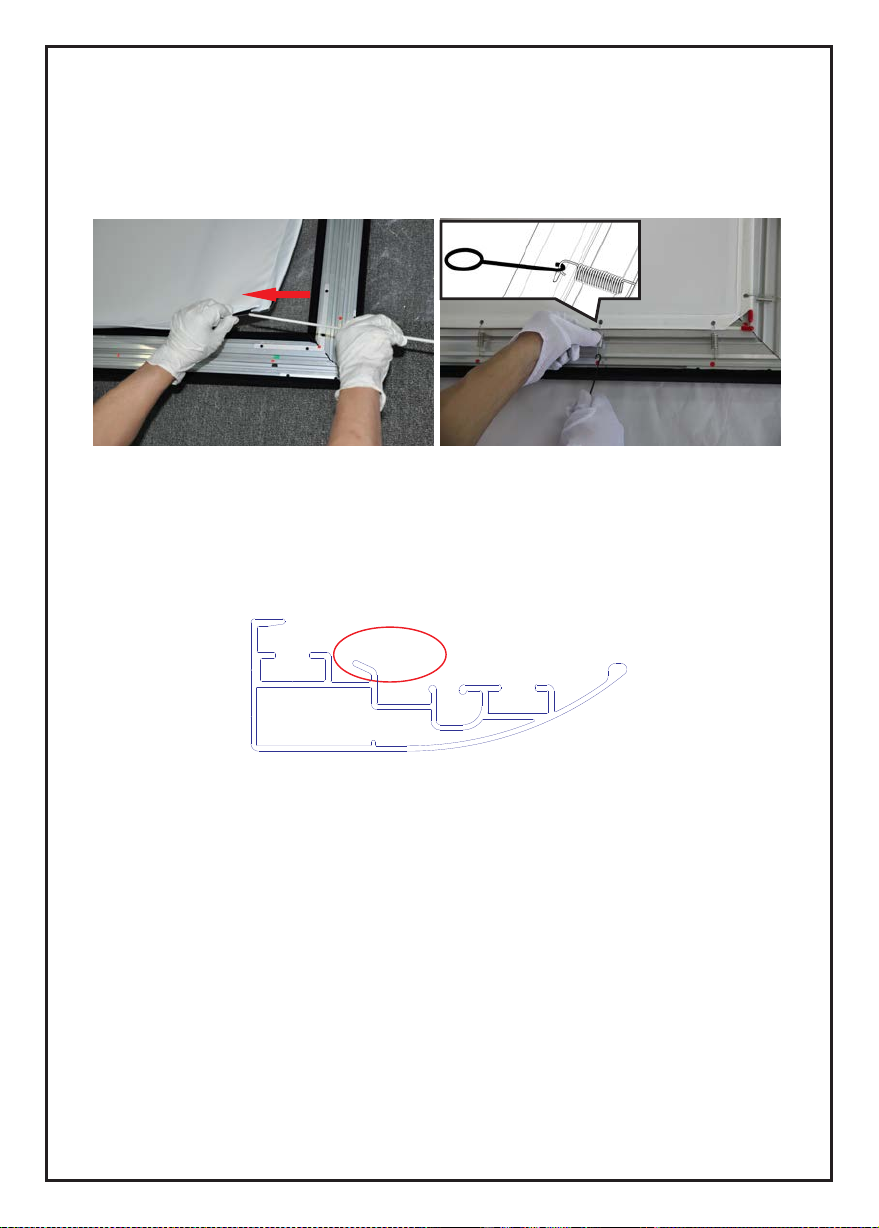
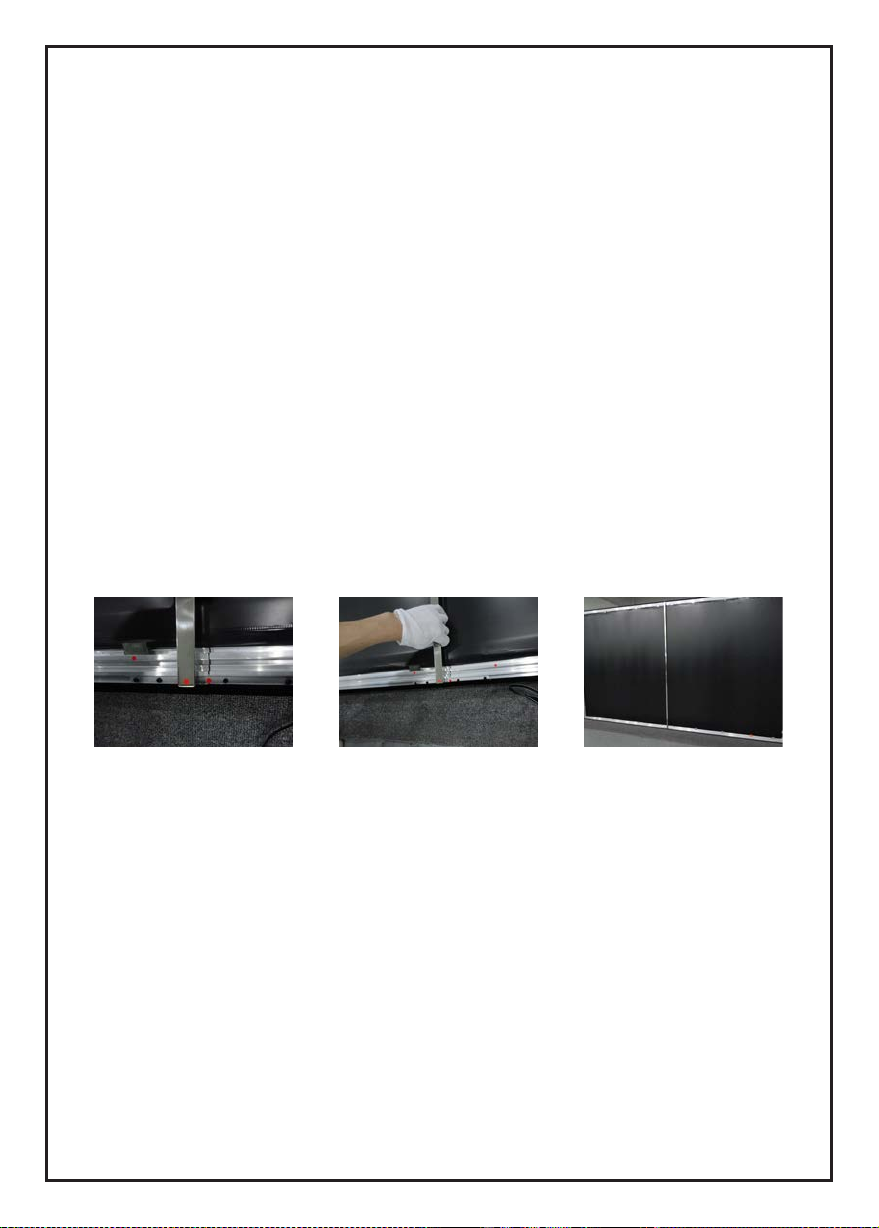
Attaching Screen Surface to Frame
1 )Take out the screen fabric from roller and unroll the material on clean area.
2) Insert the screen through the sleeves according to their corresponding lengths on each tension rods
edge of the screen as seen below.
Tension Rod(Horizontal)X4
Tension Rod(Vertical)X2
3) Place the screen material on the back of the built frame and slip the tension rods into the grooves
running along each side on the back of the frame on all four corner and clip on the fix plates to the back
of the frame to secure the rods into place creating tension for a tight and flat surface.
fix plate
Tension Rods
Viewing surface
(Front of screen)
Push
Connection
Slot
7

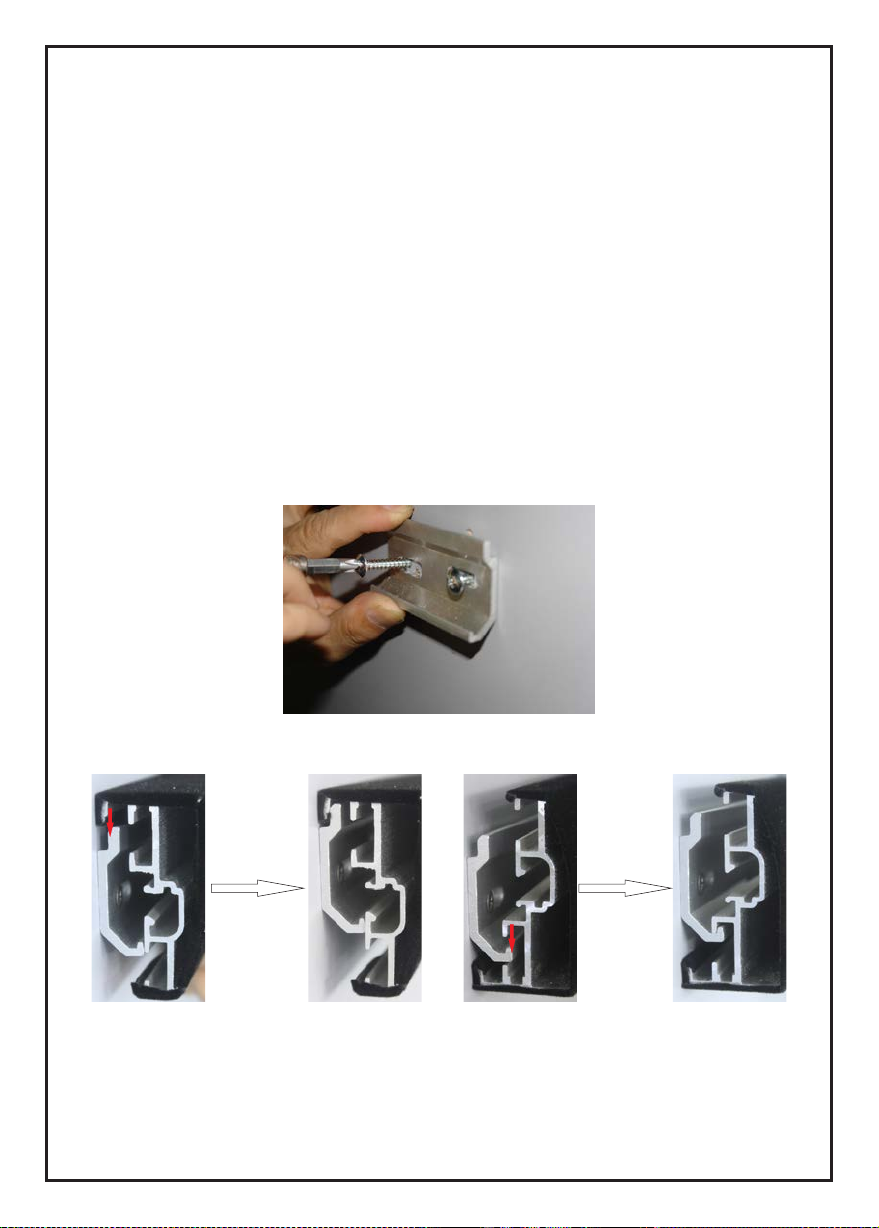
Note: 1. making sure the red alignment marks are properly matched.
2 .The silver fix plate clicked into place to show that it fixed well during the installation, if needing
to adjust the silver fix plate or take out it, please refer to the following way.
8
1) Place the screen material on the back of the built frame and slip the tension rods into the grooves
running along each side on the back of the frame on all four corner and pull the fixed frame spring to
buckle and pull the tension rods and screen surface to finish the assembling of the screen.
Spring Slot
Connection
Slot
Connection
Slot
If you choose the screen with spring structure , please follow
the steps below to install.
9
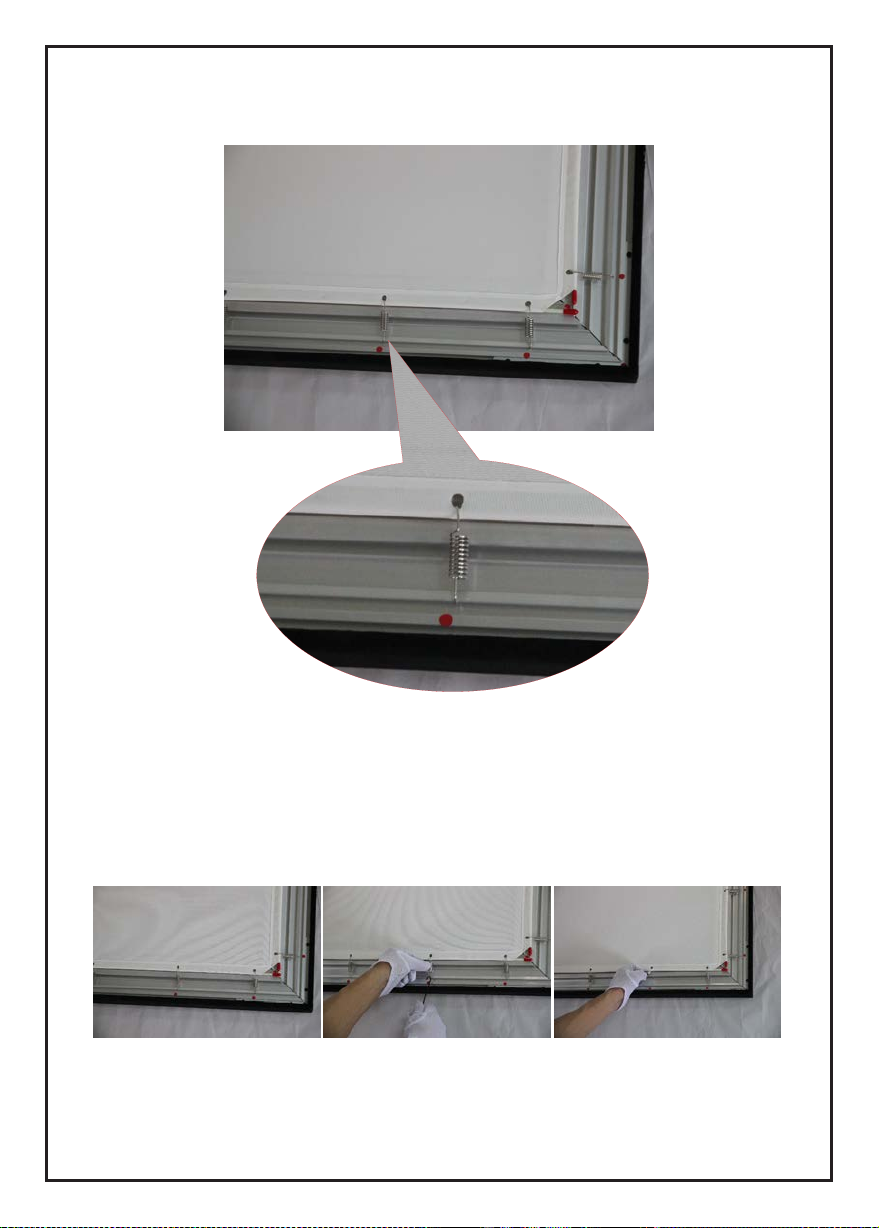
Note: 1. making sure the red alignment marks are properly matched.
2 .During installation, if you need to adjust or dismantle the fixed screen spring, please follow the
bellowed procedures and use the special drag hook to do it.
10
Mounting the Screen
Center Support Bar
Screen over 135” in size include a support bar.
Insert the Center Support Bar into the upper top groove on the back of
the frame (not the one where the fix plate inserts) with the bottom end
near the approximate center point of the frame and place it in at an angle
so that both ends of the bar are in alignment with the groove.
Slide the top end of the bar into the top center point location to complete
center support bar installation. This will provide added stability to your
frame and added tension to the material.
11
Top hanging way
Bottom hanging way
Mounting the Screen
1. Locate your desired installation location with a stud finder (recommen
ded) and mark the drill-hole area of where the screen is to be installed.
2. Drill a hole with the proper bit size according to the wood screws included.
3. Line up the wall brackets with the drilled holes on the installation location
and screw them in using a Philips screwdriver.
4. Position the fixed frame screen onto the top wall brackets as shown in
and push down at the center of the bottom frame to secure the installation.
5. The wall brackets allow flexibility by allowing the fixed frame screen to
slide to the sides. This is an important feature as it allows your screen is
properly centered.
12

13
The surface of your screen is delicate. Special attention to these instructions
should be followed when cleaning.
1. A draftsman-style brush may be used to lightly whisk away any loose
dirt or dust particles.
2 .For tougher spots, use a solution of mild detergent and water.
Rub lightly using a sponge. Blot with a damp sponge to absorb excess
water. Residual water marks will evaporate within a few minutes.
3 .Do not use any other cleaning materials on the screen. Contact the
factoryif you have questions about removing difficult spots.
4 .Use a lint brush to remove any dust on the frame.
Screen Care
Visualapex’s warranty covers defects in workmanship and fabrics, provided
screen has been installed in a normal environment and maintained according
to the written instructions.
Surface fabric(s) and frame are guaranteed for five (5) years from date of
installation.
Motors, motor controllers, and assembly hardware are guaranteed for one
(1) years – including parts and labor – not to exceed 15 months from date
of invoice.
Warranty

WWW.HIVILUX.DE
Table of contents


")


