AVer AW200 User manual

Quick Start Guide
AW200
V1.0


English-1
Standard Package
HDMI A to A
AVer Receiver AVer Transmitter
5V Universal Adapter
Quick Start Guide
1m x 1 30cm x 2
Mini DP A to A
30cm x 2
What’s in the box?
English

English-2
Installation
For FAQs, technical support, software and instruction
manual download, please visit:
Global: http://presentation.aver.com/download-center/
US: https://averusa.com/support/

English-3
AVer Receiver
DC IN POWER RESET
USB
HDMI OUT
ETHERNET
HDMI
DC power jack Power button
Reset button
USB port Ethernet port HDMI output port

English-4
Transmitter Operation
Transmitter
Main button (Mirror button)
Single click
Hold for 3 seconds
Users
Mirror / Disconnect
Full screen mirror
3
Main button Single click
Side button(Control button)
Hold for 3 seconds
(Only green button)
Users
Stop screen sharing
Plug in transmitter’s USB cable to receiver
to do the pairing Setup.
Download the pairing file to USB
disk and plug USB disk to
transmitter to do pairing setup
manually.
The receiver and transmitters have finished the pairing
setup before delivery. If you can’t use them, please do
the pairing setup again.
!
3
Switch to PC

Englsih-5
Transmitter's LED status
Sharing screen.
Standby to share screen.
Transmitter OTA Completed. (This device will be
restarted automatically.)
Standby w/o sharing device.
1. Connecting.
2. Pairing / Transmitter OTA download and installation.
3. Fail to connection(blinking for 1minutes or more).
Pairing done.
Transmitter OTA Fail.

English-6
PC
AVer Transmitter
5V1A
HDMI / Mini DP++

English-7
iOS
5V1A
Switch to Mobile
Trust This Computer?
Trust Don’t Trust

English-8
Android
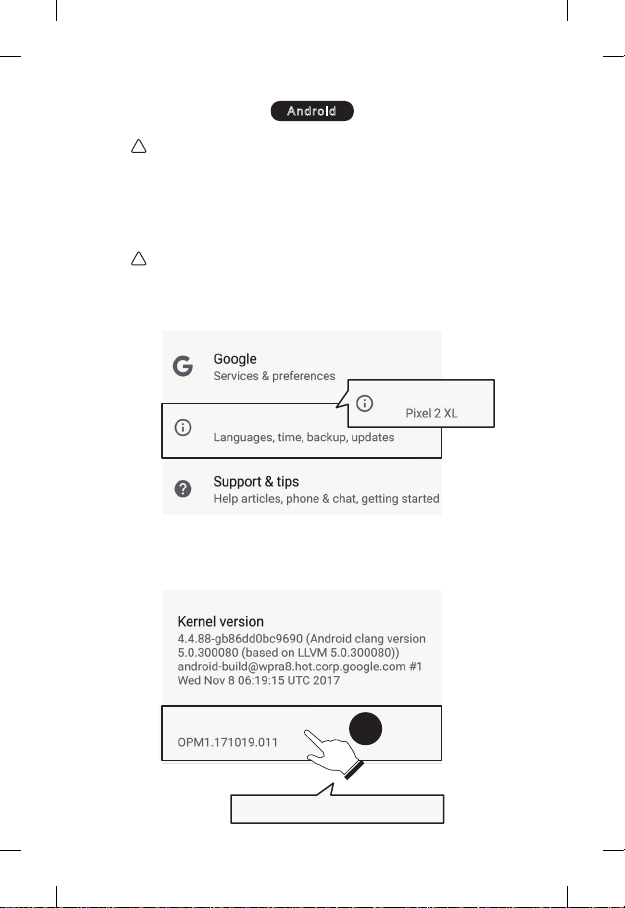
1. Go to Setting→System→About Phone
Please enable USB Debugging before using.
!
For Android devices, it is suggested that you
download the AW Share APP on Google Play
Store to enable device screen sharing.
Otherwise follow the steps below to enable
sharing using the AVer Transmitter.
!
System
About Phone
2. Click Build Number for 7 times to enable
Developer Option
You are now a developer!
x7
Build number

English-9
*Note: Please select MTP or File Transferring
in the notifications when USB is connected.
4. Plug to AVer Transmitter and Allow USB
debug
5V1A
Switch to Mobile
3. Go to Developer option→USB Debugging→ On
USB debugging
Developer options

English-10
©2020 AVer Information Inc. All rights reserved.
All rights of this object belong to AVer Information Inc. Reproduced or transmitted in any form or by any
means without the prior written permission of AVer Information Inc. is prohibited. All information or
specifications are subject to change without prior notice.
FCC STATEMENT
This device complies with Part 15 of the FCC Rules. Operation is subject to the following two
conditions:
(1) This device may not cause harmful interference, and (2) this device must accept any interference
received, including interference that may cause undesired operation.
This equipment has been tested and found to comply with the limits for a Class B digital device,
pursuant to Part 15 of the FCC Rules. These limits are designed to provide reasonable protection
against harmful interference in a residential installation. This equipment generates, uses and can
radiate radio frequency energy and, if not installed and used in accordance with the instructions, may
cause harmful interference to radio communications. However, there is no guarantee that interference
will not occur in a particular installation. If this equipment does cause harmful interference to radio or
television reception, which can be determined by turning the equipment off and on, the user is
encouraged to try to correct the interference by one of the following measures:
- Reorient or relocate the receiving antenna.
- Increase the separation between the equipment and receiver.
- Connect the equipment into an outlet on a circuit different from that to which the receiver is connected.
- Consult the dealer or an experienced radio/TV technician for help.
FCC Caution: Any changes or modifications not expressly approved by the party responsible for
compliance could void the user's authority to operate this equipment.
Radiation Exposure Statement:
This equipment complies with FCC radiation exposure limits set forth for an uncontrolled environment.
This equipment should be installed and operated with minimum distance 20cm between the radiator &
your body.
WARNING
1. To reduce the risk of fire or electric shock, do not expose this appliance to rain or moisture. Warranty
will be void if any unauthorized modifications are done to the product.
2. Use the correct accessories to avoid the damaging device.
3. Use the correct power supply voltage to avoid the damaging device.
4. Do not place the device where the cord can be stepped on as this may result in fraying or damage to
the lead or the plug.
5. Before you move the product, disconnect all external connections and power off the device.
6. Do not using it in the temperature exceed 40 degrees.
Global
AVer Information Inc.
www.aver.com
8F, No.157, Da-An Rd.,
Tucheng Dist.,
New Taipei City
Taiwan
Tel: +886-2-2269-8535
Fax: +886-2-2269-8537
Contact Information
USA
AVer Information Inc.
668 Mission Ct
Fremont, CA 94539
www.averusa.com
Toll-free: 1(877)528-7824
Local: 1(408)263-3828
Support.usa@aver.com
Europe B.V.
Westblaak 140, 3012KM,
Rotterdam, Netherland
Tel: +31(0)10 7600 550

Deutsch-
1
Standardpaket
HDMI A an A
AVer-Empfänger AVer-Sender
5 V-Universaladapter
Schnellstartanleitung
1 m x 1 30 cm x 2
Mini DP A an A
30cm x 2
Verpackungsinhalt
Deutsch

Deutsch-
2
Installation
Für FAQs, technischen Support, Download von Software
und Bedienungsanleitung besuchen Sie bitte:
Global: http://presentation.aver.com/download-center/
USA https://averusa.com/support/

Deutsch-
3
AVer-Empfänger
DC IN POWER RESET
USB
HDMI OUT
ETHERNET
HDMI
DC-
Anschlussbuchse
Ein-/
Ausschalter
Zurücksetz-Taste
USB-
Anschluss
Ethernet-
Anschluss
HDMI
Ausgangsanschluss

Deutsch-
4
Senderbetrieb
Sender
Haupttaste (Spiegel-Taste)
Einfachklick
3 Sekunden
gedrückt halten
Benutzer
Spiegeln/Trennen
Vollbild spiegeln
3
Haupttaste Einfachklick
Seitliche Taste (Steuertaste)
3 Sekunden
gedrückt halten
(Vollständig Grün Taste)
Benutzer
Bildschirmfreigabe
beenden
Stecken Sie das USB-Kabel des Senders
in den Empfänger und führen Sie das
Setup für die Kopplung aus.
Laden Sie die Kopplungsdatei auf
einen USB-Wechseldatenträger
herunter und stecken Sie diesen in
den Sender ein, um die Kopplung
von Hand auszuführen.
Empfänger und Sender wurden vor dem Versand
gekoppelt. Wiederholen Sie das Setup der Kopplung
gegebenenfalls.
!
3
Umschalten an PC

Deutsch-
5
LED-status des Senders
Bildschirmfreigabe.
Standby für Bildschirmfreigabe.
Sender OTA abgeschlossen.
(Wird das Gerät automatisch neu gestartet.)
Standby ohne Freigabegerät.
1. Verbindung.
2. Kopplung/Sender OTA Download und Installation.
3. Verbindungsfehler (blinkt mindestens 1 Minute).
Kopplung ausgeführt.
Sender OTA fehlgeschlagen.

Deutsch-
6
PC
AVer-Sender
5 V, 1 A
HDMI/Mini DP ++

Deutsch-
7
iOS
5V1A
Umschalten an Mobil
Ist dieser Computer
vertrauenswürdig?
Vertrauenswürdig Nicht vertrauenswürdig

Deutsch-
8
Android
1. Öffnen Sie Einstellungen→System→Über das Telefon
2. Klicken Sie sieben (7) Mal auf die Build-Nummer,
um die Entwickleroption zu aktivieren
PleAktvieren Sie vor der Verwendung bitte USB Debugging.
!
Für Android-Geräte wird empfohlen, dass Sie die
AW Share APP aus dem Google Play Store herunterladen,
um die Bildschirmfreigabe zu aktivieren.
Befolgen Sie sonst die nachstehenden Schritte,
um die Freigabe mithilfe des AVer-Senders zu ermöglichen.
!
System
About Phone
Nun sind Sie ein Entwickler!
x7
Build-Nummer
Other manuals for AW200
2
Table of contents
Languages:
Other AVer Projector Accessories manuals
Popular Projector Accessories manuals by other brands

Grandview
Grandview GPAD64 Series installation manual

InFocus
InFocus SP-CEIL-UNIV Installation and assembly

Christie
Christie Brio Enterprise quick start guide

FONESTAR
FONESTAR PPTR-43100-BA instruction manual

Navitar
Navitar NuView 490MCL1625 installation instructions

Premier Mounts
Premier Mounts PBM-070L installation instructions