Hix SubliPro-Ct User manual

10623 RV C_20201007
Contents
Introduction ..................................................................................................................... 2
General Information ........................................................................................................ 3
Unpacking And Placement .............................................................................................. 4
Installation ...................................................................................................................... 5
Control Panel................................................................................................................... 6
Preparation...................................................................................................................... 7
Home Screen................................................................................................................... 8
Time & Temp. Adjustment................................................................................................ 9
Settings.......................................................................................................................... 10
Preset Settings ...............................................................................................................11
Preset Storage............................................................................................................... 12
Cycle Count................................................................................................................... 13
Preferences ................................................................................................................... 14
Operation....................................................................................................................... 15
Cleaning & Maintenance ............................................................................................... 16
HIX Mug Wraps ............................................................................................................. 17
Using HIX Mug Wraps ................................................................................................... 18
Warranty ....................................................................................................................... 20
SubliPro-Ct
Electric Countertop Convection Oven
OWNER’S MANUAL
Installation, Operation and Care of HIX SubliPro-Ct
BEFORE warranty repair you MUST get Prior Authorization:
For Customer Service, Call 1-800-835-0606
or Visit www.hixcorp.com

2
INTRODUCTION
KEEP THIS MANUAL FOR FUTURE REFERENCE
Congratulation on the purchase of your Countertop SubliPro-Ct sublimation oven!
Sublimation is dened as the process of change from a solid to a gas state without
passing through a liquid phase. When heated, sublimation dyes bind permanently
with the molecules of the substrate. Under the right pressure and temperature
condition, the substrate molecules open up and allow the gaseous dye molecules to
become trapped upon cooling. This color “trapping” results in a nearly undetectable
“hand” or sensation of any physical change of the substrate. Dye sublimation shirts
retain the original feel of their fabric, breathability and wicking characteristics. Non-
textile substrates – mugs, cellphone cases, photo-imaging wooden or metal plates,
etc. – show their color designs in unusual vibrancy and color retention. Since color
is now also more than superimposed layer, the design is also generally better
protected against abrasion.
The sublimation works on polyester, either as a fabric or as a coating on non-textile
substrates. The process does not work on cotton except when the cotton is spun in
combination of a substantial percentage of synthetic material. However, since only
the polyester fabric traps the sublimation dye, there is a direct relationship between
the vivacity and longevity of the images and their synthetic content.
Dye sublimation inks are translucent. As a result, printing on dark substrates can
only occur if printing on a white underbase (in the case of fabric) or on a white panel
(in the case on non-textile).
Over the past 20 years, the use of inkjet printers to create sublimation dye transfers
has grown exponentially, partly because of its growing popularity, but also because
of the declining price of dedicated desktop-size sublimation printers. Popularization
of the technique has created such a demand that these printers have now become
accessible to any small business willing to expand into this eld.
Key among sublimation’s advantages is the ability to produce accurate colors, ne
detail and durable prints.
3
GENERAL INFORMATION
The SubliPro-Ct Electric Convection Oven is a single cavity oven and features a solid
state thermostat, digital timer, variable-speed 1/6 HP (0.124 KW) electric motor and
three racks as standard equipment. Each oven is provided with a standard 208 or
240 volt, 60 Hz., and 1- or 3-phase electrical service. Stainless steel oven interior
and exterior is standard.
A single oven may be installed on an open stand with lower storage rack (optional).
Legs are standard.
Your HIX SubliPro-Ct Electric Convection Oven is produced with quality workmanship
and material. Proper installation, usage and maintenance of your oven will result in
many years of satisfactory performance.
It is suggested that you thoroughly read this entire manual and carefully follow all
of the instructions provided.
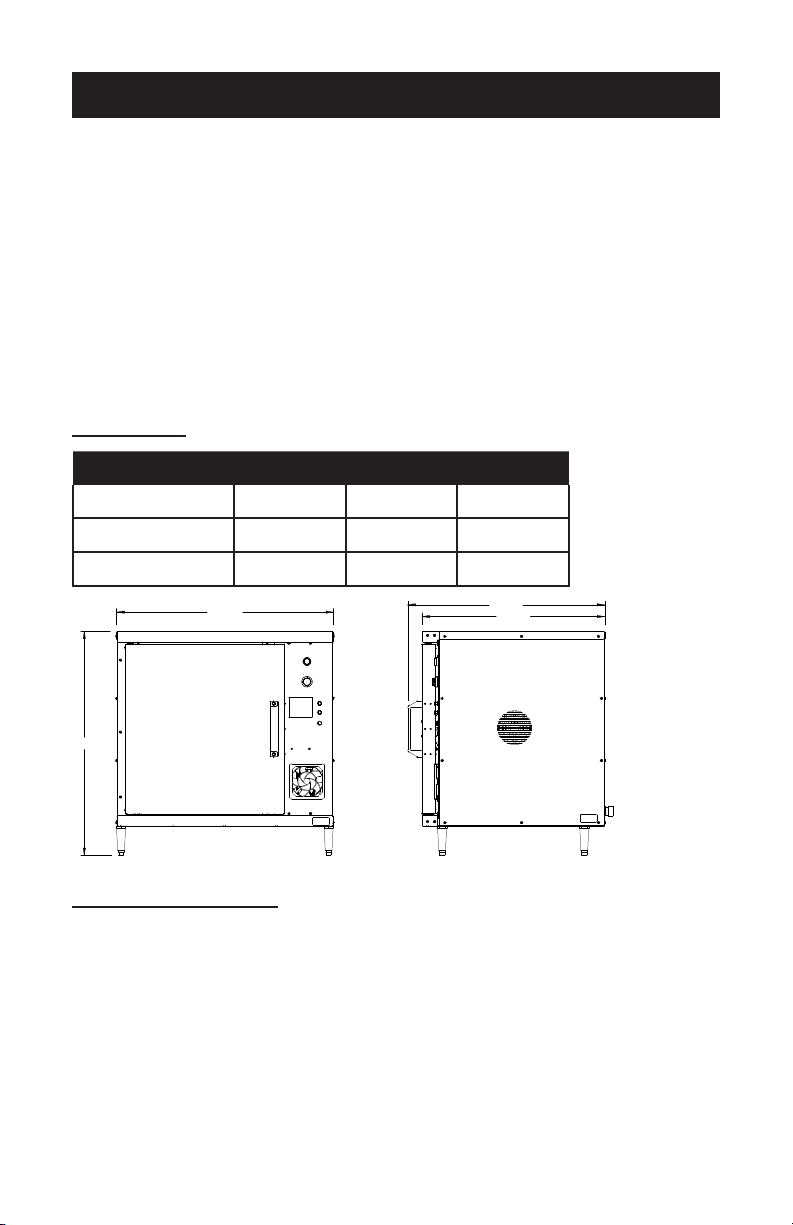
DIMENSIONS
Width Height Depth
Exterior 30.0625” 31.125” 27.375”
Interior 15.219” 22” 21.188”
Wire Racks (3) 13” 20.125”
TEMPERATURE RANGE
Ambient – 450°F
FRONT VIEW SIDE VIEW

4
UNPACKING AND PLACEMENT
Before installing, verify that the electrical service agrees with the specications on
the oven rating plate, located on the inside of the top front cover. If the supply and
equipment requirements do not agree, do not proceed with installation. Contact
your HIX customer service representative immediately.
UNPACKING
This oven was inspected before leaving the factory. The transportation company
assumes full responsibility for safe delivery upon acceptance of the shipment.
Immediately after unpacking the oven, check for possible shipping damage. If this
oven is found to be damaged, save the packaging material and contact the carrier
within 15 days of delivery.
Do not use the door or its handle to lift the oven.
PLACEMENT
The placement of the oven needs to be on a stable level surface sufcient to support
the weight of the oven and must allow adequate clearances for servicing and proper
operation Installations on supports restricting air circulation around the oven is not
advisable and may void the warranty. A minimum of three inches of clearance on
all sides and top as well as clearance from any combustible surfaces is required.
3”
3”
3”
3”

5
INSTALLATION
ATTACHING LEGS
The included legs must be installed on the SubliPro-Ct oven to provide sufcient air
circulation for the bottom of the oven. The legs screw into the four threaded inserts
located in the corners on the underside of the oven. Screw one leg into each insert.
LEVELING
Once the oven is in its permanent position, place a carpenter’s level on the oven
rack. Turn the adjustable feet in or out to level oven front-to-back and side-to-side.
ELECTRICAL CONNECTIONS
⚠ WARNING: Electrical and grounding connections must comply with the
applicable portions of the National Electrical Code and/or other
local electrical codes.
⚠ WARNING Disconnect the electrical power to the machine and follow lockout
/ tagout procedures.
ELECTRICAL DATA
Total KW 3 Phase 1 Phase
208 V 240 V 208 V 240 V
8.0 (including blower motor) 23.0 A 19.0 A 38.0 A 33.0 A
Assure you have the proper receptacle installed before plugging to oven into power.
If the correct receptacle is not available for your oven’s power conguration, have a
licensed electrician install the proper receptacle to match that of your oven; NEMA
10-50P for single Phase or L15-30R for 3-Phase.

6
CONTROL PANEL
⚠ WARNING THE OVEN AND ITS PARTS ARE HOT. USE CARE WHEN
OPERATING, CLEANING OR SERVICING THE OVEN.
CONTROLS (Fig. 3)
FAN SPEED CONTROL —
Adjusts air velocity in the oven. Turn the
dial to adjust the fan speed and increase
or decrease the air circulation inside the
oven chamber. Begin with a setting of 8
and adjust accordingly to achieve your
desired production results.
ON LIGHT (Amber) —
Lit when Master Switch or Oven Cool
Switch is positioned at ON.
OVER HEAT —
Comes on when the oven temperature
reaches 480°F. Oven will automatically
shut down and go into a cool down phase.
Oven will come back on after it stabilizes
to normal operating temperatures.
THERMOSTAT —
Controls oven temperature during cooking
operation.
TIMER —
Use to set heating cycle time. Timer range
is 0 to 99 minutes 59 seconds. Alarm
sounds continuously when elapsed time
counts down to 0; oven does not turn off.
TIMER RESET —
To turn the timer off, press the timer reset
switch
POWER
BUTTON
FAN
SPEED
CONTROL
TEMP.
CONTROL
TIMER
START
TIMER
RESET
OVER
HEAT
COOLING
FAN
Fig. 3

7
PREPARATION
BEFORE FIRST USE
Before using the oven for the rst time, it must be “burned in” to release any odors
that might result from heating the new surfaces in the chamber.
1. Using a clean damp cloth, wipe the inside of the oven, including the racks.
2. Close the oven doors, turn the Master Switch to ON, set the Thermostat to
300°F (149°C) and allow the oven to cycle for 6 to 8 hours before turning the
Power Switch to OFF.
USING THE HIX SUBLIPRO-CT OVEN
Getting Started
Sublimation printing is an indirect process which requires a printer capable of running
sublimation ink, a computer with the appropriate printer drivers, and a heat source.
As a heat source for textile or at non-textile products, use almost any of our small
format presses (visit www.hixgraphics.com for details). Presses come in small sizes
starting at 9 x 12”, 15 x 15”, 16 x 20”, and in mid-size of 20 x 25”.
For sublimation on 3D-substrates, our Mug Wraps in combination with a SubliPro
sublimation oven are particularly well designed to do the job. Whether using a
press or a Sublimation oven with Mug wraps, three variables are particularly
important: adequate sublimation dwell time, equal and sufcient pressure, equal
heat distribution at the appropriate temperature. Trust only equipment that provide
all 3 parameters in a controllable and uniform way. HIX equipment is designed to
provide these parameters within very narrow tolerances, which is critical for success.
Controllable time and temperature, properly and evenly distributed pressure and
temperature are built in to all our product and are the reason for their generational
popularity.
If the oven reaches 475°F, the display will show “OVERHEAT” to indicate the
maximum temperature has been exceeded. If the temperature continues to climb
to 480°F, the oven will automatically shut down and go into a cool down phase to
protect the oven, its components, and the environment surrounding the oven. Once
the temperature of the oven has stabilized to normal operating conditions, the power
can be turned back on by resetting the Power Button to its “ON” state.

8
HOME SCREEN
1. Turn on the machine by pressing in the POWER BUTTON
Startup/Splash screen is displayed as the controller boots up.
Note: The current program number and the software revision of the control-
ler are displayed at startup. (The default settings are program number
P 19 software revision RV 1.0)
After boot up, the home screen is displayed showing the current heat platen
temperature and set cycle time. The heat indicating lamp is represented
by the snowake in the upper left corner of the display. The heat indicating
lamp will display anytime the heating element is heating and will cycle on
and off after the set temperature is reached to maintain set temperature.
Startup/Splash Screen
MACHINE PRESET
BUTTONS
ACCESS
SETTINGS MENU
TEMPERATURE
READOUT/SETTING
HEAT INDICATING
LAMP
TIME
READOUT/SETTING TIME SCALE
HOME MENU SCREEN

9
TIME & TEMP. ADJUSTMENT
ADJUST TEMPERATURE:
1. Touch the temperature readout on the display. “UP” ▲ and “DOWN” ▼
arrows will appear on the right side of the display and the temperature
value will start ashing and to indicate it is in set mode.
2. Press the “UP” ▲ or “DOWN” ▼ arrow to change the temperature value.
Holding down on an arrow will change the temperature in 1 degree incre-
ments for 10 values; then change to 10 degrees incremental changes.
3. Once the desired temperature value is set, either press the temperature
value to lock the set temperature or simply wait for 2 seconds and it
will lock in the new value automatically.
4. Once the machine reaches the temperature of the set value (between
0-9) the controller will “beep” signaling that the machine is ready to use.
ADJUST CYCLE TIME:
1. Touch the time readout on the display. “UP” ▲ and “DOWN” ▼ arrows
will appear on the right side of the display and the cycle time value will
start ashing and to indicate it is in set mode.
2. Press the “UP” ▲ or “DOWN” ▼ arrow to change the cycle time value.
Holding down on an arrow will change the time in 1 second increments
for 5 values; then change to 10 seconds incremental changes.
3. Once the desired cycle time value is set, either press the time readout
to lock the cycle time or simply wait for 2 seconds and it will lock in the
new value automatically.
TIME ADJUSTMENT SCREEN
UP ARROW
DOWN ARROW
TIME
READOUT/SETTING
TEMPERATURE ADJUSTMENT SCREEN
TEMPERATURE
READOUT/SETTING
UP ARROW
DOWN ARROW
10
SETTINGS
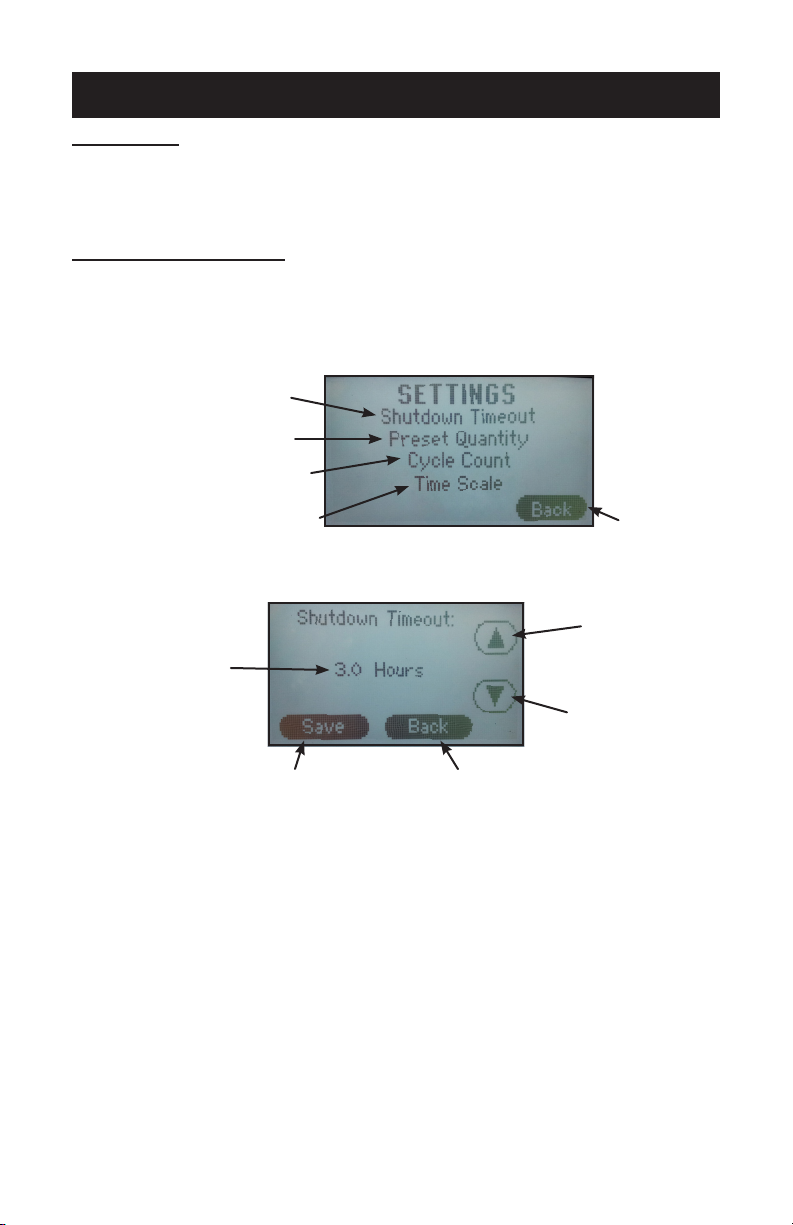
SETTINGS:
1. Press the “?” on the upper right corner of the display on the Home
Menu Screen to access the settings menu.
2. Press the settings sub menu title to be adjusted.
SHUTDOWN TIMEOUT
The shutdown feature shuts off the heat to the press after a period of in-
activity.
NOTE: The factory default is set at 3.0 hours.
1. From the settings menu press the “Shutdown Timeout” sub menu title.
2. Press the “UP” ▲ and/or “DOWN” ▼ arrows to set the desired shut-
down time.
NOTE: Shutdown time adjusts in 1/2 hour intervals. Press the “Down” ▼
button until “Disable” is displayed will deactivate this setting.
3. Press “Save” to save the setting.
4. Press “Back” to return to the previous screen.
NOTE: After the shutdown time has elapsed with the press idle, the heating
element will stop cycling to maintain the set temperature and the
home screen will display “SHUTDOWN.” Touching the display or
closing the press will take the machine out of shutdown mode.
SETTINGS MENU SCREEN
RETURN TO
PREVIOUS
SCREEN
ADJUST SHUTDOWN TIMEOUT
SETTING
SET QUANTITY OF PRESETS
DISPLAYED
VIEW/RESET CYCLE COUNT
SET TIME SCALE PREFERENCE
SHUTDOWN TIMEOUT ADJUSTMENT SCREEN
UP ARROW
DOWN ARROW
SHUTDOWN TIMEOUT
SETTING
SAVE SETTINGS RETURN TO PREVIOUS SCREEN
11
PRESET SETTINGS
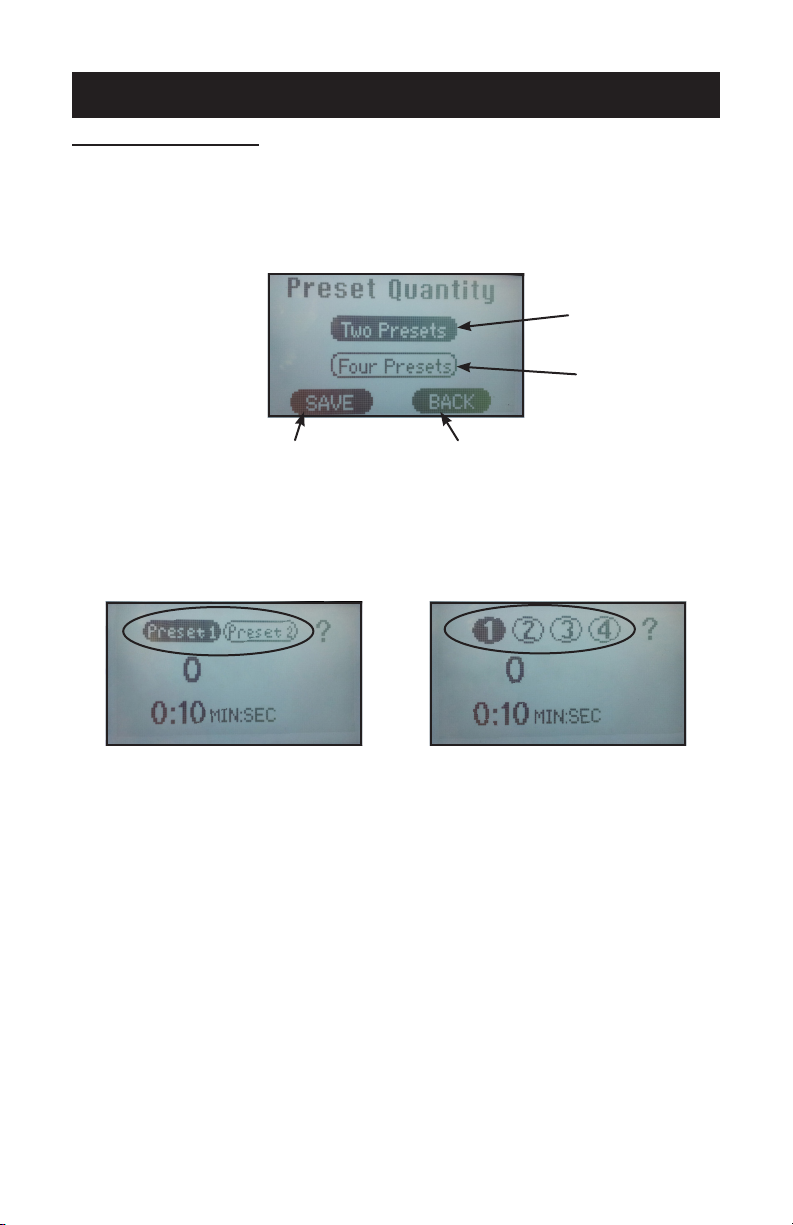
PRESET QUANTITY
Temperature presets can be stored in the memory for different trans-
fer settings. By default two presets are displayed. This setting can be
adjusted to display four presets.
1. From the settings menu press the “Preset Quantity” sub menu title.
2. Press the number of presets to be displayed on the home screen, either
“Two Presets” or “Four Presets.”
3. Press “Save” to save the setting.
4. Press “Back” to return to the previous screen.
TWO PRESETS
DISPLAYED
FOUR PRESETS
DISPLAYED
SAVE SETTINGS RETURN TO PREVIOUS SCREEN
PRESET QUANTITY DISPLAYED PREFERENCE SCREEN
TWO PRESET DISPLAY
ON HOME MENU SCREEN
FOUR PRESET DISPLAY
ON HOME MENU SCREEN
12
PRESET STORAGE
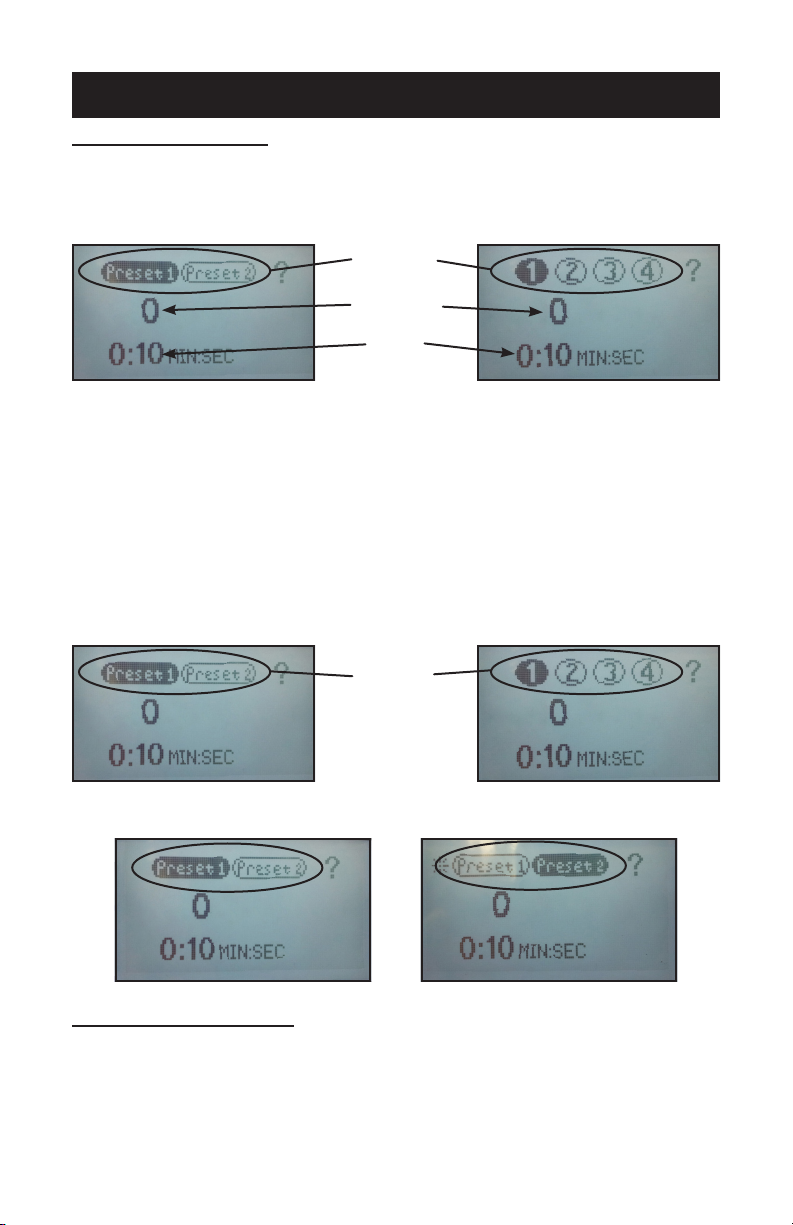
STORING PRESETS:
NOTE: The factory default settings for all presets is set to 200°F and 10
seconds.
1. Set the desired temperature and/or cycle time using the temperature
and time adjustment instructions in this document.
2. Immediately upon changing the time or temperature with the up and
down buttons, press the new temperature or time readout again until
the controller beeps once. Then press and hold the desired preset
location for two seconds. The controller will beep twice and the preset
button will display in reverse indicating the preset is stored in memory.
NOTE: Always refer to specic transfer recommendations for temperature,
time and pressure as instructed by the transfer manufacturer.
RECALLING PRESETS:
1. Press and release for approximately 1/2 second the preset button to
recall. The controller will beep and the preset location button will display
in reverse indicating the preset has been changed.
NOTE: The new set values will display for 1 second before the controller
starts adjusting the temperature or time to match the new setpoint.
PRESET
LOCATIONS
TEMPERATURE
SETTING
TIME
SETTING
HOME MENU SCREEN
PRESET 1 SELECTED
(two preset setting shown)
PRESET 2 SELECTED
(two preset setting shown)
PRESET
LOCATIONS
(press 1/2 second
to recall)

13
CYCLE COUNT
CYCLE COUNT
The cycle count feature counts the number of cycles that the machine
has undergone. A cycle is counted every time the countdown timer is
activated by closing the press.
NOTE: The cycle count will maintain the total count even if the power has
been turned off.
TO RESET THE COUNTER:
1. From the settings menu press the “Cycle Count” sub menu title.
2. Press “Reset.”
3. Press “Back” to return to the previous screen.
CYCLE COUNT/CYCLE COUNT RESET SCREEN
CYCLE COUNT
RESET TO ZERO RETURN TO PREVIOUS SCREEN

14
PREFERENCES
TIME SCALE
The time scale setting adjusts how the time is displayed on the home
screen. There are three Time Scale display options available in the
Time Scale menu:
• MIN:SEC (Factory Default)
• SEC (Seconds)
• 1/10 SEC (1/10 Second Resolution)
TO CHANGE THE SCALE:
1. From the settings menu press the “Time Scale” sub menu title.
2. Press the “UP” ▲ and/or “DOWN” ▼ arrows to select the preferred
time scale.
3. Press “Save” to save the setting.
4. Press “Back” to return to the previous screen.
TIME MODE PREFERENCE SCREEN
TIME SCALE
PREFERENCE
SAVE SETTINGS RETURN TO PREVIOUS SCREEN
UP ARROW
DOWN ARROW

15
OPERATION
Preheating
1. Turn Master Switch to ON. Amber ON light will come on, indicating that power
to the oven is on. The oven will need approximately 15 minutes to reach a
sufcient sublimating temperature.
2. Set Thermostat as desired. Refer to SUGGESTED SUBLIMATION GUIDELINES
for temperatures and times for various substrates. As a general guideline, HIX’s
in-house testing on standard 11/15 oz white ceramic mugs use a setting of:
• TIME: 13 - 15 minutes
• TEMP: 395ºF
• AIR CIRCULATION: High fan setting
NOTE: These settings are based upon in-house testing and are a starting point.
These settings may vary depending on a number of factors.
There are many variables involved in sublimation such as the size, shape
and type of coating of the substrate which affects the sublimation process.
Other variables such as different brands of sublimation printers, inks and
paper all require a certain amount of trial and error.
3. Prepare the substrates with transfers and wraps. When white HEAT light goes
off, oven has reached desired preheat temperature.
Sublimating
1. Open doors and load the substrates into the oven. Place on racks with the open
side of the substrate facing down. Close doors.
2. Set the Timer. After the preset time lapses, turn timer to OFF position to stop
alarm.
3. When sublimation is done, open doors and carefully remove sublimated product
from the oven.
End of Day
1. Turn OFF the oven power and open the door for approximately ve minutes to
allow the oven chamber to vent heat.
2. Turn Oven Cool switch to ON. Leave door ajar while the fan is on to cool the
oven.
3. When the oven has cooled sufciently, push the Master Switch and Oven Cool
Switch to the OFF position and clean the oven.
OPERATING HINTS
When using the SubliPro-Ct oven for the rst time with a new substrate, check
the sublimation quality before sublimating a batch of products to make sure the
sublimation results meet your quality standards.
Record your temperature and time settings for various products. The SubliPro-Ct
oven can provide consistent, repeatable results.

16
CLEANING & MAINTENANCE
CLEANING
Disconnect the electrical power to the machine and follow lockout / tagout procedures.
Clean outside of the oven daily by wiping with a clean damp cloth.
Clean oven interior daily with soap or detergent and water. Rinse thoroughly and
wipe dry with a soft clean cloth.
For “heat tint” (slightly darkened areas caused by oxidation) which resist simple soap
and water cleaning, an abrasive cleanser (scouring powder) mixed into a paste may
be used. Apply with stainless steel wool or sponge, always rubbing with the “grain.”
MAINTENANCE
The oven and its parts are hot. Use care when operating, cleaning or servicing the
oven.
Disconnect the electrical power to the machine and follow lockout / tagout procedures.
LUBRICATION
The fan motor comes with sealed bearings and requires no lubrication.
The door hinges and mechanism require occasional lubrication with mineral oil.
SERVICE AND PARTS INFORMATION
To obtain service and parts information concerning this model, contact the HIX
Customer Service Department.
When calling for service, the following information must be available: model number,
serial number, manufacture date (MD) and voltage

17
HIX MUG WRAPS
Why use HIX 2-Step Mug Wraps?
Sublimating is a “Snap” with HIX 2-Step Wraps!
For sublimation to occur, a dye needs to be heated in order to sublimate into a gas.
Pressure is needed to create a proper contact with the substrate and to ensure a
detailed denition of the nal image.
Traditional mug presses combine both compression and heating in one device.
The advantage of the HIX Mug Wrap is that it separates these two actions: the
wrap provides the pressure, while your Countertop SubliPro Oven provides the
heat. This provides greater reliability than traditional mug presses and reduced
maintenance costs.
Our wraps provide a quick snap-on solution. Simply position and tape your artwork
to virtually any type of drinking vessel. Then, wrap the substrate and artwork with
the tting HIX Wrap. That’s it! You are ready to sublimate!!
The advantage of the HIX Wrap is its patented tool-less 2-step clasping technology.
No other mug wrap on the market is as easy to apply or remove. There’s no fumbling
with awkward closing mechanism or wrenches, and no need for extra hands when
you’re trying to juggle endless adjustments while closing a clamp with screwdrivers
or other tools.HIX Wraps open and close with a simple “snap.”
The HIX Wrap has two settings: a rst for substrates with handle, a second for
substrates without. The rst setting is used for traditional 11oz and 15oz mugs and
provide a near 360 degree enclosure of the mug. The second setting is used for
substrates without handle and provides a complete 360 degree wrapping.
The 2-step clasp can be closed to the rst “snap” for the substrates with handle,
and to the second “snap” for substrates without handle.
Substrates, artwork and wraps are now ready to be sublimated in your Countertop
SubliPro oven!
Wrap Styles
HIX 2-stepWraps can come in as many sizes and shapes as there are substrates in
the market. For the standard straight 11oz and 15oz white mugs, HIX has a standard
wrap which is readily available as part of its standard product stock. Similarly,
standard dog bowl wraps are also available from regular stock. Any standard Mug
Wrap may be purchased in bundles of a minimum of 10 units.
Custom HIX Mug Wraps
An ever-growing variety of containers, vessels, mugs, cups, bottles and glasses
are creating a rise in demand for Wraps to match.
HIX custom designs unique custom Mug Wraps for each shape and size substrate,
whether straight or slanted. Check us at www.hixgraphics.com or your local HIX
distributor for details.
18
USING HIX MUG WRAPS
⚠ CAUTION: MUG(S) and MUG WRAP(S) ARE HOT AFTER HEATING. AL-
WAYS WEAR PROTECTIVE GLOVE OR OVEN MITTS. KEEPS
CHILDREN AWAY FROM HOT/SHARP MATERIALS.
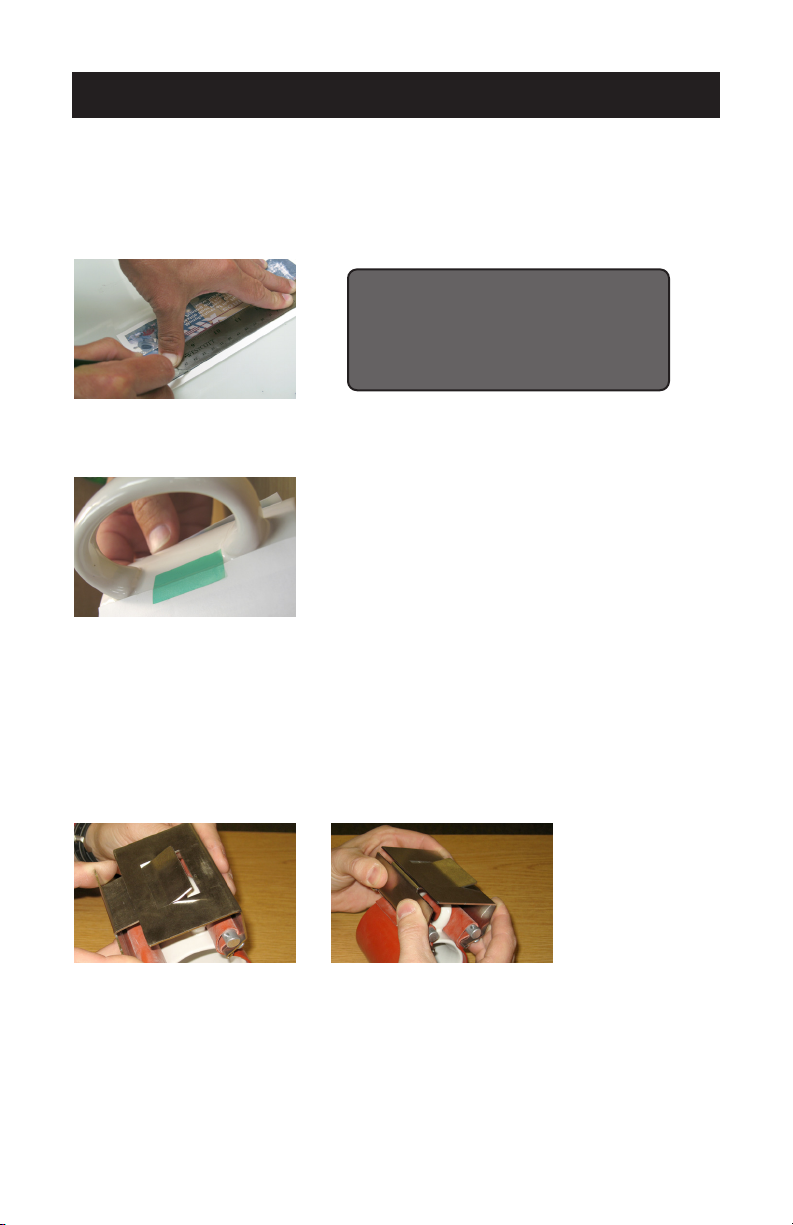
1. TRIM TRANSFER: Before applying, trim the transfer so that there is no excess
paper above or below the mug.
TIP: Trim the top of the transfer with a
straight edge; this will assist you in
lining the transfer up with the top of
the mug to help eliminate crooked
transfers.
2. APPLY TRANSFER: Secure the ends of your transfer to the mug using heat tape.
3. WRAP MUG: Lay mug wrap at on the table, position mug in the center of wrap.
With one hand, hold the handle against the “loop end” of the wrap at the point where
the silicone rubber wraps around the round bar. With your other hand, grasp the
“hook end” of the mug wrap, and wrap the silicone rubber around the mug. Insert
the bent up portion of the “hook end” into the rectangular opening on the “loop
end.” With both hands, squeeze the two halves of the mug wrap together until it
locks together. You will hear a ‘snap’ sound when the “hook end” is fully inserted
into the “loop end”.
4. PLACE IN OVEN: Make sure oven is set per transfer/ink manufactures specied
temperature usually 375° – 400°F for sublimation. Place your wrapped mugs in the
oven top down, this will allow heat to be trapped inside of the mug, improving transfer
quality. Space each mug at least 2 inches apart; 2” spacing allows for maximum
airow between mugs and more even heating of the entire mug.

19
USING HIX MUG WRAPS
5. REMOVE AND COOL:
NOTE: If you are not using a HIX Mug Oven with a Cooler then you will need to
wear heat protective gloves to handle the nished wraps and mugs.
Tip: Position any excess wrap forwards the
bottom of the mug. This will allow the
mug to sit more securely in the oven.
Remove mug from oven with heat protective gloves. Place thumbs against the
bottom lip of the “loop end” while placing index ngers against the top edge of the
“hook end.” With one motion, press thumbs up and index ngers down. This will
release the mug from the wrap. Pull the heat tape from the tabbed end and imme-
diately remove transfer with one continuous motion. If not using an in line cooler,
place mug in room temperature water to cool mug and stop sublimation process.
⚠ CAUTION: Wrap will be hot. Use care when applying wrap to another mug. Do
not re-use wrap when hot, let cool.

20
1201 E. 27th Terrace • Pittsburg, KS 66762 • U.S.A.
Web site: www.hixcorp.com • Phone: (800) 835-0606 • Fax: 620-231-1598
©2020 HIX Corp.
Design and Manufacturers of Graphic Imaging, Commercial Food, Industrial and Custom Drying Equipment
WARRANTY
(Effective 3/1/2020)
HIX will automatically register the equipment on the date it was shipped to you or your distributor. If the
equipment was not purchased directly from HIX, but through a distributor (either domestic or foreign), please
keep a copy of their sales invoice showing the serial number and date it was sold/shipped to you with this war-
ranty. In this case, we will use the distributor’s invoice date as the beginning warranty date. STAPLE A COPY
OF YOUR PROOF OF PURCHASE TO THIS WARRANTY and keep in a safe place to provide verication of
your warranty should a problem occur. Thank you.
Please ll in the following information and attach a copy of your receipt for your records.
Date Purchased: From:
Model #: Serial #:
This warranty applies to equipment manufactured by the HIX Corporation (HIX), Pittsburg, Kansas, U.S.A.
HIX warrants to the original purchaser, its Ovens and Dryers, Heat Transfer Machines, Textile Printers, Spot
Heaters, and Exposure Units against defects in workmanship and material, except for wear and tear for a
period of “One Year” from the date of purchase. HIX warrants Accessories for a period of 90 days from the
date of purchase. doughXpress products are covered under separate warranty.
In the event of a defect, HIX, at its option, will repair, replace or substitute the defective item at no cost
during this warranty period subject to the limitations of insurance and shipping costs stated below (excludes
labor).
In the case of heat transfer presses (except the Hobby Lite and Large Format presses), HIX warrants the
heat casting for the “Life” of the machine for the original purchaser. If a part becomes obsolete at the time
for repair, and/or cannot be reasonably substituted for, HIX will credit, at half the then current list price or last
recorded price, only that part toward a new machine or any product HIX offers. This credit offer shall be the
sole responsibility of the HIX Corporation in the event of an obsolete part.
This warranty does not cover belts, rail tape, pads, mug wraps, canvas, rubber blankets, bulbs, glass.
Warranty does not cover damages due to accident, misuse/abuse, alterations or damage due to neglect, ship-
ping or lack of proper lubrication or maintenance. HIX shall not be responsible for repairs or alterations made
by any person without the prior written authorization by HIX. This warranty is the sole and exclusive warranty
of HIX and no person, agent, distributor, or dealer of HIX is authorized to change, amend or modify the terms
set forth herein, in whole or in part.
In the case of a problem with the equipment identied herein, HIX Corporation should be contacted during
regular business hours to discuss the problem and verify an existing warranty. HIX personnel will assist the
customer to correct any problems which can be corrected through operation or maintenance instructions,
simple mechanical adjustments, or replacement of parts. In the event the problem cannot be corrected by
phone, and upon the issuance of a return authorization by HIX, the equipment shall be returned to HIX or an
authorized service representative. All insurance, packaging and shipment/freight costs are solely the respon-
sibility of the customer, and not that of HIX, and HIX shall not be responsible for improper packaging, handling
or damage in transit. Contact HIX customer service for complete return authorization information. Correct
shipping boxes are available from HIX.
This expressed warranty is given in lieu of any and all other warranties, whether expressed or implied,
including but not limited to those of merchantability and tness for a particular purpose, and constitutes the
only warranty made by HIX Corporation.
In no event shall HIX’s liability for breach of warranty extend beyond the obligation to repair or replace the
nonconforming goods. HIX shall not be liable for any other damages, either incidental or consequential, or the
action as brought in contract, negligence or otherwise.
This warranty gives you specic legal rights and you may also have other rights which vary from state to
state.
Table of contents
Other Hix Oven manuals


Popular Oven manuals by other brands


Jenn-Air
Jenn-Air W132B Use & care guide

Whirlpool
Whirlpool AKZM 835 User and maintenance manual

GE
GE JKP35DPBB Dimensions and installation information

SEVERIN
SEVERIN TOASTOFEN MIT UMLUFT TO 2035 Instructions for use

Siemens
Siemens HB24D555W instruction manual

Samsung
Samsung NV70K1340BS/EF User & installation manual


