manuals.online logo
Brands
  1. Home
  2. •
  3. Brands
  4. •
  5. HL Display
  6. •
  7. Merchandiser
  8. •
  9. HL Display 3eBin User manual

HL Display 3eBin User manual

8.
9.
10.
15.
1
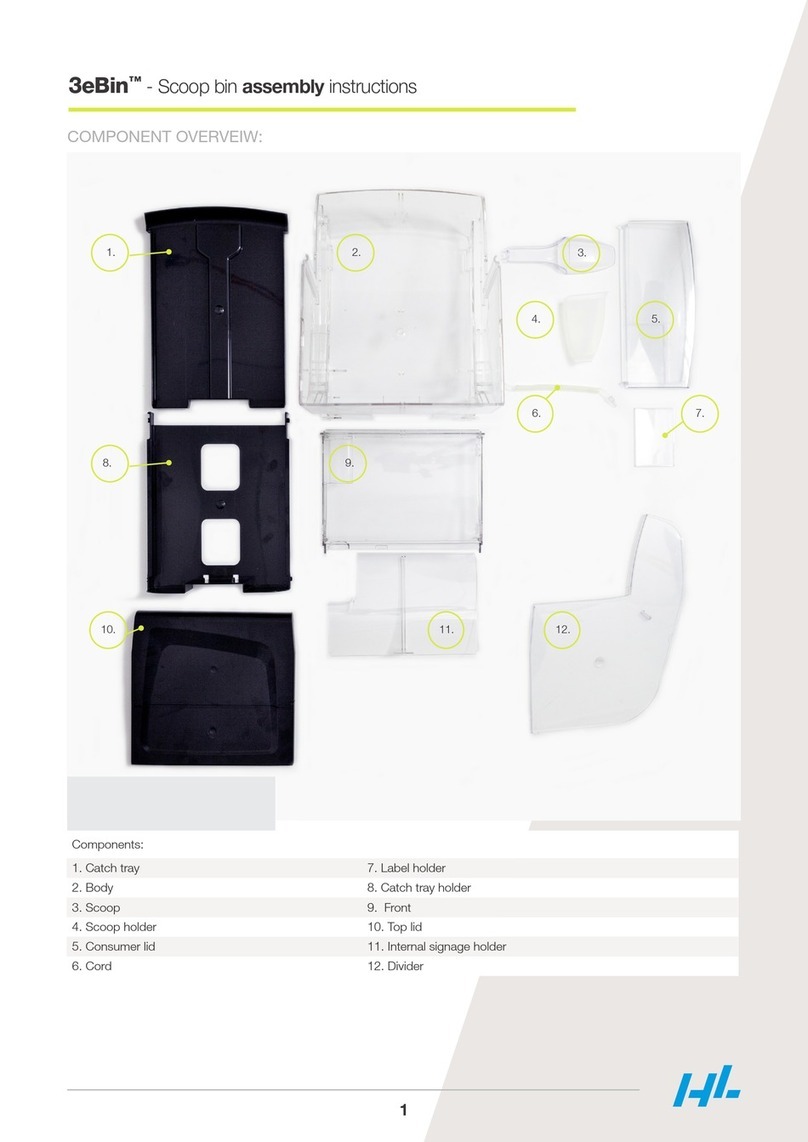
COMPONENT OVERVEIW:
1.
3eBin™- Gravity bin assembly instructions
2. 3.
6.
4.
5.
13. 14.
7.
11. 12.
Components:
1. Front 9. Bearings (2 pcs)
2. Left bin body 10. Plugs (2 pcs)
3. Right bin body 11. Sleeve
4. Label holder 12. Handle
5. Springs (2 pcs) 13. Shutter seal
6. Clip 14. Shutter
7. Shutter stop 15. Top lid
8. Flow control
5.Place bin front on the side. Place handle over the holes
in the sides of front while making sure the handle is pointing
in the direction of bin front top.
4. Place spring in groove of protruding circle. Then slide
remaining eyelet opening of spring onto its spring hook.
Do this for both springs.
3eBin™- Gravity bin assembly instructions
PLEASE FOLLOW THE BELOW INSTRUCTIONS FOR ASSEMBLY
OF YOUR GRAVITY BIN:
1. Slide one of the eyelet openings of the springs onto
the small shutter pegs. Do this for both springs.
3. Lay bin front on a flat surface. Grab shutter. There are four pegs on the shutter in total – the two pegs to which the
springs are attached should be the ones closest to you. Insert shutter into bin front with protruding circles entering front
first. Push sides of shutter slightly inwards in order to make the shutter squeeze past sides of front. Click protruding
circles into the corresponding holes in the sides of front.
2. Slide bearings onto the protruding circles on the
shutter. Do this for both bearings.
Spring hook
Groove
PLEASE FOLLOW THE BELOW INSTRUCTIONS FOR ASSEMBLY
OF YOUR GRAVITY BIN:
PLEASE FOLLOW THE BELOW INSTRUCTIONS FOR ASSEMBLY
OF YOUR GRAVITY BIN:
Protruding circles
2
9. Slide shutter seal onto any of the two bin body halves.8. Attach label holder onto front by using slits on each
respective side of the bin. Ensure you hear one click per
side as label holder clicks into slit of each respective side
of the bin.
3eBin™- Gravity bin assembly instructions
6. Push shutter in the direction opposite of the nozzle until the shutter’s holes overlap with handle’s holes. Click plugs
into the holes in the sides of front, securing the handle to the front. Do this for both plugs. Make sure you hear one click
per plug being attached – if not, keep trying by pushing the front and the shutter together using both hands as shown
in the right picture above.
7. Slide sleeve over top the nozzle with the part of the sleeve with a ridge making contact with the nozzle first.
Simultaneously, make sure streak is placed on backside of nozzle.
Ridge Streak
3
14. If you do not wish to activate the false front functionality,
do not carry out this step. To activate false front functionality,
stick your hand past shutter seal and into bin to attach the
shutter stop.
13. With bin in the same position, click shutter stop into
place in its hinges. Make sure shutter stop is installed in a
way that places the encircled plastic grip on inside of the
bin.
3eBin™- Gravity bin assembly instructions
10. On a flat surface, position the two halves of the body as above. Fit the protruding pods at the back of the left bin
body into the corresponding, square openings you can see at the back of the right bin body. Then move the rest of the
left and right bin body towards each other.
11. Ensure shutter seal is inserted into
the other bin body half as well.
12. When eventually connecting both body halves, make sure latches click
into each other. There are 8 latches in total - 2 large ones, 6 small ones.
Plastic grip
Protruding pods
Square openings
Latches Latches
4
Slot
Latch
5
3eBin™- Gravity bin assembly instructions
16. Slide flow control onto ridge running below shutter stop. To do this,
press part encircled above toward center of bin. In the right picture above,
flow control is set to the largest flow possible.
15. Attach the clip to underside of bin
by inserting clip from right to left.
17. Lay bin body down. Attach bin
front to bin body by laying back part of
front’s nozzle part over top bin body’s
nozzle part.
18. Plug latches at top of front into bin
body slots.
19. Turn bin around and attach
top lid to bin. Your bin is now fully
assembled.

Other HL Display Merchandiser manuals

HL Display 3eBin User manual

HL Display

HL Display 3eBin User manual

HL Display 3eBin Installation instructions

HL Display

HL Display 3eBin Installation instructions

Popular Merchandiser manuals by other brands

Howard McCray R-CDS35-4L Specifications

Howard McCray

Howard McCray R-CDS35-4L Specifications

Hussmann VSG Installation and operation guide

Hussmann

Hussmann VSG Installation and operation guide

Hussmann C2-LE Technical data sheet

Hussmann

Hussmann C2-LE Technical data sheet

EPTA iarp JAZZ M Use and maintenance

EPTA

EPTA iarp JAZZ M Use and maintenance

Hussmann Q3 user manual

Hussmann

Hussmann Q3 user manual

Turboair TOM-36DX Service manual

Turboair

Turboair TOM-36DX Service manual

Hussmann IMPACT RLN Technical data sheet

Hussmann

Hussmann IMPACT RLN Technical data sheet

Hussmann impact Excel C2X-LEP Technical data sheet

Hussmann

Hussmann impact Excel C2X-LEP Technical data sheet

Hussmann JVMRS install guide

Hussmann

Hussmann JVMRS install guide

Hussmann M5NX-E Technical data sheet

Hussmann

Hussmann M5NX-E Technical data sheet

Hussmann SHVSS-C Installation and operation guide

Hussmann

Hussmann SHVSS-C Installation and operation guide

Hussmann Impact Excel B3XC-LEP Technical data sheet

Hussmann

Hussmann Impact Excel B3XC-LEP Technical data sheet

Hussmann GGSM Installation and service instructions

Hussmann

Hussmann GGSM Installation and service instructions

True GDIM-26 Specifications

True

True GDIM-26 Specifications

Hussmann RHR-HEX Installation and operation guide

Hussmann

Hussmann RHR-HEX Installation and operation guide

Hussmann IMPACT RL installation instructions

Hussmann

Hussmann IMPACT RL installation instructions

CASO DESIGN DryAged Master 63 Original operating manual

CASO DESIGN

CASO DESIGN DryAged Master 63 Original operating manual

Structural Concepts Reveal NR3651RRSSV Installation and operating manual

Structural Concepts

Structural Concepts Reveal NR3651RRSSV Installation and operating manual

manuals.online logo
manuals.online logoBrands
  • About & Mission
  • Contact us
  • Privacy Policy
  • Terms and Conditions

Copyright 2025 Manuals.Online. All Rights Reserved.