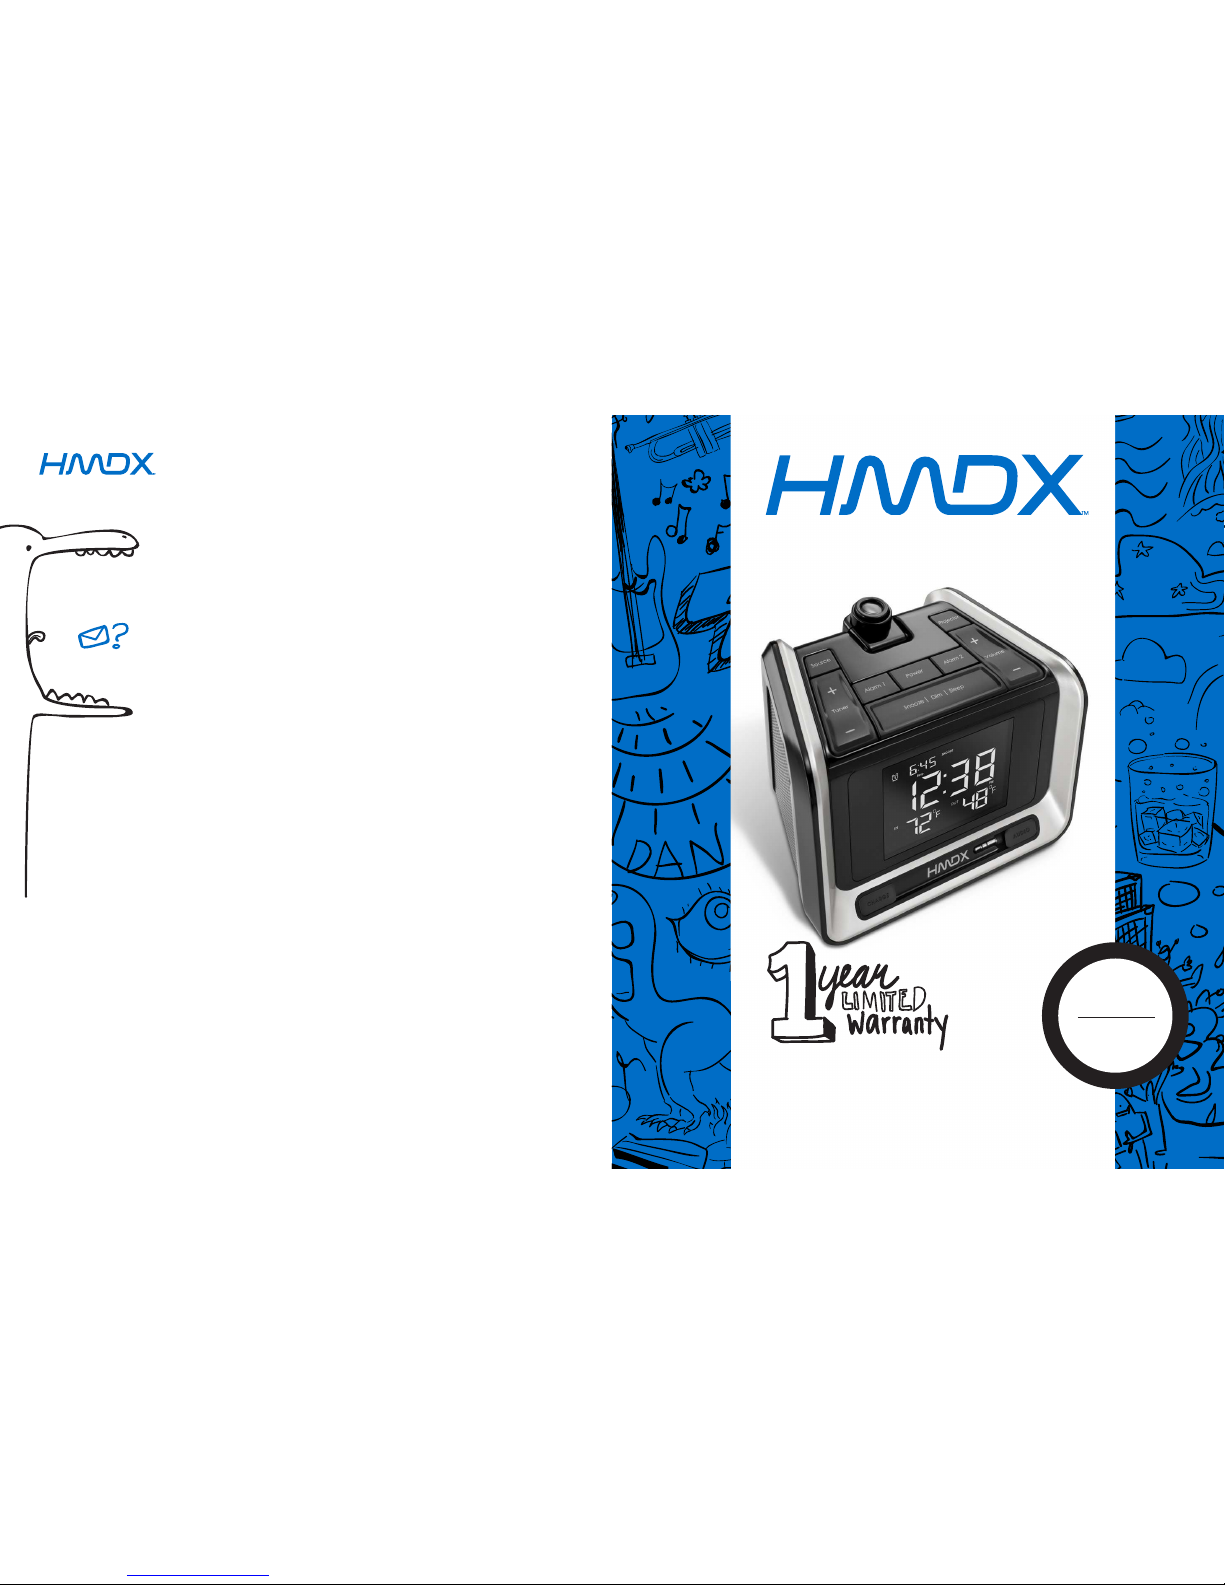
HMDX hx-b320 User manual
ONE YEAR LIMITED WARRANTY
HMDX sells its products with the intent that they are free of defects in manufacture and
workmanship for a period of 1 year from the date of original purchase, except as noted below.
HMDX warrants that its products will be free of defects in material and workmanship under
normal use and service. This warranty extends only to consumers and does not extend
to Retailers.
To obtain warranty service on your HMDX product, contact a Consumer Relations
for assistance. Please make sure to have the model number of the product available.
Representatives are available 8:30am-7:00pm EST Monday-Friday.
No COD’s will be accepted.
HMDX does not authorize anyone, including, but not limited to, Retailers, the subsequent
consumer purchaser of the product from a Retailer or remote purchasers, to obligate HMDX in
any way beyond the terms set forth herein. This warranty does not cover damage caused by
misuse or abuse; accident; the attachment of any unauthorized accessory; alteration to the
product; improper installation; unauthorized repairs or modifications; improper use of electrical/
power supply; loss of power; dropped product; malfunction or damage of an operating part
from failure to provide manufacturer’s recommended maintenance; transportation damage;
theft; neglect; vandalism; or environmental conditions; loss of use during the period the
product is at a repair facility or otherwise awaiting parts or repair; or any other conditions
whatsoever that are beyond the control of HMDX.
This warranty is effective only if the product is purchased and operated in the country in
which the product is purchased. A product that requires modifications or adoption to enable
it to operate in any other country than the country for which it was designed, manufactured,
approved and/or authorized, or repair of products damaged by these modifications is not
covered under this warranty.
THE WARRANTY PROVIDED HEREIN SHALL BE THE SOLE AND EXCLUSIVE WARRANTY.
THERE SHALL BE NO OTHER WARRANTIES EXPRESS OR IMPLIED INCLUDING ANY IMPLIED
WARRANTY OF MERCHANTABILITY OR FITNESS OR ANY OTHER OBLIGATION ON THE
PART OF THE COMPANY WITH RESPECT TO PRODUCTS COVERED BY THIS WARRANTY.
HMDX SHALL HAVE NO LIABILITY FOR ANY INCIDENTAL, CONSEQUENTIAL OR SPECIAL
DAMAGES. IN NO EVENT SHALL THIS WARRANTY REQUIRE MORE THAN THE REPAIR OR
REPLACEMENT OF ANY PART OR PARTS WHICH ARE FOUND TO BE DEFECTIVE WITHIN
THE EFFECTIVE PERIOD OF THE WARRANTY.
NO REFUNDS WILL BE GIVEN. IF REPLACEMENT PARTS FOR DEFECTIVE MATERIALS ARE
NOT AVAILABLE, HMDX RESERVES THE RIGHT TO MAKE PRODUCT SUBSTITUTIONS IN LIEU
OF REPAIR OR REPLACEMENT.
This warranty does not extend to the purchase of opened, used, repaired, repackaged and/
or resealed products, including but not limited to sale of such products on Internet auction
sites and/or sales of such products by surplus or bulk resellers. Any and all warranties or
guarantees shall immediately cease and terminate as to any products or parts thereof which
are repaired, replaced, altered, or modified, without the prior express and written consent
of HMDX.
This warranty provides you with specific legal rights. You may have additional rights which may
vary from state to state. Because of individual regulations, some of the above limitations and
exclusions may not apply to you. For more information regarding our product line in the USA,
please visit: www.hmdxaudio.com
HMDX is a trademark of HMDX.
©2013 HMDX. All Rights Reserved.
IB-HXB320
Por manual de instrucciones e Información de garantía en español visítenos
en www.hmdxaudio.com
HMDX
Service Center
1.800.753.3000
8:30 am – 7:00 pm (EST)
M – F
e-mail:
HX-B320
Por manual de instrucciones e Información de garantía en
español visítenos en www.hmdxaudio.com
SLEEP STATION PLUS™
Instruction Manual and
Warranty Information
P
l
e
a
s
e
T
a
k
e
A
M
o
m
e
n
t
N
o
w
Register
Your Product At:
www.hmdxaudio.com
Your valuable input regarding this
product will help us create
the products you will
want in the future.
32
CONGRATULATIONS ON YOUR PURCHASE.
Thank you for purchasing the HMDX Sleep Station Plus Alarm Clock Radio. It will
wake you up as you command but the Sleep Station Plus is so awesome you may
never want to rest.
Be sure to check out the entire HMDX product line on our website
www.HMDXaudio.com – Living Life Out Loud!
SLEEP STATION PLUS®ALARM CLOCK RADIO
MAIN FEATURES
or any flat surface
gradual wake
outside temperature
IMPORTANT SAFEGUARDS:
When using an electrical product, basic precautions should always be
followed, including the following:
READ ALL INSTRUCTIONS BEFORE USING
Close supervision is necessary when this product is used by, on or near
children, invalids or disabled persons.
WARNING: Do not place speakers too close to ears. May cause damage to ear
drums, especially in young children.
use attachments not recommended by HMDX.
or sink.
cleaning solvents.
SAVE THESE INSTRUCTIONS
CAUTION: Please read all instructions carefully before operating.
Never leave the product unattended, especially if children are present.
Never cover the product when it is in operation.
This unit should not be used by children without adult supervision.
Always keep the product away from high temperature and fire.
Battery Precautions
may cause damage to the unit.
prevent damage due to possible battery leakage.
GETTING STARTED
Unpack the unit carefully. Remove all the accessories from the carton. Do not remove
any labels or stickers on the bottom of the unit or adapter. Before setting up the unit,
verify that the following contents are present:
POWER SOURCE
This unit is supplied with an AC adapter; take the following steps to connect the adaptor.
1. Unwind the power cord of the AC adaptor to its full length.
NOTE: Connecting this system to any other power source may cause damage to the
PRE-SET CLOCK
This unit is equipped with a pre-set clock, meaning the clock will automatically
set itself when first plugged in.
NOTE: The clock will automatically default to Eastern Standard Time and will need to be
4 5
SETTING CLOCK TIME
TIME SET button again to select the minute using the volume buttons on the top again to
SETTING AND USING THE ALARMS
SETTING ALARM 1 OR ALARM 2
on the top of the unit to activate the alarm set feature.
5. Press the ALARM button again to select the source. The alarm can be set to sound a
Beep or play the FM radio, select using the TUNER selector button.
the sound level up or down.
7. Press the ALARM button a final time, the alarm is now set.
TURNING OFF THE ALARM / SNOOZE OPERATION
The Sleep Staion Plus is equipped with gradual wake, which means that the alarm
SNOOZE bar located on the top of the unit and the alarm will sound
again after several minutes.
NOTE: You may only press the SNOOZE button during the ALARM mode for one hour
the next set time.
on the top of the unit.
LISTENING TO THE RADIO
NOTE: For best reception, fully unwind the wire antenna. DO NOT strip, alter or attach to
other antennas.
1. To listen to the radio, press the POWER button located on top of the unit.
the display.
3. Use the TUNER selector button on the top of the unit to select desired station. For
next station with the strongest frequency.
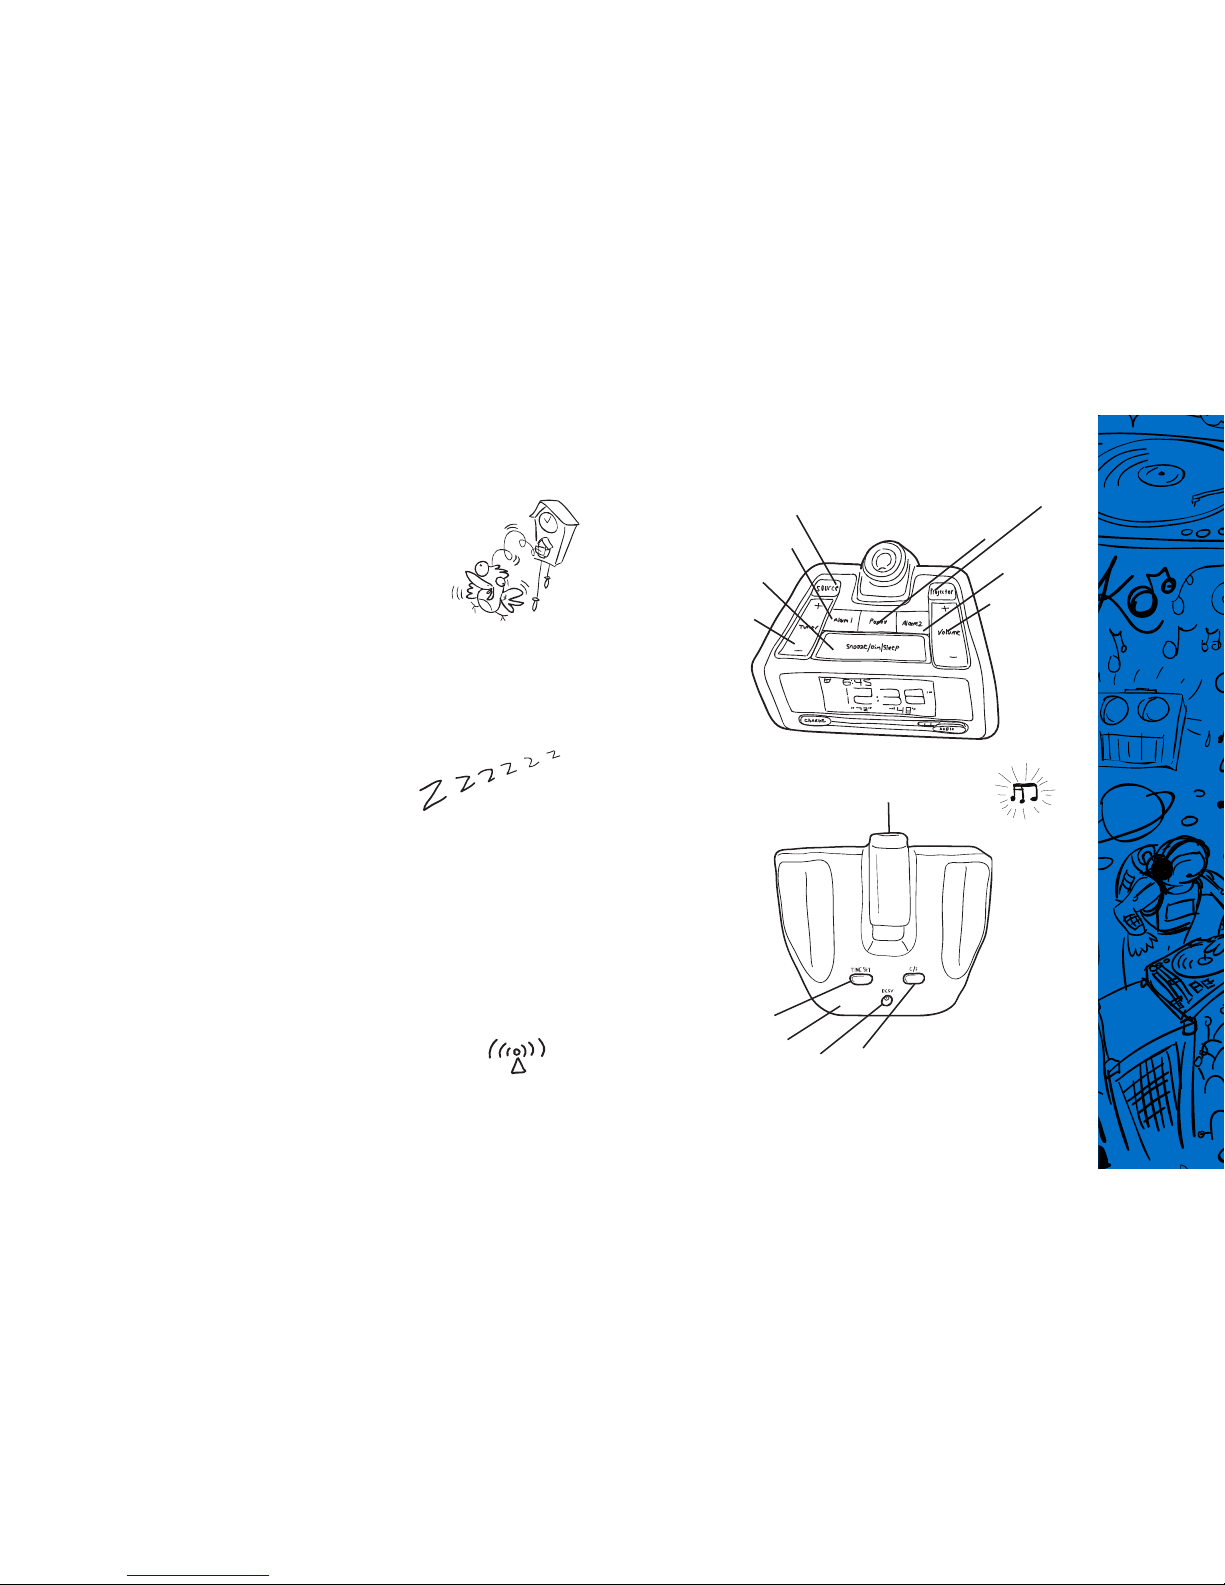
HMDX SLEEP STATION PLUS™ALARM CLOCK RADIO
CONTROLS AND CONNECTIONS:
Power
Alarm 2
Volume Up/
Down button
Alarm 1
FM Tuner
Scan Up/Down
Snooze/Dim/Sleep
Projector
Timeset
FM Antenna
C/F
DC5V Input
Projector
Source
76
SLEEP FEATURE
While listening to the radio or AUX source, press the SNOOZE/DIM/SLEEP button to
minutes. Once set, the unit will continue playing for the set length of time, then will
automatically turn off.
NOTE: The Sleep Station Plus does not turn off the MP3/AUX device.
PROJECTOR FUNCTION
TIME on any flat surface.
desired focus.
OUTSIDE TEMPERATURE SET UP
The Sleep Station Plus is equipped with an outside temperature sensor that transmits a
signal and shows the outside temperature on the display.
the Sleep Station Plus.
3. The Sleep Station Plus will automatically receive the signal and display the outside
temperature on the LCD screen.
USB CHARGING PORT
your device with a USB Type A connector on the other end.
CONNECTING 3.5MM AUDIO INPUT JACK
audio device.
3. Push power button on the unit, then push the source button and select AUX mode
5. When finished, press the power button to turn off the unit.
NOTE: You must turn OFF your audio device.
VOLUME CONTROL
DISPLAY DIMMER CONTROL
The power selector button needs to be off to use the dimmer control.
BACKUP BATTERY
MAINTENANCE
To Store: You may leave the unit on display, or you can store it in a cool, dry place.
To Clean: Use only a soft dry cloth to clean the enclosure of the unit.
NEVER use liquids or abrasive cleaner to clean.
FCC DISCLAIMER
NOTEthis device must accept any interference received, including interference that may
cause undesired operation.
NOTE: This equipment has been tested and found to comply with the limits for a Class
B digital device, pursuant to part 15 of the FCC Rules. These limits are designed to
provide reasonable protection against harmful interference in a residential installation.
This equipment generates, uses and can radiate radio frequency energy and, if not
installed and used in accordance with the instructions, may cause harmful interference
to radio communications. However, there is no guarantee that interference will not
occur in a particular installation. If this equipment does cause harmful interference to
radio or television reception, which can be determined by turning the equipment off
and on, the user is encouraged to try to correct the interference by one or more of the
following measures:
Reorient or relocate the receiving antenna.
Increase the separation between the equipment and receiver.
Connect the equipment into an outlet on a circuit different from that to which the
receiver is connected.
Consult the dealer or an experienced radio/TV technician for help.
Changes or modifications not expressly approved by HDMX could void the user's
authority to operate the equipment.
Table of contents
Other HMDX Clock Radio manuals


