HOLBERG HEO6760MIX User manual

MODEL
HEO6760MIX / HEO6760MBL
HEO6760MW / HEO6781TIX
HEO6781TBL / HEO6781TW
Руководство Пользователя
Встроенного Духового Шкафа
Built-in Oven User Manual

Before leaving the factory, this appliance was tested and regulated by expert and
skilled personnel to give the best operating results. Any repair or regulation that may
subsequently be necessary must be carried out with the greatest care and attention.
For this reason, we recommend you always contact the Dealer you bought the
appliance from or our nearest Service Centre, specifying the type of
problem and the model of your appliance. Please remember as well that the
original spare parts are available only from our Technical Service Centres.
Do not leave the packaging unguarded, both for the safety of children and for the
protection of the environment, but dispose of it in a centre for differentiated waste.
The symbol on the product or on the packaging means that the product must
not be considered as normal household refuse, but must be taken to the
appropriate collection point for the recycling of electric and electronic equipment.
The appropriate disposal of this product helps avoid potential negative
consequences on the environment and for health, which could be caused by
inappropriate disposal of the product. For more detailed information on the
recycling of this product, please contact your municipal offices, the local waste
disposal service or the store where the product was purchased.

Dear Customer,
Thank you for having chosen one of our products. This appliance is easy to use, but
you must read this booklet carefully before installing and using it. The booklet
contains instructions that will help you to install, use and service the product in the
best way.
WARNING: This appliance and its accessible parts become very hot
during use. Young children must be kept well away from the
appliance. Take care and do not touch the heating elements inside
the oven. Unless they are supervised at all times, children younger
than 8 years of age must be kept well away from the appliance.
WARNING: This appliance may be used by children from 8 years of
age onwards and by persons with reduced physical, sensorial or
mental capabilities, or who lack experience and knowledge so long as
they are properly
supervised or have been trained on how to use the appliance safely
and are aware of the risks involved. Children must not play with the
appliance.
The appliance must not be cleaned or serviced by unsupervised
children.
The glass parts must not be cleaned with abrasive products or sharp
metal scrapers since these could scratch the surface and cause it to
break.
WARNING: To avoid the risk of electric shock, make sure that the
appliance has been switched off before you change the light bulb.

This appliance has been designed for non-professional use by private
individuals in their homes and its purpose is to cook and heat food.
Do not use it for other purposes.
The appliance must be installed by a skilled and qualified installer
who is familiar with the installation rules in force.
Before it is cleaned or serviced, the appliance must be disconnected
from the electric power source and allowed to cool.
IMPORTANT: The oven produces hot air or steam during the cooking
processes. Take great care when you open the door.
The electric power cable of the appliance must not be replaced by
the user. It must only be replaced by a qualified electrician.

IMPORTANT: The oven produces hot air or steam during the cooking
processes. Take great care when you open the door.
The electric power cable of the appliance must not be replaced by
the user. It must only be replaced by a qualified electrician.
Never line the oven with aluminium foil. It could block the slots and
prevent regular heat exchanges from taking place, consequently
damaging the enamelled surface.
Before you start using the oven for cooking, you must remove the
protective film from the oven door and heat the empty oven at
maximum temperature for about 45 minutes (this will eliminate the
odours and fumes created by manufacturing residues). After this, the
oven must be thoroughly cleaned with soapy water and rinsed well,
but do not use too much water as this could penetrate and damage
the internal components.
Always call an authorized Technical Assistance Center and insist on original spare
parts if repairs are required. Repairs made by incompetent persons could cause
damage.
The appliance is conform to the following European Directives and Regulations :
Directive 2014/35/EC ( Low Voltage Appliances )
Directive 2014/30/EC ( ElectroMagnetic Compability )
Directive 2012/19/EC ( WEEE - Waste Electrical and Electronic Equipment )
Directive 2009/125/EC ( ErP - Eco Design )
Directive 2011/65/EC ( RoHS - restriction of hazardous substances)
Regulation 1935/2004/EC ( Materials intended to come into contact with food )
Regulation 1907/2006/EC ( REACH –Restriction of Chemicals)

Installation must be carried out by an authorized technician according to the
guidelines. Our company cannot be held responsible for the damages to
people, animals or properties due to improper installation.
INSTALLATION WARNINGS
Dimensions and materials of the cabin or cupboard in which the built-in oven
will be installed in have to be correct and it has to be resistant to temperature
increases. Please install as shown in Figure.
*The furniture walls in which the oven is installed in must be heat resistant.
Wall panels must be resistant to 100 C especially if the side walls are made of
wallboard. Plastic or adhesive panels that are not resistant to this heat may
deform and sustain damage.
*For safety reasons, direct contact with electrical parts of the oven must be
avoided.
*Isolation and protective parts must be installed in a way to prevent them from
being removable by any tool.
*Oven must be installed as in Figure in order to provide a more effective air
flow.
*It is advised to leave a space of at least 40 mm on the back for the kitchen
unit in which the oven is installed.
*A support must be placed under the oven which can carry the weight when
placing the oven.
*The back section of the cabin in the kitchen unit must be removed in
order to provide better air flow.
*It is not advised to install the device near refrigerators or freezers, otherwise
performance of said devices would be affected from the heat radiated.
*Place the device centered on the inlaid cabin.
*Open the oven lid and mount the body to the countertop with four
woodscrews by aligning the holes on the sides.
*Oven can be mounted to a cupboard up top or under the counter if desired.
*When mounting an electrical built-in stove on the counter over the oven, electricity
cables of the oven and the stove must be separated in order to dismount the oven
from the stove when necessary.
SEE THE FIGURE


Open the door and fix the oven with four wood screws which must be screwed
through the holes in the lateral jambs of the oven.
ELECTRICAL CONNECTION
*The device must be connected to the main electricity grid only by authorized
electricity technicians in accordance with the laws and regulations in force.
*Make sure that the power from the main grid is enough to supply the power
stated in the information tag placed on the front bottom of the device.
*If the current of fuse in your house is less than 16 Ampere, have a qualified
electrician connect a 16 Ampere fuse.
WARNING: The device must absolutely be grounded.
*Your oven includes a grounded plug mounted on the grid cord. This plug must
be used with a grounded line. Have a licensed electrician do the grounding
installation.
Before supplying electricity to the device:
1) Place the oven in a way to make reaching the plug used for electricity
connection or double pole switch easier.
2) Do not let the electricity cable touch hot surfaces when placed and do not
pin it to the oven lid.
3) Contact the nearest authorized service if the electricity cable is damaged.
Make sure authorized service makes the chance with a new cable with plastic
insulation at the same size and that can withstand the electricity current the
oven needs.
*A double pole switch with at least 3 mm between the contact points between
the device and the electric wire and suitable for carrying the desired load in
accordance with the laws in force must be installed

if the device is to be connected directly to the electric wiring. Ground wire must
not be cut be double pole switch.
*It is not advised to use adapters, multi plugs or extension cords. If absolutely
necessary, adapters or extension cords in line with safety laws can be used.
However, never go beyond the maximum current capacity and maximum
power stated for the adapter.
*Test heating elements for 3 minutes after the connections are done.
*Electricity safety of the device is guaranteed only if connected to suitable source
correctly with grounding in accordance with the rules. Our company cannot be held
responsible for the damages to people, animals or properties due to the failure to
ground the device properly.
WHEN THE DEVICE IS INSTALLED INITIALLY:
1. Set the Temperature Control to maximum level. (250 C MAX)
2. Set the Function button as Top and Bottom Grill (and + Fan if available).
3. Run the oven in this setup for 30 minutes.
4. Open a window for air circulation.
A smoke and smell resulting from insulation materials and heating elements
can be experienced for once during this period. If this happens, wait for the
smoke and smell to dissipate before placing food inside the oven.
*After these are done, clean the interior of the oven with a slightly wet soapy
soft cloth.
IMPORTANT: Always use the middle section of the handle when opening
the lid of the oven.
WARNING: Carefully wash parts such as tray, grid etc before the first use of the
oven.

Important: before carrying out maintenance or cleaning the oven, unplug it
and wait for it to cool down.
General cleaning
To keep the enamelled part shiny for as long as possible, the oven must be
cleaned each time after using it. Leave the oven to cool down and you can easily
remove the deposits of fat with a sponge or damp cloth and warm soapy water
and, if necessary with a product on the market.
Do not use abrasive cloths or sponges that could irreparably damage the enamel.
The control panel, handle and knob of white ovens must also be cleaned each time in
order to avoid greasy steam turning them yellow in time. After use, rinse the stainless
steel parts well with water and then dry them with a soft cloth or chamois leather.
For stubborn
stains, use normal non-abrasive detergents or specific products for stainless steel
or a little warm vinegar. Clean the window of the oven door only with hot water,
avoiding the use of rough cloths.
Oven with copper surfaces: the copper surfaces have a special protection. To keep
the surfaces intact, we recommend using, when the oven is cold, a soft clean cloth
and a neutral detergent for delicate surfaces. Never use abrasive tools.
Do not clean with a jet of steam.
Inside the Oven
Appropriate chemicals can be used after consulting the recommendations of
the manufacturer and trying it on a small part of the gap. Abrasive cleaning
agents or abrasive clothes must not be used on the surfaces of the gap.
Do not clean with a jet of steam.
NOTE: The manufacturer of this appliance does not take responsibility
for damages caused by chemicals or abrasive cleaning.
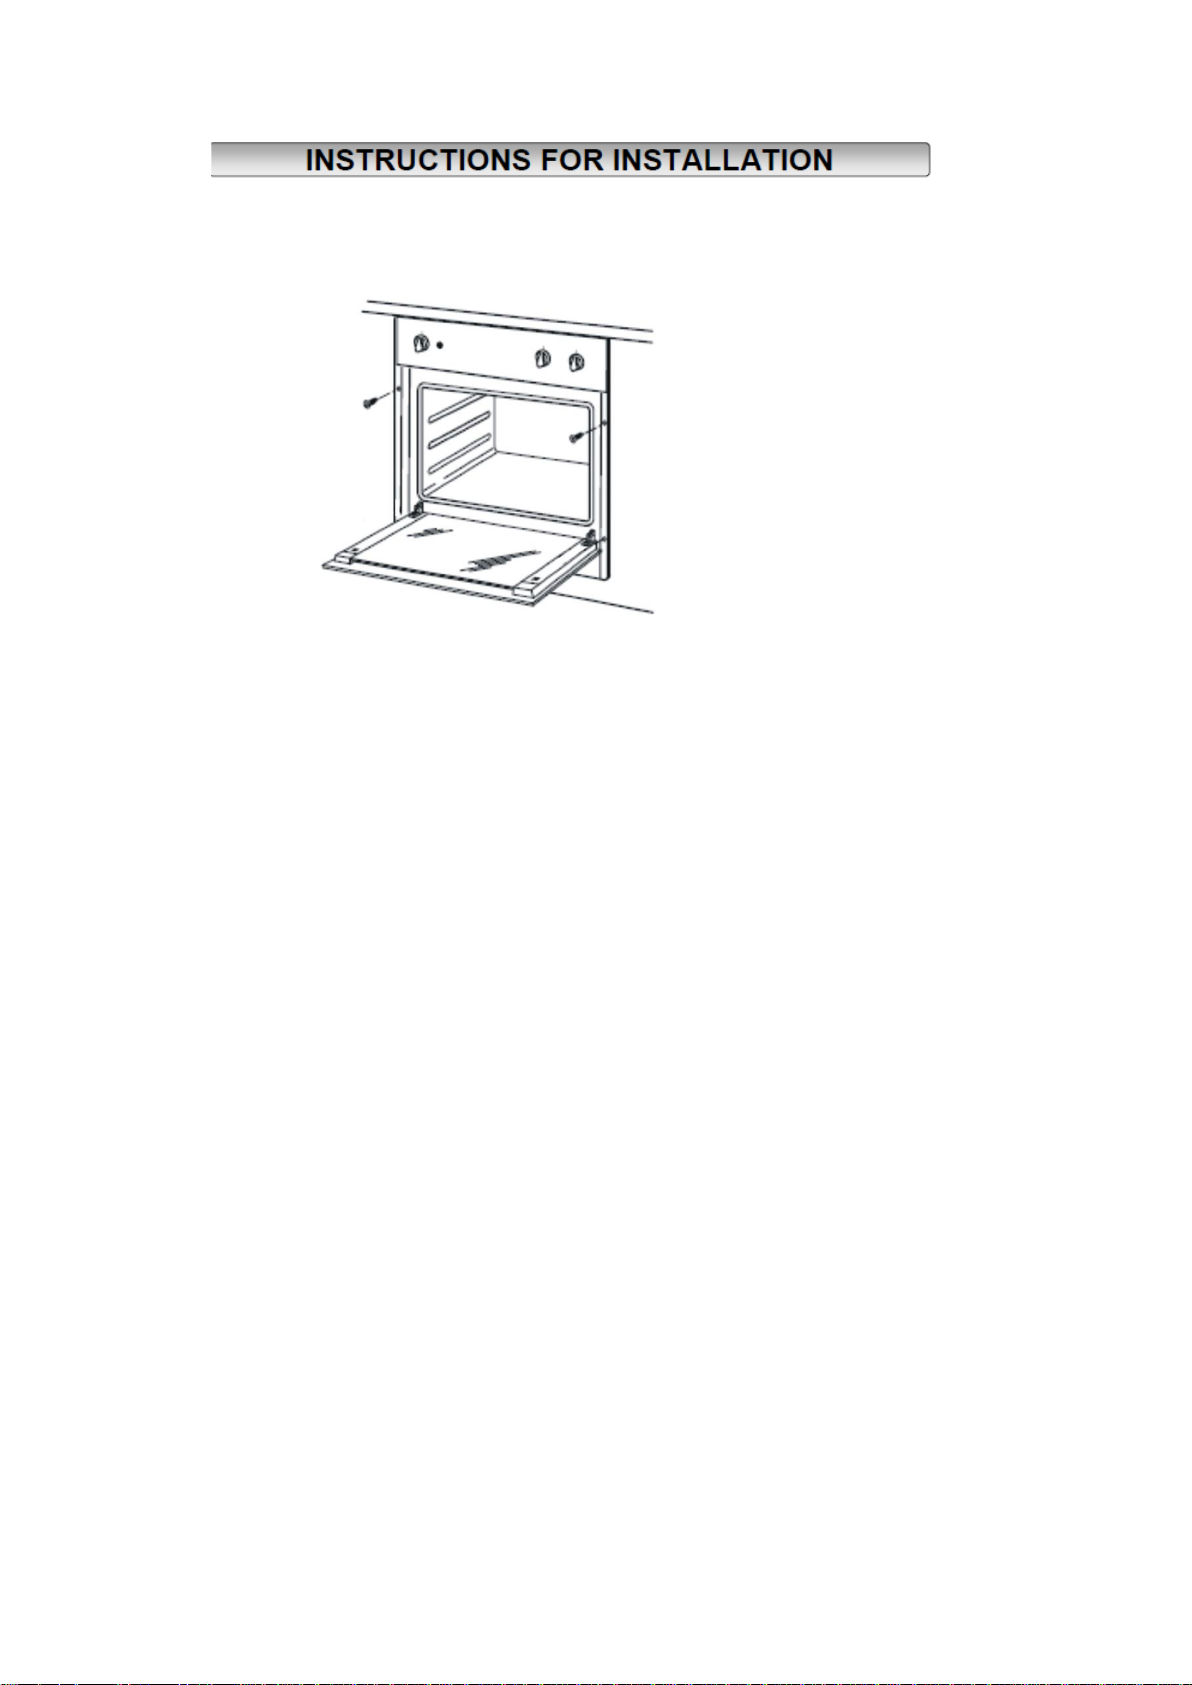
REMOVING SIDE WIRE TRAYS OF THE
OVEN
It is possible to remove and clean the side wire
trays in which trays and wire grids are placed
easily. Follow the procedure as shown in the
picture below to remove the oven interior wire
trays from the side walls.

REMOVING OVEN DOOR
You can remove and clean the oven DOOR easily. You must follow the
procedures below to remove the DOOR
*Open the DOOR completely.
*Push the 2 hinges shown in the picture backwards.
*Hold the DOOR and close up to the first stopping place.
*Pull the raised DOOR away from its mounted location.
Place the hinges correctly and push downwards in order to mount removed oven
DOOR back properly.
All the glass used in this appliance has undergone a special safety treatment. In the
case of breakage, the glass shatters into small square and smooth pieces which are
not dangerous because they are not sharp.
Please take care and avoid thermal shocks for the glass pane, for example, never start
cleaning when it is hot.
Replacing the oven light bulb
After having disconnected the oven from thepower supply,
unscrew the glass protection cap and then the bulb and
replace it with another one suitable for high temperatures
(300°C /E14/230V/25W ). Remount the glass cap and
reconnect the oven.

- Ovens with high efficiency in electricity use and heat insulation should be
preferred.
- Frequently opening the oven lid causes cold air outside the oven to enter
inside, thereby causing energy loss. Therefore, oven lid shouldn't be opened if
not necessary.
- You shouldn't try to cook more than one meal in the oven at once. Meals that
cook earlier should be taken out first, thereby use less energy without
changing oven temperature.
- Residual heat after the meal cooked in the oven should be used for another
meal. You will save energy this way.
- Preheating should be done for a short time (10 minutes the most).
- Frozen meals should be deiced before cooking in the oven.
- Combustible, inflammable materials that ignite easily must be kept away from
the oven.
- Ovens must be installed on a location far from inflammable environments.
- Ovens will continue cooking in current temperature by using less energy if the lid is
closed a few minutes before cooking.
MODEL
HEO6760MIX / HEO6760MBL
HEO6760MW / HEO6781TIX
HEO6781TBL / HEO6781TW
Top Heater
Top Heater
900 W
Bottom Heater
1200 W
Turbo Heating Element (HEO6781TIX / HEO6781TBL / HEO6781TW)
2100 W
Grill Heater
1200 W
Cooling Fan
20 W
Oven Lamp
25 W
Turbo Fan
25 W
Oven External Dimension (WxDxH)
600x600x570 mm
Installation Cabin Dimension (WxDxH)
595x595x560 mm
Oven Interior Volume
67 lt
Voltage
220-240 V 50-60 Hz
Maximum Power
2170 W
ENVIRONMENTAL WARNING:
*After you installed your product, please dispose of its packaging
materials according to the safety and environment conditions.

OVEN DESCRIPTION
1) Control Panel
2) Oven Top Resistor
3) Lamp
4) Turbo Fan
5)Wire Grill
6)Product Information Tag
7)Oven Glass
8)Front Lid
9)Handle
10)Temperature Warning Lamp

MISCELLANEOUS
Overheating of the external surface oven and damaging its perimeter is prevented by ventilation
system cooling fan. This fan creates a ventilation that enables discharge of hot air from grids
(ventilation openings). The heat emanating over the oven prevents oven from reheating, also
prevents overheating of the control panel and the cover and the components by creating an air
curtain. Ventilation of the cooling fan prevents condensation that may occur by heat and humidity on
electrical and mechanical components and makes them safer and durable. Cooling fan is enabled and
disabled by the thermostat on it. In this case, as the cooling fan works based on temperature, it will
run for a period even if the oven is turned off and stops automatically.
COOLING FAN
PROBLEM
CAUSE
SOLUTION
Top of the meal is
overcooked, bottom is
undercooked.
Bottom heat level low
Possibly wrong cooking
shelf, tray must be put to
the shelf 1 lower
Bottom of the meal is
overcooked, top is
undercooked.
Top heat level low
Possibly wrong cooking
shelf, tray must be put to
the shelf 1 higher
Exterior of the meal is
cooked but interior is not
Overheating
Wrong cooking temperature,
lower heat
Exterior of the meal dried
Low heating
Wrong cooking temperature
Increase heat

1
2
3
1. FUNCTION SELECTION BUTTON
Sets the oven working positions In the
button turn to when the oven starts
working.
2. MECHANICAL TIMER
3. TEMPERATURE ADJUSTMENT BUTTON
Used for setting the oven temperature
between 50-250 °C when working. Only put to
max. position for grill function.
HEO6760MIX / HEO6760MBL / HEO6760MW
OFF FUNCTION: The product won't work in this position.
DEICING FUNCTION: Only turbo fans work in this position, circulates the air at room temperature around
frozen food and thaws them.
FAN + TOP AND BOTTOM HEATER FUNCTION Circulates hot air inside the oven for more homogeneous
cooking. Used for meals you want to be soft on the inside and crunchy on the outside.
BOTTOM HEATER FUNCTION: Only the bottom heater is functional. Used for meals that have to be cooked
from the bottom, heating meals or for meals that have to be cooked for a long period with low temperature
such as stew.
GRILL FUNCTION: Uses the grill heater.
BOTTOM AND TOP HEATER FUNCTION: Mostly used for cooking in one tray. Roasts both sides of the
food equally, making it crispy.
TOP HEATER FUNCTION: Only the top heater is functional. Used for roasting the top section of mostly
cooked meals, or heating previously cooked meals.

USING MECHANICAL TIMER
You can adjust up to 90 minute by rotating the mechanical clock button clock wise. The clock
will have the oven work for the set duration and shut it down automatically when the time is up.
Set the function and temperature adjustment buttons after placing the meal inside the oven and
adjust the mechanical clock button to the position you want. The oven alarm will sound and the
oven will automatically shut down when the time is up. With circuit cutter, oven working
duration can be set to 90 minutes maximum. It is possible to set longer cooking periods
manually. For manual use, align the clock button counter clockwise to the " " symbol.
You oven will start working at this position. It will continue working for the duration of your
choosing. Turn the mechanical clock button clockwise when you want to end cooking. Your oven
will shut down when you hear the alarm sound.

HEO6781TIX / HEO6781TBL / HEO6781TW
1
2
3
1. FUNCTION SELECTION BUTTON: Sets the oven working positions in the button turn to when the oven starts
working.
2. DIGITAL TIMER
3. TEMPERATURE ADJUSTMENT BUTTON: Used for setting the oven temperature between 50-250 °C when
working. Only put to max. position for Grill function.
OFF FUNCTION: The product won't work in this position.
DEICING FUNCTION: Only turbo fans work in this position, circulates the air at room temperature around frozen
food and thaws them.
FAN + TOP AND BOTTOM HEATER FUNCTION Circulates hot air inside the oven for more homogeneous cooking.
Used for meals you want to be soft on the inside and crunchy on the outside.
FAN + TOP HEATER FUNCTION: Only the top heater is functional. Used for roasting the top section of mostly
cooked meals, or heating previously cooked meals.
BOTTOM HEATER FUNCTION: Only the bottom heater is functional. Used for meals that have to be cooked from
the bottom, heating meals or for meals that have to be cooked for a long period with low temperature such as
stew.
FULL GRILL FUNCTION: Uses the full grill heater.
BOTTOM AND TOP HEATER FUNCTION: Mostly used for cooking in one tray. Roasts both sides of the food equally,
making it crispy.
FAN + TURBO HEATER: Fan and surrounding heater will be activated. This program also enables cooking more than
one food without their smell or taste mixing up.
FAN + BOTTOM HEATER: Fan and Bottom heaters will be activated at the same time.

DIGITAL TIMER USER MANUAL
SETTING THE TIME OF DAY (24 H CLOCK)
After plugging in or reconnecting to a power source after current decay, “0.00”, and
“AUTO” flashes.
Press button 1 approximately 2 sec., dot icon starts flashing. Set the current time
using buttons 2 and 3. About 7 seconds after the set time has been finished, new data is
memorized.
The time correction can be done later;
Press button 2and 3 approximately 2 sec., dot icon starts flashing. Then you can set
the current time.
Notice! If the correct time is not set then proper operation of the oven is not possible.
MANUAL OPERATION
If the programmer is not in semi-automatic or full-automatic mode you can use oven functions
manually.
SETTING THE MINUTE MINDER
You can activate the minute minder at any time, regardless the activity state of other
programmer functions. The measured time ranges from 1 minute to 23 hours 59 minutes.
Press button 1 until the minute minder icon starts to flash, and the display shows
“0.00”.
Enter the required time using buttons 3 and 2. Minute minder icon remains on the
display.
After the set time has elapsed, an audible signal will be heard for approximately 7 minutes
and the minute minder icon starts to flash again.
Press buttons 1, 2 or 3 to turn the signal off; the minute minder icon disappears, and
the display indicates the current time.
CHANGE THE TIMER BEEPS
The tone of the timer beeps may be changed as follows:
Press buttons 2 and 3 simultaneously,
Press button 1 to see actual tone “ton.1” to see on the display.
Press button 2to select the tone you wish from 1 to 3.
CANCEL SETTINGS
Cancel automatic function settings:
Press buttons 2 and 3 simultaneously.
Cancel minute minder settings:
Press button 1 to select minute minder settings,
Press buttons 2 and 3.

COOKING TIMER
If the oven is supposed to turn off at specified time, cooking timer can be set. It is named as semi-
automatic operation.
Press button 1 until the “dur” and “0.00” flashes on the digits, beside automatic
cooking icon flashes.
Set the cooking time using buttons 3 and 2, within the range from 1 minute to 10
hours.
The set time is memorized after about 7 seconds; the current time is shown again.
Automatic cooking icon remains on the display.
Select the required temperature and the oven function.
When cooking is completed, an audible signal will be heard for approximately 7 minutes, and the
automatic cooking icon starts to flash again. Return control and thermostat knobs to the OFF
position. Press button 1, 2or 3to cancel signal and to return to the manual operation.
COOKING TIME WITH DELAY
If the oven is supposed to turn on for specified cooking time and turn off at specified time,
cooking time and the cooking end time can be set. It is named as full-automatic operation.
Press button 1 until the “dur” and “0.00” flashes on the digits, beside automatic
cooking icon flashes. (for example hour is 17:30 now)
Set the cooking time using buttons 3 and 2, within the range from 1 minute to 10
hours. (for example 1 hour)
Press button 1 until the “End” and “18.30” (end time) flashes on the digits.
Set the turn-off (cooking end) time using buttons 3 and 2, which is limited up to 23 hours 59
minutes. (for example 19:30)
Turn the thermostat and function control knobs to the required settings.
Cooking icon is disappeared on the display. Oven will not be switched on until cooking start time (for
example 18:30), that is the difference between the cooking end time and the cooking time.
When cooking is completed (19:30), an audible signal will be heard for approximately 7 minutes, and
the automatic cooking icon starts to flash again. Return control and thermostat knobs to the OFF
position.
Press button 1, 2or 3to cancel signal and to return to the manual operation.

-Keep the original packaging.
Carry the product in its original package. Follow the handling signs on the package.
If you do not have the original package;
-Take caution against impacts on outer surfaces of your product. Do not place heavy loads on it.
-While carrying, hold/place the product upwards parallel to the ground (top side facing up).
*If the oven isn't heating,
Your product may not be plugged to a grounded outlet, fuse might be blown, clock may not be set
for models with clock.
*If the oven isn't working,
Is the function selection button on multi system ovens set to the necessary function?
Is the temperature setting set by heater command button?
Is the fuse of the outlet in which oven is connected to or the main fuse blown?
*If the interior lighting lamp is not on,
Is electricity on? Can the lamp be broken? If broken; replace using the manual.
*Cooking (if top/bottom sections aren't cooked equally).
Check tray positions, cooking durations and temperature values according to user manual.
PLEASE CALL AUTHORIZED SERVICE IF YOU'RE STILL
EXPERIENCING PROBLEMS IN YOUR PRODUCT
This manual suits for next models
5
Table of contents
Languages: