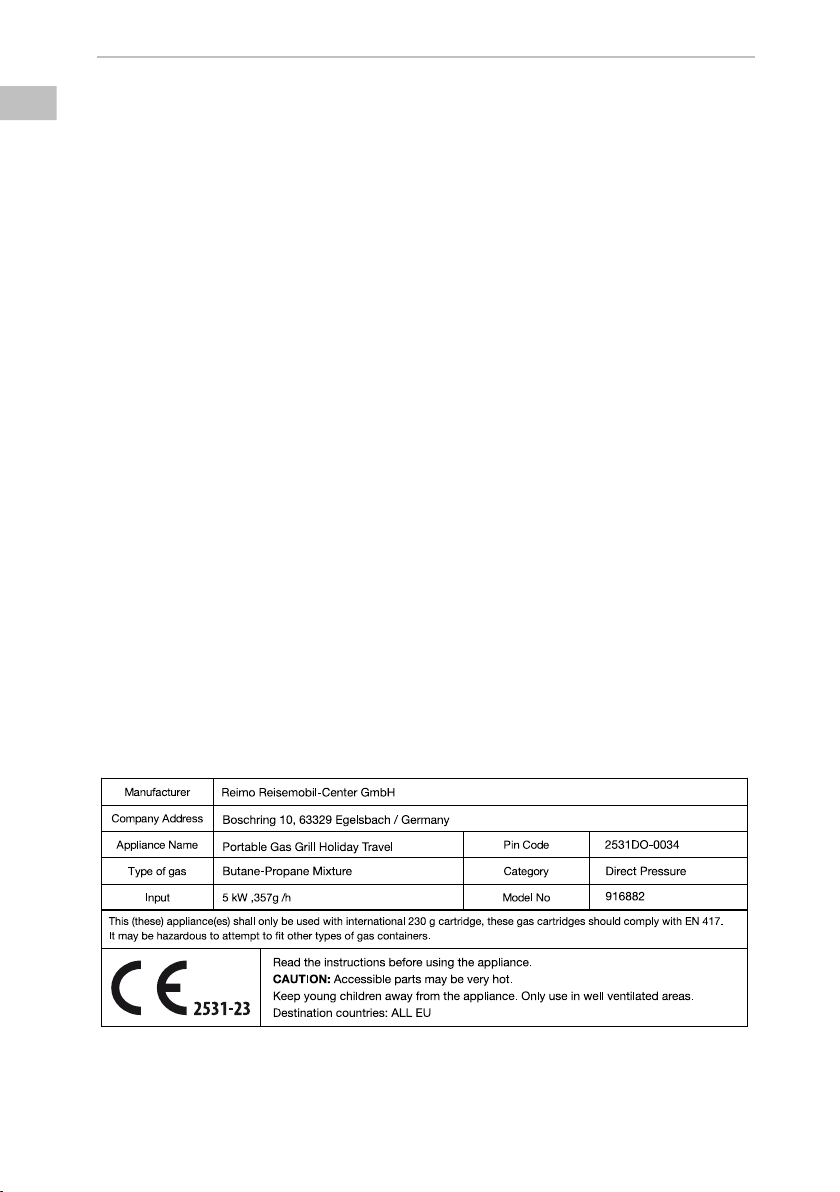
HOLIDAY TRAVEL Koffer-Gasgrill | 916882
DE
EN
IT
ES
FR
NL
FI
DK
SE
8
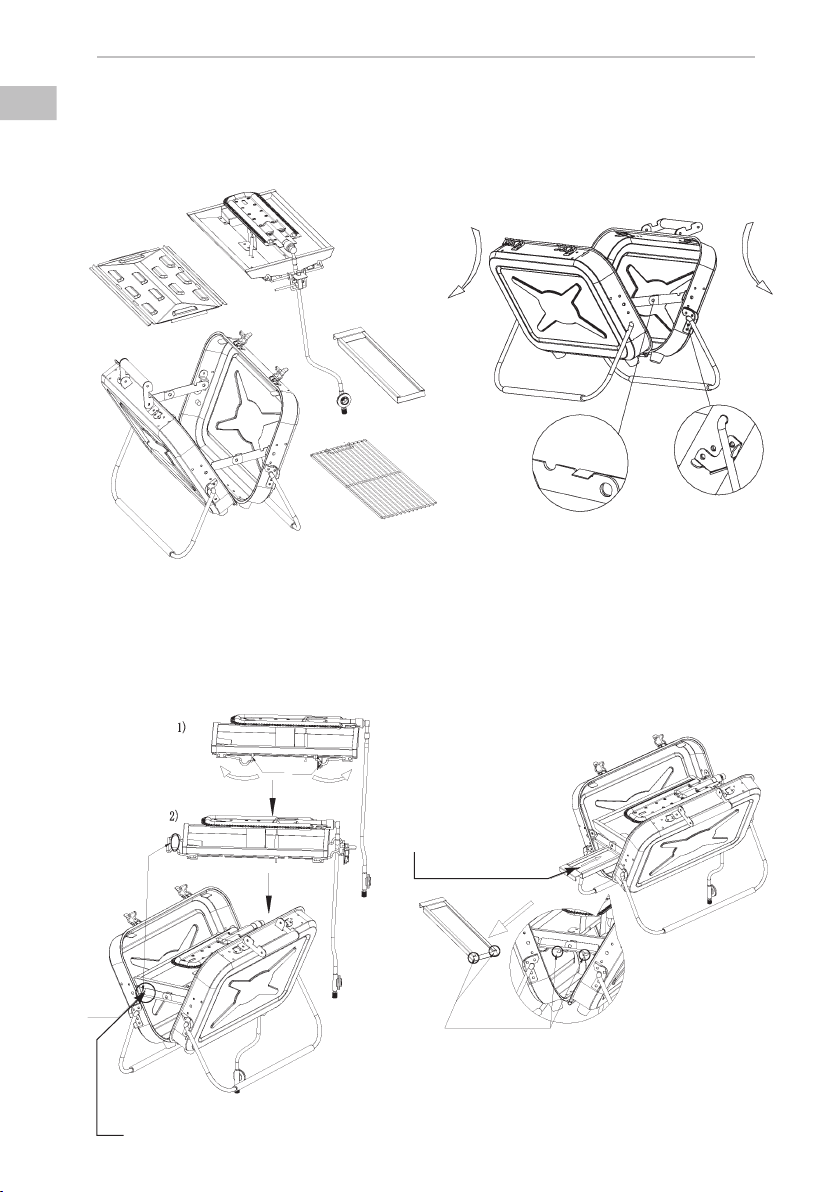
GASKARTUSCHE ANSCHLIESSEN (ABBILDUNG 1, SEITE 5)
• Überprüfen Sie den Zustand der Dichtung, bevor Sie eine neue Gaskartusche verwenden oder die
Gaskartusche an das Gerät anschließen.
• (Siehe: Entfernen der Gaskartusche, wenn die vorhandene Flasche leer ist).
• Achten Sie beim Ein- und Ausbau von Gaskartuschen darauf, dass Sie in einem gut belüfteten
Bereich arbeiten, vorzugsweise im Freien. Arbeiten Sie nicht in der Nähe von Flammen,
Wärmequellen oder Funken (angezündete Zigaretten, elektrische Geräte usw.) und halten Sie
einen gewissen Abstand zu anderen Personen und brennbaren Gegenständen ein.
Da die passende Gaskartusche über ein Ventil bedient wird, kann sie zum bequemen Transport vom
Gerät entfernt werden (auch wenn sie nicht leer ist).
(1) Drehen Sie, wie in Abbildung 1-A dargestellt, den Drehknopf k im Uhrzeigersinn bis zum
Anschlag (der Pfeil zeigt auf "–") um den Gasanschluss zu schließen.
(2) Überprüfen Sie den Zustand des Dichtungsrings e. Wenn der Dichtungsring beschädigt oder
abgenutzt ist oder fehlt, verwenden Sie das Gerät nicht und wenden Sie sich an einen Händler,
um den Dichtungsring auszutauschen.
(3) Schrauben Sie die Gaskartusche (gegen den Uhrzeigersinn) und den Brenngasanschluss fest
zusammen, wie in Abbildung 1-B dargestellt.
(4) Stellen Sie den Gasgrill und die Gaskartusche auf dieselbe feste Unterlage und achten Sie darauf,
dass die flexible Gasleitung vom Gasgrill (Flamme) entfernt ist.
Das Gerät ist nun einsatzbereit.
Wenn ein Leck auftritt (Gasgeruch vor dem Öffnen des Ventils), bringen Sie das Gerät bitte sofort ins
Freie und stellen Sie es an einen gut belüfteten Ort ohne Verbrennungswärmequellen. Finden Sie die
Leckstelle und stoppen Sie das Leck. Wenn Sie überprüfen wollen, ob das Gerät richtig abgedichtet
ist, tun Sie dies bitte im Freien. Versuchen Sie nicht, die Leckstelle mit einer Flamme zu lokalisieren.
Verwenden Sie eine Gaslecklösung.
VERWENDUNG DES GASGRILLS
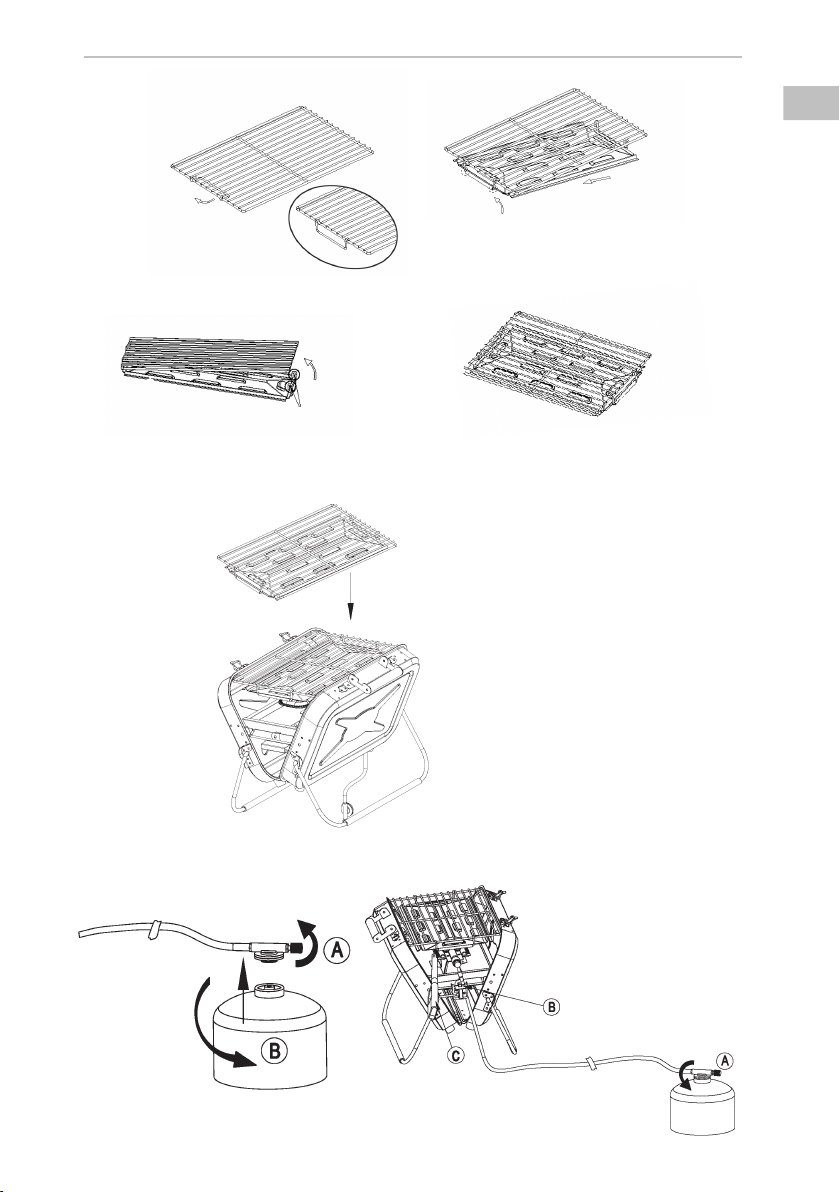
1� Piezoelektrische Zündung (Abbildung 2, Seite 5)
Drehen Sie, wie in Abbildung 2-A dargestellt, den Drehknopf k etwa 1/3 Umdrehung gegen den
Uhrzeigersinn (der Pfeil zeigt auf "+", drehen Sie ihn richtig herunter, wenn die Flasche voll ist), um
das Gas einzuschalten.
Drücken Sie, wie in Abbildung 2-B dargestellt, wiederholt die Taste i, bis der Gasgrill gezündet
wird.
Anmerkung: Wenn die piezoelektrische Zündung fehlschlägt, drehen Sie den Drehknopf im Uhrzeiger-
sinn bis zum Anschlag (der Pfeil zeigt auf "–") und stellen Sie das Gas ab. Warten Sie eine Minute, bevor
Sie einen zweiten Versuch unternehmen, oder befolgen Sie das unten beschriebene Zündverfahren.
Zündung durch Stabfeuerzeug:
Setzen Sie den Stabfeuerzeug in die Nähe des Brenners (Abbildung 2-C), drehen Sie den Drehknopf
k gegen den Uhrzeigersinn (der Pfeil zeigt auf "+"), schalten Sie das Gas langsam ein und drücken
Sie die Stabfeuerzeugtaste (Abbildung 2-C).
2� Grillen
Legen Sie nach dem Vorheizen das Grillgut auf den Grill und platzieren Sie es in der Mitte des
Brenners. Stellen Sie die Gasdurchflussmenge so ein, dass die Flamme nicht aus dem Feuerschild
herausschlägt. Aufgrund der offenen Verbrennung des Produkts kann es an dem vom Gaseinlass ent-
fernten Ende zu Schwankungen in der Feuerleistung kommen. Tragen Sie beim Gebrauch Grillhand-
schuhe, um sich vor den Auswirkungen der Temperatur zu schützen.
3� Flamme ausschalten
Wenn Sie mit dem Grillen fertig sind, drehen Sie den Drehknopf k im Uhrzeigersinn bis zum
Anschlag (der Pfeil zeigt auf "–") und schalten Sie das Gas ab.