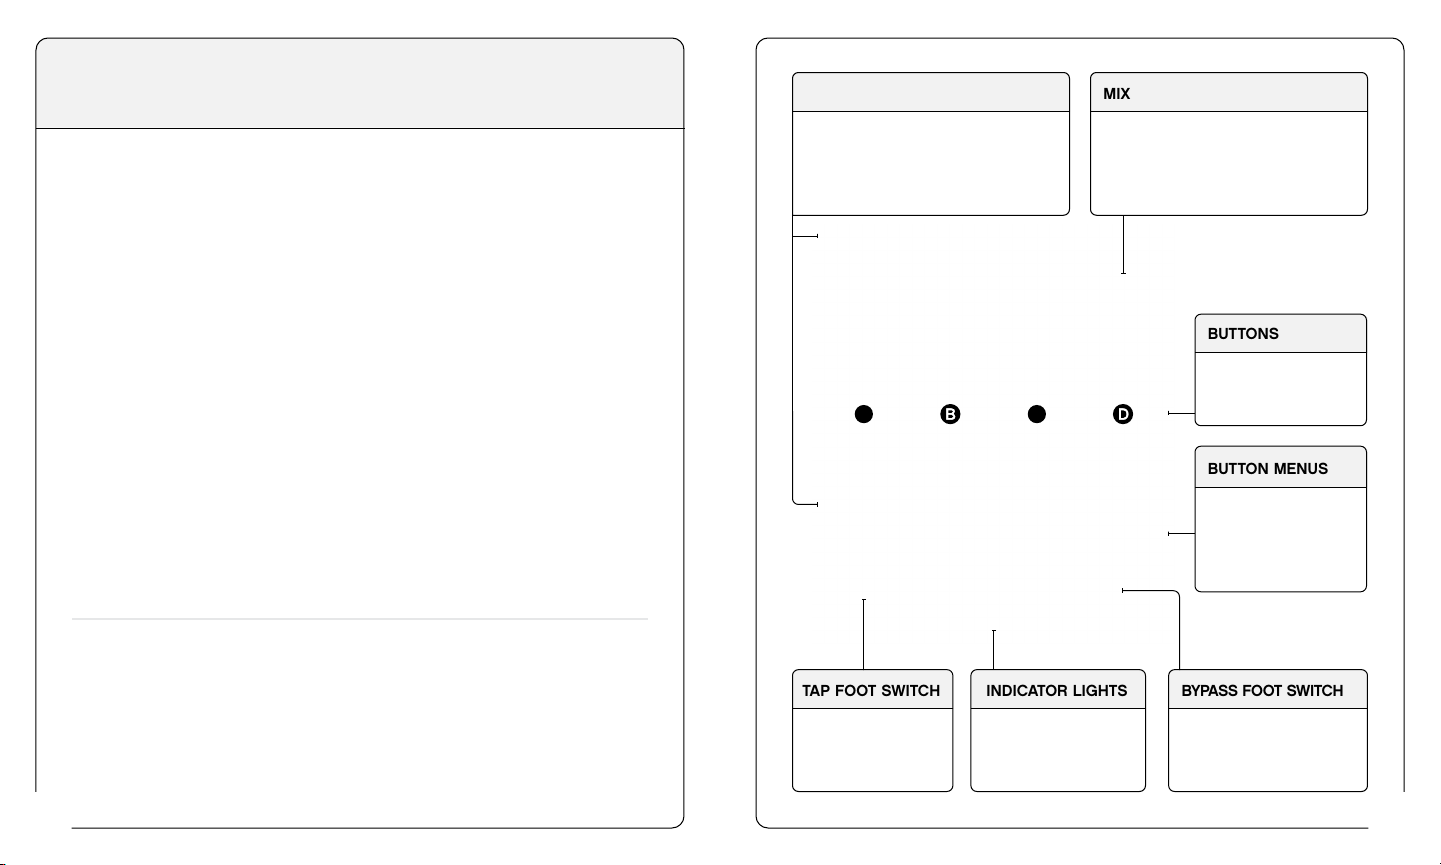
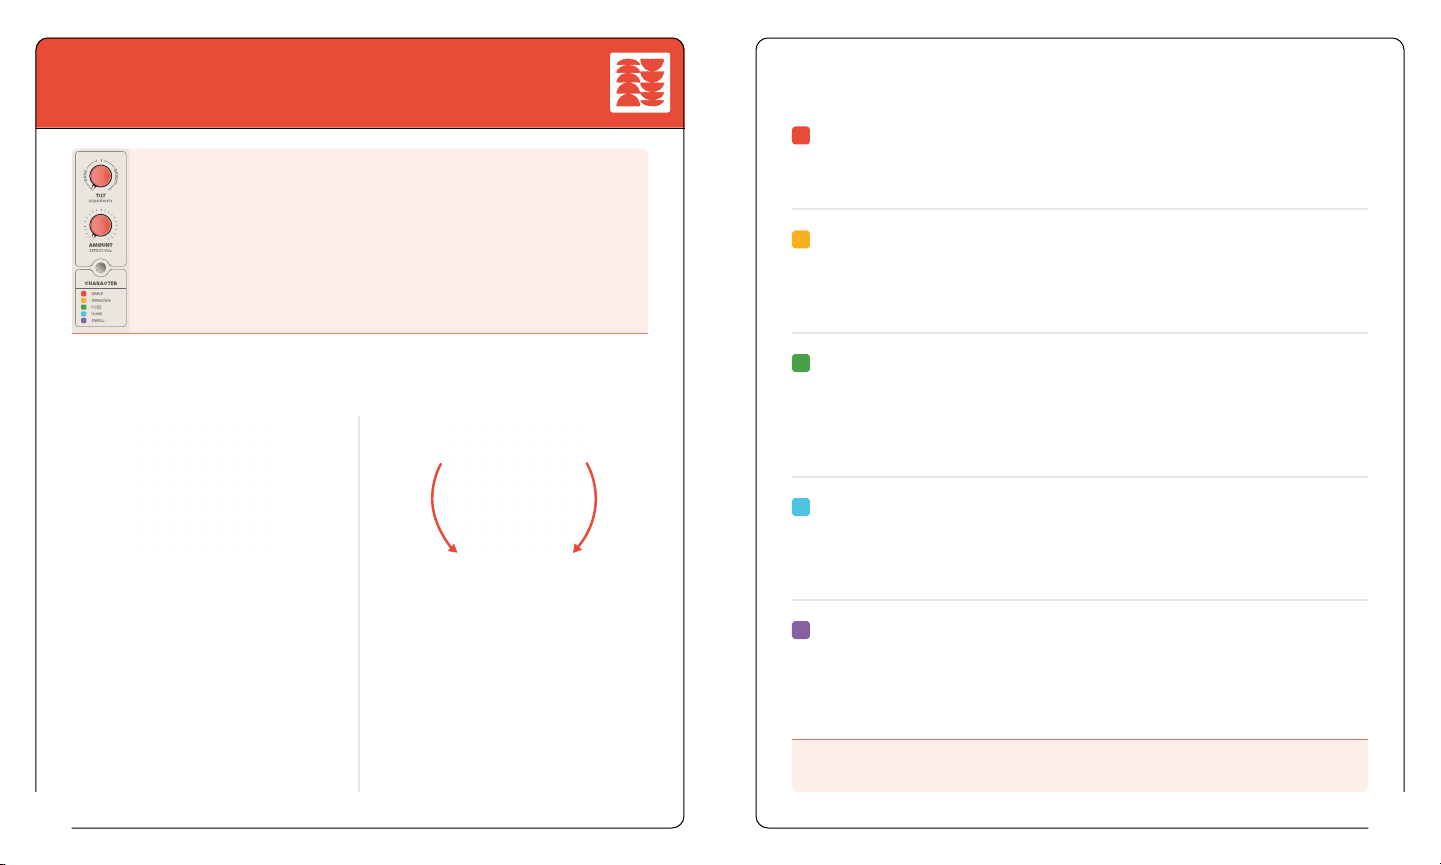
Hologram CHROMA CONSOLE User manual


2 3
1. OVERVIEW
2. CALIBRATION
3. NAVIGATION & PRIMARY CONTROLS
CHANGING EFFECTS
BYPASSING EFFECTS
CONTROLS
FOOT SWITCH CONTROLS
4. CHARACTER MODULE
EFFECTS & CONTROLS
5. MOVEMENT MODULE
EFFECTS & CONTROLS
6. DIFFUSION MODULE
EFFECTS & CONTROLS
7. TEXTURE MODULE
EFFECTS & CONTROLS
8. SECONDARY CONTROLS
ENTERING THE SECONDARY CONTROL MENU
EXIT/RESET SECONDARY CONTROLS
SENSITIVITY
DRIFT
EFFECT VOL
OUTPUT LEVEL
9. GESTURE
ENTERING GESTURE RECORDING
RECORDING KNOB MOVEMENTS
DELETING KNOB RECORDINGS
10. CAPTURE
TABLE OF CONTENTS
06
08
10
12
14
16
18
20
24
26
11. FX SETUP
ENTERING FX SETUP
MODULE ROUTING
DUAL BYPASS
CAPTURE ROUTING
FILTER STYLES
EXPRESSION CONTROL MAPPING
12. COPY/SAVE PRESETS
ENTERING THE COPY/SAVE MENU
NAVIGATION
13. BROWSING PRESETS
ENTERING THE PRESET BROWSER
NAVIGATION
14. GLOBAL SETTINGS
ENTERING THE GLOBAL SETTINGS MENU
CONFIGURATION OPTIONS
GLOBAL RESET
FACTORY RESET
15. INPUTS & OUTPUTS
CONNECTIONS
STEREO INPUTS/OUTPUTS
POWER SUPPLY
EXPRESSION PEDAL INPUT
MIDI & USB-C CONNECTION
16. MIDI IMPLEMENTATION CHART
17. WARRANTY
27
31
34
36
43
46
50

4 5
A NOTE FROM THE DESIGNERS:
Thank you for purchasing a Chroma Console!
In the pages that follow, we’ll tell you everything you need to know about what
Chroma Console does and how you can get the most out of it. But first, it might
be worth taking a moment to talk about why we made this pedal and what it’s
about.
If you’re like us, you may agree that some of the best moments throughout the
history of recorded music have something in common: the “limitations” of a
piece of gear or recording medium were exploited to create something vastly
more exciting than the thing it was meant to do in the first place.
Maybe it’s the preamp on a four-track cassette recorder cranked up so high
that an acoustic guitar sounds like a wobbly Marshall stack. Or it’s a kick drum
mic clipping the desk but nobody cares because the take was good. The
crunchy lo-fi converters on an old sampler, snarling filter on a vintage synth,
or maybe the analog delay that runs away into distorted oscillation just as
the song reaches its crescendo. Pieces of gear, when pushed to extremes,
can sometimes yield unexpectedly expressive results beyond what they were
originally intended to do.
Perhaps you’ve had the experience of sitting on the floor, surrounded by a pile
of mismatched gear, twisting knobs, plugging one thing into another just to see
what would happen when they interact. Then something unexpected happens,
and although you don’t know exactly how you got there, your musical intuition
takes over and you’re just interacting with the
sound
—you’re no longer thinking
about the devices at play, or equipment at all.
Chroma Console is our attempt to distill these happy accidents into something
you can use and enjoy every day. It’s not a studious emulation or tribute to any
specific piece of gear, although we’ve spent years carefully researching (and
exploiting) the most exciting “limitations” of beloved gear from many different
eras.
Instead, it’s a tribute to the sometimes messy, sometimes chaotic, but always
exciting things that can happen when you allow yourself to experiment.
Sometimes you don’t know what you’re looking for until you hear it, and we
hope this helps you find it.
Ryan Schaefer &Jason Campbell

6
1 |OVERVIEW
Chroma Console is a flexible multi-effect pedal that takes inspiration from the eccentricity,
grit, and lively instability of beloved vintage recording technology, combines it with brand
new sounds, and delivers it all through an intuitive user interface that puts wide-ranging
sonic experimentation at your fingertips.
You can easily re-order the effects and experiment with different signal chains—process
reverb through a fuzz, run a reverse delay into a pitch shifter, or run the evocative, gritty
sound of an aging cassette recorder into a stereo double-tracker. You can use one module
to overdrive another, and the entire signal chain can even be pushed into gentle soft
clipping when approaching the headroom limit.
Before you get started, be sure to calibrate Chroma Console to your instrument so that
it can match the effects to your signal level and make experimentation easy. We suggest
starting with Mix at 100%, as that represents the simplest signal path through the effects
modules. Next, try tapping the buttons to advance through the different effects in each
module.
Once you’ve found a signal chain you like, try using the GESTURE feature, a hands-on
sound design tool that lets you record and automate knob movements to quickly and
easily create complex, evolving textures with no additional programming or menu diving
required.
Then try creating ambient pads or layer looped phrases using CAPTURE, Chroma
Console’s combination looper/sustainer.
When you’ve got something interesting happening, you can capture a snapshot and save
up to 80 user presets for immediate recall. You can dive back into your collection of
experiments and happy accidents later, just as you remember them.
• 20 Vibrant Effects
• 4 Rearrangeable Effect Modules
• Stereo or Mono Input/Output
• Sophisticated Input Level Calibration
• Knob Recording with GESTURE feature
• Sustain and loop audio with CAPTURE
feature
• BYPASS Foot Switch Customization
• Configurable Filter Effect (TILT, Lowpass,
or Highpass)
• 80 User Presets
• MIDI In/Out/Thru, clock synchronization
• True Bypass Switching/Buffered
Bypassed with trails
• Tap Tempo, which can sync time-based
effects and modulation effects
7
EFFECT MODULES
Chroma Console consists of 4 Modules
(Character, Movement, Diffusion, and
Texture), each containing 5 unique
effects.
BUTTONS
Use the buttons to
change effects,
bypass Modules.
BUTTON MENUS
Pressing buttons in
specific combinations
accesses deeper
menus and settings
shown here.
BYPASS FOOT SWITCH
Bypass
Hold to Access User Presets
Preset Navigation
INDICATOR LIGHTS
Indicator Lights
communicate various
functions, menus, and
feature navigation.
TAP FOOT SWITCH
- Tap Tempo
- CAPTURE (pg. 26)
- Preset Navigation
MIX
Blends between your input signal and
effected signal. For the simplest signal
path, we recommend starting at 100%
effected when creating a new sound—
blending in dry signal as necessary.
AC

8
2 |CALIBRATION
Because Chroma Console’s effects are designed to color, overdrive, and
interact with each other, they are at their most exciting when calibrated to
match the input level of your instrument.
Calibration automatically sets the compression and saturation thresholds, as
well as many other effect parameters, to the right level for your instrument so
that you can focus on experimentation and having fun—not endlessly fussing
with volume controls.
You can choose one of 4 headroom levels (Low, Medium, High, or Very High)
selected either automatically or manually. Automatic calibration will pick the
level that the pedal deems most appropriate for the input material it samples,
but feel free to experiment and see which category suits your instrument best.
For cleaner and louder effects, select a higher input level.
For less headroom and earlier saturation, select a lower input level. You can
use the SENSITIVITY and EFFECT VOL secondary controls to further tweak the
saturation sensitivity and effect output levels later if you wish.
Chroma Console will always remember the most recent calibration setting
(even through power cycles) and will be applied to all presets. We recommend
re-calibrating when changing between instruments with distinctly different
output levels.
To automatically calibrate, simply begin playing your instrument after
entering the calibration menu. The indicator lights will change color, and
the pedal will listen to your instrument and place it into one of four input
headroom levels automatically.
If you’re using a guitar, simply strumming an open chord a few times
at your normal playing volume should do the trick. For synths, line level
sources, or any other instruments, play a few notes or chords to give
Chroma Console an idea of the level of signal it should expect to hear
most of the time. This measurement doesn’t have to be super precise—it
just needs to get the general level.
AUTOMATIC CALIBRATION
9
To manually choose a different input headroom level, tap one of the four
buttons to select your desired category.
MANUAL CALIBRATION
To enter the Calibration Menu, press and hold both footswitches
simultaneously until you see the indicator lights display a purple animation.
Many lower output
guitars or basses,
instrument level
synths, other low
output instruments.
Many guitars or
basses (humbuckers,
stacked pickups),
electric piano, some
synths
Hot output guitars
(high/overwound/
active pickups), most
line level instruments.
High output line level
signals, modular, etc.

10
3 |NAVIGATION & PRIMARY CONTROLS
Press a button once to descend through effects. The module button will
illuminate with the corresponding effect color to indicate selection.
Press and hold a button to bypass the selected effect.
SECONDARY controls are listed in gray lettering
underneath the primary. These controls are accessed
via the SECONDARY menu. For more on accessing
these controls, see the SECONDARY CONTROLS
section (pg. 20).
CHANGING EFFECTS
BYPASSING EFFECTS
CONTROLS
Each knob on Chroma Console has two functions:
PRIMARY and SECONDARY controls. PRIMARY controls
are listed in bold lettering below each knob.
3 |NAVIGATION & PRIMARY CONTROLS
11
FOOT SWITCH CONTROLS
Single press
BYPASS foot switch
Single press
TAP foot switch
Long press
BYPASS foot switch
Long press
TAP foot switch
Double tap
BYPASS foot switch
Bypass/Engage pedal or modules.
Tap Tempo for Vibrato, Phaser, Tremolo, Cascade,
Reels, Collage, and Reverse.
Enter PRESET BROWSER mode. See BROWSING
PRESETS (pg. 34).
CAPTURE Recording. See CAPTURE section (pg.
26) for more information.
Bypass pedal when using DUAL BYPASS. See DUAL
BYPASS section for more information (pg. 28).

12
4 |CHARACTER MODULE
CHARACTER
Shape and articulate your sound with overdrive, compression,
fuzz, and swell effects. Inspired by a collection of analog gear,
these effects offer dynamic response and a wide range of tones.
The red TILT & AMOUNT knobs control the selected effect.
DRIVE: Tube-like drive with nothing but sweet spots, ranging from warm
preamp to full overdrive.
AMOUNT adjusts intensity of overdrive.
TILT controls the tone of the effect.
At center, the EQ is set to neutral,
with minimal processing. Turning to
the right makes the effect brighter,
and turning to the left will make
the effect darker. In addition to EQ
adjustments, TILT also interacts with
the parameters of the saturation
effects, so experiment and find the
sound that suits you best.
SENSITIVITY is a secondary control
that fine-tunes the headroom that
you set in Calibration, allowing you
to dial in your preferred breakup
point for the drive effects.
When set to SWELL, sensitivity
allows you to adjust the triggering
threshold, making the effect more or
less responsive to your playing.
SWEETEN: A pleasant preamp that adds EQ, compression, and gentle
saturation as you increase AMOUNT. Perfect for subtly sweetening your
basic instrument sound or lightly overdriving the effects that follow it.
AMOUNT adjusts compression and saturation.
EFFECTS
CONTROLS
13
FUZZ: Dynamic vintage-voiced fuzz tones ranging from smooth and
rounded to brash blown-speaker sounds. Use the TILT control to change
not only the tone, but also the transient and bias characteristics of the
fuzz for varied sounds across the dial.
AMOUNT adjusts intensity of the FUZZ effect.
HOWL: Resonant filter fuzz with a lot of personality. Howl can create
smooth sustaining tones or synth-like stabs that cut through the mix,
depending on the position of the TILT control.
AMOUNT adjusts intensity of the HOWL effect.
SWELL: Expressive envelope-triggered volume swells. As you get a feel for
playing the effect, you’ll find that allowing more or less separation between
notes allows you to precisely control when the swells trigger.
AMOUNT adjusts the attack and decay times of the SWELL effect.
EFFECT VOL adjusts the output volume of the Character module.
MORE
DISTORTED
LESS
DISTORTED

14
5 |MOVEMENT MODULE
MOVEMENT
Warp and expand your sound with modulation effects inspired
by classic studio recording gear and techniques, ranging from
subtle to pronounced, steady to wobbly.
The yellow RATE & AMOUNT knobs control the selected effect.
DOUBLER: Stereo double tracking effect that reproduces the sound of
overdubbing a part multiple times. Sounds range from tight doubling to
short slap-back delay.
RATE: sets the doubling time range from short to long.
AMOUNT: mixes in more doubling as it is increased.
DRIFT: introduces and increases intensity of random momentary pitch
shifts.
VIBRATO: Lush pitch modulation that can range from classic sine wave
vibrato to tapelike random warbles.
RATE: sets the frequency of the pitch modulation.
AMOUNT: adjusts the modulation depth.
DRIFT: increases the stereo width of the effect and introduces a random
modulation waveform that evokes tape warble and instability.
EFFECTS
15
PHASER: Vintage-voiced classic phaser effects that range from swirling
hypnotic sweeps to pulsing vibrato-like undulation.
RATE: sets the phase-shifting frequency.
AMOUNT: adjusts the modulation intensity and introduces additional phase
shifting stages (ranging from 2-stage to 12-stage). This allows for many
different phase shifting styles across the travel of the knob, so experiment
to find the sound you like the best.
DRIFT: adds randomness to the phase-shifting waveform.
TREMOLO: Colorful, pulsing, amplitude modulation that can go from a
classic guitar amp shimmer to a hard, square-wave chop.
RATE: sets the amplitude modulation frequency.
AMOUNT: sets the tremolo depth, from soft flutter to choppy rhythm.
DRIFT: introduces randomness, variation, and instability into the tremolo
effect as DRIFT increases.
PITCH: Pitch shifting from -1 octave to +1 octave. Use DRIFT to add a
colorfully expressive lo-fi grit, or try automating the sweep or the pitch with
GESTURE for maximum enjoyment.
RATE: determines pitch of effect. No pitch shifting is applied in the center,
-1 Octave when fully left, and +1 Octave when fully right—with gliding travel
through the pitch range in between.
AMOUNT: determines the mix of the pitch-shifted signal; 100% wet signal
when fully clockwise.
DRIFT: lowers the resolution of the pitch shifter in a pleasing, lo-fi manner.
Adds instability as DRIFT increases. Can be used in the center position,
even if no pitch shifting is applied, to add a little extra personality to your
signal.
EFFECT VOL adjusts the output volume of the Movement module.

16
6 |DIFFUSION MODULE
DIFFUSION
Diffusion’s time-based effects are equal parts vintage gear appreciation
and the weirdness you’ve come to expect from Hologram. Each effect
has its own unique character when moving the TIME parameter, which
can be exploited to great creative effect by automating it with a
GESTURE.
The green TIME & AMOUNT knobs control the selected effect.
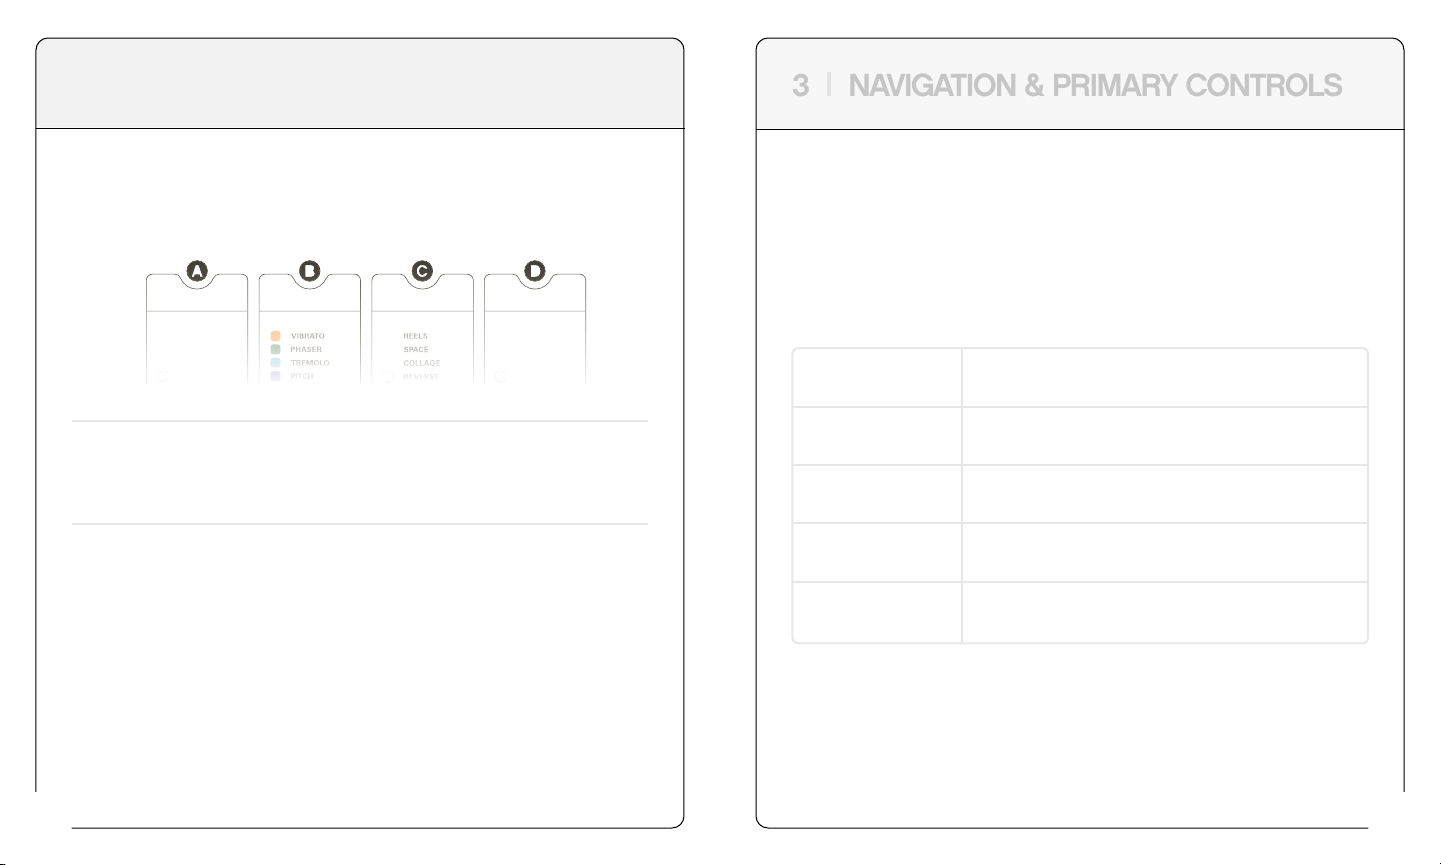
CASCADE: Influenced by the classic sound of a bucket-brigade style analog
delay, but heightened. Dime the AMOUNT, twist the TIME knob, it does the thing.
Darker in tonality, subtle modulation that increases with DRIFT.
TIME: sets the delay time, ranging from short slapback to quarter-note taps. When
using tap-tempo, delay times will be quantized subdivisions of the tempo you tap.
AMOUNT: increases repeats and feedback until it begins to self-oscillate, distort,
and pleasingly explode at maximum.
DRIFT: increases intensity of pitch modulation and adds more instability and
signal degradation to the repeats for added character.
REELS: Inspired by the expressive sound of a well-worn tape echo, this one is full
of grit and bright, lively, slightly wonky echoes that are constantly evolving. Add
DRIFT to further degrade the tape medium and see what happens.
TIME: sets the delay time, ranging from short slapback to quarter-note taps.
AMOUNT: increases repeats and feedback; lively self-oscillation at 100% for
maximum creative effect.
DRIFT: adds instability and degradation to the tape playback, repeats disintegrate
as they get recycled into feedback and then fade away.
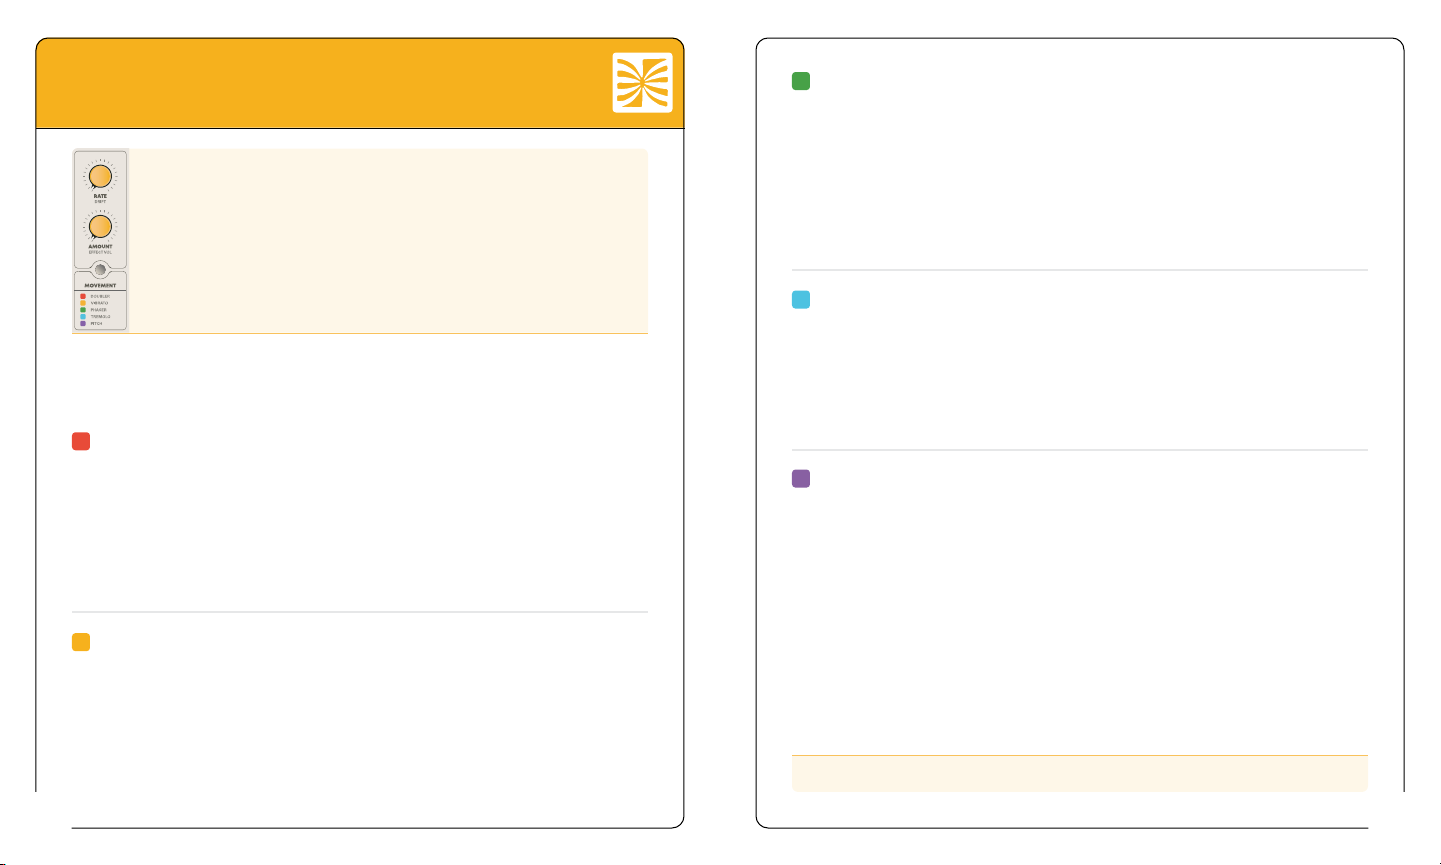
EFFECTS
SPACE: A versatile reverberation effect that seamlessly blends between 5 different
reverb sounds, ranging from tight recording echo chambers to massive sustaining
clouds of notes.
TIME: sets the reverb size and tonality. Reverb size increases as you turn clockwise.
AMOUNT: sets the wet/dry mix of the reverb; 100% wet when fully clockwise.
DRIFT: introduces pitch modulation to the reverb.
COLLAGE: Wild, spontaneous looping delay. Collage destructively edits the
delay line as you move the TIME knob, so quick knob movements or recorded
GESTURES create pitch bends, double speed/half speed loops, and all kinds
of pleasing manipulations that repeat and fold in on themselves as feedback
increases.
TIME: sets the delay subdivision, ranging from short, granular samples to longer
looplike phrases.
AMOUNT: introduces additional repeats and feedback, resulting in evolving
oscillation at the maximum setting.
DRIFT: introduces random double-speed loops into the mix and increases pitch
modulation.
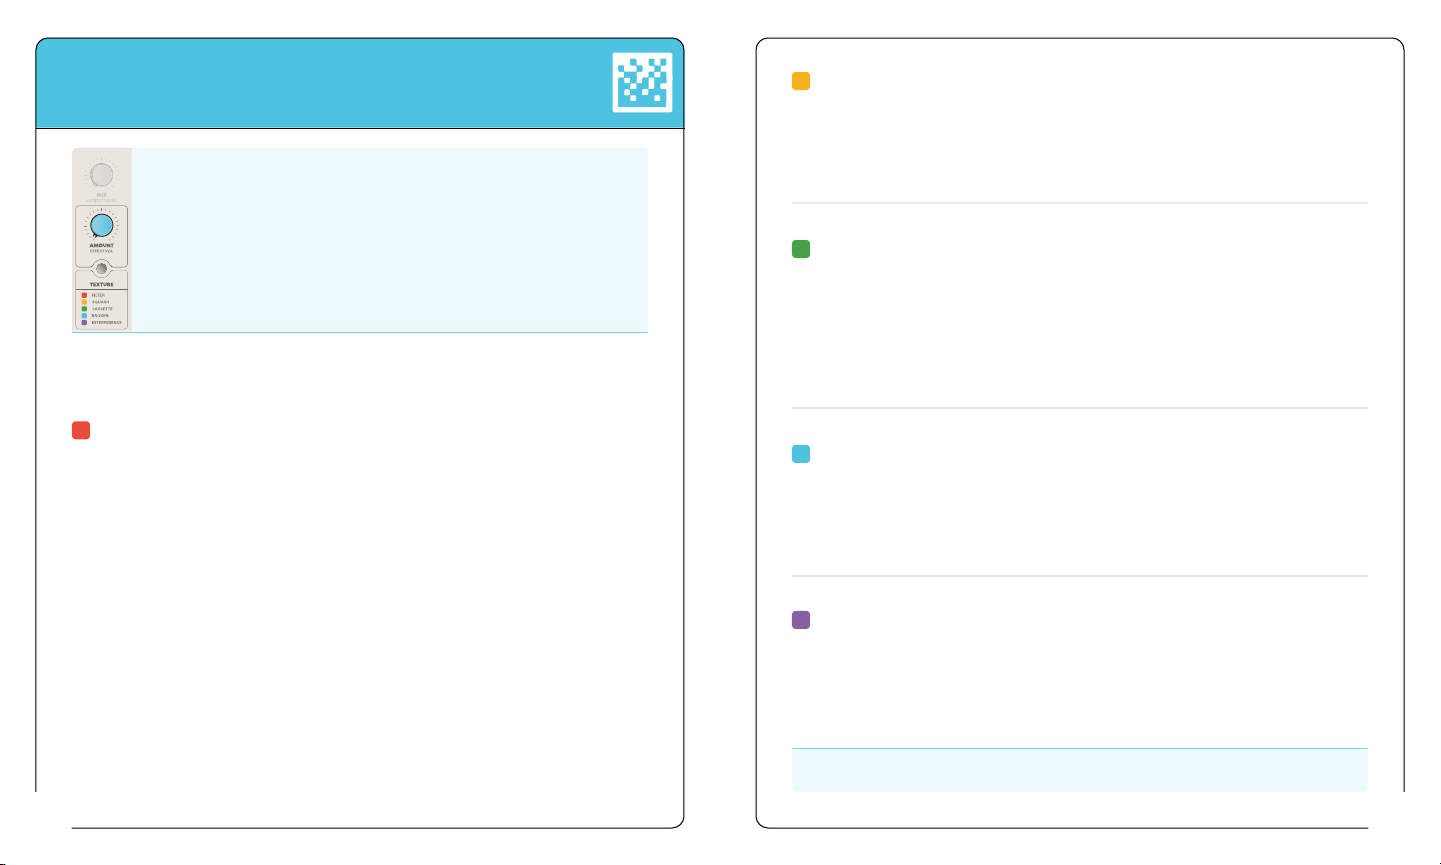
REVERSE: Reverse delay with variable playback speed/pitch (-1 Octave to +1
Octave) for real-time “backwards tape” effects and haunting ambience.
TIME: sets the speed/pitch of the delay. At center, it plays back at normal speed,
halfspeed (-1 Octave) at left, and double-speed (+1 Octave) at right.
AMOUNT: sets the wet/dry mix of the delay; 100% wet when fully clockwise.
DRIFT: adds pitch modulation to the repeats.
17
EFFECT VOL secondary control adjusts only the DIFFUSION wet effect volume.
In this way, you can use EFFECT VOL to set the volume of the delay taps, reverb,
loops, etc. to your preferred level in relation to the dry signal.

18
7 |TEXTURE MODULE
TEXTURE
Sculpt, squash, and break your signal with a collection of textural
effects. Use FILTER or SQUASH to add a subtle polish to your
effect chain, or sand it down with your preferred level of grit
by using Broken, Cassette, or Interference to add expressive
dimension to your instrument.
The blue AMOUNT knob controls the selected effect.
FILTER: Multi-mode filter effect. By default, the active filter style is TILT, but
it can be configured as a standalone low-pass filter (LPF) or high-pass filter
(HPF). See FX SETUP (pg. 27) for more info.
AMOUNT: sets the cutoff frequency of the filter.
SQUASH: A heavy-handed compressor and overdrive that can rein in loud
chains of effects, provide subtle polish, or add a pleasing grit to a signal
depending on the position of the AMOUNT knob.
AMOUNT: introduces more compression and begins to overdrive as the
knob approaches 100% clockwise.
EFFECTS
19
CASSETTE: A celebration of all the weird things that cassette tape
recorders can do. Wow, flutter, warble, tape degradation, and pitch artifacts
can add a profound nostalgic quality to even the simplest of sounds.
AMOUNT: tape saturation, compression, filtering, and artifacts all increase
in intensity as the knob moves clockwise. There are many different flavors
of tape coloration present across the range of the knob, so experiment to
find the sound you like best.
BROKEN: Periodic pitch drops combine with amplitude and frequency
modulation to mangle your input with the sounds of motorized audio
equipment in need of service.
AMOUNT: increases breakdown, reaching maximum intensity when fully
clockwise.
INTERFERENCE: Adds a dissolving layer of musical disturbance to your
signal, inspired by telecom network glitches, radio static, and interference
of all kinds.
AMOUNT: moves through various flavors of interference, increasing in
intensity as you turn clockwise.
EFFECT VOL adjusts the output volume of the Texture Module.
LOW-PASS FILTER
EQ is set to neutral when
fully clockwise; turn left
to cut highs.
HIGH-PASS FILTER
EQ is set to neutral when
fully counter-clockwise;
turn right to cut lows.
TILT FILTER
EQ is set to neutral at
center. Turn left to cut
highs; turn right to cut
lows.

20
8 |SECONDARY CONTROLS
To enter the SECONDARY CONTROLS MENU, press the Aand Bbuttons
simultaneously and release. Lights will animate teal.
While in this mode, each knob will adjust the Secondary Control of each
respective knob (listed in gray lettering underneath each knob).
ENTERING THE SECONDARY CONTROLS MENU
Both MOVEMENT and DIFFUSION modules are equipped with DRIFT controls.
DRIFT parameters are inspired by the captivating eccentricities of vintage
musical equipment and the charming musical applications of instability and
unpredictability.
Each DRIFT parameter is different, and each was carefully designed to bring
a wide range of expressive, musical malfunctions under your control. You can
take the baseline sound of each effect and then use DRIFT to dial in the amount
of randomness, chaos, or nostalgic warble that your composition requires.
For example, increasing DRIFT when the VIBRATO effect is selected will
gradually change the the modulating wave form from a sine wave to a random
wave shape while simultaneously altering the stereo spread.
21
0% 50% 100%
DRIFT
8 |SECONDARY CONTROLS
To exit this menu at any time,
press Aand Bagain and
release. This returns the knob
functions to their primary
controls. Alternatively, press the
BYPASS foot switch once to exit.
To reset all secondary controls
to the default values, press and
hold Aand Buntil a pulsing
teal animation displays. This
indicates that all secondary
controls have been reset to the
default values.
EXIT SECONDARY RESET SECONDARY
DOUBLER random momentary pitch shifts
VIBRATO random modulation waveform that evokes tape warble and instability
PHASER adds instability to the phase-shifting waveform
TREMOLO introduces variation to the amplitude and frequency modulation
PITCH lowers the fidelity of the pitch shifter and adds instability
CASCADE increases pitch modulation, adds signal degradation to repeats
REELS increases pitch instability and adds tape degradation
SPACE introduces pitch modulation at various stages in the reverb
COLLAGE introduces random double-speed loops and increases pitch modulation
REVERSE adds pitch modulation to the repeats

22
Each Module has an EFFECT VOL secondary control. This secondary control
adjusts the output volume of its respective module. This control is helpful to
adjust the internal balance of the modules within the signal chain.
EFFECT VOL
8 |SECONDARY CONTROLS
23
This secondary control can attenuate or boost the output volume of Chroma
Console’s FX output.
OUTPUT LEVEL
8 |SECONDARY CONTROLS
SENSITIVITY fine-tunes the headroom that you set in Calibration for the
Character module, allowing you to dial in the your preferred breakup point for
the drive effects.
SENSITIVITY
NEUTRAL
Indicator lights illuminate green.
NEUTRAL
Indicator lights illuminate green.
NEUTRAL
Indicator lights illuminate green.
MORE SENSITIVITY
Increase distortion
and reactivity.
BOOST FX
OUTPUT LEVEL
BOOST
OUTPUT SIGNAL
LESS SENSITIVITY
Clean, less distortion
and reactivity.
ATTENUATE FX
OUTPUT LEVEL
ATTENUATE
OUTPUT SIGNAL
For the DIFFUSION module, EFFECT VOL boosts/attenuates only the wet
output signal of the diffusion effects.

24
9 |GESTURE
To enter the GESTURE RECORDING mode and begin recording knob
movements, press the Cand Dbuttons simultaneously and release. The
lights will animate white to indicate that the Gesture menu is active.
Begin turning the knob or knobs of your choice. Button LEDs will change from
white to red to indicate that a knob in that column is being recorded.
To end the knob recording cycle, press C and D once more or hit the BYPASS
footswitch. Either action will exit the GESTURE menu.
Gesture recording is an exciting feature that allows you to record and loop
knob movements of Chroma Console’s Primary Controls. This allows the user
to build up complex, evolving sounds easily with simple motions of the knobs.
ENTERING GESTURE RECORDING
RECORDING KNOB MOVEMENTS
25
While playing back a gesture recording, Module LEDs will oscillate between the
color of the selected effect and white, giving indication that knob recording is
present within the corresponding Module.
More knob recordings can be created by re-entering GESTURE and repeating
the above steps for a different knob. Moving a knob that has been previously
recorded will overwrite the original loop and create a new loop.
Once you’ve recorded a gesture, you can use tap tempo (or external MIDI
clock) to speed these gestures up or down relative to the tempo they were
originally recorded at. For example, recording a gesture at a slow speed and
then speeding up the tempo is an interesting way to create complex motions
and patterns that move faster than one can physically move the knobs.
To individually delete a knob’s recording, simply move the knob while in
live effect mode.
To delete all present knob recordings, press and hold C and D until a
pulsing white animation displays. This indicates that all recorded knob
movements have been deleted.
RECORDING KNOB MOVEMENTS CONT.
DELETING KNOB RECORDINGS
9 |GESTURE

26 27
10 |CAPTURE
CAPTURE is an ephemeral sustainer and looper with up to 30 seconds of
record time. Immediately create soft droning pads or musical looped phrases
with the press of a single footswitch.
While the TAP foot switch is held down, the CAPTURE mode is initiated, and
a short loop will begin recording. As soon as the foot switch is released, the
the loop will stop recording and the CAPTURE mode will enter into playback
mode. This step can be repeated to simultaneously clear the original and
start recording a new loop.
The CAPTURE feature can be configured in POST-FX (default) or PRE-FX in
the FX SETUP menu. This CAPTURE ROUTING is saved on a per-preset basis.
When recording very short loops, the
audio playback will have soft fading
edges that overlap, creating a seamless
ambient pad in a short moment. The
indicator lights will animate blue when
playing sustainer loops.
With longer material, CAPTURE will
act as a traditional looper, allowing
you to capture and play a musical
phrase. The indicator lights will
animate green when playing
looped phrases.
CAPTURE recordings are not saved within user presets.
To stop/delete CAPTURE recordings, press the TAP foot switch once.
11 |FX SETUP
Chroma Console’s presets can be customized further in the FX SETUP menu.
In the FX SETUP menu, the following settings can be adjusted:
1. Module Routing
2. Dual Bypass
3. Capture Routing
4. Filter Style
5. Expression Control Mapping
When entering the FX SETUP menu, the buttons will animate in sequence to indicate
the current module order of the preset. The default module order is as follows:
To enter the FX SETUP menu, press & release the Aand Dbuttons
simultaneously.
After the animation displays, the four buttons will begin blinking blue, at which
point you can tap the buttons in your desired routing sequence to reorder the
modules. Once modules have been reordered, the pedal will exit the FX SETUP
menu and return to live effect mode.
To cancel the module routing process and exit the menu, you can either press
the BYPASS foot switch or press A and D.
MODULE ROUTING
ENTERING FX SETUP

28
Chroma Console’s BYPASS foot switch can be configured to bypass and
engage specific Modules, as opposed to bypassing the entire pedal.
In a blank or default preset, Chroma Console’s BYPASS foot switch is configured
to bypass/engage all Modules at once.
From the FX SETUP main menu (blinking lights, awaiting module routing), press
and hold the BYPASS foot switch.
While the BYPASS foot switch is being held down, the four buttons will be
illuminated either in SOLID YELLOW or BLINKING YELLOW. While the foot
switch is being held, you can press the buttons to toggle between SOLID or
BLINKING Buttons.
Releasing the BYPASS foot switch at any moment will return you to the FX
SETUP main menu (blinking lights, awaiting module routing).
When using DUAL BYPASS, double tap the BYPASS foot switch to disengage
the entire pedal.
If a Button is BLINKING YELLOW,
Chroma Console’s BYPASS foot
switch
will
bypass/engage that
particular module.
If a Button is SOLID YELLOW,
Chroma Console’s BYPASS
foot switch
will not
bypass
that particular Module.
DUAL BYPASS
BLINKING YELLOW SOLID YELLOW
11 |FX SETUP
11 |FX SETUP
29
Chroma Console’s CAPTURE recordings can be routed POST-FX (default) or
PRE-FX. From the FX SETUP menu, turn the MIX knob to make your selection.
An orange menu will indicate that you’ve entered the CAPTURE routing menu.
CAPTURE ROUTING
PRE-FX: Turning MIX left of center will
route CAPTURE before the effects.
POST-FX (default): Turning MIX right
of center will put CAPTURE after the
effects.
A white button light will indicate your selection. After 3 seconds of inactivity,
Chroma Console will return to the FX SETUP main menu.
From the main FX SETUP menu, move the expression pedal—this will open
the expression mapping menu.
Next, move the corresponding knob of the control you’d like to map to the
expression pedal. After 3 seconds of inactivity, the expression mapping menu
will time-out and return to the FX SETUP main menu.
The expression mapping menu also automatically opens when you connect
an expression pedal to the EXP jack, or when you move an expression pedal
after assignment was cancelled.
EXPRESSION CONTROL MAPPING

30 31
LOW-PASS
FILTER
HIGH-PASS
FILTER
TILT FILTER
To change the style of Filter effect,
move the TEXTURE AMOUNT knob
while in the FX SETUP menu.
After 3 seconds of inactivity, Chro-
ma Console will return to the FX
SETUP main menu.
11 |FX SETUP
12 |COPY / SAVE PRESETS
To enter the COPY/SAVE menu, press the Band Cbuttons simultaneously.
This will copy the active preset and prepare it for saving.
To exit this menu at anytime, press Aand Dagain and release. Alternatively,
press the BYPASS foot switch once to exit.
To reset all changes made in FX SETUP, press and hold A and D until
a pulsing blue animation displays. This indicates that all FX SETUP
parameters have been reset.
Chroma Console is capable of storing up to 80 user presets.
These user presets save:
• Effects & Module Routing
• All primary control settings
• All secondary control settings
• All Gesture recordings
• Filter Style
• Dual Bypass Settings
• Capture Routing
• Expression control mapping
• Tapped tempo
ENTERING THE COPY/SAVE MENU
EXIT / RESET FX SETUP The 4 LED bars will indicate which
specific preset slot you are in.
PRESETS 1-4
BANK A
BANK B
BANK C
BANK D
PRESETS 5-8
PRESETS 9-12
PRESETS 13-16
PRESETS 17-20
The Buttons indicate which
preset bank you are in.
Chroma Console has 3 distinct filter styles that can be configured on a per-
preset basis.
TILT FILTER - turn left to cut high frequencies; turn right to cut low frequencies
LOW-PASS FILTER - turn left to cut high frequencies
HIGH-PASS FILTER - turn right to cut low frequencies
FILTER STYLE

32
You can navigate through the presets and banks two different ways. Use either
the AMOUNT knobs or foot switches to scroll to the desired saving location.
NAVIGATION
If a preset slot is empty, the buttons will briefly illuminate white as the cursor
hovers over the slot.
If there is already a preset saved within a slot, the buttons will illuminate with
corresponding effect colors. Any saved preset will become active as you scroll
through the banks, allowing you to audition the sound before overwriting it.
12 |COPY / SAVE PRESETS
SAVE/OVERWRITE
12 |COPY / SAVE PRESETS
33
To save or overwrite your copied preset into the desired slot, press both the B
& Cbuttons again. A teal animation will be displayed as the pedal saves your
preset. Chroma Console will return to normal operation once the process is
complete.
To cancel the saving process and exit the COPY/SAVE menu, press and
hold the BYPASS foot switch. The lights will animate red to indicate that the
process has been stopped. The copied settings will be restored.
In this example,
BANK A, USER PRESET 3
is selected.

34
13 |BROWSING PRESETS
You can load and audition presets from the PRESET BROWSER. To enter
the PRESET BROWSER menu, press and hold the BYPASS foot switch.
A wiping button animation will indicate that you’ve entered the browser.
The Buttons indicate which preset bank you are in.
A Button illuminated: Bank A
B Button illuminated: Bank B
C Button illuminated: Bank C
D Button illuminated: Bank D
The 4 LED bars will indicate which specific preset slot you are in, using a
white cursor and color coded menus.
ENTERING THE PRESET BROWSER MENU
Controls and Button Functions are disabled while browsing presets.
13 |BROWSING PRESETS
35
You can navigate through the presets and banks two different ways.
1. Turn any module AMOUNT knob to scroll through its corresponding 20
available presets.
2. Tap either foot switch to move the cursor to the desired saving location. A
single tap of the left or right foot switch will move the cursor one slot to the left
or right, respectively.
3. To load a preset, press & hold the BYPASS or the TAP foot switch while the
desired preset is selected.
By default, presets will be auditioned while navigating through the browser.
Preset Browser Audition can be turned off in the GLOBAL SETTINGS menu (see
pg. 36 for more information).
NAVIGATION
In this example,
BANK A, USER PRESET 3
is selected.

36
KNOB CONFIGURATION OPTIONS
TILT MIDI CHANNEL 1-16
RATE MIDI ROUTING
Interface mode, Interface without internal
clock, Thru mode, Thru without internal
clock
TIME MIDI CLOCK SOURCE AUTO, USB MIDI, DIN MIDI, Internal clock
only
MIX N/A N/A
AMOUNT (CHARACTER) LED BRIGHTNESS Min-Max
AMOUNT (MOVEMENT) PRESET BROWSER
AUDITION
Enable Preset Browser Audition
Disable Preset Browser Audition
AMOUNT (DIFFUSION) BYPASS MODE Buffered Bypass, Buffered Bypass with
trails, True Bypass
AMOUNT (TEXTURE) N/A N/A
14 |GLOBAL SETTINGS
To enter Chroma Console’s GLOBAL SETTINGS MENU, press all buttons
(A, B, C, and D) simultaneously and release.
Once in the GLOBAL SETTINGS MENU, Chroma Consoles knobs are used
to make changes to the global settings. Below is a table that illustrates the
settings each knob can alter.
This setting configures which
channel Chroma Console will
listen to incoming MIDI messages
on. By default, Chroma Console is
set to MIDI Channel 1.
In Global Settings, you can
choose how Chroma Console
routes MIDI messages from other
devices and whether it sends its
own internal clock messages.
The GLOBAL SETTINGS MENU lets you change the default behavior of Chroma
Console to suit your needs.
ENTERING THE GLOBAL SETTINGS MENU
CONFIGURATION OPTIONS
Channels 1-4
Channels 5-8
Channels 9-12
Channels 13-16
CONFIGURATION OPTIONS
1. MIDI CHANNEL (TILT KNOB)
37
14 |GLOBAL SETTINGS
Interface mode
Thru mode
Interface without
internal clock
Thru without internal
clock
2. MIDI ROUTING (RATE KNOB)

38 39
14 |GLOBAL SETTINGS
14 |GLOBAL SETTINGS
2. MIDI ROUTING (RATE KNOB)
MIDI USB FROM COMPUTER
MIDI FROM EXTERNAL DEVICE
CHROMA CONSOLE INTERNAL CLOCK
2. MIDI ROUTING (RATE KNOB)
When Chroma Console is synced to External Clock sources, its Internal Clock,
as it is referred to here, is equivalent to the External Clock BPM. See MIDI
CLOCK SOURCE for more.
AUTO
DIN MIDI
USB MIDI
Internal Only
3 - MIDI CLOCK SOURCE (TIME KNOB)
Chroma Console has two hardware
interfaces – USB MIDI and standard
5-PIN DIN MIDI. Chroma Console will
sync the following effects to external
MIDI clock:
Vibrato, Phaser, Tremolo, Cascade,
Reels, Collage, and Reverse.
In Global Settings, you can configure
Chroma Console to listen for clock
messages from different external
MIDI sources.
Interface Mode (Default): Chroma Console
works like a USB MIDI interface. If you send
a message from a computer to the Chroma
Console over USB, it will be forwarded to the
DIN MIDI OUT port. If you send a message to
the DIN MIDI IN port, it will be forwarded to the
computer over USB. Chroma Console’s clock
signals will be output to both DIN and USB
MIDI.
Interface without internal clock: This setting
functions the same way as Interface Mode, but
Chroma Console does not send out its own
internal clock messages. MIDI clock messages
from the computer are forwarded along with
all other MIDI messages.
Thru Mode: Chroma Console forwards incom-
ing messages from the DIN MIDI IN port to the
DIN MIDI out port. Clock signals will be output
to both DIN and USB MIDI.
Thru without internal clock: This setting func-
tions the same as Thru Mode, but Chroma
Console will not send out its own internal clock
messages. MIDI clock messages sent to the
DIN IN port will be forwarded to the DIN OUT
port.
Table of contents
Other Hologram Music Pedal manuals
Popular Music Pedal manuals by other brands

EarthQuaker Devices
EarthQuaker Devices Avalanche Run Operation manual

hexinverter
hexinverter Mutant Clap user manual

DEELEEBOB
DEELEEBOB Loop X Systems 421 user guide

Electronic Audio Experiments
Electronic Audio Experiments Halberd Technical document

Vertex
Vertex BOOST product manual

BBE
BBE WAH owner's manual