Home Deluxe Vital M User manual

Assembly Instructions
Bathtub for elderly
Vital M (lying) / Vital L (sitting)
Model example*
*Pictures and descriptions may differ slightly depending on the model.

Dear customer,
We are pleased that you have chosen a product of Home Deluxe GmbH.
Please observe all instructions before installation and use of the bath tub and follow strictly the
described procedure!
Please first check the product for completeness according to the provided check list. In case of any
damage, send us a message with a short description and photos of the affected area to the e-mail
address below. A qualified staff member will contact you as soon as possible to find a solution.
You have a two year statutory warranty on all products.
Customer satisfaction is our primary goal. You can contact us at:
Home Deluxe GmbH
Schanzeweg 2
32312 Lübbecke
Germany
Phone number: +49 (0)5743 - 603 919 - 0
Fax number: +49 (0)5743 - 603 919 - 90
Email address: info@home-deluxe-gmbh.de
1. Important Notes:
Please note:
T This product is designed exclusively for use in a private area.
The seals, hand showers, and shower hoses are wearing parts, therefore they have a guarantee of 6
months. We are not able to accept the costs for an exchange. The bulbs are completely excluded from
the warranty.
The massage water pump has a power of 0.75 kW / 220-230 V, and the water blister pump
has a power of 0.25 kW / 220-230 V.
To ground the product, you should use a high quality copper cable to be connected to the
circuit breaker of the bathroom. The grounding cable should be connected to the floor.
The water can reach a maximum temperature of 75°C, and a 4-6 bar pressure.
Please, be careful when you move and carry the bathtub,
so as not to damage the product.
Before final assembly and positioning of the bathtub, please, fill the bathtub with water to
check for leaks. Test all the functions.
The bathtub/shower must be accessible from all sides for repairs. The costs of disassembling
and reinstalling firmly inserted bathtubs are not taken over by the company Home Deluxe
GmbH. If the bathtub is not accessible from all sides, no repair or replacement is possible.
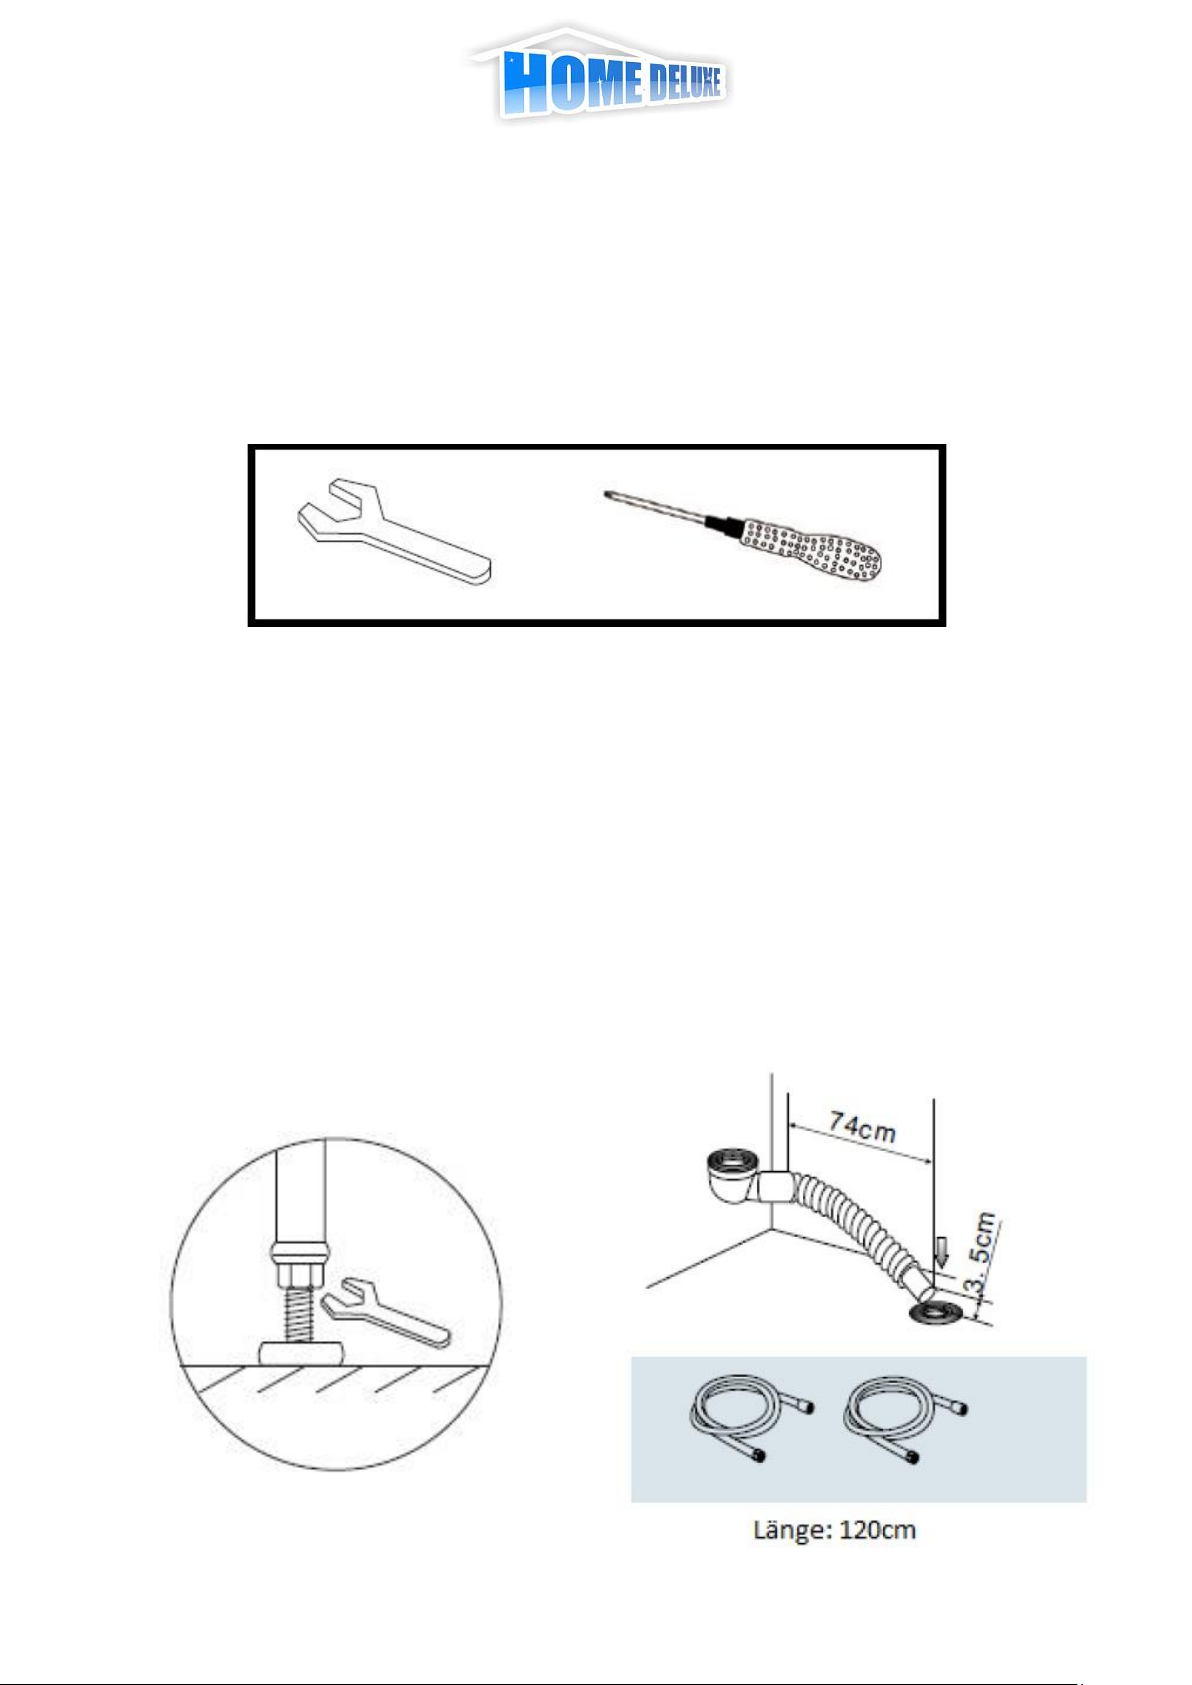
2. Technical drawings


IMPORTANT
The installation work should be carried out only by skilled
personnel!
3. Assembly and Installation
For the assembly/installation, we recommend the following tools:
Furthermore, we recommend carrying out the assembly with the assistance of a second person.
Before installing use the adjustable feet to align the tub horizontally.Check the alignment
with a water level. Use the supplied screws to firmly fix the tub. It is useful to isolate both the
tub feet and the lateral panels' edges of the bathtub with sound isolation strips.
Note: Make sure that all feet have firm contact with the ground.
Install the faucet with a wrench.
You should use flexible hoses to connect the tub.
Connect the drain tube to the drainage outlet of the bathtub.
Check the connection for tightness with a little water.
Connect the hot and cold water connection.
Before final installation, you should fill the tub with water and test all the functions.

3.1 Water connection
The water connections of the tub are all pre-installed, so you can easily and properly
install the hot and cold water connections. You need enough space to be able to
connect properly the hoses.
3.2 Drain connection
The drain connection is made with a 40mm HT flexible hose.
Use a sufficiently long hose to do the connection to the bathtub outlet.
4. Electrical Installation
The main connections should only be carried out by or under the supervision of a qualified electrician.
The bathtub needs a normal 220-240V outlet for the whirlpool function. The connector is protected by
a FI switch and works with 50/60 Hz. Note: If work is performed on the plumbing system, the
bathtub must be disconnected from the water supply and from the electrical grid (voltage switch off).
It is important to electrically ground the bathtub to prevent any electric leakage.
For the grounding, we recommend a 2.5 mm² copper cable.
The ground wire should be connected to the bottom of the bathtub.
5. Operating instructions
5.1 First start
After the installation of the tub, you should check for cleanliness. The tub has a temperature sensor
(40°C +/- 5°C) up to the level above the highest nozzles to allow the filling of the tub and the
operation of the whirlpool system. When turned on, let the whirlpool system run for 10 minutes at
least. If the bathtub has a motor with speed regulation, you must select minimum/maximum speed at
least once during the test cycle. Without emptying the bathtub, switch off the whirlpool system, and
after a period of at least 10 minutes, check all pipes and connections for leaks.
Repeat the process after any adjustment of the installation for proper functioning or after the
replacement of any defective component.

6. Maintenance and servicing of the shower
Clean the tub and faucets with a mild detergent and a soft cloth.
Acetone or ammonia-based detergents and abrasive materials are not suitable.
Clean the bathtub drain regularly.
Make sure that the drainage, which is centrally located beneath the rear part of the tub, is
always open safe.
Regularly clean the rolling system and the framework guiding the sliding doors.
Check regularly for leaks the connectors and silicone joints.
Unclog body jets and air jets when necessary. (Caution: not during or shortly after usage
of the bathtub!)
Note: Tightness problems or possible fungus formation
in silicone joints are excluded from the guarantee!
7. Safety guidelines
Please thoroughly clean before the first use, test all functions, and familiarize yourself
with the correct usage of the bathtub (danger of scalding).
While using the bath tub, don't press the power button to avoid the risk of scalding due to
non-activation of the automatic water flow.
Don't bring any electrical appliances into the bathtub/shower.
Children should not use the bathtub/shower unattended, unless they are sufficiently
familiar with the hazards and the proper use of the bathtub.
People with circulation problems, asthma, heart disease etc., should refrain from using the
bathtub.
This manual suits for next models
1
Table of contents
Popular Bathtub manuals by other brands

DURAVIT
DURAVIT Cape Cod 700362 Mounting instructions

Novellini
Novellini Calypso Eco Installation, use and maintenance manual

American Standard
American Standard Colony Oval 1742 Series installation instructions

Acquabella
Acquabella AKRON Maintenance and installation guide

glass 1989
glass 1989 elle combi 180/75 manual

American Standard
American Standard Heritage 6' Whirlpool 2806.018WC Specifications