manuals.online logo
Brands
  1. Home
  2. •
  3. Brands
  4. •
  5. Home Fires
  6. •
  7. Indoor Fireplace
  8. •
  9. Home Fires REAL FLAME User manual

Home Fires REAL FLAME User manual

O W N E R S M A N U A L
Installation & Operating Instructions
For REAL FLAME®Gas Coal And Gas Log Fires Using Natural Gas and Automatic Ignition
Please read these instructions carefully before you begin to install this gas coal/log set.
NOTE: Installer should leave these instructions with the customer for future reference.
This fireplace gas coal/log set is for use with NATURAL GAS ONLY.
Installation and all repairs must be performed by an individual who is experienced in the installation, repair,
and servicing of vented gas coal/log sets.
WA R N I N G
FOR INSTALLATION IN A VENTED FIREPLACE ONLY.
THE FIREPLACE CHIMNEY MUST HAVE A PERMANENT VENT OPENING TO ATMOSPHERE.
KEEP DAMPER WIDE OPEN WHEN IN USE.
Do not burn wood or other material in any fireplace fitted with a gas coal/log set.
A fireguard should be used with this appliance for the protection of children and the elderly.
F O R Y O U R S A F E T Y
DO NOT STORE OR USE GASOLINE OR OTHER FLAMMABLE LIQUIDS
IN THE VICINITY OF THIS OR ANY OTHER APPLIANCE.
Young children are not allowed to operate this unit, and should be supervised
when they are in the same room with the appliance.
Do not use this appliance or any part that has been under water.
F O R Y O U R S A F E T Y
WHAT TO DO IF YOU SMELL GAS:
• Open Windows
•Do not try to light any appliances
•Do not touch any electrical switch; do not use any phone in your building
•Immediately call your gas supplier from a neighbor’s phone
• Follow the gas supplier’s instructions
If you cannot reach your gas supplier, call the fire department.
GENERAL INFORMATION
1. This gas coal/log set is only to be installed and
used in a fully vented fireplace with a completely
functional damper and chimney that is free of any
obstructions. The fireplace must be constructed
of non-combustible materials and approved to
burn wood.
2. To operate this gas coal/log set, the flue damper
must be fully opened and locked.
3. To be installed in a fireplace with a minimum
height of 20", a minimum depth of 12" and a min-
imum width of 3 inches greater than the maximum
width of the firegrate being installed. The flue size
and height must be related to the size of the fire-
place opening. For example, a big fireplace needs
a tall wide flue. This gas coal/log set will normally
require a chimney flue of at least 8 inches in diam-
eter to clear its fumes. If in doubt consult your
supplier. Do not use if fumes from the burner
emerge into the room when the damper is fully
open. This indicates that there is not adequate
draft. Do not use until the problem is corrected.
4. If the fireplace has glass doors, operate the set
with the doors fully opened. A fireplace screen,
with an opening for introduction of combustion air,
should be used when operating this appliance.
5. The nominal inlet gas pressure for this appliance
is 7" water column for natural gas.
6. This gas appliance and its individual shutoff valve
must be disconnected from the gas supply piping
system during any pressure testing at pressures in
excess of 1/2 PSIG.
7. Do not move or jostle the grate once it has been
connected to the gas line.
8. The National Health and Safety Board recommend
1CO (carbon monoxide) detector for each floor.
9. The installation of the appliance and the provisions
for combustion and ventilation air must conform
with NFPA 54 unless otherwise noted in local build-
ing and safety codes.
10. The minimum permanent free fireplace opening
required is 70 square inches.
FIREPLACE PREPARATION
A. Remove all ash and debris from the inside of the
fireplace.
B. Prior to connecting the gas coal/log set, make sure
the gas supply is completely shut off.
C. Prior to installation, a smoke test should be per-
formed using a smoke pellet. The pellet is ignited
at the base of the flue in the fireplace opening. All
the smoke created must be emitted at the
termination of the flue without spillage
from the fireplace opening or without leak-
age from the flue in other parts of the build-
ing. If spillage is taking place then either:
•the flue is partially blocked
• the fireplace opening is too great for
the height of the flue
•the flue diameter is too narrow for the
size of the fireplace opening
INSTALLATION INSTRUCTIONS
Firegrate & Burner Pan Placement
A. The firegrate should sit in the center back of the
fireplace.
B.
The burner sits in the bottom of the firegrate with the
control knob facing the Front (see drawing).
The pan is locked into the firegrate using the fixing
clips found in the box with the coals. The purpose of
the fixing clips is to prevent the burner from moving
when the USER operates the control knob. Simply
tighten the bolts so that they push against the fire-
grate and lock the burner pan into position.
Check the ignition electrode spark by pushing in
and turning the valve knob counter-clockwise until
Heat refractory coals
Typical grate
Ember material
High silica sand
Pilot
Control knob
Flame failure valve
there is a definite click. Check that a spark is produced
between the pilot burner and the piezo electrode.
Connecting gas supply to Burner Pan
The 3/8" gas tubing will enter from the back of the
fireplace and should be fitted inconspicuously at
the back of the hearth. It should then be run up and
connected to the inlet side of the flame failure valve
beneath the firegrate. Use tape, not pipe dope, to
seal the 3/8" flare connection. Visible gas piping
should be painted black.
Testing, Sand, Ember, and Coal Placement
A. Fill the burner to the top edge with the high silica
sand supplied. Overfill rather than underfill.
B. Igniting the PILOT manually. Apply a lit match
to the pilot burner head while pressing in and
turning the knob counter clockwise to the ignition
position. The pilot burner should light.
Continue to depress the valve knob for another 15-
20 seconds. When you release the knob, the pilot
should remain lit
C. Igniting the PILOT by spark generator. From
the OFF position, push the valve knob in and turn
counter clockwise. You should feel a click. A
“spark” will be produced and the pilot should light.
The knob will be in the ignition position.
Continue to depress the valve knob for another 15-
20 seconds. When you release the knob, the pilot
should remain lit.
If the pilot goes out, repeat the above steps.
Once the pilot is lit, rotate the knob from the
to the large position (full counter clockwise) to
supply full flow to the main burner. An even
distribution of flame should be seen on the sand
bed. If it is not evenly distributed, turn off the
burner and adjust the depth of sand bed—less
sand for more flame and more sand for less flame.
These controls are factory preset and will not nor -
mally require additional adjustment of the pilot
flame. If field adjustment of the pilot is required,
turn the adjusting screw clockwise to reduce flame,
or counterclockwise to increase flame.
D. Lay the black ember material supplied along the
front edge of the fire. This gives the flickering
effect. Break the tan ember material into smaller
pieces and place it evenly over the rest of the sand
bed, particularly piling toward the center.
E. If you have a log fire, place the logs in any pleas-
ing arrangement, but stack them loosely with air
spaces between the logs. For a coal fire, stack the
coals as loosely as possible.
Spillage Test:
Test for spillage of fumes into the room with a
smoke match*. The smoke match should be
moved slowly along the top of the fireplace open-
ing just inside the fireplace. If the smoke is drawn
into the fireplace then draft is correct. If smoke can
PILOT ASSEMBLY CONTROL VALVE
be seen coming into the room the fireplace is spilling.
Disconnect the appliance and correct the flue system.
(See enclosed spillage test diagram.)
*Smoke matches and pellets are also available from
HomeFires.
Warning:
Improper installation may cause Carbon Monoxide
Poisoning. Carbon Monoxide, which is an odorless
and colorless gas, is a by-product of combustion.
Caution must be taken to insure the fireplace is
properly vented when set is in use. To avoid having
potentially dangerous fumes enter the living area,
be sure the chimney is drawing properly.
OPERATING INSTRUCTIONS
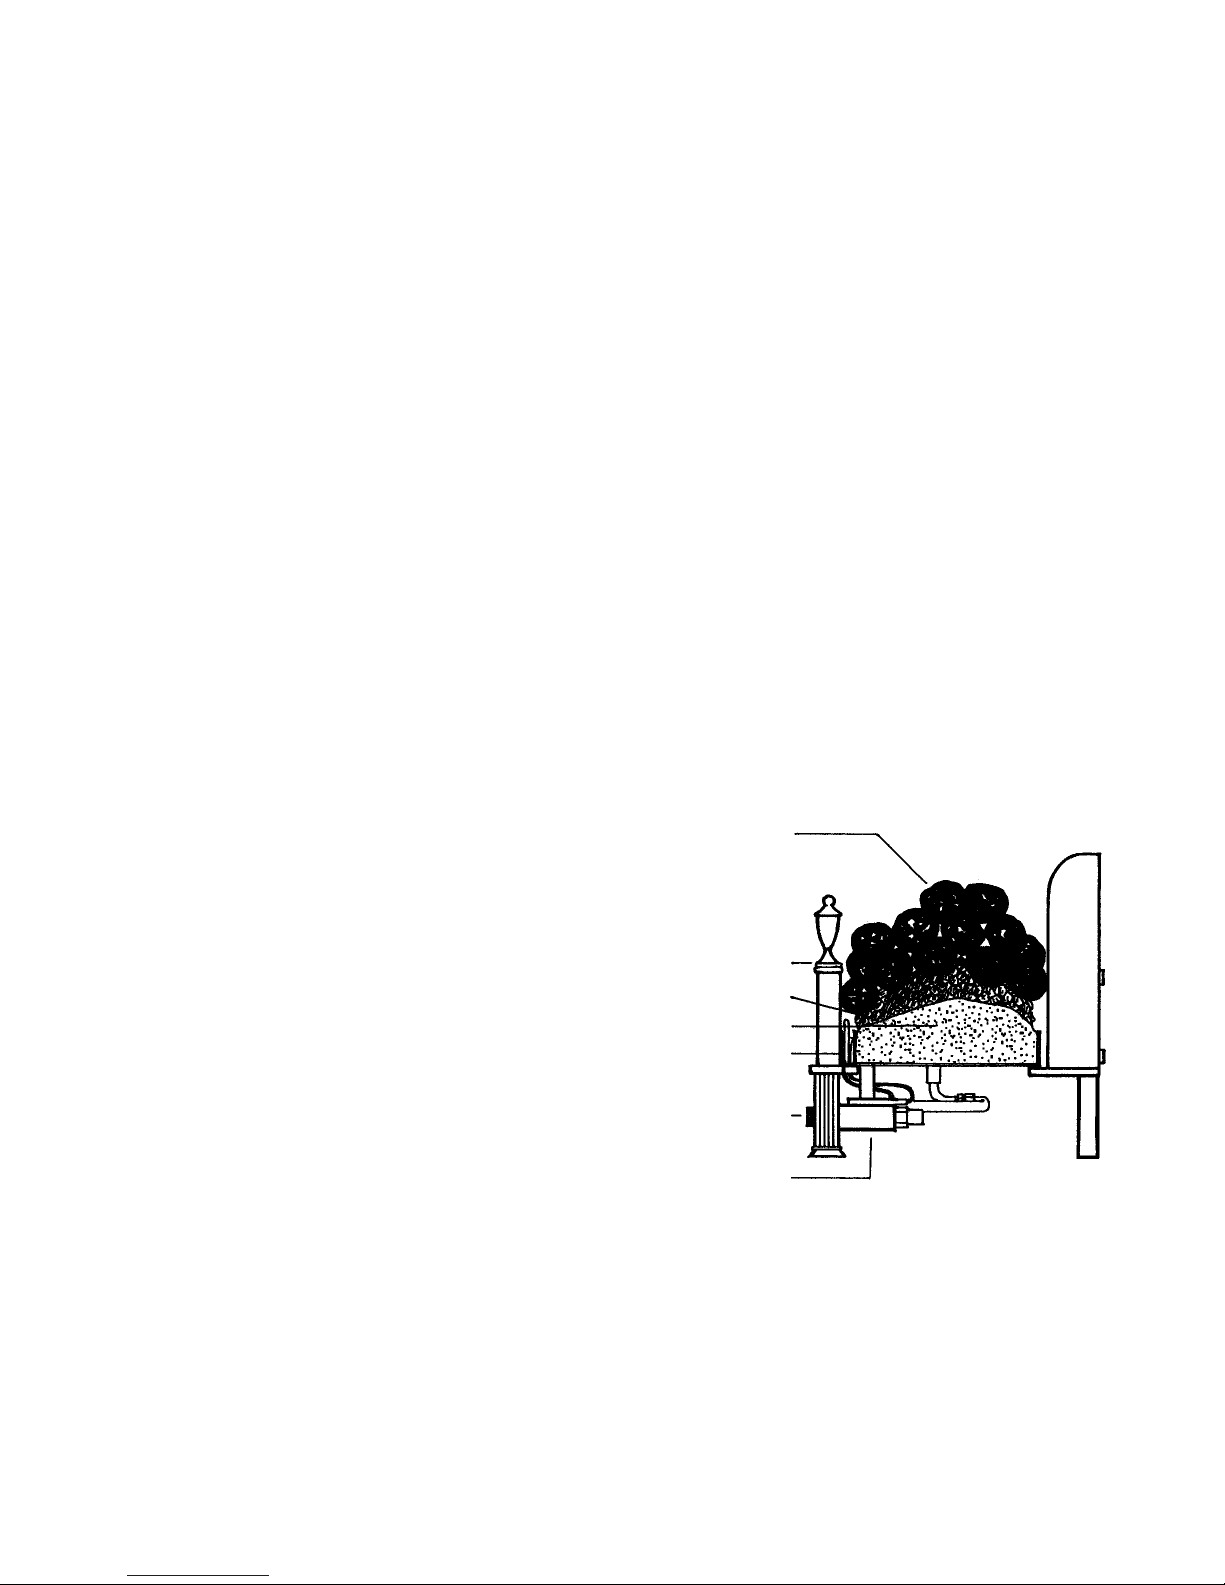
Lighting your gas coal/log set
(Automatic Valve only)
A. Open chimney flue damper to the full open position
and lock it.
B. Be sure gas control knob is to OFF position
(it may be necessary to depress the knob slightly
at the PILOT position).
C.
If there is a floor key or manual gas cock in or around
the hearth turn it to the full open position.
D.
Push the valve knob in and turn counter clockwise.
You should hear and feel a click, a “spark” will be pro-
duced and the pilot should light. Continue to depress
the valve knob for another 15-20 seconds. When you
release the knob, the pilot should remain lit.
E. After igniting the pilot, turn the valve knob counter
clockwise to the high setting. The main burner will
light and the pilot will remain lit. You may now con-
trol the flame level of the fire by turning the control
knob from full to low without depressing the knob.
F.
To leave just the
PILOT
on, push the valve in and turn
clockwise from the low setting to the pilot setting. the
main burner will go out, but the pilot will remain lit.
G. To turn the appliance completely off, push in the
valve knob and turn clockwise in the OFF position.
The burner and the pilot will extinguish completely.
MAINTENANCE
Very little if any maintenance is required. The car-
bon deposits resulting from use is natural and adds
to the realistic appearance of the set. If carbon
becomes excessive it can be lightly brushed away.
It is most important that you have your fire serviced
once a year. This is to insure that combustion
remains correct and that your flue remains clear
and unobstructed so that no dangerous fumes can
spill into your room.
GUARANTEE/WARRANTY
These logs and coals are guaranteed against
breakage in normal use for their replacement for a
period of two years from the date of purchase. All
other components are guaranteed against defects
in material and workmanship for a period of one
year from date of purchase. This excludes varia -
tions in color which occur naturally from heat
impingement. Claims under this guarantee should
be accompanied by the original purchase invoice.
This warranty does not apply in the case of
improper installation, neglect, accident, misuse or
as a result of modifications of the original product.
All costs for removal and reinstallation are the
expressed responsibility of the purchaser. Failure
to follow all instructions in the Owner’s Manual will
also void this warranty.
Real Flame®and S.C.S. Incorporated will not be
liable for incidental or consequential damages.
If this item fails due to defect in material or crafts -
manship, we will replace or repair, at our option,
free of charge. To order parts or obtain warranty
service, call or write:
SCS Incorporated
PO Box 11313
Charlotte, NC 28220
Phone: 1-800-749-4049
Fax: (704) 376-0268
www.homefiresusa.com
email: info@homefiresusa.com
America’s Exclusive Distributor of Real Flame®Products
Certified by RADCO
Listing # 1281
Listing complies with

Other Home Fires Indoor Fireplace manuals

Home Fires REAL FLAME User manual

Home Fires

Home Fires REAL FLAME User manual

Home Fires HF-C700 Specification sheet

Home Fires

Home Fires HF-C700 Specification sheet

Popular Indoor Fireplace manuals by other brands

Lennox MLDVTCD-35NM Care and operation instructions

Lennox

Lennox MLDVTCD-35NM Care and operation instructions

Duraflame 23IRM7491 manual

Duraflame

Duraflame 23IRM7491 manual

Twin-Star International Bell'O 26MM2632 manual

Twin-Star International

Twin-Star International Bell'O 26MM2632 manual

Valcourt FP12 Mundo Quick install guide

Valcourt

Valcourt FP12 Mundo Quick install guide

Dru Metro 100XT user manual

Dru

Dru Metro 100XT user manual

SGS EF23T user manual

SGS

SGS EF23T user manual

Dimplex BF33STP Service manual

Dimplex

Dimplex BF33STP Service manual

Qlima FFW 1036 operating manual

Qlima

Qlima FFW 1036 operating manual

Qlima FFB 105 user manual

Qlima

Qlima FFB 105 user manual

climacity Pur Line Inox Clasic Series manual

climacity

climacity Pur Line Inox Clasic Series manual

Tulikivi VAALA operating manual

Tulikivi

Tulikivi VAALA operating manual

Nibe Contura C51L instructions

Nibe

Nibe Contura C51L instructions

chazelles HP530 Instructions for installation and use

chazelles

chazelles HP530 Instructions for installation and use

Montigo Homefire ME34-DV-2 Installation & operation manual

Montigo

Montigo Homefire ME34-DV-2 Installation & operation manual

Wildfire RAVEL HE F-101 2 Series instructions

Wildfire

Wildfire RAVEL HE F-101 2 Series instructions

Ecoflam MAX GAS 350 PAB manual

Ecoflam

Ecoflam MAX GAS 350 PAB manual

Dimplex X1B Black user manual

Dimplex

Dimplex X1B Black user manual

HWAM Carmen gas Installation and user manual

HWAM

HWAM Carmen gas Installation and user manual

manuals.online logo
manuals.online logoBrands
  • About & Mission
  • Contact us
  • Privacy Policy
  • Terms and Conditions

Copyright 2025 Manuals.Online. All Rights Reserved.