Homemaker XQB50-808GF User manual

READ ALL OF THE INSTRUCTIONS BEFORE USING THE WASHING MACHINE AND
KEEP THE INSTRUCTION MANUAL IN A SAFE PLACE FOR FUTURE REFERENCE.
FULLY AUTOMATIC WASHING MACHINE
Model: XQB50-808GF

Compliance Plate found on back of unit

Accessories
Parts and components
Level adjustment knob
(Please close the
tab after using)
Inlet hose
Lint filter
Pulsator
Power cord
Drain hose
(Hang up the drain
hose when washer works)
Adjustable foot
Inner tub
Control panel
Base
Detergent case
Softener dispenser
Noise and mice-proof
plate
(It is inserted into
the base to reduce
noise and keep the
mice away.)
SOAK
WASH
RINSE
SPIN
NORMAL
STRONG
SPEED
GENTLE
WASH
TEMP
WATER
LEVEL
PROGRAM
POWER
START
PAUSE
FUNCTION
Rated voltage
Rated input power
Rated wash and spin
capacity
Dimension
Specifications
Rated frequency
Rated water volume
(high water level )
230-240V~ 50Hz
350W 35L
Net weigh
5.0kg
545mmX550mmX860mm
32kg
2PC 1PC
(2set screws)
Inlet hose Noise and mice-proof plate

Wash temperature select button
Press the button to select wash temperture.
6Start/Pause button
Press the button once to start program, press the
button once again to pause it .
5
Power switch button
Press power switch button to start
operating, When you press the button to "OFF"
you have to wait for 3 seconds or more to press to
The power will be automatically
switch off after 10 minutes without any operating.
10
Displays the preset time, and trouble code .Shows
the remaining time of each wash cycle when the
machine is working.
Digital indicator
1
Water level indicator
Indicate the water level you choose.
2
Control panel
Program indicator
Indicate the program you choose.
3
Function indicator
Indicate the function you choose.
4
Water level select button
Select the water level according to the wash
load.
7
Program select button
Press the button to choose program of fuzz
normal speedy gentle.
8
Function select button
You can choose the function of soak, wash,
rinse or spin with it.
9
1
2
4
5
3
Wash temperature indicator
Indicate the wash temperature you choose.
11

5cm
Install the washing machine on a stable and level surface, adjust the level
adjustment knob to level the washing machine.
1.Take out the noise-proof plate.
2.The entrance is in front of the
bottom part.
3.Insert the noise-proof plate
into the base.
4.Lay down the washing
machine on the back, fix the
plate with two screws.
Insert the noise-proof plate into the washing machine base
Keep the washing machine at
least 5cm away from the wall.
Installation instructions
Adjust the foot
In order to prevent vibration during wash
operation, you can level the washing machine
by adjusting the height of the adjustable foot
until the washing machine is stable on the floor,
and then fasten it. (The inclination of the washer
should not be more than 2 degrees)
Loosen Fasten
Level
adjustment knob

Installation instructions
Water Temperature
Cold :
Recommended cold water temperature is 10~23.8 .
Hot :
Recommended hot water temperature is 50~60 .
Warm:
Mixture of hot and cold water. (Warm water temperature is dependent upon the water
temperature and the pressure of both the hot and cold water supply lines.)
IMPORTANT:
Owner should turn off water supply whenever there will be an extended period of non-use.
Water Pressure
Do not operate the washer when the water pressure is lower than 0.05MPa or higher than
0.5MPa to avoid damage of the inlet system.
Water supply requirements
Change the direction of the drain hose
Unfasten the fixed screw of
the drain hose joint.
Lead out the drain hose from
the opening to the other side.
Fasten up the screw to fix
the drain hose.
Connection of the drain hose
0.7m~1.2m
Insert the end of the drain hose into the hook shelf, and hang
the drain hose over a drain outlet (bath tub, sink, etc.).
Note: The highest point of the drain hose must be in the
height of 0.7m~1.2m above floor level, otherwise, the
washer can not work normally.
Connection of the drain hose

Installation instructions
Connection of the inlet hose
Refer to Section on Water Supply Requirements before connecting water
inlet hoses.
Faucet:
The faucet must be with G3/4" standard screw
thread. If not , it is impossible to connect the
inlet hose properly.
I. About faucet
1. If you just have one water supply line (cold or hot water), connect the
inlet hose to the cold water connector in water mixing valve. (Do not
unscrew the lid of hot water connector in water mixing valve, otherwise
it will result in water leakage from the hot water valve during fill cycles.
IMPORTANT: At this situation you can not set wash temperature to
WARM/COLD or HOT/COLD.
II. About washing machine
Connect the other end of water inlet
hoses to the cold connector in water
mixing valve by turning the connecting
nut.
WATER
INLET HOSE
CONNECTING
NUT
COLD WATER
CONNECTOR LID OF HOT WATER
CONNECTOR
RUBBER RING SEAL
WARNING:
Do not twist the inlet hose.
If water leakage, check the nut whether it is
filled with sealed rubber ring.
Connection of faucet:
Put rubber ring seal into the nut at one
elbow of inlet hose and fasten it to the
faucet as shown in the illustration.
Installation and connection of the Inlet hose
RUBBER RING
SEAL
Note:
The washing machine is to be connected to the water mains using new
hose-sets supplied with the appliance are to be used and old hose-sets
should not be re-used.

1.5mm
No movements of hose
Inlet connecting nut must be tighten to a point where
there is only approximately 1.5mm gape of the thread
showing. In addition, the hose should not be loose when moved
from left to right.

Installation instructions
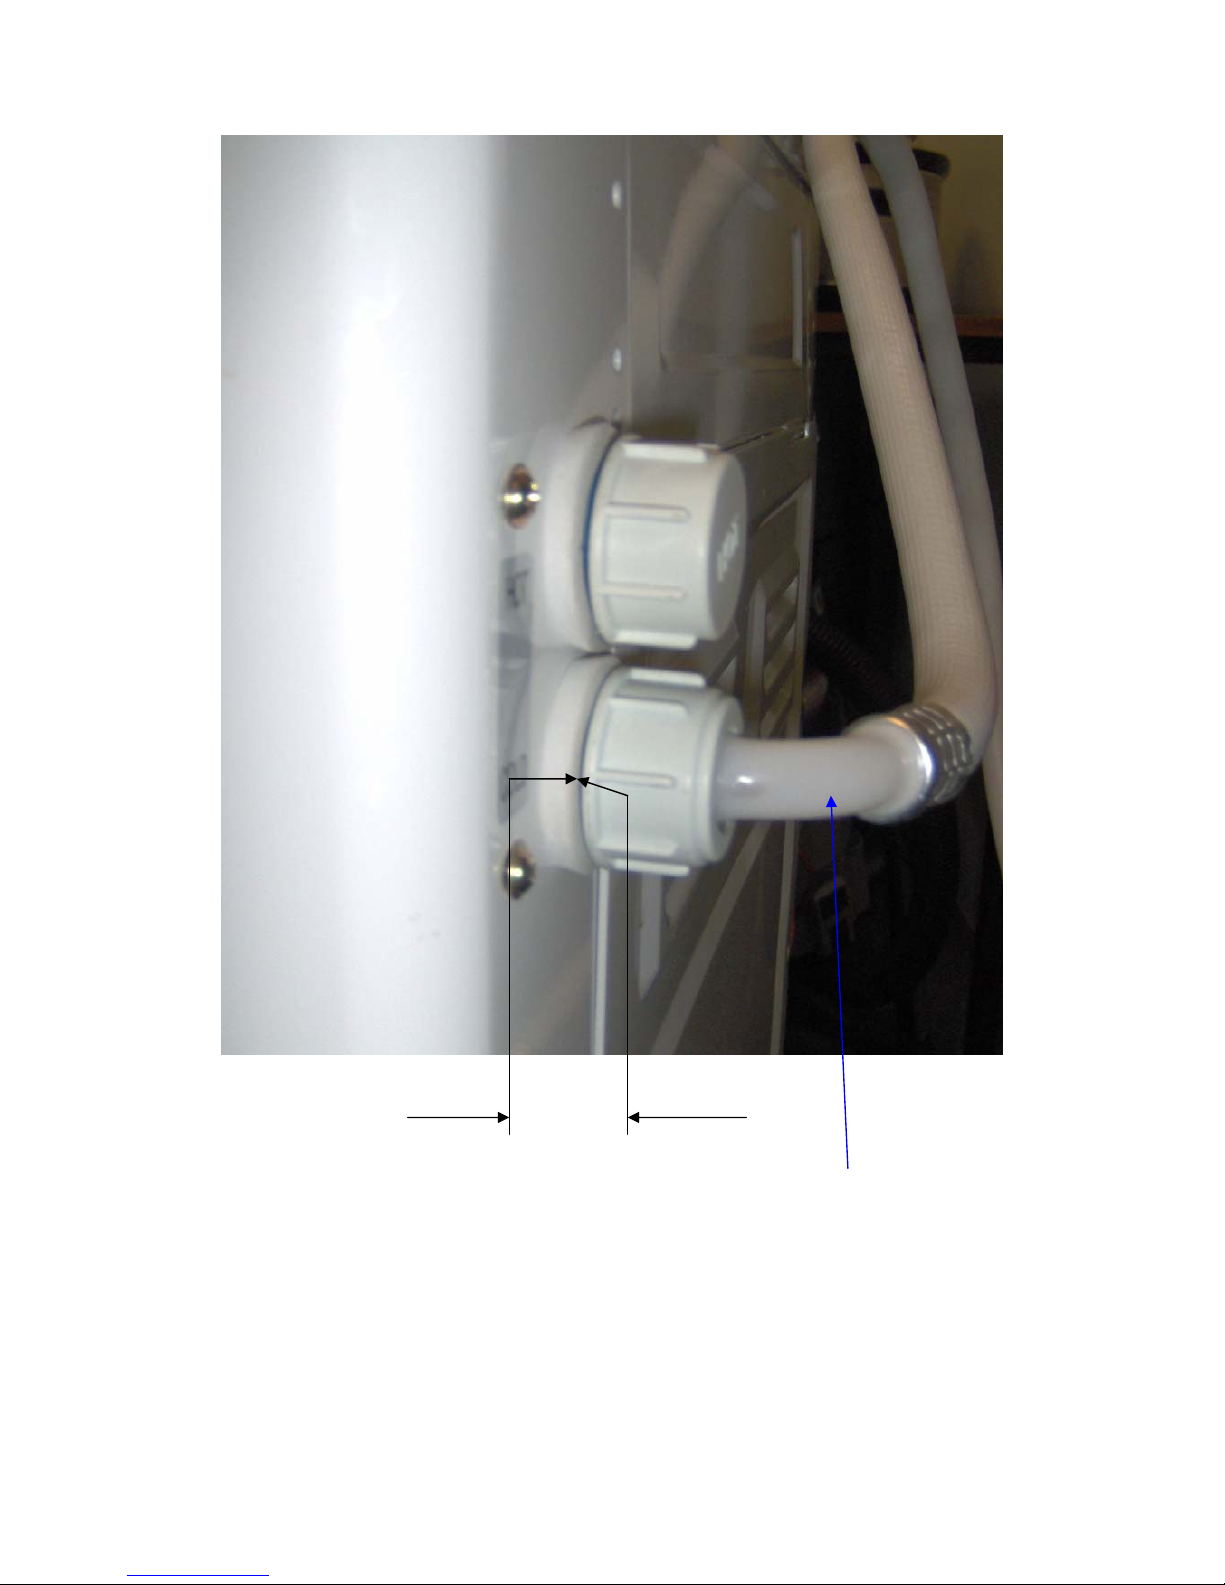
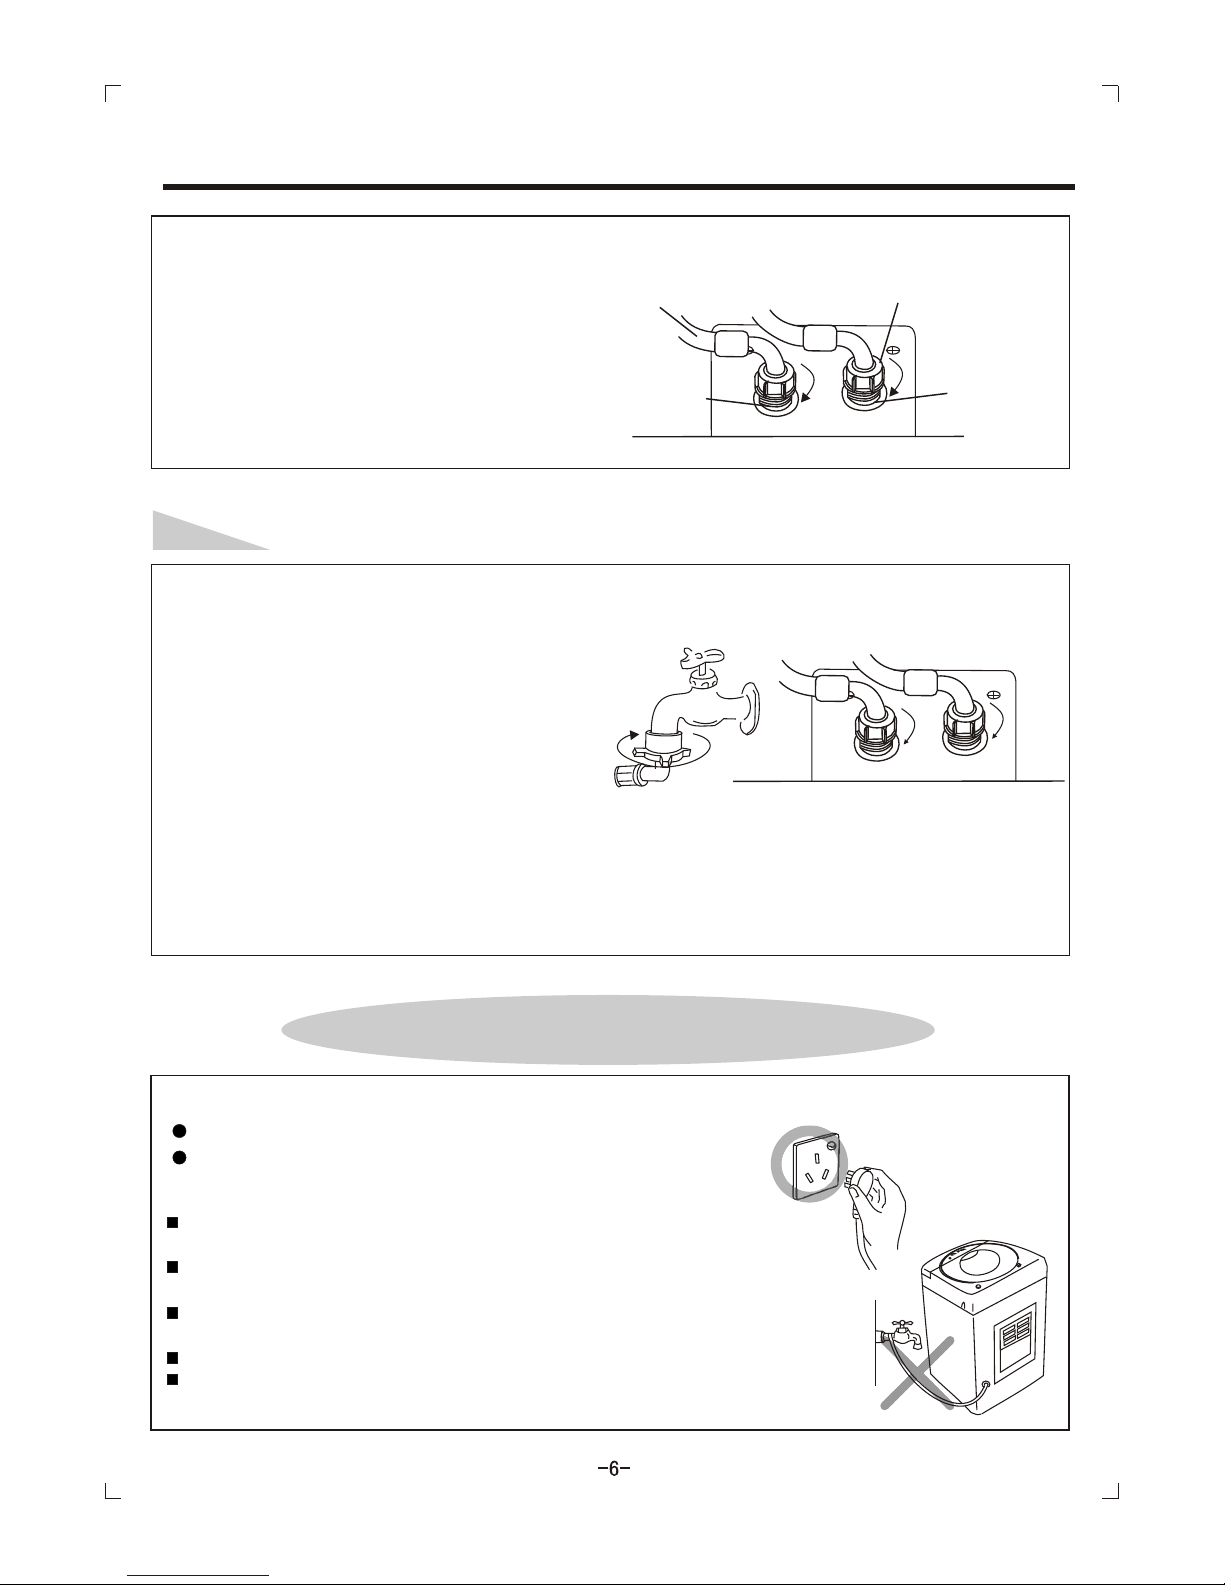
2. If you have both cold and hot water supplied, connect the inlet hose by
cold to cold and hot to hot.
Unscrew the lid of hot water connector
in water mixing valve, and then connect
the other end of water inlet hoses to the
connectors in water mixing valve by
turning the connecting nut.
WATER INLET HOSE CONNECTING NUT
COLD WATER
CONNECTOR
HOT WATER
CONNECTOR
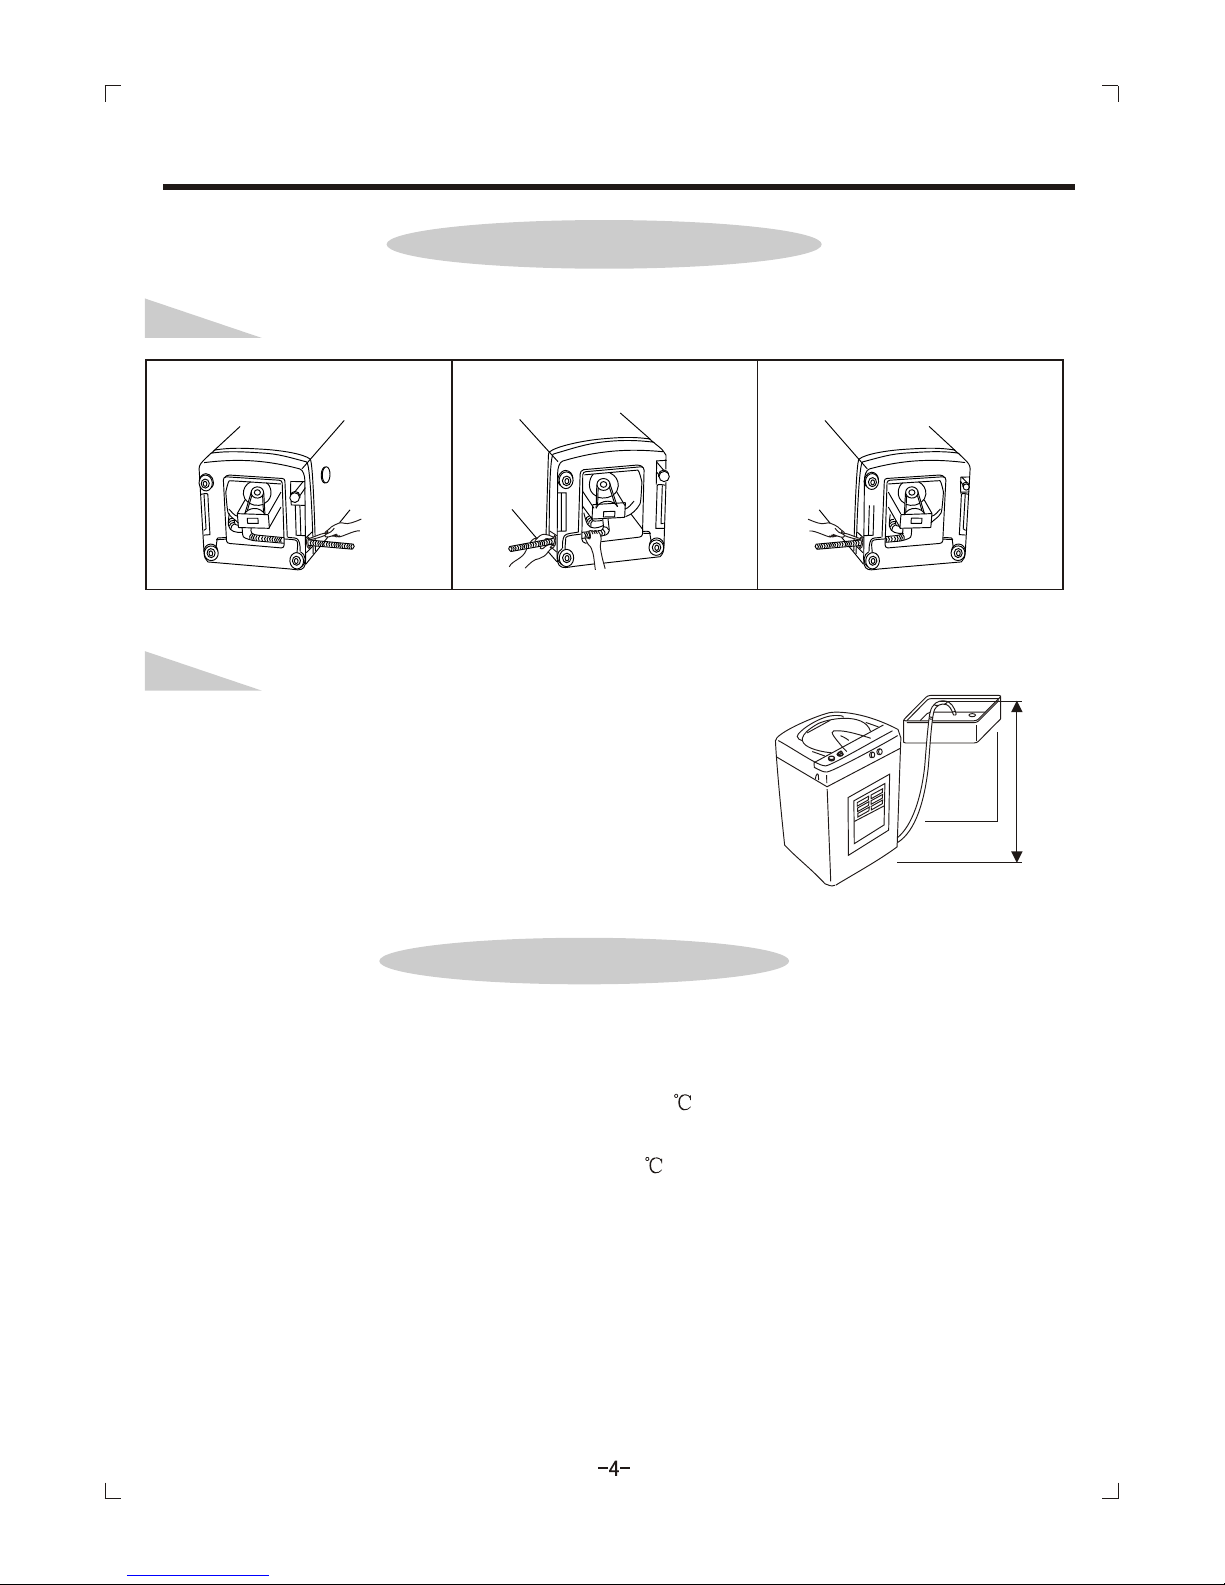
DISMANTLING THE INLET HOSE
Note:If the machine is used frequently, it is unnecessary to take off inlet
hoe to avoid damage to the nut at the elbow.
Dismantling the hose directly may cause water to splash since the water pressure is still high, even
after the faucet has been turn off, so please take off the hose according to the following.
steps:
1) Turn off the faucet.
2) Turn on the power and keep the machine in operation.
3) Turn off the power after approximately 5 seconds.
4) Loosen the nuts on both sides of inlet hose.
5) The washing machine is to be connected to the water
main using new hose-sets and old hose-sets should be not re-used.
Warning:
The socket should have assembled the 3A fuse.
Use three jacks socket, which can be connected ground wire.
Note:
The ground wire of the washing machine is set in the plug, don't try to
modify it.
The socket should have reliable ground wire. If no ground wire in socket,
please call the technician to assemble.
Never try to connect the ground wire of the washing machine together with
that of gas pipe or water pipe, telephone cord or lightening rod.
Do not use the damaged cord because it could cause electrical leakage and fire.
If the supply cord is damaged, it must be replaced by the manufacturer, its
service agent or similarly qualified persons in order to avoid a hazard.
Connection of the power cord

Operation instructions
Preparation
1.Connect the water inlet hose
to the water faucet.
4.Load clothes not exceeding
rated capacity.
5.fill suitable quantity of detergent
into the detergent case according
to the wash load.
6.Close wash lid completely.
(Otherwise it will not spin and
will give alarm)
2.Plug in the power cord.
Wiring Diagram
C-capacitance L-inductance IV-inlet valve Ms-drain water motor assembly
b-blue bl-black br-brown g-gray gr-green o-orange p-purple r-red w-white y-yellow
Ms
Microcomputer Programmer
bl/w
ywbl
water level
switch
safety switch
rr
r
motor
plug y/gr
b
y
y
b
r
b
b/w
br
br
br w
CL
br/w
bl
P
gr
bl
pump
g
(cold)
p
(hot)
g
w
w
p
w
3.Insert the end of the drain hose
into the hook shelf, and hang the
drain hose over a drain outlet
(bath tub, sink, etc.).
0.7m~1.2m
Note: The highest point of the drain hose must
be in the height of 0.7m~1.2m above floor level,
otherwise, the washer can not work normally.

Operation instructions
SOAK
WASH
RINSE
SPIN
wash rinse spin
SOAK
WASH
RINSE
SPIN
SOAK
WASH
RINSE
SPIN
SOAK
WASH
RINSE
SPIN
soak wash rinse
spin
wash rinse soak wash rinse
SOAK
WASH
RINSE
SPIN
wash only
SOAK
WASH
RINSE
SPIN
SOAK
WASH
RINSE
SPIN
SOAK
WASH
RINSE
SPIN
soak wash rinse spin spin only
Step one: Switch on the power supply.
Press the POWER button and the digital indicator will show .
Step three: Choose wash function.
Press the "FUNCTION" button to Choose the desired function and then the corresponding
indicator blink.
Step two: Choose wash program.
Press the "PROGRAM" button to Choose NORMAL STRONG SPEED or GENTLE
program(water current) according to the quality of the wash laundry and then the
corresponding indicator blink.
Step four: Choose the water temperature.
Press the WASH TEMP button to choose water temperature you need.
NOTE:
The washer will provide a cold rinse in all TEMPERATURE setting.
IMPORTANT:
A single hose system does not allow the washing machine to automatically (select)regulate
incoming water temperatures to match those listed on the control panel such WARM or HOT.
Step five: Choose the water level.
Press the WATER LEVEL button to choose appropriate water level according to wash
quantity and then the corresponding indicator blink.
It means that the washing machine will select the fuzzy program, if
you press down "START/PAUSE" button, the washing machine will
automatically running and then select the exact water level, wash
time, spin time and water current according to the quantity and
quality of the wash laundry itself.
(If you don't want to use the FUZZY program, follow next operation.)
The FUZZY program will run the soak program at first.
NOTE: The "SOAK" function is a default mode for all NORMAL, STRONG, SPEED and
GENTLE programs .If you do not want "SOAK" function please press off the button
of "SOAK".
(If you want to change the functions defaulted by the program, follow next operation.)

Operation instructions
Program
Program Soak
(min) (min) (min)
(cycle)
20
Normal
Strong 30
Wash Rinse Spin
Speed
Gentle
10
10
20
12
12
5
5
5
5
2.5
2
2
Washing program form
Microcomputer saves up 4 kinds of washing programs, pleas refer to the following washing
program form.
Regarding soak wash program, clothes will be actively soaked for 10-30 minutes , then begin
to work under normal wash program, so as to improve the clean ratio.
Note: 1.The total operating time may vary according to water volume, tolerance is permitted.
2.In case the unbalance of laundry trigger the safety switch into action when spinning, the
machine will automatically refill water to adjust the balance.
The power will be automatically switch off after finish washing.
Please close the wash lid completely.
Step six: Start the washing machine
Note:
If you want to change the program when the washing machine is running, you must
press the
The water level can be changed when the washing machine is running. If you change the
water level to the higher one when the washing machine is running, the washing machine
will stop running and fill water to match the level you choose at last and then begin
running again automatically.
"START/PAUSE" to hold at first.
Press "START/PAUSE" button, the washing machine will buzz and run automatically.
Please close the wash lid completely (otherwise, the machine will stop running
when it go to the spin program and give alarm.)
Fuzzy Select the exact time according to the quantity and quality
of the wash laundry itself.
2
1

Operation instructions
dosage of detergent
Draw out the detergent case.
11
22
33
Put detergent into the detergent case and
extent it evenly.
Normal dosage of detergent 1
2
3
Very low
Low
Middle
High
Water level dosage of detergent(g)
Slight dirty Dirty
10-16
12-19
14-22
18-24
20-32
24-38
27-43
35-47
dosage of softener
11Infuse softener into the bleach dispenser before program
starts, then it will run into the wash tub automatically during
the last rinse.
22Please dilute the concentrated softener with 3 volumes of
water.
33Please do not open the lid during spin cycle, otherwise the
softener will release ahead the time it should.
Very low
Low
Middle
High
Water level dosage of softener(ml)
Normal softener
14
21
27
34
5
7
9
12
Concentrated softener
Softener dispenser
Close the case, the detergent will be
automatically dissolved into water when the
washing machine begins to run.

Safety instructions
Never use water above 60 .
Do not let children to play
with the machine.
Never use the plug as shown. Do not only hold the cord
while pulling out the plug.
Do not put hands into the
rotating tub.
Do not expose washing
machine to direct sunlight or
rain.
Do not place the washing
machine in a damp place
and do not pour water onto
the control panel.
70C
Keep the washing machine
away from fire or heat.
Do not clean the body of washer
with volatile solvent such as
petrol and methane. Also, do
not pour these solvents into the
tub for washing or drying
purposes.
0.5
0.80.2
Make sure the lid is closed
especially during spin.
The highest point of the drain
hose must be in the height of
0.7m~1.2m above floor level.
Do not switch on when the
water pressure isn't within
0.05MPa--0.5MPa, so as to
protect the inlet valve.

Maintenance instructions
Clean the filter in the inlet valve regularly in order to prevent it from clogging
1.Unplug the power cord first.
2.Take off the inlet hose and clean the filter with a brush.
Clean the lint filter
1.Pull upward to remove the
lint filter.
2.Clean and rinse it thoroughly. 3.Reinstall
Body Maintenance
Note:
Clean the surface of the washing machine with a soft
cloth regularly.
Clean the filter in the inlet valve

Troubleshooting
Fail to drain
Spin
malfunction
Unable to turn
for Spin
Fail to fill
with water
Loose of the
water level
senseor
Drain time passed 10 min.
Washing machine will buzz
and display "E1".
Spin doesn't start after drain,
washing machine will buzz and
display "E2".
If there are 3 tub-crushes
during spin operation,
washing machine will buzz
and display "E3".
When water filling time
passes 20 min. It will buzz
and display "E4".
Troubles Checklist
Please open the lid when the machine buzz, and solve the problem according to the above tips, then close the lid,
the machine may work again.
Please call the technician to check if the
water level sensor is danger or loosen.
Is the lid open?
Does the wash load
lay in one side?
Is the machine
installed on a
stable surface?
Please call the technician to check if
the safety switch is damaged or
not.
Please call the technician
to check if the safety
switch is damaged or not.
Please call the technician
to check if the inlet valve
is damaged or not.
Is the tap closed?
Is the water supply cut?
Is the water flow too
small?
Is the filter in the tap
connected or inlet
valve blocked?
Is the drain frozen or blocked?
Is drain hose placed properly from
0.7m to 1.2m above floor level?
0.7m~1.2m

If this appliance is supplied with a cord extension set or and electrical
portable outlet device, the cord extension set or electrical portable device
must be positioned so that it is not subject to splashing or ingress or
moisture.
The appliance is not intended for use by young children or infirm persons
without supervision.
Young children should be supervised to ensure that they do not play with
the appliance.
The power supply cord must be unplugged after use.
Please use low foam powdered laundry detergent.
CAUTION:
N15151
Table of contents
Other Homemaker Washer manuals
Popular Washer manuals by other brands

Electrolux
Electrolux EWF 1045 Instruction booklet

Alliance Laundry Systems
Alliance Laundry Systems 802734R6 Installation & operation

Bosch
Bosch WFMC2201UC - Nexxt 300 Series Washer Operating, care and installation instructions

BOMANN
BOMANN WTK 5020 Instruction manual and user handbook

AEG
AEG LAVAMAT 2045 operating instructions

GE
GE GE Profile WCCB1030J Dimensions and installation information