HOMEVIZ G1 User manual

USER MANUAL
HOMEVIZ Robotic Vacuum Cleaner G1
V1.0

CONTENTS
WHAT'S IN THE BOX
PRODUCT INTRODUCTION
INSTALLATION INSTRUCTIONS
OPERATION INSTRUCTIONS
DAILY CARE
BASIC PARAMETERS
TROUBLESHOOTING
COMMON PROBLEMS
SPECIAL PROMPTS
SERVICE RESTRICTION
CONTACT US
01
02
05
09
16
22
23
24
25
25
28

WHAT'S IN THE BOX
Quick Start Guide
HOMEVIZRobotic Vacuum Cleaner G1
V1.0
Main Device *1 Charging Base *1 Water Tank *1
Adapter *1 Side Brush *2
Rag Holder Board *1 Aroma Stick *2
Rag *2
Before using the product, please check whether the package contains the
following items, if there is any loss, please contact customer service.
Quick Start Guide *1
1
EN

PRODUCT INTRODUCTION
1
1
2
3
4
4
3
4
2
3
4
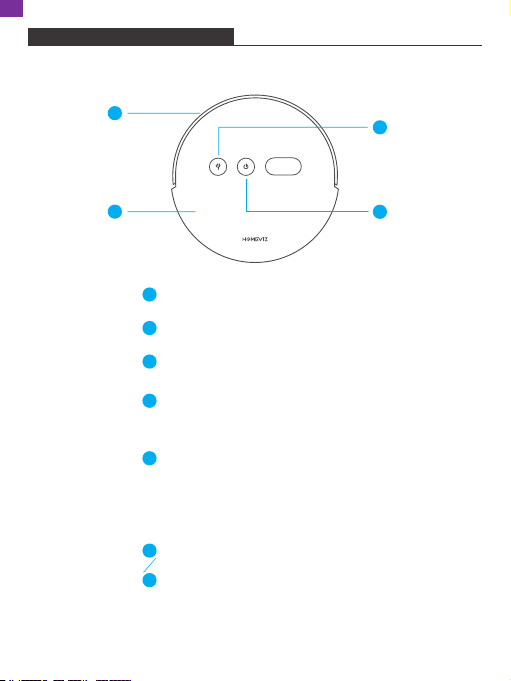
Auto-recharge Button
Short Press: start the auto-recharge.
Power on, off/Whole House Cleaning
Short Press: Start/Stop Cleaning
Long Press: hold for 3 seconds for power on/off
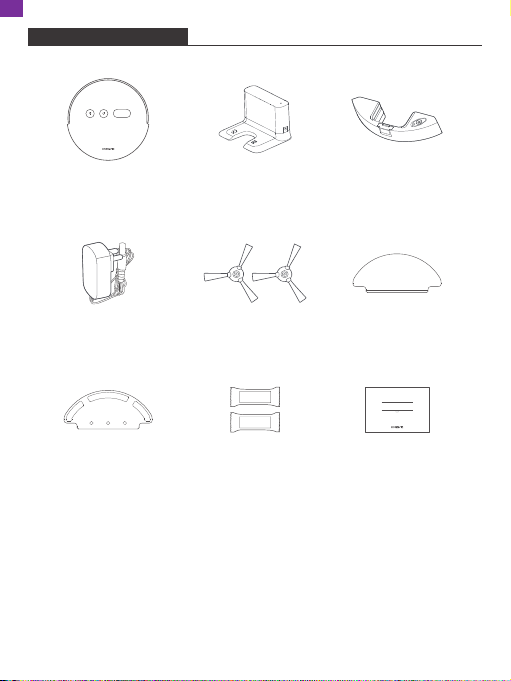
· Main Device
Front Bumper
Top Cover
Power Indicator Lamp Color
Steady white light: works normally
White light blinking: enter the network configuration mode
Yellow light blinking: recharging/low battery
Yellow light breathing: charging
Red light blinking: error state
Network Configuration
In the power-on state, press and hold “Smart
Recharge”+”Power on/off” at the same time
for 3 seconds to enter the network
configuration.
2
EN

7
9
5
1
2
5
4
6
8
· Dust Bin Components
1
2
3
4
5
Universal Wheel
Battery Cover
Rolling Brush
Water Tank
Cliff Sensor
6
7
8
9
Main Device
Charging Pole Piece
Side Brush
Driving Wheel
Rag
Dust Bin Handle
Dust Bin
Dust Bin Release Button
Dust Bin Cover Board
HEPA Component
3
EN

· Charging Base
· Water Tank Component
Charging Connector
Rag
Charging Indicator
DC Power Jacket
Water Tank Release Button
Water Tank Seal Cover
Rag Holder Board
4
EN

INSTALLATION INSTRUCTIONS
1. Set the Charging Base
Place the charging base on a flat surface against a wall.
Note: Ensure a space of at least 1.0 m/3.3 ft on both sides of the charging base, and
a space of at least 2.0 m/6.6 ft in front. Do not put the charging base near the objects
with strong reflective surfaces such as mirrors.
2. Power on and Charge
To charge, manually align the charging pole piece at the bottom of the device with
the terminal of the charging stand.
Charging Mode A:
Put the whole device on the charging base directly.
5
EN

Charging Mode B:
In the power-on mode, press the button on the device or click the App recharge
button, the machine will be auto-recharged.
Automatic Charging:
The device will start searching the charging base to charge automatically when it
completes cleaning or under low battery state. Keep the charging base in power-on
state, or the device may fail to find the charging base.
Note:
Hold and press the power button to turn off the device if not used for long term.
Charge the device as soon as possilbe when it runs out of power.
This product can only use the respective adapter and charging dock equipped with
the Homeviz.
replace.
6
EN

3. Install Water Tank
1) Add Water
water into the water tank and buckle the plug.
2) Rag Assembly
Put the pocket on one end of the rag into the rag holder board, and then stick the
rag to the magic sticker of the rag holder board.
7
EN

3) Rag Holder Board Assembly
Insert the rag holder board into the slot at both ends of the water tank according to
the figure.
4) Install Water Tank
Press the water tank release button and install the water tank into the main device.
8
EN

OPERATION INSTRUCTIONS
1. Power On/Off
① It will automatically turn on when the main device is on the charging base.
② It cannot be turned off when the main device is on the charging base.
③ Press and hold the POWER button to shut it down when the main device is
stationary, and a voice prompt will be given.
④ Press and hold the POWER button, the power indicator will light up, and the main
device will be turned on, and you will hear a voice prompt after the power-on is
completed.
3. Device Recharge
① When the main device finished cleaning, there will be a voice prompt “Cleaning
completed, enter the recharging mode”, and it will recharge automatically.
②When the power of the device is less than 20% during cleaning, the main device
will automatically recharge.
③ When the battery of the main device runs out and shuts down automatically, you
can manually put it on the charging base. Make sure that the charging connector
is in good contact.
2. Cleaning
①Press the POWER button in the power-on state, there will be a voice prompt
“Whole house cleaning starts”.
② Press the button in the power-on state, there will be a voice prompt “Enter
the recharging mode”.
③ Open the app and enter the device page, tap on the “Start cleaning” button to
start cleaning task, there will be a voice prompt “Whole house cleaning starts”.
④ Open the app and enter the device page, tap on the button to start recharging
task, there will be a voice prompt “Enter the recharging mode”.
Note:
The cleaning function cannot be activated when the battery is too low.
9
EN

4. Distribution Network and Firmware Upgrade
Scan the QR code on the device to download the app, and long press the button
and POWER button to enter the reset Wifi Internet work configuration mode device
will be turned on, and you will hear a voice prompt after the power-on is completed.
①Open the Tuya Smart app and tap "+" in the upper right corner or "Add Device".
②Choose "Add Manually" and "Small Home Appliances". Scroll down and choose
"Robot Vacuum (Wi-Fi)" in the "Clean" section.
OR
10
EN

③ Select a 2.4 GHz Wifi network and enter the password, then tap "Next".
④ Choose "AP Mode" in the upper right corner, then confirm that the indicator light
is blinking slowly.
11
EN

⑤ Connect your phone to the device's hotspot. The Wifi name starts with "SmartLife"
followed by "-xxxx".
xxxxx
12
EN

⑥After connecting, go back to the TuyaSmart app and wait for its response.
The device firmware can be directly inquired and upgraded through the app. Make
sure that the device is charged, and the battery level is not less than 30% when
upgrading. Please refer to instructions in the app for the upgrade steps.
Note:
① Follow the prompts in the app to configure the network once completed
download. After the main device is connected to the network, you can use the APP
to remotely start the cleaning and reservation functions.
Click the device that you added. In this interface, you can select different cleaning
modes and check the cleaning time and power consumption of the device. Tap
"More" and "Adhesion" to adjust the scale of the suction ability, and choose "Water
Control" to adjust the water tank level.
② The main device does not support 5G band Wi-Fi network currently.
13
EN

5. Pause
① Press the POWER button to pause the device, press again, cleaning continues.
② Press the stop cleaning button on the app to pause the device, and press start
cleaning button to continue.
6. Sleep Mode
If there is no operation for more than 3 minutes in the standby state, the main
device automatically enters sleep mode, and during sleep, it can be awakened by
pressing the buttons on the device or the app.
Note:
① The main device does not enter sleep mode when it is charged on the charging
base.
② It will automatically shut down when the power is less than 10% in sleep mode.
③ The main device will automatically shut down if there is no operation for 30
minutes.
7. Cleaning Preference
Choose Off, Quiet, Standard, Strong, and Max modes on the phone app, default is
standard mode.
8. State of Accident
During the motion of the main device, fault occurs, button light starts rapidly flashing
red, accompanied by a voice indication. Ways to solve emergency problems, see:
“Troubleshooting”.
Note:
The main device goes into sleep mode automatically if there is no operation for 3
minutes in the fault condition.
14
EN

9. Mopping Mode
Install the rag holder board on the main device, default is I-shaped cleaning and
mopping route.
The water output can be adjusted through the app, which are:
① Low mode;
② Middle mode;
③ High mode.
11. DND Mode
In Do Not Disturb mode, the main device will not respond to reservation cleaning
and actively broadcast voices. Do Not Disturb mode configured to 22:00 to 07:00 by
default. You can use the mobile APP to turn it off.
12. Reservation Cleaning
Use the mobile app to set the schedule cleaning time, and the unit will automatically
start cleaning at a selected time, and automatically return to base to recharge after
cleaning.
13. Spot Cleaning
The machine starts sweeping clockwise in a spiral manner from the starting point. Its
algorithm is cleaning zone 0.5m * 0.5m around the device. When the maximum
radius is reached, it returns to the starting point in a counterclockwise direction in a
spiral manner. When the spiral sweep encounters an obstacle, it turns back to the
starting point in a counterclockwise direction.
10. Add Water to the Water Tank or Wash Rag
If you need to add water or clean the rag to the main device during the cleaning
process, press the button first, and then remove the water tank after pausing.
After adding water or cleaning the rag, replace the water tank and the rag, and
press the button to continue working.
15
EN

DAILY CARE
1. Dust Bin
1) Remove the flip cover and lift the handle to take out the dust bin.
2) Press the dust bin button as shown in the figure, open the front cover, and
empty trash from the dust bin.
16
EN

3) Remove and change a filter grid, as illustrated.
4) Open the dust bin, rinse it and the cover.
Note:
Filter grid cannot be washed with water, please tap to remove the dust.
Note:
Hang up the dust bin, HEPA and filter components, keep them dry to ensure
the service life.
It is recommended to change filter grid every 3 months to ensure cleaning efficiency.
17
EN

2. Water Tank Components
1) Remove the rag and the rag holder board, rinse and hang up the rag.
2) Press the water tank release button to take out the components.
18
EN
Table of contents