Hommie CT-P10X User manual

Hommie
CT-P10X Kids Camera
>>Quick Guide
EN.......01/08
FR........09/16
IT.........17/24
ES........25/32
JP.........33/40

1
Thank you for purchasing the Hommie product.
Please read this [User Manual] carefully before
using the product, and retain it in for future use.
Important Tips for First Use.
1. Charge the camera after unpacking, then plug
in the TF card to take photos.
2. Enter into Settings to choose the
corresponding language after turning on the
camera.
Package Contents:
1. Camera*1
2. TF Card*1
3. Sticker*1
4. Lanyard*1
5. User Manual*1
6. Ejector Pin*1 (For inserting the loop of the
lanyard into the lanyard holes.)

2
Product Overview
Note:
1. Micro USB port for charging or data transfer.
2. Power button for turning on/off the camera;
1. Confirm/Camera
Button
2. Front Camera Lens
3. Power Button/Back
4. Mic
5. Up
6. Left/Time Lapse
7. Right/Lens Switch
8. Down
9. Screen Display
10. Micro USB port
12. TF Card Clot
13&14. Speaker
15. Rear Camera Lens

3
100% 75% 50% 25%
Back for returning to the previous page.
3. Confirm/Camera button. On the photo mode,
press it to take photo; On the main menu, press it
to confirm the option. On the videotaping mode,
press it to start recording video; press it again to
stop.
Introduction of Battery Indicator
Note: When charging the camera, red light near
the microphone is on. When fully charged, the light
is off.

4
Main Functions
♦Taking Photo
Press it to switch the photo mode and
frame; Hold it to shorten the focal length.
Press it to switch the photo mode and
frame; Hold it to lengthen focal length.
Press it to boot up the time lapse. Then the
screen display the icon of time lapse.
Press it to switch the lens.

5
♦ Videotaping
Press it to start or stop videotaping.
Press it to switch the lens.

6
♦ Album
On the video interface, press it to play
video; On the photo interface, press it to
set the photo as Startup Picture. If you
don’t want to use the photo as the
Startup Picture, just reset your camera to
the factory settings.
Press it to delete the current photo.
Press it to delete the whole photo album.
Press it to view the previous photo.

7
♦ Settings
Specifications
Image sensor
GC0308
Screen
2.0 in color screen
Lens
Fixed cameras, 100 degree
angle
Press it to view the next photo.
Find the icon on the main menu to set the
resolution, size of photos, the format of video,
time lapse, language, date time.

8
Storage
medium
Micro SD card, maximum
support 32 GB
Picture
Resolution
2M, 3M, 5M, 8M, 12M, 16M,
18M, 20M.
Video
resolution
VGA: 640*480;
720P: 720*1280;
1080P: 1440*1080.
Picture format
JPG
Battery
600mAh
Working
voltage
5V
Language
Chinese/English/Japanese/
Spanish/ Italian/French, etc.
Address: Building 5, Yuxing Science and
Technology Park, Nanchang Third Industrial Zone,
Nanchang Community, Xixiang Street, Bao'an
District, Shenzhen, China.
If any questions, please feel free to contact us:
hommiehk@hotmail.com.

9
Merci d'avoir acheté le produit Hommie.
Veuillez lire attentivement ce [Manuel de
l'utilisateur] avant d'utiliser le produit et le
conserver pour une utilisation ultérieure.
Conseils Importants pour La Première
Utilisation.
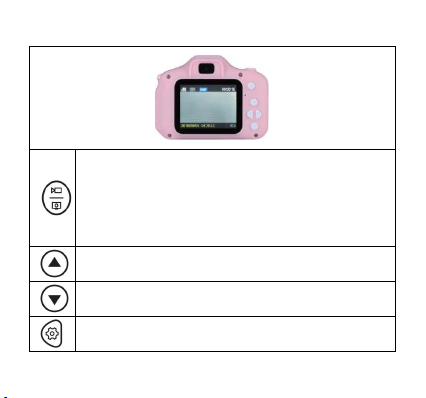
1. Chargez la caméra après le déballage, puis
insérez la carte TF pour prendre des photos.
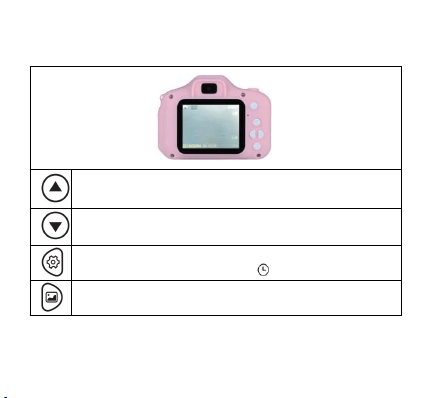
2. Entrez dans Paramètres pour choisir la
langue correspondante après avoir allumé la
caméra.
Contenu du colis:
1. Caméra*1
2. Carte TF*1
3. Autocollant*1
4. Cordon*1
5. Manuel de l’Utilisateur*1
6. Goupille d'éjection*1 (Pour insérer la boucle de
la lanière dans les trous de la lanière.)

10
1. Bouton Confirmation
/Caméra
2. Caméra Frontale
3. Bouton d'Alimentation
/Retour
4. Microphone
5. Séléction Haut
6. Gauche/Accélérée
7. Droite/Switch Caméra
8. Séléction Bas
9. Ecran d’Affichage
10. Port Micro USB
12. Slot pour Carte TF
13&14. Haut-parleur
15. Caméra Arrière
Présentation du Produit
Note:
1. Port Micro USB pour charger ou transférer des
données.

11
100% 75% 50% 25%
2. Bouton d'alimentation pour allumer/éteindre la
caméra; Bouton retour pour revenir à la page
précédente.
3. Bouton Confirmation/Caméra. En mode photo,
appuyez dessus pour prendre une photo; dans le
menu principal, appuyez dessus pour confirmer
l'option. En mode d'enregistrement vidéo,
appuyez dessus pour commencer à enregistrer
une vidéo ; appuyez à nouveau pour arrêter.
Introduction de l'Indicateur de Batterie
Note: Lorsque vous chargez la caméra, le voyant
rouge près du microphone est allumé. Lorsqu'il est
complètement chargé, le voyant est éteint.

12
Fonctions Principales
♦ Prendre une Photo
Appuyez dessus pour changer le mode
photo et le cadre; maintenez-le pour
raccourcir la distance focale.
Appuyez dessus pour changer le mode
photo et le cadre; maintenez-le pour
allonger la longueur focale.
Appuyez dessus pour démarrer
l’accélérée. Ensuite, l'écran affiche
l'icône accélérée.
Appuyez dessus pour changer l'objectif.

13
♦ Enregistrer une Vidéo
Appuyez dessus pour démarrer ou
arrêter l'enregistrement.
Appuyez dessus pour changer l'objectif.

14
♦ Album
Sur l'interface vidéo, appuyez dessus
pour lire la vidéo; sur l'interface photo,
appuyez dessus pour définir la photo
comme image de démarrage. Si vous ne
souhaitez pas utiliser la photo comme
image de démarrage, réinitialisez
simplement votre appareil photo aux
paramètres d'usine.
Appuyez dessus pour supprimer la photo
actuelle.
Appuyez dessus pour supprimer tout
l’album.

15
♦ Paramètre
Spécifications
Capteur
Photographique
GC0308
Appuyez dessus pour voir la photo
précédente.
Appuyez dessus pour voir la photo
suivante.
Recherchez l'icône dans le menu principal pour
définir la résolution, la taille des photos, le
format de la vidéo, l’accélérée, la langue, la
date et l'heure.

16
Écran
Écran Couleur 2,0 inch
Objectif
Caméras fixes, angle de
100 degrés
Support de
Stockage
Carte Micro SD, prise en
charge maximale de 32
Go
Résolution d'Image
2M, 3M, 5M, 8M, 12M,
16M, 18M, 20M.
Résolution Vidéo
VGA: 640*480;
720P: 720*1280;
1080P: 1440*1080.
Format d'Image
JPG
Batterie
600mAh
Voltage de Travail
5V
Langue
Chinois/Japonais/Espagn
ol/Italien/Allemand/
Français, etc.
S’il y a des problèmes, n’hésitez pas à nous
contacter: hommiehk@hotmail.com.

17
Grazie per aver acquistato il prodotto Hommie.
Leggere attentamente questo [Manuale d'uso]
prima di utilizzare il prodotto e conservarlo per
un uso futuro.
Suggerimenti importanti per il primo utilizzo.
1. Caricare la fotocamera dopo il disimballaggio,
quindi collegare la scheda TF per scattare foto.
2. Premere Settings per scegliere la lingua
corrispondente dopo aver acceso la fotocamera.
Contenuto del pacco
1. Camera*1
2. TF Scheda*1
3. Etichetta*1
4. cordoncino*1
5. Manuale utente*1
6. Perno espulsore*1 (per l'inserimento del
passante del cordino nei fori del cordino).

18
1. Confirma/Pulsante
Camera
2. CameraLente
Anteriore
3. Power/Indietro
4. Mic
5. Su
6. Sinistra/Lasso di tempo
7. Destra/Interruttore
dell'lente
8. Giù
9. Display Schermo
10. Micro USB port
12. TF Slot per schede
13&14. altoparlante
15. lente posteriore
Panoramica del Prodotto
Nota:
1. Porta micro USB per ricarica o trasferimento
dati.

19
100% 75% 50% 25%
2. Pulsante di accensione per accendere/
spegnere la fotocamera; Indietro per tornare alla
pagina precedente.
3. Pulsante Conferma/Videocamera. Nella
modalità foto, premilo per scattare una foto; Nel
menu principale, premilo per confermare l'opzione.
Nella modalità di registrazione video, premilo per
iniziare a registrare video; premerlo di nuovo per
interrompere.
Introduzione dell'indicatore della batteria
Nota: durante la ricarica della fotocamera, la luce
rossa vicino al microfono è accesa. Quando è
completamente carica, la luce è spenta.
Table of contents
Languages:
Other Hommie Digital Camera manuals