Homony HBA-5120A User manual

IR
POWER
Five Zone Management Amplifier
Installation and Operating Manual
EN
HBA-5120A
HBA-5240A

Table of Contents
…………………………………………………
…………………………………………………
……………………………………………
………………………………………………………
………………………………………………………………………
………………………………………
……………………………………………………………………………
………………………………………………………………………………
…………………………………………………
………………………………………………………………………
………………………………………………………………
………………………………………………………………
………………………………………………………………
2
3
4
4
4
1. IMPORTANT SAFEGUARDS
2. HANDLING PRECAUTIONS
3. INSTALLATION PRECAUTIONS
4. GENERAL DESCRIPTION
5. FEATURES
6.NOMENCLATURE AND FUNCTIONS
FRONT
REAR
5
6
4
7. SYESTEM CONFIGURATION 8
8. APPENDIX 8
13
16
17
9 Microphone.
10 Remote Control.
11 System Diagram .
12 Specification .
13 System Diagram .
………………………………………………………………
………………………………………………………………
18
19

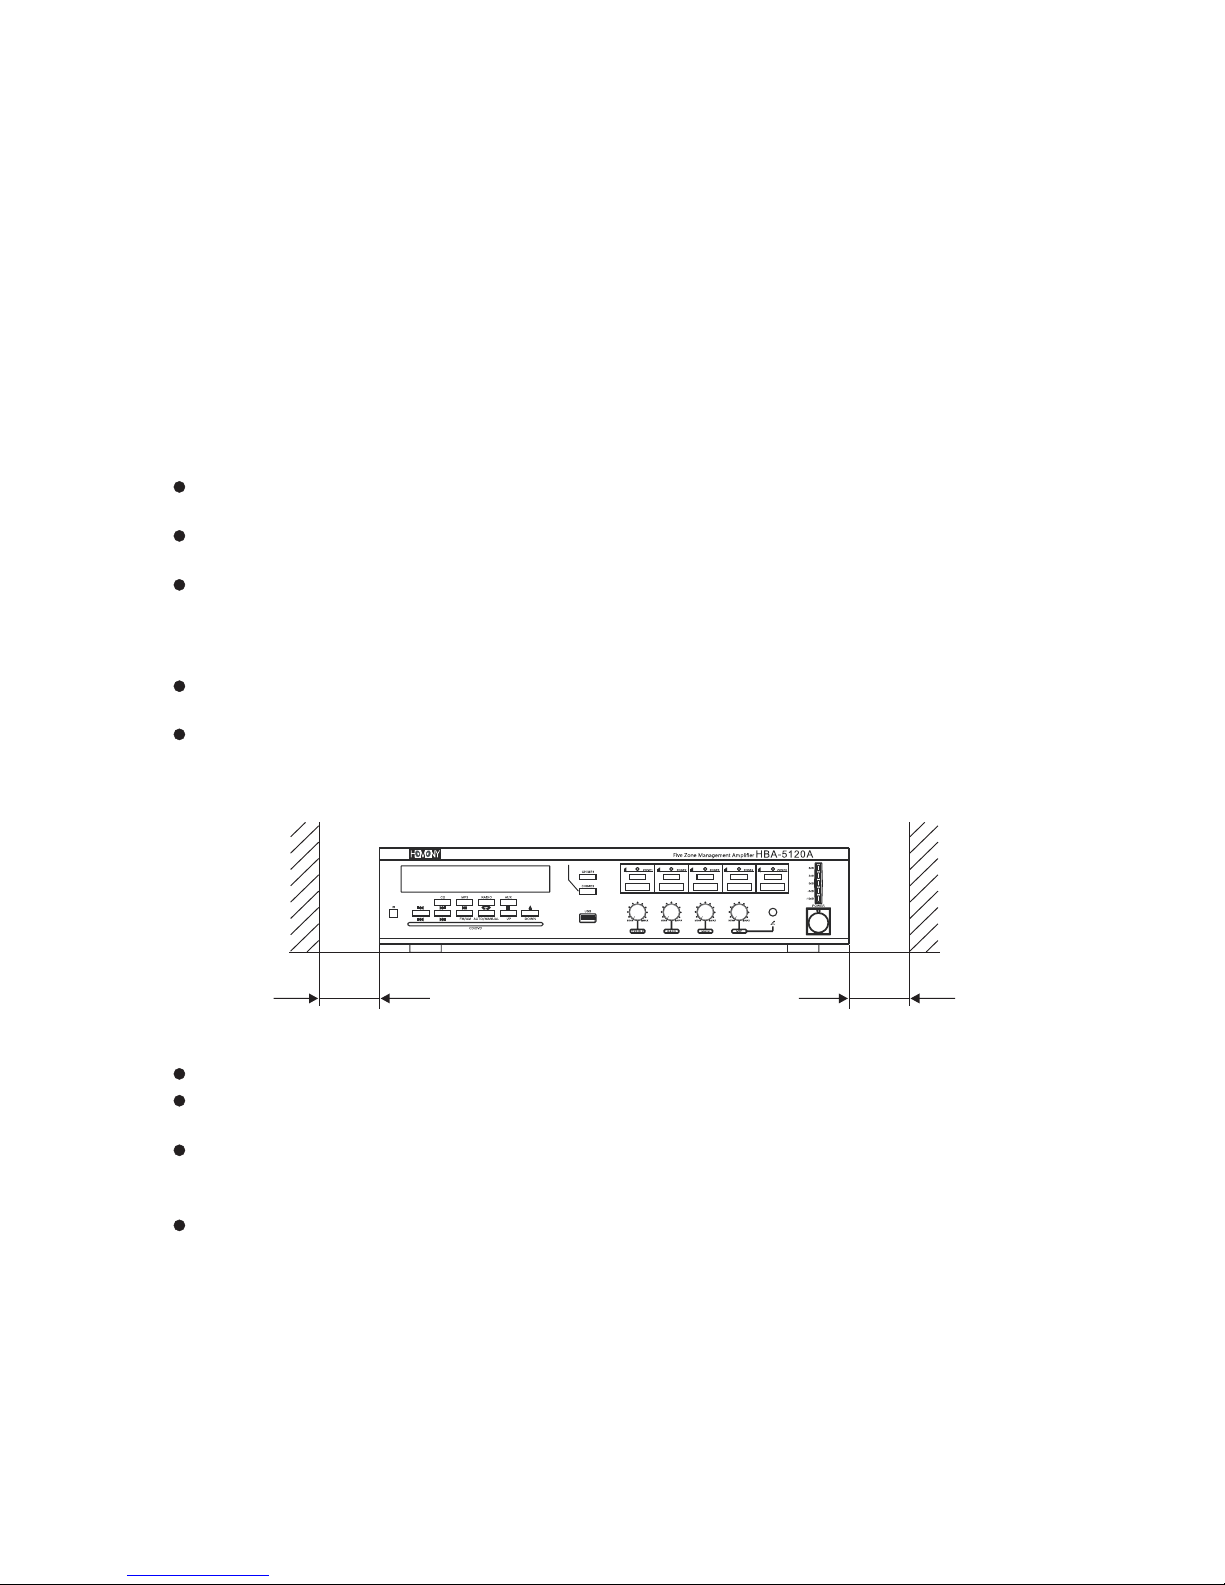
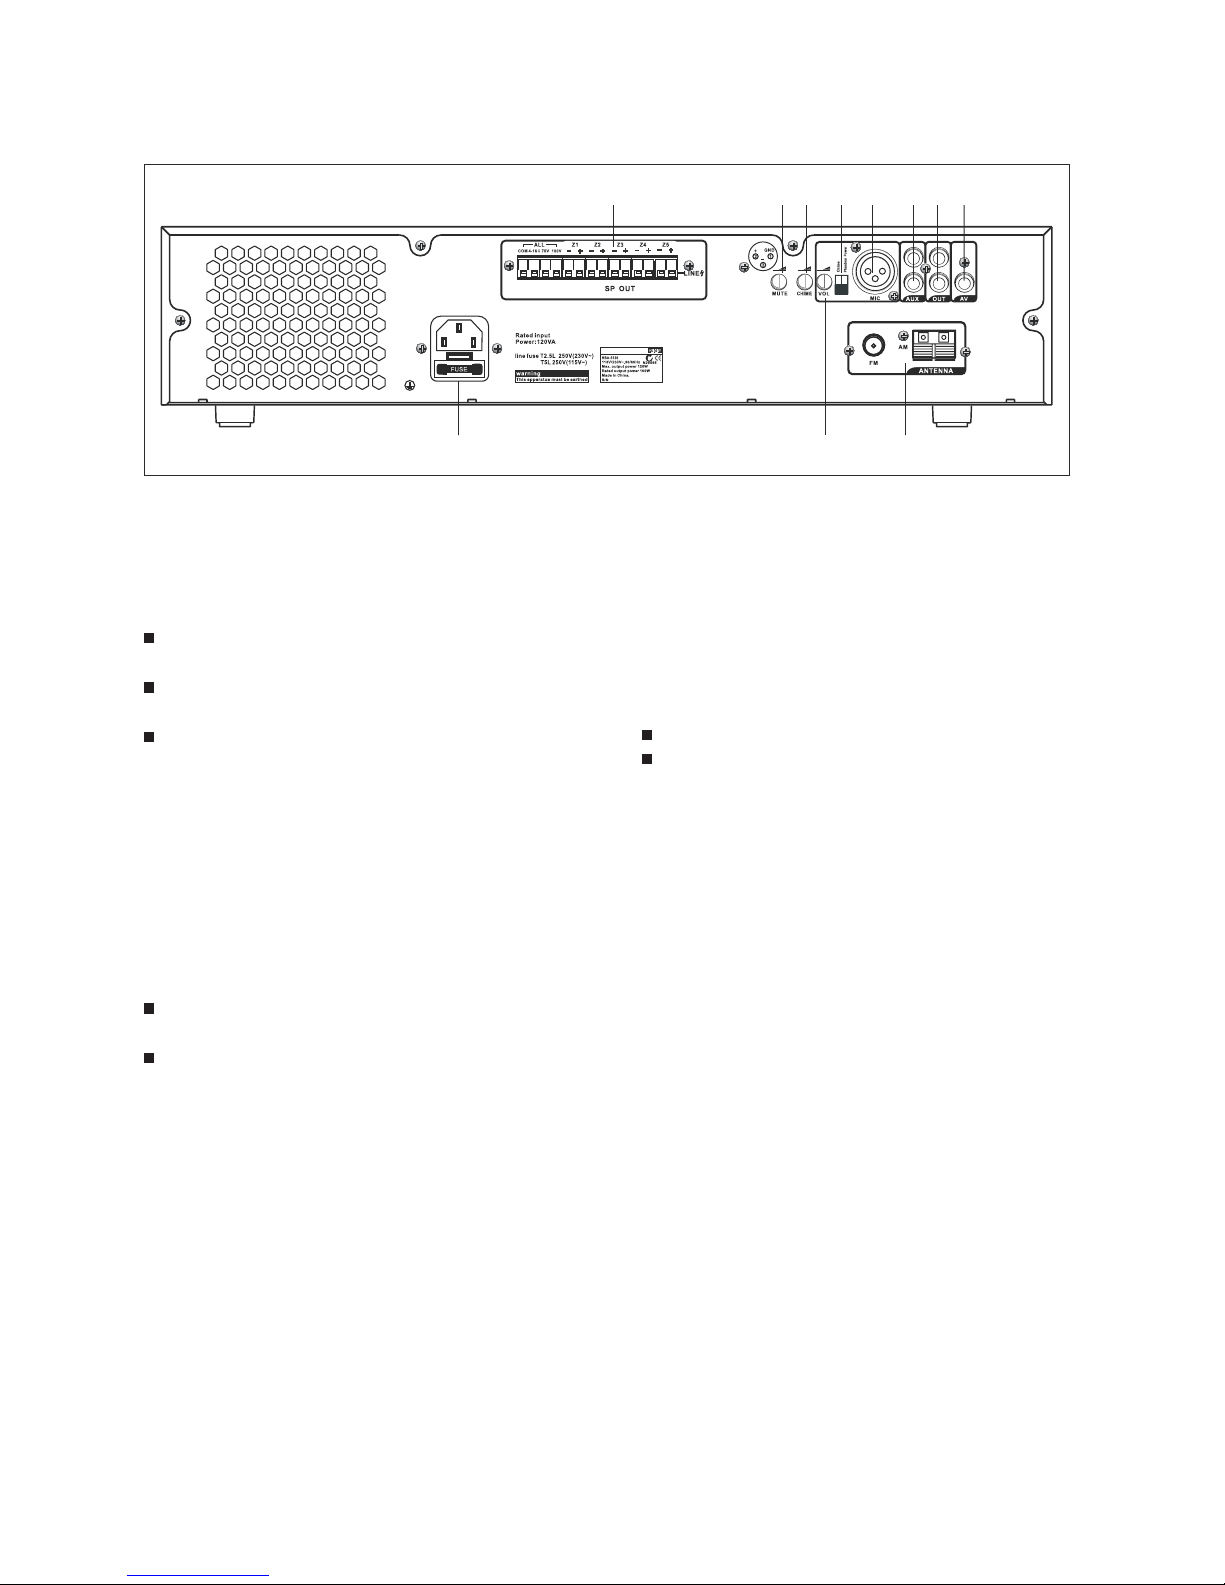
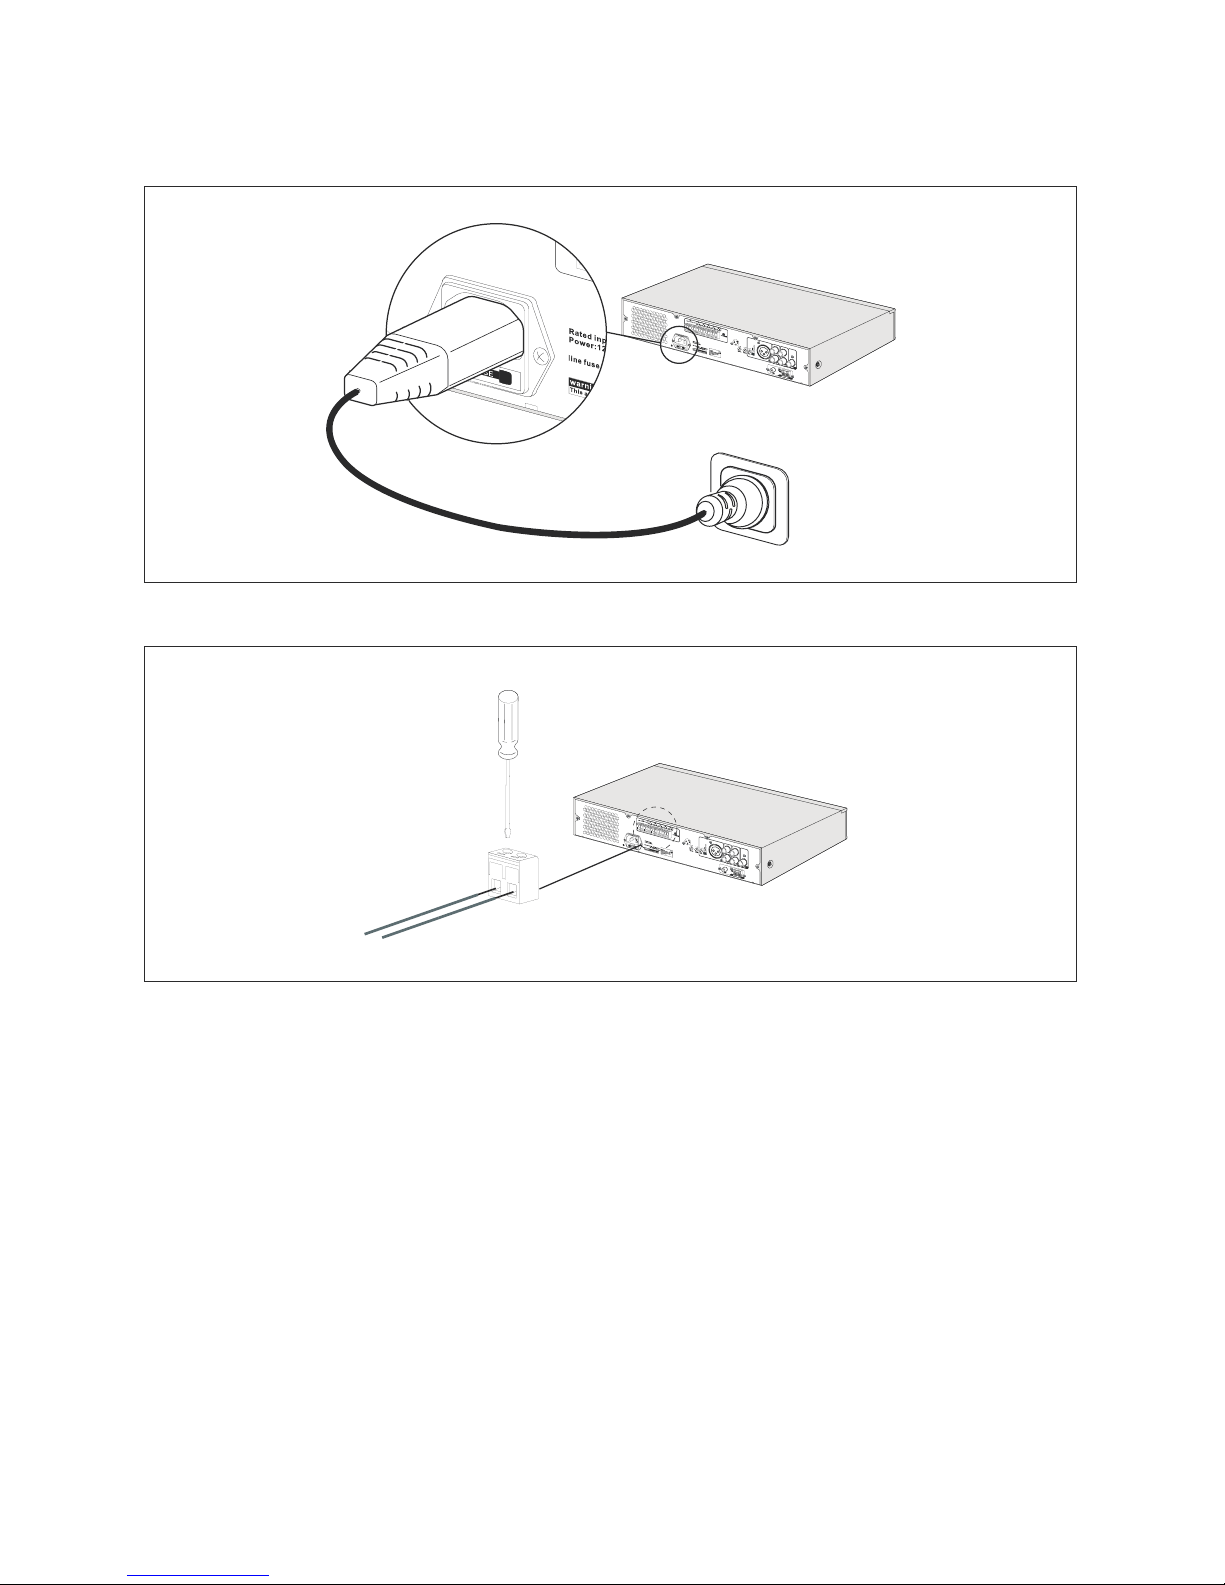
1. Important Safeguards
(1) Read instructions—Before the system is installed and operated all the safety instructions
shouldbe read
(2) Retain instructions—For future reference the safety instructions and instructions for use
should beretained.
(3) Heed warnings—User should adhere all warnings on the unit and in the installation and
operationinstructions.
(4) Follow instructions—User should follow all installation and operation instructions for use.
(5) Cleaning—Before cleaning, system units should be unplugged. Use a damp cloth not liquid
cleaners or
aerosol cleaners for cleaning.
(6) Attachments—The attachments not recommended by the product manufacturer may cause
hazards please do not use them.
(7) Water and Moisture—In wet location such as kitchen skin, washbowl, bathtub, laundry
basket, in awet basement, in an unprotected outdoor installation, do not use this unit.
(8) Accessories—Use this unit only on a stand, tripod, bracket or mount recommended by the
manufacturer, or sold with the product otherwise this unit may fall and cause serious injury
to a person and serious damage to the unit.
(9) Ventilation— If there are openings in the enclosure providing for ventilation, it is to ensure
reliableoperation of the unit and to protect from overheating. Do not place the unit in a
built-in installationunless proper ventilation is provided or the manufacturer's instructions
have been adhered to.(10). Power sources—The type of power source indicated on the
marking label should be use whileoperating this unit. If you are not able to make sure of the
type of power supply you plan to use,contact our appliance dealer or local power company.
If this unit intended to operate from batterypower, or other sources, please refer to the
"Installation and Operation Instructions".
(11) Grounding or polarization—A polarized alternating current line plug (one plug have a blade
widerthan the other) may be equipped with this unit. This plug will fit into the power outlet
only one way.Alternatively, this unit may be equipped with 3-wire grounding type plug
having a third (grounding)pin. Only a grounding-type power outlet is suitable to this plug.
This is a safety feature.Try reversing the plug when you are unable to insert the plug fully
into the outlet. Contact yourelectrician to replace your obsolete outlet if the plug still fails
to fit. Never defeat the safetypurpose of the polarised plug.
(12) Power-Cord Protection—In order to avoid the power supply cords from walking on or
pinching byitems place upon or against them, the power supply cords should be routed.
(13) Overloading – To avoid fire and electrical shock do not overload outlets and extension cords.
(14) Object and Liquid Entry—Do not push any kinds of objects into this unit through openings
as theymay touch dangerous voltage points or short-out parts which could result in a fire or
electric shock.Never spill any kinds of liquid on the unit.
(15) Servicing—Never try to service this unit yourself as opening or removing covers may
expose todangerous voltage or other hazards.
(16) Damage Requiring Service—Under the following conditions unplug the unit from the outlet
andrefer servicing to qualified service personnel
1

controls that arecovered by the instructions for use, because an improper adjustment of
other controls may cause damageand will often require extensive work by a qualified
technician to restore the units to their normal operation. If the unit has been exposed to
rain or water
When the power-supply cord or plug is damaged
If liquid has been spilled, or objects have fallen into the unit
(17) Replacement Parts—Make sure that the service technician has used replacements parts
specified bythe manufacturer or parts which have the same characteristics as the original
one when replacing a part.Unauthorized and improper substit-utions may lead to a result
of fire, electric shock or other hazards.(18). Safety Check—Ask the service technician to
perform safety checks to determine that the unit is in properoperating con-dition after
completing any service or repairs to the unit.
(19) Lightning—Unplug the unit from the wall outlet and disconnect the cable system for added
protection ofthe units during a Lightning storm, or when it is unattended and unused for
long periods of time.The lightning and power-line surges will pr-event damage to the unit.
If the unit does not run normally by following the instruction for use. Only adjust those
About this manual
This manual provides all the information required to install and operate the unit.
Conventions
Caution
Follow these instructions to prevent damage to the equipment.
Warning
Do not open the unit when it is connected to mains.The unit contains
non-insulated parts,which cancause electric shock
Safety precautions
Caution
There are no user-serviceable parts inside the unit.Service must be done by
qualified person.
Note
Read these instructions for tips and other useful information.
Warning
Follow these instructons to prevent personal injury.
2

To clean, be sure to switch off the power supply to the unit first, then wipe with a dry cloth.
When the unit gets very dirty, use a cloth damped in a neutral cleanser. Never use
benzene, thinner or chemically-treated cleaning cloth because such volatile liquids could
deform or discolor the unit.
Never move the unit from one place to another with the Flash Card inserted because the
CompactFlash card may fail.
Avoid inserting or withdrawing the CompactFlash card while the unit is in use.
3. INSTALLATION
Do not install the unit in locations exposed to the direct sunlight or heaters, as
the unit could be deformed or discolored.
Avoid installing or storing the unit in dusty or humid locations, as doing otherwise
could cause the unit's failure.
Keep the unit as far away as possible from a fluorescent lamp, digital equipment,
PC or other equipment which generate high frequency noise.
Do not block the ventilation slots on the upper, right and left, and rear sides to allow
inside heat radiation.
Keep at least 50 mm space from the unit's right and left sides for heat radiation.
HBA-5120A/HBA-5240A
HBA-5120A/HBA-5240A
HBA-5120A/HBA-5240A
HBA-5120A/HBA-5240A
PRECAUTION
To avoid oscillation, keep the input cable away from the output cable. Particular care must
be exercised when mounting the unit in an equipment rack.
In some installations, a ground loop is formed and hum noise may be generated. In such
cases,connecting the rear-mounted signal earth terminal to the body of connected
equipment (BGM sound source, expansion amplifier, etc.) may reduce it.
Never connect two amplifier outputs in parallel under any circumstances.
Never connect the AC power cord to any other line voltage than that specifically designated
3
Five Zone Management Amplifier
At least 50 mm At least 50 mm

4. General Description
The Five Zone Management Amplifier is an economical solution for medium installations
including 1 to 5 zones office buildings, workshops, restaurants, factories, sports clubs etc.
It offers
outstanding performance and featured microphone and auxiliary inputs. For ease
of use, the unit has built-in CD/DVD, USB input with Mp3 player and FM/AM tuner. There is
an additional auxiliary input, an AV input, a XLR Microphone input with 24V Phantom Power
and an 6.35mm Jack Microphone Input. Five zones may be selected on or off via the front
panel switches. Output level is monitored via the LED VU meter. It is suitable for 4-16Ohm,
70V/100V speaker.
5. FEATURES
120W/ 240W Rated Power
1 *balanced XLR MIC Input with 24V phantom Power
1 *6.35mm Jack Microphone Input
1 *Auxiliary Input
Built-in CD/DVD
1 *USB Input with build in Mp3 player
1* FM/AM Turner
5 Output Zones
Zone Individual On / Off Switch
Master Volume Control
Treble, Bass Volume Control
LED VU meter
Chime and Mute
4-16Ohm, 70V/100V output
Caution
■
optional boards or setting switches, ensure it is done by a qualified service technician.
■ Make sure to switch the power off before performing any work on the amplifier such as the
caseabove.
■ Terminals marked with the symbol shows Hazardous live and make sure a qualified service
personal is involved in making external wiring connections to the terminals or use only those
If there is a need to open the amplifier's top cover when performing work such as mounting
4

6.NOMENCLATURE AND FUNCTIONS
1
2 3 4 5
6
7 11
8 9 10
12 13 14 15
16
17
[Front]
The HBA-5120 is shown in the figure. The features and functions of
HBA-5240A are the same as the above figure.
1.LCD Display
Displays the current status and operating
instructions of the system
2.IR Signal indicator
Receives signal from the remote control.
3.Disc Tray
This player can play DVD/CD/Mp3 disc
4.Key functions of CD/DVD, MP3, AM/FM.
Last Song;
Next Song;
Play / Pause ( AM/FM selector);
Play Mode Selector ( AM/FM auto / manual
selector );
Stop (AM/FM search up);
Close / Open (AM/FM search down) Select
to stop the currently playing music.
5.Sound Source Selector
Enables to select one of the sources - CD/DVD,
MP3, Radio, AUX
6.Build in Chime Function
7.USB input [USB]
Connect USB that has music in MP3 format.
The maximum capacity of the USB should
not exceed 32 GB.
Use only .MP3 music format. Otherwise,
abnormal situations may occur, or the system
might not identify the USB data.
8.Zone Selector [ZONE]
Individual zones may be switched on or off
out of five zones
9.Zone IndicatorIndicates active zones
10.Zone labeling
Label each zone for reference
11.Treble Control
Adjust the level of high frequency sound from
the BGM Input. Turn clockwise to accentuate
the high frequency output and counterclockwise
to attenuate it. The center click position
indicates a flat frequency response.
12.Bass Control
Adjust the level of low frequency sound from
the BGM Input. Turn clockwise to accentuate
the low frequency output and counterclockwise
to attenuate it. The center click position
indicates a flat frequency response.
13.Master Volume Control
Adjust the sound volume for the BGM Input.
14.Microphone Volume Control[MIC]
Adjust the volume for MIC input.
15.MIC Input.
16.Level meter
17.Power source[Power]
Switch on/off the power
5

[Rear]
11
2 3 5 6 7 8
10
1
4
9
The HBA-5120 is shown in the figure. The features and functions of
HBA-5240A are the same as the above figure.
1.Loudspeaker Terminal
[4~16 Ω, 70/100V,Z1~Z5]
Screw terminal, connect 4~16 Ω f or
70/100V loudspeaker to this jack.
Screw terminal, connect loudspeaker of
each zone to this jack.
Z1~Z5 can be used at the same time,
however, the total output power should
not exceed the rated power outlet.
2.Mute Volume Control
3.Chime Volume Control
4.MIC Input Volume Control
5.Function Switch
[Chime] indicates chime switch
[Phantom Power] indicates Microphone
24V power switch.
6.MIC Input
A XLR jack, connect MIC source to this jack.
6
9.AV Output
Connect monitor or TV to this jack.
10.Radio Antenna [ANTENNA]
11.AC power socket
Connect AC power plug in this socket
Main fuse socket.
7.AUX Input
A RCA pin jack. Connect other music sources
to this jack.
8.AUX Output
A RCA pin jack. Connect other amplifier to
this jack.

7. SYESTEM CONFIGURATION
System Configuration Steps:
Step 1: Connect with sound source equipment, for example, connect source equipment to AUX
Input; connect Microphone with MIC input in the front.
Note: MIC has higher priority than other music sources.
Step 2: Connect with loudspeakers. For example,
Note: Settings for 70V/ 100V high-impedance systems, as well as a low-impedance (4-16ohm)
position, are provided. Connect the speaker output terminals to the corresponding
position; otherwise, will cause overloading and damage to the amplifier.
Step 3: Amplifier Extension. Connect the corresponding equipment to line out output.
Step4: Connect Microphone to the XLR socket.
Step 5: Connect AM/FM antenna to corresponding AM/FM inputs, otherwise, the radio signal
cannot be received.
Step 6: Finish
Fm Ant
Am Ant
Amplifier
Sound Source
Equipment
7
The system is easy to operate. Users can get a further understanding of the setup of
HBA-5120A/ HBA-5240A by reading the following figure and descriptions.

8.1 Power Cable
8.2.1 Please use screwdriver to fix the speaker line with the loudspeaker connectors tightly.
Otherwise, the imperfect connection may result in loudspeaker noise.
8.2.2 After the speaker line is connected with the loudspeaker connectors, check carefully
whether metal part is excessively exposed. Otherwise, it might cause short circuit in the output
terminal of power amplifier, and even damage the equipment.
8.2.3 When connecting the speaker line to the output terminals, please be aware of
corresponding broadcasting area of each output terminal. Four Terminal Connector: COM,
4-16 Ohm, 70V, and 100V
8.2 Loudspeaker Connection
8
8. APPENDIX

ZONE5
100 V
ZONE3
100 V
ZONE4
100 V
ZONE2
100 V
ZONE1
100 V
8 Ohm
Call/Mix direct out 4-16 Ohm
4 Ohm
4Ohm
8Ohm
8Ohm
8Ohm
8Ohm
Mix Only
100/70V
9
8.2.4 When connecting the speaker line to the output terminals, please be aware of
corresponding broadcasting area of each output terminal. Four Terminal Connector: COM,
4-16 Ohm, 70V, and 100V

8.3 Microphone
8.3.1 Connect standard RCA 6.35 Plug Microphone to the MIC input, then the microphone can work.
俨៤
8.3.2 Connect standard XLR Plug Microphone to the MIC input, then the microphone can work.
10

8.4. Sound Source Input and Output
8.4.1. Connect the sound source equipment with AUX input
8.5 Rack Mounting
8.51 The amplifier is delivered for table top use, but you can mount it in a 19" rack.
8.52 If you mount the amplifier in a rack, you must:
Ensure that the unit does not exceed the overheating temperature (45 °C ambient).
★ Align the holes in the unit (two locations on each side) with the mounting bracket and
secure the unit with the accessory screws.
★ Make sure that the unit is installed securely in place. If the unit is unstable, it may malfunction.
★ Remove the 4 feet from the bottom of the unit.
★
11
AMPLIFIER

8.6 CD/DVD Drive Input
茠 ᘬ
8.6 1.This player can play DVD/CD/Mp3 disc
12

这页起和后面的所有页请翻译,谢谢!!!
1
2
3
2 1
9 Microphone
9.1 Adaptive Microphone HCM-001MH
[Front]
The exterior and function of HCM-001MH is the same as above figure
Please put sound source close to the zone to ensure a clear input
1.Microphone
Press the button to turn on the microphone for paging
2.Switch
When the indicator is on Red, Microphone is on and ready for paging
When the indicator is off, Microphone is switched off
3.Status Indicator Light
[Rear]
The exterior and function of HCM-001MH is the same as above figure
Please connect to DC 9v~12v 100mA~1A power.
1.Power
Connect to the MIC input of the Amplifiers via audio cables with XLR connector.
2.XLR pin
13

9.2 Microphone
9.21 Plug standard XLR connector into the MIC input.
9.22 Plug standard XLR connector into the Microphone output.
9.23 A 3 meter cable with standard XLR connector is provided with Microphone.
9.24 DIY XLR connector
If customers make XLR connectors themselves, please refer to the following cabling
definitions: Line 2 is +, Line 3 is -,Line 1 is ground.
Make sure the male and female have the same cabling definition otherwise the
microphone may not work properly.
If plug into unbalanced microphones, make sure the signal terminal of the microphone is
connected to the ‘+’ of the XLR and the public terminal is connected to the ‘-’ of the XLR.
Simultaneously, the phantom power must be turned off, otherwise may bring damage to the
connected equipment and DC noise may arise with output sound.
14

1
2
3
1
2
32
1
3
9.25 When connect microphone with standard XLR connector, please make sure the phantom
power is turned on, otherwise the microphone will not work. If phantom power is not available,
please plug in 9v~12v 100mA~1A power.
DC 9v~12v power is suitable for Microphones
Phantom power can be switched on when there is no external power supply available surrounded
9.4 Specifications
Mod e lH C M - 0 01M H
Frequency 50-12000Hz
Sensitivity -62 d B
Con n e c t o r XLR , b a l a n ced
Chi m e B u i l d in Ch i m e
Dimensions
Weight
18
DV 9V~12V
Power Supply
9.3 Microphone power supply
15

MODE
MUTE
SELECT
AUTO
AEARC H
AUTO/N ORMAL ME MORY
2
4
8
11
1412
13
10
9
6
7
5
3
1
10.Remote Control
1. Mute
2. CD/DVD In / Out
3. Number Keys to select the program when playing Mp3, CD/DVD, or AM/FM.
4. Audio Source Selector
5. Search forward when playing AM/FM.
6. Search back when playing AM/FM.
7. Previous
8. Next
9. Stop
10.Play / Pause
11.Mode selector
12.FM/AM Auto Search and Save
13.FM/AM Auto / Manual Search Selector
14.FM/AM Program Save
16

11. System Diagram
17
∑
AM/FM
DVD
PLAYER
Mp3
PLAYER
AV
AUX
L
R
KEYBOARD
CPU
PHANTOM
POWER
PRIORITY
VOX
BAL.INPUT
VOX
ON/OFF
FUSE FUSE
FUSE
6dB
3dB
-3dB
-10dB
0N
LEVEL DISPLAY
100V
70V
4-16Ω
COM
ZONE5
ZONE4
ZONE3
ZONE2
ZONE1
AMP
TONE
MASTER
USB

12. Specification
18
Mode HBA-5120A HBA-5240A
Rated Power 120 W 240 W
Weight 11.2KG 15.4KG
Dimensions 405mm*430mm*100mm 405mm*430mm*100mm
Power Supply 230Vac ± 10%, 50/60 Hz
Protection 5A ac fuse
Distortion < 1% @ rated Outputs, 1kHz
Bass Control -14/+10 dB @ 100 Hz
Treble Control -14/+10 dB @ 10 KHz
Frequency
Response
50 Hz - 20 kHz (+1/-3 dB @ -10 dB ref. rated Outputs)
2* MIC Input XLR,balanced,24V Phantom Power(ON/OFF Switch),
6.35mm Jack microphone input
Sensitivity:Mic:5mV, Line:775mV; Impedance:>1k Ohm; S/N:>60dB
Aux Input RCA stereo socket bridged mono; Sensitivity:775 mV; Impedance:10K Ohm;
S/N:>75db
CD/DVD Player
(build-in)
Frequency Response:20Hz-20KHz(+1/-3dB); Distortion;<0.1%; S/N:>80dB
USB Input (Build
in Mp3 player)
Supported bit rates:CBR 32kbps-320 kbps and VBR, mono and stereo; USB:
Max.16G; File System: FAT, FAT32; File Format: MP3
Tuner FM:87.5-108MHz(50KHZ); AM:522-1611KHz(9KHz)
Video Out AV
Speaker Outputs Screw terminals; 70V/100V; 4-16ohm outputs
Control Treble, bass ,BMG Vol, Microphone Vol, Mute Vol, Chime Vol, CD/DVD Function
Key, Zone Selector, Chime switch, Phantom Power, switch LED Contrast
and On/OFF Switch
Indicators VU-meter ( LEDs for -10,-5,0,3 and 6dB)
Relative
Humidity
< 95%
Operating
Temperature
Range
-10°C to +45°C
Speaker Outputs Screw terminals; 70V/100V; 4-16ohm outputs
Control Treble, Bass ,BGM Vol, Microphone Vol, Mute Vol, Chime Vol, CD/DVD Function
Key, Zone Selector, Chime switch, LED Contrast and On/OFF Switch
Indicators VU-meter ( LEDs for -10,-5,0,3 and 6dB)
Relative
Humidity
< 95%
This manual suits for next models
1
Table of contents
Other Homony Amplifier manuals
Popular Amplifier manuals by other brands

Perreaux
Perreaux Silhouette SXH2 owner's manual

Trace Acoustic
Trace Acoustic ACOUSTIC CUBE operating instructions

Ashdown
Ashdown Kidd G-1508 Combos operating instructions

Harman Kardon
Harman Kardon CITATION 7.1 Schematic diagrams

Sigma
Sigma ADA-26A instruction manual

Mark Levinson
Mark Levinson 431 Brochure & specs