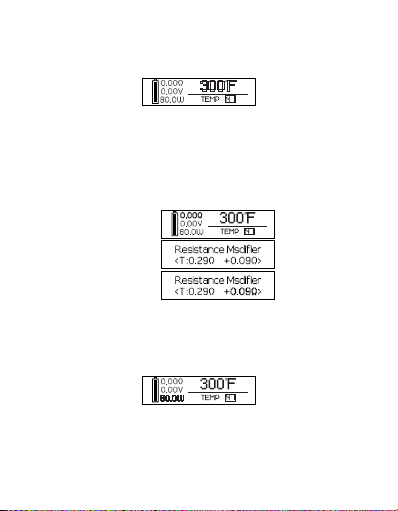
Hotcig RSQ User manual

POWERED BY


1
Thank you for choosing RSQ BF Box Mod which
designed & manufactured by Hotcig. In order to get the
best vaping experience, be sure to read the instructions
and precautions carefully. In addition, please keep this
Instruction Manual for further reference if necessary.
RSQ BF Mod is R-Series product from Hotcig,
powered by 80w HM chip, designed to be BF/ Squonker
mod, and continues the style of replaceable panels.
Three output modes: Power Mode, Temperature
Control Mode, and BYPASS Mode. Power output: 1-80.0W.
Temperature control mode:100℃-315℃/ 200℉-600℉,
TCR settings. Support USB 2A charging. PC firmware
upgradeable.
Please refer to the ofcial website of Hot
Technology
about the TCR settings and upgrades
User Manual

2
PRODUCT DETAILS:
①
②
③
④
⑤
①510 connector
②FIRE
③OLED screen
④“+/-”Button
⑤USB port

3
ON/OFF:
CONNECT THE ATOMIZER:
After loading the battery, it will display
“"HOTCIG, POWERED BY HM”, and then it
enters the main interface. Press the FIRE button
five times to display SYSTEM OFF, then it shuts
down; press the FIRE button five times to turn it
on again.
ON:
OFF:
The screen displayed after the atomizer is connected,
Press the “+” “-” button to switch between new or former atomizer.
The screen will Show “CHECK ATOMIZR” when the atomizer is
unconnected; It will show SHORTED when there happened Short
circuit; it will show OHMS TOO HIGH when the resistance is too
high; it will show OHMS TOO LOW when the resistance is too low.

4
OUTPUT MODE:
Filled the bottles, then install the battery, squeeze the squonk
bottle, e-liquid can be directly injected into the BF atomizer.
Pressing the FIRE button three times until one of the display
ashes, and then press again FIRE button (1-3 times) to switch to
the Output Mode, and nally press the +/- button to switch among 3
output modes: POWER Mode, BYPASS Mode, TC Mode.
Rell e-liquid:

(A)
(%) (P)
(S)
5
1. POWER Mode :
A.Wattage adjustment: You can adjust to the appropriate wattage
(1-80W) according to your needs by pressing the +/- button in
POWER mode.
B. Function adjustment: in POWER mode, Press the +/- button
to lock or unlock the resistance value after the FIRE button is clicked
3 times in succession and the screen resistance value ashes,
in the state where the resistance value is ashing, Press the FIRE
button to switch to the main parameter display item, then Press the
+/- button to select the display of output current (A), the output time
(S), the battery charge (%), and the number of outputs (P).
2.BYPASS Mode:
When pressing the FIRE button three times to switch to the main
parameter display Item in BYPASS mode. Press the +/- button to
select the output current (A), output time (S), battery power (%) and
output times (P) (refer to the above).

FIRE
①
②
6
3.TC Mode:
A.Temperature adjustment: Press +/- to adjust the temperature
(° C / ° F) High and low In TEMP mode.
B. Resistance ne-tuning: Press 3 times FIRE button while the
resistance value hints ash. The rst click of the +/- button switch
to the resistance ne-tuning interface. Press the +/- button to ne-
tune the resistance value, ne-tuning range between -0.09 to +0.09.
In the TC mode, ne-tune function remain OFF. The system will
automatically keep your modied resistance.
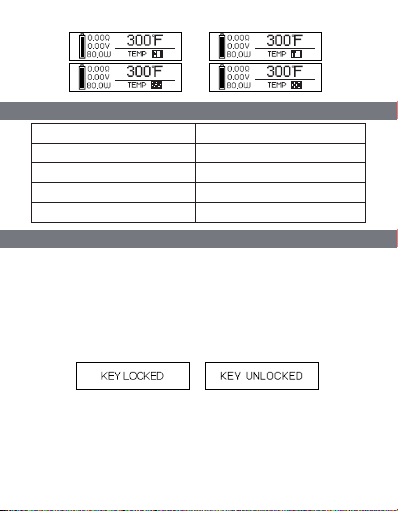
C. Power adjustment: in TC Mode, after you fix the ohm
resistance adjustment. Press the FIRE button to switch to the power
value interface and while the power value flashing, press the +/-
button to adjust wattage range.
D. Heat material selection: After the power adjustment, press
FIRE button to switch to material items. While the material item
ashes, press the +/- button to switch NI, TI, SS,TCR material.

7
TCR EXTENT:
BUTTON SET:
Material TCR value PPM/℃
Nickel 4952-7428
Titanium 3296-4944
SS(303,304,316)704-1056
TCR(XX)704-8000
A. Lock/ unlock: When hold the “+”button and “-”button for 3
seconds at same time the product will show “ key locked ”, the “+/-”
will be locked. Only press re and “+/-” can get interactive reaction.
Press the “+” button and “-”button for 3 seconds at same time the
product will show “key unlocked”, the“+/-” will be unlocked. As
below picture:
B.Flipping screen: When the product is locked, press the
FIRE button and the "-" button the screen will flip to the
opposite direction. As below:

+
-
+
-
8
Connect to USB:
ALARM NOTICE:
This device could be charged via USB wall charger or connected
to computer’s USB port. When connecting to the computer, it performs
“charge mode" by default, press “+/-" button to choose“update” or
“charge”, and press the FIRE button to confirm. While charging, the
battery logo keeps flashing, the logo will disappear when battery gets
fully charged.
C. RGB Settings: while "+" "-" button locked, hold FIRE and "+"
button at the same time,color table will display on screen, click "+""-"
to choose color, and press FIRE button to confirm.

9
Warning 1
1.Please choose the e-liquid with or without nicotine at your own
needs. This product only aims at people of the legal smoking age (over
18 years old). The product is not allowed to be sold to non-smokers,
such as children, pregnant women, the breast-feeding, and people
with heart disease, high blood pressure, diabetes. Taking drugs to
treat depression or asthma, nicotine allergy is also not appropriate to
use the product.
2.Please make sure that the product isn’t suitable for tobacco or
dry herb plants.
3.This device is not approved by FDA, not suggest to treat,
relieve or prevent any disease.
4.Keep out of the reach of children and pets.
5.This product contains tiny parts, please keep it well as ingestion
of small parts may cause a choking hazard.
6.The product may be damaged due to falling or improper
operation, please do not throw and be careful to place, otherwise
cover and internal parts would get broken.
7.Do not try to repair the product yourself and stop using the
damaged product to prevent personal injury.
8.We strongly suggest charge the product timely if battery power
lower than 10%.
9.Keep away from high temperature environment in use or
storage.
10.Please follow the local laws and regulations regarding the use
of electronic cigarettes when using this product. Please do not vape if
you are in any non smoking or potentially dangerous area.

10
Warning 2
WARRANTY POLICY
Please use the device strictly according to the instruction listed in
the manual, otherwise Hotcig would not undertake any responsibility.
Hotcig provides a 90 days’ after-sales service warranty to all of
our authorized vendors. This warranty does not apply if the product
was purchased from unauthorized vendors.For more information
about the product, please consult our authorized dealers or visit:
www.hot-vapor.com
11.This product adopts a chip with certain water proof function,
but it is does not mean that this product is water proof, please use
with caution. If any liquid penetrate into the product from the slots or
holes, please stop using it immediately and contact with your local
authorized dealers.
12.Shenzhen Hot Technology Co., Ltd. is not responsible for the
use of non-Hotcig product (such as poor quality atomizers, batteries,
etc) which resulting in product failure or damage, charger explosion,
re or other losses.
13.Don’t throw or drop or use this device in wrong way, or the
cover or internal parts may get damaged.
14.Hotcig would not undertake any responsibility for the use of
inferior chargers or batteries which leads to product damage, charger
explosion, re or other losses. Users are suggested to charge RSQ
with 5V 0.5A-2A USB wall charger(CE/UL certied). Don’t charge
via car charger.
SHENZHEN HOT TECHNOLOGY CO.,LTD

11
感谢您使用热火科技的 RSQ 蒸汽电子烟温控盒,为
了让您的电子烟使用时获得最佳体验,请务必仔细阅读使
用说明及注意事项,并妥善保管,以便随时参阅。
RSQ 电子烟是热火科技 R 系列产品,增加了内置烟
油瓶注油功能,并延续了 R 系列产品可替换面板的特点。
本产品使用了 HM 的最新 80W 芯片,功率模式、
温控模式和机械模式,功率输出为 1-80W;温控模式为
100℃ -315℃ /200 ℉-600 ℉,温控还增加了 TCR 功能;
BYPASS 机械模式。 支持 USB 2A 充电;支持 PC 端升
级功能。
TCR 设置及升级功能请至热火科技官网
www.hotcigtech.com
使用说明书

12
产品图示:
① 510 连接头
②主按键(FIRE)
③ OLED 显示器
④“+”“-”按键
⑤ USB 充电端口
①
②
③
④
⑤

13
开关机:
连接雾化器:
装载电池后,分别显示欢迎界面 HOTCIG、
POWERED BY HM,然后到主界面。连续按 5 次 FIRE
键,显示 SYSTEM OFF 后关机;关机状态下连续按 5
次 FIRE 键可重新开机。
开机画面:
关机画面:
未连接雾化器
雾化器短路 电阻过低
电阻过高
连 接 雾 化 器 后 屏 幕 显 示 按 + 键
选择新雾化器,按-键选择旧雾化器。未连接雾化
器 屏 幕 显 示 CHECK ATOMIZR; 雾 化 器 短 路 显 示
SHORTED; 电阻过高显示 OHMS TOO HIGH; 电阻
过低显示 OHMS TOO LOW。

14
输出模式切换:
将油瓶注满油后装入电子烟,再装上电池,然后通过
按压油瓶直接可将油注入 BF 雾化器。
连续按压 3 次 FIRE 键后任一显示栏闪烁后,再次按
压 FIRE 键 (1-3 次 ) 切换到输出模式项闪烁为止,按压
+/- 键可切换 POWER、BYPASS、TEMP3 种输出模式。
POWER TEMP BYPASS
内置油瓶注油:

15
1.POWER 模式 :
A. 功率调节:POWER 模式下,按压 +/- 键可调节功
率(W)大小。
B. 功能调节:POWER 模式下,连续按压 3 次 FIRE 键,
屏幕电阻值闪烁状态下,按 +/- 键可以锁定或解锁电阻值;
保持电阻值闪烁状态,再次按压 FIRE 键切换至机体参数
显示项,按压 +/- 键可选择显示输出电流(A),输出时
间(S), 电池电量 (%),输出次数 (P)。
2.BYPASS 模式:
BYPASS 模式下,连续按 3 次 FIRE 键 , 直接切换至
机体参数显示项,按 +/- 键可选择显示输出电流(A),
输出时间(S),电池电量(%),输出次数(P)(参考
上图)。
3.TEMP 模式:
A. 温度调节 :TEMP 模式下,按 +/- 键可调节温度(℃
/ ℉) 高低 。
B. 电阻微调 :TEMP 模式下,连续按 3 次 FIRE 键,屏
幕电阻值闪烁状态下,第一次按压 +/- 键进入电阻微调界
(A)
(%) (P)
(S)

面, 第二次按压 +/- 键可微调电阻值 , 微调值在 -0.09 到
+0.09 之间 . 不做微调显示 OFF, 默认为 OFF. 您修改的
阻值系统将自动保存 。
C. 功率调节:TEMP 模式下,当设定好微调值,再次
按压 FIRE 键切换至功率值,功率值闪烁状态下,按压 +/-
键可调节功率值大小。
D. 发热材质选择:TEMP 模式下,当设定好功率值,
按 FIRE 键切换至材质项,材质项闪烁状态下,按压 +/-
键可切换 NI,TI,SS,TCR 材质。
16
FIRE
①
②
TCR 范围表:
材料 TCR 数据值 PPM/℃
Nickel 4952-7428
Titanium 3296-4944
SS(303,304,316) 704-1056
TCR(XX) 704-8000

+
-
+
-
17
按键设置:
A.“+”“-”按键锁定 / 解锁:同时按住“+”键和“
-” 键 3 秒钟后显示 key locked,“+”键和“-”键锁定,
锁定状态下单独按压“+”键和“-”键将无法操作,配合
FIRE 键时,“+”键和“-”键才可操作;同时按住“+”
键和“-”键 3 秒后显示 Key unlocked,“+”键和“-”
键解锁 。
B. 翻转显示:“+”键和“-”键锁定状态下,同时按住
FIRE 键和“-”键,屏幕显示将翻转为反方向(屏幕显示
顺时针旋转 180 度),“+”键和“-”位置相互切换,正
视屏幕时,“+”键始终在上边(如下图)。
C.RGB 灯设置:+ 键和 - 键锁定状态下,同时按住
FIRE 键和 + 键,界面显示 颜色表,按 +/- 键选择任一颜色,
按 FIRE 键确定。

18
连接 USB:
报警提示:
警告
连接 USB 通过 USB 墙充或连接电脑 USB 端口进
行充电,连接电脑时默认充电模式:charge;“+”,“-”
键选择更新选项:update;按 FRIE 键确定进入升级模式,
充电时电池标志出现闪电标闪烁,充满电后,闪电标志消失。
提示充电
检查电池
过热
1. 请根据自身需求选择含有或不含尼古丁的电子雾化液
与本款产品配套使用。如果对您使用的电子烟雾化液有任
何疑问,请与您的电子雾化液销售商联系。此产品仅出售
给法定吸烟年龄的人群(18 岁以上)所使用。该产品不能
出售给非吸烟者,如儿童、孕妇、哺乳期妇女,以及患有
心脏疾病、高血压、糖尿病、服用药物治疗抑郁症或哮喘
的人群不宜使用,对尼古丁过敏的人同样也不宜使用该产
品。
2. 这款产品需要和高品质电子雾化液搭配使用。请您与
电子烟雾化液提供商再三确认,并不适合烟叶或者干烟草
Table of contents