Hotpoint HCM10 User manual

CoffeeMaker
Instructions


11
11
1
AMC15
DESCRIPTION OF THE MACHINEDESCRIPTION OF THE MACHINE
DESCRIPTION OF THE MACHINE .................................................................................................................. P. 2
•Front view ................................................................................................................................................................... P. 2
•Side view and controls ............................................................................................................................................. P. 2
• Safety instructions and warnings .......................................................................................................................... P. 3
• Correct use ................................................................................................................................................................ P. 3
• Technical safety ......................................................................................................................................................... P. 3
• Use .............................................................................................................................................................................. P. 3
OPERAOPERA
OPERAOPERA
OPERATIONTION
TIONTION
TION
................................................................................................................................................................ P. 4
INSTINST
INSTINST
INSTALLAALLA
ALLAALLA
ALLATIONTION
TIONTION
TION ............................................................................................................................................................. P. 5
ADDINGADDING
ADDINGADDING
ADDING WW
WW
WAA
AA
ATERTER
TERTER
TER AND COFFEEAND COFFEE
AND COFFEEAND COFFEE
AND COFFEE ......................................................................................................................... P. 8
• Filling the water tank ........................................................................................................................... P. 8
• Filling the coffee bean holder .................................................................................................................................. P. 8
REMOREMO
REMOREMO
REMOVV
VV
VAL OF COFFEE GRAL OF COFFEE GR
AL OF COFFEE GRAL OF COFFEE GR
AL OF COFFEE GROUNDSOUNDS
OUNDSOUNDS
OUNDS ANDAND
ANDAND
AND WW
WW
WAA
AA
ATERTER
TERTER
TER ................................................................................. P. 9
OPERAOPERA
OPERAOPERA
OPERATIONTION
TIONTION
TION AND USEAND USE
AND USEAND USE
AND USE ............................................................................................................................................. P. 10
• Switching on ............................................................................................................................................................... P. 10
• Setting the grinding ................................................................................................................................................... P. 10
• Setting the quantity of coffee .................................................................................................................................... P. 11
• Coffee length adjustment .................................................................................................................................... P. 11
• Setting 1 or 2 cups .................................................................................................................................................... P. 11
• Autotimer ..................................................................................................................................................................... P. 11
PREPPREP
PREPPREP
PREPARAARA
ARAARA
ARATION OFTION OF
TION OFTION OF
TION OF THE DRINKSTHE DRINKS
THE DRINKSTHE DRINKS
THE DRINKS ....................................................................................................................... P. 12
• Preheating the cups and pipes .............................................................................................................................. P. 12
• Preparing the coffee ................................................................................................................................................. P. 12
• Hot water .................................................................................................................................................................... P. 12
• Steam .......................................................................................................................................................................... P. 12
CARE AND CLEANINGCARE AND CLEANING
CARE AND CLEANING ........................................................................................................................................... P. 13
• Front and interior of the machine .......................................................................................................................... P. 13
• Water tank ................................................................................................................................................................ P. 13
• Hot water or steam distributor ................................................................................................................................. P. 1 3
DESCALING THE MACHINEDESCALING THE MACHINE
DESCALING THE MACHINE ............................................................................................................................... P. 1 4
OPERAOPERA
OPERAOPERA
OPERATING PRTING PR
TING PRTING PR
TING PROBLEMSOBLEMS
OBLEMSOBLEMS
OBLEMS ........................................................................................................................................ P. 15
TECHNICAL DTECHNICAL D
TECHNICAL DAA
AA
ATT
TT
TAA
AA
A....................................................................................................................................................... P. 16
DISPOSAL OF OLD ELECTRICAL APPLIANCESDISPOSAL OF OLD ELECTRICAL APPLIANCES
DISPOSAL OF OLD ELECTRICAL APPLIANCES ................................................................................. P. 16
CONTENTSCONTENTS
CONTENTSCONTENTS
CONTENTS

22
22
2
AMC15
DESCRIPTION OF THE MACHINEDESCRIPTION OF THE MACHINE
DESCRIPTION OF THE MACHINE
Front view
1. Lighting
02. Steam control
03. Hot water/steam distributor
04. Drawer handle
05. Coffee distributor
06. Water tank
07. Drip tray
08. Coffee bean holder
09. Coffee distributor button
10. Hot water/steam selector
11. Low water warning light
12. Low coffee warning light
13. Remove coffee grounds signal
14. On/Off switch
15. 1 cup or 2 cup selector
16. Short, medium or long coffee selector
17. Adjustment of the degree of grinding
18. Attention
19. Read the manual instruction
Side view and controls
2
1
5
3
4
6
8
7
14
11
10 15 16 9
12
13
17
19
Attenzione
Leggere le istruzioni
Attenzione
Leggere le istruzioni
18

33
33
3
AMC15
Safety instructions and warnings
This machine complies with the current safety regulations. Incorrect use of the machine may cause harm.
Read the instructions carefully before using the machine. They contain important information on safety, use and mainte-
nance, to provide protection and to avoid damaging the machine.
Correct use
• This machine is designed solely for preparing espresso, cappuccino and long coffee and for boiling water for tea and
other hot drinks.
Other types of use are not permitted and may prove dangerous. The manufacturer will not be held liable for any damage
caused by incorrect use of the machine.
Technical safety
• Before connecting the machine to the electricity supply, check the connection data (voltage and frequency) on the data
sheet with that of the electricity supply thoroughly.
This data should be exactly the same to avoid damaging the machine. In case of doubt, contact a qualified electrician.
• The electrical safety of the machine is only guaranteed if it is connected to a regulation earth wire. It is very important to check
this carefully. In case of doubt, have the electricity supply checked by a qualified electrician. The manufacturer will not be held
liable for any harm or damage caused due to a lack or malfunctioning of the earth wire (e.g. risk of electric shock).
• Only operate the machine when built-in so as to avoid contact with the electric parts. For the assembly, dismantling and
daily maintenance of the machine, always make sure it is disconnected from the electricity supply.
• The machine should not be connected to the electricity supply with extension cables, as these do not provide the neces-
sary safety for the machine (e.g. danger of overheating).
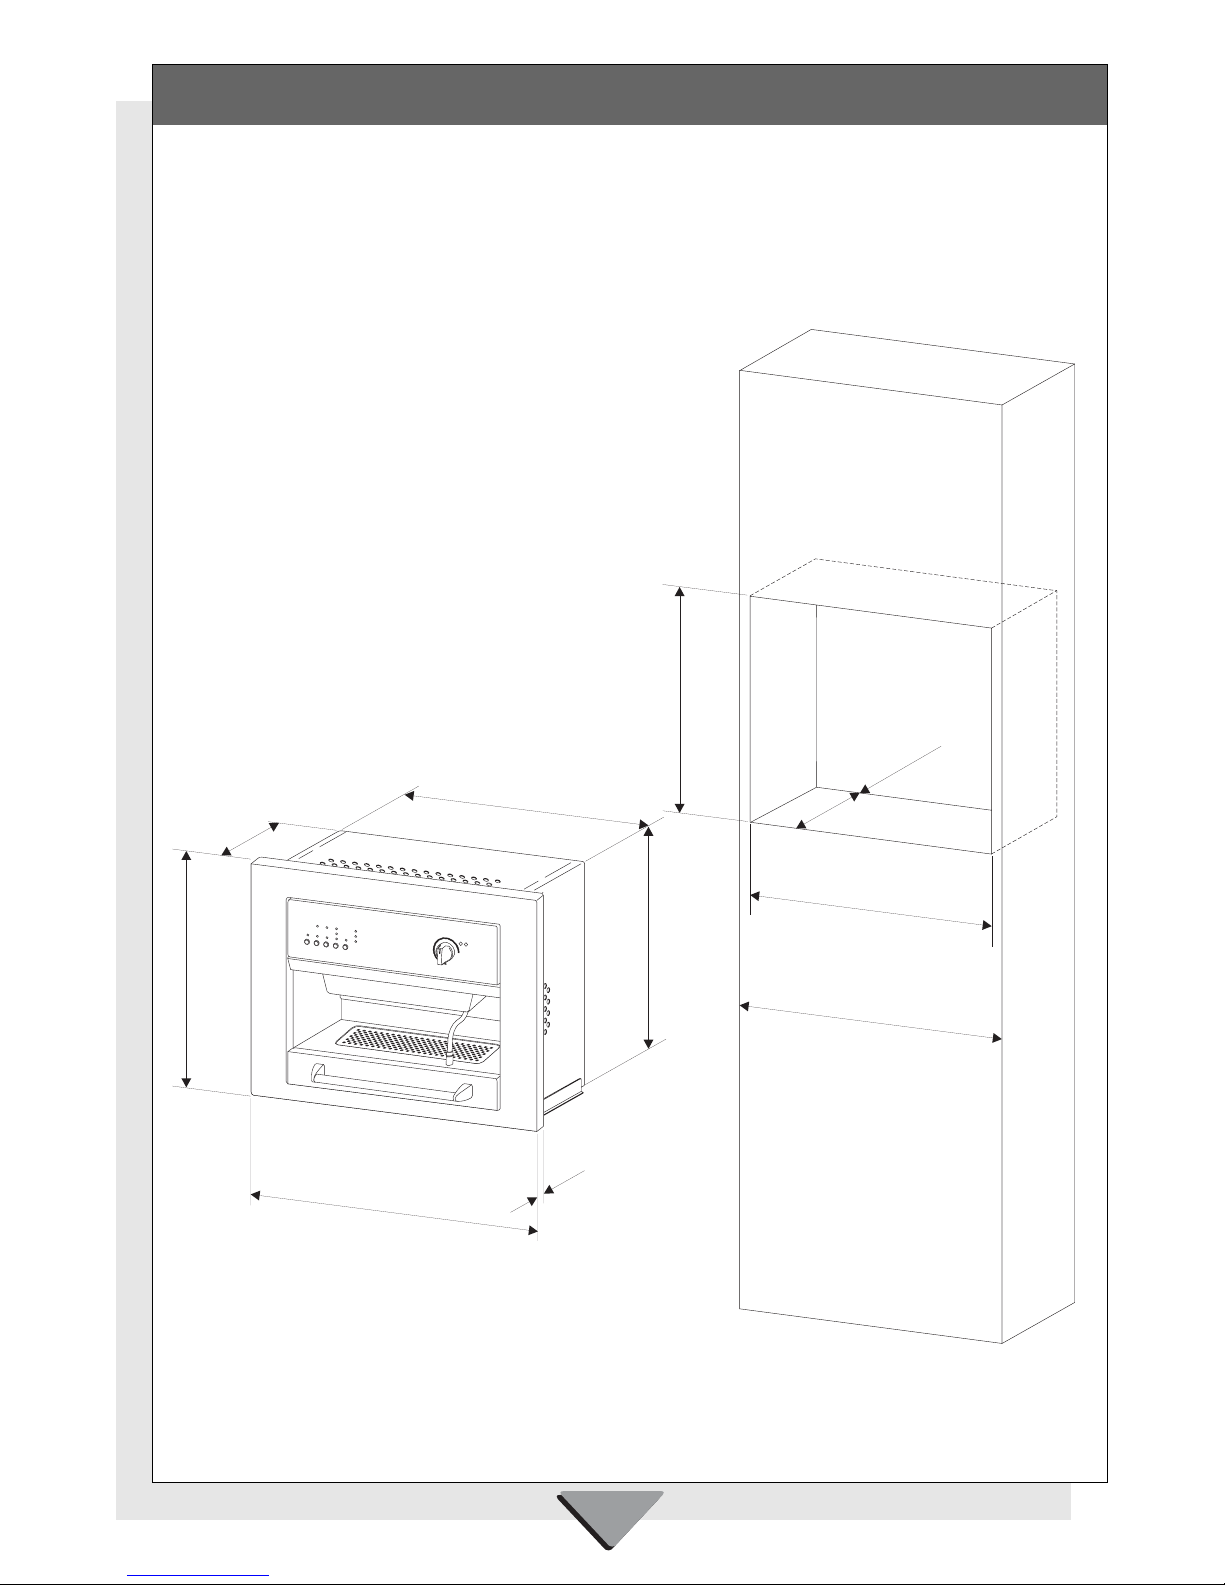
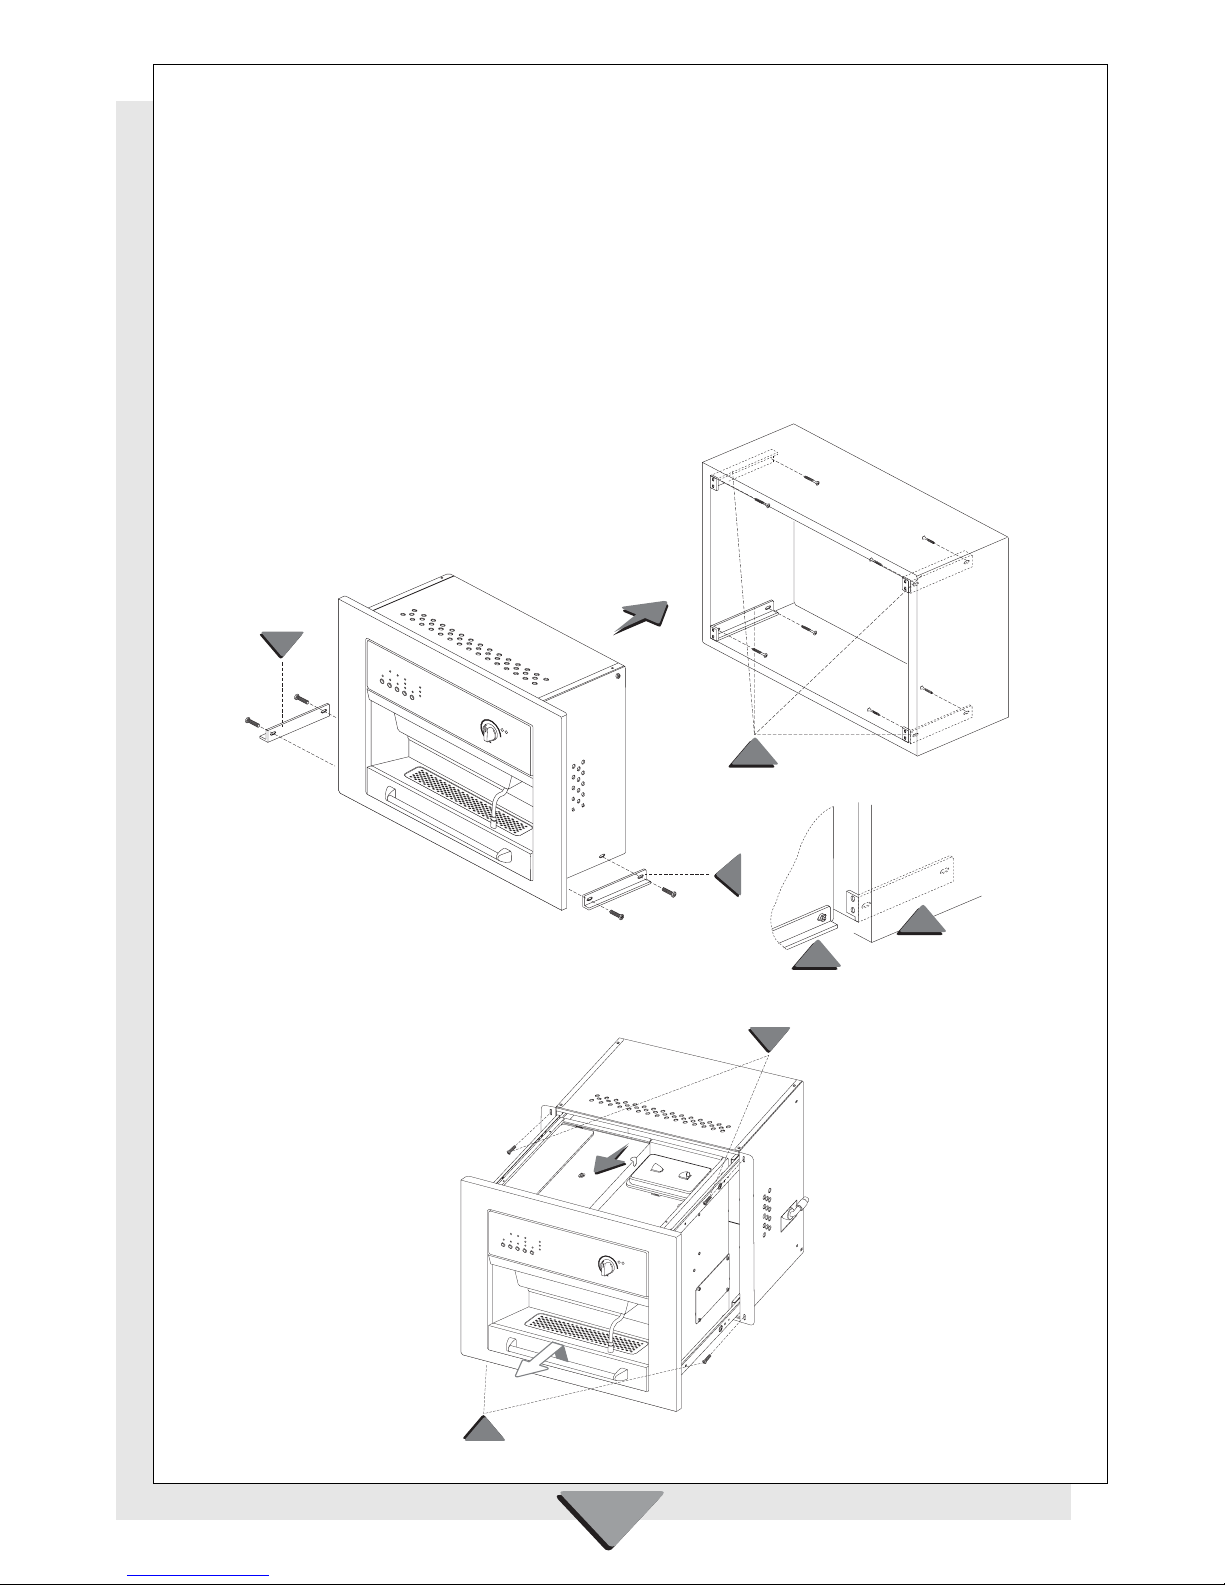
• The machine may also be built into a cabinet (special accessory). It is not suitable for outdoor use. Due to the weight of
the machine, the cabinet must be secured firmly to the wall.
• Installation, maintenance and repair works must only be carried out by qualified persons. Any installation, maintenance
and repair works carried out incorrectly may cause considerable danger to the user, for which the manufacturer will not
assume any liability.
• The machine should only be disconnected from the electricity supply when:
-The main switch of the electricity supply is disconnected;
-The fuse for the house electricity supply is removed;
-The plug to the machine is taken out of the electricity socket.
To disconnect the machine from the electricity supply, unplug without pulling on the cable.
• Under no circumstances should the machine casing be opened. Touching the voltage cables or changing the electrical
and mechanical structure may cause danger of electric shock. It may also affect the operation of the machine. The
manufacturer declines all responsibility for persons or property if the above instructions are not observed in full.
• If the machine has to be built in with other appliances, it must be separated from them with a shelf.
Use
Warning! Danger of scalding! Liquids leaving the distributors are boiling!
•Children should only use the machine under supervision. Children’s skin is more sensitive to high temperatures.
They may scald themselves! Remember too that espresso coffee is not a children’s drink.
•When using the machine for the first time, rinse the pipes to get rid of any deposits and for good hygiene.
•Only fill the water tank with drinking water at room temperature or chilled. Hot or boiling water or any other liquid may
damage the operation of the machine. It is advisable to replace the water daily to prevent bacterial growth.
•Only pour coffee beans into the coffee holder. If ground coffee is poured into the holder, it may damage the grinder.
•Sugar damages the machine!
Do not fill the machine with coffee beans treated with caramel, sugar or similar substances or instant coffee or other
substances containing sugar.
• Boiling water and steam may cause scalding, so these functions should be used with the utmost care. Never direct the
steam distributor towards parts of the body. It may cause scalding!
• Always ensure that the steam selector is disconnected when no steam is required. Otherwise, steam may escape
unintentionally. It may cause scalding!
• The water/steam distributor gets very hot during use. Only hold the distributor by the handle. It may cause scalding!
• Depending on the lime content of the water, the machine should be descaled regularly with a citric acid solution. In areas
of very hard water, the water pipes should be descaled more frequently.
The manufacturer will not be held liable for any damage caused by inadequate descaling.
Follow the mixing instructions indicated on the descaling pack. Otherwise, the machine may get damaged.
• Do not lean on the open drawer of the coffee machine, as this may damage the machine.
• If the coffee machine is built in with an oven with a pyrolytic cleaning function, disconnect the coffee machine during
pyrolytic cleaning, otherwise it may get damaged.
The manufacturer cannot be held liable for any damage caused by failure to observe the safety instructions and
warnings.

44
44
4
AMC15
DESCRIPTIONDESCRIPTION
DESCRIPTION AND OPERAAND OPERA
AND OPERAAND OPERA
AND OPERATIONTION
TIONTION
TION
The coffee machine has two heating systems, one for heating the water and one for the coffee. It is possible to prepare
boiling water (for tea) or to use the steam (for cappuccino) and to prepare espresso coffee.
Unlike most other machines, in this coffee machine, the beans can be ground just when they are required, allowing you to
taste the aroma of freshly ground coffee at its best.
If the cup used is smaller than the quantity programmed by the machine, the coffee supply can be interrupted at any time by
pressing button "1" (Figure 1A/B), which also enables the user to select the most suitable quantity.
The degree of grinding can also be set, by turning the knob on the left of the machine to select a more coarsely or more finely
ground mixture, depending on the user’s requirements.
The boiling water supplied by the machine is particularly suitable for preparing tea, as the temperature is ideal.
The coffee machine lighting comes on automatically when the machine is switched on by pressing the on/off switch.
For safety reasons, the coffee machine switches off automatically as soon as it is taken out of the cabinet.
The boiling water from the distributor can also be used to preheat the cups.
Fig. 1AFig. 1A
Fig. 1AFig. 1A
Fig. 1A
Fig. 1BFig. 1B
Fig. 1BFig. 1B
Fig. 1B
1
1

55
55
5
AMC15
N.B. Owing to the weight of the machine, the cabinet must be secured firmly to the wall.
1. Check that the opening dimensions can accommodate the machine (Fig. 2A/B).
Fig. 2AFig. 2A
Fig. 2AFig. 2A
Fig. 2A
INSTINST
INSTINST
INSTALLAALLA
ALLAALLA
ALLATION OFTION OF
TION OFTION OF
TION OF THE MATHE MA
THE MATHE MA
THE MACHINECHINE
CHINECHINE
CHINE
505
595
279
Min 290
19
438
458
450
±2
560
+6
600

66
66
6
AMC15
Fig. 2BFig. 2B
Fig. 2BFig. 2B
Fig. 2B
INSTINST
INSTINST
INSTALLAALLA
ALLAALLA
ALLATION OFTION OF
TION OFTION OF
TION OF THE MATHE MA
THE MATHE MA
THE MACHINECHINE
CHINECHINE
CHINE

77
77
7
AMC15
2. Fix the 4 brackets "A" to the 4 corners of the cabinet opening, using the appropriate screws (Fig. 3).
The horizontal movement of the nut allows any width tolerance of the cabinet to be offset.
3. Fix the 2 angular brackets "B" to the machine (Fig. 3). The 2 vertical holes on the brackets allow the height of the
machine to be levelled and aligned.
4. Connect the machine to the electricity supply, observing the current safety regulations.
Important: The current plug must be reachable after the installation of the machine.
5. Place the machine in the centre of the cabinet, taking care that the horizontal side of the 2 angular brackets "B" are
slotted into the appropriate holes on the brackets "A" (Fig. 3).
6. Open the machine by lifting the handle and pulling outwards, taking care not to pull it out of the cabinet (Fig. 4).
7. Secure the machine using the appropriate screws "C" (Fig. 4).
8. Close the machine.
The manufacturer declines any responsibility for persons or property and for the incorrect operation of the machine
if the above instructions are not observed in full.
Fig. 3Fig. 3
Fig. 3Fig. 3
Fig. 3
B
B
A
A
B
Fig. 4Fig. 4
Fig. 4Fig. 4
Fig. 4
C
C

88
88
8
AMC15
FILLINGFILLING
FILLINGFILLING
FILLING THETHE
THETHE
THE WW
WW
WAA
AA
ATERTER
TERTER
TER TT
TT
TANKANK
ANKANK
ANK AND COFFEE BEAN HOLDERAND COFFEE BEAN HOLDER
AND COFFEE BEAN HOLDERAND COFFEE BEAN HOLDER
AND COFFEE BEAN HOLDER
Filling the water tank
The water tank should only be filled once it has been taken out of the machine.
For a good espresso coffee, as well as using quality coffee, good water should also be used. It is therefore recommended
that you empty the water tank frequently, preferably daily, and refill it with fresh water. Avoid leaving the water for too long time
in the water tank.
Boiling water or other liquids may damage the coffee machine. Fill the water container daily with just cold or running
drinking water.
• Open the machine by lifting the handle and then pulling outwards.
• Take the lid off the water tank.
• Remove the tank and fill it with fresh water up to 4 cm from the top.
• Place the tank in the machine and replace the lid.
• Close the machine.
N.B. The symbol lights-up to indicate low water level and consequently the tank must be filled.
Filling the coffee bean container
Only fill the coffee bean container with beans for espresso coffee.
Any other substance, including ground coffee, will damage the coffee machine.
The coffee machine should not be filled with beans treated with caramel, sugar or other similar substances, instant
coffee or drinks containing sugar. Sugar can damage the machine.
The coffee bean container cannot be removed for technical reasons.
• Open the machine by lifting the handle and then pulling outwards.
• Take the lid off the coffee bean container.
• Fill the coffee bean container with coffee beans up to 2 cm from the top.
• Replace the lid on the container.
• Close the machine.
N.B. The symbol lights-up to indicate low coffee level and consequently the container must be filled.

99
99
9
AMC15
REMOREMO
REMOREMO
REMOVV
VV
VAL OF COFFEE GRAL OF COFFEE GR
AL OF COFFEE GRAL OF COFFEE GR
AL OF COFFEE GROUNDSOUNDS
OUNDSOUNDS
OUNDS ANDAND
ANDAND
AND WW
WW
WAA
AA
ATERTER
TERTER
TER
Whenever the positioned on the right-hand side of the keys lights-up,
it means that the coffee grounds container is full and must be emptied.
N.B. As soon as the container is full and the lights-up, the machine blocks and cannot be used.
IMPORTANT:
The container must be emptied regularly to prevent damage to the machine.
1.Open the drawer A
2.Take out the grid B
3.Take out and empty the used coffee tank Cand the water tank D.
4.Replace the two tanks and the grid in its location.
5.Close the drawer.
6. Press button for more than 3 seconds.
Now the machine is ready for use.
C
D
A
B

1010
1010
10
AMC15
Switch on
Switch the machine on and off using the ON/OFF button
Setting the grinding
Certain factors indicate whether the degree of grinding has to be adjusted:
• If the coffee comes out too quickly, this means that the beans have been ground too coarsely.
• If the coffee comes out slowly, this means that the beans have been ground too finely.
We recommend to use coffee beans with a mixture from 60 to 80% of Robusta quality and the remaining with Arabica
quality.
One very important factor for a good coffee is to set the degree of grinding correctly.
• Open the machine.
• Turn knob "A" on the left of the machine (Fig. 5) carefully.
Turning the knob clockwise gives a finer grinding, while turning it anticlockwise gives a coarser grinding.
Note: Rotate knob min. 3 turns anti-clockwise or clockwise to make one adjustment Coarser or Finer
IMPORTANT !!
After having set a new degree of grinding, it is necessary to do 3 coffee. Only the third coffee will come out with the
new degree of grinding set . The first two coffee come out with the previously coffee ground which is still in the coffee
grinder, so with the degree of grinding previously preset.
How to return to the intermediate grinding setting:
1 Turn on the appliance.
2 Carefully turn the knob “A” located on the left side of the appliance (Fig. 5) to the right until a “click” can be heard.
3 Carry out 6 complete turns towards the left.
4 The appliance is now fixed to the intermediate setting.
Fig. 5Fig. 5
Fig. 5Fig. 5
Fig. 5
OPERAOPERA
OPERAOPERA
OPERATIONTION
TIONTION
TIONAND USEAND USE
AND USEAND USE
AND USE

1111
1111
11
AMC15
Setting the quantity of coffee
The flavour of the coffee depends on the type and degree of grinding of the coffee used and also on the quantity of water.
Cups for normal coffee, espresso coffee and tea are not all the same size. To adjust the quantity of water desired accurately
to the size of the cup as well, three different espresso coffee positions can be set.
By pressing the following drinks can be selected:
A short coffee.
A normal coffee. The quantity of coffee is the one selected, with a larger amount of water.
A long coffee. In this case too, only the amount of water supplied is altered, giving a weaker flavour.
Coffee length adjustment
To vary and memorise the amount of coffee proceed in the following way:
• During infusion press and hold the key down until you have the amount of coffee desired.
• To memorise, once infusion has ended, use the key to select the type of coffee (short, medium or long) onto which the
new setting is to be memorised.
• Press and hold down the key again until the confirmation beep is heard.
Now the new amount of coffee is memorised and is associated to the type of coffee selected.
Setting 1 or 2 cups
It is possible to make just one coffee, or two coffees at the same time.
Choose by means of the following buttons:
One coffee
Two coffees at the same time.
Autotimer
The user may choose to set the “autotimer” function in the
machine (the machine switches off after 30 minutes from
its last use). Proceed as follows for machine status:
• switch the machine off using key 1
• press key 4; if the machine then makes a “beep” sound, it
means that self-switching off is activated; if the machine
does not make a “beep” sound when key 4 is pressed it
means that self-switching off is not activated.
To activate or deactivate machine self-switching off pro-
ceed as follows:
• switch the machine off using key 1
• press key 5 until a “beep” sound is heard (self-switching
off is activated or deactivated at every “beep”).
51 2 34

1212
1212
12
AMC15
Preheating cups and pipes
Espresso coffee should always be prepared with the pipes already heated and served in a hot cup that enhances the
aroma and prolongs the flavour. Thermal shock can alter the aroma of coffee.
The lower the quantity of espresso coffee in the cup, the more important it is to heat the cup.
• Place the cup under the boiling water distributor.
• Half-fill the cup.
• Leave the water in the cup for 30 seconds and then empty it. This will preheat the pipes as well.
Preparing coffee
•Position the cup or cups underneath the spouts.
• Check that the has stopped flashing. (= boiler temperature reached).
• Press the button to start the supply. The supply stops automatically but it can be stopped early by pressing the same
button again.
Hot water
• Use the key to switch the boiler on and prepare hot water.
• Wait for the symbol to stop flashing and remain illuminated.
• Place the cup or container under the distributor.
• Turn knob "A" (Fig. 7) to the left to obtain hot water.
Steam
• Switch on the heating system to obtain steam by pressing the
button
• Wait for the symbol to stop flashing and remain illuminated.
• Before placing the cup or container under the distributor, turn
the knob "A" (fig.7) to the left in order to let the remaining water
in the pipes coming out.
• Turn knob "A" (Fig. 7) to the left to obtain steam.
PREPPREP
PREPPREP
PREPARAARA
ARAARA
ARATION OFTION OF
TION OFTION OF
TION OF THE DRINKSTHE DRINKS
THE DRINKSTHE DRINKS
THE DRINKS
Fig. 7Fig. 7
Fig. 7Fig. 7
Fig. 7
A

1313
1313
13
AMC15
For cleaning, the machine should not be immersed in water or in other liquids.
Allow the machine to cool down before cleaning it. Danger of scalding! Do not use steam appliances to clean it.
Never use products containing soda, acid or chlorine, as these substances damage the surface of the machine.
Regular cleaning guarantees the functioning and long life of your espresso coffee machine.
Front and interior of the machine
Take out the filter holder, tray and basin and clean both the front and the interior of the machine with a soft sponge, using
delicate products and hot water, preferably.
Dry with a soft cloth to avoid scratching.
Water tank
Preferably, empty the water tank every day and fill it, if possible, just before use, with cool, running, drinking water.
Wash the water tank by hand using a delicate product.
Hot water/steam distributor
Clean hot water/steam distributor with a soft sponge, preferably using just hot water. If there are any deposits, it is
recommended that you wash the parts in the dishwasher. The steam nozzle can be unscrewed for washing in the
dishwasher. When it is used for frothing milk, we recommend that the steam is allowed to escape to get rid of any
remaining milk or froth present.
CARE AND CLEANINGCARE AND CLEANING
CARE AND CLEANING

1414
1414
14
AMC15
DESCALING THE MACHINEDESCALING THE MACHINE
DESCALING THE MACHINE
When the machine is switched off, the “water missing” LED flashes, which means that your machine must be decalcified
with specific products appropriate for coffee machines.
Attention – Very important!
Do not use lemon-based products for decalcification. These products contain citric acid which, on contact with
calcium at high temperatures, has a chemical reaction. Dicalcium citrate is formed that may lead to total blocking of
the hydraulic circuits.
For security reasons and safeguard of the environment, we recommend to decalcify the machine (each 2 months)
using only vinegar. Vinegar is a good product for decalcifying but is less powerful than the common chemical products
for decalcification, therefore it is necessary to decalcify more frequently your machine.
Therefore, if the machine indicates to do the decalcification you need to do it with chemical and specific product available
on the market following the instructions attached with the product.
Proceed as follows:
- switch the machine off using key 1
- switch the machine on by holding key 1 pressed down for several seconds. The “water missing” red LED together with
other selection LEDS will be switched on. The switched-on selection LEDS indicate the percentage of machine cleanli-
ness as follows:
If the LEDS switched on are:
2+3+4+5 = cleanliness 100%
2+3+4 = cleanliness 75%
2+3 = cleanliness 50%
2 = cleanliness 25%
To start the decalcifying cycle proceed as follows:
Cycle 1
• Press keys 4 and 5 at the same time and hold them down. Successively also press key 1. The machine will start the
decalcifying cycle.
• It is possible to note that the decalcifying cycle is activated because the red “water/coffee missing” LEDS flash alternately.
Once the first cycle has ended the red “water/coffee missing” LEDS will stop flashing.
The 2,3,4,5 selection LEDS indicate the decalcifying phase.
Cycle 2
• Press key 5. LEDS 2+3 are switched on. The red “water/coffee missing” LEDS flash alternately.
• Switch off the machine and remove the water from the water container.
• Fill half water container with the specific product for decalcification.
• Open the drawer and remove the water and used coffee from the containers both located in the drawer. Close the drawer
without putting the grid and place the steam distributor in direction of the container located in the drawer in order that the
water which comes out from the steam distributor goes directly in the container in the drawer.
Cycle 3
• Switch the machine on and wait for the confirmation “beep”, open the tap. LED 4 will switch on and the machine will
automatically carry out the decalcifying phase.
• When all of the decalcifying product as finished, LED 5 will switch on and several beeps will be continually heard, these
confirm that decalcification has ended.
• Close the steam tap.
• Switch the machine off.
• Remove the water container and wash it well. Fill the water container with clean water.
• Close the machine.
Cycle 4
• Switch the machine on using key 1
• On hearing the confirmation beep, open the steam tap and press key 5. At this point the machine will carry out the pipes
washing cycle.
• As soon as the cleaning cycle is finished, the machine is ready to work normally.
• Close the tap and fill the water container with fresh and clean water. Wait until the temperature of the coffee and water has
been reached.
• After having done two coffees, the machine is ready for use.
The manufacturer can not be responsible for any damages caused by not respecting the instructions regarding
coffee machine descaling.
51 2 34

1515
1515
15
AMC15
When the coffee machine indicates it is not working properly (indicator light or “failure” display depending upon model), it is necessary
to disconnect the machine from the network (open and close the machine or disconnect the plug from the current) in order to obtain
a “reset” function of the electronic.
The machine does not come on.
- Front not completely closed.
- No electricity supply.
The coffee does not come out or comes out slowly.
- No water in the tank.
- Coffee too finely ground.
- Pipes contain limescale.
The coffee comes out too slowly and is not very creamy.
- Coffee too coarsely ground.
- Coffee too old.
The milk does not froth.
- Check the fat content of the milk.
Noisy supply pump.
- No water in the tank.
- Insufficient pressure in the filter holder causing too coarse grinding.
Malfunctioning alarms:
The electronics manage and recognise several alarms and functioning abnormalities.
These are indicated by the flashing of certain symbols.
1. Machine switched off:
Alternate flashing of symbols:
= Steam tap open.
Solution: Close tap.
2. Machine switched on:
Flashing of symbol = Fault
Solution: Try opening and re-closing the machine before calling technical assistance.
3. Machine switched on:
Contemporary flashing of the and symbols = Water circuit alarm.
Solution: Check the water tank and open the water tap, releasing water from the steam nozzle until the symbols stop
flashing (Circuit recharge) and close the vapour tap.
4. Machine switched on:
Contemporary flashing of the and symbols = Grinder alarm.
Solution: Check for the presence of foreign bodies in the grinder (Stones, hard impurities etc.).
Turn the grinding adjustment knob in an anticlockwise direction (coarse grinding) as far as possible. Remove any foreign
bodies by activating the grinder for a few seconds. Reset the grinding knob in the previous position.
For any further operating problems, contact your nearest Assistance Centre.
OPERAOPERA
OPERAOPERA
OPERATINGPRTINGPR
TINGPRTINGPR
TINGPROBLEMSOBLEMS
OBLEMSOBLEMS
OBLEMS

1616
1616
16
AMC15
TECHNICAL DTECHNICAL D
TECHNICAL DAA
AA
ATT
TT
TAA
AA
A
• External dimensions (mm):
Height 458 x Width 595 x Depth 295
• Built-in dimensions (mm):
Height 450 x Width 568 x Depth 290
• Operating voltage: 220-240 V – 50/60 Hz
• Pump pressure: 15 bar
• Pump power: 48 Watts
• Coffee heating power: 1000 Watts
• Steam heating power: 600 Watts
• Grinder power: 100 Watts
• Power max: 1470 Watts
• Water tank capacity: Approx. 2.5 litres
• Coffee tank capacity: Approx. 250 g
• Coffee heating time: Approx. 2 mins
• Gross weight: 36,9 kg
Net weight: 32,6 kg
This appliance complies with EC Directive 73/99:
•Relating to electrical safety regulations EN 60335-1 (August 1995 – safety of electric domestic appliances and the
like) and EN 60335-2-15 (April 1996 – specific regulations relating to equipment for preparing hot water).
•EMC 89/336 and relevant regulations:
55014-1
55014-2
61000-3-2
61000-3-3
The European Directive 2002/96/EC on Waste Electrical and Electronic Equipment (WEEE), requires that old household
electrical appliances must not be disposed of in the normal unsorted municipal waste stream. Old appliances must be
collected separately in order to optimise the recovery and recycling of the materials they contain and reduce the impact on
human health and the environment.
The crossed out “wheeled bin” symbol on the product reminds you of your obligation, that when you dispose of the
appliance it must be separately collected.
Consumers should contact their local authority or retailer for information concerning the correct disposal of their old
appliance.
DISPOSAL OF OLD ELECTRICAL APPLIANCESDISPOSAL OF OLD ELECTRICAL APPLIANCES
DISPOSAL OF OLD ELECTRICAL APPLIANCES


MorleyWay,Peterborough,PE29JB,England
www.hotpoint.co.uk
Table of contents
Other Hotpoint Coffee Maker manuals