Hotpoint RS778GJ Specification sheet

J
/’
0
GridNe
‘owtogetYourGrfl
the best from
Range
Conknb
Aluminum Foil
28
Use and Care of
Anti-Tip Bracket
3,5
Appliance Registration
2
Baking.
Bakinz
Guide 24.25
Broiling, Broiling Guide
28,29
Canning Tips
9
Care and Cleaning
32-35
Clock/Timer
22
Cookware Tips
10, 11
Energy-Saving Tips
5
Features
6,7
Griddle
12-16
Grill
17-21
Installation Instructions
5
Leveling
5
Light Bulb Replacement
32
Model and Serial Numbers
2
Oven
23
Problem Solver
36,37
Reuair
Service
39
Roasting, Roasting Guide
26,27
Safety Instructions
3,4
Self-Cleaning Instructions 30,31
Surface
Cooking
8-11
Thermostat Adjustment
33
Vent Duct
32
Warranty Back Cover
models
RS778GJ
Rs7pGJ
GE Answer
Center@
800.626.2000

Help us help you...
Before using your range,
read this book carefully.
It is intended to help you operate
and
maintiin
your new range
properly.
Keep it handy for answers to your
questions.
If you don’t understand something
or need more help, write (include
your phone number):
Consumer Affairs
Hotpoint
Appliance Park
Louisville, KY 40225
Write down the model
and serial numbers.
You’ll find them on a label on
the front of the range behind the
oven door.
These numbers are also on the
Consumer Product Ownership
Registration Card that came with
your range. Before sending in this
card, please write these numbers
here:
Model Number
Serial Number
Use these numbers in any
correspondence or service calls
concerning your range.
If you received
a damaged range . . .
Immediately contact the dealer (or
builder) that sold you the range.
Save time and money.
Before you request
service...
Check the Problem Solver on
pages 36 and 37. It lists causes of
minor operating problems that you
can correct yourself.
THE
GULL/G~DLE
RANGE IS
AVMLMLE
FOR
EITHER
VO/240
OR DO/208 VOLT OPERATION. BE
SURE YOUR RANGE POWER SUPPLY
MEE~
THE
ELE~UCAL
REQUIREMENTS OF YOUR MODEL.
We recommend use of high-air-flow hood (models
JV374,
JV474
or
JV674)
or high-air-flow
Spacemaker@
microwave oven
model JVM72 or
JVM172
to remove smoke during grilling.
To add versatility to your range, the following accessories are available at
extra cost from your Hotpoint dealer.
Accessories—Modules Model
N7~GJ
Model
~7WGJ
For 240 volt only For 208 volt only
Calrod”
Surfice
Unit
JX32 JX32
Grill
JXGM8 JXGM9
Griddle
JXGD48 JXGD49
2

IMPORT~T
S~TY
~STRUCTIONS
Read all
imtructions
before
wi~
thk
appliance.
—
men
using electrical appliances,
basic safety precautions should
be followed, including the
following:
c
Use this appliance only for its
intended use as described in this
manual.
. Be sure your appliance is
properly
instied
and grounded
by a qualified technician in
accordance with the provided
installation instructions.
●
Don’t attempt to repair
or replace any part of your
range unless it is specifically
recommended in this book.
All
other servicing should be refereed
to a qualified technician.
●
Before performing any
service,
DISCONNE~
THE
RANGE POWER SUPPLY
– AT THE HOUSEHOLD
DIS~~ON
P~L
BY
REMOWNG
THE FUSE
OR
SWTCHING
OFF THE
CmCUIT
BRE~R.
can
tip and
injury
codd
mtit.
To
prevent
accidenti
tipping of the
range,
attach
it to the
W
or floor by
insWing
the
ANTI-TIP bracket supplied. To
check if the bracket is
insded
and engaged properly, remove the
drawer and inspect the rear
levehg
leg. Make sure it fits securely
into the slot in the bracket.
If you pull the range out from the
—
wall for any reason, make sure
the rear leg is returned to its
position in the bracket when you
push the range back.
Q
Do not leave children
alone—
children should not be left alone
or unattended in an area where
an appliance is in use. They
should never be allowed to sit or
swd
on any part of the appliance.
●
Don’t allow anyone to climb,
stand or hang on the door,
drawer or range top. They
cotid
damage the range and even tip
it over, causing severe personal
injury.
●
CAUTION: ITEMS OF
~TE~T
~
CHILDREN
SHOULD NOT BE
S~~D
~
CABINE~
ABOVE A
RANGE OR ON THE
BACKSPLASH OF A
RANG&C~LDREN
CL~ING
ON THE
RANGE
~
REACH ITEMS
COULD BE
SEWOUSLY
INmD.
c
Never wear loose-fitting or
hanging garments while using
theapptice.
Hamma
ble
material
could be ignited if brought in
contact with hot heating elements
and may cause severe burns.
Q
Use only dry pot
holders—
moist or damp pot holders on
hot surfaces may result in bums
from steam. Do not let pot
holdem
touch hot heating elements. Do
not use a towel or other bulky
cloth in place of a pot holder.
●
Never use your appliance for
warming or heating the room.
● Storage in or on
appliance—
H
amrnable
materials should not be
stored in the range or near it.
●
Keep hood and grease filters
clean
to maintain good venting
and to avoid grease fires.
3
●
Do not let cooking grease
or other flammable
materi~
accumulate in or near the
range.
●
Do not use water on grease
fires. Never pick up a flaming
pan. Smother flaming pan on
surface unit by covering pan
completely with
we~-fitthg
lid,
cookie sheet or flat tray.
Flaming grease outside a pan
can be put out by covering with
baking soda or, if available, a
multi-purpose dry chemical
or foam type fire extinguisher.
● Do not touch heating
elements or interior surface of
oven.
These surfaces may be hot
enough to bum even though they
are dark in color. During and
after use, do not touch, or let
clothing or other flammable
materials contact surface units,
areas nearby surface units or any
interior area of the oven; allow
sufficient time for cooling, first.
Potentially hot surfaces include
the grates, griddle,
cooktop
and
areas facing the
cooktop,
oven
vent opening and surfaces near
the opening, and crevices around
the oven door. Remember: The
inside surface of the oven may be
hot when the door is opened.
c
When cooking pork,
follow
the directions
emcdy
and always
cook the meat to an intemd
temperature of at least
l~°F.
This assures that, in the remote
possibility that trichina may be
present in the meat, it will be
killed and the meat will be safe
to eat.
●
Keep the reflector and grease
co~ector
clm
to reduce smoking
and avoid grease fires.
-

IMPO~ANT
S~TY
INSTRUCTIONS
(continued)
Oven
●
Stand away from range when
opening oven door. Hot air or
stmm
which escapes can cause
burns to hands, face and/or
ey~.
s
Don’t heat unopened food
containers in the oven. Pressure
could build up and the container
could burst, causing an injury.
Q
Keep oven vent duct
unobstructed.
●
Keep oven free from grease
buildup.
●
Place oven shelf in desired
position while oven is cool.
If
shelves must be handled when
hot, do not let pot holder contact
heating units in the oven.
Q
Pulling out shelf to the
shelf stop is a convenience in
lifting heavy foods. It is
dso
a
precaution against burns from
touching hot surfaces of the
door or oven walls.
● When using cooking or
roasting bags in oven,
follow
the manufacturer’s directions.
.
Do not use your oven to dry
newspapers.
If overheated, they
can catch fire.
Self-CleaniW
Oven
Q
Do not clean door gasket.
The door gasket is essential for a
good seal. Care should be taken
not to rub, damage or move the
gasket.
●
Do not use oven cleaners. No
commercial oven cleaner or oven
liner protective coating of any
kind should be used in or around
any part of the oven.
●
Clean only parts listed in this
Use and Care Book.
●
Before self-cleaning the oven,
remove broiler pan and other
utensils.
Surface
CWMW
Unifi
●
Use
proper
pan
sti-This
appliance is equipped with a
six-
inch and an eight-inch surface
unit. Select utensils having flat
bottoms large enough to cover
the
surface unit heating element. The
use of undersizd utensils will
expose a portion of the heating
element to direct contact and may
result in ignition of clothing.
Proper relationship of utensil to
burner
WW
dso improve efficiency.
● Never
leave
surface units
unattended at high heat
se-
Boilover
causes smoking and
greasy
spillovers
that may catch
on fire.
● Be sure drip pans and vent
ducts are not covered and are
in place.
Their absence during
cooking could damage range
parts and wiring.
. Don’t
use aluminum
foil
to
line drip pans
or anywhere in
the oven except as described in
this book. Misuse could result in
a shock, fire
hard
or damage
to the range.
●
Only certain types of glass,
glass/ceramic, earthenware or
other
gl-d
containem are
suitable for range-top service;
others may break because of the
sudden change in temperature.
(See section on “Surface
Cooking” for suggestions.)
●
To avoid the possibility of
burns,
ignition of flammable
materials, and
sptiage,
the
hande
of a container should be
turnd
toward the center of the range
without extending over nearby
units.
●
Mways
turn surface unit to
0~
before removing utensil.
●
Keep an eye on foods being
fried at HIGH or MEDIUM
~GH
heats.
s
To avoid the possibility
of a burn or electric shock,
always be certain that the
controls for all surface units
are at OFF position and
all
coils are cool before attempting
to remove the unit.
●
Don’t immerse or soak
removable surface
unifi.
Don’t
put them in a dishwasher. Do
not self-clean the surface units
in the oven.
● When flaming foods under
the hood, turn the fan off. The
fan, if operating, may spread
the flame.
●
Foods for frying should be as
dry as possible.
Frost on frozen
foods or moisture on fresh foods
can cause hot fat to bubble up
and over sides of pan.
●
Use little fat for effective
shallow or deep-fat frying.
Filling the pan too full of fat can
cause
spillovers
when food is
added.
● If a combination of oils or
fafi
will be used in frying,
stir
together before heating, or as fats
melt slowly.
●
Mways
heat fat slowly,
and
watch as it heats.
● Use deep fat thermometer
whenever possible
to prevent
overheating fat beyond the
smoking point.
SAVE
TH~E
INSTRUCTIONS
4

Instilling
Your Range
Your range,
like many other
household items, is heavy and
can settle into soft floor coverings
such as cushioned vinyl or
carpeting. When
moving
the range
on this type of flooring. use care.
We recommend that you follow
these simple and inexpensive
instructions.
The range should be installed on
a sheet of plywood (or similar
material) as follows:
When the
floor
covering ends at the front of
the range,
the area that the range
will rest on should be built up with
plywood to the same
level
or higher
than the floor covering. This
will
allow
the range to be moved for
cleaning or servicing.
Wveling
the
Range
Leveling screws are located on
each corner of the base of the
range. Remove the bottom drawer
and you can level the range on
an uneven floor with the use of
a nutdriver or by using pliers on
the hex flats of the leg.
To
remove drawer, pull drawer
out all the way, tilt up the front
and take it out. To replace
drawer,
insert glides at back of
drawer beyond stop on range glides.
Lift drawer if necessary to insert
easily. Let front of drawer down,
then push into close.
One of the rear leveling screws
will engage the ANTI-TIP bracket
(allow for some side to side
adjustment). Allow a minimum
clearance of 1/8” between the range
and the leveling screw that is to be
installed into the ANTI-TIP bracket.
We~-Saving
~ps
Surface Cooking
s
Use cookware of medium weight
aluminum, with tight-fitting covers,
and flat bottoms which completely
cover the heated portion of the
surface unit.
●
Cook fresh vegetables with a
minimum amount of water in a
covered pan.
. Watch foods when bringing them
quictiy
to cooking temperatures at
HIGH heat. When food reaches
cooking temperature, reduce heat
immediately to lowest setting that
will keep it cooking.
. Use residual heat with surface
cooking whenever possible. For
example, when cooking eggs in the
shell, bring water and eggs to boil,
then turn to OFF position and cover
with lid to complete the cooking.
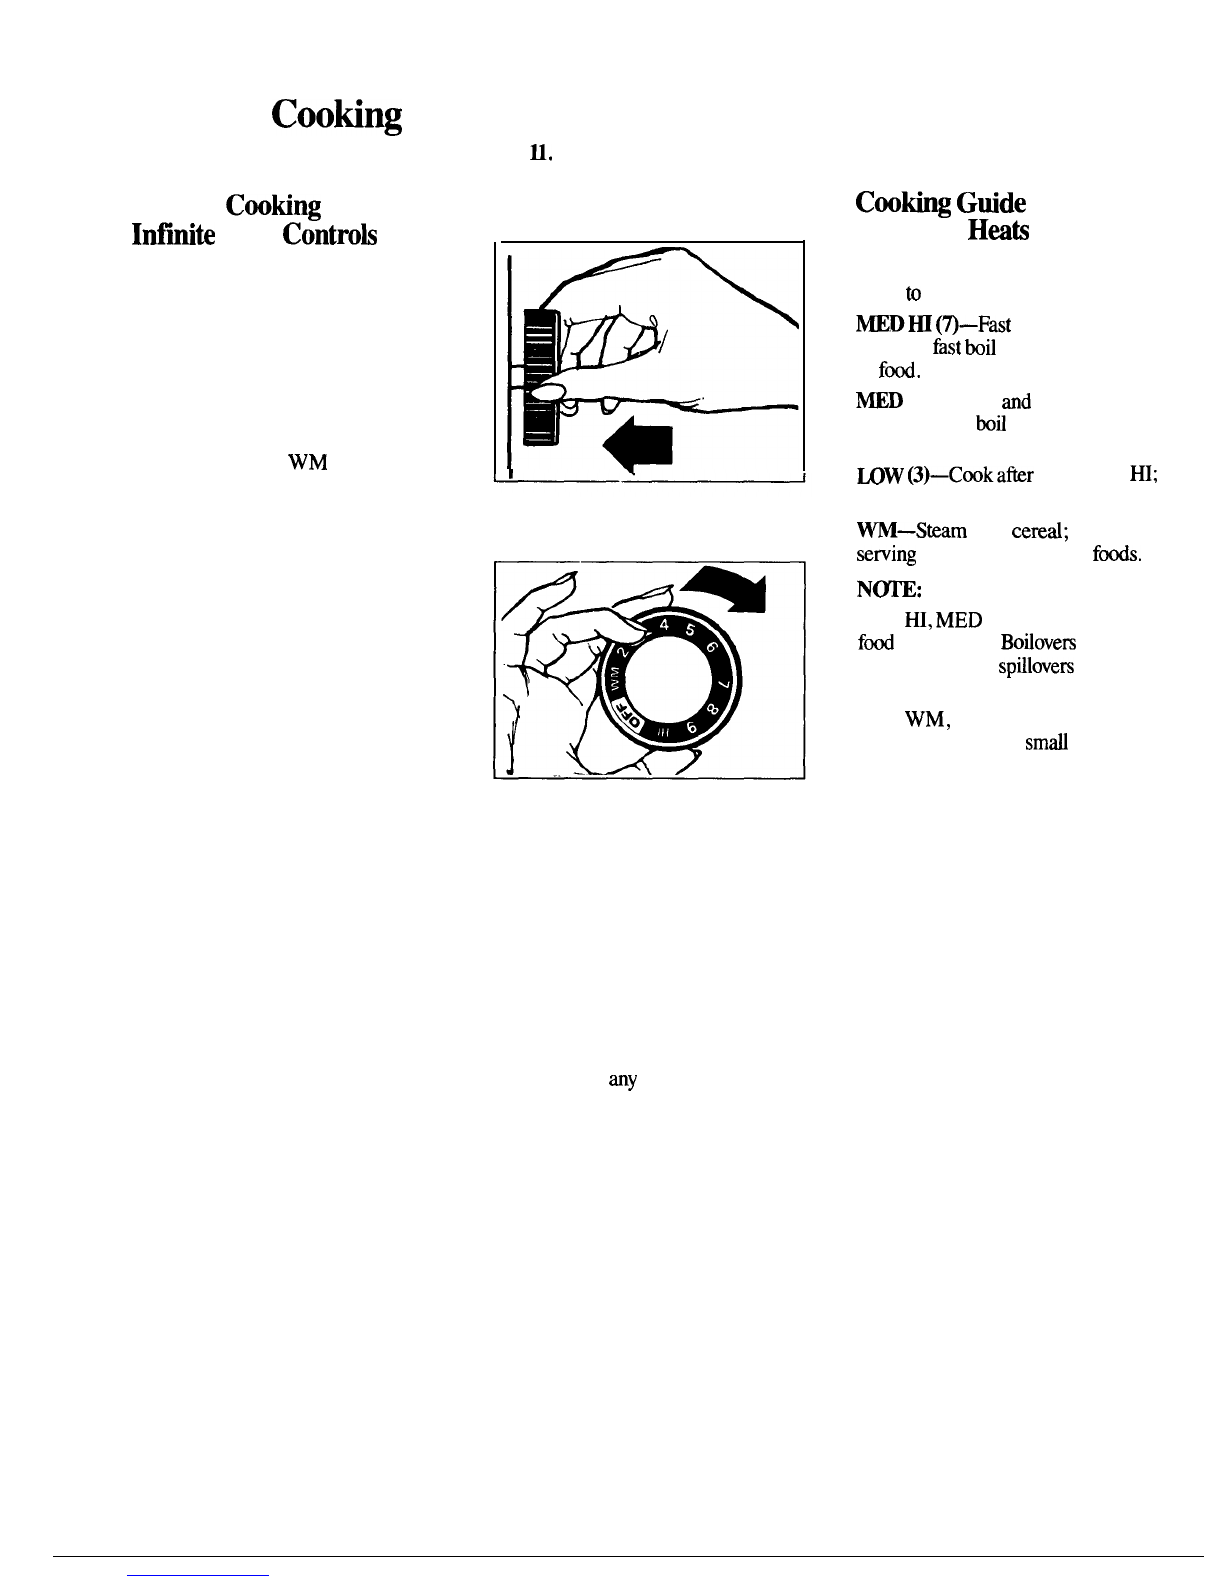
Use correct heat for cooking task:
HIGH—to start cooking (if time
allows, do not use HIGH heat to
start).
MEDIUM HI—quick browning.
MEDIUM—slow frying.
LOW—finish cooking most
quantities, simmer—double boiler
heat, finish cooking, and special
for small quantities.
WARM—to maintain serving
temperature of most foods.
●
When boiling water for tea or
coffee, heat only the amount
needed. It is not economical to boil
a container full of water for only
one or two cups.
Grid~e
Cooking
. Preheat griddle only when
necessary. Foods high in natural
fat, such as bacon or sausage, can
be started on a
cold
griddle.
Grill Cooking
● Heat only half the grill when
cooking small amounts of food.
Use rear position for best results.
Oven Cooking
● Preheat oven only when
necessary. Most foods will cook
satisfactorily without preheating.
If you find preheating is necessary,
watch the indicator light, and put
food in oven promptly after the
light goes out.
●
Always turn oven OFF before
removing food.
. During baking, avoid frequent
door openings. Keep door open as
short a time as possible if it is
opened.
●
Be sure to wipe up excess spillage
before starting the self-cleaning
operation.
Q
Use residual heat in the oven
whenever possible to finish
cooking casseroles, oven meals,
etc.
Also
add rolls or precooked
desserts to warm oven, using
residual heat to warm them.
●
Cook complete oven meals
instead of just one food item.
Potatoes, other vegetables, and
some desserts will cook together
with a main-dish casserole, meat
loaf, chicken or roast. Choose
foods that cook at the same
temperature and in approximately
the same time.
5

Features of Your Grill/Griddle Range
6

Features of Your Grill/Griddle Range
lxplaine(
on page
2
8
lxplaine(
on page
17
Feature Index Feature Index
1 Model and Serial Number Plate 15 Grill Heater (Plug-in heating unit
used when cooking with grill.)
2 Master Indicator Lights for Surface
Units (When any surface unit is on,
this light will come on and stay on
until the unit is turned off.)
16
Grill (2-Piece Grate)
(Remove when griddle is being used.
Grates support foods being grilled.)
17
12
22
22
23
23
3 Surface Unit Controls
8
30
30
23
17 Plug-In Griddle (Remove when not
in use. Use for meats, pancakes or
other foods usually prepared in
frying pan or electric skillet.)
18 Automatic Oven Timer
19 Clock and Minute Timer
20 Oven Cycling Light (Light glows
when oven is energized.)
4 Lock Light (Glows when oven has
reached cleaning temperature and
oven will be locked. Oven door cannot
be opened when this light is on.)
5 Oven Cleaning Light (Glows when
all
steps for cleaning have been set.
Cycles off and on with the oven
heating units after oven reaches
heating temperature. )
6 Oven Set Knob
7 Oven “On” Light (Glows when oven
is turned on for any type of oven
cooking or self-cleaning, and remains
on as long as oven is in use. )
8 Calrod” Module (Entire unit can be
easily removed for cleaning. Plugs into
either side for optimum convenience. )
9 One-Piece Chrome-Plated
Drip Pan/Rings
21 Oven
Temp
Knob
22 Oven Vent (Oven is vented through
this grill directly above oven door.)
—
23
8
35
23 Door Latch
30
24 Interior Oven Light (Automatically
turns on when the oven door is
opened or may be turned on with
switch on right front of door when
door is closed.)
32
23
25 Embossed Shelf Supports (Letters A,
B, C and D indicate cooking positions
for shelves as recommended on
baking, roasting and broiling guides.)
10 Calrod” Plug-In Surface Units
33
12, 17
11 Backsplash (Helps keep wall clean
from spattering; shows grill and
griddle settings of frequently
prepared foods.)
26 Oven Shelves
23
28
28
24
30
3,5
35
35
27 Broiler Pan and Rack
28 Broil Unit
29 Bake Unit (Maybe lifted gently
for cleaning oven floor.)
30 Woven Door Gasket
31 Anti-Tip Bracket
(See Installation Instructions)
32 Storage Drawer
12 Grill Module (Remove and store if
second
Calrod@
Module or Griddle
is being used. )
17
17
13 Grease Collector Pan and Shield
(Positioned under Grill Module or
Plug-In Griddle and removable for
easy cleaning. )
14 Reflector (Supports Grill Heating
Elements and Griddle. Fits directly
above Grease Collector. )
17
33 Oven Liner
7

Surface
Cooting
See Surface Cooking Guide on pages 10 and
U.
Surface
Cooting
with
Infitite
Heat
Controk
Your surface units and controls
are designed to give you an infinite
choice of heat settings for surface
unit cooking.
At both OFF and HI positions, there
is a slight niche so control “clicks”
at those positions; “click” on HI
marks the highest setting; the lowest
setting is between WM and OFF. In
a quiet kitchen, you may hear slight
“clicking” sounds during cooking,
indicating heat settings selected are
being maintained.
Switching heats to higher settings
always shows a quicker change than
switching to lower settings.
How to Set the Controls
Step 1:
Grasp control knob and
push in.
Step
2: Turn either clockwise or
counterclockwise to desired heat
setting.
Control must be pushed in to set
only from OFF position. When
control is in any position other
than OFF, it maybe rotated
without pushing in.
Be sure you turn control to OFF
when you finish cooking. An
indicator light will glow when
ANY heat on
any
surface unit is on.
Coohg
Gtide
for Using
Ha@
~—Quick start for cooking; bring
water
to
boil.
~D~
(n–Fast
fry, pan bred;
maintain
tist
bod on large amount
of
fd.
~D
(4)—Saute
and
brown;
maintain slow
bod
on large amount
Of food.
~W
(3)–Cookafter
starting
at
HI;
cook with little water in covered pan.
W—Steam
rice,
ced;
maintain
sewing
temperature of most
fds.
N-:
1. At
~,
MED
HI (7), never leave
fd
unattended.
Bodovers
cause
smoking; greasy
spdlovers
may
catch fire.
2. At WM, LOW (3), melt
chocolate, butter on
sm~
unit.
8

Questions &Answers
Q. May I can foods and preserves
on my surface
units?
A. Yes, but
only use cookware
designed for canning purposes. Check
the manufacturer’s instructions and
recipes for preserving foods. Be
sure canner is flat-bottomed and
fits over the center of your Calrod”
unit. Since canning generates large
amounts of steam, be careful to
avoid burns from steam or heat.
Canning should only be done on
surface units.
Q.
Can I cover my drip pans with
foil?
A. No. Clean as recommended
in
Cleaning Guide.
Q. Can I use special cooking
equipment, like an oriental wok,
on any surface units?
A. Cookware without flat surfaces
is not recommended. The life of
your surface unit can be shortened
and the range top can be damaged
from the high heat needed for this
type of cooking.
Q. Why am I not getting the heat
I need from my units even though
I have the knobs on the right
setting?
A. After turning surface unit off
and making sure it is cool, check to
make sure that your plug-in units
are securely fastened into the
surface connection.
Home Canning
~ps
Canning should be done on
cooktop only.
In surface cooking of foods other
than canning, the use of
large-
diameter pots (extending more than
l-inch beyond edge of trim ring) is
not recommended. However, when
canning with water-bath or
pressure canner, large-diameter
pots may be used. This is because
boiling water temperatures (even
under pressure) are not harmful to
cooktop surfaces surrounding
heating unit.
HOWEVER, DO
N~
USE
LARGE DIAMETER CANNERS
OR OTHER LARGE DIAMETER
P~S
FOR FRYING OR
BOILING FOODS
~HER
THAN WATER. Most syrup or
sauce mixtures—and all types of
frying—cook at temperatures much
higher than boiling water. Such
temperatures could eventually
harm
cooktop
surfaces surrounding
heating units.
Observe Following Points
in Canning
1. Bring water to
boil
on HIGH
heat, then after boiling has begun,
adjust heat to lowest setting to
maintain boil (saves energy and
best uses surface unit.)
2. Be sure canner fits over center
of surface unit. If your range does
not
allow
canner to be centered on
surface unit, use smaller-diameter
pots for good canning results.
3. Flat-bottomed canners give best
cantling
results. Be sure bottom of
canner is flat or slight indentation
fits snugly over surface unit.
Canners with flanged or rippled
bottoms (often found in enamelware)
are not recommended.
UGHT
WRONG
Q. Why does my cookware tilt
when I place it on the surface unit?
A. Because the surface unit is
not flat. Make sure that the “feet”
on your
Calrod”
units are sitting
tightly in the range top indentation
and the reflector ring is flat on the
range surface.
Q. Why is the porcelain finish on
my cookware coming
offl
A. If you set your Calrod” unit
higher than required for the
cookware material, and leave it, the
finish may smoke, crack, pop, or
burn depending on the pot or pan.
Also,
a too high heat for long
periods, and small amounts of dry
food, may damage the finish.
9
4. When canning, use recipes from
reputable sources. Reliable recipes
are available from the manufacturer
of your canner; manufacturers of
glass jars for canning, such as Ball
and Kerr; and the United States
Department of Agriculture
Extension Service.
5. Remember, in following the
recipes, that canning is a process
that generates large amounts of
steam. Be careful while canning to
prevent burns from steam or heat.
N~E:
If your range is being
operated on low power (voltage),
canning may take longer than
expected, even though directions
have been carefully followed. The
process may be improved by:
(1)
using a pressure canner, and
(2) for fastest heating of large
water quantities, begin with
H~
tap water.

Surface Cooking Guide
Cookware
~ps
Flat
ground
Pvroceram”
sauce~ans saucepan to the size of the surface
.
or s~llets
coa~ed
on the bottom
with aluminum generally cook
evenly. Use glass saucepans with
heat-spreading trivets available
for that purpose.
unit. A pan that extends more
than an inch beyond the edge of the
trim ring traps heat which causes
“crazing” (fine hairline cracks) on
porcelain, and discoloration ranging
from blue to dark gray on chrome
trim rings.
1. Use medium-or heavy-weight
cookware. Aluminum cookware
conducts heat faster than other
metals. Cast iron and coated cast
iron cookware is slow to absorb
heat, but generally cooks evenly at
LOW or MEDIUM settings. Steel
pans may cook unevenly if not
combined with other metals.
2. To conserve the most cooking
energy, pans should be flat on the
bottorn,have straight sides and
tight-
fitting lids. Match the size of the
Fond
Directions and Setting
to Start Cooking Setting to Complete
Cooking
Cookware Comments
Cereal
Cornmeal, grits,
oatmeal Covered
Saucepan HI. In covered pan bring
water
to
boil before adding
cereal.
HI.
Stir together water or
milk, cocoa ingredients.
Bring
lust
to a boil.
LOW (3) or WM, then add cereal.
Finish timing according
to package directions.
MED (4),
to
cook 1 or 2 minutes
to completely blend ingredients.
Cereals bubble and
expand
as
they cook; use large enough
saucepan to prevent
boilover.
Uncovered
Saucepan
Cocoa
Milk boils over rapidly. Watch as
boiling point approaches,
LOW (3)
to
maintain gentle but
steady perk.
Coffee Percolator HI. At first perk, switch
heat to LOW (3). Percolate 8 to 10 minutes for
8
cups, less for fewer cups.
Eggs
Cooked in shell
Covered HI. Cover eggs with COOI
water, Cover pan, cook
until steaming.
MED HI (7). Melt butter, add
:ggs
and cover skillet.
LOW (3). Cook only 3 to 4
minutes for soft cooked;
15 minutes for
hard
cooked
Fried sunny-side-up
Covered
Skillet
Continue cooking at MED HI (7)
until
whites are just set, about
3
to
5 more minutes,
LOW (3), then add eggs, When
bottoms of eggs have just set,
carefutly turn over
to
cook other
side.
[fyou do not cover skillet, baste
:ggs
with fat to cook tops evenly.
Fried over easy
Uncovered
Skillet HI. Melt butter
Poached Covered
Skillet HI. In covered pan bring
water to a boil. LOW (3). Carefully add eggs
Cook uncovered about 5
minutes at MED HI (7),
Remove cooked eggs with slotted
spoon or pancake turner.
Scrambled or omelets
HI. Heat butter until light
golden in
color.
MED (4). Add egg mixture
Cook, stirring to desired
doneness.
Eggs continue to set slightly after
cooking. For omelet do not stir
last few minutes. When set, fold
in half.
Skillet
Fruits
Covered
Saucepan HI. In covered
pan
bring
fruit and water
to
boil. LOW (3). Stir occasionally
and
check for sticking.
Fresh fruit: Use 1/4
to
t/2 cup
water per pound of fruit,
Dried fruit: Use water as package
directs. Time depends on wbether
fruit has been presoaked, If not,
allow more cooking time.
Meat can be seasoned and floured
before it is browned, if desired.
Liquid variations for flavor
could
be wine, fruit or tomato juice or
meat broth.
Meats, Poultry
Braised: Pot roasts of
beef, lamb or veal;
pork steaks and
chops
Covered
Skillet
HI
Melt fat, then add meat
Switch to MED HI (7) to
brown meat. Add water or
other liquid.
LOW (3). Simmer until fork
tender.
Timing: Steaks I to 2-inches: 1 to
2
bours.
Beef Stew: 2
to
3 hours,
Pot Roast: 2
M
to 4 hours,
Parr-fried: Tender
chops; thin steaks up
to 3/4-inch; minute
steaks; hamburgers;
franks and sausage;
tbin
fish
fitlets
Uncovered
Skillet HI,
Preheat skillet, then
grease lightly, MED HI (7) or MED (4). Brown
and
cook to desired doneness,
turning over as needed.
Parr
frying is best for thin steaks
and chops. If rare is desired, pre-
heat skillet before adding meat.
10

RIGHT
3.
Deep Fat
F~ing.
Do not overfill
kettle with fat
tha~may
spill over
when adding food. Frosty foods
bubble vigorously. Watch foods
frying at HIGH temperatures and
keep range and hood clean from
accumulated grease.
r
~
~
NOT
OVER 1“
Directions and Setting
to Start Cooking
HI. Melt
fat.
Switch
to
MED
HI (7) to brown chicken.
Setting to Complete
Cookin~
Food
Fried Chicken
Cookware
Covered
Skillet LOW (3). Cover skillet and
cook until tender.
Uncover last few minutes.
For crisp dry chicken, cover only
after switching to LOW (3) for 10
minutes. Uncover and cook, turning
occasionally 10 to 20 minutes.
A more attention-free method
is to start and cook at MED (4).
Parr fried bacon Uncovered
Skillet
HI.
[n
cold skillet, arrange
bacon
slices. Cook just
until starting to sizzle.
HI. Melt fat. Switch to MED (4)
to
brown slowly.
MED HI (7). Cook, turning
over as needed.
Sauteed:
Less
tender
thin steaks (chuck,
round, etc.); liver;
thick or whole fish
Simmered or stewed
meat; chicken; corned
beef; smoked pork;
stewing beef; tongue;
etc.
Melting chocolate,
butter, marshmallows
Covered
Skillet LOW (3). Cover and cook
until tender. Meat may be breaded or
marinated in sauce before frying.
HI. Cover meat with water
and
cover pan
or
kettle.
Cook until steaming.
LOW (3). Cook until fork
tender. (Water should
slowly boil). For very large
loads, medium heat may
be needed.
Add salt or other seasoning
before cooking if meat
bas
not
been smoked or otherwise
cured.
Covered
Dutch Oven,
Kettle or
Large
Saucepan
Small
Uncovered
Saucepan.
Use small
surface unit
WM.
~w
10
to
~
MiOUtCS
to
melt through. Stir
to
smooth. When melting marshmallows, add
milk or water.
Tbick batter takes slightly longer
time. Tam over pancakes when
bubbles rise to surface.
Pancakes or
French toast
Skillet
or
Griddle
MED HI (7). Heat skillet 8
to
10 minutes. Grease lightly. Cmk
2 to 3 minutes per side.
Pasta
Noodles or spaghetti Use large enough kettle to
prevent
boilover.
Pasta doubles
in size when cooked.
Covered
Large Kettle
or Pot
HI.
In covered kettle, bring
salted water to a boil, uncover
and add pasta slowly so
boiling does not stop.
MED HI (7). Cook uncovered
until tender. For large
amounts, HI may be
needed to keep water at
rolling boil throughout
entire cooking time.
H].
Heat until first jiggle is
heard. MED HI (7) for foods cooking
10 minutes or
less.
MED (4) for
foods over 10 minutes.
LOW (3). To finish cooking.
Cooker sbould
ji~le
2 to 3 times
per minute.
Pressure Cooking
Pressure
Cooker or
Canner
HI. Bring just
to
boil.
Puddings, Sauces,
Candies. Frostings
Stir frequently to prevent
sticking.
Uncovered pan requires more
water and longer time.
Uncovered
Saucepan
Vegetables
Fresh Covered
Saucepan
H1.
Measure 1/2 to
1
inch
water in saucepan. Add
salt and prepared vegetable
[n covered saucepan bring
to
boil.
HI.
Measure water and salt
as
above.
Add frozen block
of vegetable. In covered
saucepan bring to
boil.
HI. in skillet melt fat.
MED (4). Cook 1 pound 10
to 30 or more minutes,
depending on tenderness
of vegetable.
Break up or stir as needed while
cooking.
Frozen Covered
Saucepan LOW (3). Cook according to
time
on
package.
Sauteed: Onions;
green peppers;
mushrooms; celery;
etc.
Rice and Grits
Uncovered
Skillet MED (4). Add vegetable
Cook until desired
tenderness is reached.
Tam over or stir vegetable as
necessary for even browning.
Covered
Saucepan Triple in volume after cooking.
Time at WM. Rice:
1
cup rice and
2 cups water-25 minutes. Grits:
1 cup grits and 4 cups
water—
40 minutes.
HI. Bring salted water to a
boil..
WM. Cover and cook
according
to
time.
11

Gridde
Your non-stick coated griddle
provides an extra-large cooking
surface for
meak,
pancakes, or
other
food usually prepared in a
frying pan or electric skillet.
You can also use the griddle as
a warming tray, with a low-heat
setting.
How to
&semble
Griddle
r
Step 1:
Position the Grease
Collector Pan in the cooktop space
provided. Remove grease from the
Grease Collector Pan after each use.
Step 2:
Fit the Reflector Pan over
the Grease Collector.
Clean
the
Reflector often.
1
1
—
Step
3:
Plug the non-stick coated
griddle into the receptacle.
How to Set Griddle Control
The control knob must be pushed
into start; this prevents surface
heating units from being turned on
accidentally. Push the knob in only
when it is in the OFF position.
Men
the knob is in any other position, it
can be turned without pushing it in.
The griddle has a self-contained
heating element which can be
controlled by setting the
right
front control
(when griddle is used
on right side), or
left rear control
(when griddle is used on left side).
Push in control knob.
Turn knob to the heat setting
you want.
N~E:
Before
ih
first
use,
condition
or “season” your griddle.
Apply a thin
layer
of cooking oil
to the top surface and heat on HI
setting for 10 minutes. Griddle
is ready to use.
Before every use,
be sure griddle
components are clean.

Griddle
~ps
● Most griddled foods require
cooking on a preheated surface,
which may be greased lightly
before adding food. Preheat griddle
5 minutes at HIGH setting unless
otherwise indicated on the Griddle
Cooking Guide (see page 14), then
switch to recommended cook setting.
●
Foods which are high in natural
fat, such as bacon or sausage, may
be started on a cold griddle.
●
Foods to be warmed may be
placed directly on the griddle; a
high domed metal cover such as an
inverted kettle, placed over them
will help store the heat. Foods in
covered dishes or pans may also be
warmed on the griddle. Use
heat-
resistant dishes only.
● Condition or “season” griddle
before first-time use.
. Make sure grease collector and
reflector pans are clean before
using griddle.
Questions and Answers
Q.
How should I store my griddle
when it is not in use?
A.
To avoid marring the non-stick
finish, store griddle upright on the
edge with terminals up to avoid
damage. If it is necessary to store it
flat, avoid placing other pans or
utensils on top.
Q. How long can foods be kept
warm with the griddle, without
losing their appeal?
A. No longer than 2 hours is
recommended, to assure
good food
quality and prevent spoilage. Delicate
foods, such as eggs, should not be
kept more than 15 to 30 minutes;
entrees and casseroles may be
warmed
for 30 to
@
minutes. Hors d’oeuvres
will stay hot for serving up to 1 or
ly*
hours. Rearrange or stir foods
occasionally, if possible.
Q.
Why aren’t my foods done
even though they have cooked the
full time?
A. Under low
voltige
conditions,
foods may be lighter brown than
desired. Preheat the griddle for a
longer time and leave foods on the
griddle longer to attain the desired
degree of browning.
13
Q.
Can
my griddle be switched to
the other side of the range where it
wotid
be more convenient for me?
A.
All interchangeable modules
can be used on either the right or
left side of your
cooktop.
Simply
lift out the elements, taking care
not to damage the electrical contacts
by jerking or forcing them. Reverse
the griddle and plug it into the
receptacle on the opposite side of
the range.
Q. Do I need special cookware
for use with my griddle?
A.
Avoid using metal cookware
with sharp points or rough or sharp
edges which might damage the
non-stick coated griddle surface.
Do not cut foods on the griddle.
Use only heat-resistant dishes
when foods in containers are to be
warmed on the griddle. For further
information on caring for your
griddle’s surface, see the cleaning
instructions on page 34.
Q. Can prolonged periods of high
heat damage my griddle’s surface?
A. A brief preheating period is
often necessary for best results
with many foods, but leaving the
griddle on HIGH heat setting for
more than 10 minutes without food
can damage the non-stick coating.
Always be sure to turn control
knobs to OFF when cooking is
completed.

Griddle
Cootiq
Guide
Do not leave range unattended
during “preheat” (knobs turned
to “HI”) or anytime the knobs
are turned to “HI” with food on
the
Grill
or Griddle.
2.
Avoid using
meti
utensils with
sharp points or rough or sharp
edges which might damage the
non-stick coated griddle surface.
Do not cut foods on the griddle.
Use only heat-resistant dishes
when foods in containers are to
be warmed on the griddle.
Add oil or butter at end of preheat
time. Additional oil or butter may
be needed during cooking time.
4. Rearrange or turn foods over as
needed to assure even cooking.
1.
Su~esticookingtimes
should be
used only as a guide since variables
in food may change cooking times.
5.
Griddle settings may need to be
adjusted if griddle is used for an
extended time.
3. Preheat griddle 5 minutes unless
otherwise indicated in guide below.
I
Suggested
Food
Setting Cook Time Comments
Do not
preheat.
~rn
to setting
8
after half of total cooking time.
Bacon–1 lb.
HI to
8
Beef Strips and Cubes
1/2
to l-in.
HI to 8
Chops,
Pork/hmb
1A
to
Y2-in. 7
Cube Steak
HI
Eggs
Fried
4
Scrambled HI to 8
English Muffins
Warm HI
Fish Fillets and Steaks
1A
to l-in.
HI
Franks-1 lb.
HI to 8
11-14
6-10
25-30
Strips cut 3 inches long and l/4-inch wide. Cut cubes 1 inch.
4-5
perside
4-5
2-3
Griddle up to
6 eggs.
Avoid drain hole.
34
17-24
10-12
10-12
Tarn over often.
Turn to setting
8
after half of total cooking time.
If drained canned fruit is used, decrease time 3 to 5 minutes,
If bread is frozen, pierce with fork several times to absorb
egg
mixture.
Fruit Slices–%
to %-in.
I
HI
French Toast
HI
Ham and Canadian
Bacon Slices
1A
to 1/2-in.
HI
3-3% per side
For l-inch ham steak, double cooking time,
8-10
Hamburgers
%-in.,
4 per lb.
Medium
7
Well
7
Meatballs—l-in.
8-9
Pancakes
HI
16-18
19-21
18-22
2-3
2-3 per side
Turn over only once. Avoid pressing down with spatula to retain juices.
Turn to brown on all sides.
Prebeat
10 minutes. Turn after
1%
minutes.
If thicker, add
1
to 2 minutes.
Sandwiches,
thin
I
6-8
Sausage Links,
precooked
1
to 2 oz. each
HI to 8
4 oz. each
HI to 8
17-19
19-24
Turn and
rearrtirrge
as needed. For raw sausage, increase time
4 to 10 minutes.
Small Seafood
Shrimp, scallops, oysters
HI
Sweet Rolls,
reheating
78-10
1O-H
Cook in 2 tablespoons butter. if desired. Turn or
rearrarree
frauentlv,
u..
Do not preheat. Cover lightly with foil. If room temperature,
griddle 5 to 7 minutes.
10-16
Delicate foods:
15-30 minutes
Entrees,casseroles
and
bors
d’wuvres:
up to
1
hour
~rn
over after half of time,
To retain moisture, cover with foil or metal lid. Or, place food in
beat-resistantcontainersongriddle.
14

Griddle Recipes
French Toast
French toast was originally devel-
oped to create an appetizing break-
fast from stale bread. While syrup
and butter are traditional accom-
paniments, Strawberry Butter,
below, adds an interesting taste
variation.
Preheat: HI—5 minutes
Cook: HI to 9—4 to 6 minutes
Serves 4 to 5
3 eggs
3/4 cup milk
1 tablespoon sugar
1/4 teaspoon salt
8 to 10 slices white bread
1 tablespoon butter
Preheat griddle 5 minutes at HI
setting.
In
small mixing bowl, beat
eggs, milk, sugar and salt until
smooth and blended.
Dip bread into egg mixture, coating
both sides.
Spread butter on preheated griddle.
Cook at HI or 9 setting 2-3 minutes
per side until golden brown. Serve
with syrup or Strawberry Butter,
below.
Strawberry Butter
1/2 cup butter, softened
1 cup strawberry preserves
Place butter and preserves in
small
mixing bowl. Beat with mixer until
well blended.
Griddle Pizza
Preheat: HI—5 minutes
Cook: HI to 8-10 to 14 minutes
total
Makes 8 pizzas, 5 inches each.
Crust
2 cups biscuit mix
1/2 cup water
Sauce
1 can (8 oz.) tomato sauce
1/4 teaspoon garlic salt
1/2 teaspoon dry minced onion
1/4 teaspoon oregano
1/2 teaspoon sugar
1 tablespoon butter
Preheat griddle 5 minutes. In small
mixing bowl, stir together biscuit
mix and water. Divide dough into 8
equal parts. On floured surface, roll
out each part into a 5-inch circle.
In mixing bowl, stir together tomato
sauce, salt, onion, oregano and
sugar. Set aside. Melt butter on
griddle, add 4 pizza rounds.
Griddle 3 to 4 minutes at
H]
set-
ting. Turn over, add 2 tablespoons
sauce on each and 2 or more of
toppings, listed below. Cover with
foil and griddle at setting 8 for 2 or
3 minutes
until
hot.
Toppings
Use 2 tablespoons of the following
for each pizza: Mozzarella or Par-
mesan cheese; cooked ground
chuck or sausage; chopped ham;
chopped mushrooms or green
peppers.
15
Salmon or
Tua
Patties
Preheat: HI—5 minutes
Cook: HI to 9-7 to 11 minutes
1 can (13-15 oz.) salmon or tuna,
drained and flaked
1 egg
1/3 cup dry bread crumbs
1/4 cup catsup
1/4 cup water
1 teaspoon onion salt
1 tablespoon parsley, minced
1
tablespoon lemon juice
1 tablespoon butter
Preheat griddle 5 minutes at HI
setting. In large mixing bowl, mix
salmon, egg, bread crumbs, catsup,
water,
salt,
parsley and lemon juice.
Form into 6
equai
patties.
Melt butter on preheated griddle.
Add patties and griddle about 4 to
5 minutes per side, until browned
and firm.
Note: Or make in 36( l-inch) balls.
Griddle
12
to 15 minutes at HI set-
ting. Turn often.
Fish and Potato Patties
Substitute 1 cup mashed potatoes
for egg, bread crumbs, catsup and
water.
Fish and Chips Patties
Substitute 1 cup crushed potato
chips for bread crumbs and add
I / 2 cup chopped olives and
1
/ 2 cup shredded cheddar cheese.

Griddle Recipes
(continued)
Brunch Egg Scramble
Preheat: HI-5 minutes
Cook: 9—2 to 3 minutes
Serves 4
6 eggs
1/2 cup evaporated milk
1/2 teaspoon salt
1
teaspoon dry minced onion
2
tablespoons butter
1 can (4 oz.) chopped green
chilies, drained
1 cup cheddar cheese, shredded
Preheat griddle 5 minutes at
H]
setting. In large mixing bowl, mix
eggs, milk, salt and onion until
thick and very smooth.
Place butter on griddle. Add egg
mixture and griddle 2 to
3
minutes
at setting 9, stirring often until
evenly cooked. Stir in green chilies
and cheese until cheese melts. Serve
warm.
Chicken Livers with
Bacon and Onions
Preheat: HI-5 minutes
Cook: HI—16 to 19 minutes
Serves 3 to 4
1/4 cup flour
1 teaspoon salt
1/4 teaspoon pepper
1 pound chicken livers
6
slices bacon
1
medium onion, sliced 1/4 inch
thick
In small mixing bowl combine
flour, salt and pepper. Mix well.
Coat livers with flour mixture; set
aside. Cut each slice of bacon cross-
wise into 4 parts and
place
on pre-
heated griddle. Cook 3 to 4 minutes
at HI setting. Add onions and
coated livers to griddle and cook
13
to 15 minutes at HI setting, stir-
ring often until livers are brown
and tender.
Corn Cakes
Preheat: HI—5 minutes
Cook: HI-2-l/2 to 3 minutes per
cake
Makes 12 to 15 cakes
1 tablespoon oil
1
cup yellow corn meal
1 teaspoon salt
2
tablespoons sugar
1/2 cup boiling
water
1 egg
1/2 cup milk
2 tablespoons butter, melted
1/2 cup flour
2 teaspoons baking powder
1 cup cream style corn
Preheat griddle, then spread
oil
evenly over griddle.
In small mixing bowl, mix corn
meal, salt and sugar.
Add water and mix well.
Beat together egg, milk and butter
and add to mixture.
Stir in flour and baking powder.
Add corn and stir.
Measure
1/4
cup of batter for each
cake. Pour on griddle and cook at
HI 1-1/2 minutes. Turn over and
continue cooking
I
to l-l/2 min-
utes. Serve with Honey Butter
Sauce, below.
Honey Butter Sauce
1/4 cup butter
3/4
cup honey
1 teaspoon cinnamon
Place all ingredients in a l-quart
saucepan. Cook at HI setting 2 to
3 minutes until butter is melted.
To
Microwave
this sauce, place in
l-quart casserole and microwave at
HI
1
to 2 minutes. Stir to
blend.
Basic Meatballs
Preheat: HI—5 minutes
Cook: HI-15 to 18 minutes
Makes 48—1 inch balk
1 pound ground chuck beef
2 eggs
1 cup dry bread crumbs
1/4 cup mik
1 teaspoon salt or seasoned salt
1
tablespoon cooking oil
In large mixing bowl, mix ground
chuck, eggs, crumbs, milk and salt.
Form mixture into 48 balls, about
1
inch each.
Place oil on preheated griddle, add
the meatballs and cook at HI setting
for 15 to 18 minutes. Turn frequently
to brown all sides.
Sausage and Ham Balls: Substitute
l/2 pound sausage and 1/2 pound
ground ham for beef.
Savory Meatballs: Add 1 teaspoon of
one of the following: curry powder,
chili powder, basil
OR
add 2 tea-
spoons mustard and 2 tablespoons
catsup OR add
1
packet (half of
2 3/4 ounce box) dry onion or
tomato soup mix.
16

Grill
You can enjoy grilled foods year
‘round, prepared in your own
kitchen on the grill that came
with your range.
Separate heating elements can be
set at different temperatures,
allowing you to use half the
cooking surface to grill meat and
the other half to prepare potitoes
or other vegetables, for a
complete meal.
How to Assemble the Grill
J}-
1
Step 1:
Position the Grease
Collector and Pan in the cooktop
space provided.
Step
2:
Fit the Reflector Pan over
the Grease Collector.
Step 3: Plug the Grill Heating Unit
into the receptacle so Heating Unit
rests on
the
edge of the Reflector Pan.
11~—-
I
Step
4: Place the 2-piece grate over
the heating element. Each half of
the grill is controlled by one of the
surface heating unit control knobs
on that side of the range.
How to Set Grill
Controk
The control knobs must be pushed
in to start; this prevents surface
heating units from being turned on
accidentally. Push the knob in only
when it is in the OFF position.
men
the knob is in any other position, it
can be turned without pushing it in.
Front and rear units of the grill
heating unit are
controlld
separately
by setting one or both surface unit
control knobs. Heat only half the
grill surface for cooking small
portions; or set each half at a
different temperature for cooking
different types of foods.
—
Push in control
knob
or knobs,
depending on
area
needed for food.
[
I
\,+/
N~E:
Be sure grill components
are cleaned before each use.
Turn knobs to the heat setting
you want.
17

Grill
~ps
● Do not leave
grill
unattended
while in use.
. Occasionally rearrange foods on
the grill, to prevent sticking and
provide better browning.
● Remove accumulated grease from
drip pan after each use, to lessen
smoking and odors. Grease buildup
can also become a fire hazard.
●
Trim fat from meats before
placing on grill. This will reduce
smoking and lessen grease buildup
in the collector pan. The trimmings
may be rubbed on the hot grates to
help prevent sticking.
. Grates should be oiled or sprayed
with a non-stick vegetable oil
before cooking to prevent sticking.
● Use the
grill
unit ONLY with a
high air-flow vented hood to carry
away smoke and fumes.
● Preheat grill for 5 minutes at
HIGH heat setting, then turn to
desired setting for cooking,
● Make sure grease collector and
reflector pans are clean before
using
grill.
●
Allow space between foods when
placing them on the grill. Air needs
to circulate around the food for best
cooking results.
Questions and Answers
Q. When cooking many individual
foods, what can I do to ensure
that foods will cook evenly?
A.
When cooking foods of various
sizes and thicknesses, start larger
or thicker pieces first, add
quicker-
cooking small pieces later. Press
meat lightly to lie flat on grill;
slash the fat on edges of steaks and
chops to prevent curling; break the
joints of split chickens so they will
lie flat.
Q. My grilled meats sometimes
come out drier than they should.
What can I do to help prevent this?
A.
Season meats after cooking
rather than before—salt can draw
out juices and dry out meat. Use
tongs to turn and rearrange meats
on the grill; forks will pierce the
meat and release juices.
Q. I follow the cooking times
suggested, but my foods don’t get
done properly. Is there something
wrong with my grill?
A. Probably not. Suggested
cooking times should be used only
as a general guide. Variables in
food can change cooking times
required.
Q. How can
I
keep barbecued
meak
from developing an
unattractive burned
look
and taste?
A.
Sauces containing sugar will
often burn if used during the entire
cooking time. If your favorite sauce
contains sugar, try adding it only
during the last 15 to 20 minutes of
cooking time for best results.
Q. Should I use the vent hood
during preheating?
A. Yes.
Turning the ventilation
hood on during preheating helps
eliminate smoke from the heating
elements as cooking soils burn off.
Q. Can my grill be switched to
the other side of the range?
A. Yes. These interchangeable
modules can be used on either the
right or left side of the
cooktop.
When inserting or removing a
module, take care not to force the
connection or exert undue pressure
which could damage the electrical
contacts.
Additional modules can be
purchased from your dealer, to
double your grill/griddle capacity
or to add two more
Calrod@
surface
heating units.
Q. Foods cooked on my
grill
are
not browning as much as I like.
What could cause this?
A.
If your range is being operated
on low power (voltage), foods may
be lighter brown than expected. A
longer preheating and grill time
may be necessary to achieve the
results desired.
Q. When cooking
small
loads
with only
half
the heating
elements, foods
are
not browning
as much as I
like.
What could
cause this?
A.
To get optimum cooking
performance with small loads, use
the rear heating element. Longer
preheating time may be required
to get the desired results.
18

Grill Cooking Guide
Do not leave range unattended
during “preheat” (knobs turned
to “HI”) or anytime the knobs
are turned to “HI” with food on
the Grill or Griddle.
1.
Preheat at HI setting for 5 minutes
4. Suggested cooking times should
before grilling.
~rn
to cook setting be used only as a guide, since
on guide for your particular food. variables in food can change
2. Trim excess fat from
meat,
cooking times.
3.
Before cooking steaks, slash fat
around edges to prevent curling
of meat.
Suggested
Setting
Cook Time
17-20
Comments
Marinate less tender
beef before grilling.
Food
Beef Cubes, 1 inch
Chicken:
Pieces or Quarters
HI
9
50-60 (total)
70-80 (total)
40-50
If sauce is desired, baste last 15 to 20 minutes, turn and rearrange often
Chicken,
halves
9
Cornish
Hens, halves
9
Fish Steaks
Turn or rearrange often.
Brush with melted butter.
If stuffed, add 6 minutes to total time. Cover top with foil.
Firm fruit such as apples and pineapples are recommended.
~rn
often.
I
1 inch or less
HI
15-20
Fish.
whole (6 to 8 oz.)
717-20
Ii
Fruit Slices (
%
to %-in. )
9
17-22
11
Ham Steaks (1
to
lfi-in.
) HI 8-10
per
side
Hamburgers
(%-in.)
Rare
Medium
Well
6-7 per side
8-9 per side
10-11 per side
Turn over afier half of cooking time.
HI
HI
HI
Ham Chunks
1
inch, precooked
9
17-20
Hot
Dogs
HI 7-9 (total)
Rearrangeoften
fibobs
Meat HI
Vegetable
HI
Lamb Chops
(%
to l-in. )
HI
20-25
10-15
For less tender vegetables such as tomatoes, reduce time 4 to
6
minutes.
9-13 per side
hbster
Tails
HI 24-28
Cut thin undersell to expose meat.
~rn
over every 5 to 10 minutes.
Brush with butter.
Pork Chops
(loin or rib)
1/2-in.
l-in.
Sausage Links (4 oz. each)
Raw
Precooked
HI
HI 9-10 per side
15-17 per side
HI
9-HI
11-12 per side
6-8
Der
side Grill whole or cut into 2 to 4 pieces.
firn
to brown all sides.
Spare Ribs
Entree (3
Ibs.)
Appetizer (2
Ibs.
)
9
9
60-80
(total)
50-60 (total) Parboil 5 minutes before grilling. Rearrange and turn over frequently.
Bastewithsauce last 10 minutes, as desired.
Steaks, Tender Beef
74
to l-in.
Rare
Medium
Well
1
M
to 2-in.
Rare
Medium
Well
HI
HI
HI
5-7 per side
6-8 per side
8-10 per side
HI
HI
HI
7-9 per side
9-11 per side
12-15 per side
Beef Steaks, less tender
3A
to
l-in.
Medium
Well
Tenderizebefore grilling.
~rn
and cover with foil after firsthalfof cooking
time for more
iuiciness.
HI
HI 9-11 per side
13-15
per side
VegetableSlices
1/2-in.thick
Firm vegetables such as potatoes and acorn squash are recommended. Brush
with butter. Turn often.
Choose tender vegetables such as squash and tomatoes. Cover with foil. For
tomatoes.
reduce
cookine
time 10 minutes.
918-23
Vegetable Halves
9
25-30
19
.—

Grill Recipes
Satisbury
Steak
tith
Mushroom Sauce
Preheat: HI—5 minutes
Cook: HI—See below
1-1/2 pounds ground chuck
2 tablespoons onion, chopped
1 teaspoon seasoned salt
1/4 teaspoon pepper
Preheat grill 5 minutes at HI set-
ting. In large mixing bowl, combine
ground chuck, onion, salt and
pepper, Mix
well.
Form into 4 oval
patties, (2-1 /2 inches by 4 inches by
l-inch thick). Place patties on grill
and cook at setting 9 for 21 to 25
minutes for well done, or 16 to 20
minutes for medium doneness. Turn
patties after half of total cooking
time.
Mushroom Sauce
In 2-quart saucepan, melt
1/4
cup
butter. Add and saute 2 cups fresh
mushrooms (about 5 minutes).
In 2-cup measure, blend 3/4 cup
water, 2 teaspoons cornstarch, 1 / 2
teaspoon salt,
1/8
teaspoon pepper
and 2 teaspoons soy sauce. Gradu-
ally add to mushrooms, stirring
well. Simmer 10 to
15
minutes,
stirring often.
Gtiled Chicken Quarters
tith
Smoky Texas Sauce
Preheat: HI-5 minutes
Cook: 9—50-60 minutes
Non-stick coating spray or oil
1 3-pound chicken, quartered
Prepare grates with non-stick
coating spray or oil before
preheating.
Break the leg bones at the joint to
allow chicken to lie flat on grill.
Place meaty side down on grill and
cook on setting 9 for 40 minutes,
turning over every 20 minutes.
Brush with sauce below and con-
tinue cooking 10 to 20 minutes,
turning over every 5 minutes.
Smoky Texas Sauce
1 can tomato soup
1/3 cup water
1 tablespoon oil
1 teaspoon dry mustard
1 teaspoon brown sugar
1 teaspoon salt
2 teaspoons chili powder
2 tablespoons vinegar
1 tablespoon
Worcestershire
sauce
1/4 teaspoon pepper
1/2 cup onions,
finely
chopped
1 tablespoon liquid smoke
In l-quart saucepan, stir together
all ingredients. Start cooking on HI
setting until bubbling, about 2
minutes. Turn heat down to
medium and cook 7 minutes.
To
Microwave
this sauce, place
ingredients in a 1-quart casserole
and microwave at HI 7 to 8 min-
utes, stirring after 4 minutes.
Lemon Marinade
In 1 quart measure or cooking con-
tainer, mix together 1/2 cup lemon
juice,
1/2
cup cooking oil,
I
table-
spoon parsley, 2 bay leaves, 1 clove
crushed garlic, 2 onion slices,
1
tablespoon sugar, 2 drops liquid
hot pepper sauce. Good with
poultry or beef.
Teriyaki Marinade
In 1 quart measure mix 1/4 cup soy
sauce, 3 tablespoons honey, 3/4 cup
cooking oil, 2 teaspoons ginger,
1
teaspoon garlic salt and 3 table-
spoons chopped onion. Good with
bacon wrapped appetizers, beef,
chicken and seafood.
Mustird Jelly Sauce
In 1 quart saucepan mix
1
jar
(10 oz.) apple jelly and 1/3 cup
prepared mustard. Cook 6 to 9
minutes at setting 5 until jelly
melts, stirring often. Good with
pork or sausage.
Brom
Sugar Pineapple Baste
Drain 1 can (15
1/2
oz.) pineapple
slices, saving juice. In 1 quart
saucepan stir together reserved
pineapple juice plus water to equal
1
cup, 1 teaspoon vinegar, 1/4 cup
brown sugar, 1 tablespoon corn-
starch,
1/4
teaspoon cinnamon and
1/8
teaspoon cloves. Cook
10
to 12
minutes on surface unit setting 8
until thickened. Stir often. Serve
with pork or poultry; use pineapple
slices as garnish.
20
Other manuals for RS778GJ
1
This manual suits for next models
1
Table of contents
Popular Griddle manuals by other brands

Lang
Lang 236ZC Chrome Installation, operation and maintenance instructions

APW Wyott
APW Wyott GGM-24S owner's manual

Vulcan-Hart
Vulcan-Hart HEG24R Specifications

croydon
croydon GR1E instruction manual

Costway
Costway FP10274US-SL Instruction booklet

Vulcan-Hart
Vulcan-Hart 902A ML-52630 Installation & operation manual