HQ Avante QM30239 User manual

©2015Handi Quilter, Inc. All rights reserved. Printed in the U.S.A.
HANDI QUILTER 18-INCH LONGARM
Designed by a Quilter, for Quilters.
®
USER MANUAL
QM30239 • VERSION 3.1
PRINTED 03 /20 /2015
Handi Quilter, Inc
501 N 400 W
North Salt Lake, UT 84054
1-877-MY-QUILT (697-8458) • www.HandiQuilter.com
HQ Avanté
®
is part of the family of innovative quilting products from Handi Quilter
®

Page 2 HQ Avanté User Manual
Congratulaons on your purchase of the HQ Avanté from Handi Quilter!
You haven’t just purchased a quilng machine, you’ve
joined the Handi Quilter family and we welcome you.
Handi Quilter is commied to innovaon, reliability,
customer service and educaon. Our machines are
“Designed by a Quilter, for Quilters®” and we are
commied to your quilng success.
With that in mind, we invite you to bookmark our
website: www.HandiQuilter.com and invite you to
visit to learn more about the art of quilng. We’ve
posted ps, tricks and tutorials on subjects as di-
verse as “Oiling Your Machine” to “Loading a Quilt”
to “Making Perfect Feathers”. We’ve got videos to
watch, pdf les to print out for reference and forums
for asking quesons.
Remember, if you ever have quesons, your local Rep
can help you. If the Rep is not available, contact
Handi Quilter directly at techsupport@HandiQuilter.
com or by calling us at 1-877-697-8458,
Monday- Friday, 8-5 MST.
Package Contents
Please keep your original box and packaging
Contents of Package
1. Bobbins (5 pieces, one in machine)
2. Needle (135x5) size 16 (pack of 10)
3. Needle (135x5) size 18 (pack of 10)
4. Bobbin Case
5. Thread Mast
6. Pin Oiler
7. Lint Brush
8. Screwdriver
9. Power Cord
10. 2.5 mm L Allen tool
11. 3 mm L Allen tool
12. 5 mm L Allen tool
13. Laser Stylus and Clamp
14. Laser Stylus Post
15. Open-toe Handi Foot
16. Extra encoder O-ring
17. HQ Quilng Machines “Geng Started” DVD
18. User Manual
19. HQ Avanté Quilng Machine
Oponal Accessories
1. Micro Handles
2. Ruler Base
3. Horizontal Spool Pin
4. Groovy Board Stylus and Adaptor
5. HQ Pro-Stcher

Note: A set of Handi Quilter Geng Started DVDs is included with your HQ Avanté machine. Review the DVDs and
these instrucons to beer understand how to set up and use the HQ Avanté.
Table of Contents
Safety ....................................................................................4
Components (Front Side View) ................................................................7
Components (Back Side, Rear and Front Views) .................................................8
Installaon (Frames) ........................................................................9
Installaon (Handlebars) .....................................................................9
Installaon (Power Cord). . . . . . . . . . . . . . . . . . . . . . . . . . . . . . . . . . . . . . . . . . . . . . . . . . . . . . . . . . . . . . . . . . . . 10
Inserng Needle ..........................................................................11
Changing the Handi Feet ....................................................................12
Laser Stylus ...............................................................................13
Installaon (Thread Mast) ...................................................................14
Threading the Machine .....................................................................15
Horizontal Spool Pin .......................................................................17
Bobbin and Thread Tension Adjustments ......................................................19
Easy-Set Tension™ Adjustment ...............................................................19
Maintenance (Oiling and Lubricang) .........................................................20
Touch Screen Displays ......................................................................18
System Informaon ........................................................................27
Diagnoscs Tests ..........................................................................28
HQ Stch Regulator Operaon ...............................................................31
Geng Started Quilng ....................................................................32
Troubleshoong ...........................................................................33
Warranty Informaon ......................................................................37
Warranty Registraon Card ..................................................................39
Installaon and Training Checklist ............................................................41
Page

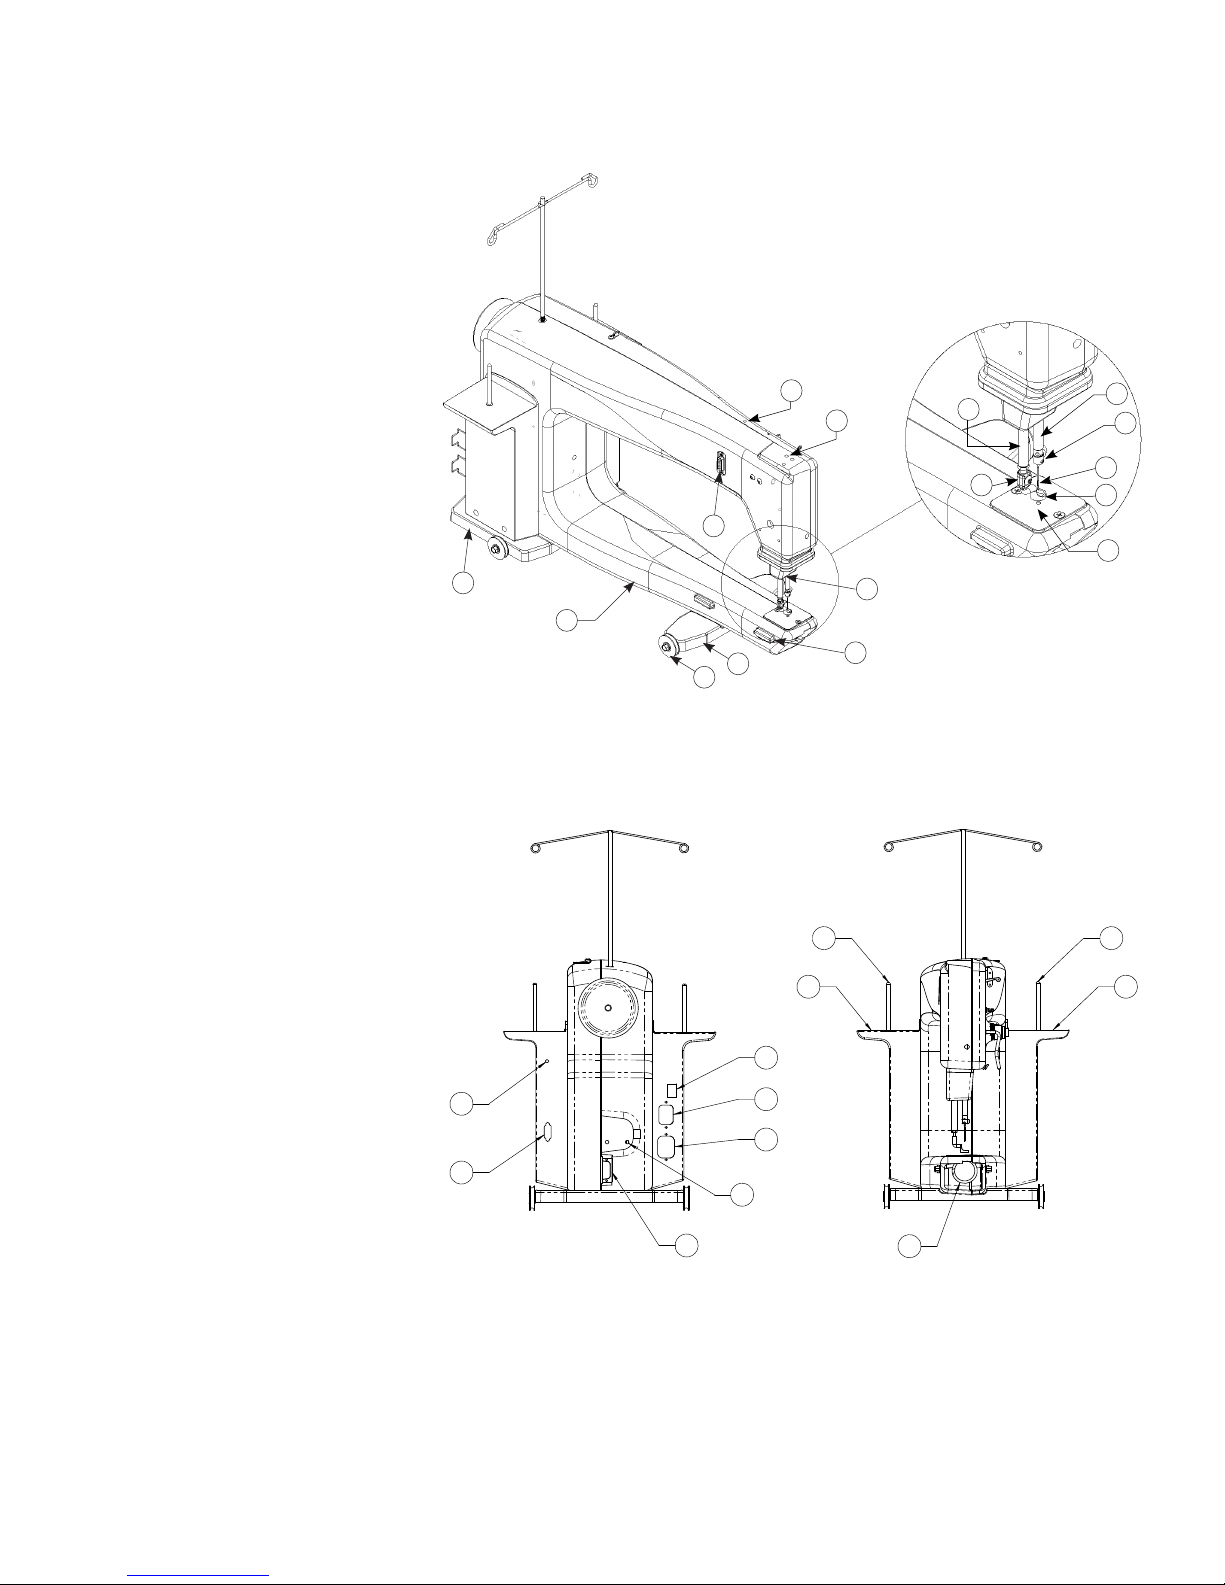
Page 4 HQ Avanté User Manual
Safety Secon
This device complies with Part 15 of the FCC Rules.
Operaon is subject to the following two condions:
(1) This device may not cause harmful interference,
and (2) this device must accept any interference
received, including interference that may cause
undesired operaon.
Please note: Do not operate your HQ Avanté®
quilng machine unl you have completely read the
informaon contained in this manual. Please keep
all packaging and order informaon for warranty
purposes.
IMPORTANT SAFETY INSTRUCTIONS
Read all instrucons before using this machine.
When using this machine, basic safety precauons
should always be followed, including the following:
DANGER — To reduce the risk of electric
shock:
• A quilng machine should never be le
unaended when plugged in. Always unplug the
machine from the electrical outlet immediately
aer using and before cleaning.
WARNING — To reduce the risk of burns,
re, electric shock, or injury to persons:
• The HQ Avanté® is heavy. Never aempt to li it
alone. Always use two people when liing. Always
li from the throat of the machine, not from the
handlebars.
• Always unplug the HQ Avanté® from the electrical
outlet when performing any maintenance,
changing the needle, removing thread locks, or
when le unaended.
• Do not unplug by pulling on cord. To unplug, grasp
the plug, not the cord.
• Keep ngers away from all moving parts. Use
cauon around the needle or sharp external
components.
• Change the needle oen. Do not use bent or dull
needles. “Every quilt deserves a new needle”.
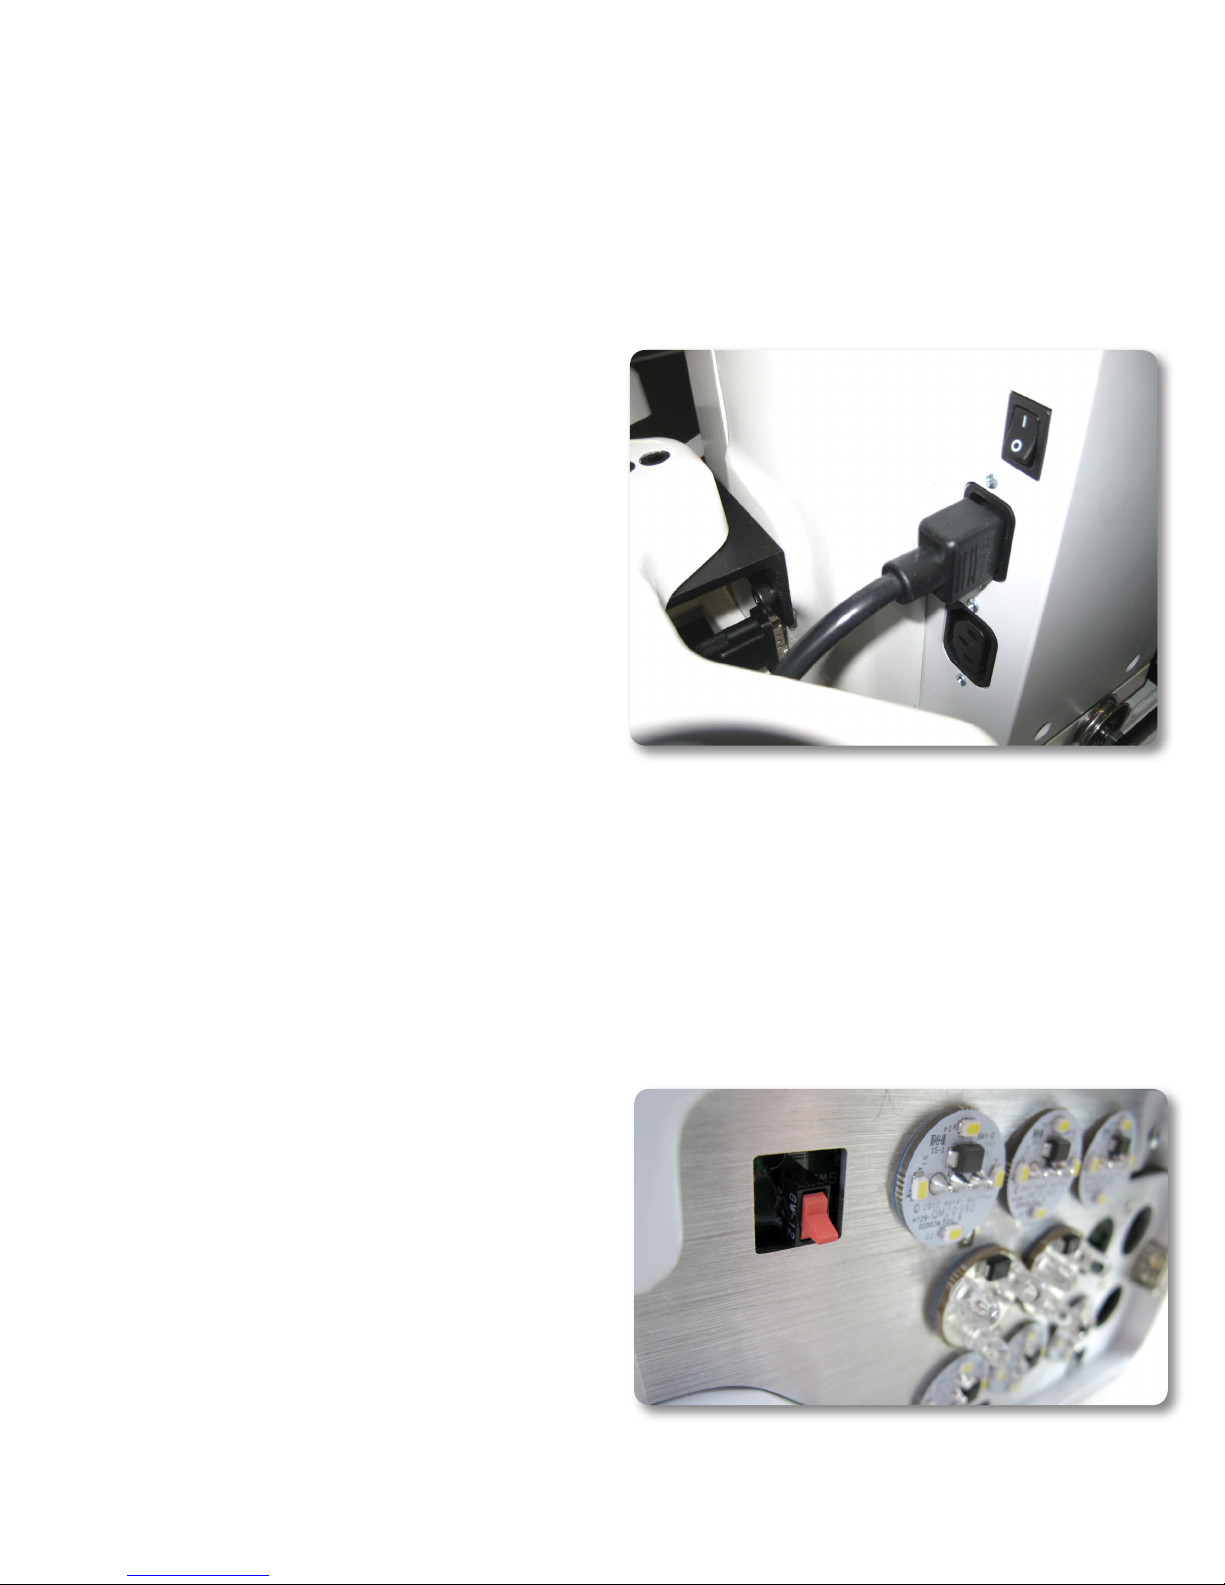
• Switch the machine to the symbol o, or
0, posion to turn it o when making any
adjustments in the needle area, such as threading
needle, changing needle, threading bobbin,
changing hopping foot, and so forth.
• Never drop or insert foreign objects into any
opening.
• The HQ Avanté® should only be used indoors away
from moisture.
• The HQ Avanté® should not be stored or used in
extreme temperatures.
• Use the HQ Avanté® only for its intended use as
described in this manual.
• To disconnect from the wall outlet, push the
switch to the o posion, then remove the plug
from outlet pulling from the plug, not the cord.
Never operate the HQ Avanté® if the cord is
damaged or not working correctly. If a mechanical
or electrical problem is encountered, return the
HQ Avanté® to the nearest authorized service
center or the manufacturer for examinaon,
repair, electrical, or mechanical adjustment.
• It is not recommended that the HQ Avanté®
quilng machine be used with any machine
quilng frame other than those recommended by
Handi Quilter.
• Use this quilng machine only for its intended use
as described in this manual. Use only aachments
recommended by the manufacturer as contained
in this manual.
• Never operate the machine with any air openings
blocked. Keep venlaon openings of the machine
free from the accumulaon of lint, dust, and loose
cloth.
• Do not operate where aerosol (spray) products
are being used or where oxygen is being
administered.
• Do not pull or push the machine across the fabric
excessively while stching. It may deect the
needle enough to cause it to break.
• Use only needles designed for free moon quilng
and recommended by Handi Quilter for this
machine. Other types of needles may be break
during normal quilng.
• Children shall not play with the machine. Close
aenon is necessary when this machine is used
by or near children.
• This sewing machine may be used by children
age 8 years and above and persons with reduced
physical, sensory, or mental capabilies or lack of

HandiQuilter.com Page 5
experience and knowledge if they have been given
supervision or instrucon concerning use of the
machine in a safe way and understand the hazards
involved.
• Cleaning and user maintenance shall not be made
by children without supervision.
Save these instrucons.
This machine is intended for household use.
Disclaimer
Handi Quilter and its Representaves are in no way
legally responsible or liable for damage to the HQ
Avanté when used improperly or not in accordance
with the guidelines stated in this manual or when
used on machine quilng frames not recommended
by Handi Quilter.
To use the machine safely
1. Carefully watch the needle when sewing. Do not
touch the hand wheel, take up lever, needle, or
other moving parts.
2. Turn the machine o and unplug the cord in the
following cases:
• when you have stopped using the machine
• when you replace or remove the needle or any
other part
• when you check or clean the machine
• when you leave the machine unaended
3. Connect the machine directly to the wall outlet or
to a surge protector that connects directly to the
wall outlet. Do not use extension cords.
To increase the life of your machine
1. Do not store this machine in areas exposed
to direct sunlight or high humidity. Never use
or store the machine near a heater, an iron, a
halogen lamp or other hot things.
2. Use only neutral soaps or detergents to clean
the machine. Benzene, solvents and scouring
powders can damage the case and the
machine and therefore should never be used.
General Specicaons
The HQ Avanté ulizes high-tech electronics and an
innovave touch-pad user interface to oer greater
funconality and ease of operaon to home quilters
than ever before conceived in the quilng industry.
The HQ Avanté quilng machine is a high quality
machine that incorporates very robust design
features and is very easy to service.
Disclaimer
Handi Quilter and its Representaves are in no
way legally responsible or liable for damage to the
HQ Avanté when used improperly or not in
accordance with the guidelines stated in this manual
or when used on Machine Quilng Frames not
recommended by Handi Quilter.
Sewing Opening Dimensions:
Sewing Speed:
Stches-Per-Inch:
Needle System:
Needle Sizes, (recommended):
Hook System:
Bobbin Type:
Bobbin Case:
Motor Type:
Needle Posioning:
Electrical Power:
US and Canada*:
Rest of world:
*Complies with internaonal
cercaons
LED Power Consumpon:
Sew Foot Stroke/Li:
Needle Bar Stroke:
Take-Up Stroke:
Lubricaon, main components:
Lubricaon of hook:
(245 mm X 610 mm)
8.25” X 18”
Manual Mode:
Min 90spm, Max 2,200spm
Regulated Mode:
Min 0spm, Max full speed
4spi – 22spi
134 (135 X 7)
12/80 - 20/125
Rotary, Horizontal axis, M-class bobbin
Aluminum, Class M
Type MF
Brushless DC
Up and down, walking stch
105 – 120 VAC, 47 - 63Hz, 300W peak
100 – 250 VAC, 47 - 63Hz, 300W peak
8 W
5 mm
35.3 mm
73 mm
Kluber Lube, permanent
Velocite 10, Texaco 22
3. Do not drop or bump the machine.
4. Always consult the manual to replace or x the
hopping foot, needle or any other part of the
machine. If necessary contact an authorized

Page 6 HQ Avanté User Manual
Handi Quilter representave or Handi Quilter technical support.
Oponal U.S. Grounding for Customers with 120 VAC Connecons
GROUNDED OUTLET BOXES
METAL
SCREW
ADAPTER
(B) (C)
TAB FOR
GROUNDING
SCREW
(A)
GROUNDING PIN
This product is for use on a nominal 120 V or nominal 220 V circuit, and has a grounding plug that looks like
the plug illustrated in sketch A above. A temporary adapter, which looks like the adapter illustrated in sketches
B and C, may be used to connect this plug to a 2-pole receptacle as shown in sketch B if a properly grounded
outlet is not available. The temporary adapter should be used only unl a properly grounded outlet can be
installed by a qualied electrician. The green colored rigid ear, lug, and the like, extending from the adapter,
must be connected to a permanent ground such as a properly grounded outlet box cover. Whenever the
adapter is used, it must be held in place by the metal screw.
ÂIMPORTANT: In Canada, the use of a temporary adapter is not permied by the Canadian Electric Code.
To repair or adjust the machine
If the machine breaks down or needs adjustment, rst check the troubleshoong chart in the appendix to
inspect and adjust the machine yourself.
For more product informaon and updates, visit our website at www.HandiQuilter.com.
The contents of this manual and product specicaons are subject to change without prior noce.
Check for updated manuals at www.handiquilter.com/manuals/.

HandiQuilter.com Page 7
1. Thread Mast
2. Thread Guide A
3. Three Hole Thread Guide B
4. Thread Guide C
5. Tension Assembly
6. Srrup Thread Guide E
7. Take-Up Lever
8. Thread Guide F
9. Front Casing/Frame
10. Handwheel
11. Side Laser Stylus Post Hole
HQ Avanté Components
Front Side View
3
1
2
10
4
5
6
7
8
9
11
3
1
2
10
4
5
6
7
8
9
11
3
1
2
10
4
5
6
7
8
9
11
3
1
2
10
4
5
6
7
8
9
11
3
1
2
10
4
5
6
7
8
9
11
Figure 1

Page 8 HQ Avanté User Manual
12. Ruler Foot
13. Needle
14. Needle Bar Thread Guide
15. Needle Bar
16. Presser Bar
17. Handi Feet Mount
18. Needle Plate
19. LED Light Ring
20. Front Handlebar Connector
21. Ruler Base Posion Guides
22. Front Wheel Base
23. Wheels (4)
24. Back Casing/Frame
25. Rear Wheel Base
26. Front Threaded Handle Holes
27. Top Laser Stylus Post Hole
Back Side View
28. Spool Pin 1
29. Electronic Control Pod (C-Pod)
30. Laser Stylus Power Connector
31. Serial Port for Stch Regulator
32. Rear Handle Bar Serial Port
33. Rear Threaded Handle Holes
34. Accessory Power Outlet
35. Power Cord Connector
36. On/O Switch
37. Power Pod (P-Pod)
38. Spool Pin 2
39. Bobbin Assembly
Rear and Front Views
35
37
36 26
27
33
28
29
30
31
32
34
35
37
36 26
27
33
28
29
30
31
32
34
Rear Front
Figure 2
Figure 3
25
24
23 22 21
27
26 16
17 12
13
14
15
18
30
31
32
33
34
35
36
37
38 28
29
39
20
19

HandiQuilter.com Page 9
1. Place the carriage on the table rails, ensuring that
the Carriage Encoder Assembly will be toward the
back of the machine (the power cord side of the
machine). The back side of the carriage has an
encoder assembly aached to the rear cross-piece.
Be sure to place the carriage on the frame correctly
(see Figure 4).
2. Place the machine on the carriage.
3. Plug the Ribbon cable into the Carriage Encoder
Assembly. The connector is keyed to assure correct
alignment. Make sure the keyed poron of the
cable connector aligns with the keyed poron of
the encoder connector. Do not force.
4. The remaining length of cable comes back under
the Power Pod from the Rear Encoder Assembly,
behind the machine, and into the 9 pin serial port
of the machine.
5. REMEMBER that if the machine is to be removed
from the carriage, the cable must be disconnected
from the Carriage Encoder Assembly. The other
two connectors on the cable should remain in
place. Failure to unplug the cable when removing
the machine from the carriage could result in
damage to the cable, encoders, and carriage.
Installaon (Studio Frame)
Figure 4
Installing Front Handlebars
Cauon: Unplug the HQ Avanté from the electrical outlet. All power to the machine must be turned o when
installing the front handles. Failure to do so can result in damage to the machine.
Locate the three long bolts and the 5mm Hex wrench. To install the handlebar,line up the holes on top of the
handles with the pre-drilled holes on top of the machine. Slide a single bolt into one of the holes unl it stops.
Hand-ghten the bolt enough to secure the handles to the top of the machine. Insert and hand-ghten the
remaining two handlebar bolts.
Use the included 5 mm Hex wrench to securely fasten the handles to the front of the machine.
Once the bolts are in place, plug the 9-pin connector into the serial port located on the le-hand side of the
machine (see Figure 2, #18, page 6). Ensure the pins are lined up so they are not damaged when the plug is
pushed in. Push the plug securely in place.

Page 10 HQ Avanté User Manual
Note: Aer the handles have been completely installed
and plugged in, test them by turning the HQ Avanté
on/o switch to “on”. You will not be able to turn on
the machine unl the front handlebars are installed.
If nothing is displayed, check that the handlebar cable
on the side of the machine is plugged in securely, that
your machine is turned on, and that the power cord is
plugged into the machine as well as a power source.
Check that the HQ Avanté is unplugged from the
electrical outlet. All power to the machine must be
turned o when installing the back handlebar. Failure
to do so can result in damage to the machine.
The rear handle bar comes mounted with three
screws to the “L” bracket. Line up the two holes in
the “L” bracket with those on the rear of the machine.
Slide the short bolts into holes unl they stop. Hand
ghten, and then use the 5mm wrench to securely
fasten the handles to the back of the machine.
Once the two bolts are in place, plug the 9-pin
connector into the serial port underneath the rear
handles. Ensure the pins are lined up so they are not
damaged when the plug is pushed in. Push the plug
securely in place.
Installing Rear Handlebars
Insert the cord into top power connector on the
rear of the machine. Plug the three-prong end into a
power source (see Figure 5).
The lower power connector is for powering other
aachments developed by Handi Quilter. (Not
yet available)
Turning on the HQ Avanté
There are two power switches for your machine. The
main power switch is at the rear of the machine and a
red power switch is under the right handlebar at the
front of the machine for your added convenience
(see Figure 6).
The machine is turned on when both switches are
turned on. The machine is turned o when both
switches are o. However, you may turn o the
machine funcons by turning o only the front switch
if you will be returning to quilt within a day.
Turn on the back switch rst by toggling the switch
from the 0 posion to the 1 posion. Then turn on
the front switch by toggling it as well. The front switch
will not turn on the machine unless the back switch is
already on.
Installing the Power Cord
Figure 5
IMPORTANT: If you will not be using the machine
for more than a day, we recommend you turn o
both switches and unplug the power cord from the
power source.
IMPORTANT: Refer to the safety instrucons.
Figure 6

HandiQuilter.com Page 11
Inserng (or changing) the Needle
Figure 7
1. Check that all power is turned o.
2. Move the needle bar to the highest posion by
turning the hand wheel or by pressing the needle
up/down control on the handles (prior to turning
the power o).
3. Loosen the needle-bar clamp thumb screw
(Figure 7).
4. With the scarf (small ground out secon/dip on the
back side of the needle just above the needle eye)
facing the rear hand wheel side of the machine,
and the long groove down the front of the needle
facing the bobbin case side (see Figure 7), push the
needle all the way up into the needle bar – unl it
can go no farther. Look into the sight hole to verify
that the bu of the needle reaches the top of the
sight hole.
5. Carefully ghten the needle bar clamp screw. Over
ghtening the needle clamp screw will result in
damaged threads stripping the hole. Stripped holes
are not covered under warranty. Another side
eect of damaged threads from over-ghtening
that the needle may be very ght when inserted up
into the needle bar. To avoid over-ghtening the
screw, nger ghten only.
SIGHT
HOLE
NOTE: Changing the needle is recommended for
each new quilt loaded on the machine or any me
the needle becomes bent, dull or burred.
IMPORTANT: Check the needle to conrm that it is
fully inserted. The needle bar has a stop/sight hole
above the needle bar clamp screw – make sure the
needle is touching the top of the stop/sight hole
(Figure 7). If it is not, the machine ming will be
o and it may be possible for the needle to collide
with internal parts causing damage not covered by
warranty.
CAUTION: Your Handi Quilter machine stches at a
much faster speed than your home sewing machine.
Therefore it is essenal that the needle is rmly
seated in the needle bar and fully ghtened (but not
over ghtened). Check oen that the needle has not
become loose. If the needle comes loose, it could
break in the machine causing damage, throw o the
machine’s ming, or worse, cause bodily harm.

Page 12 HQ Avanté User Manual
Your machine came with two Handi Feet: a ruler foot and
an open-toe foot. Use the ruler foot for ruler work and
everyday quilng, and the open-toe foot when you need
greater stch visibility (such as micro quilng). Other Handi
Feet are available, such as the Handi Feet Couching Kit.
1. Remove the
foot that is
on the mount
by using the
2.5mm hex
wrench to
loosen the
mounng
screw far
enough that
you can slide
the foot o of
the mount.
2. Slide the
desired foot
onto the
mount (gure
8). Note that the opening on the side of the foot is
lined up with the screw hole. Push the Handi Foot
up as far as it will go.
3. Ensure the foot is centered with the needle when
the foot is fully ghtened with the 2.5mm hex
wrench. If it isn’t properly centered, loosen the lock
nut; center the foot
with the needle; hold
the foot in posion;
and rmly ghten the
lock nut (Figure 9).
Changing the Handi Feet
Figure 8
Figure 9

HandiQuilter.com Page 13
The laser stylus projects a straight laser beam visible
as a dot on surfaces it hits. The laser dot is used as
a guide or stylus, allowing you to stch the same
paern onto a quilt that is being traced with the laser
dot.
Laser Operaon and Use
There is not a separate on/o switch for the laser.
Power is supplied to the laser when it is plugged into
the HQ Avanté . Be sure the laser is aached to the
HQ Avanté and pointed downward toward the table
before connecng it to the port. Never point it in a
direcon that would project the beam into someone’s
eyes. If the laser should cease to operate, check to
ensure the plug is rmly seated into the HQ18 Avanté
laser port.
CAUTION: Use of controls or adjustments or
performance of procedures other than those specied
herein may result in hazardous radiaon exposure.
Laser Focus/Laser Image Size
This high quality laser is focusable. The laser is
focused by simply grasping the threaded housing
surrounding the lens and turning clockwise or
counter-clockwise (see Figure 10). The laser image
can be adjusted bigger or smaller. The direcon of
rotaon needed is determined by the distance of
the laser from the intended focal plane. Experiment
by turning the threaded end to achieve your desired
focal size.
Clamp Adjustment
The laser aaches to a mounng post. The post may
be vercal or horizontal. The clamp is designed to
arculate in any direcon by rotang the clamp on
the post and pivong the laser up or down. To make
an adjustment, simply loosen the black thumbscrews,
posion, and reghten.
Locaon of Laser Labels
The label is aached to the case of the laser and
contains an arrow which indicates the direcon the
laser light will shine when energized. The label must
remain in place on the laser. Removal of the label will
void the laser’s warranty.
Laser Stylus Safety and Use Guidelines
Figure 10

Page 14 HQ Avanté User Manual
For use at front of machine
Begin by locang the laser stylus post, the laser
holder and the laser stylus.
To aach the laser stylus to the top of the machine:
1. Locate the threaded hole on top of the machine
near the front (see Figure 2, #20, page 6). The laser
stylus guide post comes with the washer and nut
Installing the Laser Stylus
Figure 11
on it. Remove the nut and washer, replace the nut
onto the post and then place the washer under the
nut and onto the machine painted surface. The
washer protects the painted surface when the nut
is ghtened. Tighten the post clockwise unl it is
securely in place. Use the nut to secure the post to
the machine.
2. Be sure the laser stylus is inserted into the laser
clamp.
3. Slide the laser clamp over the post to the desired
height.
4. Plug the laser into the top port on the side of the
front electronic control pod (see Figure 11).
For use at rear of machine
To aach the laser stylus to the side of the machine:
1. Place the nut on the laser stylus post with the
washer under it and thread the laser post into
the threaded hole (see Figure 1, #11, page 5),
near the rear wheel base. Turn unl securely in
place. Lock in place with lock nut. The washer
will be under the nut to protect the machine paint.
An unused spool pin can also be used to mount the
laser.
Follow steps 2-4 above.
Locate the threaded hole on top of the machine near
the rear by the hand wheel. The thread mast comes
with the washer and nut on it. Remove the nut and
washer, replace the nut onto the mast and then place
the washer under the nut and onto the machine
painted surface. The washer protects the painted
surface when the nut is ghtened. Tighten the mast
clockwise unl it is securely in place. Use the nut to
secure the mast to the machine.
Note: The eyelets of the thread mast MUST be
centered over the spool pins. This ensures that the
cone of thread will not pull, turn or lt, causing
thread tension problems (see Figure 12).
Installing the Thread Mast
Figure 12

HandiQuilter.com Page 15
1. Place a cone or spool of thread on the spool pin.
Pass the thread through the thread-mast eyelet
from back to front, connuing to thread guide A.
(Figure 13)
2. Connue to the three-hole thread guide B. Wrap
all three holes from back to front, hand wheel side
to needle side (see Figure 14).
Note: The purpose of the three-hole thread guide B
is to prevent loops of thread coming o the thread
cone from going into the top tension as a knot causing
thread breakage and bad tension. For most threads
on a cone, it is important to thread all three holes
for consistent results and to make adjustments at
the top tension assembly. An excepon to this rule
is when working with very delicate threads, such as
holographic or threads that are prone to breakage, in
which case you may try skipping one or two holes on
thread guide B.
Threading the Machine
B
C
D
E
A
BACKFRONT
2
TENSION ASSEMBLY
TAKE UP SPRING
1
E
C
D
DETAIL 2
B
DETAIL 1
Figure 13
Figure 14
Note: See Geng Started DVDs (included with your
machine) for videos showing threading and other ps.
These videos are also available on www.HandiQuilter.
com.
DETAIL 2
F

Page 16 HQ Avanté User Manual
3. Thread connues through thread guide C, and then
down to the tension assembly (see Figure 15).
NOTE: It is important that the thread is “ossed”
up between the two tension discs. If the thread is
not rmly in place between the two tension discs,
the thread rests on the outside of the tension discs
(without tension) and looping on fabric or thread
nests may occur.
4. Once the thread is in place, be sure that the thread
catches on the take-up spring and then pull it down
under the srrup (thread guide D).
5. Bring the thread back up through the take-up
lever from back to front, and then down through
thread guide E. Pull the thread at the take up lever
to ensure that it is properly ossed between the
tension disks. If it is properly ossed in the tension
disks you should feel some resistance as you pull
the thread. If it is not, then the thread will pull
freely.
6. Pull the thread down to the needle thread guide
and thread through the hole (thread guide F).
7. Make sure the thread is following the groove down
the front of the needle and threads from front to
back. Be careful that the thread does not twist
around the needle.
Figure 15
Important notes: The HQ Avanté quilng machine
does not have a presser foot lever or top tension
release like a home sewing machine. On a home
sewing machine the top tension is released when the
presser foot is raised, allowing the thread to come
freely out of the machine. When a home machine is
threaded, the presser foot is raised and the tension
discs are released and open for the thread to easily
fall between the tension discs. This is not the case
with the HQAvanté quilng machine where the top
tension is always ght and the tension discs are never
open. Therefore, the thread must be pulled up or
“ossed” between the tension discs or it will stay
outside the discs and oat without tension, causing
serious tension problems and/or thread nests. It is
also possible to bend the needle while it is threaded
if care is not taken while moving the machine around
the quilt because the top tension is never released.
E
C
D
DETAIL 2
F

HandiQuilter.com Page 17
1. An oponal horizontal spool pin is available for
metallic and specialty threads wound on a spool
(not a cone).
2. The horizontal spool pin mounts on the laser stylus
guide post on the top of the machine
(see Figure 16).
3. When using threads on the Horizontal Spool Holder,
skip thread guide A. Thread the top hole only of
the three-hole thread guide B, back to front.
4. Connue threading the machine as described in
steps 3 through 7 on page 13.
Oponal Horizontal Spool Pin
Inserng the Bobbin
Note: Turn o the power switch while inserng the
bobbin case or anyme your hands are near the
needle area.
1. Place the bobbin in the bobbin case so that the
thread pulls o clockwise when viewing the open
side (Figure 17).
2. Slide the thread through the slot (Figure 18) and
under the tension spring leaving 5 to 6 inches of
thread hanging loose (Figure 19, next page).
Bobbin and Thread Tension
Adjustments
Note: See the Geng Started DVDs (included with
your machine) for videos showing adjusng bobbin
tension and other ps. These videos are also available
on www.HandiQuilter.com.
Figure 16 Figure 17
Figure 18

Page 18 HQ Avanté User Manual
Figure 19
TENSION
SPRING
3. Turn o the power switch while inserng the
bobbin case or anyme the hands are near the
needle area.
4. Do not li the lever on bobbin case. When placing
the machine t the bobbin case onto the hook
spindle in the machine. Rotate the casing unl the
open throat keys into the alignment notch in the
middle of the hook. Push the casing in unl it stops
in place. Push inward unl it clicks (see Figure 20).
Note: It is not suggested that the lever on the bobbin
case be used for this installaon. The latch lever
should be used only for removal of the bobbin case.
Figure 20
Drawing the Bobbin Thread to the Top of the Quilt
1. Aer the machine is threaded, locate needle
up/needle down buon on the le handle.
2. While rmly holding the tail of the needle thread
with the le hand, press the needle up/down
buon with right hand, bringing the needle back to
the up posion.
3. Pull the machine three to four inches away while
holding the needle thread.
4. Bobbin thread will pull up and through to the top,
allowing you to grasp the loop and pull it to the
desired length.
Bobbin Tension
The bobbin tension is the foundaon tension for the
enre machine. To test that bobbin tension is correct,
hold the bobbin case in the palm of your hand with
the open end facing up. Wrap the thread around
your index nger and while pulling up on the thread
and gently wiggling the nger front to back (not up
and down which is not consistent), the bobbin case
should li up on its side, but NOT li out of your
hand. If it will not li up onto its side, it is too loose
and if it lis out of your hand, it is too ght. The small
screw in the center of the tension spring is where the
adjustment is made (see Figure 21). Turn clockwise to
ghten and counter-clockwise to loosen the bobbin
case tension. Check your bobbin tension every me a
new bobbin is inserted.
Figure 21

HandiQuilter.com Page 19
IMPORTANT: Top tension should be adjusted only
aer the bobbin case foundaon tension adjustment
is made.
Puckering, gathers and thread breakage occur when
the top tension is too ght. Loops and thread nests
occur on the back when the top thread tension is too
loose. Tension may need to be adjusted depending on
the fabric, thread or bang you are using on
each project.
It is easy to set the top tension with the HQ Avanté
Easy-Set Tension. To adjust the top tension ghter,
turn the tension knob clockwise. To loosen the
tension, turn the tension knob counterclockwise.
Unlike the bobbin-case adjustment, which requires
minute adjustments (like the ck of a clock), the top
tension knob might need to be turned anywhere
from 1/4 of a turn to two to four turns to achieve
balanced tension.
As you adjust the tension, a tension value appears on
the Main Screen (when the machine is turned on).
make a note of this value to easily set the tension
again in the future for the same type of thread.
Note: Before adjusng the top tension, remember to
oss or pull the top thread up into the tension discs
or it will oat outside the discs providing lile or no
top tension. This could cause signicant tension or
nesng problems on the boom side of the quilt.
Easy-Set Tension™ Adjustment
Cleaning and Lubricang the Machine
Only use light sewing machine oil in the HQ Avanté.
Internal oiling is not necessary on the HQ Avanté
except when the machine is taken to a service
technician for roune maintenance and cleaning. The
hook assembly, however, needs regular lubricang.
Failure to keep the hook assembly lubricated can
cause severe damage to the machine.
To lubricate, turn o the machine. Remove bobbin
and case before oiling. Clean around the hook
assembly with a so brush to remove lint. Put a very
Maintenance
Figure 22
small drop of oil on the hook in the region where the
bobbin basket assembly and the rotang hook meet
(see Figure 22). The bobbin basket is the poron of
the hook that the bobbin case snaps into. The bobbin
basket remains staonary while the hook rotates
around the basket. The oil lubricates the region
where these two components interlock. A drop of oil
in the region indicated will work its way back into the
interlocking area of the hook and bobbin basket.
The frequency of lubricaon depends upon the usage
of the machine. Lubricang is recommended before
running the machine if it has not been used regularly,
or every other bobbin change if used frequently. Aer
oiling, always sew a scrap piece as oil may cling to
thread. Over oiling can cause excess dripping from the
bobbin assembly. Lack of lubricant may be noced by
a change in the sound of the machine and will aect
stch quality.
Cleaning the Touchscreen
Never use any chemicals to clean your display as this
may adversely aect the touch screen response. Use
a so rag dampened with isopropyl alcohol and gently
wipe the display to remove any marks.

Page 20 HQ Avanté User Manual
The HQ Avanté has touch-screen displays on the front
and rear handlebars. Sengs may be changed at
either of these locaons.
Main Screen
Manual Mode Screen
Buon Funcons:
Pressing the “Regulated” buon while in the Manual
Mode Screen will toggle to the Regulated Mode
Screen. The current stching mode is displayed at the
top le corner of the screen. Dierent opons are
available depending upon which mode the system is
in. (Figure 23)
Needle Stop
The Needle Stop seng enables you to specify
whether you want the needle to end in the up or
down posion when you stop quilng (Figure 24).
If you select Down, when you press the stop buon
on the right handlebar, the needle ends in the down
posion. If you select Up, the needle ends in the up
posion when you press the stop buon on the right
handlebar. Switch between the up and down posion
by pressing the Needle Stop buon.
Easy-Set Tension
The tension box (Figure 25) on the Main Screen shows
the current tension seng as a numeric value. As
you turn the tension dial clockwise to ghten the
top tension, the number increases in increments of
ve. As you turn the tension dial counterclockwise
to loosen the top tension, the number decreases in
increments of ve. The faster you turn the dial, the
faster the numbers increase or decrease.
Aer seng the bobbin tension, test the top tension
by stching on a fabric scrap on the edge of the quilt
bang and backing. Increase or decrease as needed
unl you have achieved balanced tension. Make a
note of the type of thread (weight, brand, color)
you’re using and the tension value. You will be able to
quickly and easily set the tension when you use this
same thread again in the future.
Using the Touch Screen Displays on the Handlebars
Machine and Handlebar Menus
Figure 23
Figure 24
Figure 25
Table of contents