manuals.online logo
Brands
  1. Home
  2. •
  3. Brands
  4. •
  5. HSS Hire
  6. •
  7. Saw
  8. •
  9. HSS Hire 07311 Troubleshooting guide

HSS Hire 07311 Troubleshooting guide

735/01 Page 1 Black PMS Pro. Blue
Bench Saws
14” Junior
©HSS Hire Service Group Plc 1998 No. 735/01
Group Office: 25 Willow Lane, Mitcham, Surrey CR4 4TS
Hire Shops
A heavy duty electrically powered
site bench saw for cutting bricks
and tiles in bulk.
Operating & Safety Guide 735
Now, locate the disc on the back flange plate,
making sure that both the diameter and the arbor (centre
Hole) are the correct size for the machine.
If fitting a diamond disc, ensure the direction arrow on the
disc corresponds with the direction arrow on the guard.
Finally, replace the outer flange followed by the
lock bolt and secure the disc in place by tightening
the lock bolt (see illustration). Then slide the blade
cover down.
Take care not to over-tighten, then check that the
new disc rotates freely and does not foul the
guard, before use.
Fit the drain plug to the water tray, ensuring it is
secure, then fill the tray with clean fresh water 1in
from the top. During use you must ensure the pump is
fully immersed in silt free water.
Plug the unit into its power supply and switch the
supply ON.
Two types of cutting action are available, the first
is a chopping action where the cutting head is
lowered onto the item to be cut.
When using the chopping action, the max depth
of cut must be set to ensure the tray is not
damaged by the disc. To set this, lower the cutting
head until the discs cutting edge is 3mm below the top
level of the sliding tray. Lock the head in this position
with the head lock bar. Next loosen the depth set bolt
(below the head lock bar), slide it upwards as far as it can
go and re secure. All that remains is to loosen the head
lock bar to free the cutting head.
When using abrasive discs the setting will need adjusting
as the disc wears down.
The second is with the cutting head locked in a
lowered positioned, and must only be used with
wet cut diamond discs. Under no circumstances
must dry diamond discs or wet or dry abrasive
discs be used. Used for repetitive cuts, either fully
through the item or where necessary, a partial cut.
If you wish to lock the cutting head, lower it into the
required position and lock with the head lock bar. If the
cut requires excessive pressure, make 2 or 3 shallow cuts.
Place the item to be cut on to the sliding tray,
there is a cutting guide set in millimetres on the
front. If making a mitre cut, set the mitre guide to the
required angle.
Open the water cock, situated at the back of the
guard (see illustration). Switch the unit ON, wait
for the disc to reach operating speed, then check
that water is being fed to each side of the disc.
Next, grip the item being cut and adopt a
comfortable, stable stance that lets you see what you
are doing while keeping your hands away from the disc.
BASIC TECHNIQUES
Move the material along the cut in a straight line,
never twist the material or apply sideways
pressure – the disc could break up and cause damage
or serious personal injury.
Apply just enough pressure to ensure reasonable
progress. Too much pressure will damage the disc, the
workpiece, and the machine’s motor.
After the cut is complete switch the unit OFF and
wait for the disc to stop.
Never push the equipment beyond its design
limits. If it will not do what you want with reasonable
ease and speed, assume you have the wrong tool for the
job. Contact your local HSS Hire Shop for advice.
Keep the equipment clean – you will find this less of a
chore if you clean regularly, rather than wait until the
end of the hire period.
Regularly change the water in the tray and wash out any
silt before replacing.
Regularly check that the disc and safety guards
have not vibrated loose, if either have STOP and
contact your local HSS Hire Shop for advice.
When not in use, store the equipment somewhere
clean, dry and safe from thieves. Protect this unit
from frost and freezing temperatures.
Having lifted the disc clear of the workpiece,
switch the unit OFF and wait for the disc to stop
before removing the workpiece.
Unplug the unit, remove the disc, abrasive discs
should be disposed of, NEVER re-use a used disc!
Empty the water tray and remove any silt.
Finally, neatly coil the power supply cable and give
the unit a final clean up ready for return, to your
local HSS Hire Shop.
FINISHING OFF
EQUIPMENT CARE
Code 07311
Contact your local
0990 282828
735/01 Page 2 Black PMS Pro. Blue
For advice on the safety and suitability of this
equipment contact your local HSS Hire Shop.
This equipment has been designed to be used by
an able bodied adult. If you suffer from either a
temporary or permanent disability, you must seek
expert advice before using this equipment.
Keep children, animals and bystanders away from
the work area.
Never use this equipment if you are ill,
feeling tired, or under the influence of
alcohol or drugs.
This equipment should only be used by a
competent person who has read and understood
these instructions.
There is a serious risk of personal injury if you do
not follow all instructions laid down in this guide.
Safety Goggles MUST be worn by everyone in
the work area.
Some materials when cut contain substances
which, when inhaled, can be harmful to
health. A suitable mask must be worn when using
this equipment. Respiratory protective equipment
is available for hire, contact your local HSS Hire
Shop for details.
This equipment generates potentially harmful
noise levels. To comply with health and safety at
work regulations, ear defenders must be worn by
everyone in the vicinity.
Wear practical, protective clothing,
gloves and footwear. Avoid loose garments
and jewellery that could catch in moving parts, tie back
long hair.
Ensure the work area is well lit and ventilated, if in
doubt, ask about dust extraction and ventilation
equipment at your local HSS Hire Shop.
Do not work near flammable gasses or liquids, petrol
or paint thinner fumes for example. Keep combustible
materials at a safe distance – at least 5m.
Make sure you know how to switch this machine
OFF before you switch it ON in case you get
into difficulty.
Always switch OFF and unplug the machine before
making adjustments to it. Check that you have
removed all spanners before plugging it back in.
Having switched OFF, always wait for the disc to
come to rest, before removing the workpiece.
Never carry, lift or pull the equipment by its power
supply cable.
Check the condition of the equipment before use.
If it shows signs of damage or excessive wear, return it to
your local HSS Hire Shop.
GENERAL SAFETY Ensure guards are correctly adjusted and secure
before starting work.
Most HSS Bench Saws plug into a standard 13amp
power socket. However, 110v models (with a round
yellow plug) must be provided with a suitable 110v
generated supply, or powered from the mains via a
suitable 110v transformer (minimum 3kvA tool rating).
If the equipment fails, or if its power supply cable
or plug becomes damaged, return it. Never try to
repair it yourself.
Keep cables out of harm’s way, and clear of the
work area.
Extension leads should be fully unwound and
loosely coiled, away from the equipment. Never run
them through water, over sharp edges or where they
could trip someone.
Using electrical equipment in very damp or wet
conditions can be dangerous.
To reduce the risk of electric shock, use a
suitable RCD (Residual Current-Operated Device)
available from your local HSS Hire Shop, or power the
equipment from a mains circuit with a built-in RCD.
If using a transformer to provide power, ensure
that the total power load is less than 75% of the
transformer’s power rating.
Ensure the power socket is switched OFF before
plugging into the power supply.
This model of bench Saw is fitted with an NVR (No
Volt Return) switch. The switch will only stay in the
ON position if there is a power supply. If the power
supply is interrupted, for what ever reason, the
switch will move to the OFF position. This safe
guards the user so that when the power is restored, the
motor will not start without warning.
To switch the saw ON, push the green ON button.
To switch the saw OFF push the red STOP (OFF)
button. The STOP button can be locked in the OFF
position for extra safety, simply push the button in
and turn 1/4 clockwise. To release, simply turn
anti-clockwise. Familiarise yourself with the switches
and their location so that you can operate them quickly
in an emergency.
Where applicable, fit the bench with it’s 4 legs and
secure them in place with the leg lock nuts.
Position the Bench Saw on firm level ground, in an
area that allows adequate space for the operator
to work.
There are four swing-out carry arms under the unit
(see illustration). If used, ensure they are folded back
under the unit before proceeding.
GETTING STARTED
ELECTRICAL SAFETY
Release the head lock bar and raise the cut-
ting head.
Fit the right disc for the job. HSS Hire Shops offer
abrasive cut-off discs and diamond discs.
Regularly check the disc’s condition and replace if
worn or damaged, using only discs supplied by HSS
Hire Shops.
Ensure replacement discs are distortion free and
undamaged. In the case of an abrasive disc, ensure
that the paper washers are not wrinkled or torn. NEVER
FIT SUBSTANDARD OR OLD, USED DISCS.
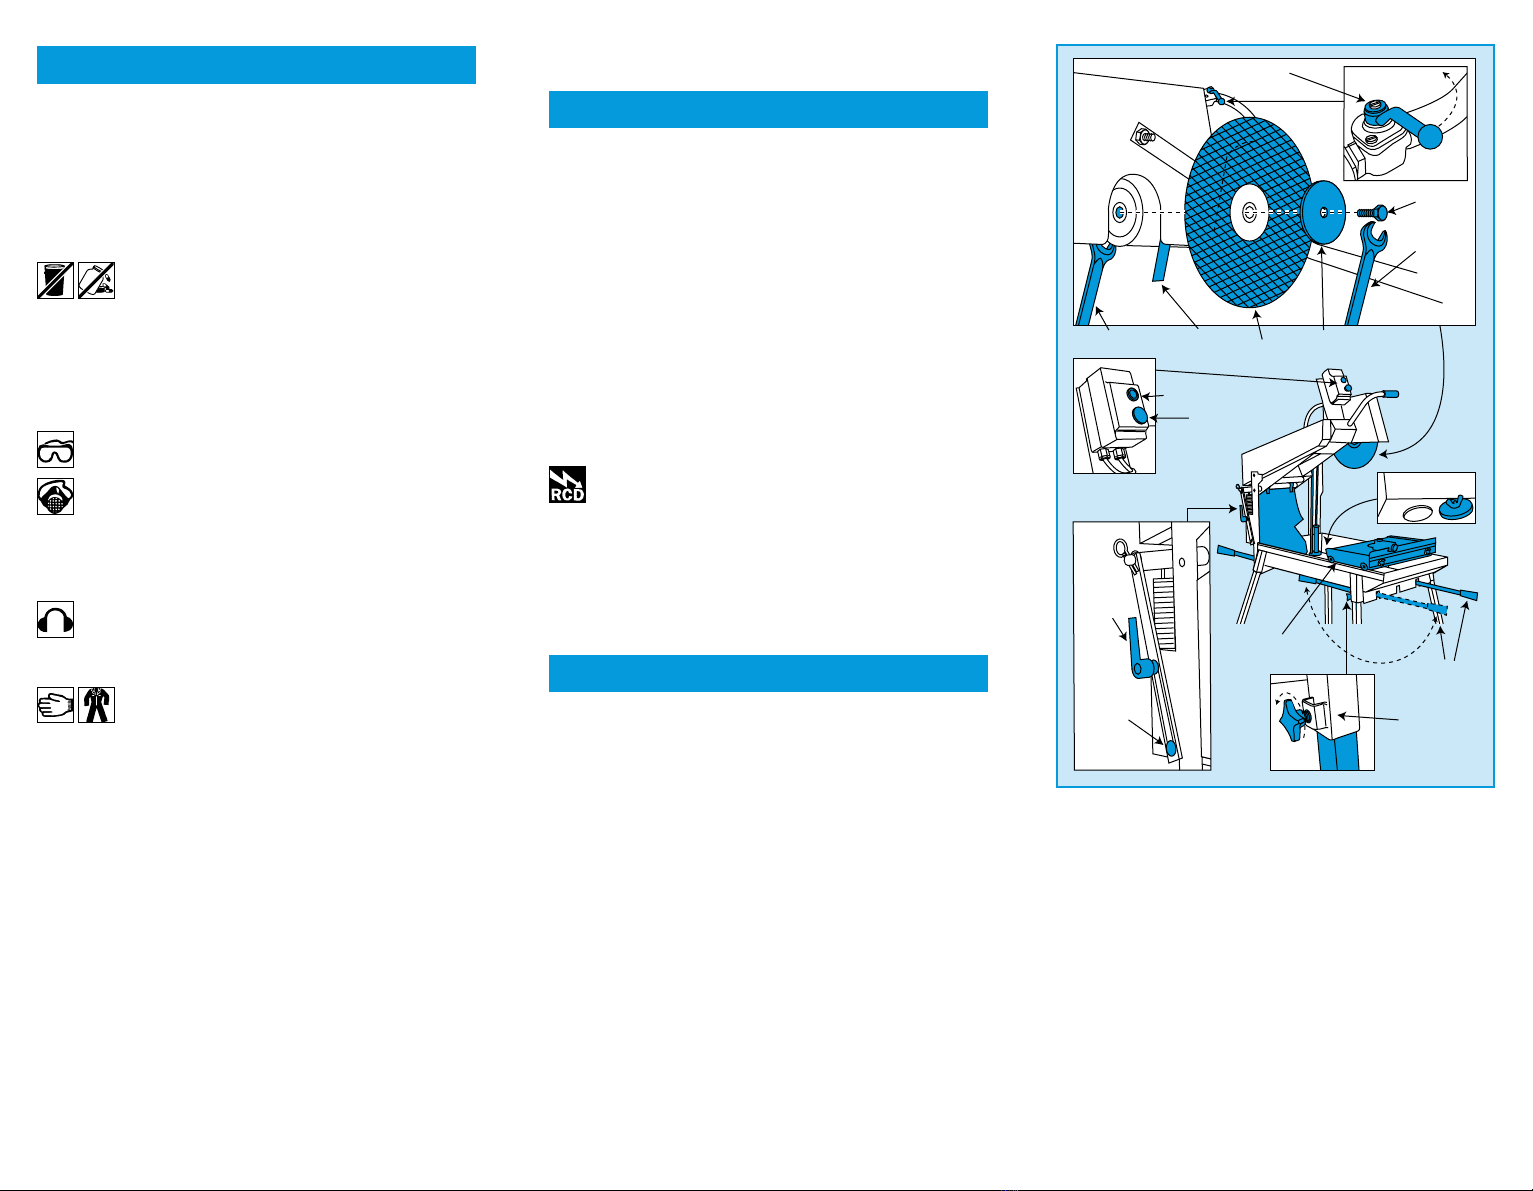
To fit a disc, switch OFF and unplug the Bench Saw,
slide the blade cover up, then immobilise the back
flange with the spanner provided (see diagram).
Remove the lock bolt (right hand thread) followed by
the front flange and check the condition of both
inner and outer flanges. If either is damaged, return
the unit to your local HSS Hire Shop.
OPEN
CLOSED
Water Cock
Disc Front
Flange
Lock Bolt
Spanner
Spanner Blade
Cover
ON Button
STOP
(OFF) Button
Carry
Arms
Leg
Lock Nut
Head
Lock
Bar
Drain Plug
Sliding Tray
Depth
Set Bolt

Other HSS Hire Saw manuals

HSS Hire 03151 Troubleshooting guide

HSS Hire

HSS Hire 03151 Troubleshooting guide

HSS Hire 07211 Troubleshooting guide

HSS Hire

HSS Hire 07211 Troubleshooting guide

HSS Hire 07116 Troubleshooting guide

HSS Hire

HSS Hire 07116 Troubleshooting guide

HSS Hire 07411 Troubleshooting guide

HSS Hire

HSS Hire 07411 Troubleshooting guide

HSS Hire 609 Troubleshooting guide

HSS Hire

HSS Hire 609 Troubleshooting guide

HSS Hire 530 Troubleshooting guide

HSS Hire

HSS Hire 530 Troubleshooting guide

HSS Hire 404 Troubleshooting guide

HSS Hire

HSS Hire 404 Troubleshooting guide

HSS Hire 03411 Troubleshooting guide

HSS Hire

HSS Hire 03411 Troubleshooting guide

HSS Hire 941 Troubleshooting guide

HSS Hire

HSS Hire 941 Troubleshooting guide

HSS Hire 03431 Troubleshooting guide

HSS Hire

HSS Hire 03431 Troubleshooting guide

HSS Hire 723/03 Troubleshooting guide

HSS Hire

HSS Hire 723/03 Troubleshooting guide

Popular Saw manuals by other brands

Stihl TSA 230 instruction manual

Stihl

Stihl TSA 230 instruction manual

Craftsman 113.29411 Assembly, operating instructions and parts list

Craftsman

Craftsman 113.29411 Assembly, operating instructions and parts list

Milwaukee M18 FUEL SAWZALL CSX2 Operator's manual

Milwaukee

Milwaukee M18 FUEL SAWZALL CSX2 Operator's manual

DualSaw CS 650 manual

DualSaw

DualSaw CS 650 manual

Parkside PKS 1500 A2 Operating and safety instructions

Parkside

Parkside PKS 1500 A2 Operating and safety instructions

Stanley SM16 manual

Stanley

Stanley SM16 manual

GreenWorks CRG301 Original instructions

GreenWorks

GreenWorks CRG301 Original instructions

Stomer Professional SMS-1800-T manual

Stomer Professional

Stomer Professional SMS-1800-T manual

Jet JWBS14DXPRO Specifications

Jet

Jet JWBS14DXPRO Specifications

Makita 2704 instruction manual

Makita

Makita 2704 instruction manual

Diamond Products CC500M Operator's manual

Diamond Products

Diamond Products CC500M Operator's manual

Kobalt KT10152 manual

Kobalt

Kobalt KT10152 manual

Sima BALI 700 MKNO Original user guide

Sima

Sima BALI 700 MKNO Original user guide

MasterForce 240-0037 Operator's manual

MasterForce

MasterForce 240-0037 Operator's manual

Powersmart PS4010 instruction manual

Powersmart

Powersmart PS4010 instruction manual

Southbend SB1080 owner's manual

Southbend

Southbend SB1080 owner's manual

Toolshop 240-2093 Operator's manual

Toolshop

Toolshop 240-2093 Operator's manual

Delta UNISAW 34-801 instruction manual

Delta

Delta UNISAW 34-801 instruction manual

manuals.online logo
manuals.online logoBrands
  • About & Mission
  • Contact us
  • Privacy Policy
  • Terms and Conditions

Copyright 2025 Manuals.Online. All Rights Reserved.