HTG 800LE User manual


Contents
1.
Introduction
2.
3.
4.
01
01
01
01
01
01
02
02
03
03
04
05
06
06
06
07
07
08
08
08
08
08
08
09
09
09
09
10
10
10
Machine Description
5.
6.
7.
8.
Warranty
14
14
14
15
15
15
15
15
16
16
16
16
16
17
18
19
Equipment Maintenance
10
11
11
11
11
12
13
14
14
14
Frequently Asked Questions and Solutions
Technical parameter
1.1 Summary
1.2 Responsibility
1.3 Accessories
1.4 Package acceptance
1.5 Machine name plate
1.6 Handling and storage
1.7 Warranty items
Safety guidance
2.1 Overview
2.2 Operation safety guidance
2.3 Electrical safety guidance
3.1 Overview
3.2 Machine parts
3.3 Swing lever accessories
3.3.1 Overview
3.3.2 Forward/ backward device
3.3.3 Handle
3.3.4 The angle adjustment of swing lever
3.3.5 Handle
3.3.6 The angle adjustment of swing lever.
3.4 Water tank
3.5 Suction connector
3.6 Additional weight iron
3.7 Clutch device
3.8 Main electric cabinet
Machine operating
4.1 Overview
4.2 Machine position description.
4.2.1 Machine working position
4.2.2 Machine carriage position
4.2.3 Machine package position
4.2.4 Machine upright position
4.2.5 Lift the machine
4.2.6 Precautions
4.3 Transportation
4.3.1 Manual transportation
4.3.2 Automatic transportation
4.3.3 Transportation and storage
4.4 Start and stop the grinder
4.5 Replace abrasives
4.6 The wire winding
4.7 Optimal grinding route
5.1 Overview
5.2 Daily check
5.2.1 Check the switches
5.2.2 Check the disc cover
5.2.3 Check the grinding plate
5.2.4 Long-term storage of batteries
5.3 Cleaning
5.3.1 Clean switches
5.3.2 Clean the grinding plate cover
5.3.3 Clean the grinding plate and Velcro-iron accessories
5.3.4 Note
5.4 Overloading
5.5 Maintenance

PAGE
01
PAGE
02
Pantheon machine are used to handle the floor surface. The scope of use of the machine depends on the
choice of the tool. In addition to the use and general functions, this manual describes information on the use,
repair and maintenance of the grinder. You can contact your local retailer for further information.
We make every effort to make this manual as complete and accurate as possible, and we are not responsible
for any errors or loss of information. Pantheon reserves the right to change the instructions in this manual
without prior notice.
This manual is protected by copyright law and can not be reproduced or used in any part without the express
written consent of Pantheon .
Below accessories are included with the grinder. Contact your supplier if anything is missing.
(1)1set of grinding machine
(2)1copy of machine using manual
(3)1set of Velcro-iron accessories
(4)1pcs of socket (apply with machine’s plug)
(5)1pcs of anti-dust tape
(6)2pcs of main electric cabinet key
(7)1 set kit bag (with a whole set of tools inside)
Check carefully to see if the package or the grinder has been damaged during delivery. If there is any sign
of damage, contact your supplier and report it. Check that the delivery matches the order. If there are any
discrepancies, contact your supplier.
6、Voltage
7、Electric current
8、Frequency
9、Weight
10、Address
1、Model
2、Model number
3、Manufacturer
4、Manufacturing date
5、Power
The grinding machine should be stored in a dry place at room temperature when not in use. Otherwise
it may be condensed and cold damaged. The size and weight of the grinder are given in the technical
data of the Manual.
Note! Improper operation may lead to the grinding machine overturned and damaged, even endanger
personal safety.
This warranty covers only manufacturing defects. Pantheon does not assume damage in the
transport, unpacking or operation. The manufacturer is not responsible for any damage or defects
caused by improper use, corrosion or use of specifications beyond the noted specifications. The
manufacturer shall not be responsible for any indirect damage or expense under any circumstances.
For complete information on the manufacturer's warranty period, please refer to the current warranty
terms of Pantheon . Local retailer may has special warranty terms. If you have any uncertainty about
the warranty terms, please contact with your retailer.
This manual records the key information for machine safety operation. Read the manual carefully
before your first operation.
Non-standard operation, modification or maintenance without training may cause losses,machine
problems or injury. You are allowed to operate the machine after training. All maintenance must be done
by qualified professional technician. Any machine parts that need to be changed must be provided by
Pantheon. Pantheon machines only can be used in the way of Pantheon recommended. And they only
can be used for commercial purposes. Anyone who uses a machine should know its function, the
location of the emergency stop. The operator should have to ensure the safety rules that the
unauthorized person can not be stationed at work area when the machine starts.
The operator should be equipped with professional personal protective equipment when you are at
work: safety goggles, protective gloves, safety shoes, breathing masks, protective earmuffs, etc.Do
not wear looseclothes or anything that can grasp things such as scarves, bracelets, rings and so on.
1. It is strictly prohibited to operate under the condition that the electricity is less than 20%, especially
on slopes, to avoid personal injury.
2. When working on the slopes, please check the battery’s electricity should be more than 40%, the
power supply shall not be lower than 350V and the clutch is locked.
3. When this machine needs to operate in a place with slopes, it should be less than 25 degrees. The
company is not responsible for any accident caused by the operation when the slope is greater than
25 degrees.
4. This machine is only used for floor grinding, polishing;
5. Read and understand the safety guide totally. Different models have different accessories and
operation instructions.
6.
7.
Operation of this machine only needs one person. Keep children and irrelevant person away. Keep
in mind that “one machine one person.
Operator who is in poor physical state or without training is not allowed to operate the machine. The
operator and the repairman must be physically strong and able to withstand the weight of the whole
machine and the working intensity of the motor.
8. Do not lend or rent the machine without instruction manual.
9. Wear helmet, safety shoes, the headset,non-moist goggles and masks when operating the machine.
10. Keep body, jewelry or any loose clothing away from machine moving parts. Otherwise, it may
endanger personal safety.

PAGE
03
PAGE
04
11. Random modification of the machine is not allowed. Only Pantheon accessories can be used for
maintenance and adjustment.
12. Do not operate the machine in rainy or foggy days.
13. Ensure no explosive flammable materials and steam nearby when operate machine. Do not operate
machine nearby the place with fuel, grain dust, solvents, dilution agent or other flammable items.
1. Operators should wear protective equipment when using the machine, such as dust masks, protective
gloves, overalls, helmets, insulated shoes and so on.
2. Make sure there is no oil leakage, electric leakage,water leakage on the machine before using. The machine
can be used normally.
3. Check the machine control switches and electric parts are in good conditions without moisture.
4. Make sure no obstacle or human being at working area.and make sure there is enough lighting device.
5. The anti-dust tape should be installed on the machine for safety. It is necessary to connect to industrial
vacuum cleaner when dry grinding.
6. The machine should be connected to appropriate electrical outlet. Only use the power cables that can
withstand high current.
7. Do not adjust the handle during machine operation. Only when the machine is stopped and the emergency
stop switch has been pressed,the worker can adjust the machine.
8. The handle has different functions when it is in different positions. Please read the manual for more
information.
9. Ensure the machine has stopped operating and the emergency stop button is pressed when changing
abrasives or accessories. If necessary, disconnect the power and the plug.
10. Keep the machine away from drains and furnace mouths or other dangerous goods, otherwise it may
cause personal injury or loss of machinery and property.
11.Tight-hold hand grip, clockwise rotate the emergency switch, then turn on the power button and start the
machine
12. Please note that the emergency stop switch can only be pressed or rotated. Prohibit upward pull.
13. Before operation,check the working surface and remove any protrusion to prevent machine plates and pads
from damage.
14 Double check before connecting to power, make sure the working Voltage, HZ is same with input
Voltage and HZ, no lack of phase of input power. (If the machine do not work normally , and it results in the
input power and working power is not the same, then manufacturers warranty is unavailable.)
15. Connecting with vacuum to achieve dust free working condition.
16. Install appropriate abrasive. Improper abrasive may cause personal injury and floor damage.
17. After installing the abrasive, keep the grinding plate touch with ground directly, adjust handle bar to the
"lifting position", so that the operator could operate the machine easily.
18. When machine inverter turns to overload protection, it means there is something wrong with the
machine(cable is too small or voltage is unstable) , if so please reference the following cable sizes which are
recommend. Or reduce the abrasive pressure(adjust the additional to suitable position) if users keep using
the machine when overload leads to damage, it would be not allowed to guarantee.
19. After few minutes of grinding ,stop to check how much the abrasive uses. This behavior could reduce the
economic loose when using wrong polishing pads.
20. Please do not upward the machine when machine is still running , otherwise the polishing pads may fly out
to threat the human safety.
2. Note: After the machine is stopped, the line is still energized. Disconnect all power before servicing the
machine.
3. The machine is equipped with an overload protection device and it will automatically jump off when the
machine is overloaded, to prohibit the machine from running; (re-adjust this overload in case of safety)
4. Continue to use the machine in the overloaded situation may cause some other losses even machine
can’t work normally,then manufacturers warranty is unavailable.
5. The purpose of installing an inverter in machine is to speed and protect the user and the machine. It is
forbidden to modify or adjust the inverter and modify the inverter parameters without the manufacturer's
consent. If the unit fails, it is only allowed to replace the defective parts with the accessories provided by
the manufacturer; (Other loss caused by changing, adjusting or modifying the inverter parameters
without the manufacturer's consent, and the machine is not working properly, the manufacturer does
not afford warranty)
6. Never modify the parts or lines inside the inverter by yourself.
7. Do not operate the machine when the distribution box is turned on.
8. If the machine current is overloaded, please pay special attention;
9. When the cables is energized or loaded, do not connect or disconnect the wires;
10. Using a damaged power cord may result in electric shock. Do not use a damaged power cord;
11. Cables should be kept away from hot surfaces;
12. The dryness of all electrical equipment should be maintained and the machine should be kept in a
dry place;
13. After the power is turned off, before the panel indicator is off, it indicates that there is still high voltage
inside the inverter, which is very dangerous. Do not touch the uninsulated electrical equipment;
14. The machine motor and the frequency conversion box are prohibited from entering twater; (the other
damage caused by the water inflow then the machine is not working properly, the manufacturer does
not afford the warranty);
15. The machine must be connected to the qualified wire and voltage, specifications is noted by the
manufacturer. (The machine label indicates the power supply specifications).
1. All circuit repairs can only be carried out by qualified personnel;
800LE is used to grind (rough grind, fine grind and polish) concrete, natural stone and terrazzo
floors or other materials specified in this manual or recommended by Pantheon .
The 800LE is a self propelled grinder. The forward/reverse switch can be used to control the forward and
backward movement of the driven wheel, so that the user can get rid of the action of manually pulling or
pushing the machine to forward/reverse, which greatly saves manpower and facilitates user operation.
The innovation of this equipment is that it equipped with a water tank and add additional weight iron. The
heat dissipation openings on both sides of the water tank make the heat dissipation of the frequency
conversion box faster and extend the service life of the internal electrical appliances. The design of the
water tank allows the equipment to be applied not only in dry grinding but also water grinding. The
benefits of water grinding are as follows: good flatness, small cutting amount, easy polishing, suitable for
later stone polishing.Increasing additional weight makes the lifting easier, and the grinding pressure can
be increased during grinding to make the ground smoother.
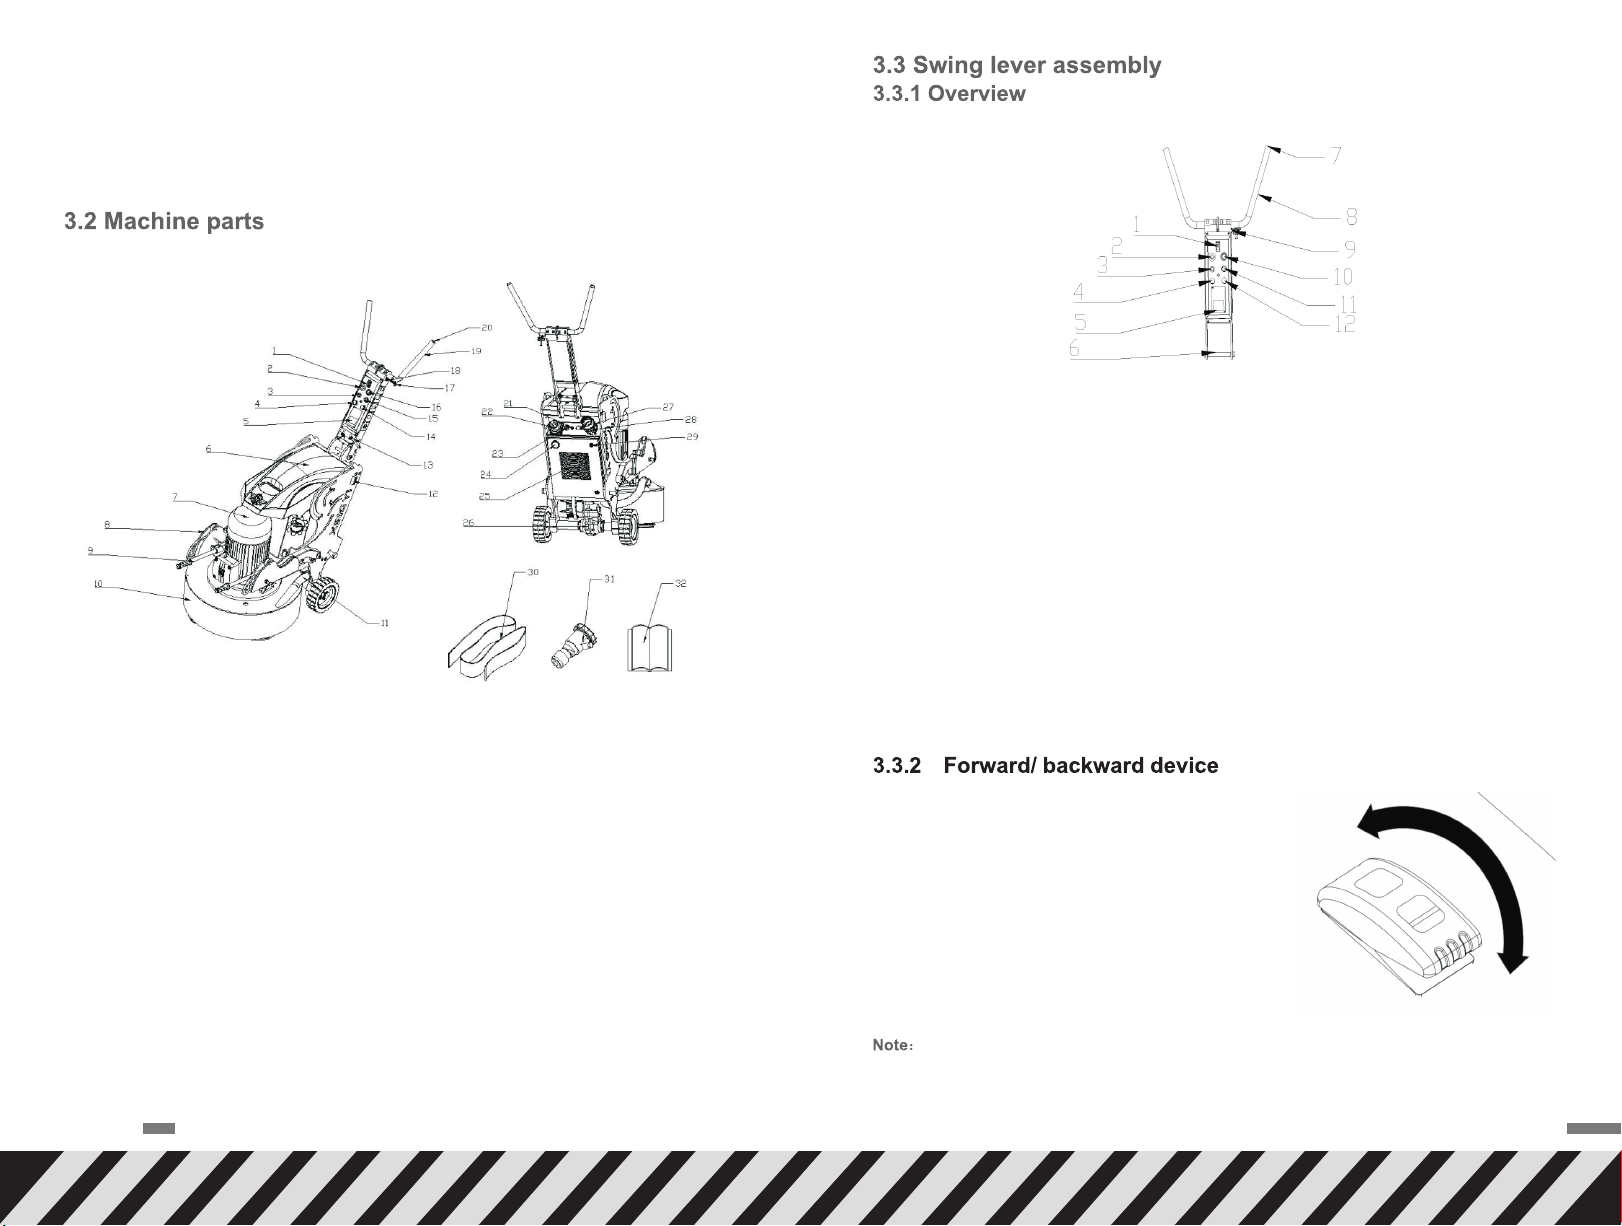
The swing lever and handle can be set in many different tilted positions. When the machine is manually
operated, you can choose the most suitable position. The grinding head of the machine can be used with
different grinding plate for operation. The dust belt covers the working area of grinding head. Because of
floating design, it always touch the floor, which not only ensures that the operator does not touch the

PAGE
05
PAGE
06
rotating mechanical parts, but also reduces the exposure of dust and improves the dust absorption efficiency of
the vacuum cleaner.
When dry grinding, to prevent dust from being exposed to air, posing a threat to the health of the operator and
nearby people, make sure that the vacuum cleaner is connected to grinder (preferably equipped with a vacuum
cleaner manufactured by Pantheon ) Due to inhalation of dust is harmful in the course of operation, even there is
a vacuum cleaner protective mask is also necessary to protect health.
The machine can use different Pantheon abrasive. Due to the different ground materials, the abrasive discs
used in grinding are also different.
1. Forward and backward switch
2. Driving wheel speeder
3. Motor speeder (grinding disc)
4. LED light switch
5. Display screen
6. Water tank
7. Motor
8. Additional weight iron
9. Additional weight iron pole
10. Floating anti-dust tape
11. Suction hose
12. Additional weight iron limiting device
13. Connecting lock rod
14. Running indicator
15. Forward and reverse switch
16. Emergency stop switch
17. Main electric cabinet key
18. Handle adjustment bolt
19. Elbow handle
20. Handle rubber sleeve
21. LED lamp interface
22. Power outlet
23. Wire pipe connector
24. Timer
25. Heat sink
26. Driving wheel motor
27. Battery charging port
28. Suction connector
29. Electric cabinet lock
30. Anti-dust tape
31. Power plug
32. Manual
1.Forward/reverse switch: Controls the forward and backward movement of the machine.
2.Driving wheel speeder: adjust the walking speed of driving wheel.
3. Speeder: adjust the rotation speed of motor.
4. LED light switch: control the LED light.
5. Display screen: display some parameters, such as voltage, current, motor speed and fault code.
6. Swing lever locking rod: lock the rotation of swing lever.
7. Operation handle: Where people put their hands when operating the machine.
8. Sponge cover (handle): make the operation more comfortable.
9. Operation handle angle adjustment bolt: pull out the bolt and the handle can be rotated freely
to the proper position to operate the device.
10. Emergency stop switch: When the device is in a dangerous state or needs to stop working,
press the emergency stop switch to cut off the power and stop the operation of the device to
achieve the protection of personal and equipment safety.
11. Forward/reverse switch: The switch has three gears. Turn on the emergency stop switch.
Turn it to the left to rotate the motor forward, turn to the middle gear to prevent the motor
from rotating, and turn to the right to reverse the motor.
12. Running indicator: When the device is working normally, the running indicator lights up.
The forward / backward device is mainly used to control
the forward or backward movement of the machine. Users
can make the machine move forward/backward without
pulling or pushing. Such this device greatly reduce the
manpower, making the more convenient operation.
The forward / backward device has three main gears,
one is forward: press forward, then the machine forward
move; the second is the middle gear, press to the middle
gear, the machine remains stationary (if the machine is
currently forward, you should press back it to the middle
gear; The third one is the reverse gear, press it back, then
the machine to recede accordingly.
In the exchange of different gear, it should be noted that overexertion will lead to trip over stop.
During grinding, do be sure to connect a vacuum cleaner. It is suggested to use the vacuum cleaner

PAGE
07
PAGE
08
produced by Pantheon to ensure the vacuuming efficiency. Bad vacuum cleaner is likely to clog
the dust in forward / revers switch, resulting in a switch failure.
The handle adjusting bolt can be positioned at
different round hole, so as to adjust the position
of handle to meet different needs of users. Hold
the handle with one hand, pull out the adjusting
bolt with the other hand, then release the
adjusting bolt when it is rotated to proper position.
1. When plugging out the pin, sometimes it will be caught, and the pin can be pulled out by shaking
the support wheel.
2. When the handle adjustment bolt is automatically reset, the hole may not be aligned, just rotate
up and down
3. When adjusting the position of the handle, please check whether the handle adjustment pin has
been automatically reset before operating the machine.
Use the swing lever position adjusting handle to adjust theposition of swing lever to realize conversion
of the machine placement mode in different states. Hold the handle tightly with one hand to support
the swing lever, turn the other hand counterclockwise and press down the adjustment handle, rotate
according to the hole location on sector plate, and release the adjusting handle when it reaches
required position.
After adjusting the position of the swing rod, it is necessary to check whether the swing rod has
been limited before operating the machine.
There is a water inlet on the side of the water tank
(open the water injection hole as shown below).
The heat dissipation openings on both sides of
the water tank make the heat dissipation of the
inverter box of the equipment faster, and can
extend the service life of the electrical appliances
inside the inverter box. Turn the water switch
clockwise to start water grinding.
Grinding machine needs to be connected to a vacuum
cleaner in drying grinding. As shown in figure,
connect suction hose to the connector. (These steps
are all shown in figure below)
There are three positions for the additional weight iron: transporting, tilting, and working position. The
adjustment and limit of the extra weight is mainly achieved by spring pin and limiting device on frame.
Please hold the additional weight iron when you switch it.
When the additional weight iron is switched from the transporting position to the other position, pull out
the handle on the additional weight iron positioning pin. Then the position can be switched.
The clutch device (the device composed of the clutch rubber sleeve and clutch pin is collectively referred
to as clutch device) has two main states:
Unlocking state: When the machine is not working, loosen the clutch device, then pull out the clutch pin,
rotate the clutch pin sleeve, and stuck the clutch pin in the limit device of the clutch pin sleeve to tighten
the clutch device.
Locking state: When the machine starts working, loosen the clutch device, then pull out the clutch pin,
rotate the clutch pin sleeve, and clamp the clutch pin on the limiting device 2 to tighten the clutch device.

PAGE
09
PAGE
10
1. The clutch may be stuck sometimes when you try to pull out, shake the machine in this case.
2. Rotate the clutch to proper position when grinding. Be sure to limit the clutch pin before working.
3. When pulling or rotating the clutch device, be sure to put the additional weight in working position first
to prevent the iron from injuring or hitting people, causing unnecessary casualties.
4. When unplugging or screwing the clutch pin, do not screw the clutch device too loose or too tight, or
the clutch pin cannot be pulled out and stuck in the limit device smoothly.
1. Power socket: connected to an external power, supply power to the machine
2. Timer: shows the total running time of the device.
3. Heating sink: play a role in heat dissipation, to avoid excessive temperature inside the electric cabinet
burning out electrical components.
4. Vacuum hose connector: connection to the vacuum cleaner.
5. Charging hole: for the device's own internal battery to charge.Charge the internal battery of the machine.
6. Main electric cabinet key lock: used to lock the electric cabinet.
3.8 Main electric cabinet
The following part mainly describes the grinder in different positions when the mode is switched to manual
operation, the main operation of the grinder and how to install the grinding abrasive.
1. Grinders can only be used or repaired by personnel who have received the necessary theoretical and
practical training and have carefully read the user manual.
2. Wear protective equipment such as protective gloves, protective masks, overalls, helmets, insulated
shoes, etc. when operating the grinder.
During grinding, pull out the spring pin on the additional
weight, reach the gasoline motor, gently lower the additional
weight to the proper position, adjust the handle and swing
lever position to achieve the most proper working position.
Flip up or remove the support wheel.
During transportation, adjust the additional weight iron,
swing lever and handle to the transport position.
Then, pull the clutch pin out. Lower and rotate the support
wheels to lock, adjust the height of the support wheel so that
the disc is off the ground for easy transportation.
Do not rotate the support wheel to an excessive position to prevent it from falling off, which may cause
dangerous accidents;
When rotating the support wheel, always pay attention to the height of the grinding disc from the ground.
Be careful not to make the grinding disc too low. When it is too low, the grinding disc will cause collision
with the ground and damage the grinding disc;
Rotate ans lower the support wheel to raise the grinding machine from the working area. It is recommended
that the lowest position of the grinding disc is 25mm from the ground.
Adjust the position of the swing lever, foot pedal and
handle to the packaging position.
The minimum package size is as follows and the
machine can be packaged according to the specific
size.
Adjusting the bolt of the extra weight so that the extra
weight is in tilted position, and adjust the handle,
pedal and swing lever position to the lifting position.
(Recommended best lift up position) Hold the handle
with both hands and place one foot on the additional
weight to force the machine down.
Tie the lifting strap tightly to both the two lugs, one is
next to the motor and the other one next to the
anti-dust tape .(Note: you need to use two ropes
that can withstand 500 kg to bind the machine.
To put the machine down, you need to hold the handles tightly with both hands. Place feet on the handle
of the additional weight iron lifter, balance the machine with your own gravity, and slowly lower it to
protect the grinding head. When you put down the machine, pay attention to your own strength, and
do your best to ensure the safety of the machine and the person. Pantheon company does not
assume any responsibility for machine damage and personal injury caused by improper operation.
After lifting up the machine, remember to stand next to the grinding head, slightly press the grinding
head to see if the machine is stable for personal safety.

PAGE
11
PAGE
12
1. When lifting the machine, it may cause personal injury or damage to the machine and surrounding
objects. Make sure that no one is present in the danger zone during the lift.
2. After the rope is fixed to the lifting hole, you should also check whether it is firmly fixed.
3. The two ropes need to be diagonally connected to the lifting mouth.
There are two types of transportation methods for this machine, manual and automatic. It depends on
the storage battery of the machine itself during transportation.
1. Improper operation may lead to the grinding machine overturned and damaged, even endanger
personal safety.
2. When the handle adjustment pin is pulled out, it may get stuck. Just shake the handle and pull out the pin.
3. During adjustment, it is necessary to confirm the reset of the locking device before operating the machine.
4. Be careful when the grinder is adjusted to the position of transportation or packaging and there is a
risk of crushing injury.
5. Dust inhalation is harmful. Please bring a professional mask during operation to ensure physical safety.
6. In the process of lifting and downing the machine, we must pay special attention to our own safety
and avoid damage to the machine.
1. Adjusting the handle and swing lever to working position, additional weight to transport position. (The
specific adjustment actions of each component are described above. The adjusted machine is shown
below).
2. Rotating the support wheel handle can lower the support wheel and raise the grinding device from the
working area. It is recommended that the lowest position of the grinding disc is 25mm from the ground;
3. Unlocking the clutch device: Unscrew the clutch device, then pull out the clutch pin and rotate the clutch
pin sleeve, and embed the clutch pin in the inhibiting device of the clutch pin sleeve to tighten the clutch
device.
4. Use the handle to push machine. 1. It must be careful to move a machine in manual mode or on the slope. Even a small slope can create
large forces. In this case, user can't hold the machine by hand.
2. The machine should not be lifted with the handles, motors, frames or other parts. It is best to transport
the machine which is tightly held on the pallet/slide.
3. If there is no a crane or forklift never try to lift the machine.
4. If the machine is not parked on a pallet or bracket, do not use a forklift truck to lift below the planetary
grinding head. Such behaviour may cause irreparable damage to the machine's discs and other internal
components.
5. During transportation, please fix the machine firmly to avoid damage or accidents.
6. During transportation, the grinding device should touch the ground and a tool plate should be always
installed to protect the locking mechanism.
7. Please store the machine in a lockable, keeping out of the reach of children.
1. When the clutch pin is pulled out, it may get stuck. Just shake the machine and pull out the clutch pin.
2. Pay attention to your own safety when lifting the machine, be sure to do no more than you can.
3. Take out the grinding pads to prevent it drops and lost before transport, resulting in unnecessary losses.
4. When using manual push mode, the clutch must be unlocked.
5. Using hand-push way when clutch device in the locked state, will result in the drive motor damage!
6. When rotating the support wheel, remember do not to rotate to the highest position, to prevent the
support wheel off lead and the final hole is not aligned well.
7.Rotating the support wheel, it is necessary to always pay attention to the height of the grinding disc
from the ground, which can not be too low to prevent the disc shaking lead to collision with the ground,
damage the disc; it is recommended that the disc minimum position is 25mm from the ground.
Rotating the support wheel handle can lower the support wheel and raise the grinding device from the
working area. It is recommended that the lowest position of the grinding disc be 25mm above the ground
1. Adjusting the handle and swing lever to working position, and additional weight to transport position.
(The specific adjustment actions of each component are described above. The adjusted machine is
shown below.
2. Locking the clutch device: When the machine starts working,, unscrew the clutch device, then pull out
the clutch pin and rotate the clutch pin sleeve, and embed the clutch pin in the inhibiting device of the
clutch pin sleeve to tighten the clutch device.
3. Turn on the emergency stop on the swing lever control panel;
4. Press the button of drive wheel on the electric control box, adjusting the drive wheel speed to more than 30.
5. Using the forward and backward switch to transport.
1. The emergency stop switch should be screwed or pressed, and cannot be pulled. The manufacturer
does not compensate for any loss caused by improper operation.
2. Take out the grinding pads to prevent it drops and lost before transport, resulting in unnecessary losses.
3. During the operation, you must pay attention to the electric quantity of the reserve battery.
4. Be extremely careful when polishing or transport on slopes (up to 17° slope).
5. If it is a steep slope, must use a winch. Do not stand behind the machine.
6. Before walking on the slope, make sure the battery power is more than 40%, the clutch is in the locked
state, and the AC input voltage is higher than 350v.
7. Moving down in slope, the machine should be driven slowly in the reverse direction.
8. Moving up in slope, the machine should be driven slowly in the forward direction.
1. Start the grinder
(1)Firstly adjust swing lever, handle and additional
weight iron to the corresponding working position,
place the supporting wheel device in the lowest
position and invert it or disassemble it (as shown
in the figure below).

PAGE
13
PAGE
14
(2)Lock the clutch pin (unlock the clutch pin if in
the manual mode), plug in the power cord
( ensure that the emergency stop is pressed
down and the switches are reset); if the
machine using for dry grinding, connect the
vacuum cleaner (Vacuum cleaner is equipped
with a fast connector, so it can quickly connect
to the vacuum cleaner); if the machine using for
wet grinding, it's necessary to fill the water tank
with water.
(3)
speed regulator to adjust the rotation speed of the
motor, turn the switch to the left to rotate the motor
forward (rotate to the right to reverse the motor)
Press the forward and backward switch to control
the machine move forward or backward. ( turn on
the water switch before water grinding)
Turn on the emergency stop switch, rotate the
2. Stop machine: press the emergency stop switch and unplug the power to stop machine (remember
to reset the speed regulator).
When stopping the machine, it is recommended
to unplug the power supply for safety reasons.
The emergency stop switch can only be rotated
and pressed down according to the direction
shows on its top, and cannot be pulled up.
When changing the grinding disc, adjust machine tothe lifting position, then tip the machine carefully
and lay the machine flat. After leveling the machine,stand next to the machine and check whether the
machine is stable. Change the polishing pads with a flat-blade screwdriver and replace it with a new one.
1. Please ensure that the machine won’t tip forward before replacing the abrasive;
2. After the machine has been running for a period of time, the abrasive, grinding disc and the gear box
will generate high temperature. Be careful to be burn when you replace the abrasive.
3. Replace the abrasive only when the power is unplugged and the emergency stop is pressed.
During machine working process, the wire wind method is particularly important, you can greatly
improve your work efficiency and improve your safety. The specific operation is as follows:
1. Plug in an external power supply;
2. Turn the power cord through the swing lever handle;
3. The power cord wrapped around the handle at least two laps;
4. Slightly hard to pull the power cord to ensure that the power cord has enough friction so that the
power cord firmly fixed on the handle.
1. Make sure the power plug and socket are securely connected;
2. Please make sure the emergency stop has been pressed before plug the power supply, and the other
switch has been reset;
3. Power supply line, please use (please find in Manual) wire minimum wire size;
4. Please use the correct power supply.
When grinding the ground, it should be in accordance
with the # method to grind the ground to get better
effect. And according to # to grind ground, the
machine grinding directionmakes the wire more
and more farther away, so that you can further
avoid the interference of the wire to the normal
work of the grinding machine.
We recommend that the grinding machine be checked regularly to extend the service life.
During the maintenance and repair process, the power of the grinder must be disconnected.
Wear protective equipment such as safety shoes, protective gloves, protective masks, etc.
The emergency stop switch should be rotated along the rotation direction of the switch. Turn the motor

PAGE
15
PAGE
16
positive and negative knob to start the machine (Safely and normally start the machine, the running light
will light up, if not normally start, then there will be the error code showed on the display screen)
Turn on the grinder and press the emergency stop switch to see if the machine stops.
Turn on the emergency stop switch and turn LED light switches to check if the corresponding light is on.
For safety reasons, it is strongly recommended to press the emergency stop switch when stopping the
device, which would be safer.
When starting the machine, it is recommended to press the handle to lift the machine slightly, reduce the
pressure of the grinding disc, and reduce the friction between the grinding abrasive and the ground, so
as to avoid motor overloading when starting the machine.
When there is a large amount of dust, it is easy to cause dust nozzle of grinding disc cover clogged by dust,
use flashlight to see if there is dust clogged, clean up if necessary.
In the case of long hours of work or a large amount of dust, the grinding plate of grinding head may be
stained with dust. It will lead lack of connection between grinding head and plate, which will affect grinding
efficiency even lead to abrasive drop and cause accident. In view of this situation, please remember to
clean up in time.
Be sure to wear protective equipment for maintenance checking such as protective gloves, protective
masks, insulated shoes, etc.
The maintenance operation must be done when the emergency stop pressed and the power unplugged.
When the machine is tilted, make sure that the machine is flat and then check the operation of the grinding disc.
Grinding machine works on site for a long time, and the switch will inevitably run into the dust. For this
reason, please check switch after grinding, to see whether the part is clogged by dust. Otherwise, it may
cause the switch failure.
Stored for a long time, the machine battery should be maintained and charged once every 6 months
Be sure to wear protective equipment for maintenance checking such as protective gloves, protective
masks, insulated shoes, etc.
The maintenance operation must be done when the emergency stop pressed and the power unplugged.
When the machine is tilted, make sure that the machine is flat and then check the operation of the grinding disc.
Remove the vacuum tube connection, illuminate the
dust nozzle with a flashlight, clean the dust nozzle
with brush. So that it will not clog the dust nozzle
and affect dust collection efficiency.
Tilt the machine and use a cross screwdriver to remove the pads, and use shovel to remove dust. If you
do not clean up in time, it is possible to make the pads disconnected, and pads fly out when grinding,
causing damage to the machine and threaten personal safety.
1. Be sure to disconnect the plug from the socket before cleaning, maintenance or assembly.
2. Be sure to clean the whole grinder after each day’s working. Do not use a pressure washer to clean the
machine directly.
3. In order to cool the equipment effectively, the cooling air port must be kept clear and clean.
The machine is equipped with an overload protection function on the inverter. When the machine is
overloaded, the overload error will be showed on the display of the control panel. In this case, just
disconnect the power plug and then reconnect it.
Any repairs must be performed by Pantheon Service Center training service personnel and use
original Pantheon accessories. If your machine needs repair, please contact with your retailer.

PAGE
17
PAGE
18
The table and picture show the technical data and dimensions of the grinder.
Pantheon

PAGE
19
PAGE
20
Pantheon does not bear the cost of machine damage caused by improper transportation,
unpacking and improper use. Local distributors may be subject to specific warranty terms, please
contact with your local distributor for specific warranty terms.
Popular Floor Machine manuals by other brands

Nilfisk-Advance
Nilfisk-Advance Advenger BR 755 Instructions for use

Minuteman
Minuteman mc20001qp Operation service parts care

Tornado
Tornado 99732 Operation & maintenance manual

NSS
NSS WRANGLER 2016 AE Operation manual

Tennant
Tennant 3000 Operator and parts manual

Taski
Taski aquamat 75 Instructions for use

Tennant
Tennant 140E Operator and parts manual

Comet
Comet CSW 1300 B Instructions and operating manual

Trusted Clean
Trusted Clean TPL-5-100-UD-TCP Owner's manual and parts list

Amano
Amano Pioneer Eclipse 440ST Operator's manual

Clarke
Clarke BOOST 32 05312K Operator's manual

Clarke
Clarke CR 28 Boost Operator's manual