Hudson & Canal TL0481 User manual

TABLE LAMP
Save these instructions
CARE INSTRUCTIONS:
• Unpluglampbeforecleaning.
• Wipecleanwithasoft,dryclothorstaticduster.
• Alwaysavoidtheuseofharshchemicalsorabrasivecleanersastheymay
causedamagetothexture’snish
1
Made in China
TL0481TL0482revMH061120EFS
IMPORTANT SAFETY INSTRUCTIONS:
• Theseinstructionsareprovidedforyoursafety.Please read carefully and
completelybeforebeginningtheassemblyandinstallationofthislightingxture.
• Thislightingxtureisintendedforindooruseonly.
• Alwaysplacelightingxtureonasolid,levelsurface.
• ForusewithE26(medium)baselightbulbsonly.
• Toavoidtheriskofre,donotexceedthemaximumwattageof60W incandescent bulb ,
or 9W LED bulb , or 13W uorescent (CFL) bulb , or 9W self-ballasted LED bulb .
(Bulbsnotincluded)
• Thislightingxturehasapolarizedplug(oneprongiswiderthantheother)asasafety
featuretoreducetheriskofelectricshock.Thisplugwilltinapolarizedoutletonlyoneway.
Iftheplugdoesnottfullyintotheoutlet,reversetheplug.Ifitstilldoesnott,contacta
qualiedelectrician.Neverusewithanextensioncordunlessplugcanbefullyinserted.
Do not alter the plug.Donotattempttobypassthissafetyfeature.
WARNINGS:
• Toreducetheriskofre,electricalshock,orpersonalinjury:alwaysturnoandunplugthis
lightingxtureandallowittocoolbeforeattemptingtoreplacethelightbulb.
• Donottouchlightbulbwhilextureisturnedon.
• Keepammablematerialsawayfromthislightingxture.
• Neverlookdirectlyatalitbulb.

PRE-ASSEMBLY:
Carefullyremoveallpartsandhardwarefromcarton,alongwithanyprotectiveplasticpackaging.
Do not discard any contents until after assembly is complete to avoid accidentally
discarding small parts or hardware.
2
Made in China
A
E
D
F
B
C
G*
H
J
K
L*
Carefully pull the
power cord out
from the Base (A)
to remove slack.
PARTS INCLUDED:
(A)Base
(B)BaseCollar
(C)BottomPost
(D)BottomPostScrew
(E)Washer
(F)Wrench
(G*)BaseCover
(H)ExtendingArmPost/Socket
(J)On/OSwitch
(K)Shade
(L*)ShadeRing
DO NOT EXCEED THE SPECIFIED WATTAGE.
For use with light bulbs with
a E26 (medium) base.
*This part may come preinstalled.
Check parts carefully.
BEGIN ASSEMBLY AT THE BASE ON
A SOLID, FLAT SURFACE.
BE CAREFUL NOT TO STRIP THREADS.
Snap Base Cover (G) into place
once all parts are properly assembled.

LAMPE DE TABLE
Conservez ces instructions
INSTRUCTIONS D’ENTRETIEN :
• Déconnectezleluminaireavantdelenettoyer.
• Essuyez-leproprementàl’aided’unchiondouxetsecoud’unessuie-meublestatique.
• Éviteztoujoursd’utiliserdesproduitschimiquesfortsouagentsnettoyantsabrasifs,
carilspourrontendommagerlanitionduluminaire.
3
Fabriqué en Chine
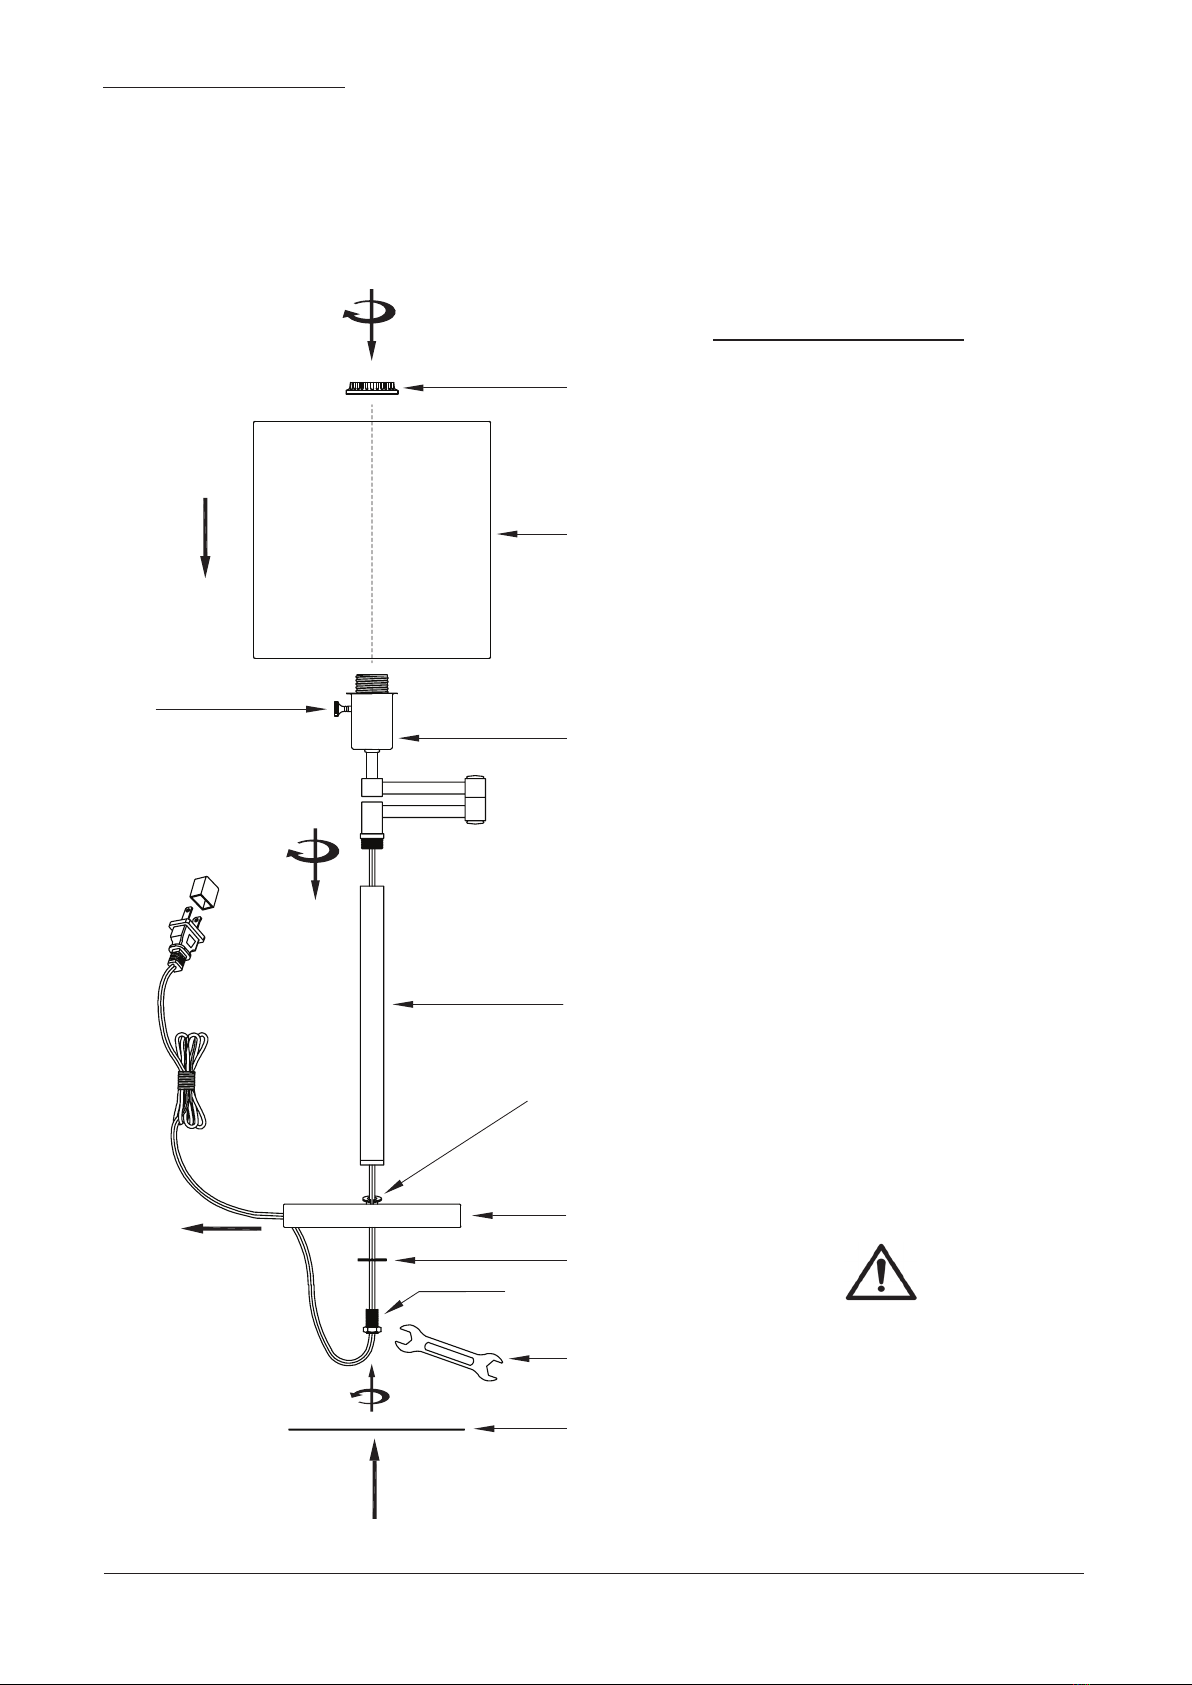
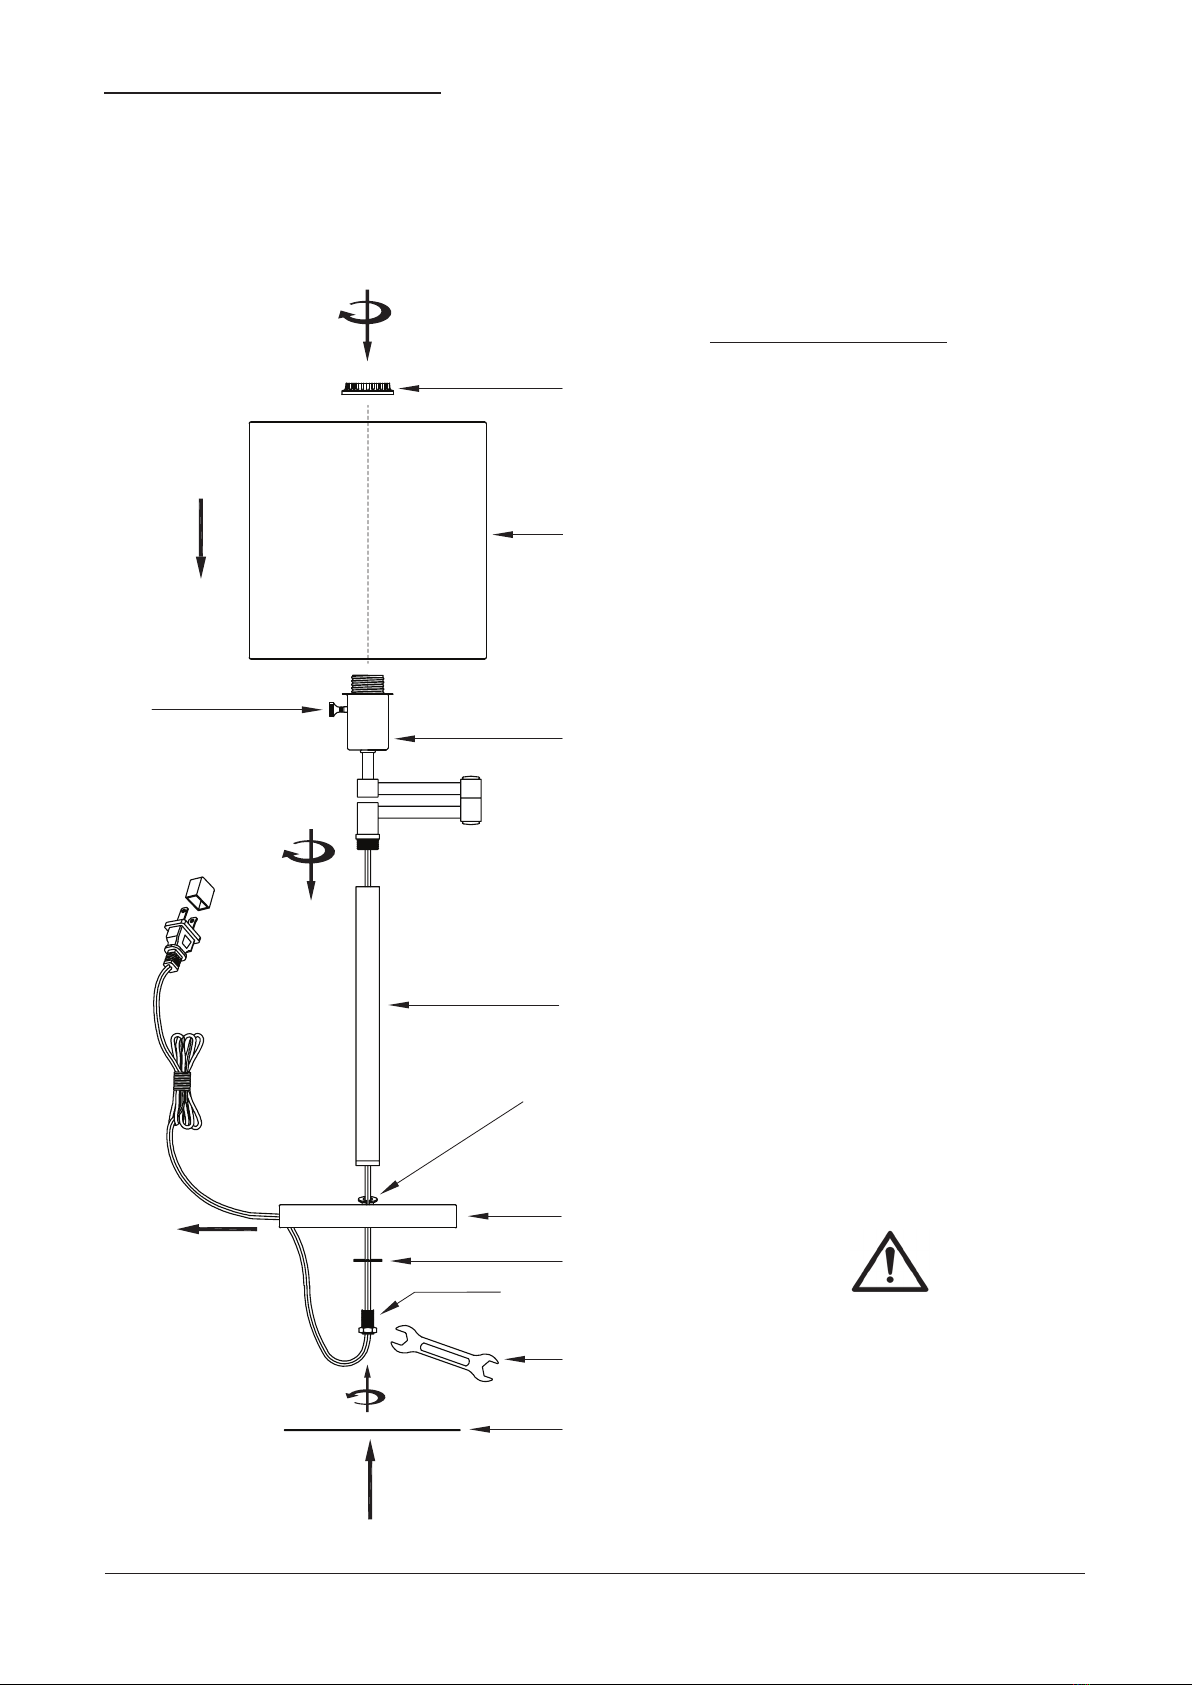
CONSIGNES DE SÉCURITÉ ESSENTIELLES :
• Cesconsignessontfourniesauxnsdevotresécurité.Veuillez les lire attentivement
et au completavantdecommencerl’assemblageetlamiseenplacedeceluminaire.
• Celuminaireestdestinéàutilisationàl’intérieurseulement.
• Poseztoujoursceluminairesurunesurfacesolideetdeniveau.
• PourutilisationuniquementaveclesampoulesavecbasedeE26(moyenne).
• Pouréliminertoutrisqued’incendie,évitezdedépasserlapuissancemaximaleprescrited’une
ampouleà incandescence de 60 W , ou d’une ampoule DÉL de 9 W , ou d’une ampoule
uorescente (CFL) de 13 W , ou d’une ampoule DÉL à ballast intégré de 9 W .
(Ampoulesnonincluses)
• Celuminaireprésenteunechepolarisée(avecunebrochepluslargequel’autre)àtitrededispositif
desécuritévisantàamoindrirlerisquedechocélectrique.Cetteches’insèredansuneprisepolarisée
d’uneseulemanière.Silachenes’insèrepasaucompletdanslaprise,inversezlache.Siellenes’y
insèretoujourspasadéquatement,communiquezavecun(e)électricien(ne)qualié(e).N’utilisezjamais
decordonprolongateuravecceluminaireàmoinsquesachepuisses’insérercorrectement.
Évitez d’altérer la che.Évitezdecontournercettecaractéristiquedesécurité.
AVERTISSEMENTS :
• Pouramoindrirlerisqued’incendie,dechocélectriqueoudeblessurecorporelle,veuilleztoujours
mettrehorstensionetdéconnecterceluminaireetlelaisserserefroidiravantdetenterderemplacer
l’ampoule.
• Évitezdetoucherl’ampoulependantqueleluminaireestsoustension.
• Gardeztoutematièreinammableéloignéedeceluminaire.
• Éviteztoujoursderegarderdirectementuneampouleallumée.

PRÉASSEMBLAGE :
Retirezsoigneusementdelaboîtetouteslespièces,toutelaquincaillerie,ettoutemballagede
plastiqueprotecteur.
Ne mettez aucun élément de contenu au rebut avant de terminer l’assemblage au complet,
an d’éviter de jeter accidentellement de petites pièces ou un élément de quincaillerie.
4
Fabriqué en Chine
Retirez délicatement le
cordon d’alimentation de
la base (A) pour éliminer
le jeu du cordon.
ÉVITEZ DE DÉPASSER LA
PUISSANCE MAXIMALE SPÉCIFIÉE
Pour utilisation uniquement avec les
ampoules avec base de E26 (moyenne).
COMMENCER À ASSEMBLER À LA
BASE SUR UN PLANCHER SOLIDE
ET PLAT, EN PRENANT GRAND SOIN
D’ÉVITER D’ARRACHER LES FILETS.
*Cette pièce peut être préinstallée.
Vériez soigneusement les pièces.
A
E
D
F
B
C
G*
H
J
K
L*
PIÈCES COMPRISES :
(A)Base
(B)Coldebase
(C)
Poteau-lampeinférieur
(D)
Visdupoteau-lampeinférieur
(E)Rondelle
(F)Clé
(G*)Couvercledelabase
(H)
Poteau
dubrasextensible/
Douilled’ampoule
(J)Interrupteurmarche/arrêt
(K)
Abat-jour
(L*)Bagued’abat-jour
Enclenchez le couvercle de la base (G)
en place une fois que toutes les pièces
sont correctement assemblées.

LÁMPARA DE MESA
Guarde estas instrucciones
INSTRUCCIONES DE CUIDADO:
• Desenchufelalámparaantesdelimpiarla.
• Limpieconunpañosuaveysecooconunpañoparaestática.
• Evitesiempreelusodelimpiadoresquímicosásperosoabrasivos,yaquepuedendañar
elacabadodelaccesorio.
Hecho en China
INSTRUCCIONES IMPORTANTES DE SEGURIDAD:
• Estasinstruccionesseproporcionanparasuseguridad.Léalascuidadosamente
yporcompletoantesdecomenzaraensamblareinstalarestalámpara.
• Estalámparaestádestinadaaserutilizadasoloeninteriores.
• Coloquesiemprelalámparasobreunabasermeynivelada.
• ParautilizarconbombillasconunabaseE26(mediano)solo.
• Paraevitarelriesgodeincendios,noexcedaelvatajemáximo de una bombilla de
60W incandescente
, LED de 9W , uorescente (CFL) de 13W , o LED
balasto incorporado de 9W .(Bombillasnoincluidas)
• Estalámparatieneunenchufepolarizado(unapatillasesmásanchaquelaotra)como
característicadeseguridadparareducirelriesgodeunelectrochoque.Esteenchufesolo
entraráenuntomacorrientepolarizadodeunasolamanera.Sinoentracompletamenteen
eltomacorriente,inviertaelenchufe.Siaúnasínoentra,comuníqueseconunelectricista
calicado.Noutilicenuncauncableprolongador,amenosqueelenchufesepuedainsertar
porcompleto.Nomodiqueelenchufe.Nointenteeludirestacaracterísticadeseguridad.
ADVERTENCIAS:
• Parareducirelriesgodeincendio,electrochoqueolesionespersonales:siempreapaguey
desenchufeestalámparaydéjelaenfriarantesdeintentarreemplazarlabombilla.
• Notoquelabombillamientraslalámparaestáencendida.
• Mantengalosmaterialesinamableslejosdelalámpara.
• Nuncamiredirectamenteaunabombillaencendida.
5

6
Hecho en China
ANTES DEL ENSAMBLADO:
Retireconcuidadotodaslaspiezasyherramientasdelacaja,juntocontodoelenvoltorio
plásticoprotector.
No deseche nada hasta después de haber terminado de ensamblar para evitar botar por
accidente piezas pequeñas o herramientas.
Extraiga con cuidado
el cable eléctrico de
la base (A) para
eliminar la holgura.
NO EXCEDA EL VATAJE ESPECIFICADO
Para utilizar con bombillas con
una base E26 (mediano) solo.
COMIENCE LA MONTAJE EN LA
BASE EN UN PISO SÓLIDO Y PLANO,
PONIENDO ESPECIAL CUIDADO
EN NO DESGARRAR LOS HILOS.
*Esta parte puede venir preinstalada.
Verique las piezas cuidadosamente.
A
E
D
F
B
C
G*
H
J
K
L*
PARTES INCLUIDAS:
(A)Base
(B)Cuellobase
(C)Posteinferior
(D)Tornillodelposteinferior
(E)Arandela
(F)Llaveinglesa
(G*)Cubiertadelabase
(H)Postedelbrazoextensor/
Portalámparas
(J)Interruptorencendido/apagado
(K)Pantalla
(L*)Anillodepantalla
Encaje la cubierta de la base (G) en su
lugar una vez que todas las piezas estén
ensambladas correctamente.
This manual suits for next models
1
Table of contents
Languages:
Other Hudson & Canal Outdoor Light manuals
Popular Outdoor Light manuals by other brands

LIGMAN
LIGMAN LIGHT LINEAR VT 2 installation manual

BEGA
BEGA 84 724 Instructions for use

WE-EF
WE-EF VFL500-SE Series Installation and maintenance instructions

HEPER
HEPER TURA 2x16 LED Installation & maintenance instructions

Timberlab
Timberlab Strato manual

Satco
Satco Nuvo 65-063 Installation and service instructions