HUMIE HU01 Instruction Manual

Ultrasonic Cool
Mist Humidiier
Operating
Manual
Please Read before
Using Your Humie Model: HU01
HUMIE MANUAL
FRONT COVER
148 x 105 mm

3
Contents 4 Warnings & Safety Precautions
7 Meet Humie
9 Speciications
10 Using Your Humie
15 Cleaning
18 Troubleshooting
HUMIE MANUAL
TEXT PAGES
148 x 105 mm

54
Warnings
& Safety
Precautions
In order to avoid electric shock,
ire and/or serious personal
injury, when using electrical
appliances, basic safety
precautions should always
be followed, including the
following:
1. Read All Instructions
2. Check that the voltage power
corresponds to that stated on
the appliance.
3. To protect against electrical
shock do not immerse cord,
plugs, power base or the
appliance in water or other
liquid.
4. Close supervision is
necessary when any appliance
is used near children.
This product is not a toy and
should be used out of reach of
children. This product shall not
be used by children, without
close supervision.
5. Unplug from outlet when
not in use and before cleaning.
6. DO NOT operate any
appliance with a damaged
cord or plug or after the
appliance malfunctions or has
been damaged in any manner.
Return appliance to the nearest
authorized service facility for
examination, repair,
or adjustment.
7. The use of accessory
attachments not recommended
by the appliance manufacturer
may cause injuries.
8. DO NOT use outdoors.
9. DO NOT let cord hang
over edge of table or counter,
or touch hot surfaces.
10. DO NOT place on or near
a hot gas or electric burner,
or in a heated oven.
11. Always attach plug to
appliance irst, then plug
cord into the wall outlet.
To disconnect, put the
switch in o position, then
remove plug from wall outlet.
12. DO NOT use appliance
for other than intended use.
13. When removing mineral
deposit, only use products
specially formulated for the
removal of mineral deposit.
Never use ammonia or any
other substance that might
be dangerous to your health.
14. DO NOT reill with
water while the appliance
is switched on.
15. Use on a water resistant,
hard, lat, level surface only.
16. NEVER use the appliance if
it has been dropped on the loor
or damaged in any way.
17. Always have water in the
water tank when operating
the unit.
18. Use only clean, cool tap
water to ill the tank
(softened or distilled water
is recommended, if tap
water is hard).
19. To avoid white dust,
you may use distilled water.
20. Be sure that the illing cap
of the tank is irmly tightened.
21. Always have the mist
direction nozzle and the water
tank in place while the unit is
operating. Rotate the appliance
so that the mist nozzle aims
away from walls, and furniture.
22. DO NOT add medication
of any type into the nozzle, base
or water tank. Do not cover any
openings on the unit or insert
objects into any openings.
23. The unit should not be left
unattended in closed rooms as
the air could become saturated
and leave condensation on walls
or furniture. Always leave the
room door partly open.
24. When cleaning the inside
of the unit, keep water away

76
from the air outlet. The exterior
may be wiped with a damp
cloth, except the electrical
controls, when the unit is o.
(Any part may be wiped with
a damp cloth when the unit is
unplugged.)
25. DO NOT tilt or tip the unit
or attempt to empty or ill it
while it is in operation.
26. If using detergent to
clean any parts of the unit that
contains water use detergent
sparsely and rinse abundantly.
Detergent deposit dissolved
in the water supply might else
interfere with the output of the
unit.
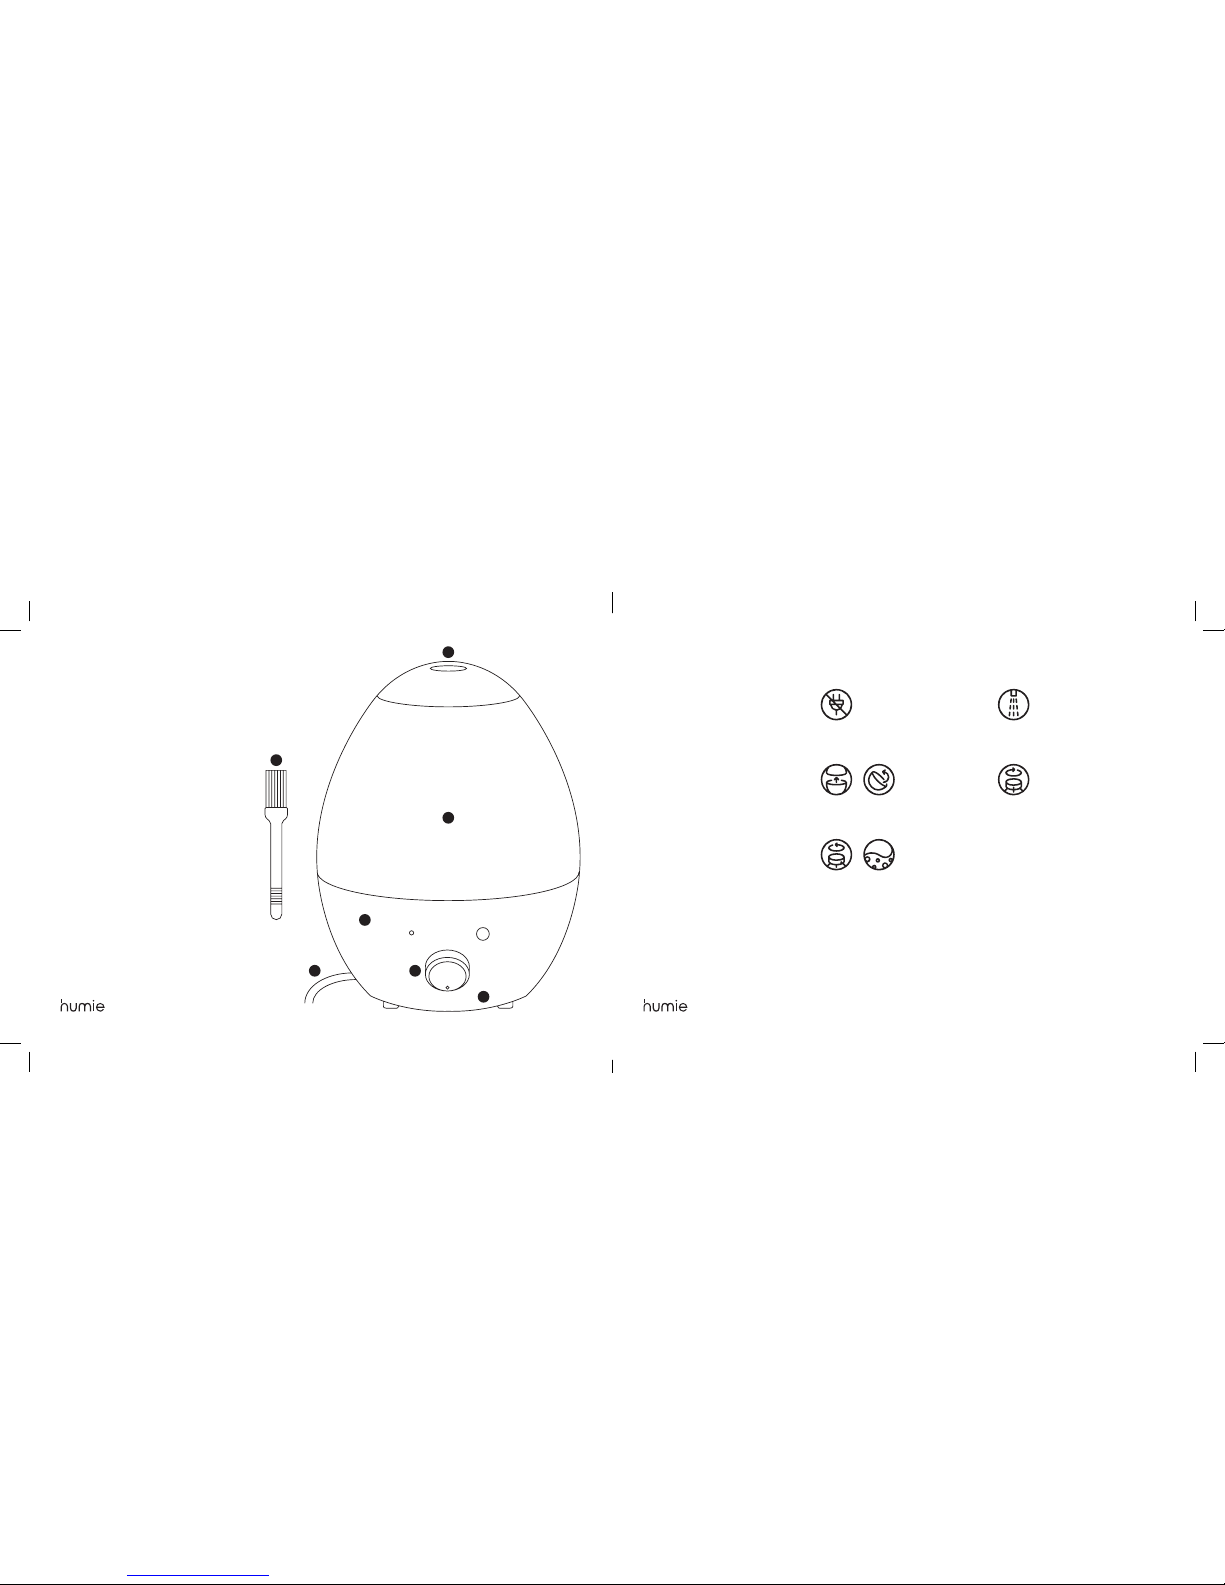
27. Adding essential oils,
fragrances, eucalyptus, water
conditioners, etc. directly to the
water tank will damage the unit.
Only use the correct essential
oils in the Aromatherapy Tray
as directed.
NOTE: For the Gold Humie,
use only essential oils that are
also approved for use on skin.
Not doing so may damage the
gold inish.
Household Use Only
Save These Instructions
Polarized Plug Warning
This appliance is equipped
with a polarized plug (one
blade is wider than the other).
To reduce the risk of electric
shock, this plug will it into the
polarized outlet only one way.
If the plug does not properly it
into the outlet at irst, reverse it.
If it still does not it, contact a
competent qualiied electrician.
Do not attempt to modify the
plug in any way.
Short Cord Warning
A short detachable power
supply cord is provided to
reduce the hazards resulting
from becoming entangled in,
or tripping over a longer cord.
Longer detachable power
supply cords may be used if
care is exercised in their use.
The electrical rating of the
longer cord should be at least
that of the appliance.
If the electrical rating of the
extension cord is too low, it
could overheat and burn.
The longer cord should be
arranged so that it will not
drape over the counter or
tabletop where it can be pulled
on by children or tripped over.
Meet Humie Congratulations on your
new Humie!
Get ready to experience a
new level of climate comfort.
Advanced air ionization
technology keeps your
bedroom or oice cool and
comfortable in any season.
Humie soothes scratchy
throats and improves sleep
by delivering continuous cool
moisture for up to 24 hours on
one tank, while the innovative
silhouette and modern colors
add swanky style to your space.
To get the most out of your
Humie, please read this manual
and keep it handy.
Humie is easy to use and easy
to love, so this won’t take long,
we promise.
Features
Maximum Cooling Moisture
Relieves a range of symptoms
associated with dry air.
Powerful Run Time
Large 2.4 liter tank provides
up to 24 hours of mist for a full
night of restful sleep.
Hushed Operation
Whisper-silent mist won’t wake
the baby or disrupt the oice.
Works Fast
Quickly transform any room into
an oasis of soothing comfort.

98
Modern, Stylish Design
Sleek good looks add style
to your bedroom, oice, or
nursery.
Smart, Simple Controls
Intuitive mist control dial makes
adjustments a breeze.
Soothing LED Night Light
Optional soft white LED light lets
you see the mist and provides a
comforting glow.
Aromatherapy Tray
Enhance your experience,
rejuvenate, and refresh with
this specially designed tray that
holds your favorite essential oil.
Speciications · 2.4-liter water capacity
· Up to 24 hour runtime
· Mist control dial for adjusting mist low
· Automatic shut-o safety feature when water level is low
· Tank removes easily to ill and clean
· Industry-leading 5-year warranty
· H 9.6 inches x W 7.4 inches x D 7.4 inches
· Voltage: 110V120V, 60Hz
· Moisture output: 200 ml. per hour approx
· Room coverage: 300 sq. ft.

1110
Using your
Humie
Parts
1. Mist Nozzle
2. Water Tank
3. Base
4. Aromatherapy Tray and Pad
5. Power Plug
6. Mist Control Knob
7. Cleaning Brush
1
2
3
4
5 6
7
Before Using
Pick a location that’s irm,
level, and lat. For proper
airlow, make sure there’s
at least six inches between
Humie and the nearest wall
or object.
Place Humie on a water-
resistant surface, since
excess water can damage
furniture and looring.
Avoid using on any porous
or delicate surface that could
be damaged by water.
Do not use on an unstable
surface. Humie will not accept
responsibility for property
damage caused by water
spillage.
Fill Water Tank
1. Make sure the base unit is
unplugged.
+
2. Separate the water tank from
the base and lip it over.
+
3. Unscrew the cap on the
bottom of the tank by turning
it counter-clockwise. Rinse the
tank with fresh water.
4. Fill the tank with cold tap or
distilled water. Do not overill.
5. Replace the cap, aligning
the notches on the tank with
the grooves on the cap,
and turn it clockwise.
WARNING: DO NOT
add essential oils or other
products to the water.
DO NOT overill the tank.

1312
Change or Remove
Ceramic Filter
+
There is a ceramic ilter housed
in the water tank cap to help
purify the water. To change the
ilter, unscrew the lid of the ilter
holder and remove the ilter.
Assemble Unit
1. Screw the cap back onto
bottom of water tank.
2. Carefully place illed tank
onto base unit vertically so that
it its irmly onto the base.
3. Place the mist nozzle on top
of the water tank.
WARNING: DO NOT touch the
power plug when the unit is on.
Green
Unit is on
Red
Water level is too low
LED Night Light
Press button to toggle the
light on and o
Mist Control Knob
Operating Instructions
+
+
1. Plug in and turn on the unit
using the mist control dial.
The green light will come on.
+
2. Use the mist control dial to
adjust the output. For more
mist, turn the knob clockwise.
For less mist, turn the knob
counterclockwise.
3. To turn Humie o, simply turn
the dial all the way to the left.
NOTE: We recommend
starting at a medium setting
and adjusting later to the
desired mist output. Starting at
maximum may cause a pool
of water to form near the unit.

1514
Automatic Safety
Shuto Feature
Humie includes an
automatic safety shuto.
The unit will shut o before it
runs completely out of water,
thanks to the water level loat.
When the tank is almost empty,
the red LED will light on.
This safety feature protects the
nebulizer from damage caused
by lack of water. To resume
operation, simply switch o,
reill the water tank with fresh
water and place the tank back
on the main housing. Turn the
dial to start the humidiier.
WARNING: The indicator light
will turn red when the tank runs
out of water but the power is
still on. Please re-ill the water
or unplug the unit for safety.
Using The Aromatherapy Tray
Enhance your Humie
experience by adding a few
drops of therapeutic fragrance
to the aromatherapy tray.
Enjoy maximum relaxation and
rejuvenation with this special
feature.
· Pull the tray out by lifting up.
· Add a few drops of your
favorite essential oil to the
cotton pad (included).
· Close the tray.
WARNING: DO NOT
Add essential oils directly
to the water tank. This may
damage the unit.
Did You Purchase A Gold
Humie?
WARNING: If you purchased
the Humie in GOLD, some
essential oils may damage the
inish. To prevent this, please
only use essential oils that are
also safe for use on your skin!
Cleaning &
Maintenance
Weekly cleanings keep
Humie happy!
REMINDER: Always turn o
and unplug Humie before
cleaning it.
Cleaning The Unit
The humidiier may be wiped
with a soft damp cloth and
bued with a dry cloth, as long
as it is unplugged. Do not wipe
the electrical controls with a
wet cloth.
NOTE: There may be some
mineral deposits in the
nebulizer, particularly if the
water in your area is hard.
This deposit will inluence
the humidiication process
and decrease performance
gradually.
Cleaning The Nebulizer
1. Dampen a wet cloth with
vinegar and wipe the nebulizer
gently, until any mineral
deposits disappear. You may
also use the brush included
with your Humie.
2. Dry using a clean cloth.
3. DO NOT use hard or abrasive
brushes or sponges.
4. DO NOT use chemical
products.

1716
Cleaning The Tank
Clean the inside of the water
tank at least once a week.
1. Fill the tank with clean water
adding a few drops of bleach
or a similar disinfectant, or a few
drops mild cleaning detergent.
Be careful not to use too much
soap or it will diicult to rinse
thoroughly.
2. Seal the tank with its cap
and shake vigorously.
3. Rinse thoroughly.
NOTE: Water left in the tank for
long periods of time may create
bacteria and mildew. Use fresh
water every day and never store
the tank with water in it.
Daily Nebulizer Cleaning
Each time you change the water,
we recommend removing any
dust and any lime residue on
the nebulizer with the included
brush.
WARNINGS:
· DO NOT place the nebulizer
directly under the tap to avoid
permanent damage.
· Never immerse the unit in
water or let water enter the air
outlet or any other openings.
· Water must not get inside the
base part; should that happen,
take it to an authorized service
center before using it again.
Storage
· Save the box for o-season
storage.
· Always drain and clean before
storage.
· Make sure the tank, reservoir
and all parts are thoroughly
dry before storage.
· If water is left in the unit
during storage, it may harden
and leave deposits that can
prevent the unit from operating
properly later.
· Leave the cap of the water
tank loose or apart, during
storage, to prevent the tank
and the gasket from sticking
together. This will prolong
the life of the gasket.
Note About Humidity
· It is best to keep the humidity
level at about 3050 percent
of relative humidity.
· The comfort level of humidity
will vary from room to room
and with changing room
conditions.
· In cold weather, especially in
unventilated areas, windows
and even some walls may fog
or develop frost from excessive
indoor humidity. If this occurs,
reduce the mist intensity
setting to avoid damage from
condensed water dripping on
windows or walls.
· Too much humidity in the
room may allow moisture to
accumulate on surfaces where
bacteria and fungi can grow.
Moisture that gathers may also
damage furniture and walls,
especially wallpaper.
· To eliminate excessive
humidity, especially in small
rooms, leave the door open
and adjust mist intensity.

1918
Troubleshooting Having trouble?
Before contacting us, see if
one of the solutions can help
you resolve it.
NOTE: Do not attempt to open
the motor housing by yourself.
doing so may void your warranty
and cause damage to the
humidiier or personal injury.
Symptoms
Power light o, no blowing,
no mist
Main switch o
Power light on, air blowing,
no mist
Cover of water level protection
switch not closed properly
Power light on, no blowing,
no mist
Foul smell of mist
Possible/Reason
Power is disconnected or
no power
Turn on the appliance using
the switch
No water in tank
Reinstall the water tank to it
properly.
Water level too high in the
water basin.
New machine
Solution
Connect to power supply
Add water to the tank
Remove some of the water
in the tank; put the tank back
in place.
Keep the water tank uncovered
and open in a cool place for
12 hours

2120
Symptoms
Dirty water or water stored
for too long
Small mist output
Mineral deposit on transducer
Dirty water or water stored
too long
Abnormal noise
Vibration on surface where
the unit is placed
Symptoms
Mist spilled from around
the nozzle
Water pooling on the
countertop
Air saturated with water
Water in the tank does not
low down
Possible/Reason
Clean the water tank,
replace the water
Mist level set too low
Clean the transducer
(see above)
Replace with clear water
Resonance caused by
insuicient water in tank
Place on another lat, stable
surface or on the ground
Possible/Reason
Gaps between nozzle and
water tank
Too much mist produced
Keep room ventilated,
with door opened
Hole in the cap of the tank
is blocked
Solution
Keep the water tank uncovered
and open in a cool place for
12 hours
Increase the mist output level
Add clean water to the tank
Solution
Soak nozzle in water before use
Decrease the mist output
Clear the blocked hole/valve

22
Thank you and
enjoy your Humie!
Register Your Humie:
www.MyHumie.com
Contact us with comments
or issues:
Warranty applies to the
humidiier and parts and labor
relating thereto. Does not apply
to damage resulting from
failure to follow the operating
instructions, accidents, abuse,
alterations or disassembly by
unauthorized individuals.

Ultrasonic Cool
Mist Humidiier
HUMIE MANUAL
BACK COVER
148 x 105 mm
Table of contents