hurlcon MX 125 User manual

MX Series Pool
& Spa Heater
Genus IV
INSTALLATION AND OPERATING INSTRUCTIONS
INDOOR AND OUTDOOR MODELS
AstralPool Australia Pty. Limited. A.B.N. 97 007 284 504
www.astralpool.com.au email: service@astralpool.com.au
Information and specifications subject to change without notice.
Melbourne:
Ph: (03) 9765 9700
Fax: (03) 9765 9770
Sydney:
Ph: (02) 9853 2100
Fax: (02) 9853 2170
Brisbane:
Ph: (07) 3308 5400
Fax: (07) 3308 5470
Gold Coast
Ph: (07) 5552 2600
Fax: (07) 5552 2670
Adelaide:
Ph: (08) 8349 2500
Fax: (08) 8349 2500
Perth:
Ph: (08) 9350 2600
Fax: (08) 9350 2670
Rev 173-0807

MX Pool and Spa Heater Page 2
CONTENTS
Introduction
Introduction 3
Notice to Installers 3
Safety Rules 3
Operation
Lighting Instructions 4
Operating Instructions 4
Turning Gas Off 4
Chemical Balance 4
Corrosion Prevention in Heaters 5
Digital Thermostat Operation 6
Fault Indication 7
Maintenance
Maintenance Instructions 8
Energy saving Tips 8
Winter Operation 8
Installation
Flow Rates 9
Water Connections 9
Plumbing Diagram 9
Heater Dimensions 10
Indoor Installation 10
Ventilation 11
Clearances 12
Electrical Connection 13
Gas Connection 13
Pressure Switch Adjustment 13
Starting the Heater 14
Testing Burner Pressure 15
Gas Conversion
Burner Conversion 16
Gas Pipe Sizing Tables 17
Troubleshooting
Fault Finding and Remedies 18
Wiring diagrams
MX Series (except MX 500) 19
MX 500 - Honeywell Ignition control 20
MX 500 - RAM Ignition Control 21
Warranty
Terms and Conditions 22

MX Pool and Spa Heater Page 3
INTRODUCTION
Congratulations on your purchase of a Hurlcon Pool and Spa Heater. Proper installation and
service of your new heating system and correct chemical maintenance of the water will ensure
years of enjoyment. The Hurlcon MX Series Heater is an efficient gas fired pool and spa heater. It
is equipped with features that take advantage of new technology developed exclusively by
AstralPool.
The Hurlcon MX Series Pool Heater can safely be connected to PVC pipe and has a built in
balanced flue for outdoor installation. It accepts high flow rates which help the heater run cooler,
giving greater performance and long life. In addition, the Hurlcon MX Series Pool Heater is
equipped with electronic start up and an accurate electronic thermostat to ensure ease of use and
accurate temperature control. The electronic display tells at a glance the operational status of the
heater.
NOTICE TO INSTALLERS
This appliance must be installed by an authorized person.
This appliance must be installed in accordance with the installation instructions, local gas fitting
regulations, the AGA Installation Code AS5601 and any other relevant statutory authorities.
Refer to data plate for details of gas type, gas consumption and burner pressure.
SAFETY RULES
1. Spa or hot tub water temperature should never exceed 40˚C.
2. Drinking of alcoholic beverages before or during spa or hot tub use can cause drowsiness which
could lead to unconsciousness and subsequently result in drowning.
3. Pregnant women beware! Soaking in water above 38˚C can cause foetal damage during the first
three months of pregnancy.
4. Before entering the spa or hot tub, the user should check the water temperature with an accurate
thermometer, spa or hot tub thermostats may err in regulating water temperatures by as much as
2˚C.
5. Persons with a medical history of heart disease, circulatory problems, diabetes or blood
pressure problems should obtain their physician’s advice before using spas or hot tubs.
6. Persons taking medications which induce drowsiness, such as tranquillisers, antihistamines or
anticoagulants, should not use spas or hot tubs.
WARNING: Should overheating occur or the gas supply fail to shut off, turn off the manual gas
control valve to the appliance. Do not use this heater if any part has been under water.

MX Pool and Spa Heater Page 4
LIGHTING INSTRUCTIONS
For your safety – read before lighting
This appliance is equipped with an ignition device which automatically lights the pilot. Do not try
to light the pilot by hand.
BEFORE OPERATING smell all around the appliance area for gas. Be sure to smell next to the
floor because some gas is heavier than air and will settle on the floor.
WHAT TO DO IF YOU SMELL GAS. Do not try to light any appliance. Do not touch any
electrical switch. Do not use any telephone in your building. Immediately call your gas supplier
from a neighbor’s house.
DO NOT PLACE ARTICLES ON OR AGAINST THIS APPLIANCE
DO NOT USE OR STORE FLAMMABLE MATERIALS NEAR THIS APPLIANCE
DO NOT SPARY AEROSOLS IN THE VICINITY OF THIS APPLIANCE WHILST IT IS IN
OPERATION.
OPERATING INSTRUCTIONS
1. STOP! Read the safety information above.
2. Turn off electric power to appliance.
3. This appliance is equipped with an ignition device which automatically lights the pilot. Do
not try to light the pilot by hand.
4. Wait five minutes to clear out any gas. If you then smell gas, STOP! Refer to instructions
above.
5. Turn filtration pump on.
6. Turn on power to the heater and press the pool/spa button to select pool or spa mode.
7. Set thermostat to desired setting and press ON/OFF switch to ON.
8. The heater will ignite in around 10 seconds.
9. If the appliance will not operate, follow instructions 5 to 7 above. If the appliance still does
not ignite, call your service technician.
TO TURN GAS OFF TO APPLIANCE
1. Turn off all electrical power to the appliance.
2. Turn off gas tap in gas line prior to heater.
CHEMICAL BALANCE
It is imperative that correct chemical balance be maintained in your pool and spa water, otherwise
corrosion of your heater may occur. Corrosion of the heat exchanger voids warranty. Your
local pool shop specialist or spa retailer can advise correct chemical balance. Your water should be
checked and maintained regularly by a pool water professional. As a guide the following
parameters may be used.
pH 7.6 to 7.8
Total Alkalinity 80 to 120 ppm
Calcium Hardness 150 to 250 ppm
Salinity 4000ppm
You should test your water chemical balance at least on a weekly basis.
Excessive sanitiser can damage your heater. Chlorine should not exceed 3 ppm and bromine
should not exceed 5 ppm. Salt chlorinators, especially when used on spa pools or indoor or
covered pools, can easily produce excessive chlorine levels which will damage the heater internals.

MX Pool and Spa Heater Page 5
CORROSION PREVENTION IN HEATERS
All pool and spa heaters use copper or copper nickel to make their heat exchangers as it is the most
efficient material in transferring heat from the combustion chamber into the water. The typical life
expectancy of a well maintained pool/spa heater is between 8 and 15 years.
Often the same heat exchanger used in residential and commercial boilers and hot water systems
will have a life expectancy of 20 years.
The addition of sanitisers (Chlorine, Bromine etc) and other water balancing and conditioning
chemicals can increase the rate of wear and tear on the heat exchanger and associated parts in your
heater.
There are three most common reasons for heat exchanger corrosion which can be avoided with a
little care and attention.
1. Excessive Sanitiser. This means too much Chlorine or Bromine in the water. Be careful, if
the level of Chlorine or Bromine is excessively high your test kit (and the pool shops) may not read
accurately or indeed may show a nil reading. Any time a salt chlorinator is operating for extended
periods, (when heating the swimming pool from cold), particularly if the weather is overcast or the
pool enclosed or covered, the Chlorine level may exceed normal levels. When heating a Spa Pool,
turn the chlorinator down or off for the duration of the heating period.
2. Out of balance water. The water balance is a combination of pH, total alkalinity, Calcium
hardness and temperature. These measurements must be at the correct levels to maintain balanced
water and effective sanitation of your pool. Balanced water will help prevent corrosion of your
heater. Your pool shop or service professional can test and balance your water.
3. The addition of acid to lower pH. Acid must always be added in small quantities and
spread over the pool surface evenly, not added in to the skimmer. Do not add a litre at a time, add a
cupful each day to lower your pH.
4. Never add chemicals to skimmer - dilute and circulate as far away as possible from
skimmer.
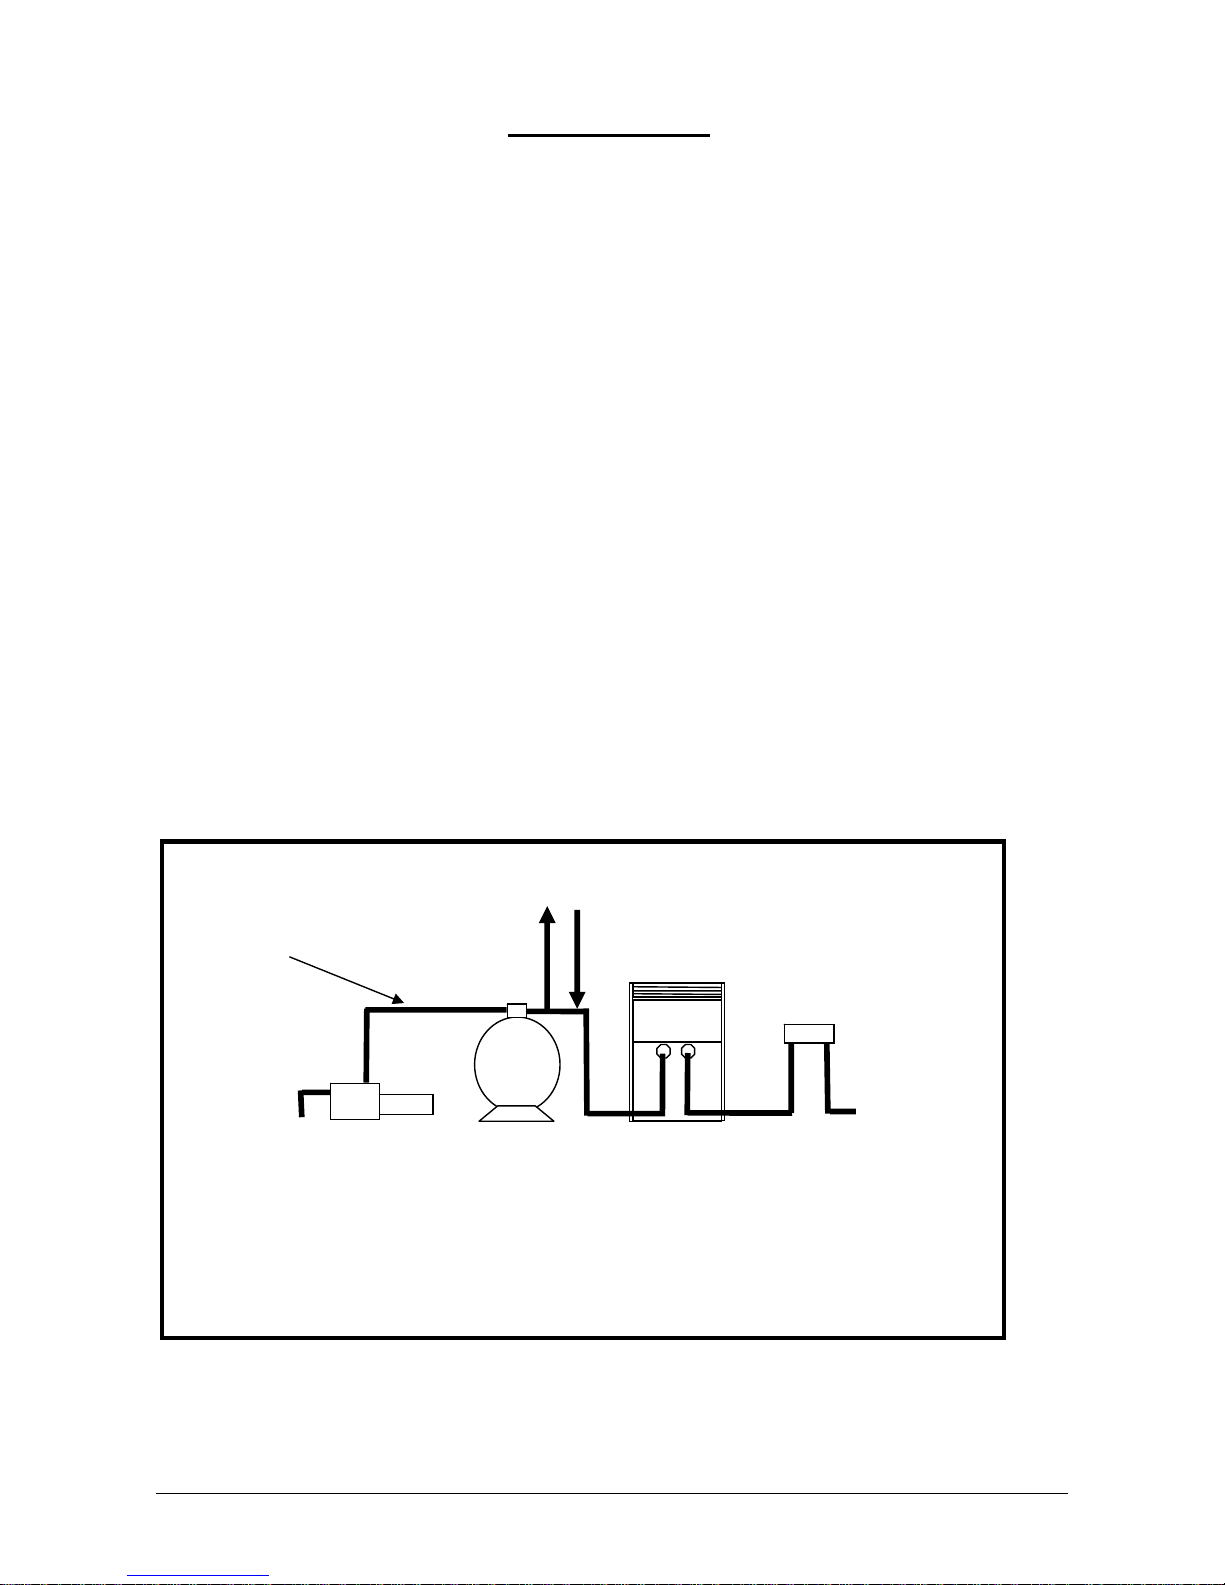
If you have a salt chlorinated INDOOR pool or COVERED pool be very careful of the level of
Chlorine being produced. If you use a salt chlorinated spa be very careful of the level of Chlorine
as the Chlorinator is usually sized for the pool and therefore should be switched off when heating
the spa. Leaving the chlorinator on can raise the chlorine level very rapidly in a small volume of
water.
These comments are intended as a guide only and are not definitive answers or recommendations on
pool water chemistry. Hurlcon’s intention is to provide a little understanding of the potential
problems of water chemistry and the dangers of corrosion to heaters (and other pool equipment and
fittings).
You should always seek the advice of your local pool shop professional and provide him with as
much information and feedback as possible when analysing your pool and spa water and obviously
be sure to tell him you have a heater connected to the system even though it may not be in constant
use.
YOUR WATER SHOULD BE ADJUSTED & BALANCED PRIOR TO ANY CORRODED
PARTS BEING REPLACED.

MX Pool and Spa Heater Page 6
DIGITAL THERMOSTAT OPERATION
DESCRIPTION
The sophisticated digital thermostat provides temperature read out, set point temperature and
operating status of the heater. The electronic display indicates the operational status of the heater
and any fault conditions.
TEMPERATURE DISPLAY
The temperature display indicates water temperature in the inlet of the heater. Therefore the pump
must be operating for an accurate pool or spa water temperature to be displayed.
Comfortable pool temperature is between 26˚C and 30˚C. Normal spa temperature is between 36˚C
and 38˚C. To select your desired temperature press the up or down button repeatedly until the
desired temperature is reached.
To prevent rapid cycling of the heater, the thermostat has an inbuilt time delay which prevents the
heater from turning on for two minutes after the set point has been reached. If the time delay is
activated, the symbol “L” will be displayed. This is part of normal operation.
The thermostat can be set to temperatures between 10˚C and 40˚C. It also incorporates several
safety features including a 45˚C high limit function to prevent overheating of the pool or spa. On
simultaneous shut down of the circulating pump and heater, the water within the heater may exceed
45˚C for a short period. If the pump and heater are restarted during this period, the thermostat will
go into a standby mode and prevent the heater from relighting until the temperature within the
heater has dropped below the set temperature.
Should the thermostat fail to stop the heater at the set point or at 40˚C, there are three temperature
limiting safety devices designed to lock the heater out and prevent further heating. A lock out
condition is indicated by the symbols F1 or F2. To reset a lock out condition, turn the power off
for five seconds.
>
<
HURLCON
HURLCON
○
I
ON/OFF POOL/SPA WARM COOL

MX Pool and Spa Heater Page 7
FAULT INDICATION
Under fault conditions the thermostat display will indicate a set of alpha numeric symbols to
indicate the status of the heater. The meaning of each symbol and action to be taken are listed as
follows:
SYMBOL MEANING ACTION
Temp Display Unit has power. No action.
F0 Heater locked off, thermistor If water temperature reads
wire disconnected or water greater than 0°C, phone for
at 0°C (freeze conditions). service.
F1 Thermostat reads greater Allow water to cool,
than 45°C. turn heater off then on again.
F2 Mechanical Hi Limit greater Allow water to cool,
than 45°C. turn heater off then
on again.
F3 Thermistor fault Phone for Service
F4 Flame rollout detected Phone for Service
L Heater locked out on time No action. Heater will
delay for 2 minutes. Automatically reset after
time delay.
Or switch off then on again
for immediate ignition.
Pump operating & sufficient No action
water pressure to operate heater
Thermostat calling for heat. No action, heater should
Electronic Ignition operating. ignite after small time delay.
Burner system has ignited and No action
is operating.

MX Pool and Spa Heater Page 8
MAINTENANCE
It is recommended that you check the following at least every six months and at the beginning of
every swimming season.
1. Examine the balanced flue or indoor draught diverter. Make sure there are no obstructions
to the flow of air to, or flue products from, the appliance.
2. Visually check the main burner and pilot flames. If the flame appears yellow, the burner
should be cleaned by a qualified service technician.
3. Keep the heater area clear and free of combustibles and flammable liquids. Chlorine should
not be stored in the vicinity of the heater. Chlorine vapours, when drawn through a heater,
can rapidly cause corrosion of the heat exchanger.
4. Keep the heater area free from garden refuse and debris. This will help prevent insects
nesting in the unit and ensure extended life and reliability of your heater.
ENERGY SAVING TIPS
1. If possible, keep pool or spa covered when not in use. This will not only cut heating costs,
but will also keep dirt and debris from settling in the pool and conserve chemicals.
2. Reduce pool thermostat setting to 28˚C or lower. This is accepted as a comfortable and
healthy swimming temperature.
3. Use an accurate thermometer.
4. Set timeclock to start filtration and circulation system no earlier than daybreak. The pool
loses less heat at this time.
5. For pools that are only used on weekends, it is not necessary to leave the thermostat set at
28˚C. During the week, lower it by an amount that can easily be achieved in one day
(generally 5˚C to 8˚C).
6. During the winter or while on vacation, turn the heater off.
7. Set up a regular program of preventative maintenance for the heater each new swimming
season. Check heat exchanger, controls, burner operation etc.
WINTER OPERATION
If the pool won’t be used for a month or more, turn the heater off at the main gas valve. For areas
where there is no danger of freezing, water should circulate through your heater all year long even
though you are not heating your pool.
Where freezing is possible, it is necessary to drain the water from the heater. This may be done by
loosening the inlet or outlet barrel union. If the heater is below water level, isolate it from the pool
first by closing shut off valves before and after the heater.
CAUTION: If the heater has been drained for freezing conditions, do not turn on until the system
is circulating water.

MX Pool and Spa Heater Page 9
INSTALLATION
THIS APPLIANCE MUST BE INSTALLED BY AN AUTHORISED PERSON. Refer to heater
data plate for specifications of gas type, gas consumption, burner pressure and water pressure.
This appliance must be installed in accordance with local regulations and A.G.A. Installation Code
AS5601.
FLOW RATES
The Hurlcon MX Series Pool Heater requires a minimum of 150 litres per minute flow and the
maximum permissible flow rate is 450 litres per minute. For flow rates in excess of 450 litres per
minute, an external by-pass valve must be fitted.
WATER CONNECTIONS
The heater should always be installed after the pump and filter. The water connections are located
on the right hand side of the heater. Left hand connection models are available by special order.
The inlet and outlet are clearly marked. Water connections require 50 mm PVC glue in plumbing.
All automatic sanitising devices must be installed after the heater and in such a way that the
sanitiser cannot enter the heater without first mixing with the water in the pool or spa. Sanitisers
that are connected prior to the heater will void heater warranty.
The Hurlcon MX Series Pool Heater incorporates a balanced flue terminal and is suitable for
outdoor installation.
PLUMBING DIAGRAM
To Solar
From Solar
From Pool
Pump Filter Heater
Chlorinator
Return to Pool
Heater Diagram
1. Plumbing in high pressure 40mm or 50mm PVC pipe
2. Connection to heater in Class 12 or higher
3. All automatic Chlorinators or Sanitisers Must be installed after heater
PVC Piping

MX Pool and Spa Heater Page 10
HEATER DIMENSIONS
INDOOR INSTALLATION
If the MX Heater is to be installed indoors, an indoor draught hood kit must be purchased from
AstralPool and installed on the Hurlcon MX Heater to convert it to an indoor model.
Product code numbers for draught hoods are:
Heater model Indoor top model Flue size Part number
MX 125 DH 10MX 150mm 10982
MX 150 DH 15MX 150mm 10983
MX 200 DH 20 175 mm 10966
MX 250 DH 25 175 mm 10964
MX 300 DH 30 200 mm 10967
MX 400 DH 40 250 mm 10965
MX 500 DH 50 300 mm 10968
A flue no smaller than the draught diverter diameter must be installed and terminated with an
approved gas flue cowl (not a Chinaman’s hat) 600mm above any roofline that is within 1.5
metres horizontally from the flue.
Model Dimension A Dimension C
MX 125 370mm 790mm
MX 150 460mm 790mm
MX 200 640mm 790mm
MX 250 710mm 790mm
MX 300 775mm 790mm
MX 400 910mm 790mm
MX 500 1100mm 930mm

MX Pool and Spa Heater Page 11
VENTILATION
When installing the heater indoors, it is imperative that an adequate supply of fresh air is provided
for combustion. Failure to provide adequate ventilation voids all warranties and may be a danger
to persons or property.
Two permanent openings shall be provided directly to outside. The openings shall be located to
ensure the distance between the top of the upper opening and the ceiling of the room or enclosure,
and the distance between the bottom of the lower opening and the floor of the room or enclosure
does not exceed 5% of the height of the room or enclosure.
The minimum vertical dimension of any free ventilation opening shall be 6 mm.
The minimum free ventilation area provided by each opening shall be:
MODEL AREA
MX 125 35,000 mm2
MX 150 50,000 mm2
MX 200 65,000 mm2
MX 250 80,000 mm2
MX 300 100,000 mm2
MX 400 130,000 mm2
MX 500 160,000 mm2
The following diagram is provided as a guide only. All flueing and installation work must be
carried out by an authorized person. Flueing must conform to local regulations and to A.G.A.
installation code AS5601. Care must be taken to provide the correct ventilation and correct flueing
materials in close proximity to combustible surfaces.
An indoor draught diverter must be purchased from Hurlcon and fitted to unit in accordance
with AstralPool’s instructions and Installation Codes before the heater can be enclosed.
1500
600
Upper grille for fresh
air ventilation
Lower grille for fresh
air ventilation
●
Approved gas
termination cowl
Bolted
sleeve to
connect flue
Draft diverter
purchased
from Hurlcon

MX Pool and Spa Heater Page 12
Do not install spa blowers in the same room as a gas heater. This is potentially dangerous to
spa users.
Do not store chemicals or fuel in the same room as the gas heater. This may cause fire or
explosion.
When installing in a garage the Hurlcon MX Series Heater must be installed 450 mm above
floor level.
CLEARANCES
The heater must be installed at least 500 mm from any combustible surface. Clearances must
comply with AS5601/AG601.
Clearances from non combustible surfaces are:
Internal External
Front 500mm 500mm
Both sides 150mm 250mm
Rear 150mm 250mm
Above N/A 1500mm
Clearances from combustible surfaces are:
Internal External
Front 500mm 500mm
Both sides 500mm 500mm
Rear 500mm 500mm
Above N/A 1500mm
Heater must be installed on a fireproof base.

MX Pool and Spa Heater Page 13
ELECTRICAL CONNECTION
The heater is supplied with a standard 10 amp 3 pin plug for connection to a 240V 10 amp GPO.
The heater incorporates a 240/24 VAC transformer which supplies power to the control circuit. All
pool or spa equipment connected to mains power should be protected by an RCD circuit breaker. It
is recommended, where possible that the heater is connected to the same time clock or power
supply as the circulating pump.
GAS CONNECTION
The gas connection is on the left side of the heater. A 20 mm (25mm for MX 500) F.I. connection
is provided for gas line connection. An approved manual shut off valve must be installed in the gas
fitting line before the heater and should be sized the same as the gas fitting line to prevent
excessive pressure drop in the gas pipe.
The gas fitting line should be installed by an authorised person and comply with local regulations
and A.G.A. code AS5601. The gas line from the meter will usually be of a larger size than the gas
inlet connection. Therefore a reduction to the heater connection fitting will be necessary. The
reduction should be as close to the heater as possible.
Before using the heater, test all connections for leaks using soapy water.
The heater gas valve has a built in pressure regulator and a ⅛” pressure test point. On starting the
heater, a manometer must be used and burner pressure checked against the heater data plate. The
gas valve regulator may need adjustment to correct manifold pressure. Incorrect burner pressure
may void warranty.
PRESSURE SWITCH ADJUSTMENT
The Hurlcon MX Series Pool Heater incorporates a water pressure switch which allows the burner
to operate only when the circulating pump is operating.
It is imperative that the following be undertaken by the person who is commissioning (first
starting) your pool or spa heater. On initial start up of the heater it may be necessary to adjust the
water pressure activation switch.
This switch is located at the upper right hand side of the area behind the access door. The pressure
switch is designed to allow operation of the heater only when the circulating pump is turned on and
there is sufficient water flow through the heater. It must shut the heater down immediately the
pump is switched off.
To check the operation of the switch:
1. Connect the heater to mains power supply. The thermostat should not yet display “θ”.
2. Turn on pump. The thermostat should now display “θ”.
3. Turn pump off. The thermostat should no longer display “θ”.
4. If display does not respond in this way, adjust the pressure switch as detailed below. If
display responds correctly, perform a final check with the heater operating.- See the section
below titled “Starting the heater”

MX Pool and Spa Heater Page 14
To adjust pressure switch:
a) Connect the heater to mains power supply
b) Turn pump off.
c) Slide toggle on side of pressure switch down to allow knurled wheel to be turned.
d) Turn knurled wheel anti-clockwise (as viewed from above) until “θ” is displayed.
e) Turn knurled wheel clockwise until “θ” disappears.
f) Continue to wind clockwise for a further half turn (180 degrees).
g) When the switch is correctly set, slide the toggle up to lock the knurled wheel in position.
WARNING: If the pressure switch cannot be adjusted correctly, DO NOT OPERATE THE
HEATER, contact AstralPool or an Authorised Service Agent for advice.
h) Perform a final check with the heater operating.- See the section below titled “Starting the
heater”.
It is imperative that the heater is installed so that it does not operate when the circulating pump
stops. Recommended methods to achieve this are:
a) Correct adjustment of internal pressure switch. Ensure heater does not turn on two or
three minutes after circulating pump is turned off.
b) Interlock power supply of circulating pump and heater so that if timer or power turns
circulating pump off, heater is also turned off.
c) Installation of an external flow switch may be preferred under certain installations
where internal pressure switch does not turn heater off when circulator stops.
STARTING THE HEATER
1. Purge gas line of any air and wait five minutes for gas to clear.
2. Turn power to unit on. Thermostat should now operate and indicate water temperature.
3. Turn circulating pump on. Thermostat should display “θ” to indicate water flow.
4. Set thermostat to “ON” and press the “^” button repeatedly until set temperature is greater
than water temperature. Thermostat should now display “ ”.
5. After a few seconds, the burner should ignite. Ignition will be confirmed by the symbol “
”
6. While leaving the heater on, turn the pump off and on at 15 second intervals, six times.
Make sure the heater turns off and on each time. If it does not, adjust the pressure switch as
detailed above.
Pressure Switch Adjustment
Slide toggle
down to allow
adjustment
Turn wheel in
direction of arrow
to decrease
pressure required
to operate heater

MX Pool and Spa Heater Page 15
TESTING BURNER PRESSURE
1. Set thermostat to “OFF”.
2. Remove front access panel.
3. Set up manometer
4. Remove screw from ⅛” brass test point located on outlet side of gas valve or burner
manifold
5. Connect manometer tube to test point
6. Set thermostat to “ON” and wait for main burner to ignite
7. Once main burner has ignited, the manometer must indicate the nominal burner pressure
listed below.
8. To adjust gas valve regulator, remove regulator adjustment cap and, using a screwdriver,
turn plastic bush clockwise to increase, anti-clockwise to decrease burner pressure.
9. When burner pressure is correclty set, set thermostat to “OFF”.
10. Replace regulator adjustment cap.
11. Disconnect manometer.
12. Replace screw and fibre washer in test point.
13. Replace front access panel.
Maximum inlet gas pressure is:
Natural Gas 3.5 kPa
Propane Gas 3.5 kPa
ULPG 3.5 kPa
Nominal burner pressure is:
MX 125 MX 150 MX 200 MX 250 MX 300 MX 400 MX 500
Natural Gas 0.82 kPa
116Mj/hr
3.4mm dia
0.82 kPa
144Mj/hr
3.3mm dia
0.82 kPa
192Mj/hr
3.3mm dia
0.82 kPa
240Mj/hr
3.3mm dia
0.82 kPa
288Mj/hr
3.3mm dia
0.75 kPa
350Mj/hr
3.3mm dia
0.78 kPa
480Mj/hr
3.3mm dia
Propane Gas 2.50 kPa
96Mj/hr
1.9mm dia
2.50 kPa
140Mj/hr
1.9mm dia
2.50 kPa
190Mj/hr
1.9mm dia
2.50 kPa
240Mj/hr
1.9mm dia
2.50 kPa
280Mj/hr
1.9mm dia
2.50 kPa
350Mj/hr
1.9mm dia
2.50 kPa
470Mj/hr
1.9mm dia
ULPG 2.00 kPa
82Mj/hr
1.9mm dia
2.00 kPa
123Mj/hr
1.9mm dia
2.00 kPa
164Mj/hr
1.9mm dia
2.00 kPa
205Mj/hr
1.9mm dia
2.00 kPa
246Mj/hr
1.9mm dia
2.00 kPa
312Mj/hr
1.9mm dia
2.00 kPa
410Mj/hr
1.9mm dia

MX Pool and Spa Heater Page 16
GAS CONVERSION
BURNER CONVERSION
1. Turn off gas supply to unit.
2. Turn off power supply to pump and heater.
3. Remove front access panel.
4. Disconnect gas supply from gas valve.
5. Remove the two Phillips head screws from the angle brackets at the end of the manifold
tube securing burner assembly to combustion chamber.
6. Disconnect wiring from gas valve and slide complete burner tray out through the access
opening.
7. Remove the four s/s bolts securing the injector manifold to the burner tray.
8. Remove burner injectors and replace with desired gas type injectors and new washers.
Tighten injectors using a torque wrench set at 26Nm.
9. Remove pilot burner and change pilot injector to desired gas type.
10. Remove regulator screw cap from top of gas valve
11. Turn plastic plug anti-clockwise until fully removed and withdraw spring.
12. Insert spring for desired gas type and re-install plastic plug.
13. Re-install burner assembly and reconnect gas supply.
14. Check gas system for leaks.
15. Commence lighting procedure as described above.
16. Adjust burner pressure as described above.
MX 125 MX 150 MX 200 MX 250 MX 300 MX 400
GAS TYPE INJECTOR SIZE BURNER PRESSURE PILOT
INJECTOR
NATURAL 3.3 mm
(3.4mm – MX125)
0.82 kPa
(0.75 kPa MX 400)
N18 (Silver)
PROPANE 1.9 mm 2.50 kPa N10 (black)
ULPG 1.9 mm 2.00 kPa N10 (black)
MX 500
GAS TYPE INJECTOR SIZE BURNER
PRESSURE
PILOT
INJECTOR
NATURAL 3.3 mm 0.78 kPa 1.00 mm
PROPANE 1.9 mm 2.50 kPa 0.80 mm
ULPG 1.9 mm 2.00 kPa 0.80 mm

MX Pool and Spa Heater Page 17
GAS PIPE SIZING TABLES
1.13 kPa gas meter pressure
VICTORIA
Maximum run of copper pipe with average number of fittings
Model 20 mm 25 mm 32 mm 40 mm 50 mm
MX 125 4 m 25 m 90 m 260 m 320 m
MX 150 2 m 14 m 50 m 140 m 320m
MX 200 2 m 8 m 30 m 75 m 320 m
MX 250 - 6 m 18 m 45 m 220 m
MX 300 - 4 m 14 m 35 m 140 m
MX 400 - 3 m 8 m 20 m 90 m
MX 500 - 1 6 m 14 m 60 m
1.25 kPa gas meter pressure
S.A., W.A., some areas N.S.W.
Maximum run of copper pipe with average number of fittings
Model 20 mm 25 mm 32 mm 40 mm 50 mm
MX 125 18 m 85 m 300 m 320 m -
MX 150 10 m 45 m 160 m 320 m -
MX 200 6 m 25 m 90 m 240 m 320 m
MX 250 4 m 18 m 60 m 160 m 320 m
MX 300 3 m 14 m 45 m 110 m 320 m
MX 400 2 m 8 m 25 m 70 m 300 m
MX 500 - 6 m 18 m 45 m 200 m
2.75 kPa gas meter pressure
N.S.W. some areas
Maximum run of copper pipe with average number of fittings
Model 15 mm 20 mm 25 mm 32 mm
MX 125 12 m 100 m 320+m -
MX 150 8 m 65 m 260 m 320+m
MX 200 4 m 40 m 160 m 320+ m
MX 250 3 m 25 m 100 m 320+ m
MX 300 2 m 20 m 85 m 280 m
MX 400 - 12 m 50 m 160 m
MX 500 - 8 m 35 m 100 m

MX Pool and Spa Heater Page 18
TROUBLESHOOTING
HEATER WILL NOT LIGHT
Possible cause Remedy
Automatic ignition system fails Check if power to heater is turned on and
pump is in operation
Pump not running Start pump
Pump airlocked Check for leaks
Filter dirty Clean filter
Pump strainer basket clogged Clean strainer
Defective gas control Shut off gas supply and call for service
Thermostat turned off Turn on
Set temperature lower than water temperature Increase set temperature
Water too hot-fault condition displayed Refer to fault indication table
HEATER SHORT CYCLING (RAPID ON AND OFF OPERATION)
Possible cause Remedy
Insufficient water flow Clean filter and pump strainer
Defective wiring Repair or replace wiring
Defective high limit or thermostat Repair or replace
HEATER MAKING KNOCKING NOISES
Possible cause Remedy
Heater operating after pump has shut off Shut off gas supply and call for service
Heat exchanger scaled Shut off gas supply and call for service
If the heater cannot be made to perform correctly, please contact the Hurlcon office closest to you.

MX Pool and Spa Heater Page 19
MX SERIES WIRING DIAGRAM
(MX 125,150,200.250,300,400)
Hi Limit
N/C 45˚
Hi Limit
N/C 55˚
A N E
Transformer
Pressure Switch
N/O
Genus IV Thermostat
Sensor
4 Pin Plug
Ignitor/Flame sensor
Violet
Brown
Jack
Earth Post
6 Pin Plug
Gas valve
Brown
Green/Yellow
Orange
White
Flame
Rollout
Sensor

MX Pool and Spa Heater Page 20
MX 500 WIRING DIAGRAM
(Honeywell Ignition control)
Hi Limit
N/C 45˚
Hi Limit
N/C 55˚
A N E
Transformer
TH
TR
D-
D+
Genus IV Thermostat
Sensor
4 Pin Plug
Combination Valve
Violet
Brown
Jack
BLUE
BROWN
WHITE
YELLOW/GRN
YELLOW/GRN
ORANGE
IGNITION
MV
MV/PV
PV
GND
(BURNER)
24V
(GND)
24V
SPARK
Pressure Switch
N/O
Earth Post
6 Pin Plug
Hone
y
well S8605H
Brown
Flame
Rollout
Sensor
This manual suits for next models
6
Table of contents
Other hurlcon Swimming Pool Heater manuals
Popular Swimming Pool Heater manuals by other brands

COMFORTPOOL
COMFORTPOOL PRO Series User and service manual

Raypak
Raypak ELS 1102-2 Illustrated parts list

Pentair
Pentair MiniMax NT LN Operation & installation manual

Raypak
Raypak SpaPak 552 & 1102 Technical data

Power Max
Power Max PM Installation and operation instructions

Aqua PRO
Aqua PRO PRO600 operating instructions