Husky H4790 Application guide

Sold Exclusively at The Home Depot
2455 Paces Ferry Road, Atlanta, Georgia 30339
•Specifications
•General Safety Information
•Features & Operation
•Maintenance
•Parts List
•Warranty
Table of Contents
Read Operating Instructions
Always become familiar with all the instructions and
warnings before operating any pneumatic tool.
Always Wear Approved Eye Protection Impact
resistant eye protection should meet or exceed the
standards as set forth in the United States ANSI Z87.1,
Occupational and Educational Eye and Face Protection.
Look for the marking Z87.1 on your eye protection to
insure that it is an approved style. For further
information, ANSI Z87.1, Occupational and Educational
Eye and Face Protection, is available from the American
National Standards Institute, Inc., 11 West 42nd Street,
New York, NY 10036.
Hearing Protection is Recommended
Hearing protection should be used when the noise level
exposure equals or exceeds an 8 hour time-weighted
average sound level of 85dBA. Process noise, reflective
surfaces, other tools being operated nearby, all add to
the noise level present in your work area. If you are
unable to determine your noise level exposure, we
recommend the use of hearing protection.
Specifications
General Safety Information
Free Speed ............................................ 10,000 RPM
Pad Size .................................................................6"
Orbital Stroke.....................................................3/16"
Weight ....................................................... 3-1/2 lbs.
Length ........................................................... 10-1/2"
Air Inlet ................................................................1/4"
Average Air Consumption ............................... 4 CFM
Recommended Hose Size ...................................3/8"
Recommended Operating Pressure .......... 60-90 PSI
PL-0712
Avoid Prolonged Exposure to Vibration
Pneumatic tools can vibrate during use. Prolonged
exposure to vibration or very repetitive hand and arm
movements, can cause injury. Stop using any tool if
discomfort, tingling feeling or pain occurs. You should
consult your physician before resuming use of the tool.
90 PSIG Maximum
Husky sanders are designed to operate at an air
pressure of 90 pounds per square inch gauge pressure
(90 PSIG) maximum, at the tool. Use of higher air
pressure can, and may cause injury. Also use of higher
air pressure places the internal components under loads
and stresses they were not designed for, causing
premature tool failure. The air supply should be clean
and dry, preferably lubricated. For best results drain the
moisture from your compressor daily.
Wear Respiratory Protection
It is advisable, when sanding for extended periods of
time, to wear a protective mask. This will help prevent the
inhalation of the fine dust produced while sanding.
Prolonged breathing of dust particles may lead to future
respiratory problems.
Operation & Parts Manual
6" Dual Action Sander Model No. H4790
Description
The Husky model no. H4790 Dual Action Sander is
designed for use in industrial, woodworking and automotive
applications. Provides swirl-free surface sanding and
feather-edging. Powerful 1/2 horsepower motor for efficient
material removal. Built-in power regulator helps match
speed to job application.

Recommended Air Line Set-Up
Operation & Parts Manual
6" Dual Action Sander Model No. H4790
Installation
Always use clean dry air. Excessive moisture and dirt will
greatly reduce the life of any air motor. We recommend the
installation of an in-line filter-regulator-lubricator as close to
the tool as possible.
A 3/8" air hose is required up to a length of 8 ft. If more length
is required a 1/2" air hose should be connected to the 3/8"
hose to ensure the tool has the necessary air supply. Be sure
all hoses and fittings are the correct size and tightly secured.
Pre-Operation
Before the tool is connected to the air supply, clear the air
hose of accumulated dust and moisture. Before removing a
tool for service or changing accessories, make sure the air line
is shut-off and drained of air. This will prevent the tool from
operating if the throttle is accidentally engaged.
Operation
Pad Installation - To install pad, turn spindle lock (ref. no. 4),
to right or left to lock pad mounting shaft (ref. no. 11). Screw
sanding pad (ref. no. 8) into position. Turn spindle lock
(ref. no. 4) into position to allow the shaft to spin freely. Failure
to unlock shaft will prevent the orbital sander from operating
properly.
NOTE: THIS TOOL IS NOT DESIGNED TO RUN WITH THE
PAD LOCK IN PLACE. THE PAD LOCK IS TO BE USED
ONLY WHEN ATTACHING AND REMOVING THE PAD.
Let the sander do the work. The normal weight of the tool is
sufficient for efficient sanding. Do not put additional pressure
on the sander. This will only slow down the speed of the pad,
reduce sanding efficiency and put an additional burden on the
motor. Start the sander off the work surface, set it down on the
work surface evenly and move it slowly back and forth in wide,
overlapping areas. When finished sanding, lift it off the work
surface before stopping motor.
Start the work with an abrasive grit just coarse enough to
remove high spots and roughness. Follow with additional
sanding using finer grits until the desired finish is obtained.
Never go from a coarse grit to a fine grit in one step. It may be
difficult to remove swirl marks made by coarse abrasives. Use
the finest grits practical for roughing operations and finish by
using successively finer grits.
Maintenance
Lubrication
An automatic in-line filter-regulator-lubricator is recom-
mended as it increases tool life and keeps the tool in
sustained operation. The in-line lubricator should be regularly
checked and filled with air tool oil. Proper adjustment of the
in-line lubricator is performed by placing a sheet of paper next
to the exhaust ports and holding the throttle open approxi-
mately 30 seconds. The lubricator is properly set when a light
stain of oil collects on the paper. Excessive amounts of oil
should be avoided.
In the event that it becomes necessary to store the tool for an
extended period of time (overnight, weekend, etc.), it should
receive a generous amount of lubrication at that time. The tool
should be run for approximately 30 seconds to ensure oil has
been evenly distributed throughout the tool. The tool should be
stored in a clean and dry environment.
Recommended lubricants: Use Husky air tool oil or any other
high grade turbine oil containing moisture absorbents, rust
inhibitors, metal wetting agents and an EP (extreme pres-
sure) additive.
Caution -Safety goggles should be worn when
operating the sander to avoid dust and particles from entering
the eyes. Secure work with clamps or vise so both hands are free
to operate tool. Keep proper footing and balance at all times.

Exploded View and Parts List
6" Dual Action Sander
Ref. # Part No. Description Ref. # Part No. Description
Model No. H4790
1479001 Hex Screw
2479002 Washer
3479003 Wave Washer
4479004 Spindle lock
5479005 Spacer
6479006 Spring washer
7479007 Hex screw nut
8479008 6" Sanding pad
9479009 Retaining ring
10 479010 Wave washer
11 479011 Pad mounting shaft
12 479012 Ball bearing
13 479013 Hex nut
14 479014 Random balance body
15 479015 Hex screw
16 479016 Spring washer
17 479017 Rotor shaft
18 479018 Key
19 479019 Wave washer
20 479020 Ball bearing (2)
21 479021 End plate (2)
22 479022 Rotor
23 479023 Rotor blade (4)
24 479024 Cylinder
25 479025 Pin
26 479026 O-ring
For replacement parts or the nearest service center, call
toll free 1-877-841-9438
27 479027 Retaining ring ("E" type)
28 479028 Set screw (2)
29 479029 Set screw (2)
30 479030 Motor cover
31 479031 Motor gasket
32 479032 Motor body
33 479033 Plastic cover
34 479034 Air regulator
35 479035 O-ring (2)
36 479036 Retaining ring
37 479037 Spring
38 479038 Valve tip
39 479039 Valve stem
40 479040 O-ring
41 479041 O-ring
42 479042 Valve bushing
43 479043 Carrier
44 479044 Screw
45 479045 Nut
46 479046 Washer
47 479047 Nut
48 479048 Lever
49 479049 Handle cover
50 479050 Inlet bushing

Notes
Troubleshooting Chart
Operation & Parts Manual
6" Dual Action Sander Model No. H4790
Low
Power Erratic
Action Blows Air
Won't Run Tool Noisy Causes and Solutions
Check air pressure.
Check for water in lines.
Oil tool with air tool oil.
Check FWD/REV switch.
The Home Depot U.S.A., Inc.
2455 Paces Ferry Road NW, Atlanta, Georgia 30339-5694
Lifetime Warranty
The Home Depot warrants this Husky Air Powered tool to the original user to be free from defects in material and
workmanship. If you believe that this tool is defective, return the tool, with proper proof of purchase, to The Home Depot
store. If The Home Depot determines that this Husky Air Powered tool is defective and covered by this warranty, The
Home Depot will repair or replace this tool free of charge.

Sold Exclusively at The Home Depot
2455 Paces Ferry Road, Atlanta, Georgia 30339
Especificaciones
Información de Seguridad General
Model No. H4790
Manual de Instrucciones de Operación y Lista de Partes
•Especificaciones
•Información de Seguridad General
•CaracteristicasY Funcionamiento
•Mantenimiento
•Lista de las Partes de Repuesto
•Garantia
Lea las instrucciones de operación
Siempre familiarícese con todas las instrucciones y
advertencias antes de operar cualquier herramienta
neumática.
Siempre use protección para los ojos aprobada
La protección para los ojos, resistente al impacto,
tiene que cumplir o exceder los estándares
establecidos en ANSI Z87.1 de Estados Unidos sobre
la Protección de los Ojos y de la Cara en el Trabajo y
la Educación. Mire la sección Z87.1 sobre la
protección para los ojos para asegurarse que está
usando un estilo aprobado. Para más información la
publicación de ANSI Z87.1 de Estados Unidos sobre
la Protección de los Ojos y de la Cara en el Trabajo y
la Educación, está disponible en el American National
Standards Institute, Inc., 11 West 42nd Street, New
York, NY 10036.
Se recomienda la protección de los oídos
La protección de los oídos se tiene que usar cuando la
exposición al nivel del ruido es igual o excede un nivel de
ruido promedio de 85 dBA con la importancia del factor de
tiempo de 8 horas. El ruido del proceso, las superficies
reflectoras, las demás herramientas que están operando
cerca, aumentan el nivel del ruido en su área de trabajo.
Si no puede determinar su nivel de exposición al ruido, le
recomendamos que use protección para los oídos.
Evite la exposición prolongada a la vibración
Las herramientas neumáticas pueden vibrar durante el uso.
La exposición prolongada a la vibración o los movimientos
de las manos o de los brazos muy repetidos pueden
producir lesiones. Deje de usar cualquier herramienta si
siente incomodidad, hormigueo o dolor. Debe consultar a su
doctor antes de volver a usar la herramienta.
620 kPa presión atmosférica, máximo
Ha sido diseñada para operar a 620 kPa sobre la presión
atmosférica, máximo, en la herramienta. Si se usa una
mayor presión de aire puede y de hecho producirá lesiones.
También la presión de aire mayor pone a los componentes
internos bajo cargas y esfuerzos para los cuales no habían
sido diseñados produciendo fallas prematuras en la
herramienta. El abastecimiento de aire debe ser limpio y
seco, preferiblemente lubricado. Para lograr los mejores
resultados drene la humedad de su compresor diariamente.
Continendo
The Home Depot U.S.A., Inc.
2455 Paces Ferry Road NW, Atlanta, Georgia 30339-5694
Lijadora de doble acción de 6”
Velocidad libre..................................................…10,000 RPM
Tamaño de almohadilla.....................................................…6”
Carrera orbital..............................................................…3/16”
Peso.......................................................................…3-1/2 lbs.
Longitud.....................................................................…10-1/2”
Entrada de aire..............................................................…1/4”
Consumo de aire promedio…4 CFM (pies cúbicos por minuto)
Tamaño recomendado de manguera............................…3/8”
Presión operativa recomendada..........................…60-90 PSI
Descripción
La lijadora de doble acción Husky modelo no. H4790 está
diseñada para utilizarse en aplicaciones industriales, de
carpintería y automotrices. Proporciona un lijado de superficie
sin marcas y biselado. Potente motor de ½ caballo de fuerza
para eliminar material eficientemente. El regulador de potencia
incorporado ayuda a adaptar la velocidad a la aplicación.
Uso de protección respiratoria
Al lijar por largos períodos, se recomienda usar una
máscara protectora. Esto ayudará a prevenir la
inhalación del polvo fino producido mientras se lija. Si
respira por mucho tiempo las partículas de polvo puede
sufrir problemas respiratorios futuros.

Instalación
Siempre use aire limpio y seco. La humedad excesiva y la
mugre reducen considerablemente la duración de cualquier
motor de aire. Recomendamos la instalación en línea de un
filtro-regulador-lubricador, tan cerca de la herramienta como sea
posible.
Es necesario usar una manguera de 3/8" de hasta 2,44 m de
largo. Si se necesita una mayor longitud, se debe conectar una
manguera de aire de 1/2" a la de 3/8", para asegurarse que la
herramienta cuente con el abastecimiento de aire necesario.
Asegúrese que todas las mangueras y los accesorios sean del
tamaño correcto y que queden firmemente asegurados.
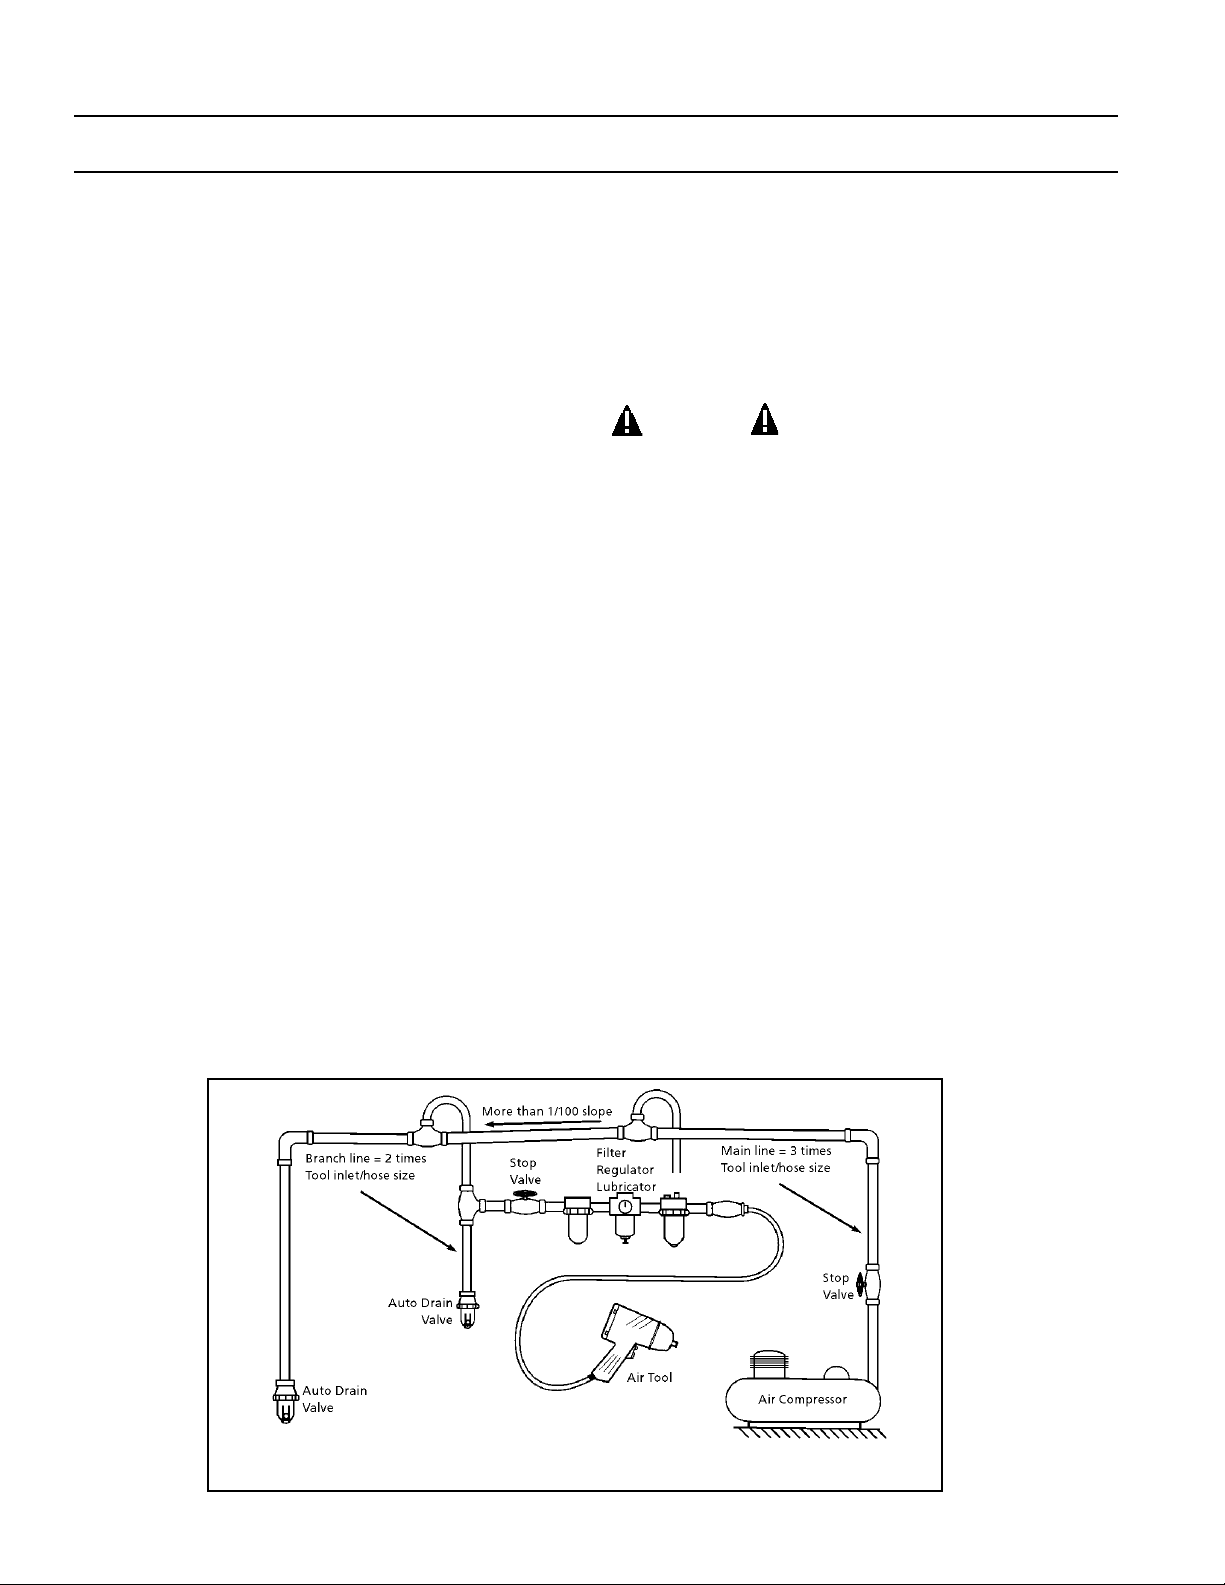
Preparacion de Tuberia de Aire Recomendada
Mantenimiento
Lubricación
Le recomendamos usar un filtro-regulador-lubricador automático
en línea debido a que aumenta la vida útil de la herramienta y la
mantendrá funcionando contínuamente. El lubricador en línea
debe ser inspeccionado regularmente y llenarse con un aceite
para herramientas neumáticas. Para ajustar correctamente el
lubricador en línea, coloque una hoja de papel al lado de los
orificios de ventilación mientras se mantiene abierto el
acelerador por 30 segundos aproximadamente. El lubricador
estará debidamente distribuido cuando se acumule una pequeña
mancha de aceite en el papel. Debe evitarse una cantidad
excesiva de aceite.
En caso que sea necesario guardar la herramienta por un
período prolongado (de un día al otro, durante el fin de semana,
etc.) en ese momento debe dársele una buena lubricación a la
herramienta. La herramienta deberá ser utilizada por un período
de 30 segundos para asegurarse que el aceite esté distribuido a
traves de toda la herramienta. Esta herramienta debe guardarse
en un lugar limpio y seco.
Lubricantes recomendados: Use Husky aceite para
herramientas neumáticas u otro tipo de aceite de alto grado para
turbina, que contenga absorbentes de humedad, inhibidores de
óxido, agentes lubricantes de metal y un aditivo para EP (presión
extrema).
Model No. H4790
Válvula de
autodrenaje
Válvula de
autodrenaje
Inclinación más de 1/100
Válvula
de cierre
Filtro
Regulador
Lubricador
Herramienta
de aire
Tubería principal = 3 veces la
entrada de la herramienta/
tamaño de la manguera
Compresor de aire
Tubería derivada = 2 veces la
entrada de la herramienta/
tamaño de la manguera
Válvula
de cierre
Manual de Instrucciones de Operación y Lista de Partes
Lijadora de doble acción de 6”
Pre-operación
Antes de que la herramienta se conecte al suministro de aire,
despeje la punta del aire para eliminar polvo y humedad. Antes
de poner una herramienta fuera de servicio o cambiar
accesorios, asegúrese de que la línea de aire esté cortada y sin
aire. Esto impedirá que la herramienta funcione si se activa por
casualidad el acelerador.
Operación
Instalación de la almohadilla – Para instalar la almohadilla, gire
(Ref. No. 4) el seguro del eje a la derecha o a la izquierda para
fijar (Ref. No. 11) el eje de montaje de la almohadilla. Gire (Ref.
No. 4) el seguro del eje en posición para permitir que el eje gire
libremente. Si no se destraba el eje esto impedirá que la lijadora
orbital funcione correctamente.
NOTA: ESTA HERRAMIENTA NO ESTÁ DISEÑADA PARA
FUNCIONAR CON EL SEGURO DE LA ALMOHADILLA EN
SU SITIO. EL SEGURO DEBE USARSE CUANDO SE
INSTALA Y RETIRA LA ALMOHADILLA.
Deje que la lijadora haga el trabajo. El peso normal de la
herramienta es suficiente para un lijado eficiente. No ejerza
presión adicional sobre la lijadora. Esto sólo hará más lenta la
velocidad de la almohadilla, reduciendo la eficiencia del lijado,
haciendo que el motor haga más esfuerzo. Ponga en marcha la
lijadora sin contacto con la superficie de trabajo, póngala sobre
la superficie de trabajo en forma pareja y muévala lentamente
hacia adelante y atrás con movimientos amplios y superpuestos.
Cuando termine de lijar, levante la unidad de la superficie de
trabajo antes de parar el motor.
Comience el trabajo con un grano abrasivo con el grosor
justo para eliminar los puntos altos y la aspereza. Siga
lijando con granos más finos hasta obtener el acabado
deseado. Nunca pase de un grano grueso a otro fino en un
solo paso. Puede ser difícil eliminar las marcas que hagan
los abrasivos gruesos. Use los granos más finos que
resulten prácticos para eliminar asperezas y termine usando
granos cada vez más finos.
Es necesario usar gafas de seguridad cuando se haga
funcionar la lijadora para evitar que entren el polvo y las
partículas en los ojos. Sujete el trabajo con abrazaderas o
un tornillo de banco para que queden ambas manos libres
para hacer funcionar la herramienta. Mantenga el
equilibrio y los pies bien plantados en todo momento.

Model No. H4790
Manual de operación y componentes
Para obtener repuestos o conocer el centro de servicio más
cercano, llame gratis al 1-877-841-9438
Lijadora de doble acción de 6”
Ref. No. No. de pieza Descripción Ref. No. No. de pieza Descripción
1479001 Tornillo hexagonal
2479002 Arandela
3479003 Arandela ondulada
4479004 Seguro del eje
5479005 Separador
6479006 Arandela de resorte
7479007 Tuerca de tornillo hexagonal
8479008 Almohadilla lijadora de 6”
9479009 Anillo de retención
10 479010 Arandela ondulada
11 479011 Eje de montaje de la almohadilla
12 479012 Rodamiento de bola
13 479013 Tuerca hexagonal
14 479014 Cuerpo de equilibro aleatorio
15 479015 Tornillo hexagonal
16 479016 Arandela de resorte
17 479017 Eje del rotor
18 479018 Chaveta
19 479019 Arandela ondulada
20 479020 Rodamiento de bola (2)
21 479021 Placa del extremo (2)
22 479022 Rotor
23 479023 Aspa del rotor (4)
24 479024 Cilindro
25 479025 Pasador
26 479026 Sello anular
27 479027 Anillo de retención (Tipo “E”)
28 479028 Tornillo prisionero (2)
29 479029 Tornillo prisionero (2)
30 479030 Cubierta del motor
31 479031 Empaquetadura del motor
32 479032 Cuerpo del motor
33 479033 Cubierta de plástico
34 479034 Regulador de aire
35 479035 Sello anular (2)
36 479036 Anillo de retención
37 479037 Resorte
38 479038 Punta de válvula
39 479039 Vástago de válvula
40 479040 Sello anular
41 479041 Sello anular
42 479042 Buje de válvula
43 479043 Portador
44 479044 Tornillo
45 479045 Tuerca
46 479046 Arandela
47 479047 Tuerca
48 479048 Palanca
49 479049 Cubierta del mango
50 479050 Buje de entrada
Table of contents
Languages:
Other Husky Sander manuals
Popular Sander manuals by other brands

CYCLO
CYCLO 12A instruction manual

MasterCraft
MasterCraft 054-2440-2 instruction manual

CH Hanson
CH Hanson Norse 9681119 Operating instructions & parts manual

Custom Shop
Custom Shop KUS P5050 Operator's safety & operating instruction manual

Dura Gold
Dura Gold DUR P9519 Safety & operating instruction manual

Road Xpedition
Road Xpedition I-4526 owner's manual