Hybrid+ B Series User manual

USER MANUAL
PROFESSIONAL
POWER AMPLIFIERS
B1200 B1800 B2400 B4000
SERIES MK6

IMPORTANT PRECAUTIONS
Symbol alerting the operator to follow important
operating instructions and precautions detailed in
this document
Symbol warning the operator that uninsulated,
dangerous voltages are present within the
enclosure that may pose a risk to electric shock.
Save the carton and packing material even if the amplifier
has arrived in perfect condition. Should you ever need
to ship the amplifier for servicing, use the original
packaging supplied.
Read all documentation before operating your amplifier.
Retain all documentation for future reference.
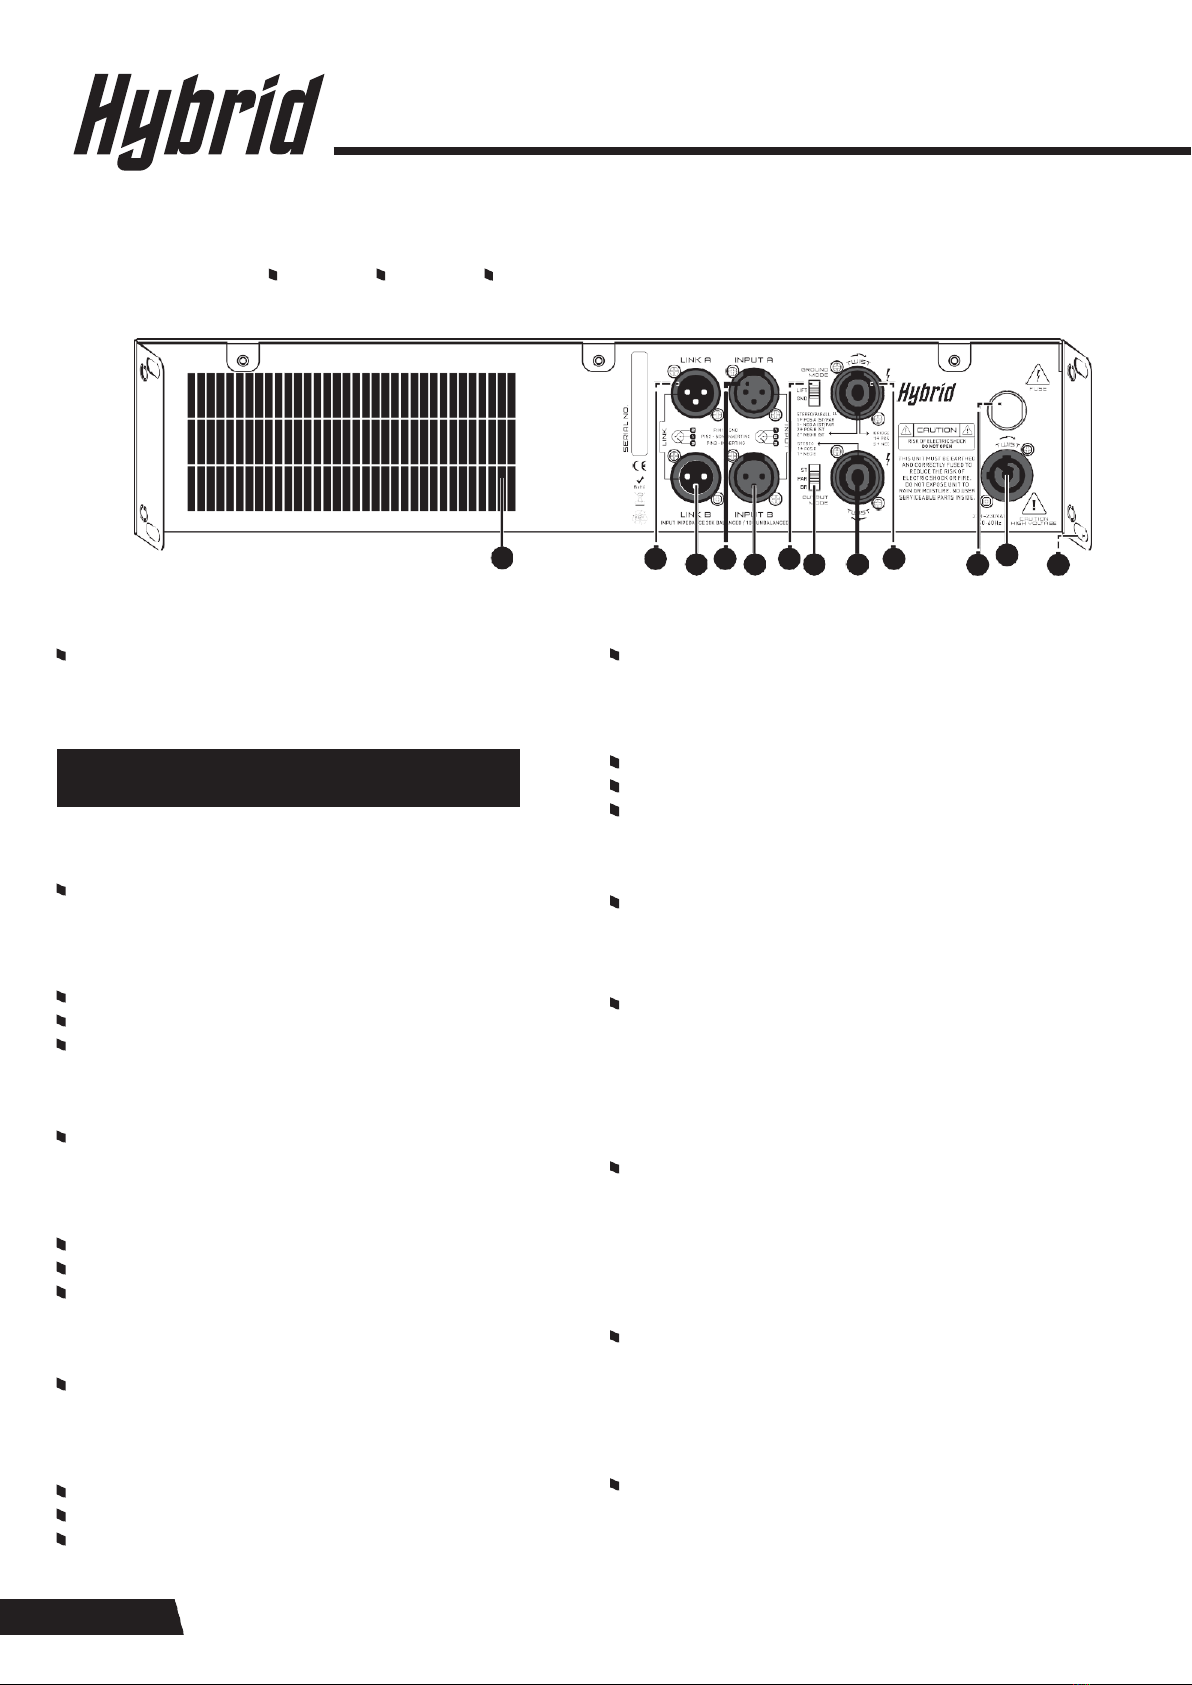
Follow all instructions printed on this user manual and the
backpaneloftheamplifierforproperandsafeoperation.
Do not spill water or other liquids into or on the
amplifier, or operate the amplifier whilst under wet
or damp conditions.
Ensure that power outlets and mains voltage conforms
to the power requirements printed on the back panel of
the amplifier.
Do not use the amplifier if the electrical power cable is
frayedordamaged. Thepowersupplycableshould be
routedsothatitisnotwalkedupon or pinchedbyobjects
closeby.Onlyusetheoriginalpowercablesuppliedwith
your amplifier.
Alwaysoperatetheamplifierwith theAC Earthwire
connected on both sides (Amplifier and Mains).
Precaution should be taken so that the Earth connection
is not defeated.
Gaincontrolsoftheamplifiershouldbeturnedtothe
minimum position (Completely anti-clockwise) during
the switch on and switch off operation in order to prevent
damage to loudspeakers.
Power down and disconnect your amplifier from mains
power before attempting any physical connections to
loudspeakers or audiosources.
Never force the power on-off switch to the “On” position if
it will not stay there by itself.
Never use your amplifier near heat radiatingappliances
such as stoves and heaters.
Donotblocktheairflowventslocatedonthefrontandrear
panels of your amplifier. Do not operate your amplifier on
asurface or environment which may impede the normal
flow of air around the amplifier.
Iftheamplifierisusedinan extremelydusty orsmoky
environment, the amplifier should periodically be blown
free of foreignmatter.
Donot removethe cover, frontor rear panels of the
amplifier. Removing any cover will expose you to
potentially dangerous voltages. There are no user
serviceable parts inside.
Connecting your amplifier output toan oscilloscope or
other test equipment while theamplifier is inbridge mode
may damage both the amplifier and the test equipment.
Donotapplyaninputsignalthatismuchgreaterthanthat
which is requiredto achievemaximum output level.
This may damage the pre-amplification stage circuitry.
Do not connect the input or output connectors of your
amplifier to any other voltage sources such as batteries,
mains power or power supply units, regardless of whether
the amplifier is switched on or off.
Never connect the output of your amplifier to an input or
output of the same or any other amplifier.
Duringlongperiodsofnouse,thepowercableshouldbe
unplugged from the mains voltage outlet.
Afterlongperiodsofnouse,thepowercableshould
beinspectedforanydamagebeforeusingthe
amplifier again.
Youramplifiershouldbeservicedonlybyqualified
service personnel. Contact your nearest official retailer
should your amplifier need technical attention.
Youramplifiershouldbeservicedbyaqualifiedservice
technician when:
-
Thepowersupplycordorplug/shavebeendamaged
-
Objects have fallen, or liquids have been spilled inside
the amplifier enclosure
-
The amplifier has been exposed torain or
excessive moisture
-
The amplifier does not appear to operate normally, or
exhibits a reduced change in performance
-
Theamplifierhasbeendroppedor theenclosure
is damaged
-
Either one of the red protect LED’s is indicating a fault
and has not corrected itself
PAGE 1

B SERIES - PROFESSIONAL POWER AMPLIFIERS
TABLE OF CONTENTS
Introduction
3
Unpacking
3
Installation and Mounting
3
Front Panel Controls and Features
3
Back Panel Controls and Features
5
Connecting Inputs and Link
6
Connecting Outputs
6
Output Mode Selection
7
Stereo Mode Selection Diagram
8
Parallel Mode Selection Diagram
9
Bridged Mode Selection Diagram
10
Protection Features
11
Maintenance
12
Service and Repair
12
Specifications
13
Block Diagram
14
B1200 B1800 B2400 B4000
PAGE 2

1
10
4
5
6
7
2
8
3
9
PAGE 3
INTRODUCTION
Congratulations on your purchase of the new Hybrid B
Series (MK6/2019) professional power amplifier, and
thank you for your confidence in the Hybrid brand.
You are amongst the growing number of audio
professionalswhohave madeHybridone ofSouthern
Africa’s leading brands of professional and commercial
audio systems.
For your safety, please read the important precautions
before installing and operating your amplifier.
The Hybrid MK6 B Series isbased on the same advanced
circuit topologiesthat havemade Hybrid amplifiers the
choice of professionals for the past 30 years.
B Series amplifiers are designed for high operating
efficiency and accurate sonic performance across the full
audio bandwidth, even under stressful conditions.
Internal components are the finest available, and
sub-assemblies are pre-tested before final assembly.
Finally,eachamplifieris“burnedin” andthoroughly
tested using precision audio test equipment before
shipping. In addition, all B Series amplifiers incorporate
extensiveprotection featurestosafeguardboth internal
circuitry and connected loudspeakers. This proven
combination of advanced design, quality construction and
comprehensive circuit protection is your guarantee of
fail-safe reliability, and you can depend on consistent,
stable performance.
UNPACKING
Please inspect the amplifier carefully immediately after
unpacking. If you find any visible damage, notify your
supplier/retailer immediately. Be sure to save the carton
andallpackingmaterialsshouldyouneedtoshiptheunit
back to your authorized service center.
Hybrid B Series amplifiers offer a 1 year “No-Quibble”
carry-inguarantee,andshouldyouramplifierinthe
unlikely event be damaged upon receiptand inspection,
weofferanexchange immediately,providedthat all
packaging and cabling is returned in original condition.
INSTALLATION AND MOUNTING
Hybrid B Series amplifiers are 2U-rack-space-High
(Approx. 90mm). All 4 models can be mounted in standard
19” Rack units by means of four mounting holes provided
in the front panel of the amplifier.
Rear ears with an additional four mounting holes
are present and it is recommendedthat the amplifier is
supported in the rear for added support.
Industry standard M6 cage nuts, screws and plastic
washersarerecommended wheninstallingyouramplifier.
FRONT PANEL CONTROLS AND FEATURES
MODELS: B1200 B1800 B2400 B4000
Please read these instructions carefully which includes important
information about the installation, operation and maintenance.

B SERIES - PROFESSIONAL POWER AMPLIFIERS
TIP:
Whenswitchingtheamplifieronoroff,ensurethatthetwo
volumecontrols(2 and3) arerotatedfullycounterclockwise,i.e.at
lowest position.
1: POWER ON-OFF SWITCH
Main power switch, switching the amplifier ON or OFF.
Once the amplifier is switched ON, the two green power-on
LED indicators(5) and the LCD screen(4) will illuminate.
2: CHANNEL A VOLUME CONTROL
Rotating Channel A volume control clockwise will increase
thevolumeoftheoutput ofChannel A(StereoMode).
Ifthe amplifierissettoeitherParallelorBridgemode,
ChannelAvolume controlwillcontrolthevolumeofthe
entire amplifier and Channel B volume control (3) will have
no effect.
Once Channel A volume control is rotatedin either direction,
the LCD screen (4) will indicate at what level the control has
beensetwitharange of 40.0beingamutedstatewithno
outputvolumeand40beingthemaximumvolume.
3: CHANNEL B VOLUME CONTROL
Rotating Channel B volume control clockwise will increase
the volume of the output of Channel B (Stereo Mode).
Ifthe amplifierissettoeither ParallelorBridgemode,
Channel A volume control (2) will control the volume of the
entireamplifierandChannelBvolumecontrolwillhave
no effect.
Once Channel B volume control is rotated in either direction,
the LCD screen (4) will indicate at what levelthe control
has been set with a range of 40. 0 being a muted state with
nooutputvolumeand40beingthemaximumvolume.
5: POWER ON LED’s
TwogreenLED’sindicatingwhentheamplifieris
switched on.
6
: SIGNAL LED’s
Two green LED’s indicating when an input signal has been
applied to the inputs of channels A and B.
Athresholdof 100mV is required fromthe input signal in
order to activate the LED’s
7
: LIMIT LED’s
TwoyellowLED’sindicatingoncetheamplifierhas
reached its optimum performance and has activated the
internal limiters.
8: PROTECT LED’s
TworedLED’sindicatingthatthereisafaultonone or both
channels. Oncethe protectLED is lit, itwillautomatically
shut down the associated amplifier channel.
Protection will activate for the following faults:
-
Thermal overload (Amplifier is overheating)
-
Short Circuit Protection
(Short sensed on output cables
or within the speaker enclosure)
-
DC protection
(DC Voltagesensed on output amplifier stage)
9: RACK MOUNT HOLES
4rackmountholesprovidedforinstallationin19”rackcase.
4
: LCD SCREEN
The LCD screen informs the operator of important information
as follows:
Channel A volume setting ranging from 0 to 40. 0 being a
muted state whilst 40 is at maximum input volume level.
Channel B volume setting ranging from 0 to 40. 0 being a
muted state whilst 40 is at maximum input volume level.
Channel A operating temperature. Normal operating
temperatures range from room temperature to 90° Celsius.
Channel B operating temperature. Normal operating
temperatures range from room temperature to 90° Celsius.
Mains Voltage supplied to the amplifier from your wall
electrical supply socket. Normal mains voltage should
range between 220 - 240Vac
10: AIRFLOW VENT
Youramplifier is equipped with dual variable speed fans and
designed with frontto back forced air cooling circuitry. Cool
airispulledfromthefrontpanelairflowventsandexpelled
out the back panel airflow vents.
B1200 B1800 B2400 B4000
TIP:
Keeptheairflowventsclearfromobjectsallowing
for free airmovement.
TIP:
UseindustrystandardM6cagenuts,screwsandplasticwashers
toavoid scratching theface plate.
TIP:
Donotdrivethepoweramplifierbeyondthis
pointasitwilldegradetheaudioqualitywhichmay
damage yourloudspeakers.
PAGE 4
TIP:
ItisgoodpracticetosetyourVolumecontrolstomaximum
whilst operating the amplifier in order to minimize the risk of
overloadinginputstagesbeforethepoweramplifier.Settingthe
volume control to a lower level WILL NOT limit / protect your
amplifier orloudspeakers.

11
12
13 14 15
16 17
19
18
20 21
22
TIP:
Keeptheairflowventsclearfromobjectsallowingfor
free airmovement.
BACK PANEL CONTROLS AND FEATURES
MODELS: B1200 B1800 B2400 B4000
11: AIRFLOW VENT
This amplifier is equipped with dual variable speed fans and
designed with front toback forced air cooling circuitry.
Coolairispulledfromthefrontpanelairflowventsand
expelled out the back panel airflow vents.
12
: LINK CHANNEL A
Channel A input link connector, enabling linking the input to
multiple amplifiers (Stereo, parallel and bridge mode).
The XLR Male connector is a balanced line connector with
industrystandardpin-outconfigurationasfollows:
Pin 1 - Ground
Pin 2 - Non Inverting (Hot)
Pin 3 - Inverting (Cold)
13
: LINK CHANNEL B
Channel B input link connector, enabling linking the input to
multiple amplifiers (Stereo mode only).
The XLR Male connector is a balanced line connector with
industrystandardpin-outconfigurationasfollows:
Pin 1 - Ground
Pin 2 - Non Inverting (Hot)
Pin 3 - Inverting (Cold)
14: INPUT CHANNEL A
Channel A Input. In Parallel and Bridge mode, Channel A
input is the only active input.
The XLR Female connector is a balanced line connector with
industry standard pin-out configuration as follows:
Pin 1 - Ground
Pin 2 - Non Inverting (Hot)
Pin 3 - Inverting (Cold)
15
: INPUT CHANNEL B
Channel B Input. In Parallel and Bridge mode, Channel B
input is notactive.
The XLR Female connector is a balanced line connector with
industry standard pin-out configurationas follows:
Pin 1 - Ground
Pin 2 - Non Inverting (Hot)
Pin 3 - Inverting (Cold)
16: GROUND MODE SWITCH
Dual position switch. On GND position, the Earth from the
mainsplugisconnectedtotheamplifier Ground.
Thispositionisrecommendedifmultipleamplifiersare
not being used.
On lift position, the Earth from the mains is disconnected
from the amplifier ground. This position is recommended
to eliminate “Earth noise” and hum within a system when
multiple amplifiers areused.
17: OUTPUT MODE SWITCH
3
positionswitch toselectthe outputmodebetweenStereo,
Parallel or Bridge.
18
:CHANNEL AAND CHANNELB OUTPUT
CONNECTOR
–
SPEAKON
Output connector with the following pin-out configurations:
When Output Mode Switch (17) is set to Stereo and Parallel
1+ Channel A Positive Output
1- Channel A Negative Output
2+ Channel B Positive Output
2-ChannelBNegativeOutput
When Output Mode Switch (17) is set to Bridge
1+ Positive Speaker Output
1- Not Used
2+ Negative Speaker Output
2- Not Used
PAGE 5

B SERIES - PROFESSIONAL POWER AMPLIFIERS
19: CHANNELB OUTPUT CONNECTOR–SPEAKON
Channel B output connector with the following
pin-out configurations:
When Output Mode Switch (17) is set to Stereo and Parallel
1+ Channel B Positive Output
1-
Channel B Negative Output
2+ Open / Not used
2-
Open / Not used
20: FUSE HOLDER
It is recommended that should the fuse be blown, take the
amplifier for testing to your nearest authorised service
center. Usually when a fuse has blown, it indicates that
thereisdamagedcomponentswithinthecircuitryofthe
amplifier. By changing the fuse and restarting the amplifier,
it may cause further damage to components.
DO NOT
attempt to bypass the fuse in any manner by
bridging the fuse with solid conductor.
DO NOT
replace the fuse with an incorrect value fuse.
Each model amplifier has a correct fuse rating printed
ontheback panel.Only replacethe fuse with theexact
fuse rating.
21: POWERCON CONNECTOR
Mains 220 - 240Vac connector
Only use the cable supplied with this amplifier to power up
the unit (Powercon –3 Pin Mains South African plug)
DO NOT
modify the cable in any way.
Inspectthecablebeforeuse andshouldanysignofdamage
be visible,replacethe cable with the exactsame, available
from your nearest authorised retailer.
22: REAR MOUNT HOLES
4
rack mount holes provided for installation in 19” rack case
(Rear Support).
CONNECTING INPUTS AND LINK
UsetheInputXLR(Female)connectors(14/15)ontherearpaneltosupplyaudiosignalstoyourHybridBseriesamplifier.
The link XLR (Male) connectors (12 / 13) may be used to daisy chain the audio inputs to other amplifiers when necessary.
BalancedandUnbalancedconnectionsmaybeusedwithpin2configuredasthenon-inverting(Hot)pin.
CONNECTING OUTPUTS
Speakers areconnectedusing the speakon connectors
(18/19)locatedon thebackpanelof theamplifier.
Channel A speakonconnector (18) canbe wired for
bothchannelsaswellaswhentheamplifierissetto
bridge mode.
Whenthe amplifierissetin stereoor parallelmode,
ChannelA speakon(18) canbewiredasfollows:
1+ Positive connection to Left speaker
1- Negative connection to Left speaker
2+ Positive connection to Right speaker
2-NegativeconnectiontoRightspeaker
When the amplifier is set in bridge mode,
Channel A speakon (18) can be wired as follows:
1+ Positive connection to speaker
2+ Negative connection to speaker
Channel B speakon (19) connector can only be wired for
channel B output, and only when the amplifier is set in
stereoorparallel mode. When the amplifieris set to
bridgemode,channelBspeakon(19)connectoris
unused / notconnected.
When the amplifier isset instereoor parallelmode,
Channel B speakon (19) can bewiredas follows:
1+ Positive connection to Right speaker
1-Negative connectiontoRightspeaker
B1200 B1800 B2400 B4000
TIP:
Itisrecommendedtoalwaysusebalancelineinputsopposedtounbalancedinputs,ensuringa+6dBgainstructureandnoisereduction
throughout your inputcables.
PAGE 6

TIP:
2ΩOutputloadsmaycausetheamplifiertobehave
erratically,causingprotectioncircuitstoactivateas well as
forcing the amplifier to operate at high temperatures. It is
notadvisabletoloadthe amplifier’s output below4Ω.
TIP:
4Ω Outputloadsmaycausetheamplifiertobehaveerratically,
causingprotectioncircuitstoactivateaswellas forcingtheamplifier
to operate at high temperatures. It is not advisable to load the
amplifier’s output below8Ω.
Connecting the amplifier outputs to oscilloscopes or other test equipment while the
amplifierisinBridgeMonomodemaydamageboththeamplifierandthetestequipment.
PAGE 7
OUTPUT MODE SELECTION
Thethree-position,recessedoutputmode selectionswitch
(17)locatedontherearpanelconfigurestheamplifier’s
outputs to either Stereo, Parallel or Bridge-Mono mode.
Factory default is configured to Stereo Mode.
STEREO MODE SELECTION
In Stereo Mode, both Channels A and B operate
independently,withtheirinputattenuators
(VolumeControls2 / 3)controllingtheir respective output
levels. Signal applied at Channel A’s input connector (14)
produces an output at Channel A’soutput connector (18),
whilstsignalapplied at ChannelB’sinputconnector(15)
produces an output at Channel B’s output connector (19).
The recommended output load impedance for stereo
operation is 16Ω - 4Ω per channel.
PARALLEL MODESELECTION
InParallelMode, aninput signal appliedtoChannel A’s
input connector (14) will be amplified and appear at both
Channels A and B output connectors (18 / 19). Outputs A
and B will still be independently controlled by their
respectiveinputattenuators(VolumeControls2/3).
The recommended output load impedance for Parallel
operation is 16Ω - 4Ω per channel.
BRIDGED MONO MODESELECTION
In Bridged Mono Mode, the amplifier is converted from
a two output channel amplifier to a single Mono output
amplifier. The output power of the converted mono output
amplifier isdoubled,makingitavery powerful,single
channel monoblock amplifier.
An input signal applied to Channel A’s input connector (14)
willresultinanamplifiedmonooutputonChannelA’s
output connector (18) with the following pinout
configuration.
1+PositiveSpeakerOutput
1- Not Used
2+ Negative Speaker Output
2- Not Used
The input attenuator (Volume Control) of Channel A (2)
controls the output level.
Input and Output connectors as well as the input
attenuator (Volume Control) of Channel B are not used,
and left open (Not connected)
The recommended output load impedance for Bridge
Mono operation is 16Ω - 8Ω.
Useextremecautionwhenoperatingtheamplifierin
BridgeMonoMode. Never groundeitherside ofthe
speaker cable / output connection as both sides are “hot”
andareatdifferentvoltageswithrespecttoground.
TIP:
2ΩOutputloadsmaycausetheamplifiertobehave
erratically,causingprotectioncircuitstoactivateas well as
forcing the amplifier to operate at high temperatures. It is
notadvisabletoloadthe amplifier’s output below4Ω.

B SERIES - PROFESSIONAL POWER AMPLIFIERS
STEREO MODE SELECTION
Input: From mixer / line source
Link: Input to additional amplifier/s
Speaker A:
4-16Ω Impedance
Mains Power:
220 - 240 Vac
50 ~ 60Hz
ST
Link: Input to additional amplifier/s
Input: From mixer / line source
+Speaker B:
- 4-16Ω Impedance
Speaker A Connector 2+ Speaker B Connector 2+
2- 1- 2- 1-
SPEAKER A POSITIVE TOPIN 1+
1+
SPEAKERANEGATIVE TO PIN1-
PIN 2+ NOT CONNECTED
PIN 2- NOT CONNECTED
SPEAKERBPOSITIVETOPIN1+ 1+
SPEAKERB NEGATIVE TOPIN1-
PIN 2+ NOT CONNECTED
PIN 2- NOT CONNECTED
Input: From mixer / line source
Link: Input to additional amplifier/s
Speaker A:
4-16Ω Impedance
Speaker B:
4-16Ω Impedance
Mains Power:
220 - 240 Vac
50 ~ 60Hz
ST
Link: Input to additional amplifier/s
Input: From mixer / line source
Speaker A andB Connector 2+
2- 1-
SPEAKER A POSITIVE TOPIN 1+
1+
SPEAKERA NEGATIVE TOPIN1-
SPEAKER B POSITIVE TOPIN2+
SPEAKER B NEGATIVETOPIN2-
PAGE 8

PARALLEL MODE SELECTION
Input: From mixer / line source
Link: Input to additional amplifier/s
Speaker A:
4-16Ω Impedance
Mains Power:
220 - 240 Vac
50 ~ 60Hz
PAR
+Speaker B:
- 4-16Ω Impedance
Speaker A Connector 2+ Speaker B Connector 2+
2- 1- 2- 1-
SPEAKER A POSITIVE TO PIN1+
1+
SPEAKERANEGATIVE TO PIN1-
PIN 2+ NOT CONNECTED
PIN 2- NOT CONNECTED
SPEAKERBPOSITIVETOPIN1+ 1+
SPEAKERB NEGATIVE TOPIN1-
PIN 2+ NOT CONNECTED
PIN 2- NOT CONNECTED
Input: From mixer / line source
Link: Input to additional amplifier/s
Speaker A:
4-16Ω Impedance
Speaker B:
4-16Ω Impedance
Mains Power:
220 - 240 Vac
50 ~ 60Hz
PAR
Speaker A andB Connector 2+
2- 1-
SPEAKER A POSITIVE TOPIN 1+
1+
SPEAKERA NEGATIVE TOPIN1-
SPEAKER B POSITIVE TOPIN2+
SPEAKER B NEGATIVETOPIN2-
PAGE 9

BRIDGED MODE SELECTION
Input: Frommixer /line source
Link: Input to additional amplifier/s
Speaker:
8-16Ω Impedance
Mains Power:
220 - 240 Vac
50 ~ 60Hz
Speaker Connector 2+ BR
2- 1-
SPEAKER POSITIVE TOPIN1+
1+
PIN 1- NOTCONNECTED
SPEAKERNEGATIVETOPIN2+
PIN2- NOT CONNECTED
B SERIES - PROFESSIONAL POWER AMPLIFIERS
PAGE 10

PROTECTION FEATURES
ACTIVE CLIP LIMITING THERMAL PROTECTION
When the amplifier reaches its full output power potential,
known as the clipping point, the Active Clip Limiting
protection feature will activate automatically, which is
indicatedbytheilluminationof theyellowLimiterLED’s(7)
located on the front panel. When the Active Clip Limiter has
activated,theprotectioncircuitwillautomaticallyreducethe
gain,protectingthe connectedloudspeakersfrompotential
damage caused by square waveforms that would be
otherwise produced.
TheActiveClipLimitercannotbeuserbypassedandwill
only activate once excessive, abnormal program transients
aresensed. Thecircuitis virtuallytransparentinoperation
and full signal bandwidth is maintained.
IMPEDANCE SENSING
The Impedance Sensing protection circuit allows the
amplifier to operate within it’s safe output load
parameters,andwill activateonceit sensesa loadthat
over stresses either amplifier stage. The output relay will
activate, disconnecting the loudspeakers to the affected
channel and the redprotectionLED (8) locatedon the front
panel will illuminate.
The Impedance Sensing protection circuit protects the
amplifier from very stressful or short circuit loads, which
could havecaused permanent damage to the output
amplifier stages.
Abnormally high heat sink temperatures will activate the
Thermal Protection circuit for the affected channel only,
allowing the other output channel to operate normally.
The output relay will disconnect the affected channel’s
connected loudspeakers and the protection LED (8) will
illuminate until such time that the temperature has dropped
to a normal level which will re-engage the output relay and
restoring signal to the affected loudspeakers.
Should the power supply overheat, both output relays will
activate, disconnecting both outputs from connected
speakers and the protection LED’s (8) will illuminate.
Once the power supply temperature has dropped to a
normal level, the amplifier will resume normal operation.
Theamplifierisequippedwithvariablespeedfans,and
depending on sensed temperatures on heat sinks and on
the power supply unit will determine the speed of the fans.
It is extremely important to keep all airflow vents located on
both front and back panels free of objects causing
resistanceto free airflow. Equally as important is to keep
air vent filtersbehind the air vents and heat-sinks free of
dust that accumulateswith time. Itis recommendedto
cleanfiltersandheatsinkswithhighcompressionairevery
6-12 months depending on the environment.
DC VOLTAGE PROTECTION
The DC Voltage protection will activate if a DC voltage is
sensed on either output, activating both output relays,
disconnecting and protecting connected speakers.
The red protection LED’s (8) located on the front panel will
illuminateuntiltheDCconditionhasbeenrectified.
SOFT START
Soft Start protection engages every time the amplifier
is switched on or is reactivatedafter a protectcondition
has been corrected. This feature gradually increases the
gain / output volume avoiding unnecessary “thumps” to
loudspeakers that are prevalent whilst the amplifier power
supplyisstabilizingduringtheinitialswitchonperiod.
SUBSONIC FREQUENCYLIMITING
Builtinhighpassfilteringreducessubsonic(20Hz<)
frequencies being applied to the loudspeakers,
protecting them from over excursion and over powering
inaudible audio ranges.
Maxloadindicatesthelowestresistancethatcanbeappliedtoanoutput.Forexample,ifthe
maximumloadisspecifiedas4Ω, impedanceslowerthan4Ω arenotpermitted/recommended.
TIP:
ThermalProtectionactivationisnotanormaloccurrenceand
should becheckedby qualified servicepersonnel.
TIP:
Amplifiersshouldbedrivenjustbeforethepointwhenthe
ActiveClipLimitingLED’s illuminateorbelowthatlevel.Pushing
amplifiers beyond their capabilities degrades the audio quality
causinghighlevelsofdistortionandcandamageloudspeakers.
TIP:
DCVoltageprotectionactivationisnotanormaloccurrence
andusuallyindicatesinternaldamagetoactivecomponentswithinthe
amplifier.Switchingtheamplifier onandoff repeatedlyusuallyresults
in further damage and should be avoided. The amplifier should be
checkedby qualified service personnel.
TIP: Ensure that connected loudspeakers do not exceed the
maximum load parameters of the amplifier. In Stereo and Parallel mode
the maximum load that is recommended is 4Ω per output channel.
In Mono Bridge mode, the maximum load recommended is 8Ω.
Ensuretousequalityspeakercablesandthattheyarefreeofdefects
such as short circuits.

B SERIES - PROFESSIONAL POWER AMPLIFIERS
USER PRECAUTIONS
SPEAKER PROTECTION
All loudspeakers have electrical, thermal and mechanical
limits that should be respected in order to preventdamage
or failure. Low-Mid frequency transducer cones and High
frequency driver diaphragms can be damaged sometimes
tothepointoffailurefromexcessivepower,clipped
waveforms, DC voltages and incorrect frequencies applied
to them.
YourBseriesamplifierautomaticallyprotectstoacertain
degree your loudspeakers from DC voltages, clipped
waveforms and subsonic (20Hz<) frequencies, however,
correct usage of the amplifier should always be followed in
orderto ensure longevity of your speakersystem.
Mid and High frequency driversareparticularly susceptible to
damage from incorrect usage of your power amplifier and the
following recommendations should be followed:
Ensure that the amplifier does not reach or go beyond
itsclipping point.Thisthresholdisdeterminedbythe
illumination of the yellow CLIP LIMIT LED’s (7) found
on the frontpanel.
Ensure that your speaker system and its components
areoperating within their ratedfrequency bandwidths.
Most passive speakers have internal crossovers that
supply the correct frequencies to drivers, however some
speaker systemsarebiand tri amped and requirean
external electroniccrossover. It is imperativethat the
electroniccrossoverissetcorrectlyforthespeaker
system. Incorrect applied frequencies especially to Mid
andHighfrequencydriverscandestroythemwithina
very short timeperiod.
Overpowering or applying clipped waveforms to
drivers can damage them permanently and it is
recommended that an external limiter is used to
protect from such occurrences.
Donotdrivelowfrequencyspeakerenclosureswith
frequenciesbelowthetunedfrequencyofthespeaker
system. A high pass filter should be applied with a
crossover frequency higher than the tuned frequency
with a moderate roll off filter.
MAINTENANCE
Your B series amplifier requires no routine maintenance
otherthan theoccasionalcleaning of the airflowvents
located on both front and rear panels as well as heat-sinks
withintheamplifier.Itisimportant tokeeptheseareasfree
of dirt and dust so as to avoid overheating of the amplifier.
Withtheamplifierswitchedoffandunpluggedfromthe
Mains (220-240 Vac)supply, blow high pressure air into
the airflow vents using an air compressor or blower.
DoNot
removethe lid of theamplifierin ordertocarryout
thisoperation asthere may still bedangerousvoltages
presentoncapacitorsandotherpassivecomponents.
Cleaning of the heat-sinks and air vents is recommended
every3-6monthsdependingontheenvironmentthe
amplifier is workingunder.
Users will not need to make any internal adjustments to
the amplifier throughout its lifetime. There are no user
serviceablepartsinside. RemovaloftheLid,Frontand
Back panel exposes risk of shock, and any servicing
needed should be carried out by and authorized and
qualified servicecenter.
SERVICE ANDREPAIR
In the unlikely event that your amplifier develops a problem,
itshouldbereturnedtoanauthorizeddistributoror service
center.Duetothecomplexityofthedesignandtherisk of
electrical shock, all repairs must be carried out by
authorized and qualified personnel. If the amplifier needs
tobecourieredtothe distributoror servicecenter,ensure
thatit iscorrectlypackedinitsoriginal packagingsoasto
avoid further damage.
Your Hybrid amplifier carries from date of purchase a
1 year, no quibble walk-in guarantee. Hybrid prides itself
foritsexcellentaftersalesserviceandit isourgoal to
return your amplifier back to you in perfect working order.
Thank you for purchasing a Hybrid product and for reading
this user manual. Youarenow readyto use your Hybrid
amplifier and we hope it brings you many hours of
listening pleasure.
B1200 B1800 B2400 B4000
PAGE 12

SPECIFICATIONS LIST
MODEL
B1200
B1800
B2400
B4000
* Stereo Power 8Ω
400W
600W
800W
1 200W
* Stereo Power 4Ω
600W
900W
1 200W
2 000W
* Bridge 4Ω
1 200W
1 800W
2 400W
3 600W
Signal toNoise
117dB
115dB
112dB
110dB
Slew Rate
90V/uS
90V/uS
100V/uS
105V/uS
Damping Factor
300
270
260
220
Frequency Response
20Hz -20KHz, ±0.5dB
THD + N
0.5%, 1KHz, 1/3 Rrte Power, 8Ω
IMD
0.1%, 1KHz, 1/3 Rrte Power, 8Ω
Cross Talk
82dB
85dB
86dB
88dB
Input Sensitivity
0.77 Balanced / 0dB Unbalanced
Input Impedance
10KΩ, Balanced / 20KΩ, Unbalanced
Input Interface
Three-core Female XLR Input
Link Interface
Three-core Male XLR Link
Speaker Interface
Speakon Connectors (4 Pole)
LED Indicator
Power / Signal (-40dB) / Clip (Peak) / Protection
Power Supply
1 260W
1 890W
2 520W
4 000W
Cooling Mode
Front to Rear Stepless Air Cooling
Net Weight
13.8kg
16.3kg
17.3kg
17.8kg
Gross Weight
15.5kg
18kg
19kg
19.5kg
Install Size
2U / 19” Rack Mount
Dimensions (w x h x d)
487 x 99 x 387mm
*
In accordance with the EIA Standard Two Channel Test: f=1KHz
/
THD=0.5%
PAGE 13

Channel A
Balanced / Unbalanced Input
Channel AVolume
(Stereo, Parallel and Bridge)
INV
AMP1
POWER
SUPPLY
Speakon
Channel A
1+ 1-
2+ 2-
Channel B
Parallel
Bridge
Stereo
ChannelBVolume
MODE
SWITCH
AMP2
1+ 1-
2+ 2-
Balanced/UnbalancedInput
(Stereo Only) Speakon
Channel B
1
2
PRE
AMP
3
GNDLIFT
2
1
PRE
AMP
3
Z
Active
Protection
Signal
Clip
DISPLAY BOARD
Active
Protection
Signal
Clip
DISPLAY BOARD
B SERIES - PROFESSIONAL POWER AMPLIFIERS
BLOCKDIAGRAM
B1200
B1800
B2400
B4000
PAGE 14
This manual suits for next models
4
Table of contents
Popular Amplifier manuals by other brands

eego
eego EE-21 series user manual

Extron electronics
Extron electronics DP DA2 user guide

Telonics
Telonics PA-4200 user manual

T+A Elektroakustik
T+A Elektroakustik PT 820 M user manual

Studiomaster Professional
Studiomaster Professional XPA Series instruction manual

SIEB & MEYER
SIEB & MEYER SD4B Hardware description