1 FF 2 RDM 3
4 REW 5 RPT
DIR
CAT
SEEK
TRACK 6
MARK
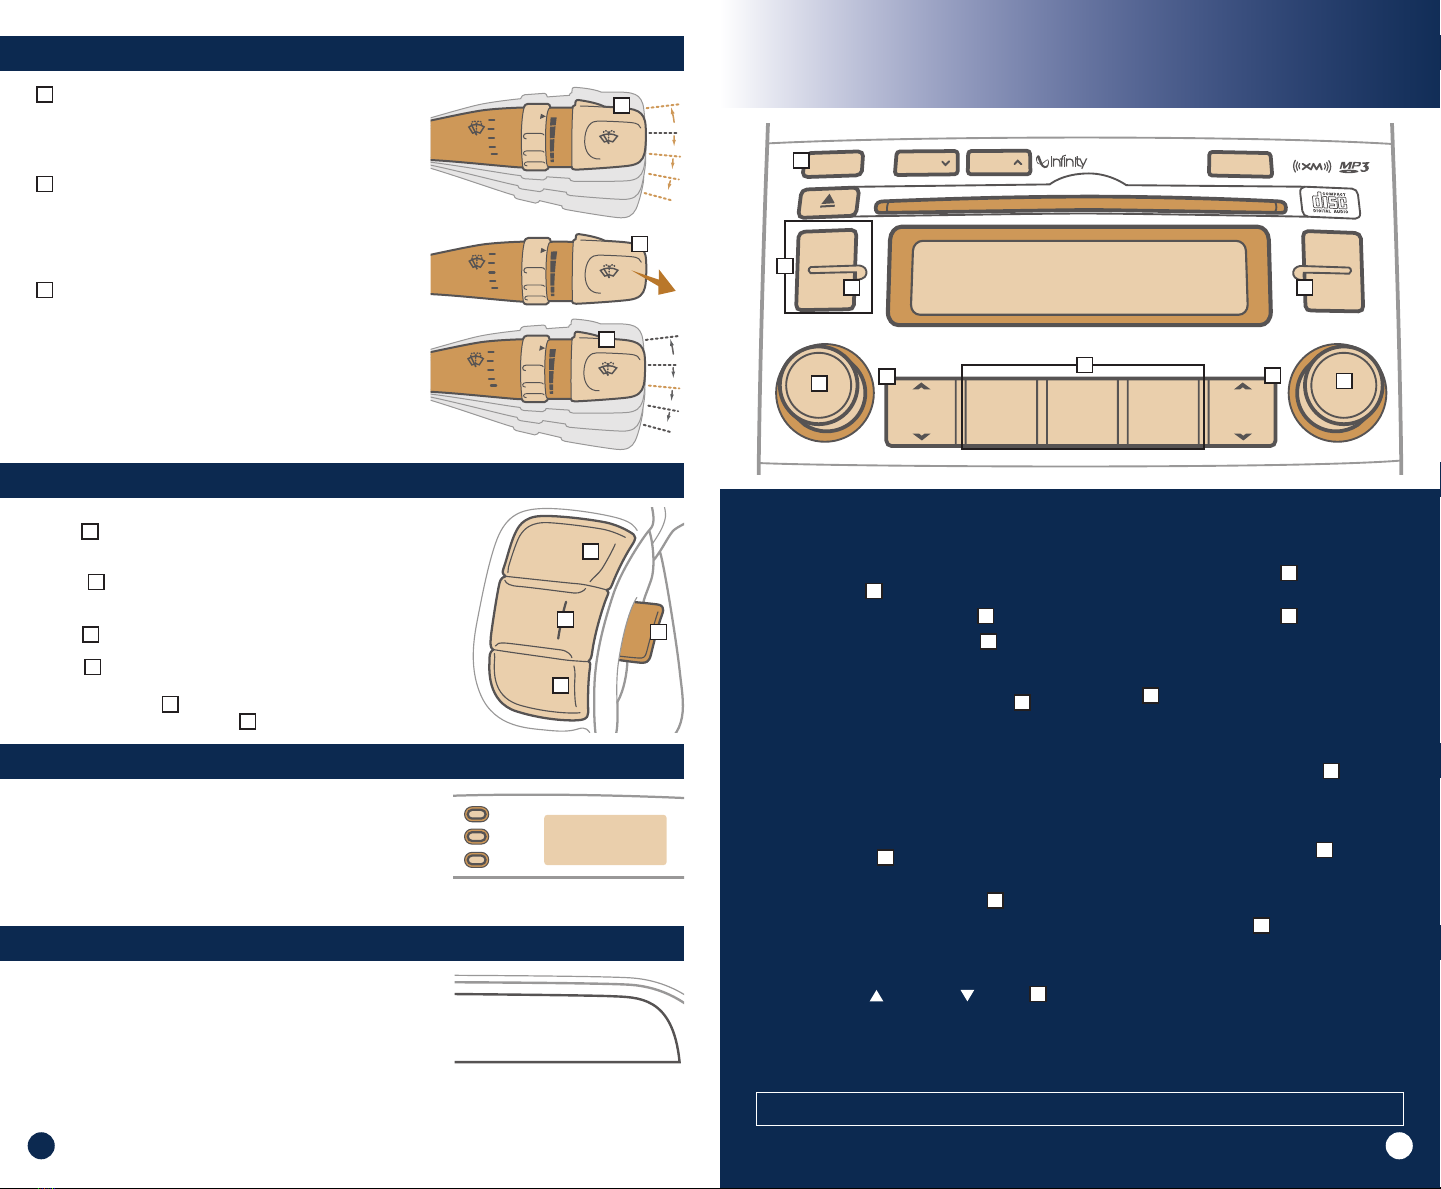
MP3 SOUND SYSTEM
6
–
DISC CHANGER
FM/AM
CD
INFO
PUSH
POWER
PUSH
ENTER
AUDIO
CONTROL
VOLUME
TUNE
FILE
LOAD
SCAN
DISC DISC
XM
AUDIO SYSTEM
(AM / FM / Cassette / 6-CD / MP3 Audio System Shown)
OFF
AUTO
MIST
LO
HI
PULL
MIST
OFF
AUTO
LO
HI
OFF
AUTO
MIST
LO
HI
PULL
MIST
OFF
AUTO
LO
HI
CRUISE CONTROL
To set a cruising speed:
1. ON D– Pull the switch and the CRUISE indicator in
the instrument cluster will illuminate. Accelerate to the
desired cruising speed (above 25 mph).
2. SET C– Push the switch and remove your foot from the
accelerator pedal.
To accelerate or decelerate speed:
ACCEL A– Press to accelerate your speed with cruising
speed set.
COAST C– Press to slow speed down with cruising speed set.
To cancel the cruising speed:
Press the CANCEL Bswitch, press the brake pedal, depress
the clutch pedal, or turn OFF Dcruise control.
RES
ACCEL
CANCEL •
COAST
SET
ON
OFF
CLOCK ADJUSTMENT
There are three control buttons for the digital clock. Their
functions are:
H: Push H to advance the hours.
M: Push M to advance the minutes.
R: Push R to reset minutes to :00 and the hour to the
nearest number. Press and hold the R button to toggle
between military time and standard time.
SETTING PRESET MEMORY BUTTONS
(AM/FM OR XM®)
1. Turn radio on by pressing the
POWER button A.
2. Select AM, FM, or XM radio C.
3. Turn the Audio Control knob Fto the
desired channel (for XM press the knob to
select the desired channel).
4. Press and hold any preset button H
(1-6) until an audible beep is heard to
memorize the current channel.
NOTE: FM has 2 bands for up to 12 presets.
XM has 3 bands for up to 18 presets.
CATEGORY SEARCH (XM)
1. While in XM mode, press the DIR p
or CAT qbutton Gto scroll through
music categories.
2. Press the Audio Control knob Fto select
the desired category.
SEEKING NEXT AVAILABLE CHANNEL
(AM/FM OR XM)
Press the SEEK or TRACK button Ito
seek the next available channel.
SCANNING THROUGH AUDIO CHANNELS
(AM/FM, XM, OR CD/MP3)
1. Press the SCAN button Dto preview
each channel / track.
2. Press the SCAN button Dagain to stop
the scan feature.
3. To scan through the channel presets, for
AM/FM/XM only, press and hold the SCAN
button Duntil an audible beep is heard.
ADJUSTING THE EQUALIZER
(SOUND QUALITY CONTROL)
1. Press the Audio Control knob Fto select
the following sound qualities:
Equalizer gBass gMiddle gTreble g
Balance gFader gCurrent State.
2. Turn the Audio Control knob Fto adjust
the sound quality.
DISPLAYING INFORMATION (XM)
Press the INFO button Eto display the
following channel information:
Title gName gCategory gCurrent State.
NOTES:
• Please refer to your Owner’s Manual for more detailed information on how to use your audio system.
• A clear view of the southern sky is recommended to ensure good XM radio reception.
Trial XM subscription ends 3 months following the vehicle date of sale.
Please contact XM Radio at 1-800-XM-RADIO (1-800-967-2346) to renew your XM subscription.
D
EB
C
AF
IG
H
WINDSHIELD WIPER / WASHER
AWIPER SPEED
The windshield wiper switch has four positions:
intermittent or AUTO (if equipped), low speed, high
speed and mist. For mist (single wipe), move the lever
up one position.
BWIPE / WASH OPERATION
To use the windshield washer, pull the wiper / washer
lever toward you. When the washer is operated, the
wipers automatically make passes across the
windshield. The washer continues to operate until
the lever is released.
CAUTO WIPER OPERATION
When the windshield wiper switch is placed in the
AUTO position, the windshield sensor will automatically
sense rain on the windshield. It senses the amount of
rainfall and controls for the appropriate length of the
intervals between wipes appropriately.
NOTE: With the switch in the AUTO position, the wipers
will perform one sweep when the car is started.
OCCUPANT CLASSIFICATION SYSTEM
PASSENGER AIR BAG OFF INDICATOR
The indicator will illuminate when you turn the ignition
key to ON or START. The light will not illuminate when the
passenger’s air bag is enabled. The occupant classification
system will disable the right front passenger’s air bags
under certain conditions (light on). Refer to the Owner’s
Manual for a complete description of this system.
NOTE: The driver’s air bag and the side impact air bag are
not part of the occupant classification system.
A
B
C
D
OFF
AUTO
MIST
LO
HI
PULL
MIST
OFF
AUTO
LO
HI
OFF
AUTO
MIST
LO
HI
PULL
MIST
OFF
AUTO
LO
HI
A
B
C
89