Hyundai HTRT65-2C User manual

1
HTRT65-2C

2
CONTENTS
SAFETY WARNINGS................................................................................................................................. 3
YOUR PRODUCT...................................................................................................................................... 8
ASSEMBLY ............................................................................................................................................ 10
FILLING THE OIL TANK AND FUEL TANK ................................................................................................. 13
OPERATION .......................................................................................................................................... 15
MAINTENANCE AND STORAGE.............................................................................................................. 17
DECLARATION OF CONFORMITY ........................................................................................................... 21
WARRANTY .......................................................................................................................................... 22
PRODUCT FAILURE................................................................................................................................ 23
WARRANTY EXCLUSIONS ..................................................................................................................... 24

3
SAFETY WARNINGS
WARNING! When using this type of garden tool, basic precautions should always be followed to reduce
the risk of fire, electric shock and injury.
Read all instructions carefully before attempting to use this product and retain these instructions. Be
familiar with all the operations described in these operating instructions. This product must be
operated by experienced users.
Inexperienced users shall first be trained in all operations by a professional.
If you are giving this machine to others, please also provide them with this instruction manual.
Take into account all the markings affixed to the product. The symbols are explained in this manual.
Use this machine as described in this instruction manual. It is strictly forbidden to use this tool for
applications other than those described in this manual.
Failure to follow these instructions can result in serious injuries and, in some cases, death.
This product is intended for private domestic use only. Do not use it for commercial purposes.
Never let people unfamiliar with these instructions or children use this product.
National regulations may limit the use of the machine.
People under the age of 18 must not use this product
Keep in mind that the operator or user is responsible for accidents or risks to other persons or their
property.
Do not use the tool if you are drunk, tired, under the influence of drugs or ill. Do not use the tool if you
are not in an adequate physical condition.
This tool is intended for outdoor use. Never use it indoors.
When transporting the machine:
oSecure the machine during transport to prevent loss of fuel, damage or injury.
oUse a carrying case to protect the cutter during transport.
Keep people and animals away from the work area. Children and people who do not know how to use
this tool should not touch it and handle it.
Keep them at least 15 m from the machine during operation,
Use the product only under daylight or under good artificial light.
When using the machine, always wear full protective equipment including a helmet, protective mask,
ear protection, gloves, non-slip footwear and protective clothing.
Wear appropriate clothing. Do not wear loose or unbuttoned shirts. Do not wear jewellery that may
come in contact with moving parts. If you have long hair, tie it down and wear an appropriate safety
helmet.
Do not operate the product with damaged guards or shields in place.
Keep hands and feet of the appliance at all times and especially when turning the appliance off and on.
Do not use the tool in an area where ventilation is poor. Gas emissions can cause injury.
Do not use the tool in the presence of flammable liquids or gases.
Caution: The machine releases gases when it is used. Avoid coming into contact with these gases.
Keep the work area clear. Before working, inspect the work area and remove any materials or objects
that could cause accidents.
Do not force the tool.
Use only accessories supplied or recommended by the manufacturer (such as saw chain and guide bar
combinations). Using other accessories may cause an accident. Refer to the “Technical Information”
section of this manual or ask your dealer for advice.
The risks of slipping and skidding must be foreseen as there is a high risk of kickback. Do not lean. Keep
a good balance at all times. Do not lose your balance at the end of a cut.
To maintain tools and accessories with care, keep cutting tools sharp and clean for best and safest
performance. Follow the instructions in this manual for lubricating and changing accessories.
Always inspect the machine before and after operation. If the tool is damaged or faulty, stop using the
tool and bring it to an authorized service for inspection and repair.

4
Turn off the tool after use, when you leave it unattended, when changing these accessories and before
servicing.
Keep handles dry, clean and free of oil and grease.
Be concentrated when using the tool. Look at what you do, use good sense and do not use the tool
when you are tired.
Remove the blade guard before using the tool.
A damaged guard or other part must be properly repaired or replaced by an authorized service center,
unless otherwise specified in this instruction manual.
Do not use the tool if the starter is not working (if it cannot be turned ON and OFF).
Place the equipment in a well-lit area, on a flat, stable, dry and well-ventilated surface, away from
flammable products and with plenty of space for the evacuation of sparks and sharpening waste.
Immediately stop the tool in the event of a malfunction of the motor or in case of unusual noise.
Do not use the tool if the starter is damaged.
Do not move the chain with your hand with the wheel moving.
Do not stop the chain with your hands or other objects.
Treat the chain teeth with caution during operation; they can cause severe cuts.
When not in use, the machine must be stored in a dry, locked place out of the reach of children.
Before using the product and after any shock, please check it for signs of wear or damage. Please carry
out repairs if necessary.
Always switch off the machine:
oEvery time you leave the device unattended;
oBefore releasing an obstruction;
oBefore checking, cleaning or working on the product;
oAfter hitting a foreign object;
oEvery time the product starts to vibrate abnormally.
Pay attention to foot and cutting injuries.
Inspect and regularly service the product. Repairs should be carried out only by an authorized service
center or a similar qualified specialist.
When not in use, the machine must be stored in a locked dry place, out of the reach of children.
When transporting the tool, always add the blade guard to the blade. Always carry the tool by holding
the handle, never the blade.
Do not use the product on a slippery surface.
Do not use the product on steep, slippery slopes.
When planning your work schedule, allow enough time for rest. Limit continuous use of the device, eg
use 30 ~ 40 minutes per session, and take 10 ~ 20 minutes of rest between work sessions. Work a
maximum of two hours per day.
If the machine has struck foreign objects, check if the tool is damaged and bring it to repair if necessary.
Do not place any part of the body on the chain when the chainsaw is operating. Before starting the
chain saw, make sure that the chain is not in contact with anything. A moment of inattention during
use may cause your clothing or body part to stick to the chain.
Always hold the chainsaw back handle with your right hand and the front handle with your left hand.
Hold the chainsaw by inverting your hands increases the risk of personal injury and should never be
used.
For the chainsaw designed with the chain guide on the left side, the reference to the "right hand" and
"left hand" positions is reversed.
When cutting a branch that is under stress, pay attention to the risk of elastic return. When the tension
of the wood fibres is released, the spring-loaded limb may strike the operator and / or project the chain
saw out of control.
Follow the instructions for lubrication, tension and chain change accessories. A chain whose tension
and lubrication are incorrect can either break or increase the risk of rebound.
Keep handles dry, clean and free of oil and grease. Oily, greasy grips are slippery and cause loss of

5
control.
Be careful when using the machine during stormy weather. Do not use the machine during lightning,
thunderstorms or in bad weather. Do not expose the tool to rain.
Do not use the tool in damp environment.
It is recommended to use the spiked bumper provided for cutting trees and thick branches.
Perform regular functional check of the clutch. It should be no have chain movement at idling speed.
When operating the tool, be careful of the emission of exhaust gases, lubrication oil mist and saw dust;
avoid being exposed to these and wear protective equipment.
Wear protective gloves when assembly, disassembly, sharpening chain tensioning and when handling
the guide bar.
Guide-bar and chain adjustments should be performed with the engine stopped (machine switched off).
Regularly check and test the chain brake.
Hazards may be encountered while using the saw, such as blockage of the saw chain, in order to reduce
hazards, follow the instruction for cutting operation; always check the condition of the tool, do not
start the chainsaw directly in the tree.
FUEL HANDLING
Be very careful when handling fuels. They are flammable and the vapors are explosive.
Use only an approved container.
Never remove the fuel cap or add fuel while the machine is on. Turn off the unit and allow the engine
and exhaust components to cool before refueling.
Do not smoke.
Never refuel inside a room.
Never store the tool and the fuel tray indoors where there is a naked flame, such as near a water
heater.
If fuel has spilled, do not attempt to start the machine, but rather move it away from the spill before
starting to use it. Clean any spills.
Replace and tighten the fuel tank cap after refueling.
Follow the instructions in this manual for filling the tool with fuel.
DURING MAINTENANCE AND STORAGE
Stop the tool and wait until it stops. Make sure all moving parts have come to a standstill.
Allow the machine to cool before performing inspection, adjustments, maintenance, servicing and
storage.
Store the tool where fuel vapor will not reach a flame or spark.
When transporting and storing, always place the tool in its transport guard and protective device on it.
CAUSES OF REBOUNDS AND PREVENTION BY THE OPERATOR
Bounce may occur when the spout or end of the chain guide touches an object, or when the wood
tightens and pinches the cutting chain in the cutting section.
The contact of the tip may in some cases cause a sudden reverse reaction by bouncing the chain guide
up and back towards the operator.
Pinching of the cutting chain on the upper part of the chain guide can force the chain guide to the
operator abruptly.
Either of these reactions can result in loss of control of the saw likely to result in a serious personal
injury. Do not rely exclusively on safety devices built into your saw. As a chain saw user, all measures
should be taken to eliminate the risk of accident or injury during cutting.
Bounce results from improper use of the tool and / or incorrect operating procedures or conditions and
can be avoided by taking the appropriate precautions specified below:
- Hold the saw with both hands firmly with the thumbs and fingers encircling the handles of the saw
and place your body and arms to allow you to withstand the rebound forces. The rebound forces

6
can be controlled by the operator, if appropriate precautions are taken. Do not allow the chain saw
to start.
- Do not stretch the arm too far and do not cut above the shoulder height. This helps prevent
unintentional end contacts and allows better control of the chain saw in unforeseen situations.
- Use only the manufacturers specified replacement guides and chains. Incorrect replacement guides
and chains may cause chain breakage and / or rebound.
- Follow manufacturer's instructions for sharpening and servicing the chain saw. A decrease in the
depth gauge level can lead to an increase in rebounds.
RESIDUAL RISKS
Even if you use this product in compliance with all safety requirements, the potential risk of injury and
damage remains. The following hazards may arise from the structure and design of this product:
•There are adverse health consequences resulting from the emission of vibration if the product is used
over long periods of time or not properly operated and properly maintained. Wear hearing protection.
•There is risk of injury and property damage due to sudden impact on hidden objects.
•There is a risk of hearing loss with prolonged use, especially if hearing protection is not worn. Always
wear hearing protection and limit the operating time.
•Cuts if no appropriate protective equipment is worn.
•Inhalation of particles and exhaust gases if no protective mask is worn.
•Risk of personal injury and property damage caused by flying objects.
•Prolonged use of this product exposes the operator to vibration and may produce “white finger”
disease. To reduce the risk, please wear gloves and keep your hands warm. If any of the symptoms of
"white finger" syndrome appear, seek medical attention immediately. Symptoms of "white finger"
include:
- Numbness, loss of feeling, tickling, tingling,
- Pain, loss of strength, changes in skin colour or condition.
These symptoms usually appear on the fingers, hands or wrists. The risk increases in cold weather.
SYMBOLS
Warning symbol
Read and refer to these operating instructions
Wear safety equipment that includes protective helmet, hearing protection and protective
goggles
Value of sound emission according to European Directive 2000/14/EC
The contact of the end of the bar with any object must be avoided.
Do not operate the tool with one hand. Always hold it with both hands.

7
Wear protection gloves
Wear anti slippery footwear
Setting the chain tension
Fuel filler (on fuel tank cap)
oil filler (on oil tank cap)
Choke knob

8
YOUR PRODUCT
DESCRIPTION(FIG.1)
1. Guide bar
2. Chain
3. Chain tensioner screw
4. Chain brake
5. Front handle
6. Starter handle
7. Air filter cover
8. Switch on/off
9. Oil tank cap
10. Starter cover
11. Fuel tank cap
12. Back handle
13. Throttle lock
14. Primer
15. Bar cover nut
16. Engine switch
17. Air filter cover lock
18. Air flap lever
SCOPE OF THE DELIVERY(FIG.2)
1. Gasoline chain saw
(machine and cover)
2. Guide Bar
3. Guide bar scabbard
4. Saw chain
5. Container
6. Kit of tools
7. Plug wrench
8. User manual with warranty card
(FIG.1)
(FIG.2)
(Deliver with an extra saw chain)

9
TECHNICAL DATA
(single cylinder, air cooled 2-stroke petrol engine)
Fuel Tank Volume 550cm³
Ratio 40:1
Oil tank volume 260cm³
Idle speed of the engine 3000/min
Clutch speed 4300/min
Maximum power 2.9kW
Displacement 65cm³
Maximum engine speed 12000/min
Maximum chain speed 27m/s
Maximum engine power speed 8500/min
Weight (empty tank, without accessories) 5.3 kg
Cutting length
Chain pitch
Gauge of chain
Type of chain and guide bar
Sprocket (number of teeth x pitch)
Carburettor HL,MC16A20/MC16
RuiXing, H142-55B/H142
Stable, MP16A53/MP16
Spark plug TORCH / L7RTC
Sound Pressure level at operation position
Uncertain K
LpA=105dB(A)
KpA=3dB(A)
Guaranteed Sound power level LwA : 112dB(A) (2000/14/EC)
Value of vibration Front handle 11.420 m/s² K=1.5 m/s²
Rear handle: 10.780 m/s² K=1.5m/s²
500mm (22’)
9.525mm (3/8’’)
Chain
JC9D-5-76 22”
Guide bar
ZLA22-76-6310P 22”
10 teeth*9.525
1,60mm (0,063’’)
Model HTRT65-2C
Type of engine T-1E65F

10
ASSEMBLY
Before you start up your chainsaw for the first time you must assemble the bar and chain, adjust the chain,
fill the fuel tank with fuel and add oil to lubricate the chain.
WARNING! Do not START the chain saw until it is completely set up for use.
Read this manual carefully before using the machine. Pay particular attention to safety precautions. This
manual is a reference and instruction manual and provides general information on the assembly, operation
and maintenance of the chainsaw.
SPIKED BUMPER
1. Remove the protective cover.
2. Place the spiked bumper on its location.
3. Secure the spiked bumper with the two bolts provided.
DRIVE BAR AND SAW CHAIN ASSEMBLE
WARNING!
Always wear protective gloves when working with the chain.
1. Make sure that the device is turned off. Place the saw on a flat surface.
2. Move the chain brake shield to the operating position by pulling the lever toward you. Make sure the
chain rotates around the bar (fig. 3).
3. Unscrew the two nuts (A) securing the protective cover. Remove the protective cover (B) (fig. 4).
Fig. 3 Fig.4
4. Install the bar so that the bar slot aligns with both bolts (C) (fig. 5).
5. Spread the chain in a circle with the cutting edges (D) aligned with the markings on the guide bar (fig. 6).
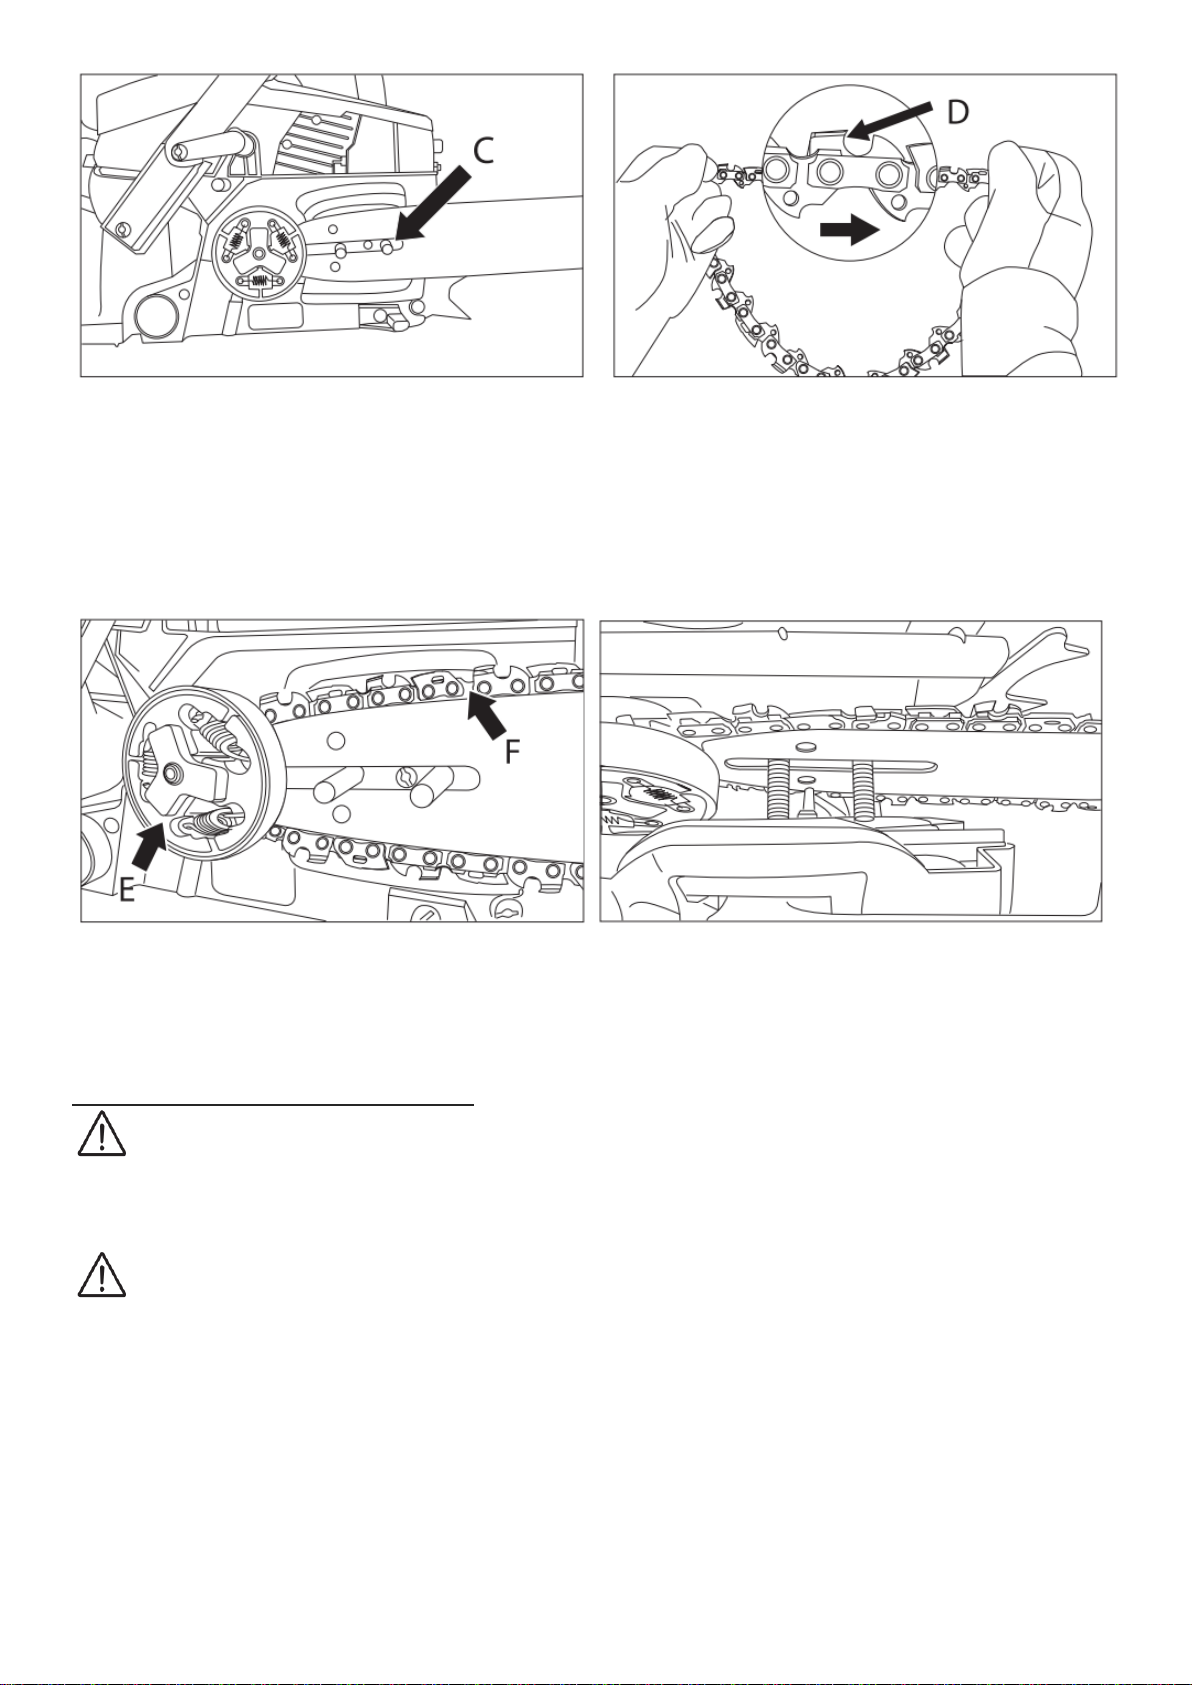
11
Fig. 5 Fig.6
6. Run the chain behind the drive chain wheel (E). Check if the chain links are well positioned between the
teeth of the chain wheel (Fig. 7).
7. Insert the links into the bar groove (F) (Fig. 7).
8. Rotate the chain to make sure the chain teeth are engaging the teeth of the chain wheel.
9. Replace the protection cover so that the bolts fit into the holes and the chain tensioning pin fits into
the lower hole in the bar (fig. 8).
Fig. 7 Fig.8
10. Install both nuts, tighten them by hand, and then follow the instructions for adjusting the chain tension.
When the chain has reached the correct tension, tighten the nuts completely.
CHAIN TENSION ADJUSTMENT
WARNING! Always wear protective gloves when working with the chain.
Proper chain tension is extremely important and should be checked both before starting and periodically
during operation. Taking the time to adjust the chain will improve your performance and extend the life of
your saw.
WARNING! A new chain will sag quickly and require tensioning after 5 to 8 cuts. This is common with
new chains and the tensioning interval increases over time.
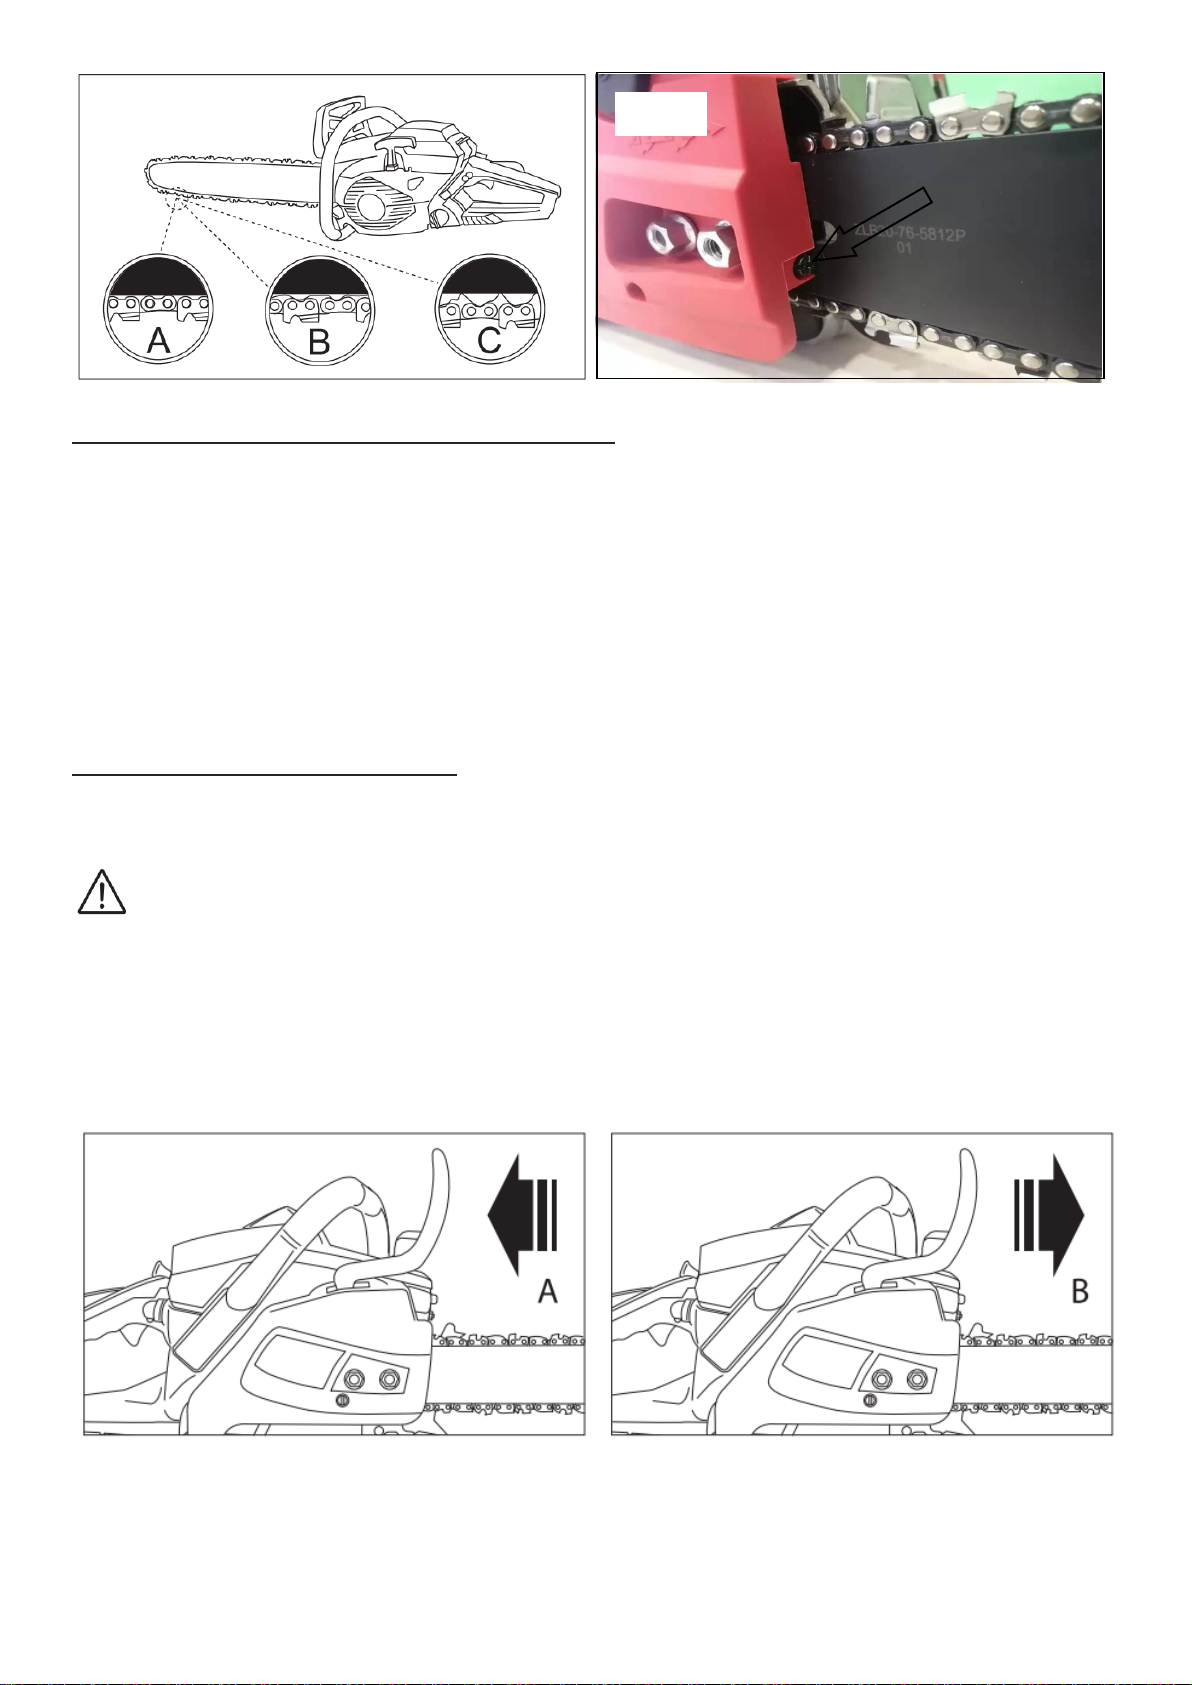
The mechanism will wear much faster if the chain is too loose or too tight. Look at fig. 9, which shows the
correct tension for a cold chain (A), a warm chain (B), and a chain whose tension needs to be adjusted (C).
12
CHAIN TENSION ADJUSTING PROCEDURE
1. Loosen the nuts (on the protective cover) and turn the adjusting screw (D) clockwise to tighten the
chain. Turn the adjusting screw (D) counterclockwise to decrease chain tension. Make sure the chain is
all the way around the bar (fig. 10).
2. After adjusting the chain, tighten the nuts securing the bar (protective cap together with the brake
shield) firmly. The chain is considered properly tensioned if you can move it over the bar by hand with
little effort. The chain should fit well on the underside of the saw blade and be pulled by hand away
from the blade by about 2-4 mm.
NOTE: If the chain has difficulty moving on the bar or stops, it is overtightened. Loosen the tension.
CHECKING THE CHAIN BRAKE
Your chain saw has a chain brake that reduces the chance of injury if the saw bounces. The safety device is
triggered when pressure is applied to the brake guard. When the operator’s hand strikes the shield, the
chain stops sharply.
WARNING! The chain brake reduces the chance of injury from chain saw bounce, but does not
provide protection if the unit is operated carelessly. Check that the chain brake is in good working order
before starting work and periodically while working with the chainsaw.
The chain brake has two positions:
1. The brake is off (the chain can move) when the brake shield is pulled back (A) (fig. 11).
2. The brake is on (the chain cannot move) with the brake shield pointing forward (B). In this case, the
chain should not move on the bar (fig. 11).
fig. 11
To check the chain brake:
1. Place the saw on a level surface and turn off the chain brake. The chain should not come into contact
with anything.
2. Start the chainsaw by pressing the throttle lock key and the throttle key.
Fig.9
Fig.10
D

13
3. Press the chain brake switch. The chain should stop quickly. Release the throttle key.
WARNING! The brake shield must be in good condition and must make a distinctive click when
moving from one position to another. Do not use the unit if the brake shield cannot be moved to one of
the positions or if the chain does not stop when the brake is applied. Take the unit to a service center for
repair.
FILLING THE OIL TANK AND FUEL TANK
TO FILL THE OIL TANK
WARNING! Never use used oil! Waste oil is harmful to the environment and may result in damage.
Chain saw oil should be used to lubricate the saw chain and bar. Use oil that contains additives to reduce
friction and wear and to prevent resin build-up on the bar and chain.
WARNING! Before filling the oil tank, make sure that the chainsaw is turned off.
1. Be sure to clean the surface around the oil tank cap to prevent dirt from getting inside.
2. Unscrew the oil tank cap and pour in the chain saw oil (260 ml tank capacity).
3. Screw the oil tank cap back on.
4. Before you start, check the oil supply: switch on the chainsaw and hold it over suitable bedding. If it is
sufficiently lubricated, a light trail of dripping oil will form (fig. 12).
fig. 12
WARNING! Always check the oil level. Do not operate the chain saw if there is insufficient oil to
lubricate the chain.
Proper lubrication is essential to reduce chain and bar friction. Operating a chain saw with insufficient
lubrication reduces performance and service life and causes fast chain and bar wear due to overheating.
This chainsaw is equipped with an automatic lubrication system that provides the necessary amount of
lubrication to the bar and chain. As the engine speed increases so does the oil supply to the bar.

14
TO FILL THE FUEL TANK
WARNING: When filling the tank:
The chainsaw must always be stopped and cooled.
Never smoke during refueling. It must not have flames or sparks near the fuel.
Before refueling, allow the chainsaw to cool completely. Do not attempt to refuel when the engine is hot.
If fuel has been spilled, immediately stop refueling and do not start the engine. Clean up the spill and fill
the machine in another location
Never fill the fuel tank to the flange; there is a risk of overflow.
Do not refuel in a closed and unventilated area.
The fuel used for this tool is a mixture of unleaded gasoline and registered engine lubricant. When mixing
gasoline with oil, use only gasoline that does not contain ethanol or methanol.
Unleaded gasoline is a quality gasoline type. This will help to avoid damaging the fuel lines of the engine
and other engine parts.
The recommended mixing ratio is 40:1 (make sure the mixing ratio is correct before filling the product.
a. Mixing
Mix in a clean, empty container (supplied).
Pour the oil into the container.
Pour the fuel into the tank. Mix the mixture long enough (more than one minute) to get a good
combination.
b. Filling the fuel tank
Unscrew the fuel tank cap and remove it.
Fill the tank slowly with the mixture. Do not exceed the maximum capacity (fill to 80% of its capacity
preferably).
Replace the cap on the fuel tank and tighten it
Wipe any spillage around the unit if necessary
Note: To avoid damage and accidents, DO NOT USE OTHER MIXTURES AND OTHER TYPES OF OIL /
PETROL
c. Storage of fuel
The fuel must be kept in a clean and safe container and always closed.
If you are not using the product for a long time, remove the fuel mixture and add it to a container.
Do not leave the fuel for a long time in the product. The fuel may clog the carburetor and the engine
will not operate properly.
d. Disposal of fuel
When the fuel is no longer used or worn, please dispose of it in an authorized location. Check local laws
regarding disposal of fuels

15
OPERATION
Before using the chainsaw, inspect the work area. This must be cleared. Remove any branches, obstacles
and other items that may cause damage during cutting.
The unit should always be filled with fuel and be usable. Check the level of filling and refill when necessary.
STARTING THE ENGINE
1. Hold the front handle with one hand and take the chainsaw to the ground. Hold the rear handle by
stepping on it.
2. Set the ignition switch to the I position (ON).
3. Press the primer about 4-5 times until fuel appears in the primer.
4. Pull the air damper lever toward you until it locks, the air damper will close.
5. Slowly pull the starter grip until you feel resistance, then pull the cable with a steady movement to a
distance of no more than 50-60 cm. Repeat the procedure several times until the engine starts.
6. Press the throttle lock key and the throttle key, the carburettor air damper will open automatically, the
damper lever will return to its original position.
WARNING!
Do not allow the cable to be pulled all the way out before the starter reel has stopped. This will cause the
starter motor to break and is not covered by the warranty.
TO STOP THE ENGINE
1. Release the throttle lock key and throttle key to allow the engine to idle.
2. To stop the engine, move the switch to the O position (OFF).
NOTE: To stop the engine in an emergency, engage the chain brake and move the switch to the “O” position.
CHAIN BRAKE
Starting shall always be done with the chain brake activated. The chain brake is a device that automatically
stops the chain in case a backward movement occurs, causing the saw to jump. Normally, the brake is
automatically activated by the inertia force.
It is also manually tightened by pushing the brake lever down and forward.
When the brake is running, a yellow sign comes out from the base of the brake lever.
To release the brake, pull the brake lever up until it clicks into place.
When the brake is in operation, release the trigger to slow down the engine speed. Continuous use when
the brake is running causes the clutch to heat up and can cause problems.
When checking the machine before using it, check the operating condition of the brake by performing the
following operations:
Start the engine and grasp the handle firmly with both hands.
While using the trigger to keep the chain in operation, push the brake lever down with the
back of the left hand.
When the brake is running and the chain is stopped, remove the hand from the throttle.
Loosen the brake.
RELEASE OF THE CHAIN BRAKE
To use the chain saw again, the chain brake must be released. This must be done machine off and cooled.
Pull the shield until it returns to its original position.

16
CHECKING THE LUBRICATION OF THE CHAIN
- Before checking the oil, make sure that the bar and the chain are in place.
- Once the engine is started, turns it at medium speed and checks that the chain oil is sprayed
and traces off the ground.
- The oil flow of the chain is adjustable to obtain the proper flow. Insert a screwdriver on the
clutch side.
- Turn the adjuster to obtain the correct flow rate for the job.
- The chainsaw must essentially consume the contents of the oil tank between each full of fuel.
Do not forget to fill the oil tank when filling the machine with fuel.
RELEASE OF A JAMMED SAW
If the saw gets stuck during cutting, the operators should:
-Saw the saw and attach it securely to the cutting foot of the shaft (ie trunk side) or has a separate chord
from the tool
-Pull the saw of the cluster while the branch is lifted, if necessary,
-If necessary, use a hand saw or a second chainsaw to release the chain saw.
CUTTING WORK
The tool should only be used to cut trees. Do not use it for other applications.
Do not attempt to remove the chainsaw when it is stuck during operation. Stop the machine and remove
the wedge blade with a wedge.
Stick your feet well, keep a good balance and do not climb on the tree trunk.
Try not to work on a slope. However, if you have to work on a slope, always stand higher than the tree
trunk.
Before bending a branch or trunk in bending, observe the direction of bending and finish the cut opposite
the bending side to prevent the chain guide from getting stuck in the cut.
FELLING OF TREES
Examine the work area and estimate where the tree will fall. Start the machine as described above. Start by
making a notch in the direction of fall chosen.
When the tree falls, shout or make a beep to alert people in the vicinity. When the shaft falls, move away
from the cutting area.
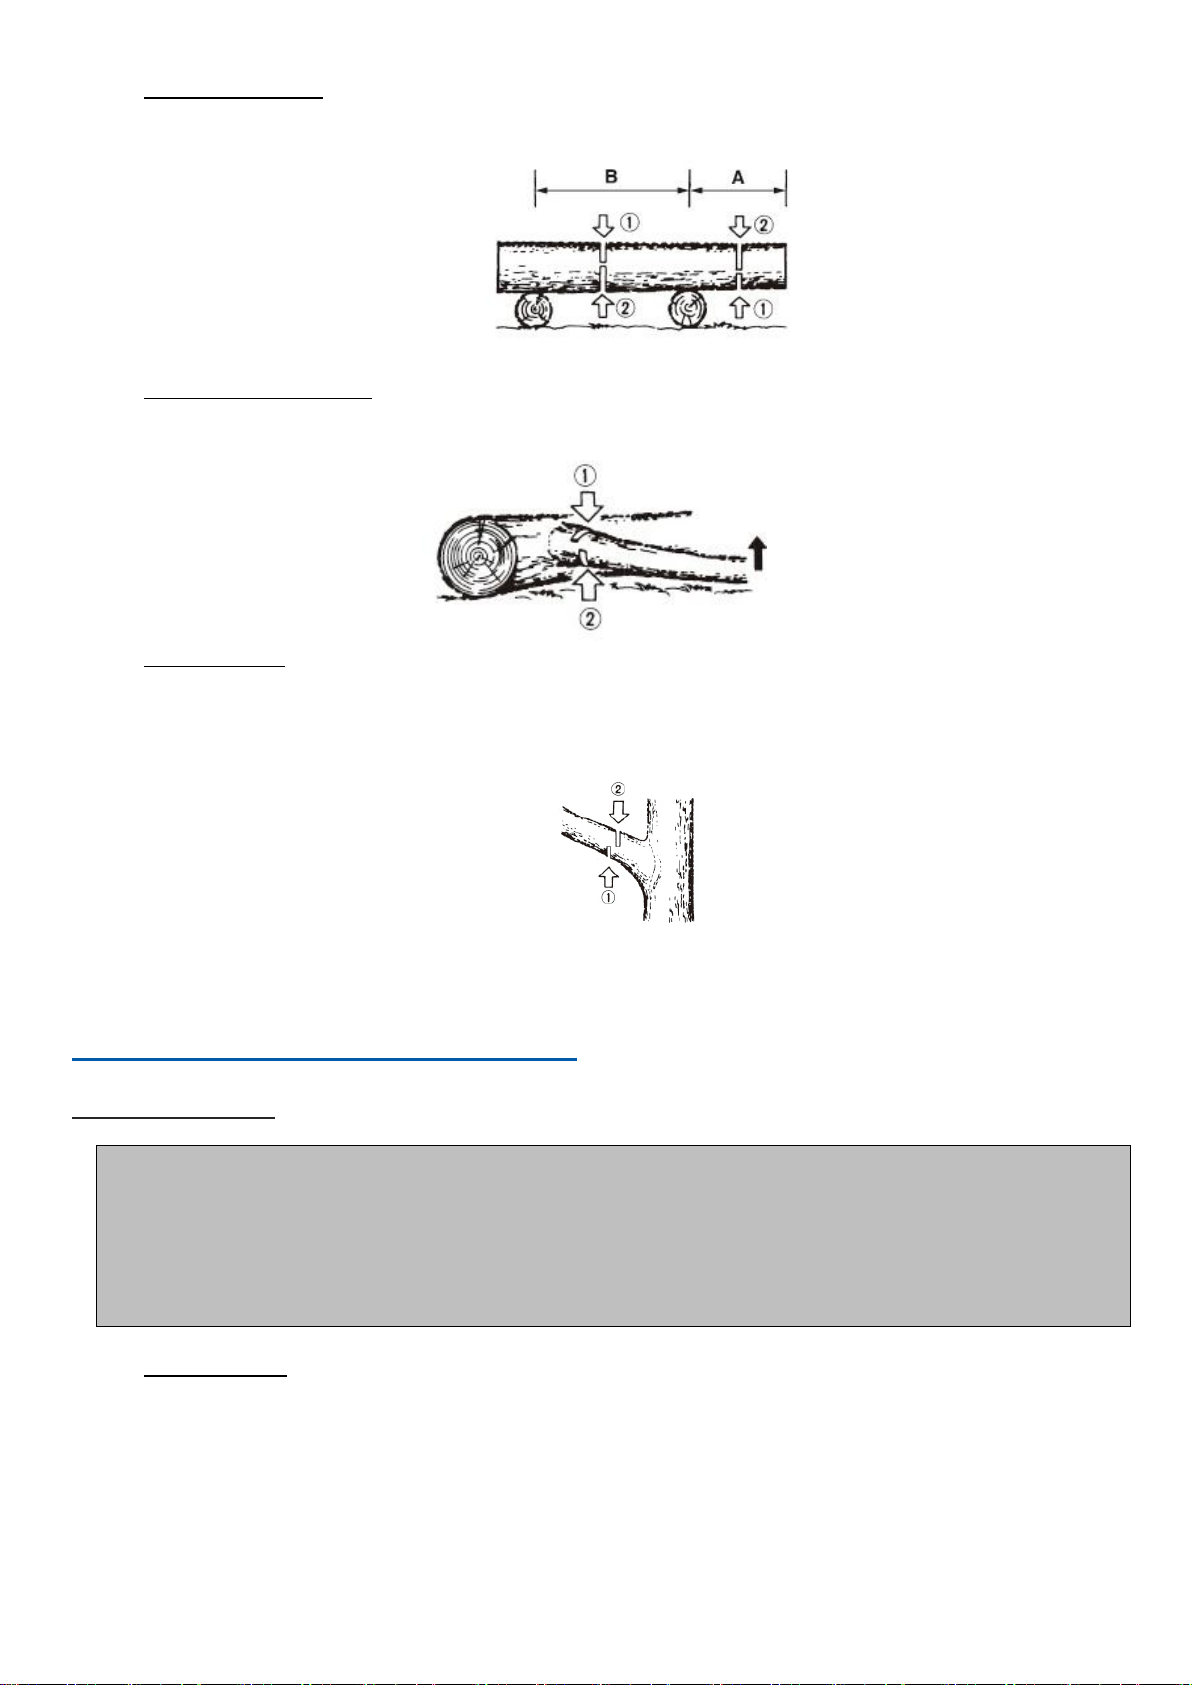
a. Trunk on the ground
Cut half of the trunk, turn it over and finish the cut on the other side.
17
b. Trunk in elevation
Begin by cutting a first part from below and then from above. Then, on the second part, repeat this
operation.
c. Pruning of a felled tree
Observe first the direction of flexion of the branch. Make a first notch on the side in flexion and
finish the cut on the opposite side.
d. Pruning a tree
Begin pruning by nicking the tree from below and then finish at the top.
MAINTENANCE AND STORAGE
MAINTENANCE
Before any maintenance work, the machine must be switched off and completely cooled.
Perform the maintenance work according to the instructions below and perform them regularly. A
clean, well-maintained machine increases its standard of living and efficiency. On the contrary, a
machine maintained can cause damage, accidents and render the tool inoperable in the short term.
Any other maintenance, modification or repair work must be carried out by a qualified professional.
Do not immerse the tool in water or any other liquid.
a. After each use
-Clean the engine block louvers with a blower.
-Check the chain brake if it is working properly.
-Clean the plastic parts before wiping with a damp cloth.
-Check the use of the chain guide
-Check the auto lubrication circuit if it is obstructed or not.
-Check sprocket condition
-Clean the cylinder fins with a compressor

18
b. Cleaning the air filter
Use a compressor to blow dust and chips.
To clean the filter foam: open the air filter, remove the foam. Clean this foam with gasoline, wring
out and dry. Replace the foam in the air filter and reassemble as described in the diagram.
After 10 uses, replace the foam with a new one.
c. Cleaning the oil inlet
Disassemble the chain guide and the chain hood and check that the oil supply is clean. If dirty,
remove dirt with a clean compressor or cloth.
d. Cleaning the oil filter and fuel filter
Clean these items regularly. Remove them from the tanks using clamps. Clean them with gasoline
and then put them back in place afterwards
e. Guide bar
Cleaning: Remove bar guide to remove dirt from grooves and oil inlet.
Regularly grease the pinion.
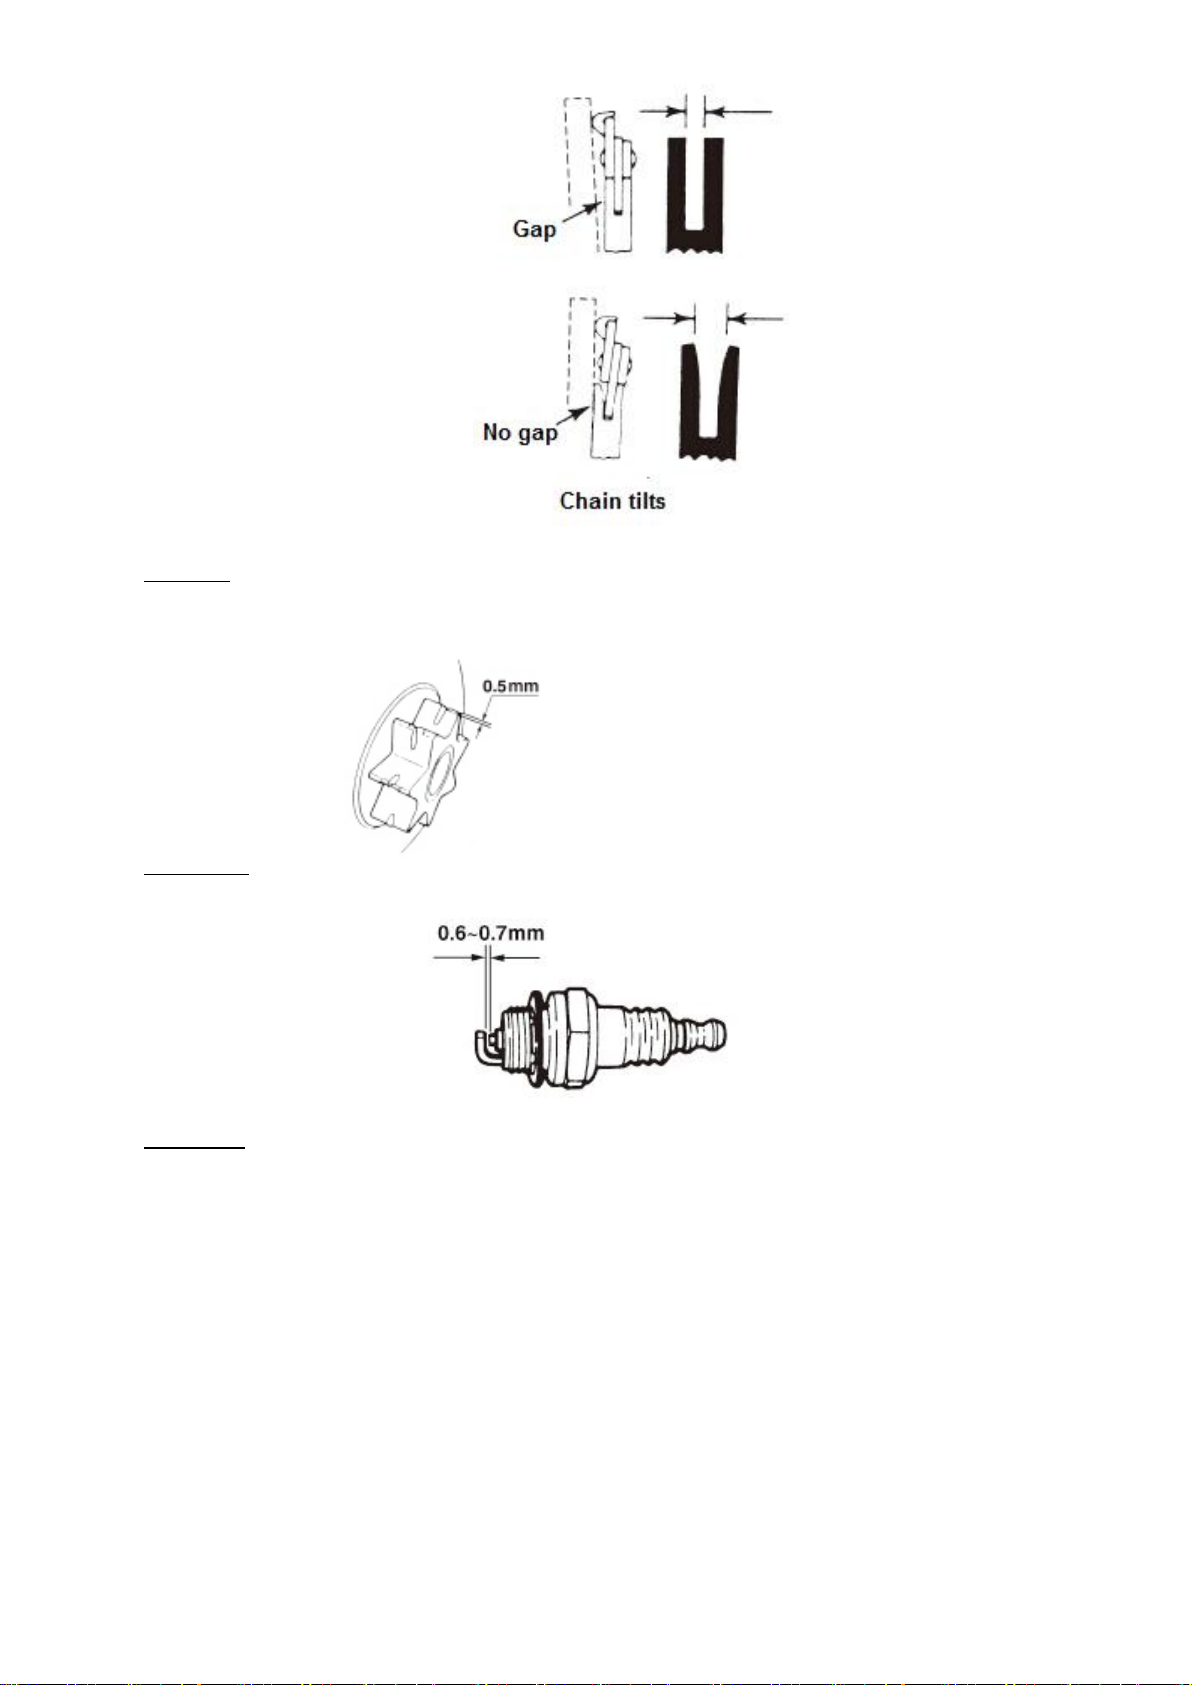
Check: Reverse the bar from time to time to avoid the effects of wear. The bar rail should always be
in place. Use a ruler to observe it. If a gap is observed between them, then the rail is normal.
Otherwise, the rail is worn out. A bar must be corrected or replaced.
19
f. Sprocket
Check the sprocket on signs of wear. If wearing is important, replace it with a new one. Do not
install a chain on a worn or damaged sprocket. Do not install a worn chain on a pinion.
g. Spark plug
Clean the electrodes with a wire brush and set the gap to 0.6mm if necessary.
h. Chain saw
Check each time the cutter and cutting angles are as shown below.
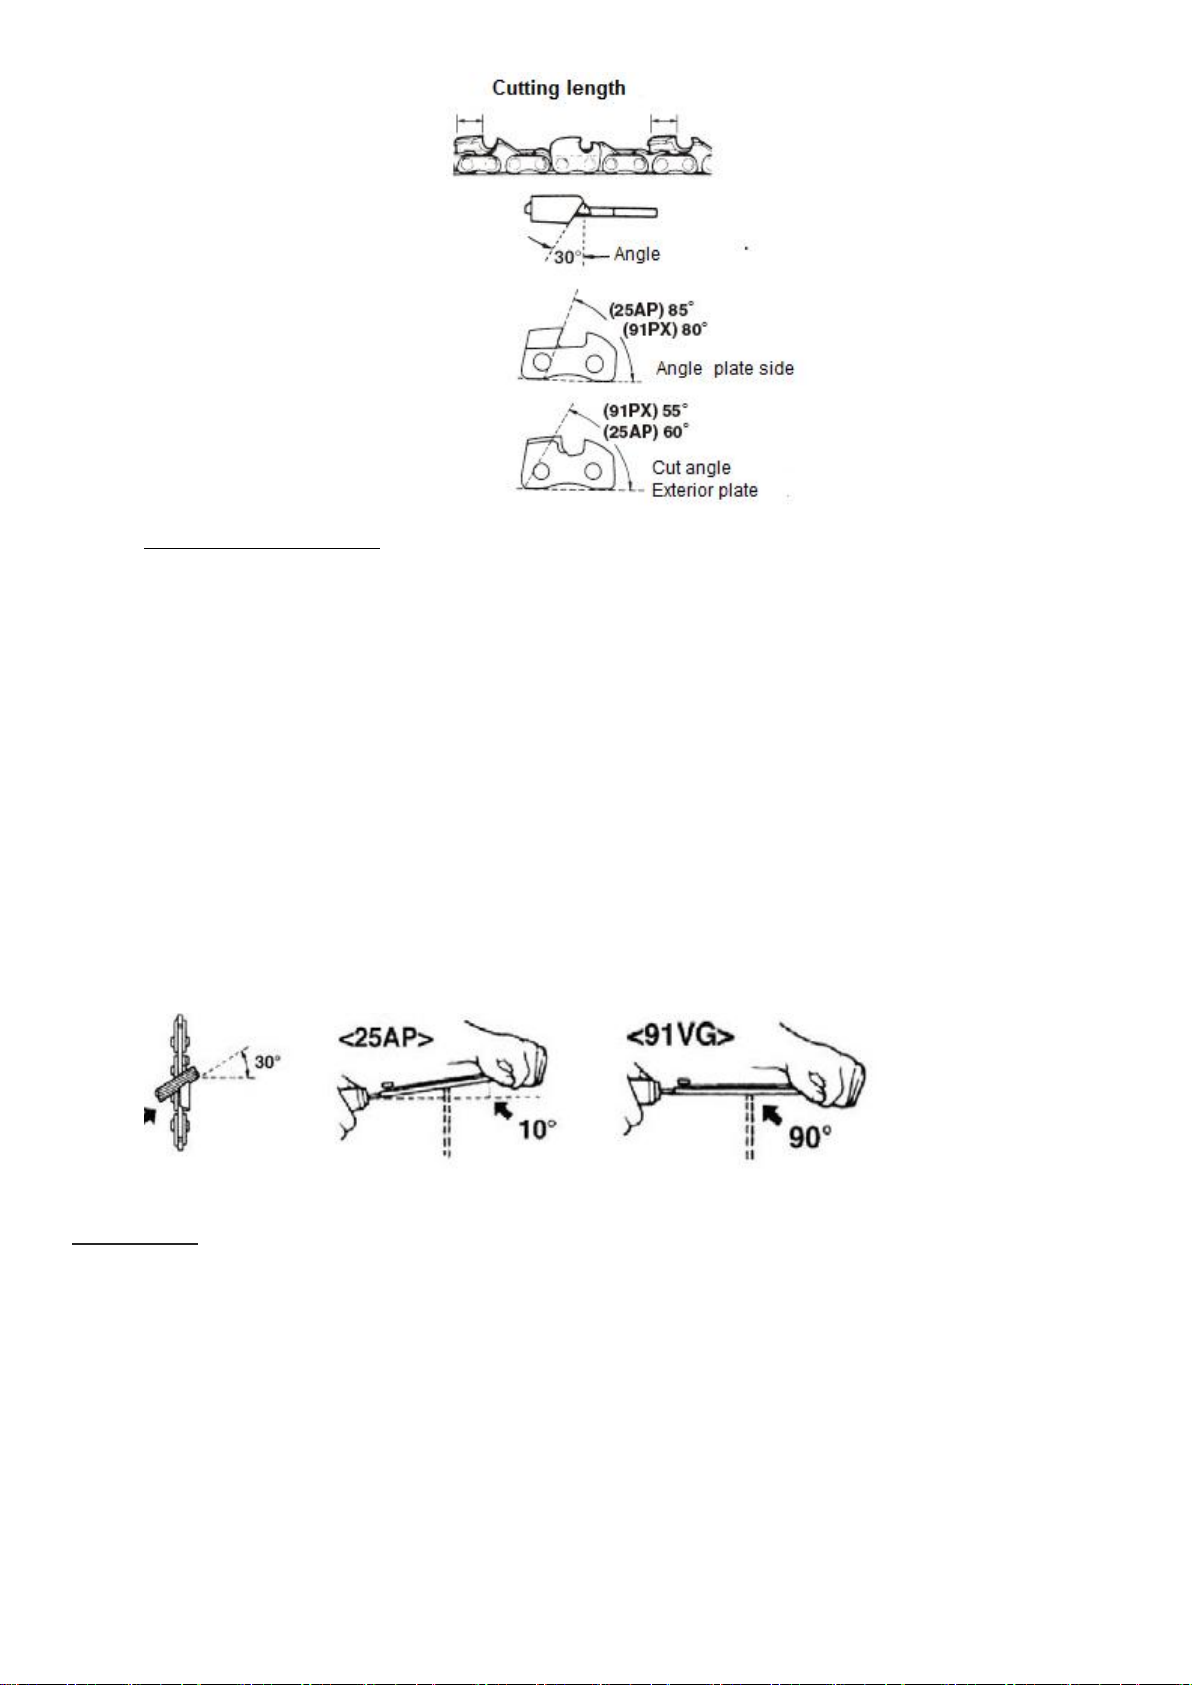
20
i. Sharpening of the chain
For best performance, we strongly recommend that you periodically sharpen the chain. The chain
can either be sharpened by a professional or by yourself by providing you with a sharpening guide
(make sure you know how to use it).
The chain must be sharpened when:
-Wood chips have become powder
-The cut is not straight
-Vibration increase
-Fuel consumption has increased
-Sharpening method:
The chain saw must be switched off and locked before sharpening. Use a round file or sharpening
device (see in store).
Place the file on the tooth and push straight. Shift with the same movement.
After sharpening all teeth, check if the teeth are sharp.
STORAGE
When storing, the tool must be turned off, cooled, emptied of fuel and thoroughly cleaned.
Store the tool in a dry, clean place, preferably in its packaging, and out of the reach of children. Store all
accessories and other items with the tool
Table of contents
Other Hyundai Chainsaw manuals

Hyundai
Hyundai HTRE2240-1 User manual

Hyundai
Hyundai HTRT42 User manual

Hyundai
Hyundai HYC3816 User manual

Hyundai
Hyundai TCS2510 User manual

Hyundai
Hyundai HTRT45-6 User manual

Hyundai
Hyundai HTRT45H45-1 User manual

Hyundai
Hyundai HYC36LI User manual

Hyundai
Hyundai HYC2610 User manual

Hyundai
Hyundai HY6222 User manual

Hyundai
Hyundai HYC6220 User manual


