Hyundai HBT75-3 User manual

PETROL SHREDDER
HBT75-3
WARNING: Read thoroughly the instruction manual before use.

2/21
GENERAL SAFETY RULES
Warning symbol
Caution: Read carefully the manual before use.
Danger - Rotating blades. Keep hands and feet out of openings while
machine is running
Keep bystanders away
Wear eye and ear protection

3/21
Do not use as a step
Wear protective gloves
Wear safety footwear
Danger – risk of fire
Caution – hot surface
Warning – exhaust gas. Do not inhale them
Guarantee sound power level

4/21
IMPORTANT
READ CAREFULLY BEFORE USE
KEEP FOR FUTURE REFERENCE
Training
Become familiar with the owner's manual before attempting to operate this equipment.
Preparation
1) Do not allow children to operate this equipment;
2) Do not operate this equipment in the vicinity of bystanders;
3) Do not run engine powered machines in an enclosed area since the exhaust from an engine
contains carbon monoxide, which is colourless, odourless, and tasteless; carbon monoxide
can be extremely dangerous in enclosed areas;
4) Wear ear protection and safety glasses at all times while operating the machine;
5) Avoid wearing clothing that is loose fitting or that has hanging cords or ties;
6) Only operate the machine in open space (e.g. not close to a wall or other fixed object) and
on a firm, level surface;
7) Do not operate the machine on a paved or gravel surface where ejected material could
cause injury;
8) Before starting the machine, check that all screws, nuts, bolts, and other fasteners are
properly secured and that guards and screens are in place. Replace damaged or unreadable
labels;
9) Use extra care in handling fuels. They are flammable and the vapours are explosive. The
following points should be observed:
use only an approved container;
Never remove the fuel cap or add fuel with the power source running. Allow engine and
exhaust components to cool before refuelling;
do not smoke;
never refuel the machine indoors;
never store the machine or fuel container inside where there is an open flame, such as a
water heater;
if fuel is spilled, do not attempt to start the power source, but move the machine away from
the area of spillage before starting;
always replace and securely tighten the fuel cap after refuelling;
if the fuel tank is drained, this should be done outdoors.
Operation
1) Before starting the machine, look into the feeding chamber to make certain that it is empty;
2) Keep your face and body away from the feed intake opening;
3) Do not allow hands or any other part of the body or clothing inside the feeding chamber,
discharge chute, or near any moving part;

5/21
4) Keep proper balance and footing at all times. Do not overreach. Never stand at a higher
level than the base of the machine when feeding material into it;
5) Always stand clear of the discharge zone when operating this machine;
6) When feeding material into the machine be extremely careful that pieces of metal, rocks,
bottles, cans or other foreign objects are not included;
7) If the cutting mechanism strikes any foreign objects or if the machine should start making
any unusual noise or vibration, shut off the power source and allow the machine to stop.
Disconnect the spark plug wire from the spark plug (electric unit disconnect from supply) and
take the following steps:
Inspect for damage;
Check for and tighten any loose parts ;
Have any damaged parts replaced or repaired with parts having equivalent specifications.
8) Do not allow processed material to build up in the discharge zone; this may prevent proper
discharge and can result in kickback of material through the feed intake opening;
9) If the machine becomes clogged at the inlet opening or discharge chute shut-off the power
source and disconnect the spark plug wire or remove the ignition key before clearing debris in
the inlet opening or discharge chute. Keep the power source clear of debris and other
accumulations to prevent damage to the power source or possible fire. Remember that
operating the starting mechanism on engine powered machines will still cause the cutting
means to move;
10) keep all guards and deflectors in place and in good working condition;
11) Do not tamper with the power source governor settings; the governor controls the safe
maximum operating speed and protects the power source and all moving parts from damage
caused by over-speed. Seek authorised service if a problem exists;
12) Do not transport this machine while the power source is running;
13) Shut off the power source and disconnect the spark plug lead (electric unit disconnect from
supply) whenever you leave the work area;
14) Do not tilt the machine while the power source is running.
Maintenance and storage
a) When the machine is stopped for servicing, inspection, or storage, or to change an
accessory, shut off the power source, disconnect the spark plug wire from the spark plug
(electric unit disconnect from supply), make sure that all moving parts have come to a
complete stop and, where a key is fitted remove the key. Allow the machine to cool before
making any inspections, adjustments, etc.
b) Store the machine where fuel vapour will not reach an open flame or spark. For extended
storage periods, run the unit dry of fuel. Always allow the machine to cool before storing;
c) When servicing the cutting means be aware that, even though the power source will not
start due to the interlock feature of the guard, the cutting means can still be moved by a
manual starting mechanism.
Additional safety instructions for units with bagging attachments
a) Shut-off the power unit before attaching or removing the bag.

6/21
INTENDED USE
This shredder is intended for mulching garden and pruning waste such as green branches,
twigs, brush, vines, and long grasses. DO NOT use this shredder for chipping construction
debris, plastic, paper products, rope or twine, or any material that may contain metal.
GENERAL IDENTIFICATION
1. Tipper
2. Discharge chute
3. Trash can
4. Starter cable
5. Motor
6. Switch
7. Wheel
8. Pusher

7/21
ASSEMBLY INSTRUCTIONS
Hopper installation
1. Carefully insert the hopper into the hopper holder (Fig. A)
2. Locate the screws (total 4 screws) to correct position.
3. Fasten the screw completely.
Fig A
Dustbin installation
1. Install the handle on the dustbin (on the side without the key) and screw it into place.
2. Install the two metal bars inside the bin by inserting the screws through the holes (on the
3 sides of the bin). Secure them with the nuts. Fix then the two bars together.

8/21
3. Insert the dustbin into body (Fig B), make sure the key well connected with transverter.
(Fig C)
4. Use the safe key to lock the dustbin well. ( Fig D)
Fig B Fig D
Fig C
Wheel installation
Place the wheels on both sides at the bottom of the machine. Secure them with a bolt and a flat
washer. Then place the decoration frame.

9/21
OIL AND FUEL FILLING
WARNING! Engine delivered without oil or fuel: Fill up with gasoline and oil before
starting the engine:
1) Fuel
Recommended fuel: unleaded petrol with an octane rating of at least 87.
Open the fuel tank cap. Pour the fuel carefully into the tank without overflowing. Never
exceed the maximum level. Then close the tank with its cap.
Wipe off any fuel that may have spilled.
WARNING ! Petrol is extremely flammable.
Store fuel in cans specifically designed for this.
Fill the fuel tank only outdoors and before starting the engine. Do not smoke when filling the
fuel tank or handling fuel.
Never open the fuel tank cap and never add fuel when the engine is running or when it is hot.
If fuel has spilled, do not start the engine, move the tool away from where the fuel was
spilled, and take care not to create a spark or flame until the fuel vapors have dissipated.
Close all fuel tank and canister caps completely.
Before tilting the mower to service the blade or drain the oil, empty the fuel tank.
WARNING: Never fill the fuel tank indoors, when the engine is running or before the engine
has been able to cool for at least 15 minutes after use.
CAUTION: Do not use unapproved gasoline, such as E15 and E85. Do not mix oil with
gasoline or modify the engine to run on alternative fuels. Using unapproved fuels will
damage engine parts and void the engine warranty.
To protect the fuel system from scale build-up, add a fuel stabilizer to the fuel.
2) Oil
Recommended oil: SAE 15W-40 4-stroke oil, 0.5L.
Open the oil tank cap. Pour the oil into the tank to the limit. Never exceed the tank limit. Then
close the tank with the cap.
Wipe off any overflow.
Oil level check
- Check the oil level after the engine has stopped.
- Remove the plug / dipstick from the oil tank and wipe it off.
- Insert the oil tank cap / dipstick into the tank neck without screwing it back, then remove it
to check the oil level.
- If the oil level is close to or below the lower limit of the dipstick, remove the cap / dipstick
and fill the recommended oil tank to the upper limit of the dipstick (lower edge of the neck).
Do not overfill.
- Replace the oil tank cap / dipstick

10 /21
STARTING THE ENGINE
a) Turn engine switch to ON position.(Fig F)
b) Press the primer button 3 times. (Fig G)
c) Pull the recoil starter handle gently until it engages the give it a good strong pull to start
the engine. (Fig H)
Fig F Fig G Fig H
TURN THE ENGINE OFF
Turn the engine switch on OFF position, or take out the dustbin.
OPERATIONS
WARNING! Never operate without dustbin; it may be dangerous to your body.
1. TOP HOPPER-FRONT CUT
The large slopping front chute of the top hopper is designed to accept leaves and small
garden clippings. Shredding and mulching is achieved by natural suction of the debris
through the blade chamber. Do not overfeed and do not feed wet, soggy material into the
shredder as this may clog the blade chamber and the discharge chute. (Fig I)
Fig I
2. TOP HOPPER-BACK CHUTE
The smaller back chute of the top Hopper accepts medium to larger size garden clippings.
Shredding and mulching is achieved through the same action as the front chute. If finer
type mulch is required, re-feed the mulch through again until the desired result is
obtained. (Fig J)
Engine switch

11 /21
Fig J
3. MATERIAL PUSH STICK
User supplied push stick to push remaining material into hopper opening. DO NOT USE
HANDS. (Fig K)
Fig K
MAINTENANCE
WARNING! Priors to any maintenance, to stop engine and switch if off first.
WARNING! Disconnect spark plug wire from the spark plug to prevent unintentional
engine starting.
WARNING! Unintentional sparking can result in fire.
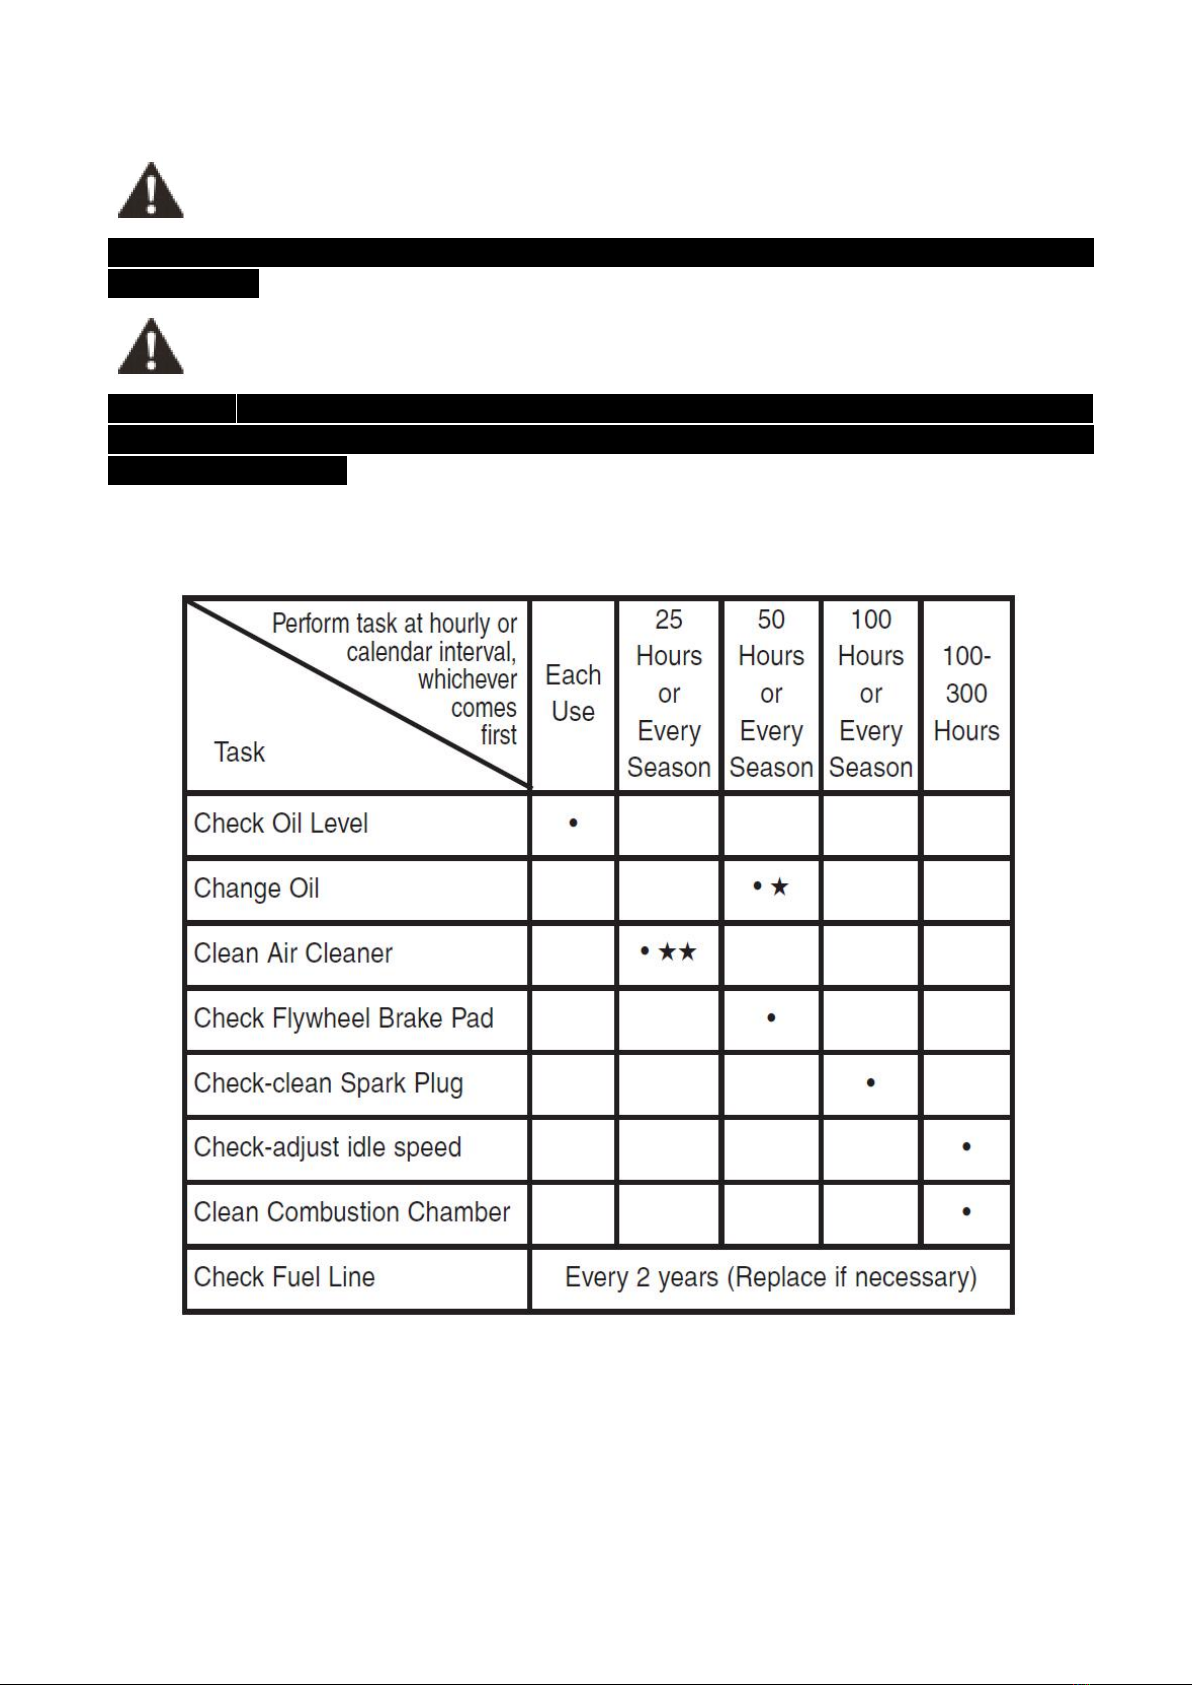
12 /21
WARNING! Unintentional start-up can result in entanglement, traumatic amputation,
or laceration.
CAUTION: Use only genuine replacement engine parts. None compliant parts may
damage the engine, and may result in injury. In addition, use of other parts may void
your warranty rights.
Regular maintenance will improve the performance and extend the life of the engine.
Please follow the instructions and schedules indicated below:
Drain engine oil and change it after first 5-8 hours of operation and every 50 hours
or three months after that. It is also a highly recommendation to change oil every
25 hours.
Clean air cleaner more frequently when working under dusty conditions or when
airborne debris is present. Replace of air cleaner element if it is very dirty.

13 /21
BLADE MAINTENANCE
WARNING! Before removing Top Hopper screw, ensure the machine is switched off,
and the machine is completely stopped.
WARNING! Take extreme care not to come in contact with cutting blades. Danger!
WARNING! If ejection chute becomes clogged or cutting blades become jammed,
under no circumstances should you place your hands in ejection chute to try to clear
obstruction, as this will lead to serious injury.
1. Switch the machine off, and make sure the machine is completely stopped.
2. Wear gloves when attempting any maintenance to the cutting blades.
3. Loose four safety 4 screws as shown on (Fig L), carefully lift up the hopper.
4. Steps on the hopper support with the foot, takes a tool to be fixed the blade of plate. (Fig
M)
5. Dismantles bit anchor screw (Fig N) with the suitable tool.
6. Close the hopper, tighten the screws.
NOTE: The blade is double edged. Should you have to change the blade, rotate the
blade 180 degree for sharper edge.
Fig L Fig M

14 /21
Fig N
DRAINING THE OIL
1. Leave the engine running until the fuel runs out and wait for the engine to stop and cool
down slightly.
2. Disconnect the spark plug.
3. Remove the oil drain plug (A). Empty the oil into a suitable container. (Fig. O)
4. Clean the oil drain plug before reinstalling it.
5. Add oil as explained in the "oil and fuel filling" section.
WARNING! Prevent skin contact with used engine oil. Wash your skin with soap and
water after oil change.
CAUTION: Used oil is a hazardous waste product. It is suggested to bring used oil to
your local recycling center with properly sealed container a sealed container to your
local recycling center. Don not discard with household waste.
Fig O

15 /21
AIR CLEANER MAINTENANCE
A dirty air filter will increase air intake restriction. Periodical maintenance or air
filter will help to improve engine performance and reduce emissions.
WARNING! Never clean air filter with gasoline or an easy ignited solvent it may
cause explosion.
1. Remove the air cleaner cover (A), and carefully remove the filter element (B) (Fig P)
2. Clean all parts.
3. Blow off dirt from filter element with pressure air.
4. Reinstall the filter element and air cleaner cover.
Fig P
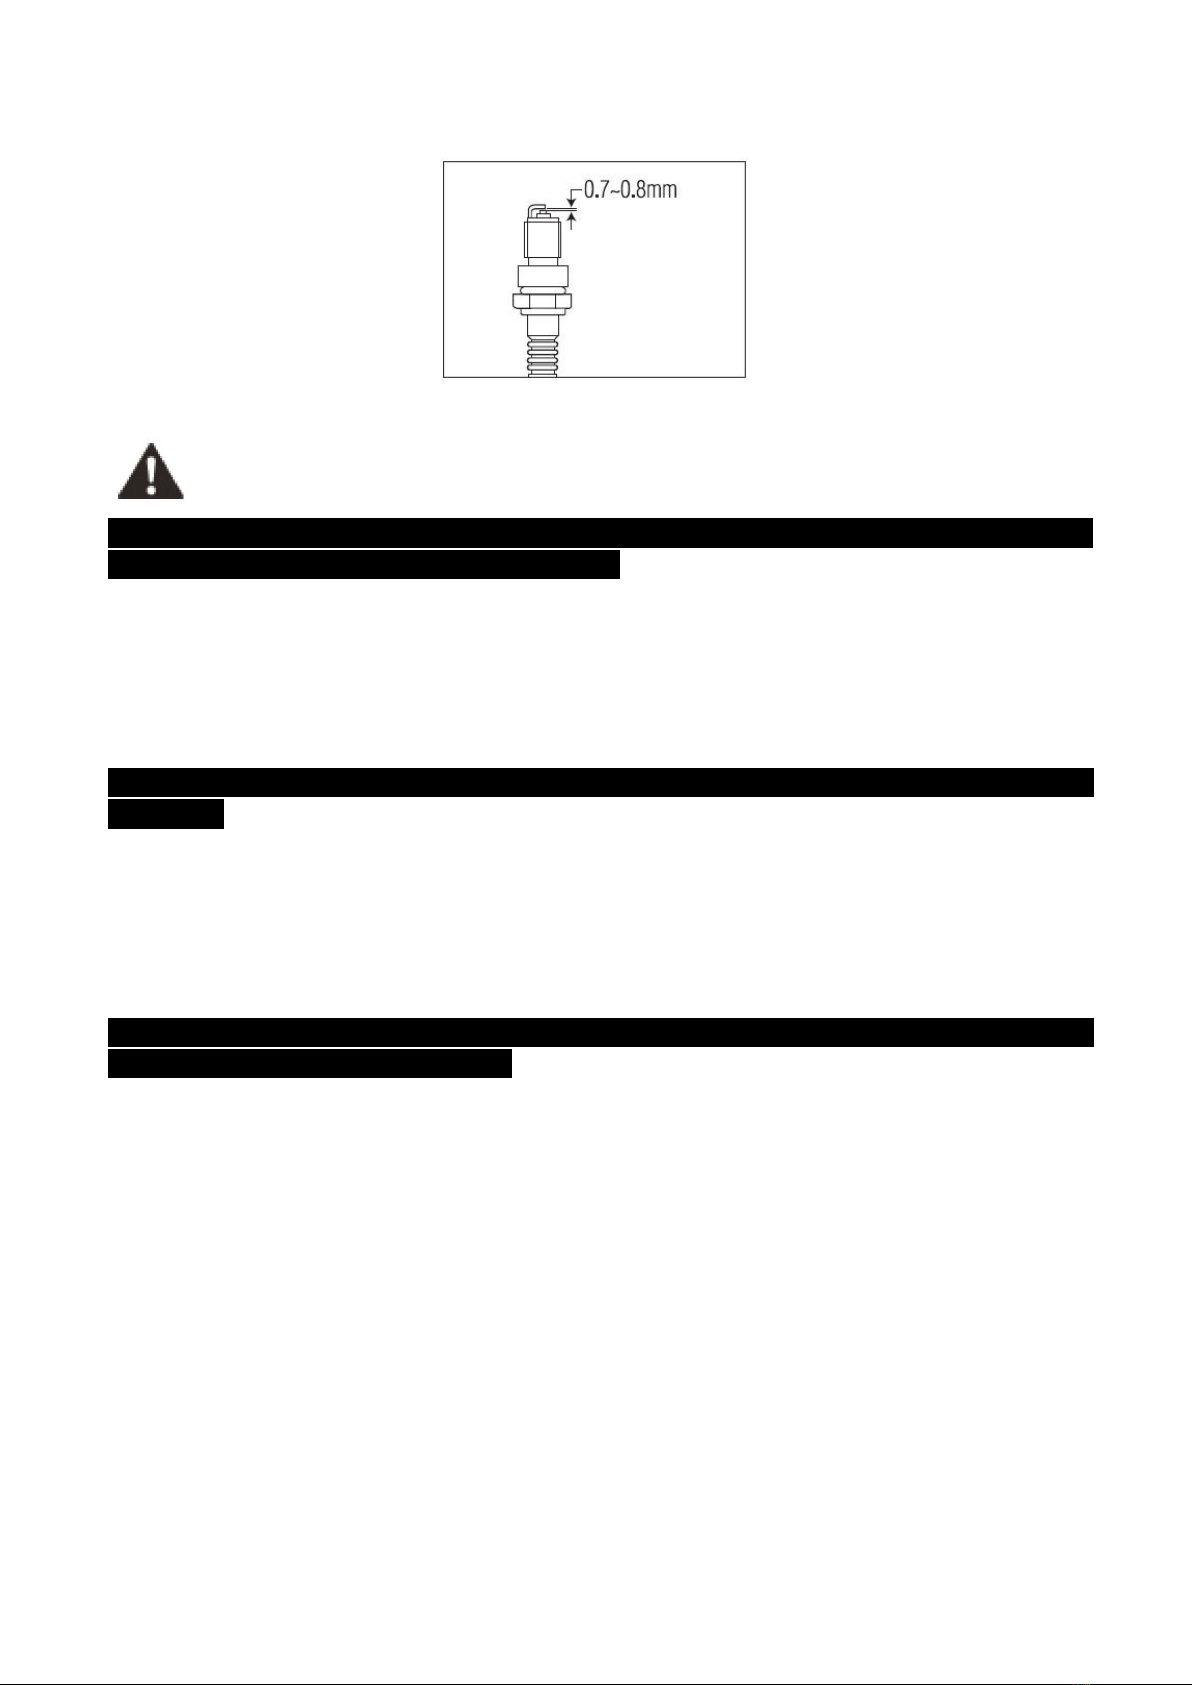
SPARK PLUG
Recommended spark plug: F7RTC.
Stop the engine and allow it to cool
WARNING! DO NOT use an incorrectly rated plug. It is essential to keep the
spark plug in good condition-clean and properly adjusted.
WARNING! To keep engine at top performance spark plug gap should be within
specified and carbon built up free.
1. Removing spark plug with a spark plug wrench.
2. Inspect the spark plug visually. If spark plug is worn, dirty or has cracks, replace with the
recommended type and heat range.
3. The correct air gap is 0.70 to 0.80mm (Fig Q)
4. Tighten the spark plug.
5. After spark plug is tight; torque to 25-30N.m.
16 /21
Fig Q
WARNING! An incorrectly tightened spark plug may result in poor engine
performance and permanent engine damage.
COMBUSTION DEPOSITS
We recommend that you should remove combustion deposits from the cylinder head, top of
piston, and around valves after every 100-300 hours of usage.
MUFFLER
WARNING! If engine just running down, do not touch muffler. Allow it to cool before
operation.
TRANSPORTING AND STORAGE
When storing engine for more than 30 days.
1. Store in a dry and clean area.
2. Run engine until fuel tank is empty and engine stops or add gasoline preservative and
running engine after adding for several minutes.
WARNING! Gasoline is flammable. Fuel or fuel vapors may explode. Keep sparks and
open flames from the working area.
3. Change engine lubrication oil.
4. Clean the exterior surfaces of the engine.
5. Remove spark plug, pour one teaspoon of fresh engine oil into cylinder.
Re-install spark plug without the spark plug wire attached. Pull starter rope slowly several
times to distribute the oil in the engine.
6. Slowly pull start handle (A) until the resistance is reached, then stop pulling.
At that point, valves are closed, that will prevent dust and rust from entering
cylinder. (Fig R)
7. Cover engine well to prevent dust.

17 /21
Fig R
WARNING! When you service the engine, inspect the blade, or clean the underside of
the housing, make sure to always tip the engine with spark plug up. Transporting or
tipping the engine with the spark plug down will cause:
1. Engine smoking
2. Hard starting
3. Spark plug fouling
4. Oil or petrol saturation of the air filter
Technical data
Sound pressure level: 106 dB(A) K=3dB(A)
Sound power level: 110 dB(A) K=3dB(A)
Guarantee sound power level: 113 dB(A)
Power: 3,1 kW
Weight: 34,5 kg
Speed: 3000/min
Engine displacement: 174 cm³
Cutting diameter: 44mm
Cutting width: 225 mm
Oil volume: 500 ml
Fuel tank volume: 1000 ml
The noise emission is measured according the requirements of the standards
EN13683 Annex F.

18 /21
CE DECLARATION
BUILDER SAS
32, rue Aristide Bergès - ZI 31270 Cugnaux - France
Is in conformity with the requirements of the Directive Machine 2006/42/EC and to the followings Europeans
Directives:
EMC Directive 2014/30/EU
ROHS Directive 2015/865/EU amending 2011/65/EU
Emission directive (EU) 2016/1628
Noise Directive 2000/14/EC and 2005/88/EC Annex X
This tool is also in conformity with the following these standards:
EN 13683:2003+A2:2011, EN ISO 14982:2009
Sound power level: 110 dB(A) K=3dB(A)
Guarantee sound power level: 113 dB(A)
Responsible of the technical file: Julia Zou
Philippe MARIE / PDG
Declare that the following tool:
Petrol Shredder
HBT75-3
Serial number: 20211159200-20211159349
Cugnaux, 19/08/2021

WARRANTY
The manufacturer guarantees the product against defects in material and workmanship for a period of 2
years from the date of the original purchase. The warranty only applies if the product is for household use.
The warranty does not cover breakdowns due to normal wear and tear.
The manufacturer agrees to replace parts identied as defective by the designated distributor. The
manufacturer does not accept responsibility for the replacement of the machine, in whole or in part , and/or
ensuing damage.
The warranty does not cover breakdowns due to:
• insucient maintenance.
• abnormal assembly, adjustment or operations of the product.
• parts subject to normal wear and tear.
The warranty does not extend to:
• shipping and packaging costs.
• using the tool for a purpose other than that for which it was designed.
• the use and maintenance of the machine done in a manner not described in the user manual.
Due to our policy of continuous product improvement, we reserve the right to alter or change specications
without notice. Consequently, the product may be dierent from the information contained therein, but a
modication will be undertaken without notice if it is recognized as an improvement of the preceding
characteristic.
READ THE MANUAL CAREFULLY BEFORE USING THE MACHINE.
When ordering spare parts, please indicate the part number or code, you can nd this in the spare parts list
in this manual. Keep the purchase receipt; without it, the warranty is invalid. To help you with your product,
we invite you to contact us by phone or via our website:
• +33 (0)9.70.75.30.30
• https://services.swap-europe.com/contact
You must create a "ticket" via the web platform.
• Register or create your account.
• Indicate the reference of the tool.
• Choose the subject of your request.
• Describe your problem.
• Attach these les: invoice or sales receipt, photo
of the identication plate (serial number), photo
of the part you need (for example: pins on the
transformer plug which are broken).
WARRANTY
19/21

WHAT TO DO IF MY MACHINE BREAKS DOWN?
If you bought your product in a store:
a) Empty the fuel tank.
b) Make sure that your machine is complete with all accessories supplied, and clean! If this is not the case,
the repairer will refuse the machine.
Go to the store with the complete machine and with the receipt or invoice.
If you bought your product on a website:
a) Empty the fuel tank.
b) Make sure that your machine is complete with all accessories supplied, and clean! If this is not the case,
the repairer will refuse the machine.
c) Create a SWAP-Europe service ticket on the site: https://services.swap-europe.com When making the
request on SWAP-Europe, you must attach the invoice and the photo of the nameplate (serial number).
d) Contact the repair station to make sure it is available before dropping o the machine.
Go to the repair station with the complete machine packed, accompanied by the purchase invoice and the
station support sheet downloadable after the service request is completed on the SWAP-Europe site
For machines with engine failure from manufacturers BRIGGS & STRATTON, HONDA and RATO, please
refer to the following instructions.
Repairs will be done by approved engine manufacturers of these manufacturers, see their site:
• http://www.briggsandstratton.com/eu/fr
• http://www.honda-engines-eu.com/fr/service-network-page;jsessionid=5EE8456CF39CD572AA2AEEDFD
290CDAE
• https://www.rato-europe.com/it/service-network
Please keep your original packaging to allow for after-sales service returns or pack your machine
with a similar cardboard box of the same dimensions.
For any question concerning our after-sales service you can make a request on our website https://
services.swap-europe.com
Our hotline remains available at +33 (9) 70 75 30 30.
PRODUCT FAILURE
20/21
Table of contents
Other Hyundai Paper Shredder manuals


