i-OnTop i-OnTemp User manual

i-OnTemp User Manual
Rev 1.0 Pg. 1
Thermal Imaging device for temperature verification
User Manual

i-OnTemp User Manual
Rev 1.0 Pg. 2
Contents
1. Introduction.......................................................................................................................................... 5
1.1 i-OnTemp system content.................................................................................................................................................................................... 5
1.2 Key features ......................................................................................................................................................................................................... 5
2. Installation instructions ....................................................................................................................... 6
Placing i-OnTemp ....................................................................................................................................................................................................... 6
Positioning i-OnTemp ................................................................................................................................................................................................ 6
3. Daily Operations................................................................................................................................... 7
3.1 i-OnTemp initialization......................................................................................................................................................................................... 7
3.2 Define the Alert temperature .............................................................................................................................................................................. 7
3.3 Fever confirmation............................................................................................................................................................................................... 7
3.4 System shut down................................................................................................................................................................................................ 7
4. ThermApp Application overview ......................................................................................................... 8
4.1 Screen layout ....................................................................................................................................................................................................... 8
5. Configuration Menu ........................................................................................................................... 10
5.1 Imaging Mode .................................................................................................................................................................................................... 10
5.2 Thermography Settings...................................................................................................................................................................................... 11
•5.2.1 Temperature units ............................................................................................................................................................................. 11
•5.2.2 Adjusting Emissivity ............................................................................................................................................................................ 11
•5.2.3 Reflected temperature........................................................................................................................................................................ 11
•5.2.4 Adjusting the scale Truncation............................................................................................................................................................ 11
5.3 General Settings................................................................................................................................................................................................. 12

i-OnTemp User Manual
Rev 1.0 Pg. 3
•5.3.1 Disable screen timeout ...................................................................................................................................................................... 12
•5.3.2 Gain limit mode................................................................................................................................................................................... 12
•5.3.4 Alert Mode Settings ............................................................................................................................................................................ 12
•5.3.5 Video/Snapshot Orientation ............................................................................................................................................................... 13
•5.3.6 Record and Stream.............................................................................................................................................................................. 13
•5.3.7 Language ............................................................................................................................................................................................. 14
5.4 Export/Save Options .......................................................................................................................................................................................... 14
5.5 Maintenance ...................................................................................................................................................................................................... 14
5.6 Help.................................................................................................................................................................................................................... 14
5.7 About.................................................................................................................................................................................................................. 14
6. Quick Settings..................................................................................................................................... 15
6.1 Imaging mode .................................................................................................................................................................................................... 15
6.2 Setup Shortcuts.................................................................................................................................................................................................. 15
•Emissivity...................................................................................................................................................................................................... 15
•Reference temperature ............................................................................................................................................................................... 15
•Number of ROIs............................................................................................................................................................................................ 15
•Degrees compensation ................................................................................................................................................................................ 15
6.3 Activity Type....................................................................................................................................................................................................... 16
6.4 Color Display ...................................................................................................................................................................................................... 16
7. Temperature Bar ................................................................................................................................ 18
8. Image display...................................................................................................................................... 18
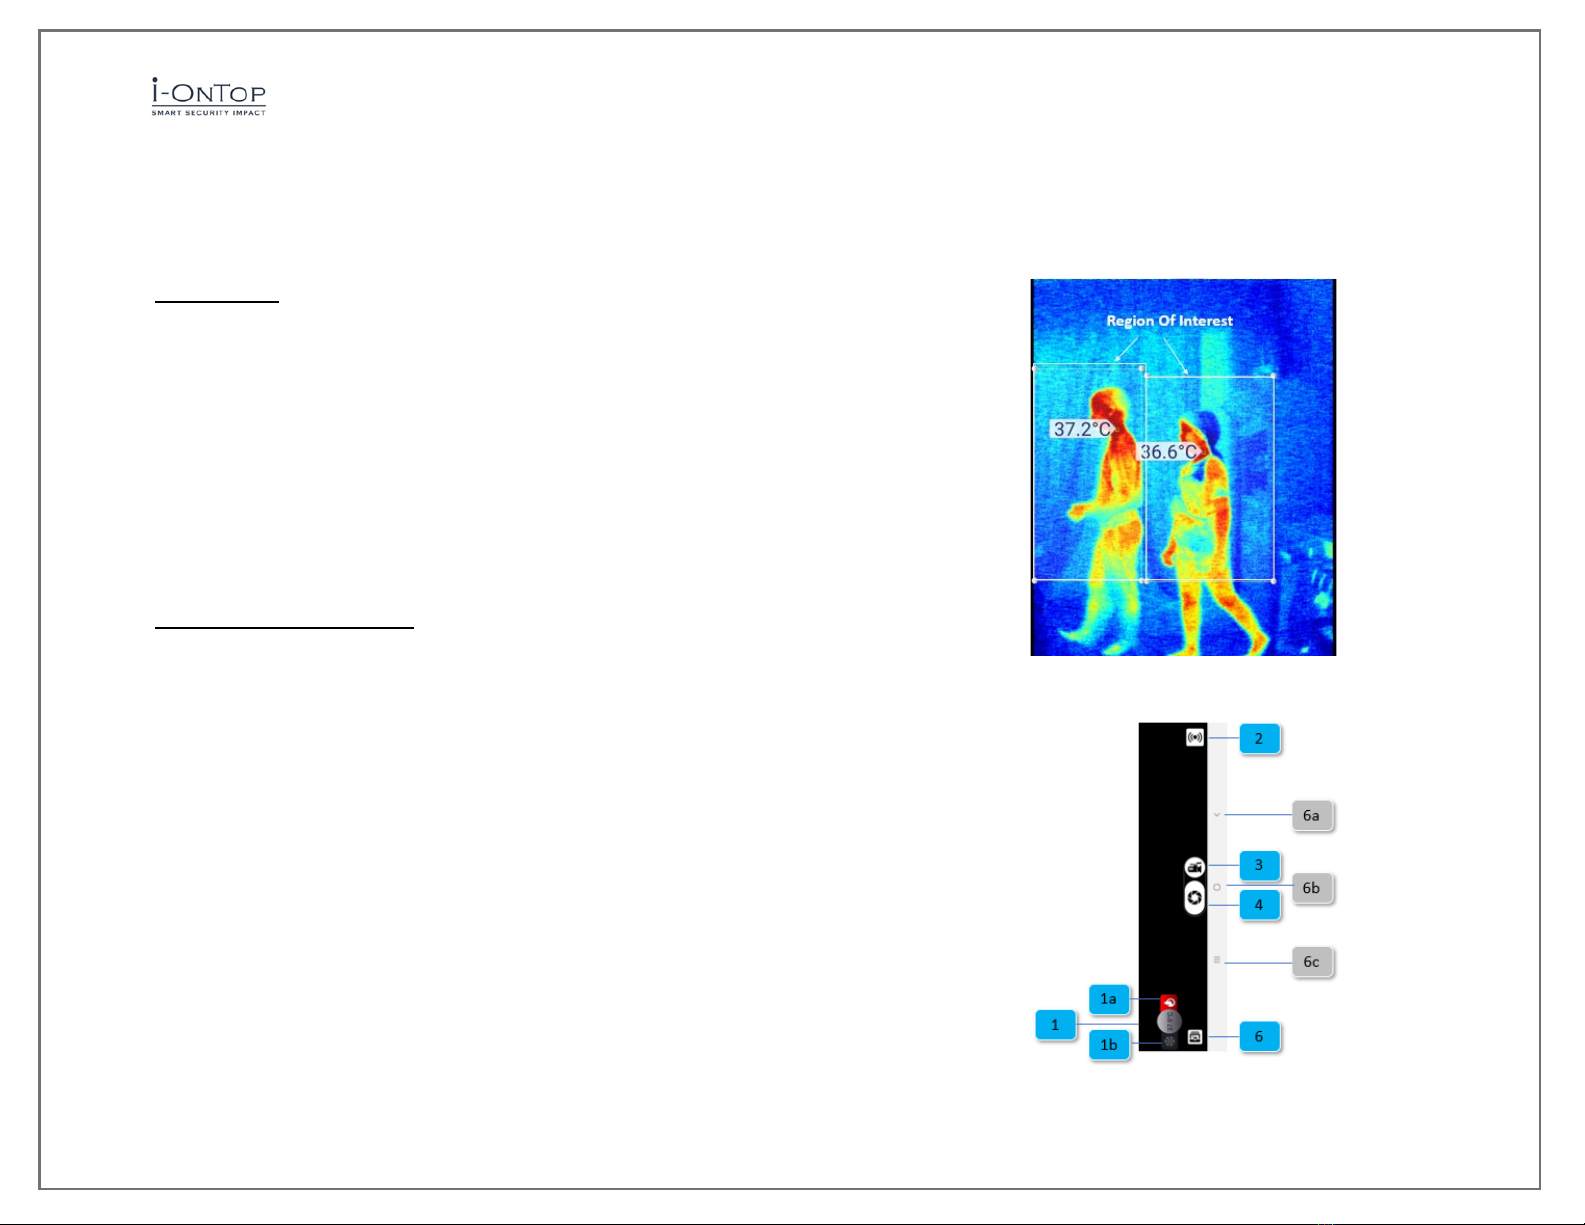
8.1 Regions of Interest............................................................................................................................................................................................. 18
9. Action commands...............................................................................................................................19
9.1 Alert temperature setting .................................................................................................................................................................................. 19

i-OnTemp User Manual
Rev 1.0 Pg. 4
9.2 Video streaming................................................................................................................................................................................................. 19
9.3 Video recording.................................................................................................................................................................................................. 19
9.4 Snapshot ............................................................................................................................................................................................................ 19
9.5Galery.................................................................................................................................................................................................................. 19
10. FAQ & Trouble shooting................................................................................................................. 20
11. Terms and Conditions ....................................................................................................................21
11.1 WHO IS ENTITLED TO WARRANTY?.................................................................................................................................................................. 21
11.2 LIMITED WARRANTY. ....................................................................................................................................................................................... 21
11.3 WARRANTY PERIOD. ........................................................................................................................................................................................ 21
11.4 WARRANTY EXCLUSIONS AND DISCLAIMERS. ................................................................................................................................................. 21
11.5 WARRANTY CLAIMS. ........................................................................................................................................................................................ 22
11.6 LICENSE GRANT................................................................................................................................................................................................ 22

i-OnTemp User Manual
Rev 1.0 Pg. 5
1. Introduction
Welcome to i-OnTemp, the thermal imaging device for temperature verification by i-OnTop.
i-OnTemp will help you identify potentially sick individuals by notifying on “hot” persons passing by based on their skin temperature.
In this document we will guide you on how and where to install i-OnTemp unit to get the most accurate results, we will go over the daily
utilization and operation, and drill down into the detailed settings of the system.
We wish you a pleasant experience with our system and are always available for any question or suggestion at info@i-OnTop.com.
i-OnTop Team
1.1 i-OnTemp system content:
•Suitcase for system portability
•I-OnTemp Unit with integrated Camera by OPGAL
•USB Type-C Charger
1.2 Key features:
•Real time response for immediate skin temperature verification
•Scanning walking persons, no need to stop
•Audio alert when high temperature is detected
•Indication on screen of suspected area
•Adjustable temperature alert
•Easy calibration and operation

i-OnTemp User Manual
Rev 1.0 Pg. 6
2. Installation instructions
I-OnTemp is a Plug and Play system aimed to be installed at the entrance of secured areas. It will help you recognize and avoid persons with
fever and keep public areas as healthy as possible.
i-OnTemp should be charged using standard USC Type C charger. I-OnTemp has an autonomy of 6-8 hours to allow unit portability. Yet, it is
recommended to continuously charge if it is in a fixed place.
Placing i-OnTemp
i-OnTemp can be placed on any counter or table by unfolding built in legs on
the bottom of the unit. To unfold the legs simply turn them to be
perpendicular to the unit itself.
In addition, i-OnTemp has ¼” screw that allows it to be installed on any
standard stand or tripod.
Positioning i-OnTemp
Thermography technology is influenced by the distance of the object
verified. The camera position and angle are key factors for the accuracy
of temperature verified.

i-OnTemp User Manual
Rev 1.0 Pg. 7
3. Daily Operations
3.1 i-OnTemp initialization
•i-OnTemp touchscreen device can be turned on from two different modes:
oTurn on from total shutdown: Press the on bottom for 5-7 seconds and
wait for the system to boot
oTurn on from Sleep mode: press the on button for 1 second
•From the lock screen, swipe up with your finger from the bottom of the screen
towards the top
•Press the ThermApp icon for camera initialization
•Wait 15 minutes for the camera to warm up
3.2 Define the Alert temperature
-Choose a “healthy person” and make him stand at the verification area
-Check skin temperature and consider it as your reference temperature
-Update the alarm temperature: For example, 1.5º Celsius or 3º Fahrenheit more
than the reference temperature
The system is ready!
3.3 Fever confirmation
•If a high temperature is recognized, the system will alert you.
•As skin temperature can be influenced by environment and personal activity it is recommended to confirm the high temperature with a
manual thermometer before blocking a person’s entrance
3.4 System shut down
•If the system is used in a fixed place, you do not need to turn the system off – you can leave it plugged in and let it run with no
interruptions
•While moving the system around, unplug the system and shut it down as follows:
oTotal Shut down: Press the on button for 5-7 seconds and confirm shut down
oSleep mode: press the on button for 1 second

i-OnTemp User Manual
Rev 1.0 Pg. 8
4. ThermApp Application overview
4.1 Screen layout
The screen is split into 3 main areas:
•Setup toolbar [1]
•Image display [2]
•Action commands [3]
Setup Toolbar
•[1] Configuration menu – System settings and configuration
(section 5)
•[2] Quick Settings Menu – Shortcuts to main setup activities
(Section 6)
•[3] Temperature bar – Presents the range of temperatures
currently being viewed. The minimum and maximum temperatures
are displayed on both sides of the bar (Section 7)

i-OnTemp User Manual
Rev 1.0 Pg. 9
Image Display
•Standard view:The default application view with direct access to all
menus and settings
•Full Screen Mode:By tapping the screen twice quickly, you can
switch between standard view and full screen mode
•ROIs squares (Region of Interest) 1 or 2 sizable regions that
indicate the region to verify (Section 8)
Action commands (section 9)
•[1] Alert temperature setting – set up the threshold temperature
for Alert
o[1a] Alert of hot temperature
o[1b] Alert of cold temperature
•[2] Gallery– Displays pictures stored in gallery.
•[3] Snapshot– Takes a snapshot of the image displayed on the
screen.
•[4] Video Record– Records a video stream of the image displayed
on the screen.
•[5] Live Video Streaming– Stream the video of the image displayed
on the screen
•[6] Tablet commands
o[6a] Go Back
o[6b] Home
o[6c] Search

i-OnTemp User Manual
Rev 1.0 Pg. 10
5. Configuration Menu
Tap the Settings button located on the upper toolbar.
The settings screen includes:
•Imaging Mode – Switches between "Night Vision" and "Thermography"
modes.
•Thermography Settings – Enables selection of temperature units, emissivity,
reflected temperature, and camera output options (available only when in
"Thermography mode").
•General Settings – See page 16 for full menu description.
•Export/Save Option – Select how photos and videos will be saved. (See page
16 for full walkthrough).
•Maintenance – Performs bad pixel repair and resets all parameters to default.
•Help – Link to User Manual, Support, and Terms of Use.
•About – General application and device version information.
5.1 Imaging Mode
•Night Vision – This mode maximizes the difference between hot objects and
their surrounding and is used for night-time detection of various targets.
•Thermography – Image pixels are colored in relation to their temperature. On
the default rainbow palette, blue indicates the coldest measured temperature
and red represents the hottest temperature measured. This mode is used for
searching for temperature differences on the scanned scene.

i-OnTemp User Manual
Rev 1.0 Pg. 11
5.2 Thermography Settings
•5.2.1 Temperature units – Choose Fahrenheit or Celsius by checking the box
of the required unit
•I-OnTemp Default Value: Celcius
•5.2.2 Adjusting Emissivity – Emissivity is the ability of the surface of a
material to emit energy as thermal radiation. The emissivity value (0 – 1)
represents the ratio of energy radiated by the observed material to the energy
radiated by a black body at the same temperature.
•To adjust the emissivity ratio
oTap the Emissivity option on the screen.
oScroll to the correct emissivity ratio and tap the Set button.
•I-OnTemp Default Value: 0.98
•5.2.3 Reflected temperature represents the energy emitted by the
surrounding objects and reflected by the measured surface. Setting this value
accurately is important if the emissivity value is low.
•To adjust the reflected temperature:
oTap the Reflected Temperature option on the screen.
oScroll to the correct temperature and tap the Set button.
•I-OnTemp Default Value: 25 Celsius/
•5.2.4 Adjusting the scale Truncation: Within every image frame, the
temperature span is calculated and displayed on the top of the thermography
image. Use this parameter to define the minimum number of pixels (defined
by percentage) required to affect the temperature span calculation.
•To adjust the truncation value:
oTap the Scale Truncation option on the screen.
oScroll to the correct temperature and tap the Set button.
•I-OnTemp Default Value: 0.25%

i-OnTemp User Manual
Rev 1.0 Pg. 12
5.3 General Settings
•5.3.1 Disable screen timeout – Allows the device’s default screen timeout to
be disabled to enable ongoing use of application
•5.3.2 Gain limit mode - This mode will allow you to reduce the background
noise when viewing an environment with low temperature contrast
•5.3.4 Alert Mode Settings - Allows you to set when and how to manage
alerts when the temperature alert parameters are met.
Actions:
•Snapshot: A snapshot is taken every time the preset temperature
threshold is met.
•SMS: Will send you an SMS to a preset phone number every time the
assigned temperature threshold is met.
•Video Recording: Will record video for as long as the temperature
meets the preset value.
•Video Streaming: Will stream to a pre-set location for as long as the
temperature meets the assigned value (for streaming settings see
page 15).
•Vibrate: Will vibrate every time the preset temperature threshold is
met.
•Play alert.mp3: Plays a tone every time the assigned temperature
threshold is met.

i-OnTemp User Manual
Rev 1.0 Pg. 13
Advanced Parameters
•Detection Duration (Seconds): Sets how long the object needs to be in
the set field to trigger the alert.
•Alert Delay (Seconds): How long the application should wait to send
consecutive alerts after the first alert is triggered (time between
alerts).
•Recording Time After Detection: How long you want it to record.
•Object Size: Sets the size of the field on the screen you want filled
before the alert is triggered:
o“Small”- 4x4 pixels,
o“Medium small”- 8x8 pixels,
o“Medium big”- 16x16 pixels,
o“Big”- 32x32 pixels
•5.3.5 Video/Snapshot Orientation
•Video/Snapshot Orientation – This lets you choose your viewing
orientation, both while using the device and while viewing onscreen
(on a display).
•Live Screen Position: Allows you to set the viewing orientation for the
live screen.
•Video/Snapshot Orientation: Allows you to set the viewing orientation
for videos or snapshots.
•Fixed Video: Blocks screen rotation.
•5.3.6 Record and Stream
•Stream Mode: Share just the image, or your full screen.
oIR Image (just the thermal image).
oScreen (thermal video, app screen details, and temperature
reading).
•Record and Stream Audio: Check box to record audio with video.

i-OnTemp User Manual
Rev 1.0 Pg. 14
•5.3.7 Language
•Select your preferred interface language (Match Phone, English,
Chinese, German, French, Russian, or Spanish).
•Match phone is the default. If this feature is selected, the application
will detect the language on your phone and attempt to match it.
5.4 Export/Save Options
•DropBox – You can save and synch you date using your Dropbox
account
•Choose you synched folders:
oUpload from Media folder
oUpload from export folder
5.5 Maintenance
•Following extensive operation of the thermal sensor, or due to
mechanical shock, some pixels may need digital repair.
•Bad pixels are observed as pixels that are darker or brighter than their
surroundings.
•To eliminate these "bad pixels" press Run Bad Pixel Repair > Start, and
follow the onscreen instructions.
•You also have the option to restore Factory setting
5.6 Help
•In the Help heading you will find options for:
1. Therm-App® support by OPGAL
2. Terms of use
5.7 About
•In the Help heading you will find options for:
1. Serial number
2. application version
3. Firmware version
4. Hardware Version

i-OnTemp User Manual
Rev 1.0 Pg. 15
6. Quick Settings
By pressing on the quick settings icon, a quick access menu will appear.
It includes:
•[1] Imaging mode (See section 5.1)
•[2] Setup shortcuts
•[3] Activity type
•[4] Color display
6.1 Imaging mode
See section 5.1
6.2 Setup Shortcuts
•Emissivity
See section 5.2.2
•Reference temperature
See section 5.2.3
•Number of ROIs
See section 8
•Degrees compensation
As the system displays the skin temperature and not the internal
body temperature, we can manually configure the system to add
a constant amount of degrees to each verification to make it
look like the internal temperature.

i-OnTemp User Manual
Rev 1.0 Pg. 16
6.3 Activity Type
The system allows you to choose the kind of activity you want to have.
You may choose between the following options
•None
Disables temperature verification
•Spot
Press the pixel you want to evaluate, and the system will return
with the temperature on the chosen spot
•Hi/Lo
The system returns the highest and lowest temperature in the
entire screen
•Area
The system returns the highest and lowest temperature in a
defined area
•Alert
The system will alert on exceed temperature on specific area
defined
Please Note: For elevated body temperature alert the alarm option should
be chosen.
6.4 Color Display
i-OnTemp system allows you to choose between several display
colors to better fit your preference

i-OnTemp User Manual
Rev 1.0 Pg. 17
Rainbow
Iron
Vivid
White Hot
Iso Red
Red above a configurable temperature
Iso Blue
Blue bellow a configurable temperature
Psy
Lava
Green

i-OnTemp User Manual
Rev 1.0 Pg. 18
7. Temperature Bar
The temperature bar presents the range of temperatures currently being viewed.
The minimum and maximum temperatures are displayed on both sides of the bar.
8. Image display
In the center of the i-OnTemp screen you can see the image display area.
The image shows the captured video by the thermal camera with an
indication of the highest temperature recognized in the pre-defined
Region of Interest (ROI).
8.1 Regions of Interest
The image display can be managed by 1 or 2 Regions of Interest pending
on the spot you want to verify.
The number of ROIs can be defined in the quick settings menu by
choosing number of ROIs option and setting it to 2
In every ROI the system will indicate which is the highest temperature
recognized in this region and will add an arrow with the temperature
identified.
It is imperative to capture in the ROI items with temperature lower than
the normal body/skin temperature.
The ROI can be simply resized by touching and adapting the ROI squares.

i-OnTemp User Manual
Rev 1.0 Pg. 19
9. Action commands
9.1 Alert temperature setting
•Press the temperature [1].
•Use the temperature scale to adjust the alert temperature required
oPressing the fire image [1a] will activate high temperature identification
oPressing on the snowflake [1a] will activate low temperature identification
9.2 Video streaming
•Press the video streaming icon [2] - NOTE: Strong WIFI connection is required
•Choose the Email application to send the streaming link
•The recipient should press on the link and follow instructions.
•The streaming will work according to the configuration (section5.3.6)
oIR Image (just the thermal image).
oScreen (thermal video, app screen details, and temperature reading).
•To stop the streaming press on the stop icon
9.3 Video recording
•Press video recording icon to start recording [3]
•Press the stop icon to stop recording
•Video is saved in the gallery
9.4 Snapshot
•Press Snapshot icon [4]
•Picture is saved in the gallery
9.5 Gallery
•Press gallery icon [3]
•Choose Samsung Gallery to open gallery pictures and video

i-OnTemp User Manual
Rev 1.0 Pg. 20
10. FAQ & Trouble shooting
•Why is the temperature on the screen much lower than the average human temperature?
Thermal imaging processes an image based on the energy emitted off objects in the field of view. This will include a person, hot
air from a heater, a computer or a cool gust of wind from an air conditioner. Unlike a thermometer – which measures absolute
temperature – a thermal imager will show the temperature in relative terms. As in – what is my temperature relative to the
person next to me. To do this we need to establish the baseline temperature, either with a black body, or by using three healthy
individuals as described in the setup instructions. Once we’ve established that baseline, the temperature gradient can be
measured very accurately.
•Why does the temperature change when a person stands at different ranges camera?
Since the camera is aggregating all the energy it is receiving in the field of view, the temperature reading will change. The
optimal range for a 6.8 millimeter lens on the camera is 2-3 meters (6-9 feet). It can be used effectively up to 5 meters (15 feet),
but it’s important to make sure the temperature of a person is measured at the exact distance that the baseline was established.
If your setup is designed to read temperatures of people at 3 meters, for example, make sure that it was calibrated during the
setup for people at that range.
•Why can’t I hear the alert?
Make sure the monitor volume is turned on and alert sound is enabled in app. The sound comes out through the HDMI cable.
Thus it goes into the monitor.
•Why after some time does the temperature of the same individuals change?
Although the camera’s steady state takes about 8-10 minutes, it may take another hour or so to truly reach a point where the
temperature stops shifting. After an hour, it is recommended to check the temperature and recalibrate the threshold
accordingly. Also, since the ambient temperature changes during the day, it is recommended to repeat the process once every 8
hours.
•Can the ThermApp be used outside?
Yes. But you need to adjust the ambient temperature in accordance with the outside temperature as it will probably not be 25
degrees, and you may need to recalibrate the ambient temperature and the baseline as the day progresses and temperatures
change. Also, avoid a field of view which is looking at a street in which vehicles (which are hot objects) could pass through it.
•I’m not getting a temperature reading and the screen says “overflow”
This occurs if an object in the screen surpasses 60°c (140°F), which is beyond our calibration range. Remove the object and check
again.
Table of contents