IBA ibaOfficeline SAS User manual

ibaOfficeline SAS
iba Industrial Computer
Manual
Issue 1.4

Manufacturer
iba AG
Königswarterstr. 44
90762 Fürth
Germany
Contacts
Main office +49 911 97282-0
Fax +49 911 97282-33
Support +49 911 97282-14
Engineering +49 911 97282-13
E-Mail: [email protected]
Web: www.iba-ag.com
This manual must not be circulated or copied, or its contents utilized and disseminated,
without our express written permission. Any breach or infringement of this provision will
result in liability for damages.
©iba AG 2012, All Rights Reserved
The content of this publication has been checked for compliance with the described
hardware and software. Nevertheless, deviations cannot be excluded completely so
that the full compliance is not guaranteed. However, the information in this publication
is updated regularly. Required corrections are contained in the following regulations or
can be downloaded on the Internet.
The current version is available for download on our web site http://www.iba-ag.com.
Protection note
Windows® is a label and registered trademark of the Microsoft Corporation. Other pro-
duct and company names mentioned in this manual can be labels or registered trade-
marks of the corresponding owners.
Certification
The device is certified according to the European standards and directives. This device
corresponds to the general safety and health requirements. Further international cus-
tomary standards and directives have been observed.

ibaOfficeline SAS Manual
Issue 1.4 3
Table of contents
1About this manual.............................................................................................5
1.1 Target group...................................................................................................... 5
1.2 Designations ..................................................................................................... 5
1.3 Symbols used ................................................................................................... 6
2Scope of delivery ..............................................................................................7
3Safety instructions............................................................................................8
4Description ........................................................................................................9
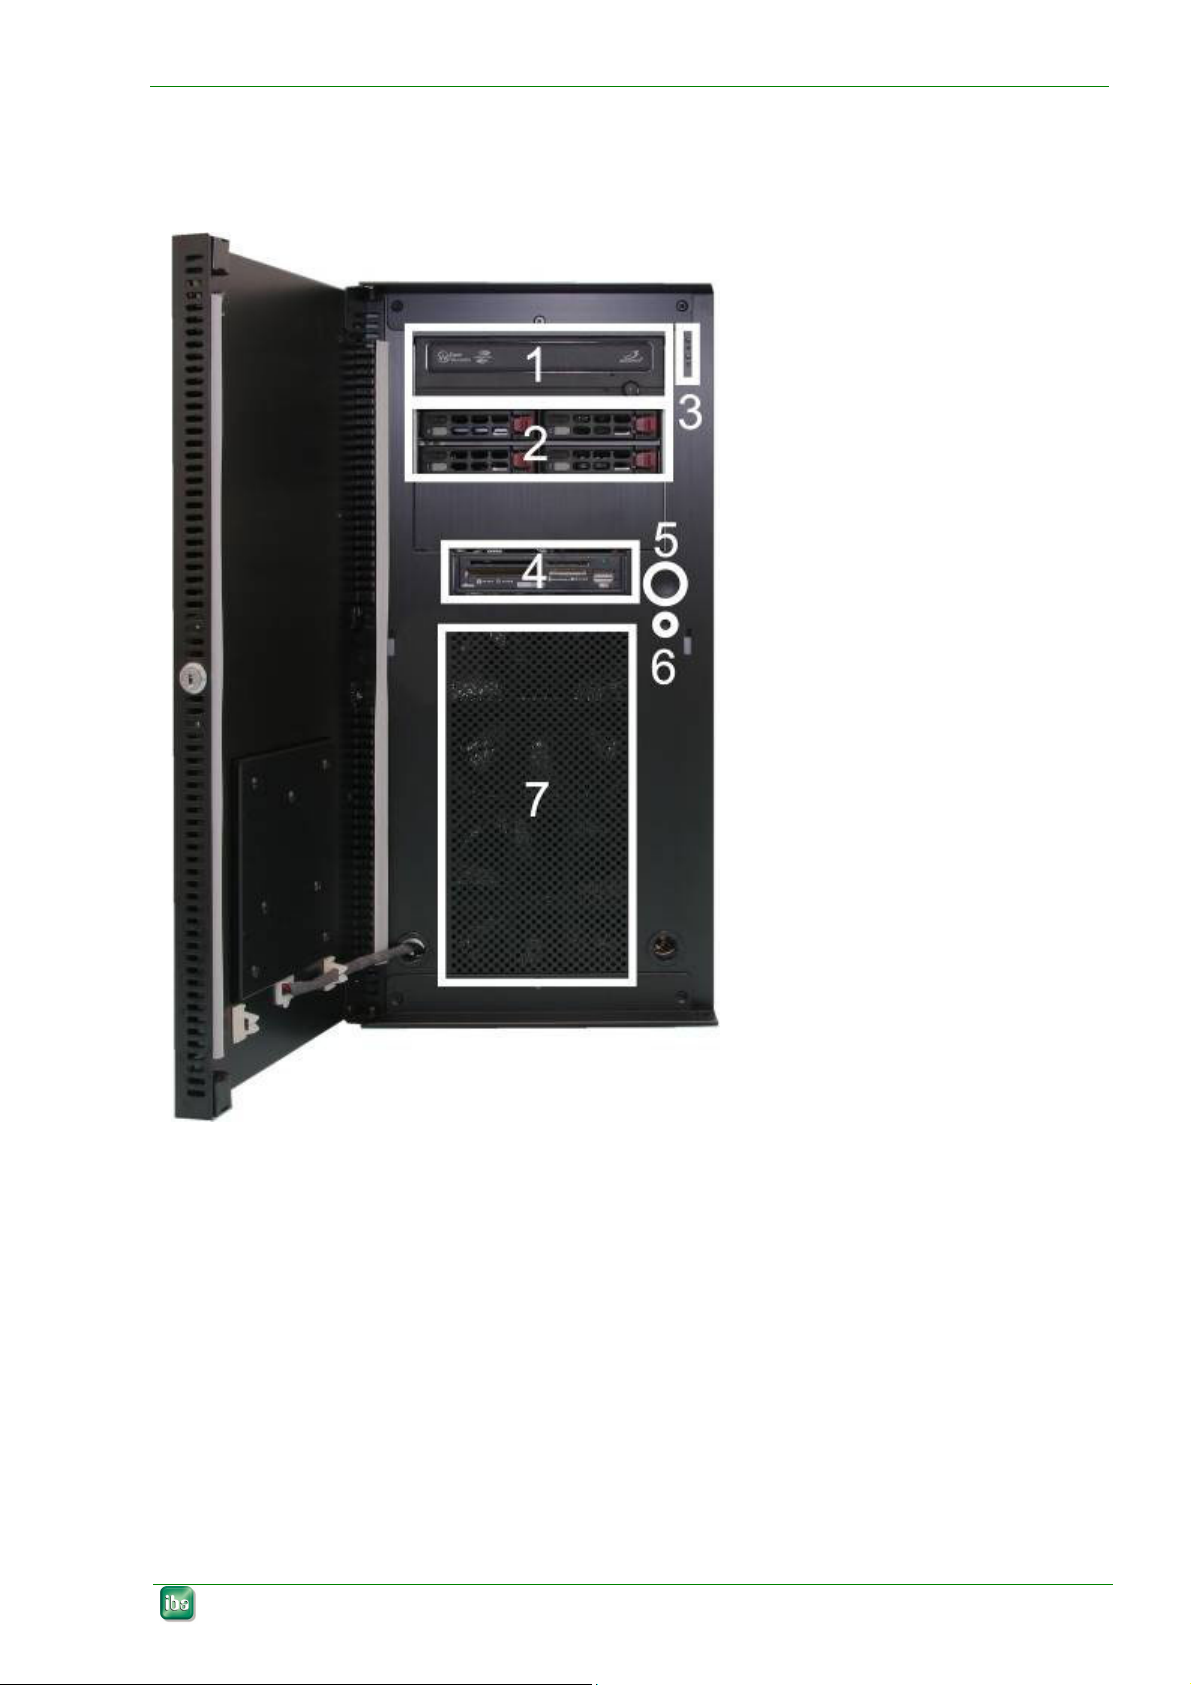
4.1 Front view ......................................................................................................... 9
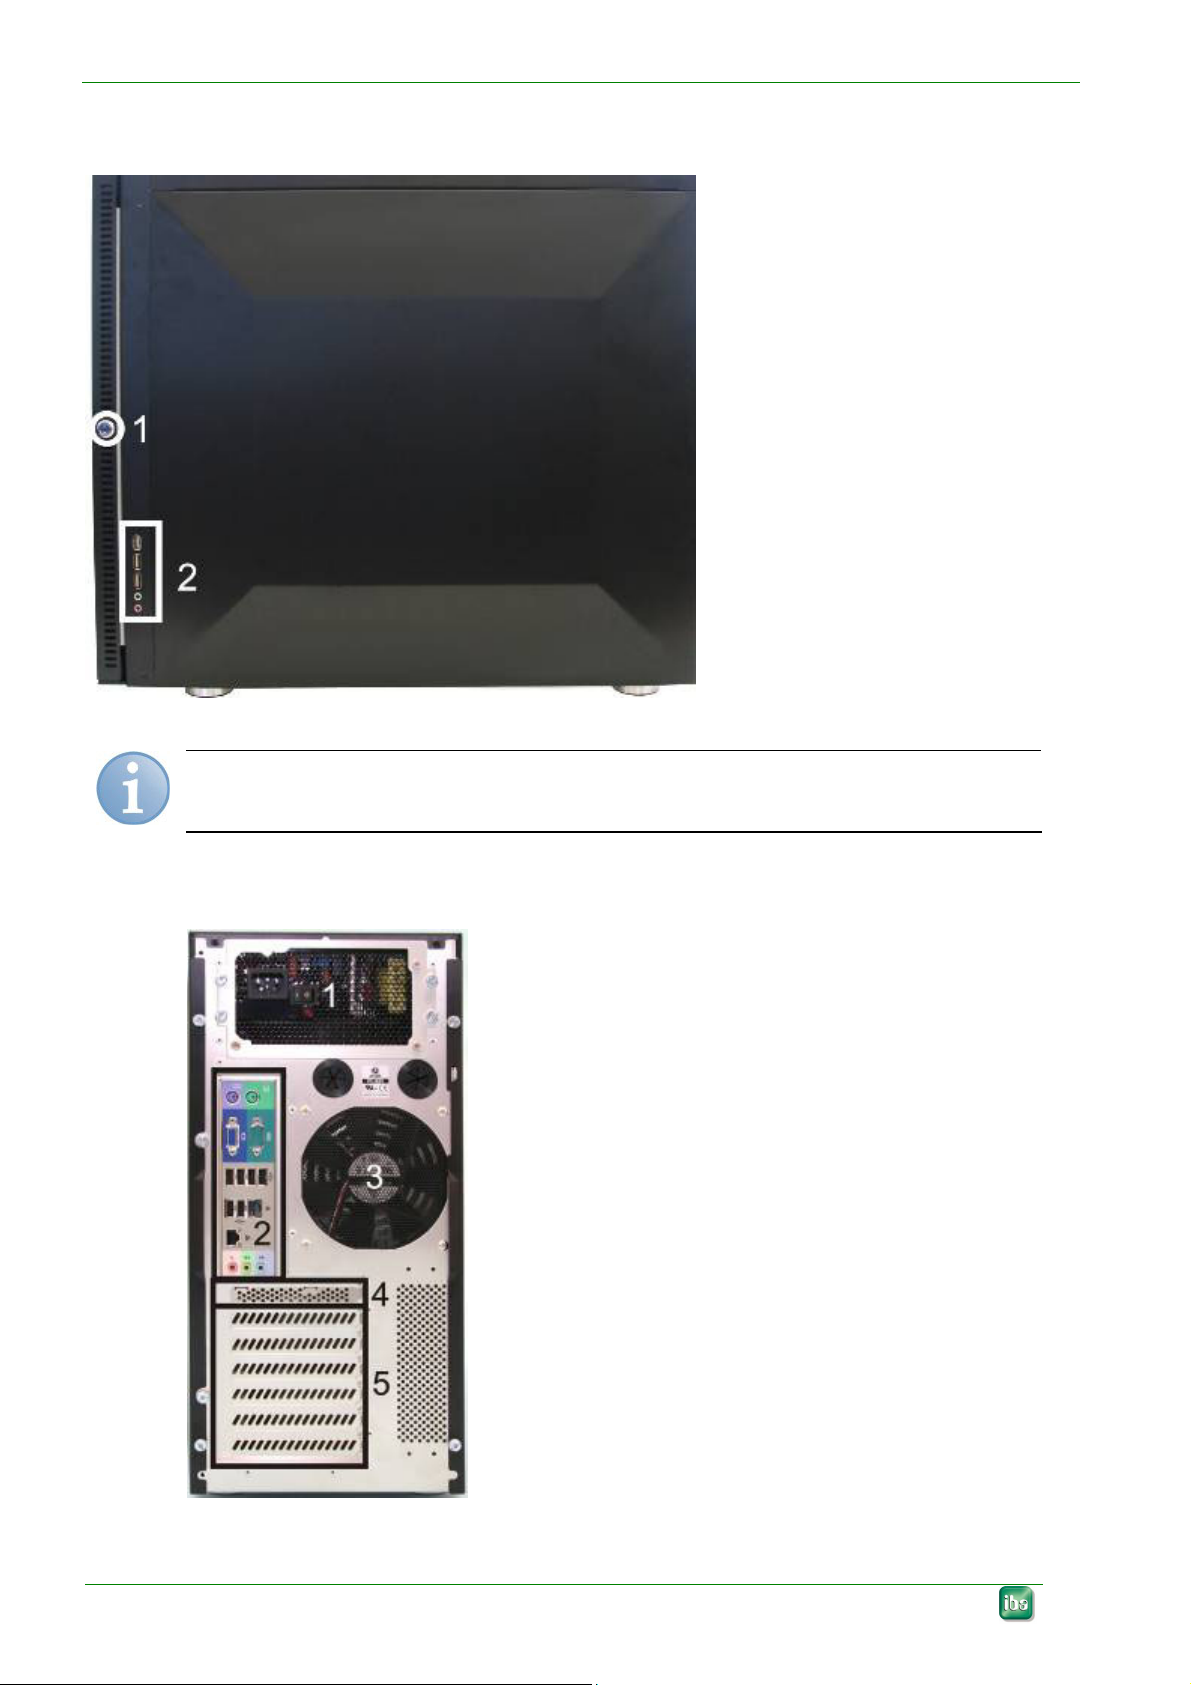
4.2 Side view......................................................................................................... 10
4.3 Rear view ........................................................................................................ 10
4.4 Internal view.................................................................................................... 11
5Setup................................................................................................................12
5.1 Installation....................................................................................................... 12
5.2 Connection...................................................................................................... 13
5.3 Installation of measuring or additional boards................................................. 13
5.3.1 Safety instructions........................................................................................... 13
5.3.2 Notes............................................................................................................... 14
5.3.3 Basic procedure .............................................................................................. 14
5.3.4 Installing special graphic card......................................................................... 14
6Installing operating system and iba software...............................................16
6.1 Installing Windows XP with the Recovery DVD .............................................. 16
6.1.1 First Steps ....................................................................................................... 16
6.1.2 Selecting drive ................................................................................................ 16
6.1.3 Selecting partitions.......................................................................................... 17
6.1.4 Specifying settings .......................................................................................... 18
6.1.5 Activating Windows operating system............................................................. 18
6.2 Installing Windows 7 or Windows 2008 Server with the Recovery DVD........ 18
6.2.1 General ........................................................................................................... 18
6.2.2 Select the language ........................................................................................ 19
6.2.3 Enter the product key...................................................................................... 19
6.2.4 Partitioning ...................................................................................................... 20
6.2.5 Completing installation.................................................................................... 24
6.3 Installing ibaSoftware ...................................................................................... 24
7Device and installation dimensions ..............................................................25
8Technical data .................................................................................................26
8.1 Main data ........................................................................................................ 26
8.2 Order numbers................................................................................................ 27

ibaOfficeline SAS Manual
Issue 1.4 5
1 About this manual
This manual describes operation of the industrial PC ibaOfficeline SAS.
1.1 Target group
This manual addresses in particular the qualified professionals who are familiar with han-
dling electrical and electronic modules as well as communication and measurement tech-
nology. A person is regarded to as professional if he/she is capable of assessing safety
and recognizing possible consequences and risks on the basis of his/her specialist train-
ing, knowledge and experience and knowledge of the standard regulations.
1.2 Designations
The following designations are used in this manual:
Action Designations
Menu command Menu „Logic diagram“
Call of menu command „Step 1 – Step 2 – Step 3 – Step x”
Example:
Select menu „Logic diagram – Add – New logic
diagram ”
Keys <Key name>
Example: <Alt>; <F1>
Press keys simultaneously <Key name> + <Key name>
Example:
<Alt> + <Ctrl>
Buttons <Button name>
Example:
<OK>; <Cancel>
File names, Paths „File name“, „Path”
Example:
„Test.doc“

Manual ibaOfficeline SAS
1.3 Symbols used
If safety instructions or other information are used in this manual, they mean:
6 Issue 1.4
The non-observance of this safety information may result in an imminent risk of death o
r
severe injury:
- By an electric shock!
- Due to the improper handling of iba software products which are coupled to input and out-
put procedures with control function!
If you do not observe the safety instructions regarding the process and the system or ma-
chine to be controlled, there is a risk of death or severe injury!
The non-observance of this safety information may result in a potential risk of death o
r
severe injury!
The non-observance of this safety information may result in a potential risk of injury or
material damage!
Note
An information indicates special requirements or actions to be observed.
Important Note
Information that a special indication has to be observed, e.g. exceptions from the general
rule.
Tip
Tip or example which serves as helpful information or a trick to facilitate the work.
Other documentation
Reference to supplementary documentation or further literature.

ibaOfficeline SAS Manual
Issue 1.4 7
2 Scope of delivery
After unpacking check the completeness and intactness of the delivery.
The scope of delivery includes:
Industrial PC ibaOfficeline SAS
PS2 keyboard
Mouse (USB/PS2), optical
Mains cable
Documentation
For installed special graphic card there is an additional DVI/VGA adapter cable
ibaSoftware license key
The documentation contains:
Manual
Subcontractors' documentation
Software (Operating system Windows XP or Windows 7 or Windows 2008 Server)
Recovery DVD (for the ordered Windows version and all associated operating sys-
tem parameters)
ibaSoftware, optional order
Hardware driver (motherboard, VGA card)
1 key is inserted in the device lock or fastened on the enclosure
1 ibaSoftware license key (dongle), optional with ibaSoftware product and inserted
on request of the client
Serial number (iba-S/N)

Manual ibaOfficeline SAS
8 Issue 1.4
3 Safety instructions
Designated use
The device may be used only for the following applications:
Machine test and commissioning of industrial systems
Measurement data logging and analysis
Applications of ibaSoftware products (ibaPDA, ibaLogic etc.)
Proper installation
The device can be installed only according to manufacturer's specifications:
Stationary
Shock-free
In the protected room, for example switch cabinet
Dust-free and dry environment
Electric Shock!
Before opening the device disconnect it from the mains and pull out the mains plug from
the socket equipped with earthing contact!
Never use the device with a damaged mains cable!
Before opening the device disconnect it from the mains by unplugging the cable from
the socket equipped with an earthing contact and wait for several minutes until the
components have cooled down! Thus you will avoid injuries due to electric shock or
burns!
Connect the device to one supply voltage only according to specifications on the built-
in power supply unit!
Always use a socket equipped with earthing contact! Use a terminal strip with over-
voltage protection or an uninterruptible power supply (UPS)!
Connect the device only to earthed power networks (TN-networks according to VDE
0100 Part 300 or IEC 60364-3)! The operation via ungrounded networks or networks
(IT networks) earthed via impedance is not permitted!
In case of fault, a defective device or a possible defect pull out the mains plug from the
socket equipped with earthing contact!
Never put a damaged device into operation!
Pay attention to sharp edges in the housing!
Never switch off the device at the mains switch without previous shutdown of the device.
Electrostatic discharge!
Touch the components only in electrostatically discharged state!

ibaOfficeline SAS Manual
4 Description
4.1 Front view
1 Optical drive with integrated
writing function
2 Plug-in slots for hard disks
3 Indication of hard disk
access/ready for operation
(LEDs)
4 Multi-card reader with
USB interface
5 Power button
6 Reset button
7 Fan unit
(2 x Ø 12 cm fan)
Issue 1.4 9

Manual ibaOfficeline SAS
4.2 Side view
1 Door lock
2 Connections, external devices
10 Issue 1.4
Note
The FireWire connection is not assigned.
4.3 Rear view
1 Power supply
2 Connections, external devices
3 Fan Ø 12 cm
4 Hard disk controller
5 Slots for cards

ibaOfficeline SAS Manual
4.4 Internal view
1 Optical drive with integrated
writing function
2 Plug-in slots for hard disks
3 Fan Ø 12 cm
4 Fan Ø 12 cm
5 Power supply
6 Fan Ø 12 cm
7 Fan /CPU fan
8 Hard disk controller SAS
9 Slots for cards
10USB connection for ibaSoft-
ware license key (dongle) etc.
Note
On delivery of the device the ibaSoftware license key is in the documentation or on client's
request plugged-in in the device.
Issue 1.4 11

Manual ibaOfficeline SAS
5 Setup
5.1 Installation
12 Issue 1.4
Place the device only in the location which has the following properties:
- Stationary
- Shock-free
- In the protected room, for example switch cabinet
- Dust-free and dry environment
- Even and non-slip support
Note
If you embed the device, observe the minimum bending radii of the cables and lines.
The mounting clearance must be at least 150 mm from the rear wall.
Do not cover the lateral ventilation slots in the door, ensure sufficient air circulation.

ibaOfficeline SAS Manual
5.2 Connection
Electric Shock!
Never use the device with a damaged mains cable!
Connect the device to one supply voltage only according to specifications on the built-
in power supply unit!
Always use a socket equipped with earthing contact! Use a terminal strip with over-
voltage protection or an uninterruptible power supply (UPS)!
Connect the device only to earthed power networks (TN-networks according to VDE
0100 Part 300 or IEC 60364-3)!
The operation via ungrounded networks or networks (IT networks) earthed via imped-
ance is not permitted!
Never put a damaged device into operation!
Protect the device and the connected devices and data lines against overvoltage! Con-
nect the device to an overvoltage protection device!
5.3 Installation of measuring or additional boards
5.3.1 Safety instructions
Electric Shock!
Shut down the device! Before opening the device disconnect it from the mains and pull
out the mains plug from the socket equipped with earthing contact!
Before opening the device disconnect it from the mains by unplugging the cable from
the socket equipped with an earthing contact and wait for several minutes until the
components have cooled down! Thus you will avoid injuries due to electric shock or
burns!
Pay attention to sharp edges in the housing!
Electrostatic discharge!
Touch the components only in electrostatically discharged state!
Issue 1.4 13

Manual ibaOfficeline SAS
5.3.2 Notes
14 Issue 1.4
Note
If you upgrade the device, observe the instructions in the subcontractors' documenta-
tion.
Back up all data on an external storage medium.
5.3.3 Basic procedure
If you carry out any work at the device, always proceed in the following way:
1. Remove all mobile data carriers (DVD, memory cards and so on).
2. Shut down the device.
3. Switch off the device.
4. Unplug the mains cable from the socket equipped with earthing contact.
5. Remove the side cover.
6. Carry out upgrade operations.
7. Finally, attach the side cover.
8. Put the device into operation again.
5.3.4 Installing special graphic card
Note
If you want to use the 2nd monitor, it is necessary to install an additional special
graphic card. The special graphic card has the iba order number 43.900.511. The
DVI/VGA adapter cable is included into the graphic card scope of delivery.
For installation observe the instructions of the graphic card manufacturer.
For the special graphic card there is a slot with PCI Express x4-plug reserved
(slot 3).
1 Hard disk controller, installed perma-
nently
2 PCI slot
3 PCI Express x4,
optional special graphic card
4 PCI slot
5 PCI slot
6 PCI slot
7 PCI slot

ibaOfficeline SAS Manual
Special graphic card
Chip set: NVIDIA Quadro NVS 290 x1
nView Enabled: Yes
Bus Interface: PCI Express x1
Max Displays/Board: 2
Power:
Monitor port:
21 W
DMS-59
DVI adapter cable
VGA adapter cable
Issue 1.4 15

Manual ibaOfficeline SAS
6 Installing operating system and iba software
The delivery includes the Recovery DVD for the operating system stated in your order. If
you want to install Windows XP continue with chapter 6.1, if you want to install Windows 7
or Windows 2008 Server continue with chapter 6.2.
16 Issue 1.4
Note
If you install the operating system using the Recovery DVD, all settings and configura-
tions of the device hardware (e.g. drivers) will be installed.
Do not change the basic configuration of the device components
(e.g. motherboard)!
If you modify the device components, it can make installation using the Recovery DVD im-
possible.
6.1 Installing Windows XP with the Recovery DVD
6.1.1 First Steps
1. Switch on the device.
2. Boot the BIOS setup.
3. Insert the Recovery-DVD into the DVD-Drive.
4. Make sure the AHCI-Mode is disabled (Supermicro C2SBC-Q Main-Screen).
5. Make sure the DVD-Drive is in the Boot-Order before the RAID-Controller
(Supermicro C2SBC-Q Boot-Screen).
6. Save the settings.
7. Finish the BIOS setup.
6.1.2 Selecting drive
The "Select Image File" dialog is activated automatically.

ibaOfficeline SAS Manual
1. To select the installed image files click <Browse>.
The "Open Image File" window appears.
2. Select the drive where the image file is saved from the "Drives" selection list.
The image (PQI file) is delivered with the Recovery DVD.
3. If the PQI file is not on the Recovery DVD, specify the directory in which the PQI file
(image) is saved.
4. Select the directory.
The PQI files are listed in the "File Name" list.
5. Click the PQI file you would like to use.
Save the settings with <OK>.
The window is closed.
In the "Image File" input field the selected image is entered with the designation of
the drive and directory.
6. If after saving a dialog box is displayed prompting you to insert the last medium of
the image set, confirm the dialog with <OK>.
7. Close the dialog. Click <Next>.
6.1.3 Selecting partitions
1. Select in the "Select Destination Partition or Unallocated Space" dialog the partition
which you would like to recover.
2. Select in the "Select Image File Partition" dialog the partitions that should be loaded
to the hard disk.
2 partitions are possible:
System: system partition with Windows
Data Files: empty data partition
To distinguish the system data from the measurement data logically, iba recom-
mends you to select both partitions.
3. Close the dialog using <Next>.
4. Select in the „Selection Destination Partition or Unallocated Space“ dialog the des-
tination partition or the hard disk.
5. Click the corresponding disk with the mouse.
Issue 1.4 17

Manual ibaOfficeline SAS
18 Issue 1.4
6. If you have installed a new unformatted hard disk, select it and click <Next>. If the
hard disk is larger than the partition which you want to recover, the "Resize Option"
dialog will be displayed.
7. Select the "Leave remaining unused space" option.
8. Finally click <OK>.
9. If you want to recover an existing system, first of all delete the defective partition.
10. Click „Delete Disk Partitions…“.
11. Select in the "Delete partitions" dialog the partition you want to delete.
12. Click <Delete>.
13. Confirm in the following dialog using <OK>.
14. Finally confirm using <Close>.
The „Selection Destination Partition or Unallocated Space“ dialog is displayed.
15. Select the free memory location and confirm by means of <NEXT>.
6.1.4 Specifying settings
1. Select in the "Select Disc Write Mode" dialog the option "Fast Mode" and confirm
using <Next>.
The dialog "Ready to Restore Image File" displays an overview of settings for in-
stallation of the Windows XP operating system.
2. Check the settings and then click <Finish>. The recovery process is started auto-
matically.
6.1.5 Activating Windows operating system
1. Restart the PC.
2. Activate Windows operating system after the restart again.
Follow the instructions of the dialog boxes. For further information refer to the short
instruction of Windows XP.
6.2 Installing Windows 7 or Windows 2008 Server with the
Recovery DVD
6.2.1 General
If you install the operating system from the Recovery DVD, the computer must be
started from the DVD. Make sure, that the required settings in the BIOS are correct.
When „PRESS ANY KEY TO BOOT FROM DVD“ appears on the screen, press any
key.
The recovery procedure is only available in English.
The setup routine of Microsoft is used.
When the recovery procedure is finished, update your Windows version to have the
latest safety related version.
6 pre-installed languages can be chosen as system language: English, French,
German, Italian, Spanish, Russian (additional languages optionally).

ibaOfficeline SAS Manual
Note
No liability is assumed for the loss of data due to incorrect handling. Always make sure, that
you select the correct drives and partitions.
6.2.2 Select the language
When the installation has started, you can select the sytem language to be installed. When
using Windows 7 or Windows 2008 Server the language can be changed subsequently.
6.2.3 Enter the product key
(only with Windows 2008 Server)
Here you can enter optionally the product key. The product key can be changed subse-
quently.
If you do not enter the product key, you will be asked to confirm.
Issue 1.4 19

Manual ibaOfficeline SAS
20 Issue 1.4
Confirm with <No>.
6.2.4 Partitioning
There are several possibilities to set up partitions:
Set up a new drive completey as system drive
Set up partitions on a new drive
Install an operating system on a drive already used (Windows 7 or Windows 2008
Server)
Substitute the operating system on a drive already used (substitute Windows 7 with
Windows 2008 Server or vice versa)
Possibility 1: New drive
You use a new drive and want to use it completely as system drive.
Click <Next> and continue with chapter 6.2.5 „Completing installation“.
Table of contents
Other IBA Desktop manuals