iCES ISCR-51 User manual

ISCR-51
ICES

Het volgend label werd op de eenheid aangebracht om de juiste procedure aan te geven om met de
laserstraal te werken.
OM BRAND OF GEVAAR VAN EEN ELEKTRISCHE SCHOK TE VERMIJDEN, HET APPARAAT NIET AAN
REGEN OF VOCHT BLOOTSTELLEN
WAARSCHUWING
NL-1
WAARSCHUWING: NIET OPENEN, GEVAAR VAN ELEKTRISCHE SCHOK
RISICO VAN EEN ELEKTRISCHE SCHOK
NIET OPENEN
OPGELET
SYMBOOL VAN EEN BLIKSEMFLITS MET PIJL
in een gelijkbenige driehoek is bedoeld om de
gebruiker te wijzen op de aanwezigheid van een
niet geïsoleerde gevaarlijke spanning binnenin
het product die voldoende krachtig is om een
elektrische schok bij een persoon te kunnen
veroorzaken.
HET UITROEPTEKEN binnen een gelijkbenige
driehoek is bedoeld om de gebruiker erop te
wijzen dat een specifieke component om
veiligheidsredenen enkel vervangen mag worden
door de component die gespecificeerd is in de
documentatie.
LABEL LASERPRODUCT VAN KLASSE 1
Dit label is op de afgebeelde plaats aangebracht om te
informeren dat het apparaat een lasercomponent bevat.
WAARSCHUWINGSLABEL BETREFFENDE DE STRALING:
Dit label wordt binnenin de eenheid aangebracht. Zoals op
de afbeelding getoond wordt. Om te waarschuwing tegen
verdere ingrepen aan de eenheid. Het apparaat bevat een
lasercomponent die laserstraling uitzendt volgens de limiet
van een laserproduct van klasse 1.
CLASS 1 LASER PRODUCT
KLASS 1 LASER APPARAT
LUOKEN 1 LAISERLAITE
KLASSE 1 LASER PRODUKT

VOEDINGSBRONNEN
naar wisselstroomingang naar stopcontact
Plaats 6 x R14/UM-2 batterijen in het batterijvak.
WISSELSTROOM
U kunt uw draagbare systeem van stroom voorzien door het verwijderbare elektriciteitssnoer aan te sluiten op
de wisselstroomingang aan de achterkant van het apparaat, en de stekker in het stopcontact te steken.
Controleer dat het spanningniveau van uw apparaat overeenkomt met uw plaatselijke spanningsniveau.
Controleer dat het elektriciteitssnoer volledig in de ingang op het apparaat gestoken is.
BATTERIJEN
Plaats 6 x R14/UM-2 batterijen in het batterijvak. Controleer dat de batterijen juist geplaatst zijn, om schade
aan het apparaat te voorkomen. Verwijder de batterijen altijd wanneer u het apparaat lange tijd niet gebruikt,
anders kunnen de batterijen gaan lekken en uw apparaat beschadigen.
NL-2

Opmerkingen:
-Gebruik batterijen van hetzelfde type. Gebruik nooit verschillende typen batterijen door elkaar.
-Ontkoppel het elektriciteitssnoer om het apparaat op batterijen te kunnen gebruiken.
LOCATIE VAN BEDIENINGSELEMENTEN
( )
)
)
(
(
)
( )
)
( )
–
)
(CASSETTEKLEP)
FM ANTENNA (FM ANTENNE )
TUNING CONTROL
VOLUMESELECTIE
CD DORR (CD KLEP
BAND SELECTOR (BANDKEUZE)
OPEN/CLOSE (OPEN/SLUIT)
DIAL POINTER (RADIOSCHAAL)
FUNCTION SELECTOR
(FUNCTIEKEUZE)
VOLUME CONTROL
VOLUMESELECTIE
TAPE BUTTONS CASSETTE BEDIENINGSKNOPPEN PAUSE (PAUZE), STOP / EJECT (STOP / UITWERPEN), FAST
FORWARD (SNEL VOORUITSPOELEN), REWIND (TERUGSPOELEN), PLAY (AFSPELEN), RECORD (OPNEMEN)
LED DISPLAY (LED-SCHERM)
FM STEREO INDICATOR (FM STEREO
INDICATIELAMPJE
POWER INDICATOR (STROOM
INDICATIELAMPJE)
STOP
REPEAT (HERHALEN)
SKIP + (VOLGENDE NUMMER)
SKIP – (VORIGE
NUMMER
PLAY/ PAUSE AFSPELEN / PAUZE
PROGRAM PROGRAMMEREN
CASSETTE DOOR
NL-3

BEDIENING RADIO
ALGEMENE BEDIENING
1. Zet de “FUNCTIE" schakelaar op de "RADIO” stand.
2. Selecteer de gewenste frequentieband door middel van de “BAND” schakelaar.
3. Stem de radiofrequentie af op de gewenste zender door middel van de "AFSTEM" knop.
4. Zet de “VOLUME” knop op het gewenste geluidsniveau.
ONTVANGST VAN FM /FM-STEREO
- Zet de “BAND” schakelaar op de FM-stand voor MONO-ontvangst.
-Zet de “BAND” schakelaar op de FM ST-stand voor FM STEREO-ontvangst. De stereo-indicator licht op
om de FM ST-stand aan te geven.
VOOR EEN BETERE ONTVANGST
- Draai de antenne voor een betere ontvangst.
- Draai het apparaat in zijn geheel voor een betereAM-ontvangst.
NL-4

BEDIENING CASSETTERECORDER
ALGEMENE BEDIENING
AFSPELEN
ONDERBREKEN
STOP/UITWERPEN
VOORUITSPOELEN
&
TERUGSPOELEN
OPNEMEN/AFSPELEN
Druk op deze toets om de cassette af te spelen.
Druk op deze toets om de weergave tijdelijk te onderbreken.
Druk weer op de toets om de weergave te hervatten.
Druk op deze toets om de cassette te stoppen.
Druk weer op deze toets om de deur van de cassetterecorder te openen nadat de
spoelen van de cassetterecorder gestopt zijn met draaien.
Druk op deze toetsen om het cassettebandje vooruit of terug te spoelen.
Druk deze toets tegelijk met de "AFSPELEN” toets in om de opname te starten. /
Druk op deze toets om de cassette af te spelen.
WEERGAVE
1. Zet de “FUNCTIE" schakelaar op de "CASSETTE” stand.
2. Druk op de “STOP/UITWERPEN” toets om de deur van de cassetterecorder te openen en uw bandje erin
te plaatsen.
3. Sluit de deur.
4. Druk op de “AFSPELEN” toets om de cassette af te spelen.
5. Zet de “VOLUME” knop op het gewenste geluidsniveau.
6. Druk op de “ONDERBREKEN” toets wanneer u de weergave tijdelijk wilt onderbreken.
7. Druk op de "STOP/UITWERPEN” toets wanneer het cassettebandje afgelopen is.
OPNAME
1. Druk op de “STOP/UITWERPEN” toets om de deur van de cassetterecorder te openen en plaats een leeg
bandje.
2. Kies de bron waarvan u wilt opnemen.
Om van de radio op te nemen - Zet de “FUNCTIE” schakelaar op de “RADIO” stand en stem af op de
gewenste zender.
Om op te nemen van CD / MP3 - Plaats een schijf in het CD-compartement. Zet de “FUNCTIE” schakelaar
op de “CD / MP3” stand en kies de gewenste track.
3. Druk de “OPNAME” toets tegelijk met de "AFSPELEN” toets in om de opname te starten.
4. Druk op de "STOP/UITWERPEN” toets wanneer u het opnemen wilt beëindigen.
BEDIENING CD-SPELER
ALGEMENE BEDIENING
NL-5

AFSPELEN /
ONDERBREKEN
OVERSLAAN + &
OVERSLAAN -
STOP
Druk op deze toets om de CD-schijf af te spelen.
Druk weer op deze toets om de weergave tijdelijk te onderbreken.
Druk weer op deze toets om de weergave te hervatten.
Druk op deze toetsen om naar de volgende of de vorige track te gaan.
Houd de toets ingedrukt tijdens de weergave totdat u het gewenste punt gevonden
heeft.
Druk op deze toets om CD-weergave te stoppen.
NL-6

WEERGAVE
1. Zet de “FUNCTIE" schakelaar op de "CD” stand.
2. Open het CD-compartement en plaats een CD-schijf met het etiket omhoog.
3. Sluit het CD-compartement.
4. Het apparaat doorzoekt de schijf wanneer deze in het compartement geplaatst is. Het totale aantal tracks
wordt afgelezen en verschijnt op het scherm.
5. Druk op de “AFSPELEN/ONDERBREKEN” toets om de CD af te spelen.
6. Zet de “VOLUME” knop op het gewenste geluidsniveau.
7. Druk weer op de “AFSPELEN/ONDERBREKEN” toets wanneer u de weergave tijdelijk wilt onderbreken.
8. Druk op de "STOP” toets wanneer u het opnemen wilt beëindigen.
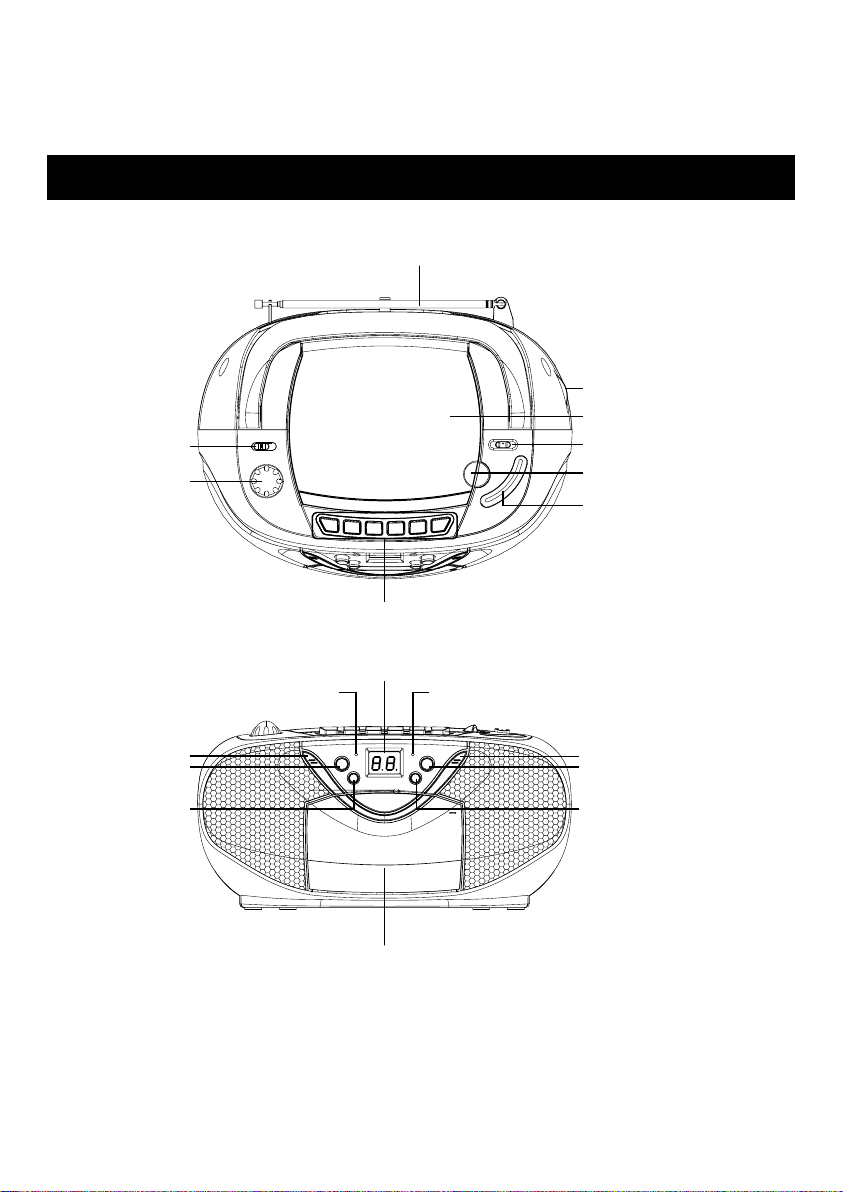
BEDIENING CD-SPELER
PROGRAMMEREN
Er kunnen maximaal 20 tracks in elke gewenste volgorde geprogrammeerd worden.
Druk op de “STOP” toets voordat u deze functie gebruikt.
1. Druk op de “PROGRAMMEREN” toets, op het scherm verschijnt de knipperende aanduiding “01”.
2. Selecteer de gewenste track door middel van de “OVERSLAAN +” of "OVERSLAAN -" toets.
3. Druk weer op de "PROGRAMMEREN" toets om de gewenste track op te slaan in het
programmageheugen.
4. Herhaal de stappen 2 en 3 om meer tracks in het programmageheugen op te slaan.
5. Wanneer alle gewenste tracks geprogrammeerd zijn, drukt u op de “AFSPELEN/ONDERBREKEN” toets
om de schijf af te spelen in de geprogrammeerde volgorde. De programma-indicator knippert.
6. Druk twee keer op de “STOP” toets om de geprogrammeerde weergave te beëindigen, en de
programma-indicator verdwijnt.
HERHALEN
Druk voor de weergave of tijdens de weergave van een CD op de “HERHALEN” toets. U kunt een enkele track
of alle tracks herhalen.
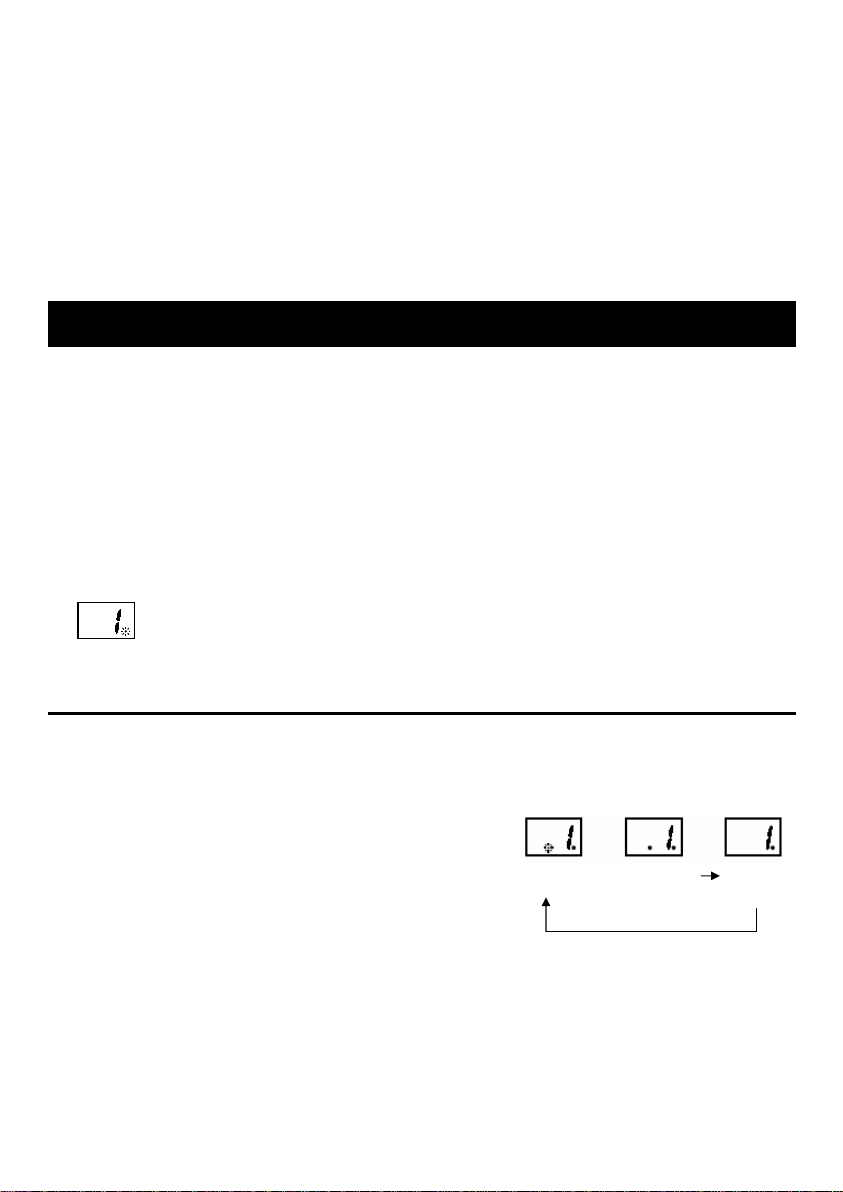
Elke keer dat u op de toets drukt verandert de herhaalstand:
1 - HERHAAL 1 (De herhaalindicator knippert.)
2 - HERHAALALLES (De herhaalindicator blijft branden.)
NORMALE
WEERGAVE
HERHAAL
ALLES
3 - NORMALE WEERGAVE
NL-7

Aanwijzingen inzake de milieubescherming
Dit product mag aan het einde van zijn levensduur niet samen met het normale
huishoudelijke afval verwijderd worden, maar moet afgegeven worden op een
verzamelpunt voor de recycling van elektrische en elektronische apparatuur. Het
symbool op het product, in de gebruiksaanwijzing of op de verpakking maakt u daarop
attent.
De werkstoffen zijn volgens hun kenmerking herbruikbaar. Met het hergebruik, de stoffelijke
verwerking of andere vormen van recycling van oude apparaten levert u een belangrijke
bijdrage tot de bescherming van ons milieu.
Gelieve bij het gemeentebestuur informatie te vragen over het bevoegde verzamelpunt.
Stroomvoorziening: AC 230V ~ 50Hz
DC 9V (6 x UM-2) (Batterijen niet inbegrepen)
Radiogedeelte
Frequentiebereik: AM: 540 – 1600 KHz
FM: 88-108 MHz
NL-8
TECHNISCHE KENMERKEN

ISCR-51
ICES

The following label has been affixed to the unit, listing the proper procedure for working with the
laser beam:
TO PREVENT FIRE OR SHOCK HAZARD DO NOT EXPOSE THIS APPLIANCE TO RAIN OR MOISTURE.
WARNING
GB-1
WARNING: SHOCK HAZARD DO NOT OPEN
RISK OF ELECTRIC SHOCK
DO NOT OPEN
CAUTION
LIGHTING FLASH WITH ARROWHEAD SYMBOL-
Within an equilateral triangle, is intended to alert
the user to the presence of uninsulated
dangerous voltage within the products enclosure
that may be of sufficient magnitude to consti-
tuted a risk of electric shock to persons.
EXCLAMATION POINT- within an equilateral
triangle, is used to indicate that a specific
component shall be replaced only by the
component specified in that documentation for
safety reason.
CLASS 1 LASER PRODUCT LABEL-
This label is attached to the place as illustrated to inform
that the apparatus contains a laser component.
WARNING LABEL INFORMING OF RADIATION:
This label is placed inside the unit. As shown in the
illustration. To warn against further measures on the unit.
The equipment contains a laser radiating laser rays according
to the limit of laser product of class 1.
CLASS 1 LASER PRODUCT
KLASS 1 LASER APPARAT
LUOKEN 1 LAISERLAITE
KLASSE 1 LASER PRODUKT

BATTERY POWER
Insert 6 x “C” size batteries into the battery compartment. Be sure that the batteries are inserted
correctly to avoid damage to the appliance. Always remove the batteries when appliance will not be
used for a long period of time, as this will cause leakage to the batteries and subsequently damage
to your set.
Notes:
- Use batteries of the same type. Never use different types of batteries together.
- To use the appliance with batteries, disconnect the AC power cord from it.
POWER SOURCES
GB-2
AC POWER
You can power your portable system by plugging the detachable AC power cord into the AC inlet at
the back of the unit and into a wall AC power outlet. Check that the rated voltage of your appliance
matches your local voltage. Make sure that the AC power cord is fully inserted into the appliance.
Insert 6 x “C” size batteries
into the battery compartment
to AC IN to a wall outlet

LOCATION OF CONTROL
GB-3
DIAL PIONTER
PLAY / PAUSE
SKIP -
REPEAT
STOP
SKIP +
PROGRAM
BAND SELECTOR
CD DOOR
FM ANTENNA
TUNING
CONTROL
OPEN / CLOSE
CASSETTE DOOR
TAPE BUTTONS - PAUSE, STOP / EJECT, FAST FORWARD, REWIND, PLAY, RECORD
LED DISPLAY
FM STEREO INDICATORPOWER INDICATOR
FUNCTION
SELECTOR
VOLUME
CONTROL

GENERAL OPERATION
1. Set the “FUNCTION” selector to “RADIO” mode.
2. Select desired band by using the “BAND” selector.
3. Adjust radio frequency to your desired station by using the “TUNING” control.
4. Adjust the “VOLUME” control to the desired level.
FM / FM-STEREO RECEPTION
- Set the “BAND” selector to FM mode for MONO reception.
- Set the “BAND” selector to FM ST. mode for FM STEREO reception. The Stereo indicator light up
to show FM ST. mode.
RADIO OPERATION
GB-4
FOR BETTER RECEPTION
- Reorient the antenna for better reception.
- Reorient the appliance to get better AM reception.

TAPE OPERATION
GB-5
GENERAL OPERATION
PAUSE Press to stop playing tape operation temporarily.
Press again to resume tape operation.
STOP / EJECT Press to stop tape operations.
Press again to open the cassette door after the tape spools stop turning.
FAST FORWARD & Press to start rapid tape winding either forward or reverse direction.
REWIND
PLAY Press to start playing tape.
RECORD Press it together with “PLAY” button to start recording.
PLAYBACK
1. Set the “FUNCTION” selector to “TAPE” mode.
2. Press the “STOP / EJECT” button to open the cassette door and insert your tape.
3. Close the cassette door.
4. Press the “PLAY” button to start playing tape.
5. Adjust the “VOLUME” control to the desired level.
6. Press the “PAUSE” button when you want to stop playing tape operation temporarily.
7. Press the “STOP / EJECT” button when finished.
RECORDING
1. Press the “STOP / EJECT” button to open the cassette door and insert a blank tape.
2. Select the source you want to record.
To record from radio - Set the “FUNCTION” selector to “RADIO” mode and adjust the desired station.
To record from CD / MP3 - Place a disc on the CD compartment. Set the “FUNCTION” selector to
“CD / MP3” mode and select the desired track.
3. Press the “RECORD” button together with the “PLAY” button to start recording.
4. Press the “STOP / EJECT” button when finished.

CD OPERATION
GB-6
GENERAL OPERATION
PLAY / PAUSE Press to start playing CD disc.
Press again to stop playing CD operation temporarily.
Press again to resume playback.
SKIP + & Press to go to the next track or back to the previous track.
SKIP - Press and hold while playing until you find the point of the sound.
STOP Press to stop all CD operation.
PLAYBACK
1. Set the “FUNCTION” selector to “CD” mode.
2. Open the CD door and place a CD disc with the label up in the CD compartment.
3. Close the CD door.
4. Focus search is performed if disc is inside. Total number of tracks is read and appears on the display.
5. Press the “PLAY / PAUSE” button to start playing CD disc.
6. Adjust the “VOLUME” control to the desired level.
7. Press the “PLAY / PAUSE” button again when you want to stop playback temporarily.
8. Press the “STOP” button when finished.

REPEAT
Press the “REPEAT” button before or during playing CD, a single track or all the tracks can be repeated.
Each press switches the repeat mode as follows:
1 - REPEAT 1 ( The repeat indicator is flashing. )
2 - REPEAT ALL ( The repeat indicator is steadily on. )
3 - NORMAL PLAYBACK REPEAT 1 REPEAT ALL NORMAL
PLAYBACK
CD OPERATION
GB-7
PROGRAM
Up to 20 tracks can be programmed for disc play in any order.
Be sure to press the “STOP” button before use.
1. Press the “PROGRAM” button, the display will show “01” and flash.
2. Select desired track by using the “SKIP +” or “SKIP -” button.
3. Press the “PROGRAM” button again to confirm desired track into the program memory.
4. Repeat step 2 and 3 to enter additional tracks into the program memory.
5. When all the desired tracks have been programmed. Press the “PLAY / PAUSE” button to play the
disc in the order you have programmed and the program indicator flashes.
6. Press the “STOP” button twice to terminate programmed play and the program indicator will turn off.

Power Supply: AC 230V ~ 50Hz
DC 9V (6 x UM-2) Batteries not included
Radio Section:
Frequency range: AM: 540 – 1600 KHz
FM: 88-108 MHz
GB-8
SPECIFICATION
Instructions on environment protection
Do not dispose of this product in the usual household garbage at the end of
its life cycle; hand it over at a collection point for the recycling of electrical
and electronic appliances. The symbol on the product, the instructions for use or
the packing will inform about the methods for disposal.
The materials are recyclable as mentioned in its marking. By recycling, material
recycling or other forms of re-utilization of old appliances, you are making an
important contribution to protect our environment.
Please inquire at the community administration for the authorized disposal location.

ISCR-51
ICES

Lʼétiquette suivante a été collée sur lʼappareil, indiquant la procédure correcte pour travailler sur le
faisceau laser:
POUR ÉVITER LES RISQUES D'INCENDIE OU D'ÉLECTROCUTION, N'EXPOSEZ PAS CET APPAREIL À LA
PLUIE OU À L'HUMIDITÉ.
ATTENTION
F-1
ATTENTION : DANGER DʼÉLECTROCUTION. NE PAS OUVRIR
RISQUE D'ELECTROCUTION
NE PAS OUVRIR
ATTENTION
L'ECLAIR AVEC LE SYMBOLE DE FLECHE
Dans un triangle équilatéral sert à prévenir
l'utilisateur de la présence d'une tension
dangereuse non isolée à lʼintérieur de lʼappareil,
pouvant être suffisamment importante pour
constituer un risque d'électrocution sur les
personnes.
dans un triangle
équilatéral sert à indiquer quʼun composant
spécifique doit être remplacé uniquement par le
composant spécifié dans ce document, pour des
raisons de sécurité.
ÉTIQUETTE PRODUIT LASER DE CLASSE 1
Cette étiquette est collée comme sur lʼillustration pour
informer que ʻappareil contient un composant laser.
ÉTIQUETTE DE MISE EN GARDE SUR LA RADIATION:
Cette étiquette est placée à lʼintérieur de lʼappareil comme
indiqué sur l'illustration. Pour mettre en garde contre
dʼautres mesures sur lʼappareil. Lʼappareil contient un laser
lançant des rayons laser, conformément à la limite de produit
laser de classe 1.
CLASS 1 LASER PRODUCT
KLASS 1 LASER APPARAT
LUOKEN 1 LAISERLAITE
KLASSE 1 LASER PRODUKT
LE POINT DʼEXCLAMATION
Table of contents
Languages:
Other iCES Portable Stereo System manuals