IDEAL AW 60 User manual

AW 60
Luftwäscher
Air Washer
Laveur d’air
DE Betriebsanleitung
EN Operating Instructions
FR Mode d´emploi
DE Bitte lesen Sie vor Inbetriebnahme des Gerätes unbedingt diese
Betriebsanleitung und beachten Sie die Sicherheitshinweise.
EN Please read and follow all safety rules and instructions in this manual
before operating.
FR Nous vous prions de lire attentivement le mode d’emploi avant d’utiliser la
machine, et attirons votre attention sur les consignes de sécurité.

- 2 -
AW 60
DE Betriebsanleitung (1 - 31)
EN
Operating Instructions
(32 - 61)
FR Mode d´emploi (62 - 92)
DE Sicherheitshinweise 4
Produktinformation
Übersicht und Benennung der Teile 12
Bedieneinheit 13
Installation
Aufstellungsort 14
Inbetriebnahme 15
Bedienung
Betriebsmodi 17
Wartung und Pege 20
Mögliche Störungen 28
Technische Daten 30

- 3 -
1 2
Technology
PlasmaWave technology removes
air pollutants resulting in cleaner,
fresher air.
Mist Humidier
AW 60 generates very ne and
light mist to enhance consistent
humidity level.
IDEAL AW 60 Humidier simultaneously humidies
and cleans the air. Featuring 12 liter per day humidication
capacity and 3-Stage air purication with PlasmaWave Technology.
Model: AW 60
Auto Mode
IDEAL’s sensor detects room
humidity level to control fan speed
and optimize the humidity level.
Sleep Mode
Quietly cleans air pollutants, and
dims indicators to ensure a good
night sleep.
Combination Filter
Compact design blends Carbon and
HEPA technology to capture 99.5% of
airborne pollutants such as dust, pollen,
pet dander, mold spores and other
irritating allergens.
Timer
The automatic Timer indicator is
used to maintain eciency
throughout the lifetime of the product.
Auto Shut-O
Automatically shuts o when the
water bucket is Low.
CleanCel Anti-Bacterial Coating
AW 60 has been treated with
CleanCel antibacterial coating to
prevent growth of bacteria in the
water tank and cleaning discs.
Der IDEAL AW 60 Multifunktions Luftwäscher reinigt und befeuchtet
die Luft zeitgleich. Bis zu 12 Liter Befeuchtungsleistung pro Tag.
Dreistuges Luftreinigungssystem mit PlasmaWave®Technologie.
PlasmaWave®Technologie
PlasmaWave Technologie
entfernt Luftverschmutzungen und
führt zu sauberer, frischer Luft.
Automatik Modus
Der IDEAL Smart Sensor misst die
Raumluftfeuchtigkeit und passt die
Lüftergeschwindigkeit an um die
Luftfeuchtigkeit im optimalen Bereich
(grün, 40-60 % rel. Luftfeuchtigkeit)
zu halten.
Timer
Mithilfe des Timers kann der AW 60
eine voreingestellte Zeit lang
operieren, bis er selbstständig
ausschaltet.
Sleep Modus
AW 60 reduziert die Lüfter-
geschwindigkeit auf die leiseste Stufe
und reduziert die Display-Helligkeit.
Befeuchtung
AW 60 befeuchtet Ihre Luft durch
hygienische Kaltverdunstung an den
Befeuchterscheiben sehr konstant
und zuverlässig.
CleanCel®Antibakterielle
Beschichtung
AW 60 ist mit der antibakteriellen
Beschichtung CleanCel®ausgerüstet
um das Wachstum von Bakterien im
Wasserbehälter und auf den
Befeuchterscheiben zu hemmen.
Automatik Stopp
AW 60 schaltet automatisch ab, wenn
der Wassertank leer ist.
Combilter
Das kompakte Design des Filters vereint
einen HEPA Filter mit einem
Aktivkohlelter um Luftschadstoffe wie
Pollen, Feinstaub, Haustiergeruch,
Schimmelsporen und viele andere
schädliche Stoffe zu ltern.

- 4 -
AW 60
Warnung
43
Follow these instructions to avoid any
risk of personal injury, property damage,
electrical shocks or re hazard.
Failure to follow the safety
instructions can lead to personal
injury or property damage.
Achtung
Warnung PROHIBITED
DO NOT DISASSEMBLE
MUST FOLLOW
Ground connection protecting
from electrical shock
Warning
DON’T unplug the unit by pulling on it’s
power cord.
DON’T touch the plug with wet hands.
DON’T plug multiple power plugs into
an outlet. Plug directly into the wall.
DO connect the power cord to only
proper power outlet with a ground
connection.
DON’T attempt to repair, alter or
disassemble the unit.
DON’T operate the unit if standing
water is present.
DO unplug the unit when not in use to
save on energy consumption.
DON’T plug power cord into loose or
damaged electrical outlet.
(This can lead to overheating or
electrical shock)
DON’T bend or place heavy object on
the power cord.
DON’T replace or modify power cord.
If the power cord/plug is damaged, it must
be replaced by the manufacturer or a
qualied technician.
SAFETY INSTRUCTIONS
Sicherheitshinweise
Befolgen Sie diese Anleitung um das Risiko
von Verletzungen, Eigentums-
beschädigungen, Elektrischem Schlag oder
Feuergefahr zu vermeiden.
Das Nichtbeachten der Sicherheitshinweise
kann zu Verletzungen oder
Eigentumsbeschädigungen führen.
Verboten
Nicht zerlegen
Unbedingt Beachten
Erdung zur Vermeidung
eines elektrischen Schlags
Stecken Sie das Gerät nicht aus indem Sie
am Kabel ziehen.
Knicken Sie das Kabel nie und stellen Sie
keine Gegenstände auf das Kabel.
Fassen Sie das Kabel nie mit nassen
Händen an.
Ersetzen oder manipulieren sie das Kabel
niemals.

- 5 -
Warnung
43
Follow these instructions to avoid any
risk of personal injury, property damage,
electrical shocks or re hazard.
Failure to follow the safety
instructions can lead to personal
injury or property damage.
Achtung
Warnung PROHIBITED
DO NOT DISASSEMBLE
MUST FOLLOW
Ground connection protecting
from electrical shock
Warning
DON’T unplug the unit by pulling on it’s
power cord.
DON’T touch the plug with wet hands.
DON’T plug multiple power plugs into
an outlet. Plug directly into the wall.
DO connect the power cord to only
proper power outlet with a ground
connection.
DON’T attempt to repair, alter or
disassemble the unit.
DON’T operate the unit if standing
water is present.
DO unplug the unit when not in use to
save on energy consumption.
DON’T plug power cord into loose or
damaged electrical outlet.
(This can lead to overheating or
electrical shock)
DON’T bend or place heavy object on
the power cord.
DON’T replace or modify power cord.
If the power cord/plug is damaged, it must
be replaced by the manufacturer or a
qualied technician.
SAFETY INSTRUCTIONS
Nicht über eine Mehrfachsteckdose
anschließen. Stecken Sie das Gerät direkt
in die Wandsteckdose.
Stecken Sie das Gerät aus, wenn es
längere Zeit nicht in Gebrauch sein wird.
Versuchen Sie nicht selbst das Gerät zu
reparieren, zu modizieren oder zu
zerlegen.
Schließen Sie das Gerät nur an einem
ordentlichen, geerdeten
Wandsteckdosen- Anschluss an.
Schließen Sie das Gerät niemals an einem
lockeren oder defekten Stromanschluss an.
(Das kann zu Überhitzung oder Kurzschluss
führen).
Betreiben Sie das Gerät nicht in der Nähe
von offenem Wasser wie z.B. im
Badezimmer.
Warnung
Warnung
SAFETY INSTRUCTIONS
DON’T operate unit on an uneven
surface.
DON’T spray liquids directly into unit.
Attempt to change the bucket and rell
with clean water every day.
DON’T pour water into the top of the
unit, place in water tank as directed.
DON’T place the unit near ammable
material.
(such as gas, aerosols, or benzene)
DON’T place the unit on an unstable
place such as a table or a sink.
DON’T insert ANYTHING into the air
inlet or outlet.
DO unplug the unit and contact your
service dealer if it is sunken under
water.
DON’T place anything around the unit
to allow children to play or sit on.
DON’T remove the water tank if a child
is nearby.
DON’T install the unit in the place full of
high humidity or dust.

- 6 -
AW 60
Warnung
Warnung
SAFETY INSTRUCTIONS
DON’T operate unit on an uneven
surface.
DON’T spray liquids directly into unit.
Attempt to change the bucket and rell
with clean water every day.
DON’T pour water into the top of the
unit, place in water tank as directed.
DON’T place the unit near ammable
material.
(such as gas, aerosols, or benzene)
DON’T place the unit on an unstable
place such as a table or a sink.
DON’T insert ANYTHING into the air
inlet or outlet.
DO unplug the unit and contact your
service dealer if it is sunken under
water.
DON’T place anything around the unit
to allow children to play or sit on.
DON’T remove the water tank if a child
is nearby.
DON’T install the unit in the place full of
high humidity or dust.
Sicherheitshinweise
Betreiben Sie das Gerät nicht auf unebenen
oder rutschigen Oberächen.
Betreiben Sie das Gerät nicht in der Nähe
von entzündlichen Substanzen (z.B. Brenn-
gas, Lösungsmittel, SprühAerosole, …)
Versuchen Sie das Wasser täglich zu
wechseln.
Lassen Sie niemals Wasser direkt auf das
Gerät laufen.
Platzieren Sie das Gerät niemals unstabil
wie z.B. auf einem Tisch oder der Spüle.
Leeren Sie kein Wasser in den Kopf des Gerätes.
Niemals. Nur direkt in die Wasserwanne des
Gerätes leeren, wie vorgesehen.

- 7 -
Warnung
Warnung
SAFETY INSTRUCTIONS
DON’T operate unit on an uneven
surface.
DON’T spray liquids directly into unit.
Attempt to change the bucket and rell
with clean water every day.
DON’T pour water into the top of the
unit, place in water tank as directed.
DON’T place the unit near ammable
material.
(such as gas, aerosols, or benzene)
DON’T place the unit on an unstable
place such as a table or a sink.
DON’T insert ANYTHING into the air
inlet or outlet.
DO unplug the unit and contact your
service dealer if it is sunken under
water.
DON’T place anything around the unit
to allow children to play or sit on.
DON’T remove the water tank if a child
is nearby.
DON’T install the unit in the place full of
high humidity or dust.
Nehmen Sie die Wasserwanne nie aus dem
Gerät wenn Kinder in der Nähe sind.
Stecken Sie das Gerät aus und
kontaktieren Sie ihren Fachhändler wenn
das Gerät abseits der Wasserwanne und
den Befeuchterscheiben in Kontakt mit
Wasser gekommen ist.
Stecken Sie das Gerät aus und
kontaktieren Sie ihren Fachhändler wenn
das Gerät schwimmt oder unter Wasser
geraten ist.
Stecken Sie nichts in den Luftauslass!
Niemals, unter keinen Umständen.
Betreiben Sie das Gerät nie in einer sehr
feuchten oder sehr staubigen Umgebung.
Platzieren Sie keine Gegenstände in der
Nähe des Gerätes, über diese Kinder auf
das Gerät gelangen könnten.

- 8 -
AW 60
Achtung
SAFETY INSTRUCTIONS
DON’T allow children to
play on or near the unit.
DON’T spray ammable
liquids or gases into the
unit.
DON’T use hot water in
the water tank.
DON’T lift the unit by the
top of the unit.
DON’T use ammable
material (such as benzene
or alcohol) to clean the
unit.
DON’T place clothes and
towels on top of unit while
operating.
DON’T spray liquids
directly into unit during
cleaning.
DON’T install the unit
under direct light.
DO clean Antibacterial
disk regularly with warm
tap water and allow to
air dry.
DO use the unit after
assembling the
Antimicrobial Disk.
DO unplug the appliance
during lling and
cleaning.
DON’T insert anything
into the air inlet or outlet.
DON’T place the unit near
a heat source.
DON’T place the unit near
curtains or other materials
that can block the vents of
the unit.
DON’T strike or drop the
unit.
DON’T place hands or any
body parts near the air
outlet during operation.
DO unplug the unit and
contact your service
dealer if any irregular
noise or smoke occurs.
Achtung
Sicherheitshinweise
Nicht während des Betriebs
ausstecken.
Betreiben Sie das Gerät nach
dem Einsetzen der
antimikrobiellen
Befeuchterscheiben.
Halten Sie während des
Betriebs keine Körperteile in die
Nähe des Gerätes.
Ausstecken während der
Wassernachfüllung und
Reinigung.
Stecken Sie nichts in den
Lufteinlass oder Luftauslass.
Platzieren Sie das Gerät nicht
in der Nähe von Vorhängen
oder anderen Materialien die
den Luftstrom des Gerät
blockieren könnten.
Ausstecken und Fachhändler
kontaktieren falls
ungewöhnliche Geräusche oder
Gerüche auftauchen.
Nicht in der Nähe von
Wärmequellen betreiben.
Lassen Sie das Gerät nicht
fallen. Stoßen Sie das Gerät
nicht.

- 9 -
Achtung
SAFETY INSTRUCTIONS
DON’T allow children to
play on or near the unit.
DON’T spray ammable
liquids or gases into the
unit.
DON’T use hot water in
the water tank.
DON’T lift the unit by the
top of the unit.
DON’T use ammable
material (such as benzene
or alcohol) to clean the
unit.
DON’T place clothes and
towels on top of unit while
operating.
DON’T spray liquids
directly into unit during
cleaning.
DON’T install the unit
under direct light.
DO clean Antibacterial
disk regularly with warm
tap water and allow to
air dry.
DO use the unit after
assembling the
Antimicrobial Disk.
DO unplug the appliance
during lling and
cleaning.
DON’T insert anything
into the air inlet or outlet.
DON’T place the unit near
a heat source.
DON’T place the unit near
curtains or other materials
that can block the vents of
the unit.
DON’T strike or drop the
unit.
DON’T place hands or any
body parts near the air
outlet during operation.
DO unplug the unit and
contact your service
dealer if any irregular
noise or smoke occurs.
Achtung
Lassen Sie keine Kinder in die
Nähe des Gerätes.
Sprühen Sie keine
entammbaren Flüssigkeiten
oder Gase in das Gerät.
Platzieren Sie das Gerät nicht
in direktem Sonnenlicht.
Befüllen Sie die Wasserwanne
niemals mit heißem Wasser.
Heben Sie das Gerät nicht am
Kopf hoch.
Legen Sie nichts auf das Gerät.
Reinigen Sie die anti-
bakteriellen Befeuchter-
scheiben regelmäßig mit
lauwarmem Wasser und lassen
Sie diese vollständig trocknen.
Benutzen Sie keine
entammbaren Putzmittel
(z.B Alkohol oder Benzol), um
das Gerät zu reinigen.
Sprühen Sie beim Reinigen
keine Flüssigkeiten direkt in
das Gerät.

- 10 -
AW 60
109
Achtung
SAFETY INSTRUCTIONS
DON’T overll the water
tank.
DO dispose of the water
to prevent it from freezing
in cold weather.
DON’T put the unit near
ceilings, walls, furniture,
or electronic appliances.
DON’T lift the unit with
water still in the water
tank.
DON’T put magnet or
metal material on the top
of the unit.
DO clean the unit
regularly, with a microber
towel or any other clean
wiping material.
DO use clean tap water
without detergent, soap,
chemical compounds or
hot water (over 104 。F).
DO unplug the unit and
move its water tank when
water is removed.
DON’T plug in if the power
plug is touched with water.
DON’T operate the unit
while insecticide is used.
DON’T put the unit near
burning cigarette or
incense.
DON’T allow water to
stay in the water tank fora
long time while not in use.
DON’T operate the unit
while water tank is
damaged.
DON’T drink the water left
in the water tank or give it
to plants or animals.
DON’T put the unit near a
microwave oven or TV.
DON’T install the unit
whose airow outlet is
facing the wall.
After cleaning, allow
Antibacterial Discs, water
tank, and pre-lter to air
dry completely.
Achtung
Sicherheitshinweise
Platzieren Sie das Gerät nicht
nah am Fenster oder nah an
der Wand.
Betreiben Sie das Gerät nicht
parallel zu Insektiziden.
Betreiben Sie das Gerät nicht
direkt an der Zimmerwand oder
der Zimmerdecke.
Betreiben Sie das Gerät nicht
in dichtem Tabakrauch.
Lassen Sei kein Wasser in
der Wasserwanne stehen
wenn Sie das Gerät längere
Zeit nicht betreiben.
Restwasser aus der Wasser-
wanne nicht trinken, keine
Tiere damit tränken und nicht
zum Gießen von Panzen
verwenden.
Lassen Sie den Vorlter, die
Wasserwanne und die
Befeuchterscheiben nach dem
reinigen an der Luft komplett
trocknen.
Betreiben Sie das Gerät nicht
mit einer defekten
Wasserwanne.
Betreiben Sie das Gerät nicht
in der Nähe eines Fernsehers
oder einer Mikrowelle.

- 11 -
109
Achtung
SAFETY INSTRUCTIONS
DON’T overll the water
tank.
DO dispose of the water
to prevent it from freezing
in cold weather.
DON’T put the unit near
ceilings, walls, furniture,
or electronic appliances.
DON’T lift the unit with
water still in the water
tank.
DON’T put magnet or
metal material on the top
of the unit.
DO clean the unit
regularly, with a microber
towel or any other clean
wiping material.
DO use clean tap water
without detergent, soap,
chemical compounds or
hot water (over 104 。F).
DO unplug the unit and
move its water tank when
water is removed.
DON’T plug in if the power
plug is touched with water.
DON’T operate the unit
while insecticide is used.
DON’T put the unit near
burning cigarette or
incense.
DON’T allow water to
stay in the water tank fora
long time while not in use.
DON’T operate the unit
while water tank is
damaged.
DON’T drink the water left
in the water tank or give it
to plants or animals.
DON’T put the unit near a
microwave oven or TV.
DON’T install the unit
whose airow outlet is
facing the wall.
After cleaning, allow
Antibacterial Discs, water
tank, and pre-lter to air
dry completely.
Achtung
Überfüllen Sie die
Wasserwanne nicht.
Leeren Sie die Wasserwanne
bei drohenden niedrigen
Temperaturen um Einfrieren zu
verhindern.
Stecken Sie das Gerät aus
wenn die Wasserwanne
herausgenommen wird.
Betreiben Sie das Gerät nicht
nah an elektronischen
Geräten oder Möbeln.
Bewegen Sie das Gerät
niemals mit Wasser in der
Wasserwanne.
Reinigen Sie Ihren AW60
regelmäßig mit einem
trockenen Tuch
(z.B. Mikrofasertuch).
Stecken Sie niemals einen
nassen Stecker in die
Steckdose.
Platzieren Sie niemals Metall
oder Magnete auf dem Gerät.
Nutzen Sie zum Betreiben
Ihres AW 60 pures kaltes
Leitungswasser. Nichts
zugeben!

- 12 -
AW 60
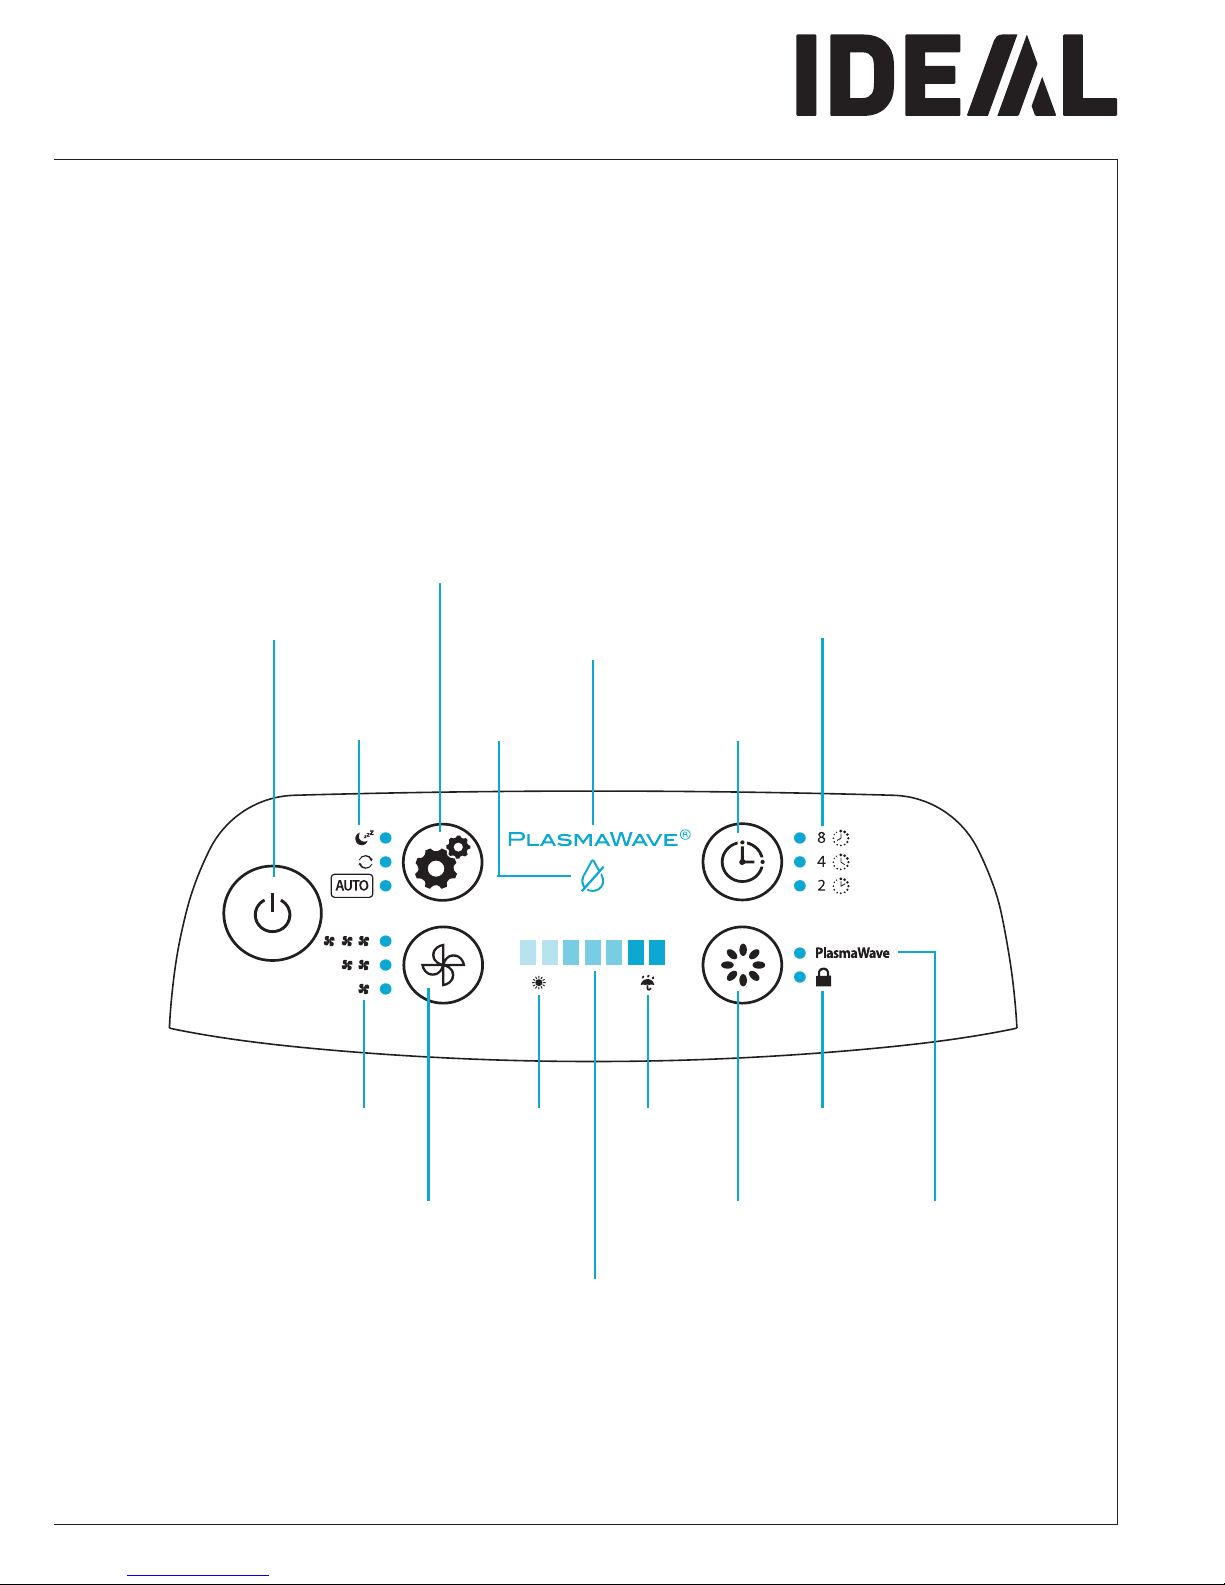
LENAPLORTNOC
MARGAIDTCUDORP
1211
Power
Function Button
1. Continuous Mode : Unit operates continuously based on the fan speed
selected by user regardless of ambient humidity. (Low/Medium/High)
2. Sleep Mode : Dims control panel lights and sets the unit to operate at
lowest fan speed.
3. Auto-Mode : Unit runs until ideal humidity level is reached and shuts o
intermittently to save energy (Green “Comfort Zone”).
Mode
Indicator
Low Water
Indicator
Timer Indicator
PlasmaWave
(ON/OFF Indicator)
Timer Setting
Button
Fan Speed
Indicator
Fan Speed Button
(Low, Medium, High)
Low
Humidity
Indicator
High
Humidity
Indicator
PlasmaWave
(ON/OFF) Button
Control Panel
Lock Indicator
Humidity Level Indicator
Displays humidity level, when desirable level of humidity
levels are reached they will be displayed in the green “Comfort Zone”
Orange : Low Humidity (Below 30% RH)
Blue : High Humidity (61-70% RH)
Green : Ideal Humidity (40-60% RH)
PlasmaWave
(ON/OFF)Indicator
Control Panel Display
Water Level Indicator
Antibacterial Water Tank
(CleanCel )
Antibacterial Disk Handle
Antibacterial Disk (CleanCel )
Rear Air Intake Grille Cover
Fan (Inside)
Combination Filter
Pre-Filter
Front Panel
Power Plug
Water Tank Release Lever
Air Outlet
Air Outlet Cover
Air Outlet Release Button
Übersicht und Benennung der Teile
Frontabdeckung
Antibakterielle Befeuchterscheiben
(CleanCel®)
Griff für Befeuchterscheiben
Antibakterielle Wasserwanne
(CleanCel®)
Wasserstandsanzeiger
Entriegelungsgriff für Wasserwanne
Bedieneinheit
Luftauslass Abdeckung
Luftauslass
Ventilator (innen)
Luftauslass Entriegelung
Lufteinlassabdeckung
Stromanschluss
Kombilter
Vorlter
- 13 -
LENAPLORTNOC
MARGAIDTCUDORP
1211
Power
Function Button
1. Continuous Mode : Unit operates continuously based on the fan speed
selected by user regardless of ambient humidity. (Low/Medium/High)
2. Sleep Mode : Dims control panel lights and sets the unit to operate at
lowest fan speed.
3. Auto-Mode : Unit runs until ideal humidity level is reached and shuts o
intermittently to save energy (Green “Comfort Zone”).
Mode
Indicator
Low Water
Indicator
Timer Indicator
PlasmaWave
(ON/OFF Indicator)
Timer Setting
Button
Fan Speed
Indicator
Fan Speed Button
(Low, Medium, High)
Low
Humidity
Indicator
High
Humidity
Indicator
PlasmaWave
(ON/OFF) Button
Control Panel
Lock Indicator
Humidity Level Indicator
Displays humidity level, when desirable level of humidity
levels are reached they will be displayed in the green “Comfort Zone”
Orange : Low Humidity (Below 30% RH)
Blue : High Humidity (61-70% RH)
Green : Ideal Humidity (40-60% RH)
PlasmaWave
(ON/OFF)Indicator
Control Panel Display
Water Level Indicator
Antibacterial Water Tank
(CleanCel )
Antibacterial Disk Handle
Antibacterial Disk (CleanCel )
Rear Air Intake Grille Cover
Fan (Inside)
Combination Filter
Pre-Filter
Front Panel
Power Plug
Water Tank Release Lever
Air Outlet
Air Outlet Cover
Air Outlet Release Button
Bedieneinheit
Funktionstaste
1.Dauerbetrieb
Ihr AW60 bleibt dauerhaft auf der eingestellten Stufe unabhängig von der
Umgebungs Luftfeuchtigkeit.
2.Sleep Modus
Ihr AW60 reduziert die Lüfter Geschwindigkeit auf die leiseste Stufe und reduziert
die Display-Helligkeit.
3.Automatik Modus
Der IDEAL Smart Sensor misst die Raumluftfeuchtigkeit und passt die Lüfter
Geschwindigkeit an um die Luftfeuchtigkeit im optimalen Bereich zu halten.
Luftfeuchtigkeitsanzeige
Zeigt die Luftfeuchtigkeit an. Wenn das optimale Niveau an Luftfeuchtigkeit
erreicht ist leuchtet die Mittlere Komfort Zone der Anzeige grün.
Orange = niedrige Luftfeuchtigkeit (unter 30% RH)
Blau = hohe Luftfeuchtigkeit (über 61% RH)
Grün = Ideal Luftfeuchtigkeit (40-60%RH)
An / Aus PlasmaWave®Timer Anzeige
Modus
Anzeige Wasserstands-
Warner Timer Taste
Lüfter Anzeige niedrige Luft-
feuchtigkeit
(orange)
hohe Luft-
feuchtigkeit
(blau)
Bedieneinheit
Sperr-
Anzeige
Lüfter Taste
(Niedrig, Mittel, Hoch) PlasmaWave®ON/OFF
Taste PlasmaWave®ON/OFF
Anzeige

- 14 -
AW 60
NOITAREPO
NOITALLATSNI
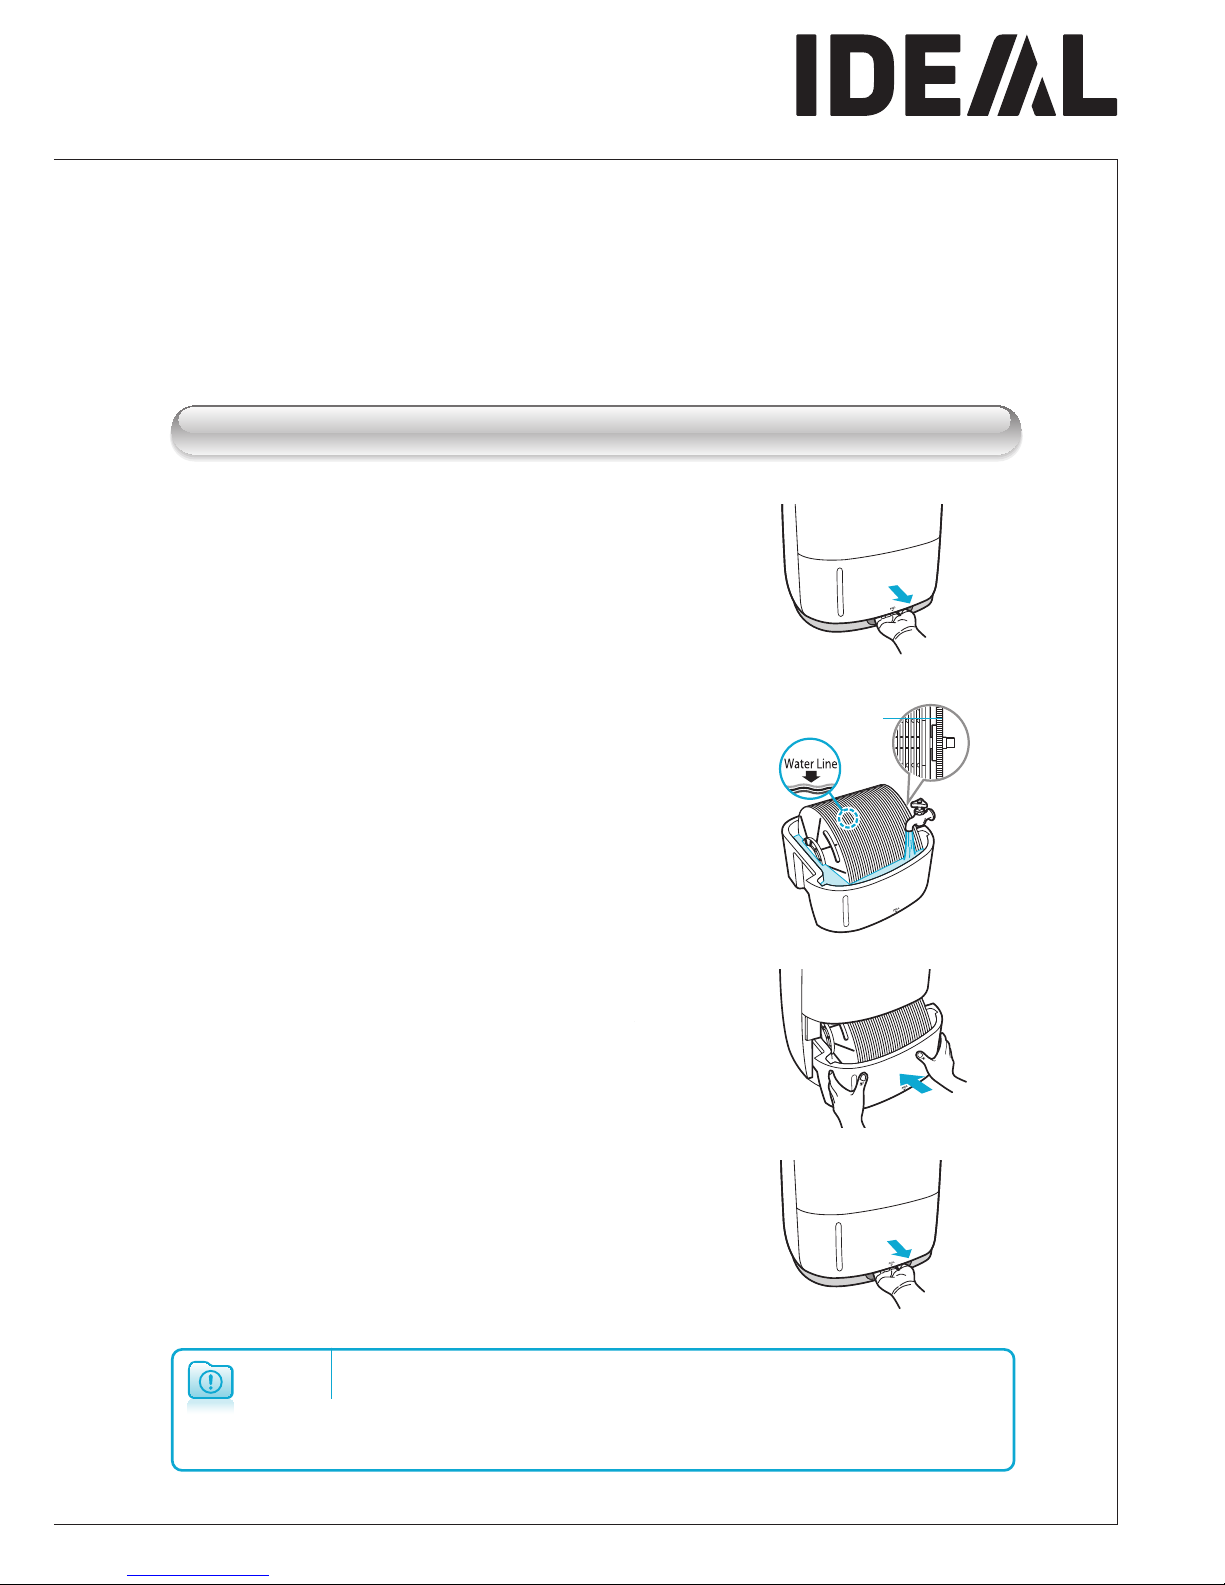
Fill the water tank with cool tap water
up to the indicator line on the inside
of water tank.
Replace the water tank by sliding it
back into the unit until you hear it click
into place.
Gently slide down the front panel and
make sure that it is seated properly and
lines up correctly.
Slide water tank out, by using the
release lever located below the water
tank on the front of the unit.
Aufstellungsort
Do not install the unit under direct sunlight.
Long Exposure to direct sunlight can cause defects.
AW 60 must be installed and operated on an even surface.
Vibrations and noise can occur on soft or non-at surfaces.
Product must be installed approximately 10cm away from
the wall and 30-40cm from other electronic appliances.
Before operating the AW 60 , remove any plastic bags and
polyfoams from outside and inside the unit.
Inbetriebnahme
Make sure to unplug the power cord before lling the unit with water.
We recommend to use ltered water to prolong the life of the product.
Use cautions when moving the unit lled with water.
Warning
Saw Tooth Gear Disc
Installation
30-40 cm
10 cm
Platzieren Sie das Gerät nicht in direktem Sonnenlicht.
- Langzeitbestrahlung durch die Sonne kann Defekte verursachen.
Ihr AW 60 muss auf einer ebenen Fläche platziert und betrieben werden.
- Vibrationen und Geräusche können beim Betrieb auf unebenen Untergründen entstehen.
Ihr AW 60 sollte mindesten 10 cm von Wänden entfernt und mindestens 40 cm
entfernt von elektrischen Geräten betrieben werden.
Bevor Sie Ihren AW60 betreiben, entfernen Sie unbedingt alle Verpackungsfolien
und Styroporteile im und am Gerät.
- 15 -
NOITAREPO
NOITALLATSNI
Fill the water tank with cool tap water
up to the indicator line on the inside
of water tank.
Replace the water tank by sliding it
back into the unit until you hear it click
into place.
Gently slide down the front panel and
make sure that it is seated properly and
lines up correctly.
Slide water tank out, by using the
release lever located below the water
tank on the front of the unit.
Aufstellungsort
Do not install the unit under direct sunlight.
Long Exposure to direct sunlight can cause defects.
AW 60 must be installed and operated on an even surface.
Vibrations and noise can occur on soft or non-at surfaces.
Product must be installed approximately 10cm away from
the wall and 30-40cm from other electronic appliances.
Before operating the AW 60 , remove any plastic bags and
polyfoams from outside and inside the unit.
Inbetriebnahme
Make sure to unplug the power cord before lling the unit with water.
We recommend to use ltered water to prolong the life of the product.
Use cautions when moving the unit lled with water.
Warning
Saw Tooth Gear Disc
1.Ziehen Sie die Wasserwanne aus dem
Gerät, indem Sie den Entriegelungsgriff
vorne unter der Wanne ziehen.
2.Füllen Sie die Wasserwanne mit kaltem
Leitungswasser maximal bis zur
Markierung in der Wasserwanne.
3.Führen Sie die Wasserwanne wieder in
das Gerät ein bis Sie ein deutliches
Klicken vernehmen.
4.Lassen Sie die Frontabdeckung wieder
einrasten indem Sie diese sorgfältig
hinunter führen.
Warnung - Achten Sie darauf dass das Gerät auszustecken bevor sie das Wasserwanne befüllen.
- Wir empfehlen den Einsatz von geltertem oder gar demineralisiertem (destilliertem)
Wasser um die Lebenszeit Ihres AW 60 zu verlängern.
- Seien Sie vorsichtig wenn sie die gefüllte Wasserwanne bewegen.
Zahnradscheibe

- 16 -
AW 60
OPERATION
15 16
Plug the power cord into a power
outlet.
Push the POWER button.
Push FUNCTION button to select
Auto Mode
AIR FLOW:
When ambient humidity is sensed at less that
60%, the unit will operate at “High” fan speed.
When the ambient humidity is sensed at greater
than 60% the unit will operate at “Low” fan speed.
CLEANING DISCS:
When ambient humidity is sensed at greater than
75% humidity the cleaning discs will stop spinning.
When ambient humidity is sensed at less than
60%, the disc resumes to circulate.
Push the FUNCTION button to select
Continuous Mode.
Continuous Mode Indicator will illuminate.
The FUNCTION button will cycle the unit
between the following:
Auto Continuous Sleep
Vor dem Einschalten
Automatik Modus
Dauerbetrieb
Note A soft buzzing or clicking sound may occur during operation;
if this is uncomfortable, you can turn o the PlasmaWave ®feature by using the
PlasmaWave ®ON/OFF button.
Installation
1.Stecken Sie den Stecker des Netzkabels
in eine Wandsteckdose.
2.Drücken Sie die An / Aus - Taste.
3.Das Gerät startet sofort im Automatik
Modus und schaltet PlasmaWave®an.
Hinweis Falls leichtes surren und klicken während des Betriebes auftritt und Sie sich gestört fühlen
können sie PlasmaWave®ausschalten indem Sie die PlasmaWave®Taste drücken.

- 17 -
OPERATION
15 16
Plug the power cord into a power
outlet.
Push the POWER button.
Push FUNCTION button to select
Auto Mode
AIR FLOW:
When ambient humidity is sensed at less that
60%, the unit will operate at “High” fan speed.
When the ambient humidity is sensed at greater
than 60% the unit will operate at “Low” fan speed.
CLEANING DISCS:
When ambient humidity is sensed at greater than
75% humidity the cleaning discs will stop spinning.
When ambient humidity is sensed at less than
60%, the disc resumes to circulate.
Push the FUNCTION button to select
Continuous Mode.
Continuous Mode Indicator will illuminate.
The FUNCTION button will cycle the unit
between the following:
Auto Continuous Sleep
Vor dem Einschalten
Automatik Modus
Dauerbetrieb
Note A soft buzzing or clicking sound may occur during operation;
if this is uncomfortable, you can turn o the PlasmaWave ®feature by using the
PlasmaWave ®ON/OFF button.
Betätigen Sie die Funktionstaste um den
Automatik Modus zu wählen.
Luft Strom
Wenn die (Umgebungs -) Luftfeuchtigkeit weniger als
60% ist, wird Ihr AW 60 die Lüftergeschwindigkeit auf
höchste Stufe stellen. Wenn die Luftfeuchtigkeit über
60% gestiegen ist, wird das Gerät die
Lüftergeschwindigkeit auf die niedrigste Stufe stellen.
Befeuchterscheiben
Wenn die Luftfeuchtigkeit über 75% gestiegen ist,
wird der AW 60 aufhören die Befeuchterscheiben
rotieren zu lassen.
Wenn der Wert wieder unter 60% gefallen ist, fangen die
Befeuchterscheiben wieder an sich zu drehen.
Betätigen Sie die Funktionstaste um den
Dauerbetrieb zu wählen.
- Die Dauerbetrieb - Anzeige leuchtet auf
- Ihr AW 60 bleibt dann dauerhaft auf der eingestellten
Lüfterstufe unabhängig von der Luftfeuchtigkeit.
Auto - Dauerbetrieb - Schlafmodus
Bedienung

- 18 -
AW 60
Push the FUNCTION button to select
Sleep Mode.
The MODE button will cycle the unit between
the following:
Auto Continuous Sleep
During Sleep Mode the unit will set fan speed to
lowest setting and the display will turn o,
except for the low fan speed indicator.
Push the FAN SPEED button to change
the Fan Speed.
The FAN SPEED button will cycle the unit
between the following:
Low Med High
Push TIMER button to set a timer.
The TIMER button will cycle through the unit
timer settings:
2 hours 4 hours 8 hours
Push PLASMAWAVE/LOCK button for
more than 3 seconds to activate Lock.
Push PLASMAWAVE/LOCK button to
operate PlasmaWave .
Use this button to turn PlasmaWave function
ON/OFF
During Humidication process
During PlasmaWave operation only
Push PLASMAWAVE/LOCK button to
operate PlasmaWave while the unit is
OFF.
Use this button to turn PlasmaWave function
ON/OFF without using the humidication
function of the unit.
OPERATION
Schlaf Modus
Einstellen der Lüftergeschwindigkeit
Timer einstellen
PlasmaWave Technologie
Sperrtaste
Betätigen Sie die Funktionstaste um den Schlaf
Modus zu wählen.
- Die Modetase wechselt zwischen folgenden
Funktionen:
Auto - Dauerbetrieb - Schlafmodus
- Ihr AW60 reduziert die Lüftergeschwindigkeit auf die
leiseste Stufe und reduziert die Display-Helligkeit.
Mit der Lüfter Geschwindigkeits -Taste können
Sie die Lüftergeschwindigkeit manuell ändern.
- Sie können folgenden Modi auswählen:
Niedrig - Mittel - Hoch
Bedienung

- 19 -
Push the FUNCTION button to select
Sleep Mode.
The MODE button will cycle the unit between
the following:
Auto Continuous Sleep
During Sleep Mode the unit will set fan speed to
lowest setting and the display will turn o,
except for the low fan speed indicator.
Push the FAN SPEED button to change
the Fan Speed.
The FAN SPEED button will cycle the unit
between the following:
Low Med High
Push TIMER button to set a timer.
The TIMER button will cycle through the unit
timer settings:
2 hours 4 hours 8 hours
Push PLASMAWAVE/LOCK button for
more than 3 seconds to activate Lock.
Push PLASMAWAVE/LOCK button to
operate PlasmaWave .
Use this button to turn PlasmaWave function
ON/OFF
During Humidication process
During PlasmaWave operation only
Push PLASMAWAVE/LOCK button to
operate PlasmaWave while the unit is
OFF.
Use this button to turn PlasmaWave function
ON/OFF without using the humidication
function of the unit.
OPERATION
Schlaf Modus
Einstellen der Lüftergeschwindigkeit
Timer einstellen
PlasmaWave Technologie
Sperrtaste
Betätigen Sie die Timertaste um den Timer
einzustellen.
- Sie können folgende Geräte - Laufzeiten voreinstellen:
2 Std. - 4 Std. - 8 Std.
Betrieb Während der Luftbefeuchtung
Betätigen Sie die PlasmaWave®/ Gesperrt - Taste um
PlasmaWave®im laufenden Betrieb aus- oder wieder
einzuschalten.
Betrieb ohne Luftbefeuchtung
Betätigen Sie die PlasmaWave®/ Gesperrt - Taste im
Standby Modus um PlasmaWave®auch ohne
Befeuchtungsfunktion einzuschalten.
Halten Sie die PlasmaWave®/ Gesperrt - Taste
für mehr als drei Sekunden gedrückt um die
Sperrungs-Funktion zu aktivieren bzw. zu
deaktivieren.

- 20 -
AW 60
Clean the outside of the unit with a soft
cloth and mild detergent. Wipe clean
with a dry cloth.
Use the tab on the bottom of
the water tank and gently slide
it out to open.
Replace the water tank with a
snap.
Gently slide down the front
panel to close.
Remove used water left in the water
tank and rell water tank with clean
water.
Used water left in the tank should be changed
because it contains dust, foreign substances
and odor causing air pollutants collected by
Antibacterial Cleaning Discs.
Fill the water tank up to the indicator line.
Replace the Saw Tooth Gear Disc back to the
right side of groove on the tank, and replace
the other Disc back to left side of groove.
CARE & MAINTENANCE
Entleerung der Wasserwanne
Reinigen der Oberäche
Be sure to change water frequently to ensure optimal functioning of
the unit.
Be sure to replace the water tank correctly in order to ensure that the
unit functions properly.
Warning
Unplug the AW 60 before performing any type of maintenance
such as cleaning or disassembling.
Do NOT clean the top portion of the unit with water.
Empty and unplug if not operating for more than 2 days.
Warning
Saw Tooth Gear Disc
1.Betätigen Sie die Entriegelung der
Wasserwanne um diese aus dem
Gerät zu ziehen.
2.Heben Sie die Befeuchterscheiben
an den Griffen vorsichtig aus der
Wasserwanne heraus.
3.Entsorgen Sie das restliche gebrauchte
Wasser. Befüllen Sie die Wasserwanne
wieder mit kaltem reinem Wasser.
- Gebrauchtes Restwasser sollte
ausgewechselt werden, weil es Staub und
geruchsverursachende Bestandteile, die aus
der Luft geltert wurden, beinhalten.
- Füllen Sie die Wasserwanne bis zur
Markierung.
- Setzen Sie die Befeuchterscheiben wieder so
ein, dass die Zahnradscheibe rechts sitzt.
Zahnradscheibe
4.Führen Sie die Wasserwanne wieder
in das Gerät ein, bis Sie ein
deutliches Klicken vernehmen.
5.Lassen Sie die Frontabdeckung
wieder einrasten, indem Sie diese
sorgfältig hinunter führen.
Warnung - Stellen Sie einen regelmäßigen Wasserwechsel sicher um eine
optimale Funktionalität des Gerätes zu gewährleisten.
- Stellen Sie sicher, dass Sie die Wasserwanne wieder korrekt
eingesetzt haben um eine optimale Funktionalität des Gerätes zu
gewährleisten.
Wartung und Pege
Table of contents
Other IDEAL Humidifier manuals


