iDeck iDecKing EasyClick system User manual

EasyClick
system
EasyClick system
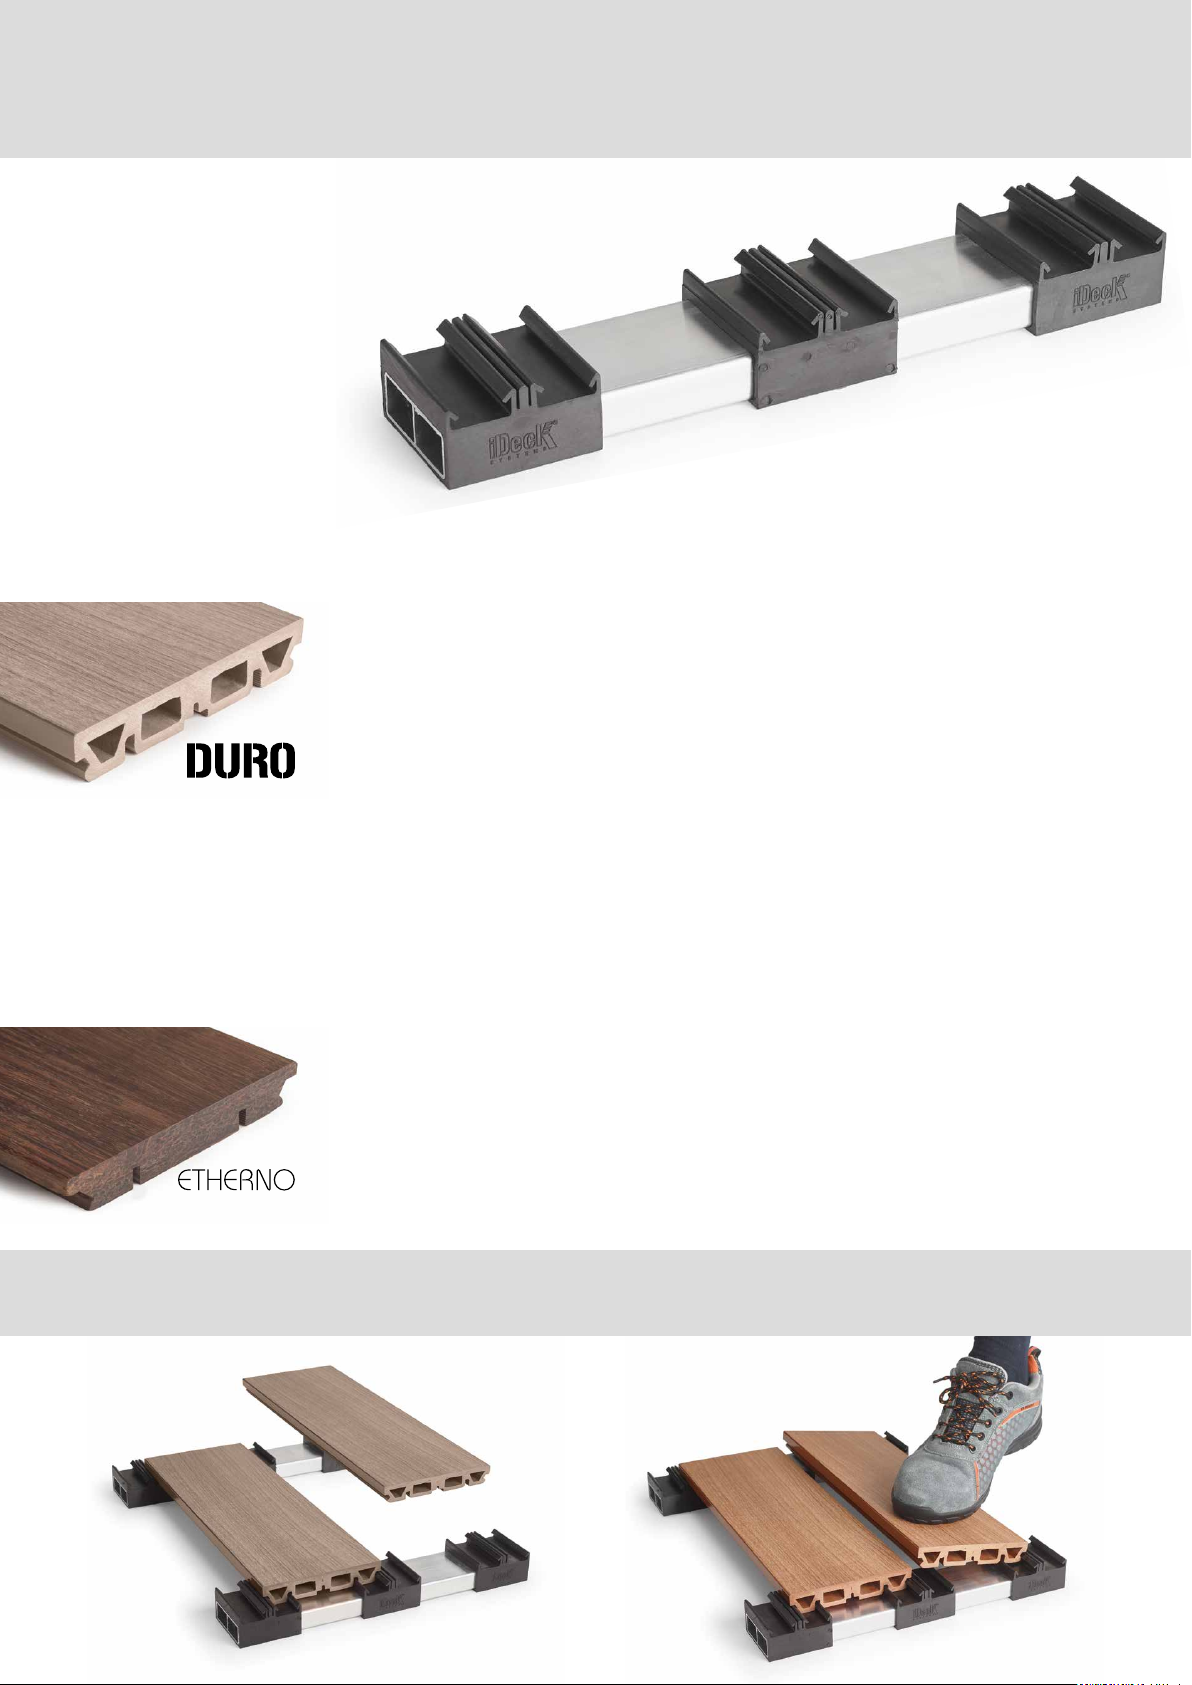
components
EASYCLICK SYSTEM UNDERSTRUCTURE
IDECKING REVOLUTION BOARDS - DETAILS
CLICK!
just 1 click and the board is installed !
Duro boards are made from circa 50% RICE HUSK and 50% virgin PVC
and Minerals in order to deliver a product with as natural a look and feel as
possible. As it happens for wood, Duro composite material can encounter a
slight chromac change due to UV rays. Aer only a few months the boards
will stop further chromac change and become colour fast. For covered
or parally shaded areas this process will take longer. Using our specic
products (Duro Shield and Duro Drop) it is possible to protect Duro’s look
from stains and slow down the rate of fade. Furniture like ower boxes can
also couse colour change to the deck area so it is advised to change the
posion of this furniture during the rst 3-6 months in order to maximum
colour compensaon.
Minimal changes in colour and tone underline the natural aspect of Etherno
Bamboo, just like in any other noble wood (ie. IPE / TEAK). Colour variaons,
like prole and surface alteraons, are normal in the natural behaviour of any
wood and don’t represent vices or defects in the product so are not cause of
a claim. In order to get uniformity over the deck area, it is advised to mix up
the boards before installaon.
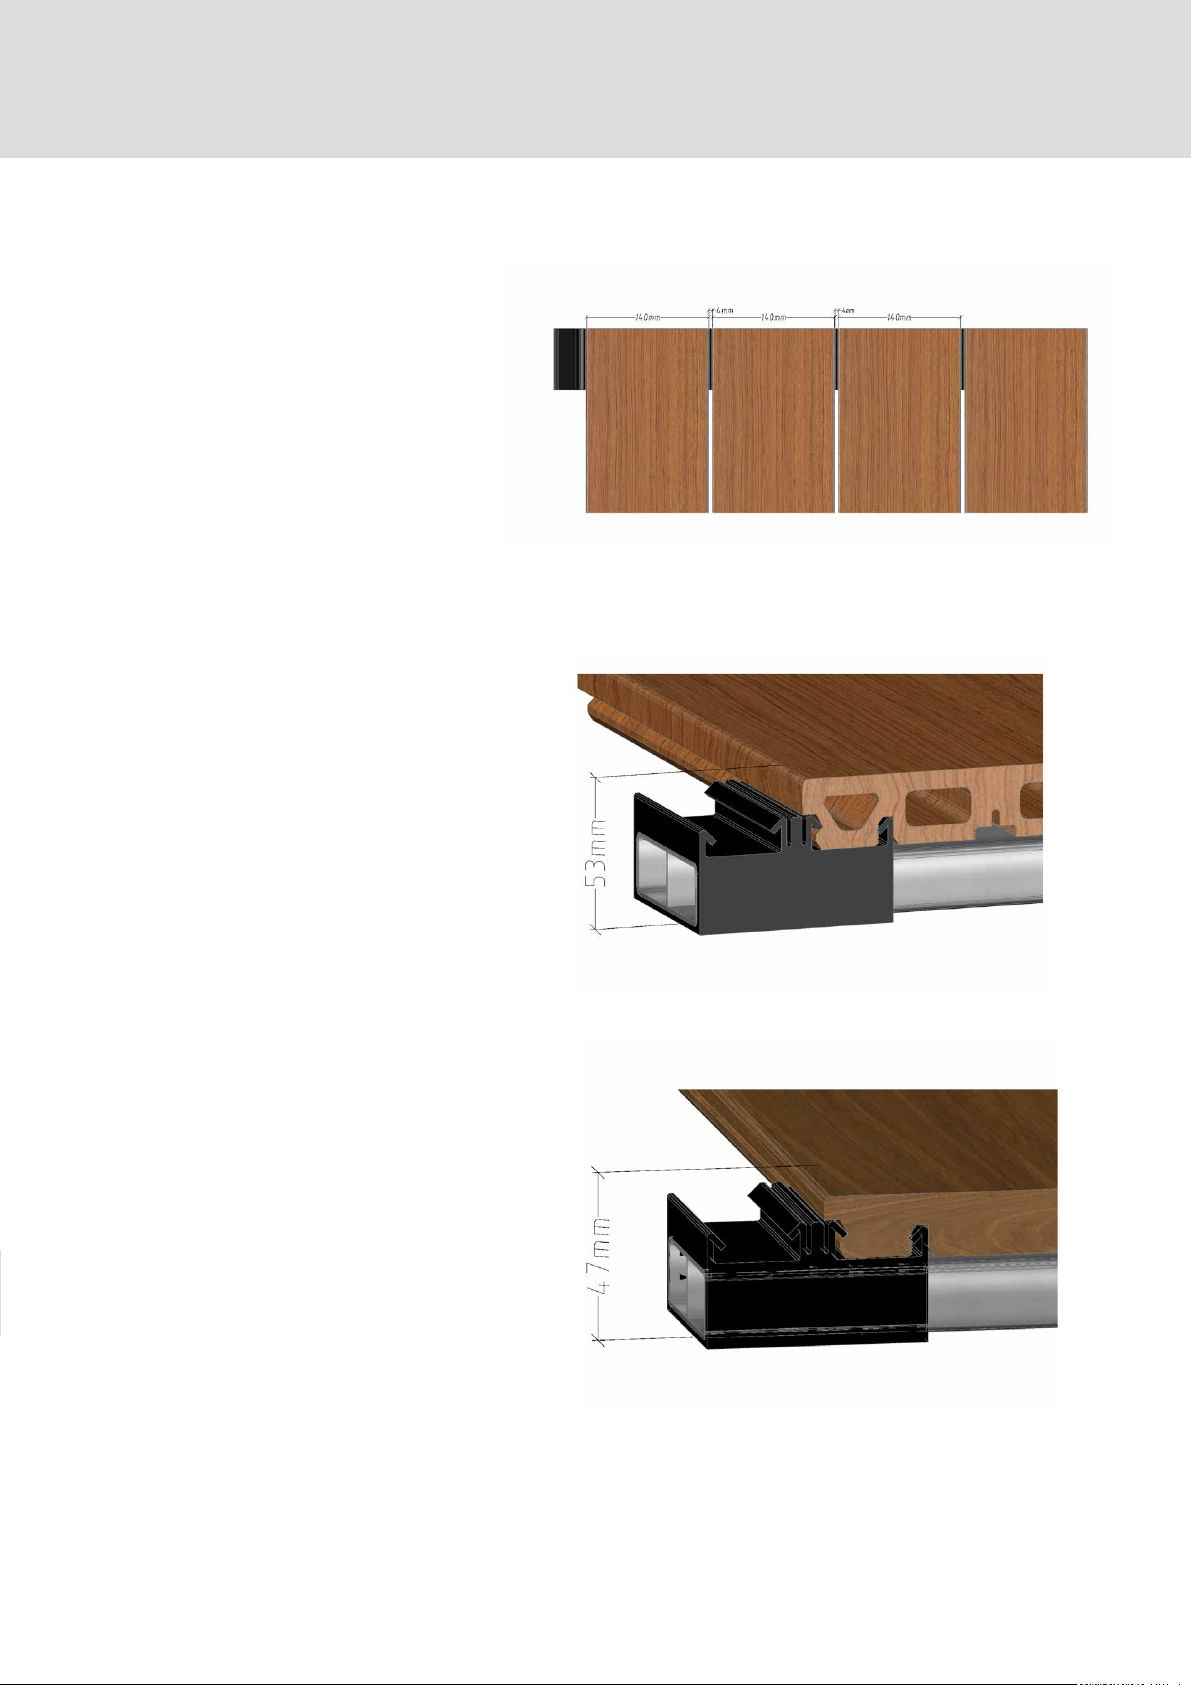
technical data on the system
EasyClick board standard width
140mm + 4 mm gap
Total Height of DURO Boards +
EasyClick Understructure: 53 mm
Total Height of ETHERNO boards +
EasyClick Understructure: 47 mm

Before the installation Dos and Donts
Duro is a non porous material so water will stand on the deck for longer than mber decking boards.
-
According to the principles of construcve wood preservaon, boards must always be installed with sucient gradient.
(1-2%). Gradient must always be in a longitudinal direcon with respect to the boards (direcon of the hollow chamber
and ung). The gradient direcon must always be away from the building. To ensure compliance, avoid water spots,
ponding, dirt deposits and other damage to the building.
-
The subsurface must be structurally sound and frost-protected and have sucient drainage.
-
For applicaons requiring approval by the building authories (e.g. balconies), you need a stacally weight-bearing
subsurface as support for the oor boards.
-
Permanent ground contact of DURO boards must be avoided!
-
When installing the deck up to a building or parapet wall, always leave at least 2 cm distance to allow
sucient expansion and contracon.
-
Drainage of adequate size is required for the subsurface. Avoid waterlogging and also ensure complete drainage during
heavy rainfall
-
Maximum distances for substructures must be adhered to!
-
Observe the minimum distances of the expansion joints to enable the unconstrained expansion of the structure where
applicable. Boards are 100% dry aer producon. Weathering causes them to absorb water and swell. Joints therefore
become smaller aer a few weeks/months. Thermal expansion must also be taken into account.
-
To guarantee a correct installaon and to preserve DURO’s surface look, the boards must be stacked out of direct
sun contact and in a dry place. When handling the boards, don’t slide boards one on top of the other in order to avoid
scratches. It is advised to deliver to boards to the site of the installaon a day or two before installaon to allow them
to acclimase to the condions. For best results, do not install iDecking boards in temperatures under +10°C.
-
Pre-drill screw connecons if any and use a low torque seng.
-
In case of any screw xaon, use only stainless steel screws
-
DURO boards will absorb heat. This heat eect has more of an impact on dark colours than light colours. Take this into
account when walking barefoot.
-
-
Fade is an unavoidable consequence of outdoor surfaces. To reduce the impact of UV related fade, two coats of
DUROSHIELD product must be applied at the me of installaon.
-
TOOLS: There are no special tools required. To achieve the best results, use saw blades and cung tools coated with
hard metal. If you use a mitre saw, we recommend a saw blade size of 254 - 305 mm with 40 teeth or fewer.
for any purpose other than for decking boards.You must use the iDecking substructures and assembly parts provided!

Installation: EasyClick system
• Scenario A : Installaons on concrete or exisng paving using rubber pads or adjustable pedestals
bonded or xed to understructure.
• Scenario B : Installaons on sensive roong membranes where mechanical xings are not possi-
ble using double aluminium rails on pedestals.
• Scenario C : Installaons over bare earth, using a primary frame with posts concreted
• into the ground
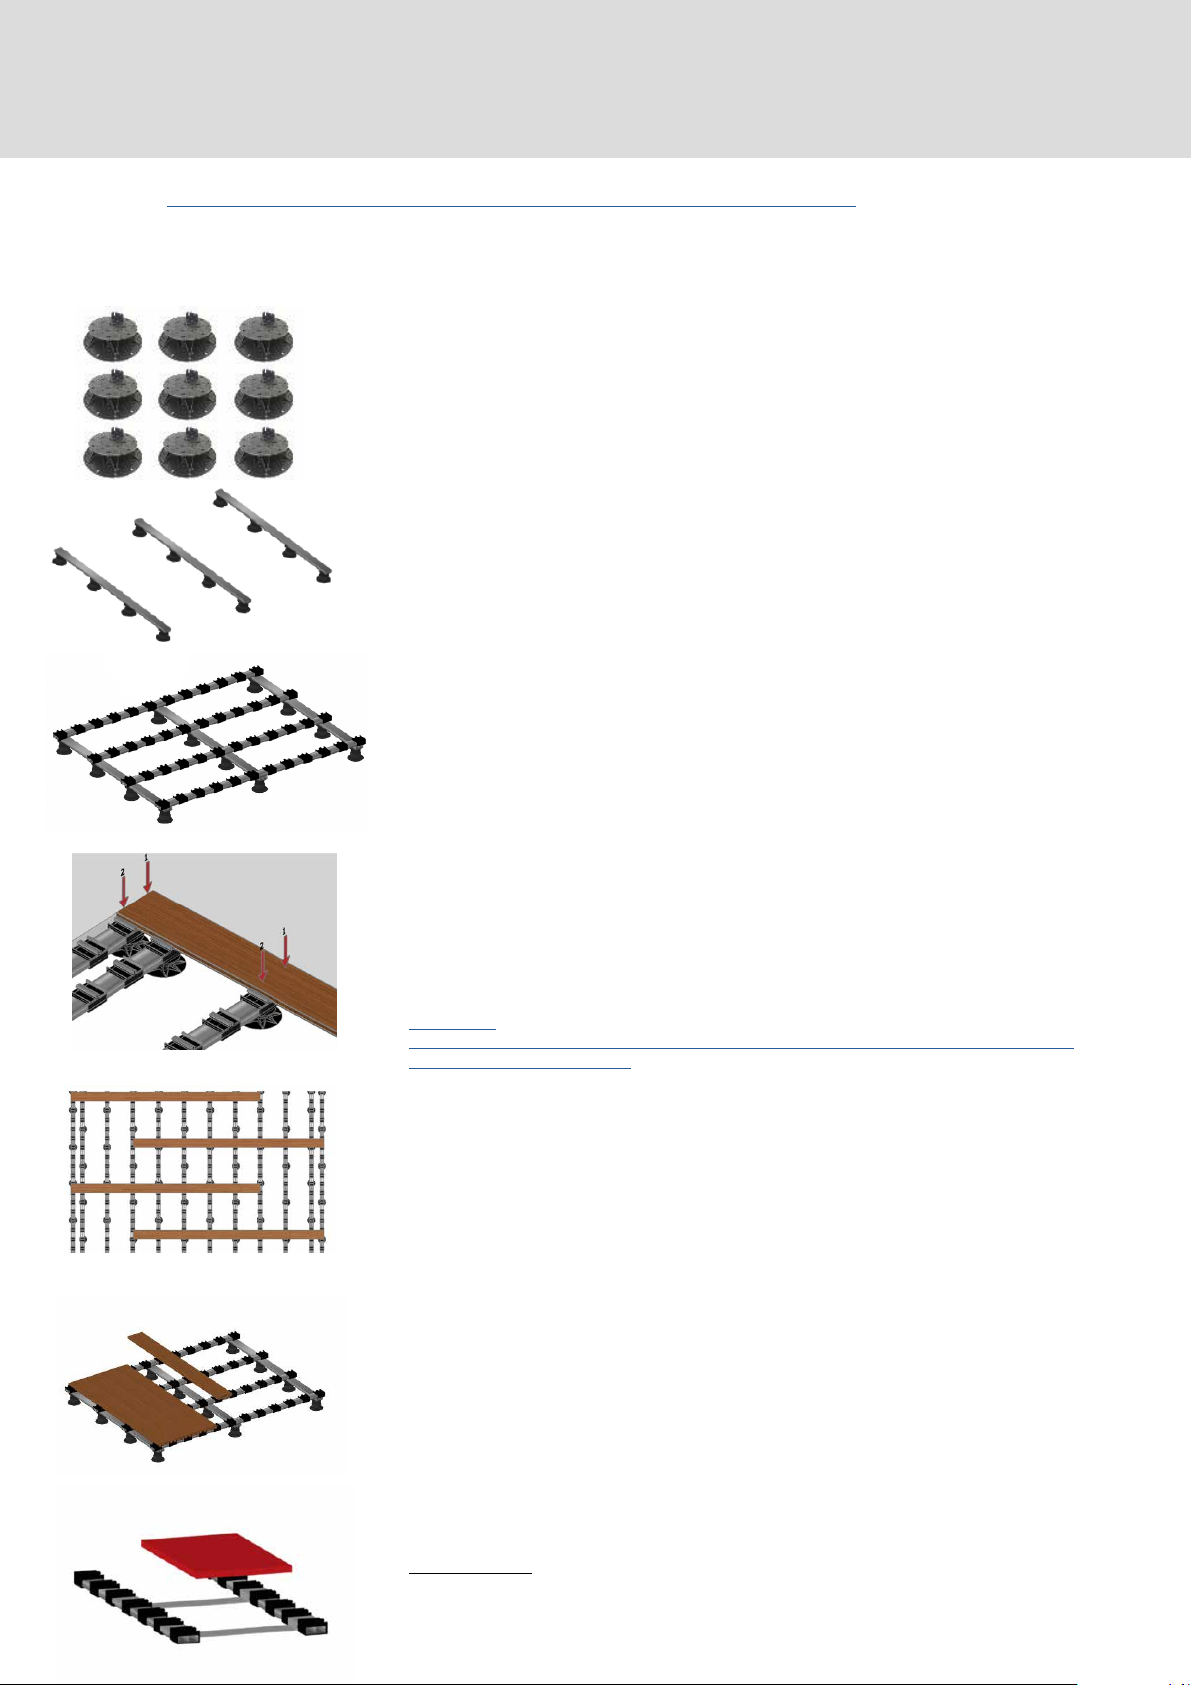
SCENARIO A :
Installaons on concrete or exisng paving using rubber pads or adjustable pedestals bonded or xed to understructure.
Leveling with rubber pads
● Posion the rubber pads or adjustable pedestals following max
of 600 mm interval from one another in the intended direcon of
the rails.
● Make adjustments to them in order to be all roughly the same
level.
● Place the EasyClick rails onto the pedestals.
Placing the EasyClick Understructure
- The interval between the aluminium rails depends on the kind
of board chosen for the deck.
- Align the aluminium rails following the suggested interval:
• Duro: interval 35cm (public areas) 40cm (private areas)
• Etherno Bamboo: interval 46cm
- Stagger the joints between the rails to ensure a more stable
structure.
Fixing the pedestals / supports to the ground
● It is now me to x the pedestals to the ground.
● In order to x the supports to the ground, li the support
from the side and inject the necessary amount of glue to x it
on the ground.
● Wait for the glue to sck to avoid support movements.
NO
YES

● Lay the board over the aligned rail.
● Click it by pressing down with your foot, rst on one side (1)
then the other side (2) onto the clips below.
● Repeat the operaon over each intersecon between board
and rail.
● When the height doesn’t allow the use of your foot, use a
rubber mallet to click the boards in place.
● It is now me to x the rails to the pedestals. Slightly li the
rails and apply a sucient amount of glue to the head of the
pedestal before replacing the rail in the centre of the pedestal
head.
● Don’t wait for the glue to completely dry. This allows a certain
degree of movement needed to square the whole structure.
● Click in every 4th or 5th board in order to square the whole
deck structure. This allows alignment of the rails that will then be
ready to be xed to the ground.
IMPORTANT: the posion of each board has to be judged with
care, paying close aenon on alternang the board edges
meeng point.
● Remember to t iJack expansion control bracket to each board
if present.
● When installing large decks, we suggest installing smaller areas
at a me and connecng the separate areas together.
ground
● To x the understructure to the ground, Drill and x the
aluminium rails to the ground.
● Complete the deck by clicking the rest of the boards.
posa del sistema EasyClickInstallation: EasyClick system
ATTENTION:
- in case you need to pull your deck close to a x point (ie. house, wall) you will have cut half of the rst
clip as shown in CASE 1 - page 13
posa del sistema EasyClick
Scenario B:
installaons on sensive roong membranes where xing down of iDecking is not possible, an addional
“blank rail” is required for this method of installaon
● Posion the rubber pads or adjustable pedestals following max of
600 mm distance from one another in the intended direcon of the
deck boards.
● Adjust the height of the pedestals to create a level under surface.
● Place the “blank rails” at intervals of 600mm for domesc decks and
500mm for public areas allowing for a 1-2% fall.
Placing the iDecking Rails
● Cross the iDecking “A” or “B” Rails over the “blank rail” placing them
at the advised intervals (Duro Excellence at 400mm for domesc use
or 350mm for public use • Etherno Bamboo at 450mm intervals)
Installing the remaining boards
● Click in every 4th or 5th board in order to square the whole deck
structure. This allows alignment of the rails that will be then ready to
be xed to the ground. IMPORTANT: the posion of each board should
be judged with care, paying close aenon on alternang the board
edges meeng point.
● Remember to t iJack expansion control bracket to each board if
available.
● At this point you will need to x the two rails together with self
drilling screws on the rails underneath.
● When installing large decks, we suggest installing smaller areas at a
me and connecng the separate areas together.
● Complete the Deck by clicking the rest of the boards.
Weight plates
● When installaon is on inverted roofs (insulaon above membrane) weight plates
will be needed. They are hung between the rails to add ballast to the deck area.
Installation: EasyClick system
● Lay the board over the aligned rail.
● Click it by pressing down with your foot, rst on one side (1) then the
other side (2) onto the clips below.
● Repeat the operaon over each intersecon between board and rail.
● When the height doesn’t allow the use of your foot, use a rubber
mallet to click the boards in place.
ATTENTION:
- in case you need to pull your deck close to a x point (ie. house, wall) you will have cut half of the rst
clip as shown in CASE 1 - page 13

posa del sistema EasyClickInstallation: EasyClick system
posts concreted into the ground
● Build a bearer framework in the chosen area with posts concreted
into the ground.
● For best results use Galvanised steel frame with bearers posioned
at intervals of 600mm for domesc applicaons and 500mm for public
areas
Placing the iDecking Rails
● Cross the iDecking Rails over the bearer framework placing them at
the advised intervals (Duro Excellence 400mm for domesc use or
350mm for public use • Etherno Bamboo: interval 450mm)
Installing the remaining boards
● Click in every 4th or 5th board in order to square the whole deck
structure. This allows alignment of the rails that will be then ready to
be xed to the ground. IMPORTANT: the posion of each board should
be judged with care, paying close aenon on alternang the board
edges meeng point.
● Remember to t iJack expansion control bracket to each board if
available.
● At this point you will need to x the two rails together with self
drilling screws on the rails underneath.
● When installing large decks, we suggest installing smaller areas at a
me and connecng the separate areas together.
● Complete the Deck by clicking the rest of the boards.
● Lay the board over the aligned rail.
● Click it by pressing down with your foot, rst on one side (1) then the
other side (2) onto the clips below.
● Repeat the operaon over each intersecon between board and rail.
● When the height doesn’t allow the use of your foot, use a rubber
mallet to click the boards in place.
ATTENTION:
- in case you need to pull your deck close to a x point (ie. house, wall) you will have cut half of the rst
clip as shown in CASE 1 - page 13
● Repeat the operaon over each intersecon between board and
understructure.

Installation: EasyClick system
Placing the iDecking Rails
- Cross the iDecking Rails over the Primary understructure
placing them at the advised intervals as shown in CASE A & B
(Duro: interval 35cm public use / 40cm private use • Etherno
Bamboo: interval 46cm) and x them with self drilling screws on
the rails underneath.
necessary when it’s impossible to x the rails on the ground
- Place the Primary Aluminum Rails with an interval range of
65/70 cm one from the other. The section of the Aluminum rails
used for Primary Understructure is: 30 x 50 x 3 mm. – 1200gr/m
- Complete the Deck by following the guidelines of the chosen
iDecking System: EasyClick or EasyChange and place the rest
of the boards

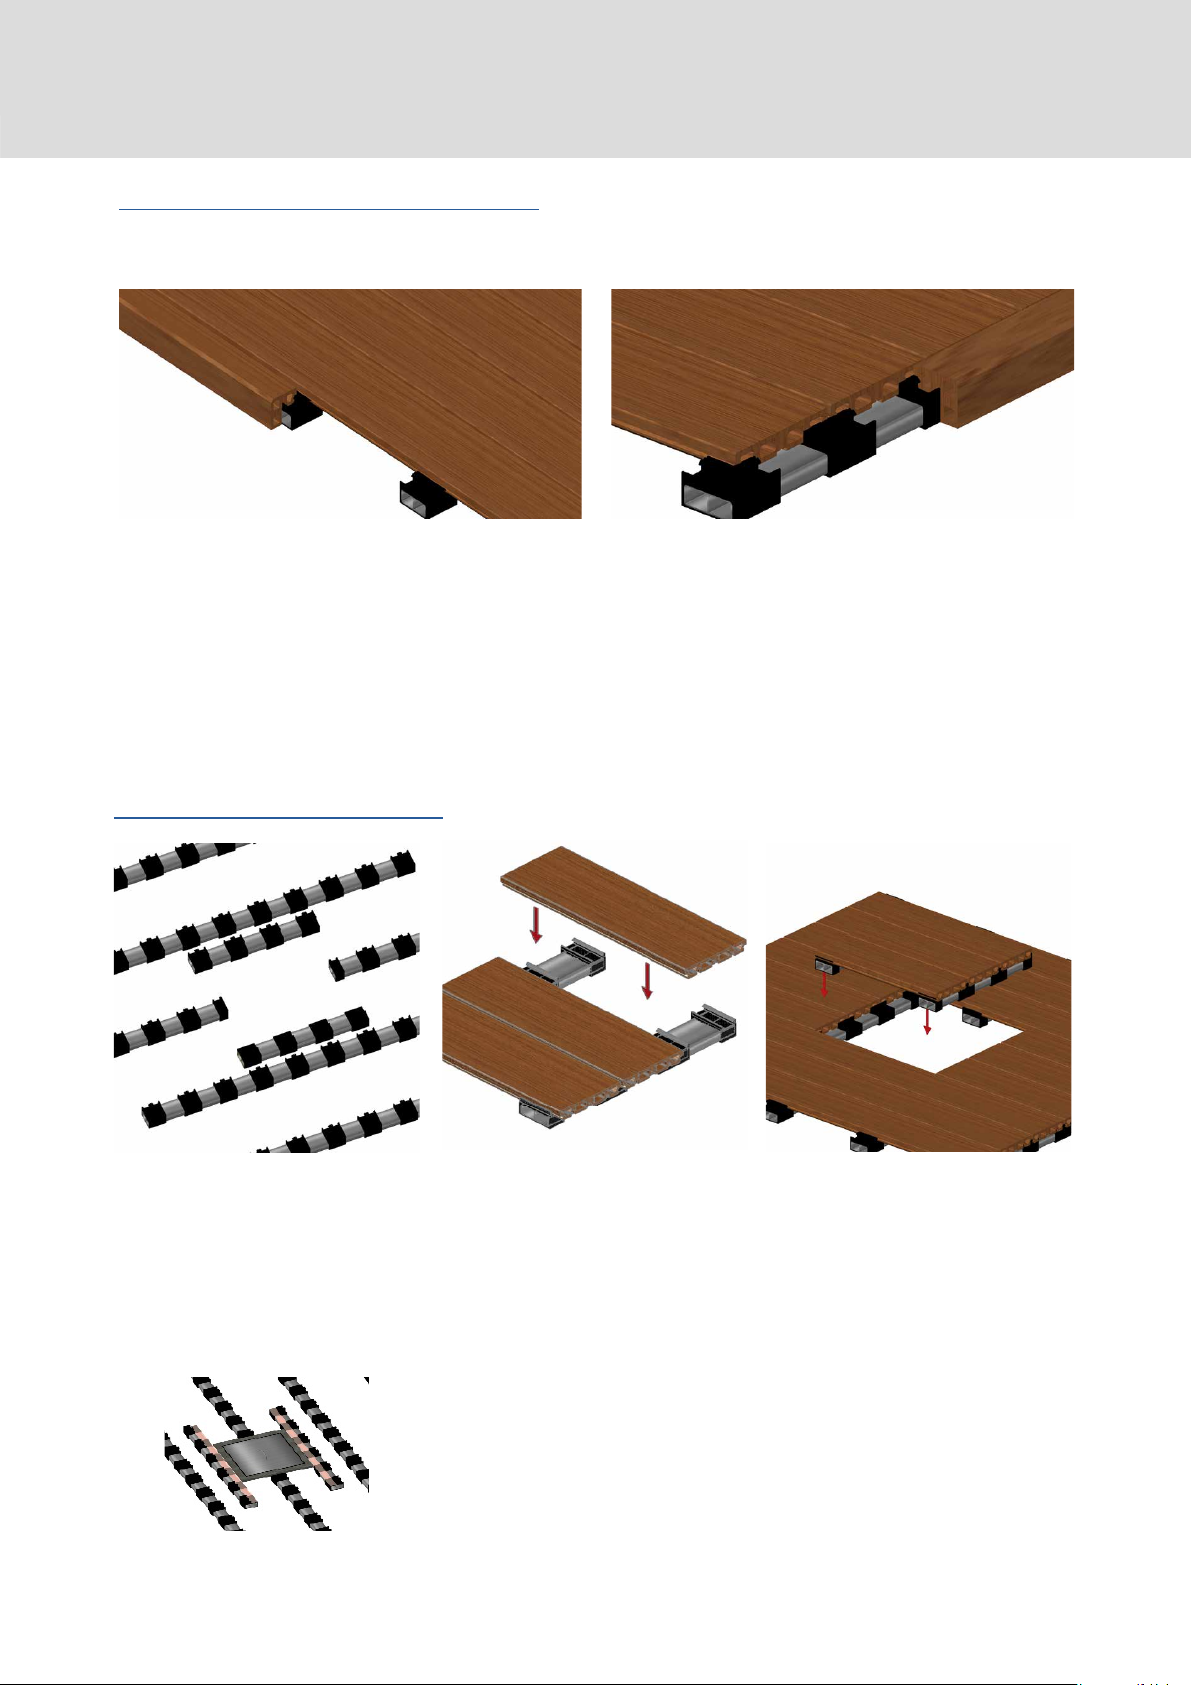
Modules: EasyClick system
EasyClick MODULES deck building
The Clip B lets you pre-build the modules of your future
deck. This soluon is even quicker in installaon me
and it is highly suggested in case of big areas to cover or
temporary decks that will have to be removed and re-
installed.
Create the module understructure
- Place the aluminum rails at the right interval:
Internals clip A rails,
Externals clip B rails
Complete the module
- Complete the Module assembling by clicking the rest of the
boards.
SUGGESTION: create the module with a maximum of 7 boards
and with understructures cut half in order to handle them
easier.
- Aer preparing the Modules and having veried the ground
level, place the modules over the desired area. Distance them in
order to let the connecng board be clicked correctly.
- The Clips B present on the short external sides of the single
modules will let you connect the modules even in longitudinal
sense.
- Insert the connecng boards (highlighted in red) both in
latudinal and longitudinal sense.
posa del sistema EasyClickframes and finishes EasyClick system
EasyClick system allows a clickable framing/nosing prole called Step Prole, to be easily and
quickly installed.
- Click the Step Prole onto the remaining
half clip at the end of each “A” rail.
- Use the Clip B understructure at the end
- Click the Step Prole in the remaining half
clip at the end of each understructure
Placing the alu rails
- Cut small secons of “A”
rail to the size of the manhole.
- Insert two pieces of aluminum
understructure as reinforcement
of the manhole.
- Remove a part of the clips to
create the manhole support.
- Cut boards to the length of
the manhole.
- Click boards into the clips
on the “A” rails to create a
small secon of decking.
- Ensure that the rails are
set back from the end of
the boards.
- Place the manhole over the
opening: the projecons of
board then lie on the
surrounding understructure
proles.

posa del sistema EasyClickframes and finishings EasyClick system
Diagonal cuts
- Cut the nal part of the understructures following the desired
angle.
- Add porons of understructure “A” among the principal ones,
to ensure correct support for the boards to click to.
Complete the deck
- Cut the boards according to the desired size and complete the
deck.
SUGGESTION: if a board ends up to be over an understructure
the rail and gluing the boards down.
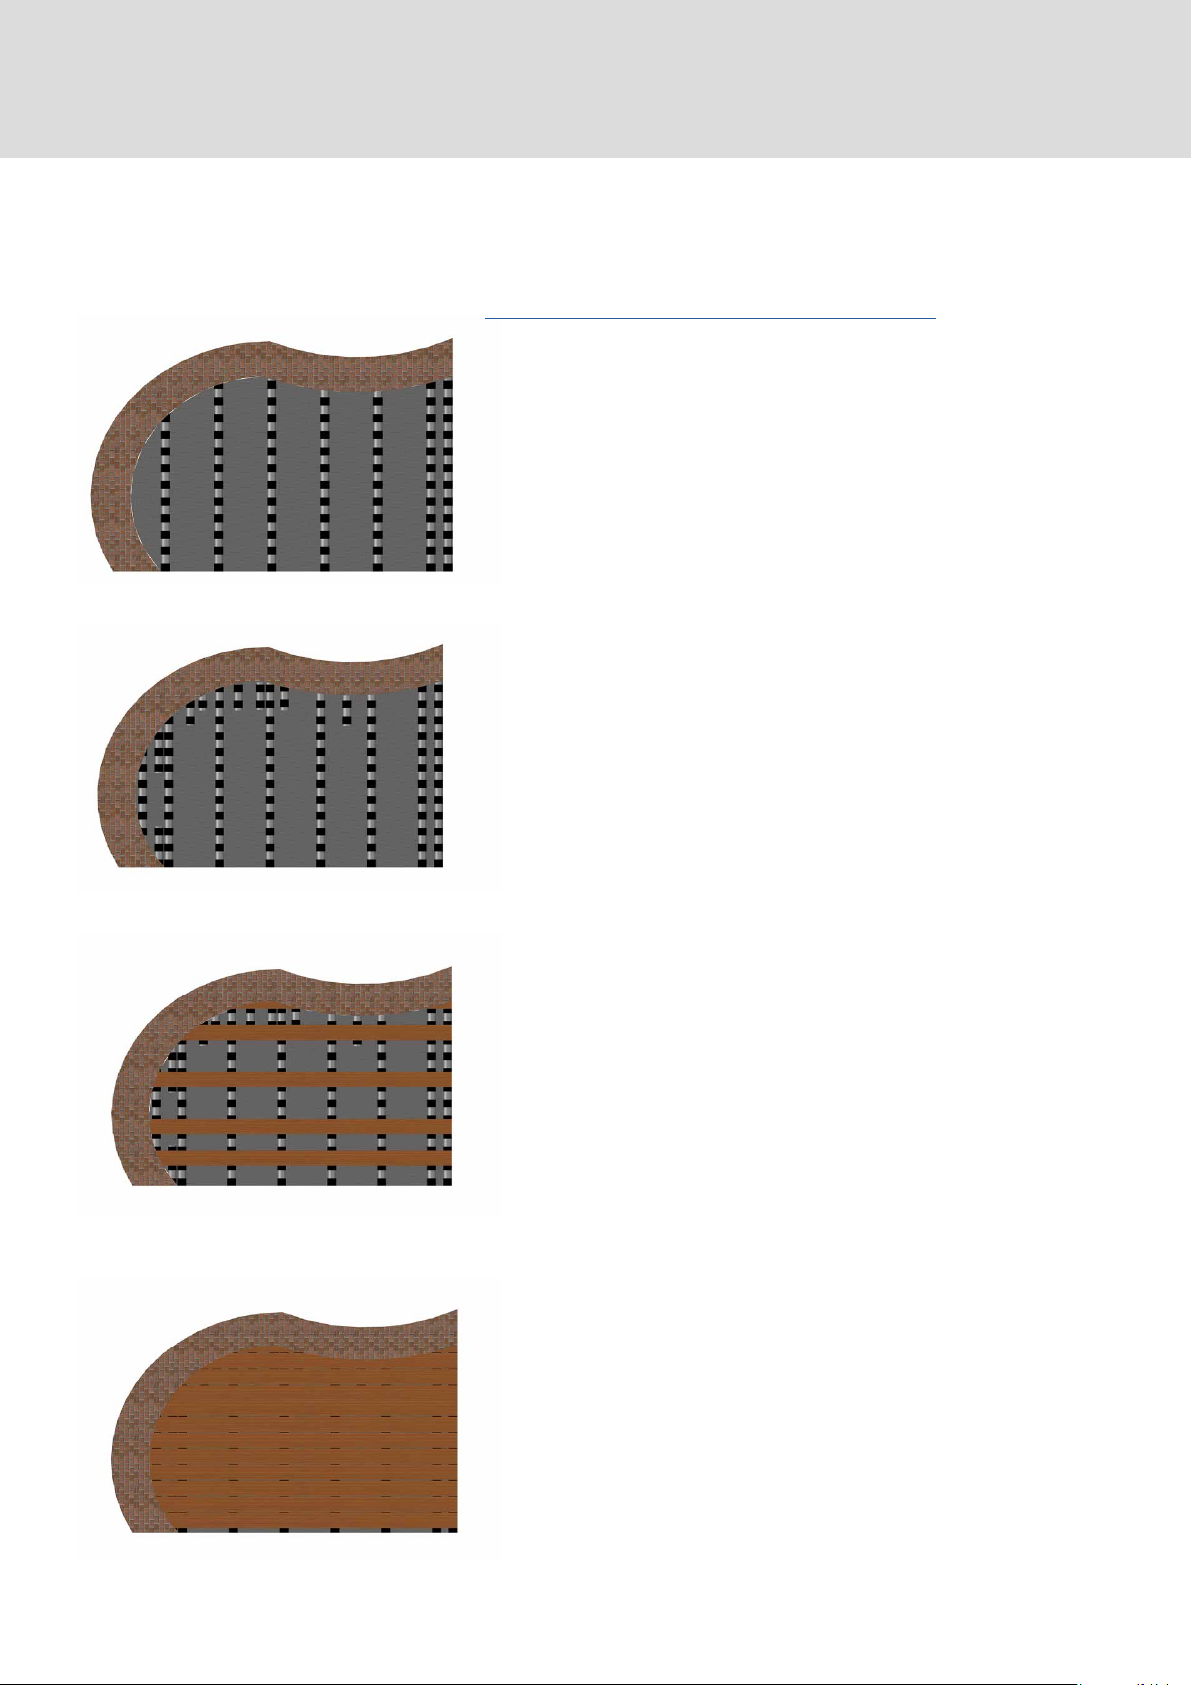
Rounded cuts
- Create the deck normally and let the boards protrude over the
area that will have to be round cut.
- Perform the cut with the right tools
- Make sure the understructure has a support clickable point at
the end of each board.
● Once cut, it is possible to install the special 10x95mm
framing prole.
● Heat the prole with a hot air gun and bend the framing
prole around the shape of the curve.
● Fix it with screws while bending it.
● Once the prole cools down, it will maintain the given bent
shape.
on the diagonal with the parallel clip pins removed.
posa del sistema EasyClickframes and finishings EasyClick system
Rounded cuts - placing the understructure
- Cut the nal part of the understructures following the desired
angle.
- Add porons of understructure among the principal ones,
otherwise the boards would not be supported in the nal part
- Cut the boards according to the desired size and complete the
deck.
Complete the deck
SUGGESTION: if a board ends up to be over an understructure
posa del sistema EasyClickframes and finishings EasyClick system
Optionals EasyClickposa del sistema EasyClickframes and finishes EasyClick system
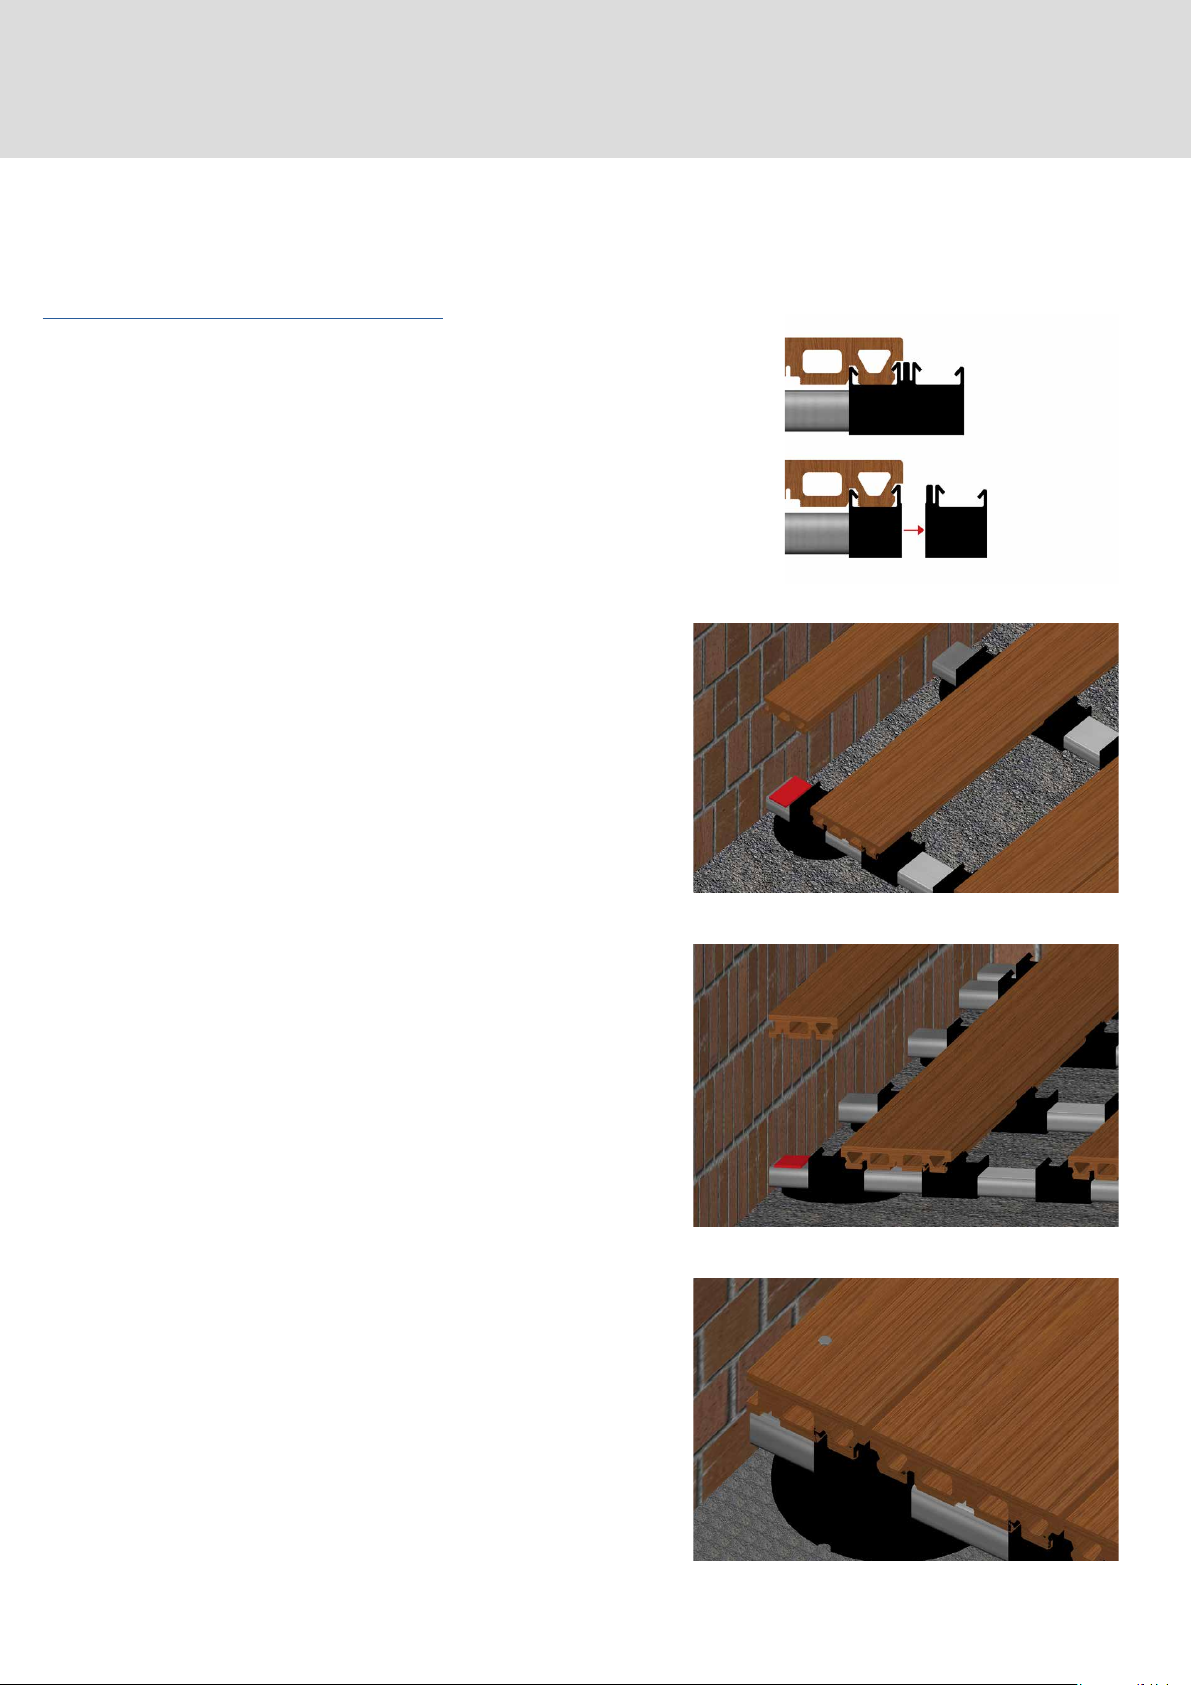
How to pull the boards close to a wall
- Cut the nal part of the clip as shown in the picture.
- Cut the board according to the needed size
- put a rubber riser as shown (in red) in the picture to
ensure the board is properly supported underneath.
- Click the board and for best results screw the outer
edge of the board down in order to secure it rmly.

together to the gap stays constant.
- Duro Excellence boards are already drilled on the underside in
preparaon of taking the iJack
Optionals EasyClick
- Turn the Duro board and click the iJack into the pre-drilled
hole, pay aenon to leave the at sides of the iJack out.
- Turn the board and click it to the understructure. Go on with
the rest of the boards if necessary.
at 17mm from the edge with a 10mm drill bit.
Counterweight plates
Useful accessory to use when
it’s not possible to drill the
soil. Counterweight plates are
50x30x2cm and 24kg each.
ClickOUT
the CLIP B understructure.
We suggest to place the plates around the perimeter of the deck at a
spacing of 1 metre one from each other. In the case of much larger areas
- ATTENTION: EasyClick system is the only in the world to block each board
posa del sistema EasyClickframes and finishes EasyClick system


IDECK SRL
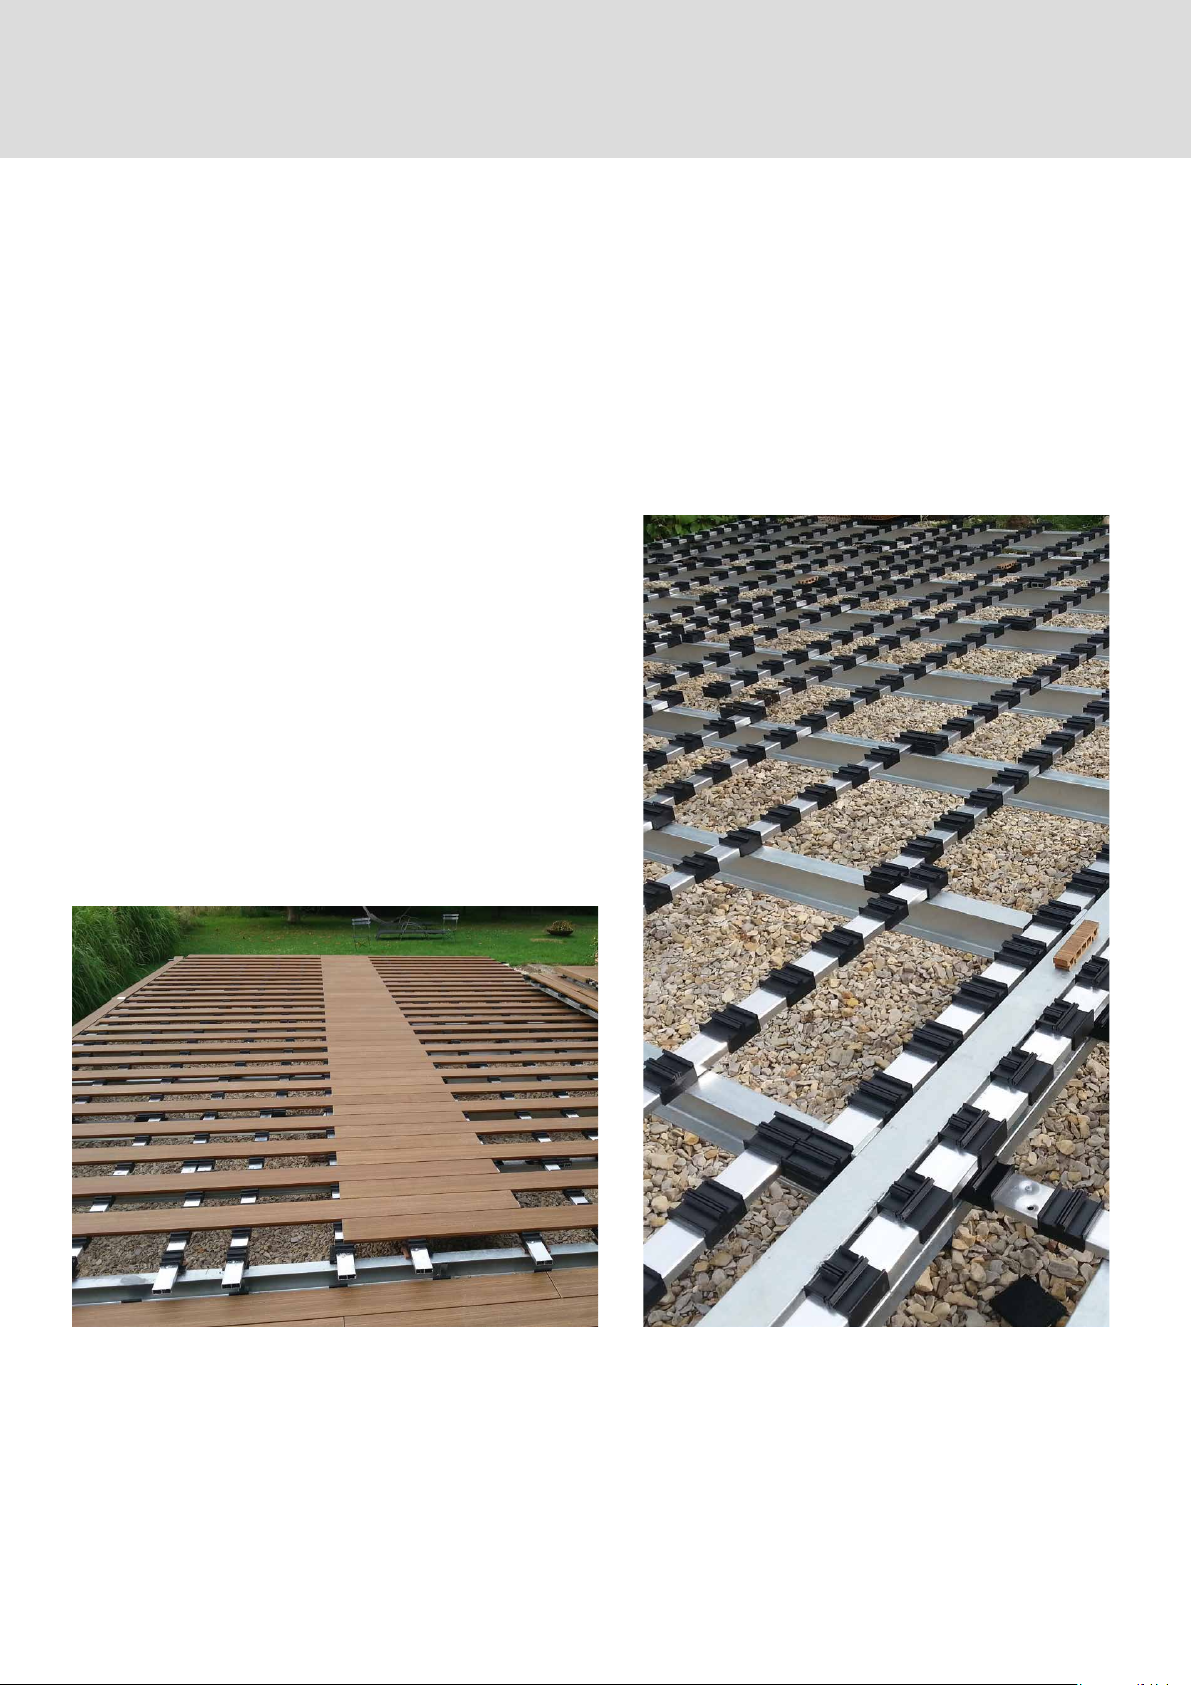
EasyClick system
Professional Deck builders will be extremely happy to know that
iDecking EasyClick system won’t force them on their knees all day long
and will also drascally reduce installaon me!
Say good bye to wasng your me aligning each decking board
since ourEasyClicksystemautomacallyalignsioryou! EasyClick
understructure “rails” are placed every 40 cm, locking each decking
board on four dierent points increasing the strength of the enre
oor/wall structure.
Special EasyClick clips are also available to serve any decking design.
zone

EasyClick system
www.idecksystems.com
Popular Indoor Furnishing manuals by other brands

Innovation Living
Innovation Living BRAGI 2 ARMS Assembly instuctions

VIBO
VIBO Galaxy 041-VGSBO Series Assembling instructions

URBAN OUTFITTERS
URBAN OUTFITTERS Ezra Side Table Assembly instructions

Sauder
Sauder 408951 Assembly instructions

Ty Pennington
Ty Pennington Style KEY LARGO SECTIONAL SOFA SET Use and care guide

ZEITRAUM
ZEITRAUM SILENT Assembly instructions

OfficeSource
OfficeSource PBTR66 Assembly instructions

Fusion
Fusion 2K Series Operation manual

L.L.Bean
L.L.Bean OTNQ9 quick start guide

convenience concepts
convenience concepts 7104090 Assembly instructions

Okay
Okay STELLA D30 Assembly instruction

Furniture Solutions
Furniture Solutions CAESAR 17CAEC02CX2 instruction manual


