IDENMATIC IDH-811 Use and care manual
1
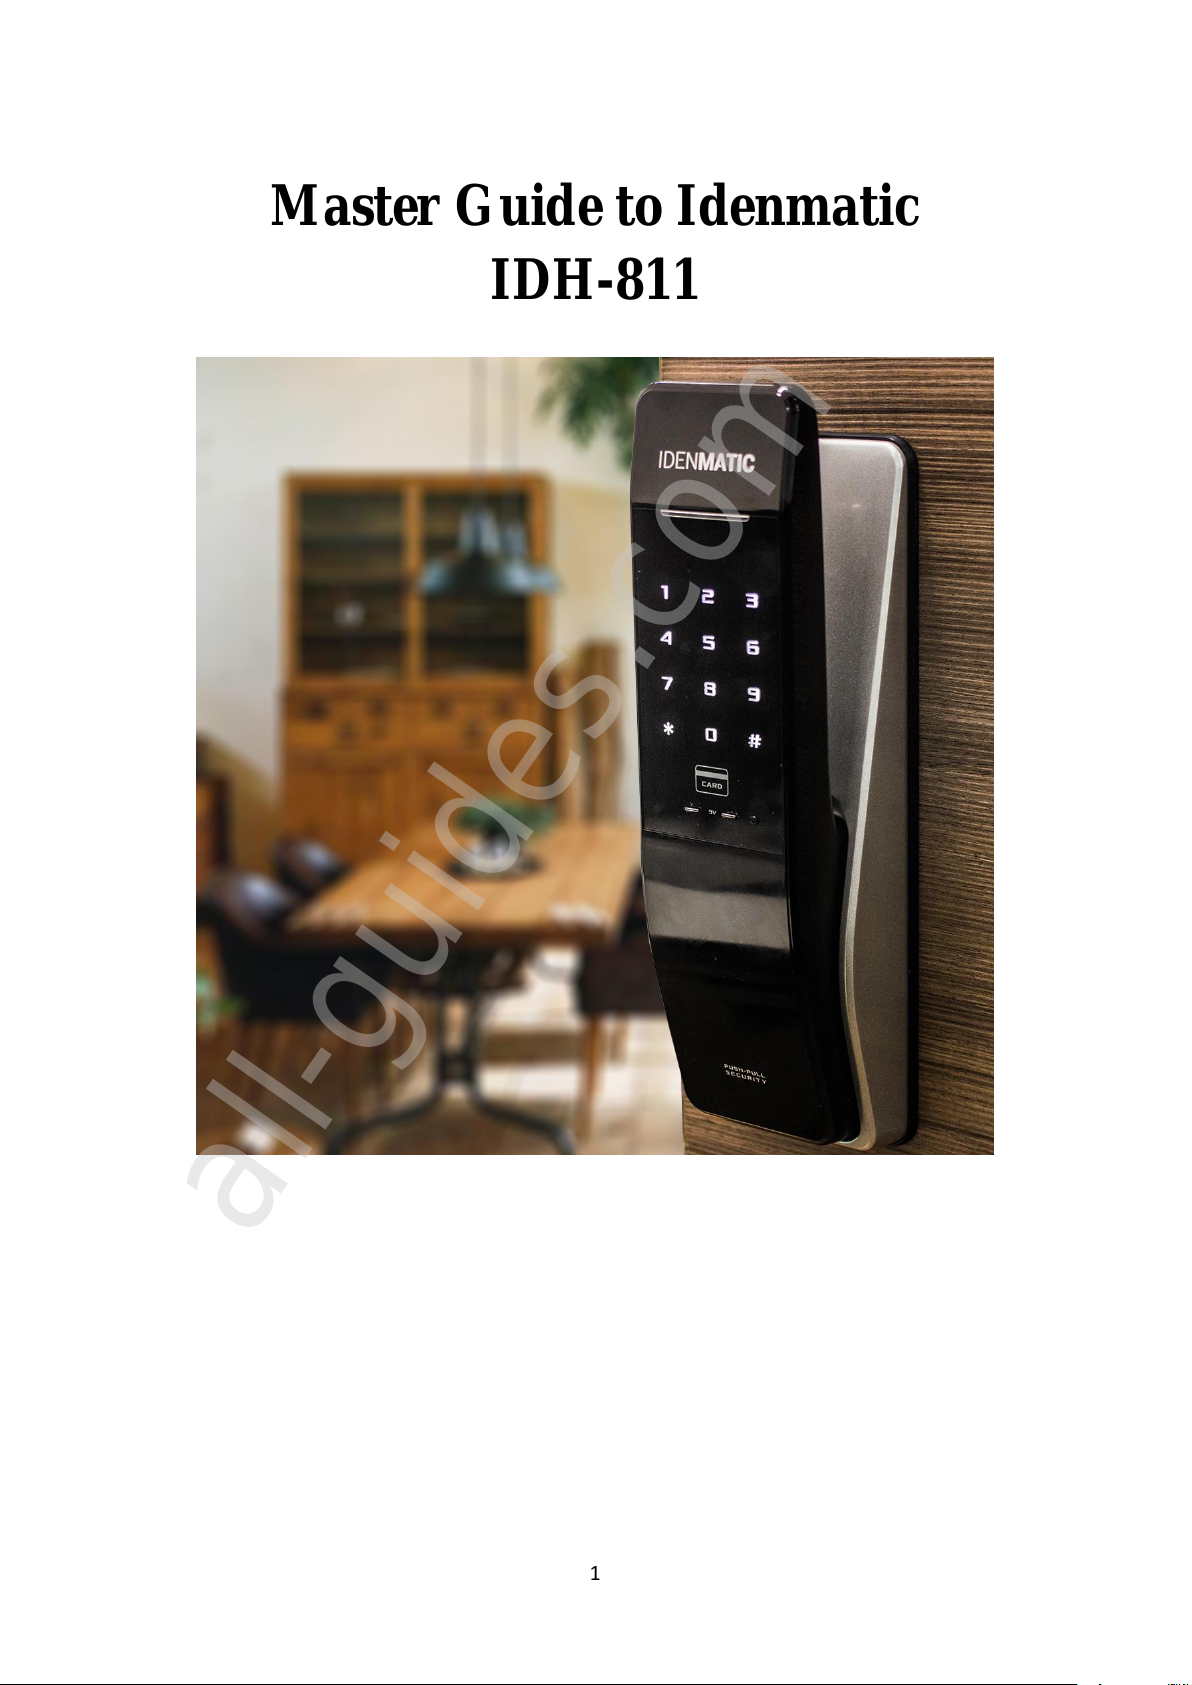
Master Guide to Idenmatic
IDH-811
All manuals and user guides at all-guides.com
all-guides.com

2
Contents
General Information ......................................................................................................4
Precautions ....................................................................................................................5
Product Specification ....................................................................................................6
Settings ..........................................................................................................................7
Password Registration................................................................................................7
RFID card Registration ..............................................................................................8
RFID card Deletion....................................................................................................9
Fingerprint Registration ...........................................................................................10
Fingerprint Deletion.................................................................................................11
Pattern Registration..................................................................................................12
Sound Pitch setting...................................................................................................13
Manual lock mode....................................................................................................13
Automatic lock mode time setting ...........................................................................14
Automatic lock mode...............................................................................................14
Mobile Application Setup ........................................................................................15
Remote Controller Registration ...............................................................................18
Remote Controller Deletion.....................................................................................19
Battery Replacement Method...................................................................................20
Operations....................................................................................................................21
Authentication Methods...........................................................................................21
Password................................................................................................................21
RFID Key Card.....................................................................................................21
Fingerprint.............................................................................................................21
Pattern Unlock.......................................................................................................22
KeyWe Mobile Application..................................................................................22
Opening with fake password....................................................................................37
Opening on silent mode............................................................................................38
Manual locking methods..........................................................................................38
Outward double –locking / Privacy mode function................................................39
All manuals and user guides at all-guides.com

3
Inward double –locking / Child lock function........................................................39
Other Special Functions/Features................................................................................40
Security Alarm function...........................................................................................40
Fire Safety function..................................................................................................40
Battery Low Indicator ..............................................................................................41
Keypad Illumination.................................................................................................41
All manuals and user guides at all-guides.com
4
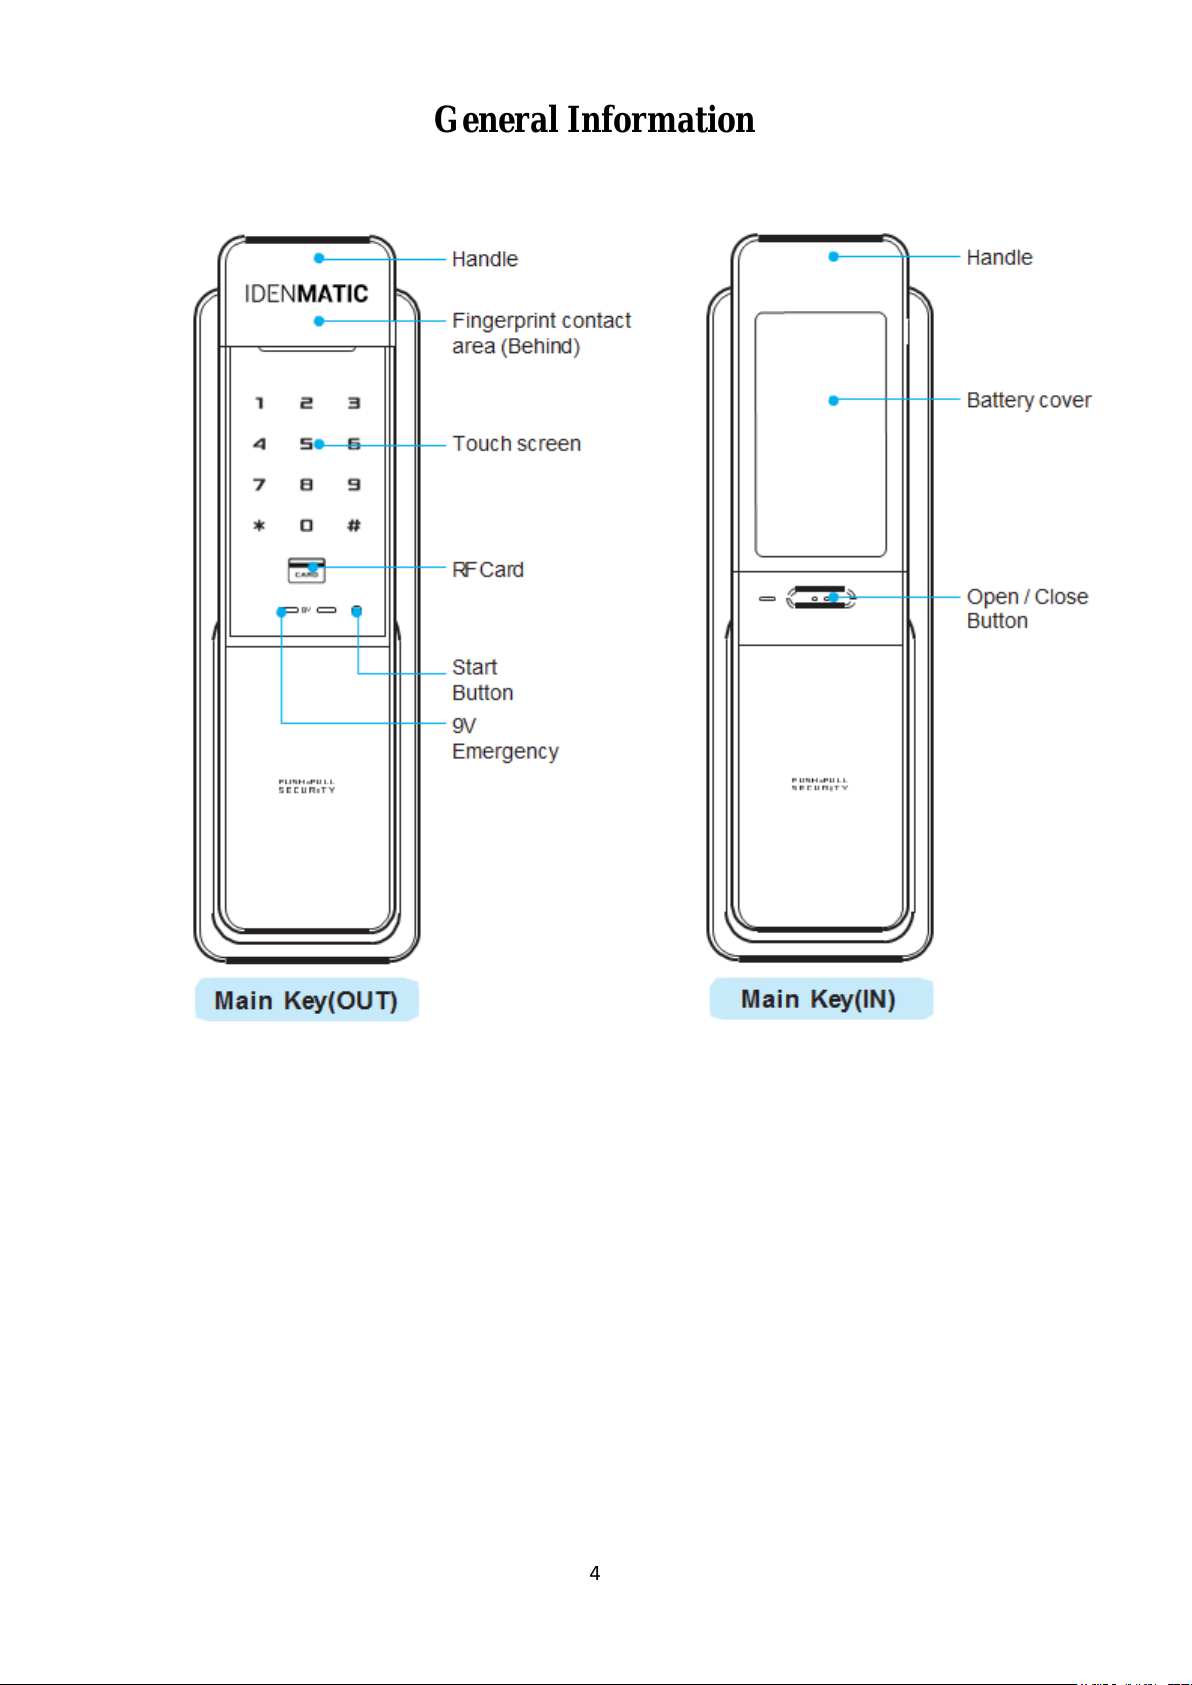
General Information
All manuals and user guides at all-guides.com

5
Precautions
All manuals and user guides at all-guides.com
6
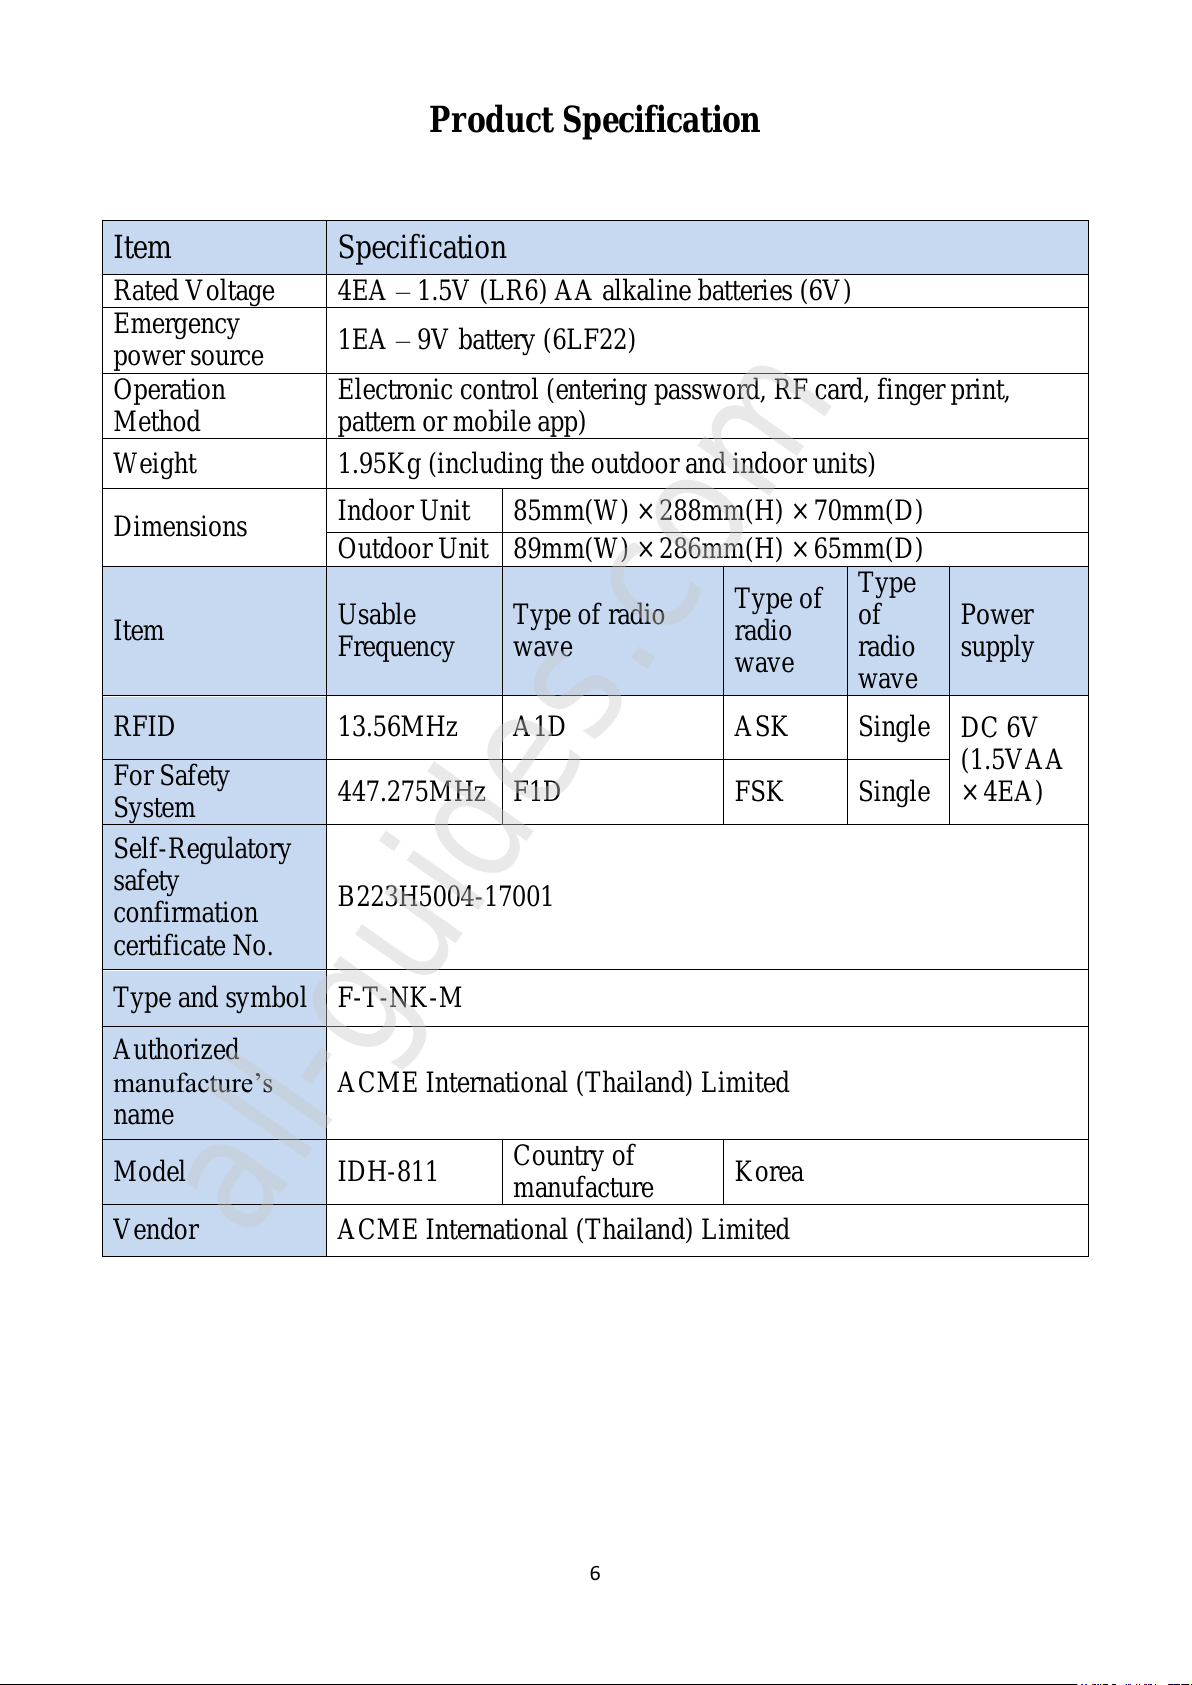
Product Specification
Item
Specification
Rated Voltage
4EA –1.5V (LR6) AA alkaline batteries (6V)
Emergency
power source
1EA –9V battery (6LF22)
Operation
Method
Electronic control (entering password, RF card, finger print,
pattern or mobile app)
Weight
1.95Kg (including the outdoor and indoor units)
Dimensions
Indoor Unit
85mm(W) × 288mm(H) × 70mm(D)
Outdoor Unit
89mm(W) × 286mm(H) × 65mm(D)
Item
Usable
Frequency
Type of radio
wave
Type of
radio
wave
Type
of
radio
wave
Power
supply
RFID
13.56MHz
A1D
ASK
Single
DC 6V
(1.5VAA
× 4EA)
For Safety
System
447.275MHz
F1D
FSK
Single
Self-Regulatory
safety
confirmation
certificate No.
B223H5004-17001
Type and symbol
F-T-NK-M
Authorized
manufacture’s
name
ACME International (Thailand) Limited
Model
IDH-811
Country of
manufacture
Korea
Vendor
ACME International (Thailand) Limited
All manuals and user guides at all-guides.com
all-guides.com
7
Settings
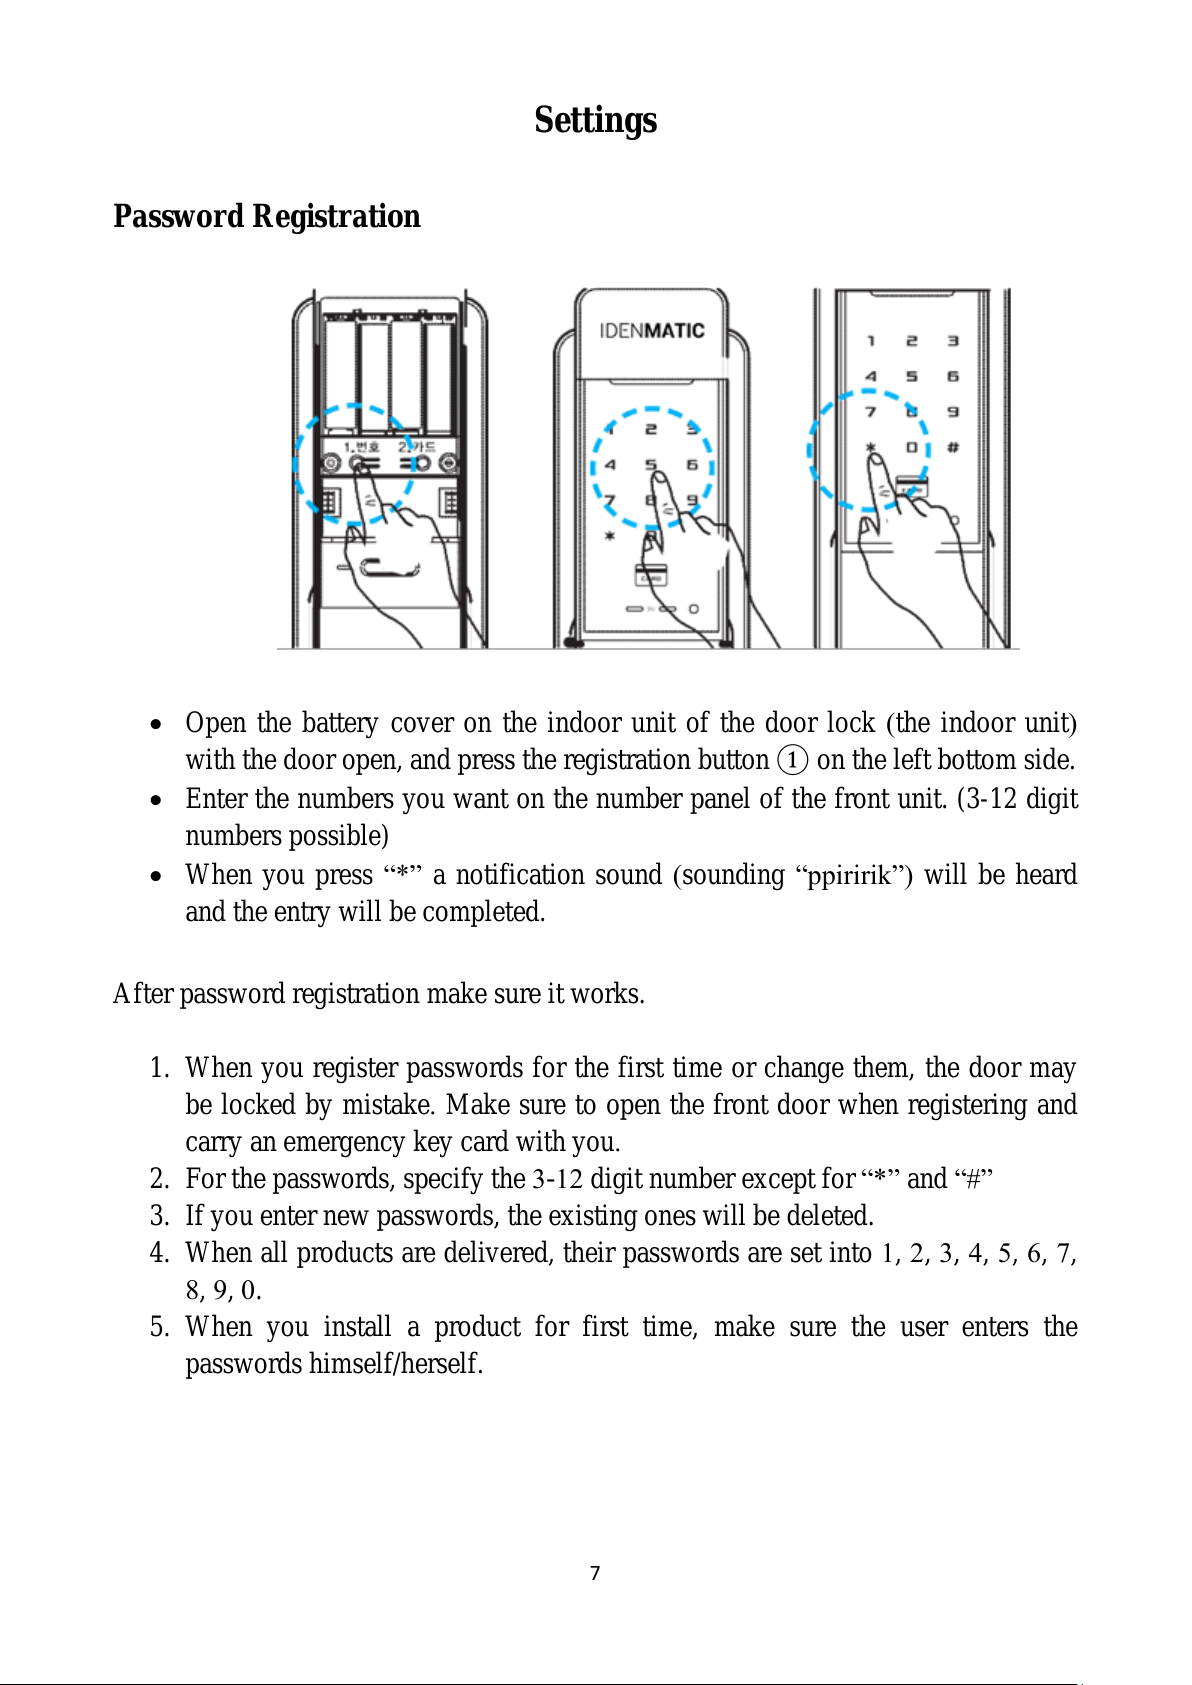
Password Registration
Open the battery cover on the indoor unit of the door lock (the indoor unit)
with the door open, and press the registration button ① on the left bottom side.
Enter the numbers you want on the number panel of the front unit. (3-12 digit
numbers possible)
When you press “*” a notification sound (sounding “ppiririk”) will be heard
and the entry will be completed.
After password registration make sure it works.
1. When you register passwords for the first time or change them, the door may
be locked by mistake. Make sure to open the front door when registering and
carry an emergency key card with you.
2. For the passwords, specify the 3-12 digit number except for “*” and “#”
3. If you enter new passwords, the existing ones will be deleted.
4. When all products are delivered, their passwords are set into 1, 2, 3, 4, 5, 6, 7,
8, 9, 0.
5. When you install a product for first time, make sure the user enters the
passwords himself/herself.
All manuals and user guides at all-guides.com
8
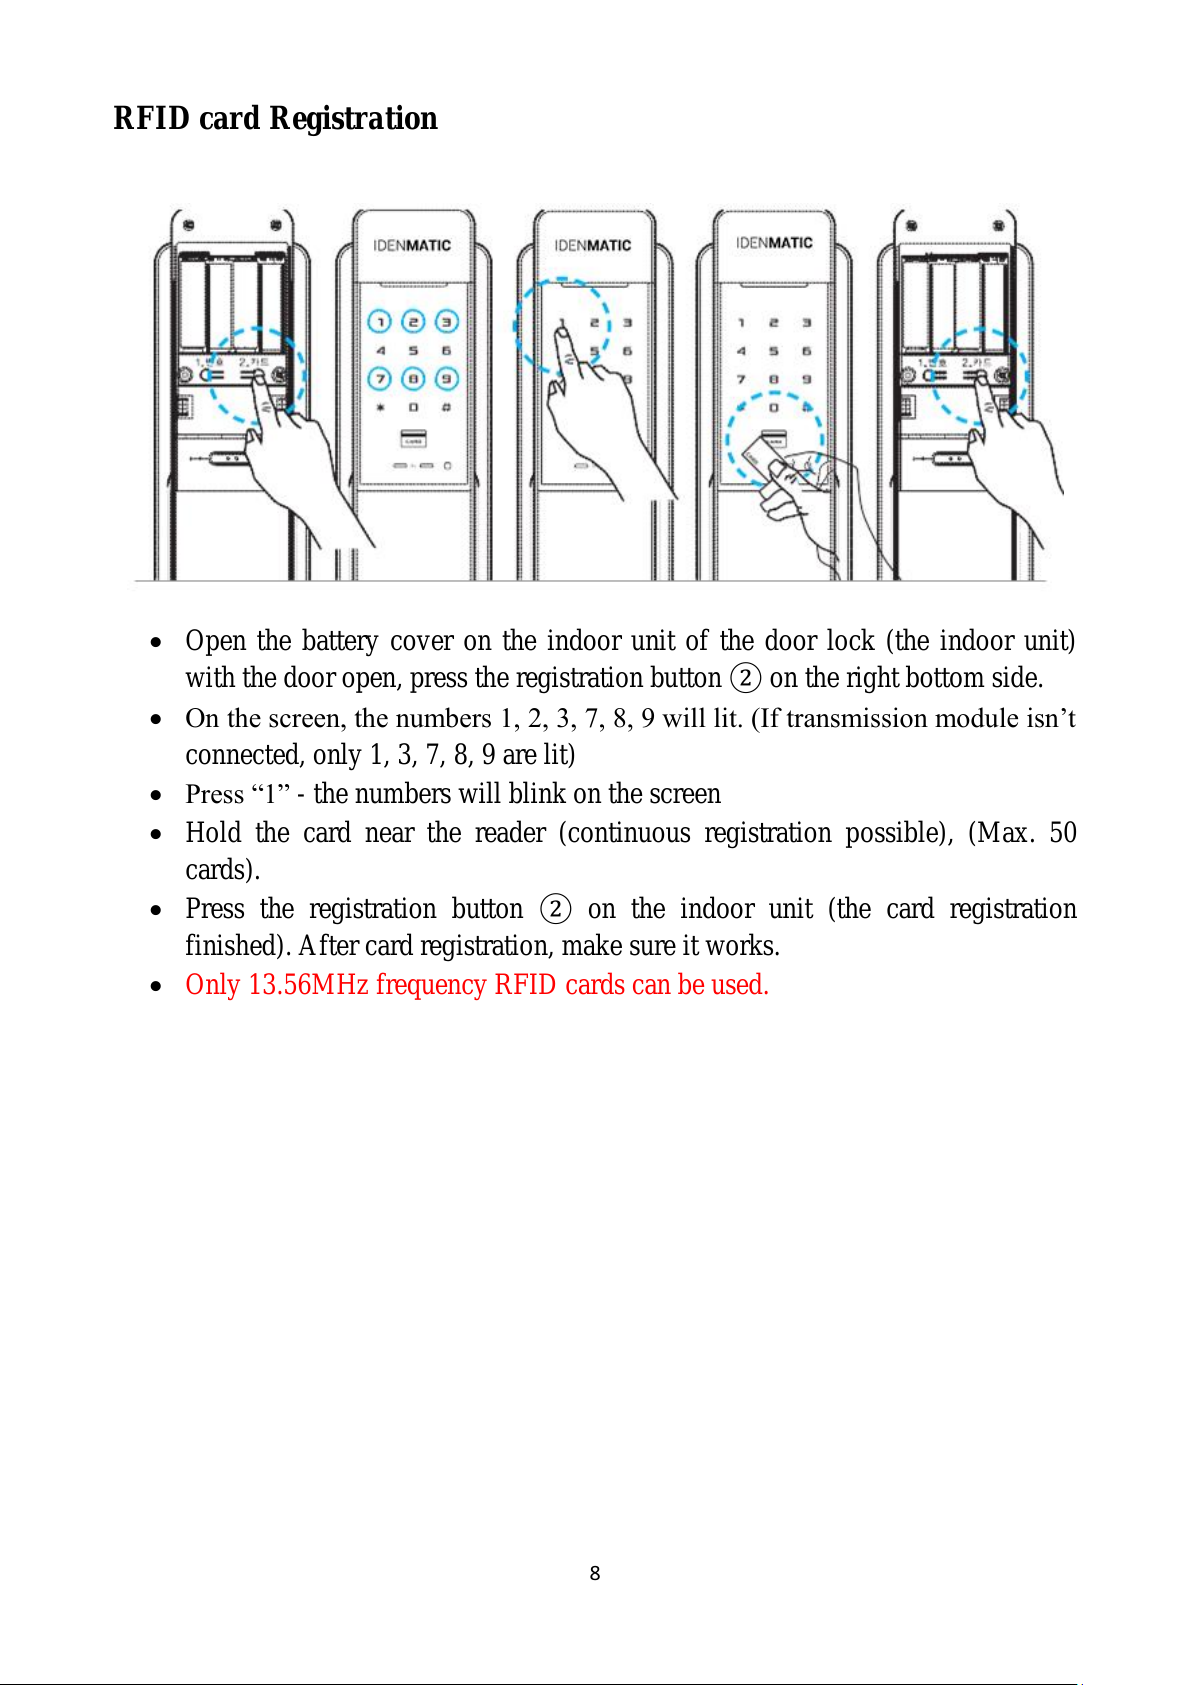
RFID card Registration
Open the battery cover on the indoor unit of the door lock (the indoor unit)
with the door open, press the registration button ②on the right bottom side.
On the screen, the numbers 1, 2, 3, 7, 8, 9 will lit. (If transmission module isn’t
connected, only 1, 3, 7, 8, 9 are lit)
Press “1” - the numbers will blink on the screen
Hold the card near the reader (continuous registration possible), (Max. 50
cards).
Press the registration button ②on the indoor unit (the card registration
finished). After card registration, make sure it works.
Only 13.56MHz frequency RFID cards can be used.
All manuals and user guides at all-guides.com

9
RFID card Deletion
Open the battery cover on the indoor unit of the door lock (the indoor part)
with the door open, and press the registration button ②on the right bottom
side.
On the screen, the numbers 1, 2, 3, 7, 8, 9 are lit. (If transmission module isn’t
connected, only 1, 3, 7, 8, 9 are lit)
Press “7” — on the screen, “#” is lit (the card deletion ready)
When you press and hold “#” for 3 seconds, all the cards will be deleted, with a
notification sound.
All manuals and user guides at all-guides.com
10
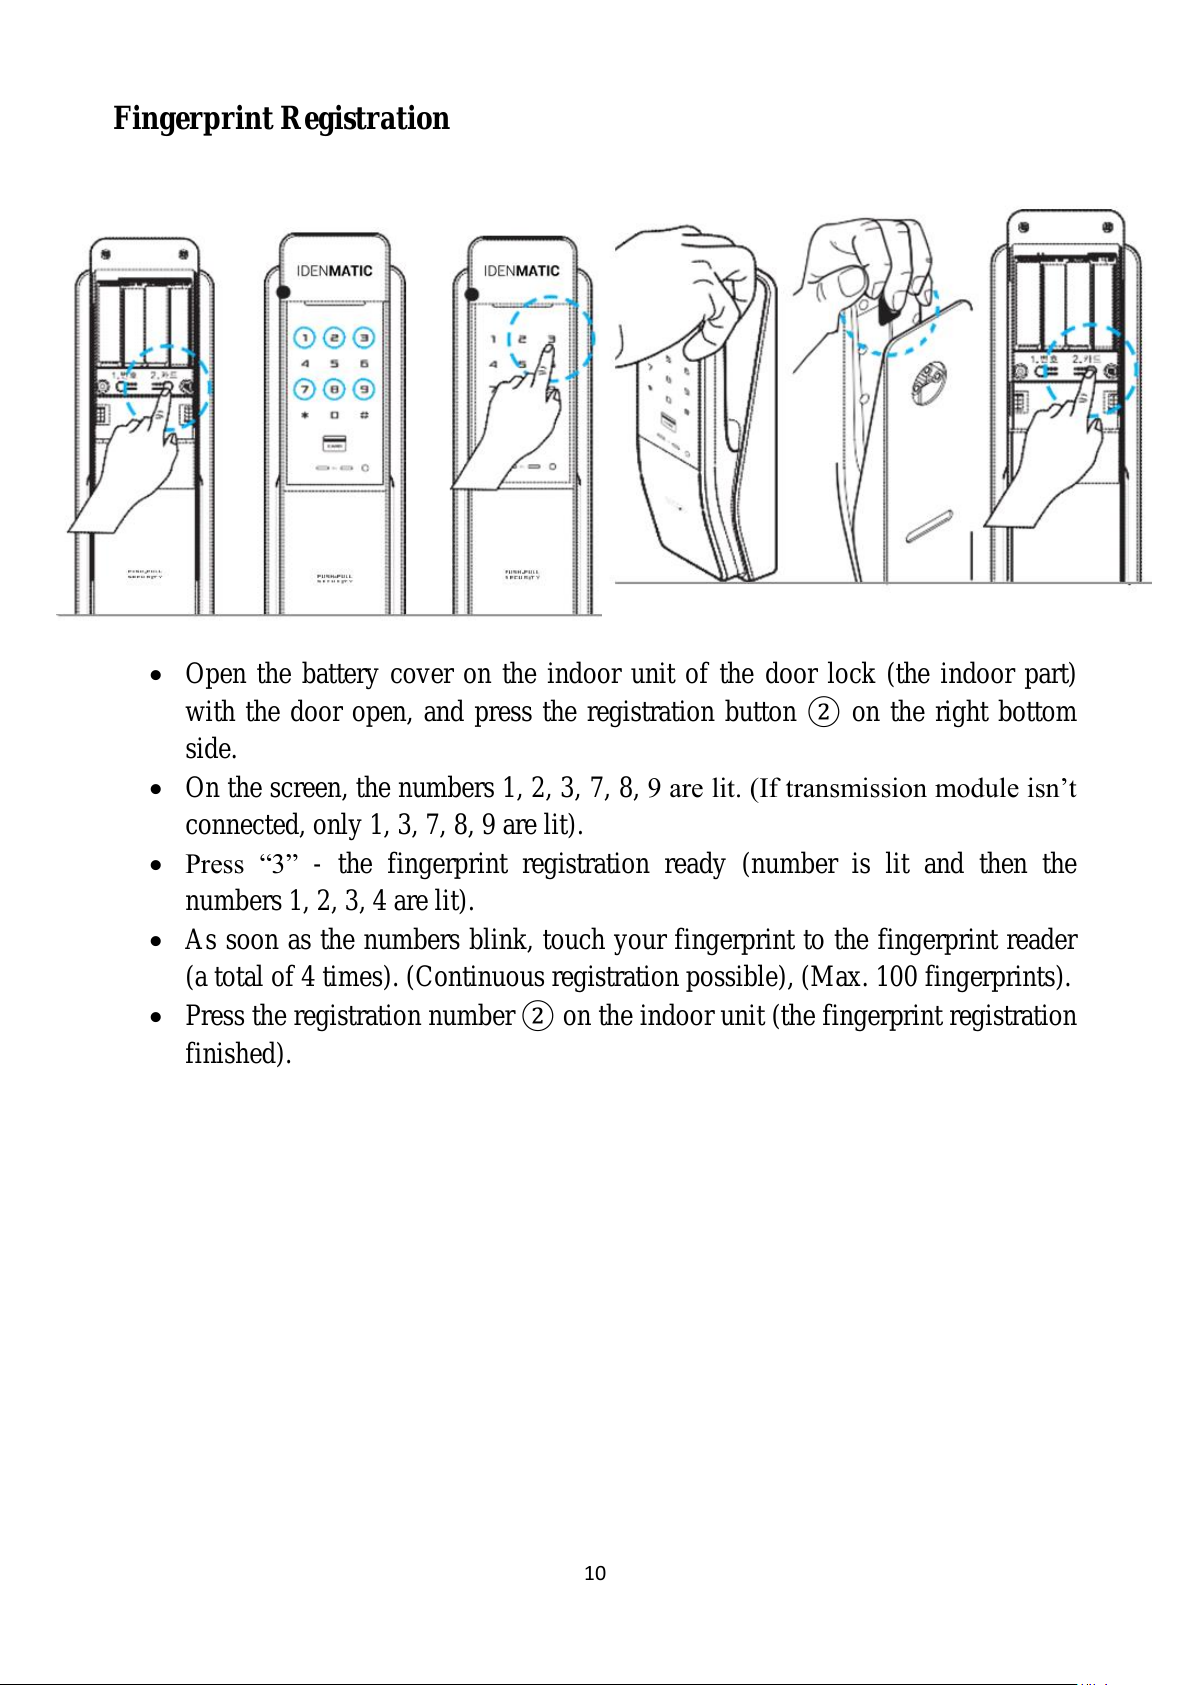
Fingerprint Registration
Open the battery cover on the indoor unit of the door lock (the indoor part)
with the door open, and press the registration button ②on the right bottom
side.
On the screen, the numbers 1, 2, 3, 7, 8, 9 are lit. (If transmission module isn’t
connected, only 1, 3, 7, 8, 9 are lit).
Press “3” - the fingerprint registration ready (number is lit and then the
numbers 1, 2, 3, 4 are lit).
As soon as the numbers blink, touch your fingerprint to the fingerprint reader
(a total of 4 times). (Continuous registration possible), (Max. 100 fingerprints).
Press the registration number ②on the indoor unit (the fingerprint registration
finished).
All manuals and user guides at all-guides.com
11
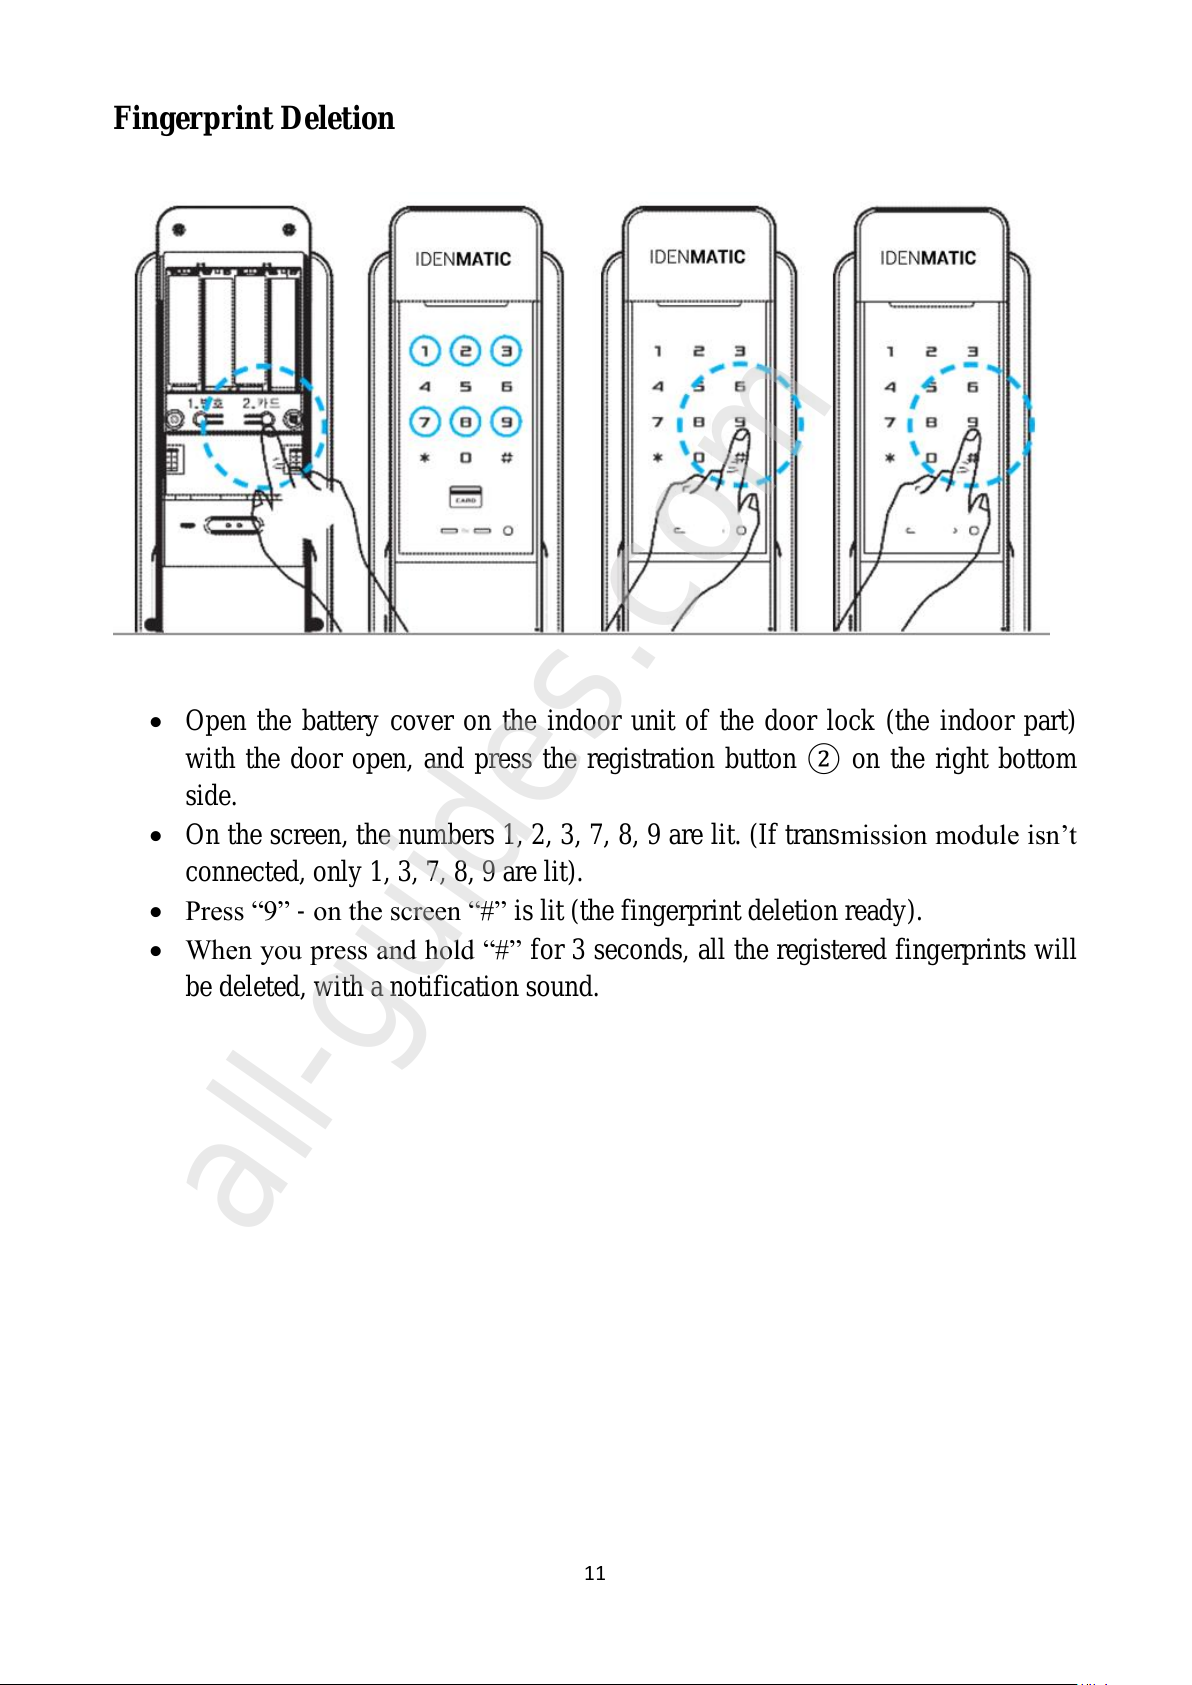
Fingerprint Deletion
Open the battery cover on the indoor unit of the door lock (the indoor part)
with the door open, and press the registration button ②on the right bottom
side.
On the screen, the numbers 1, 2, 3, 7, 8, 9 are lit. (If transmission module isn’t
connected, only 1, 3, 7, 8, 9 are lit).
Press “9” - on the screen “#” is lit (the fingerprint deletion ready).
When you press and hold “#” for 3 seconds, all the registered fingerprints will
be deleted, with a notification sound.
All manuals and user guides at all-guides.com
all-guides.com
12
Pattern Registration
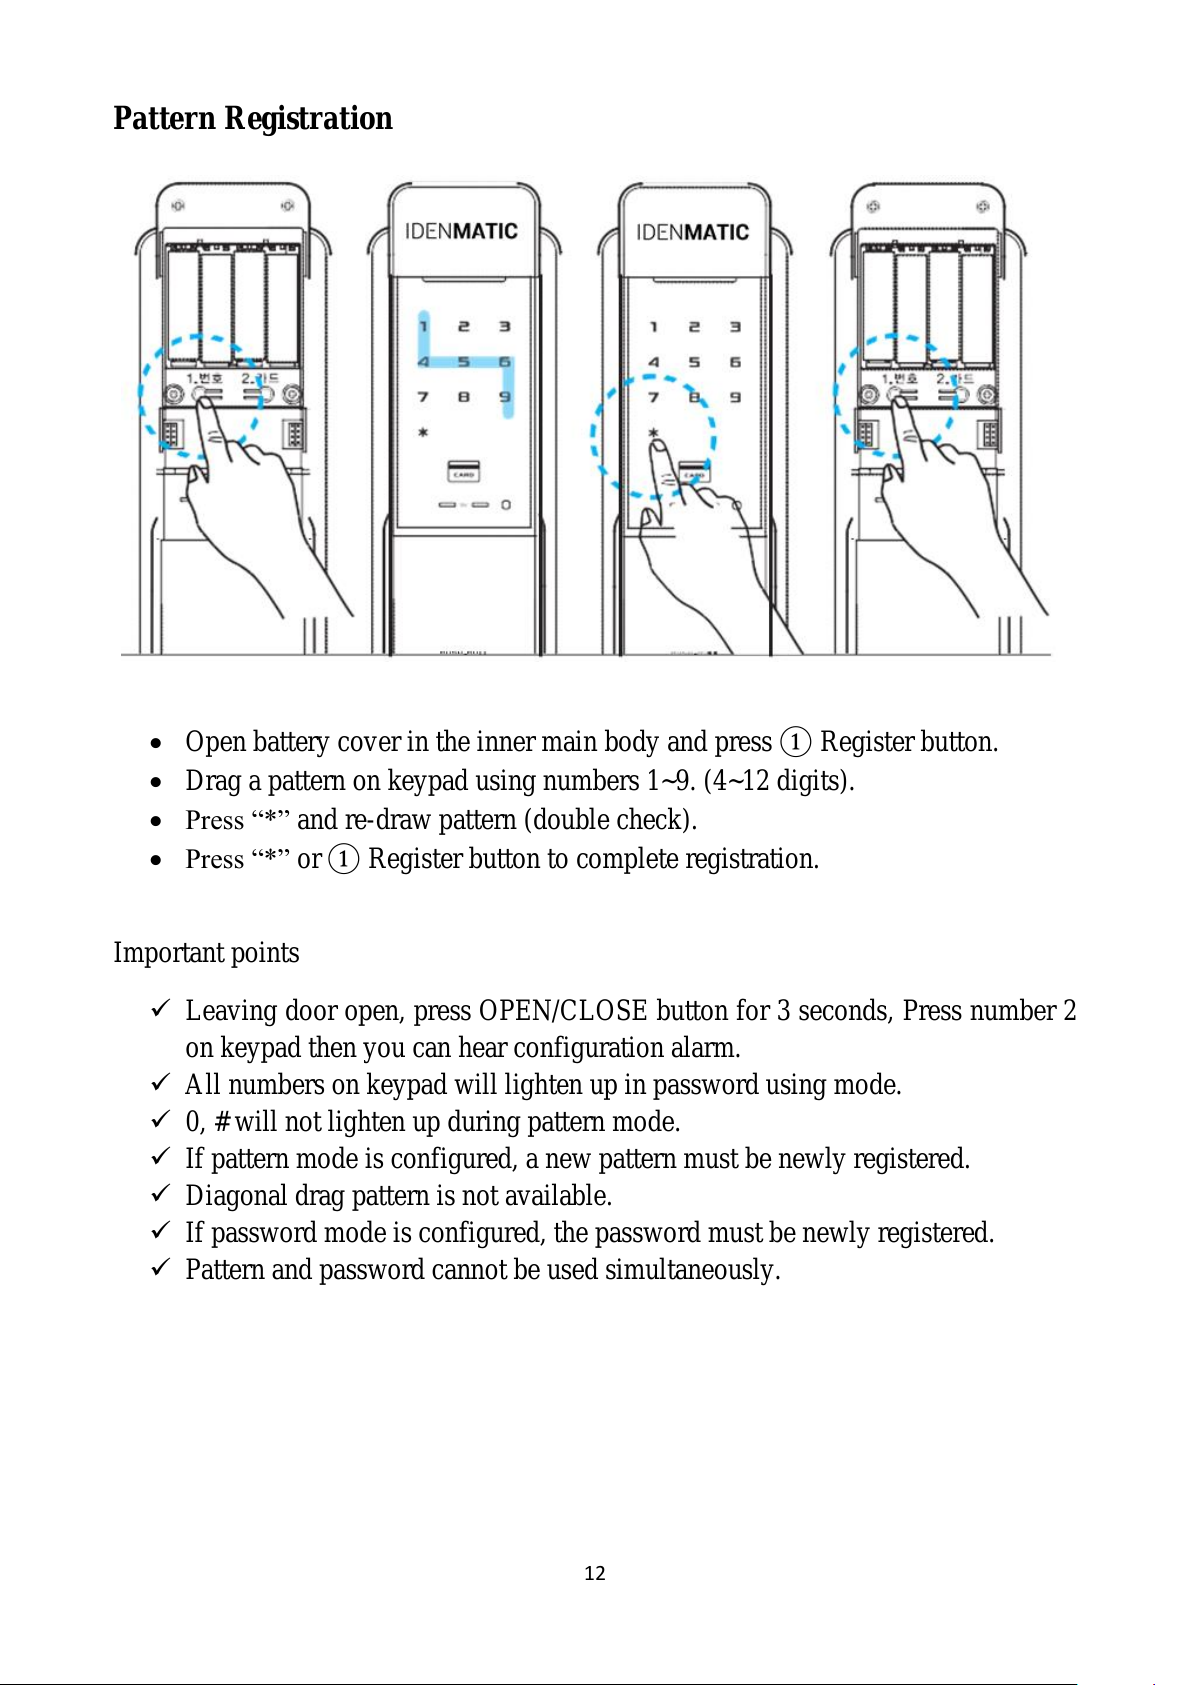
Open battery cover in the inner main body and press ①Register button.
Drag a pattern on keypad using numbers 1~9. (4~12 digits).
Press “*” and re-draw pattern (double check).
Press “*” or ①Register button to complete registration.
Important points
Leaving door open, press OPEN/CLOSE button for 3 seconds, Press number 2
on keypad then you can hear configuration alarm.
All numbers on keypad will lighten up in password using mode.
0, # will not lighten up during pattern mode.
If pattern mode is configured, a new pattern must be newly registered.
Diagonal drag pattern is not available.
If password mode is configured, the password must be newly registered.
Pattern and password cannot be used simultaneously.
All manuals and user guides at all-guides.com
13
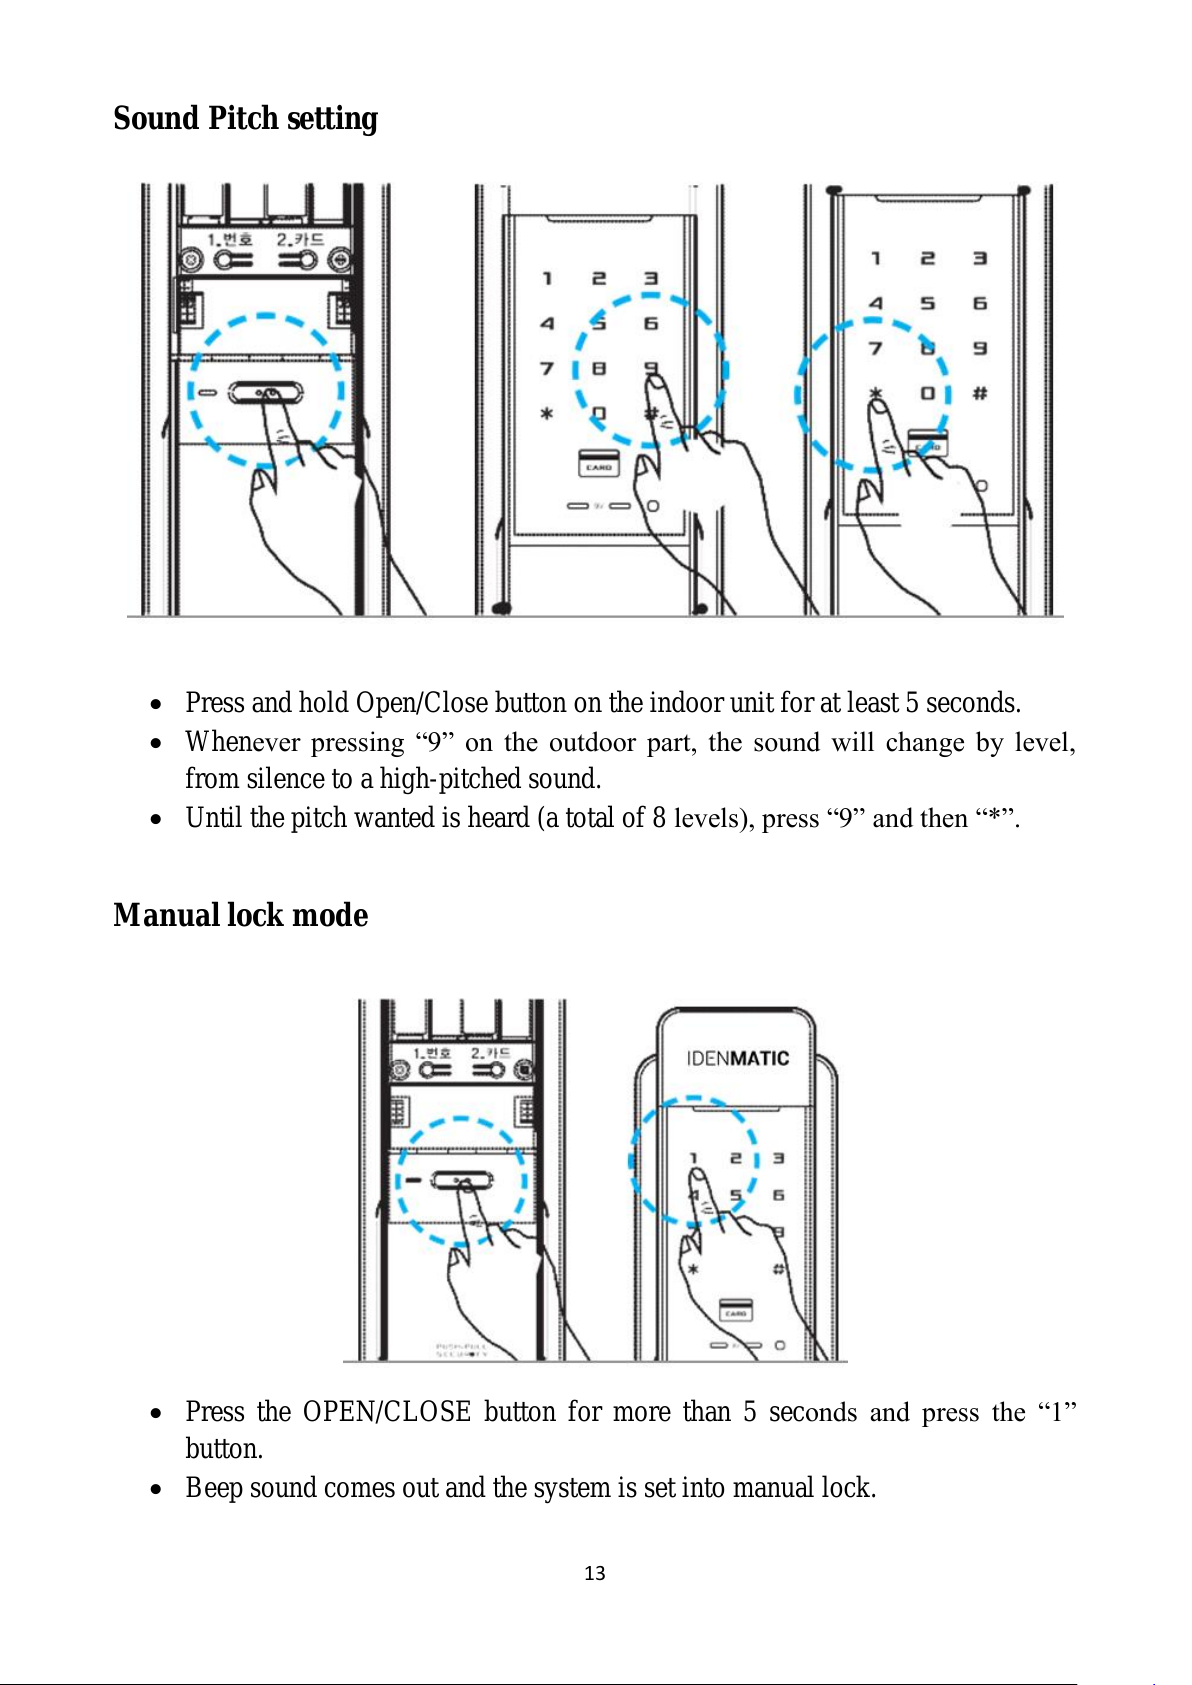
Sound Pitch setting
Press and hold Open/Close button on the indoor unit for at least 5 seconds.
Whenever pressing “9” on the outdoor part, the sound will change by level,
from silence to a high-pitched sound.
Until the pitch wanted is heard (a total of 8 levels), press “9” and then “*”.
Manual lock mode
Press the OPEN/CLOSE button for more than 5 seconds and press the “1”
button.
Beep sound comes out and the system is set into manual lock.
All manuals and user guides at all-guides.com
14
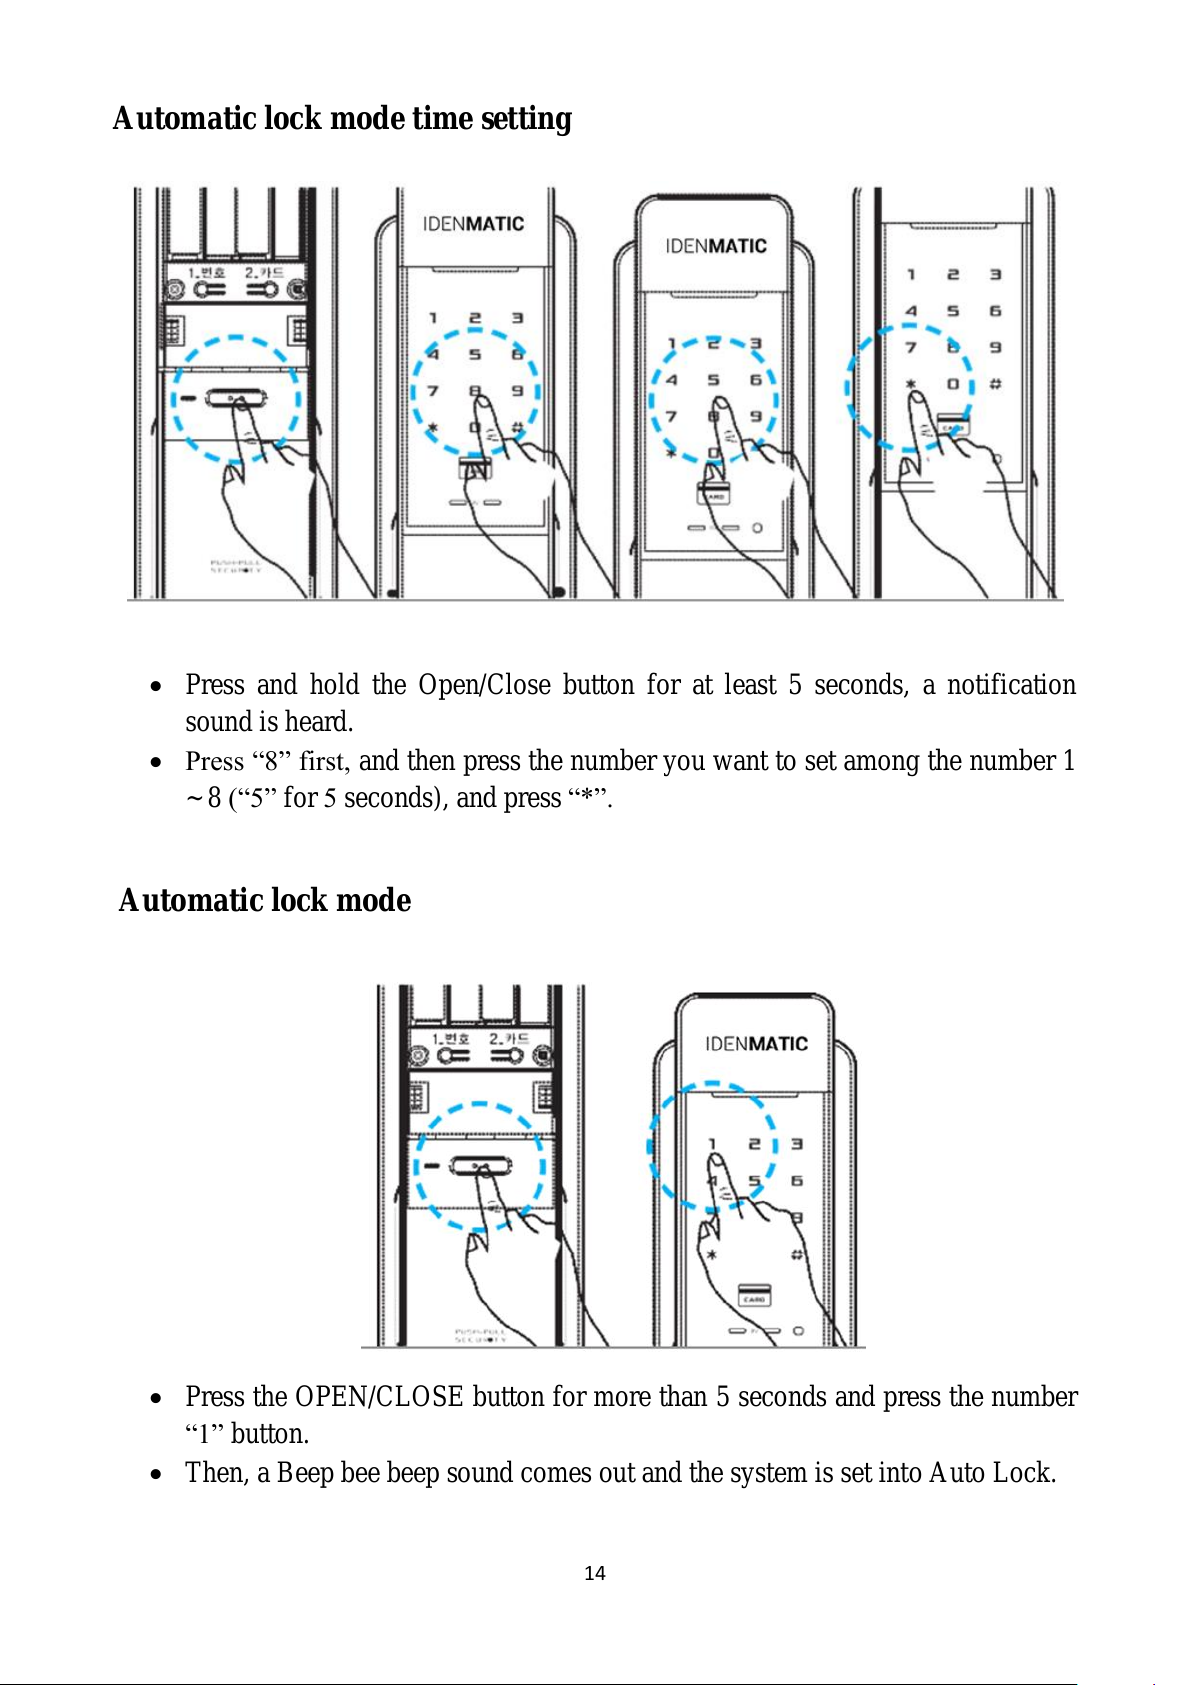
Automatic lock mode time setting
Press and hold the Open/Close button for at least 5 seconds, a notification
sound is heard.
Press “8” first, and then press the number you want to set among the number 1
~ 8 (“5” for 5 seconds), and press “*”.
Automatic lock mode
Press the OPEN/CLOSE button for more than 5 seconds and press the number
“1” button.
Then, a Beep bee beep sound comes out and the system is set into Auto Lock.
All manuals and user guides at all-guides.com

15
Mobile Application Setup
All manuals and user guides at all-guides.com

16
Widgets
On the left –Android app widget - Press and hold on any home screen on your
Android phone. There are two different types. One large widget and one small
widget. On the large widget, the access records will be displayed.
On the right –IOS app widget - You can use KeyWe widget by pulling down the top
of smartphone. You can select the door lock by using the previous and next buttons
All manuals and user guides at all-guides.com
all-guides.com
17
on both sides, and you can control the door lock by pressing the lock shape button in
the middle.
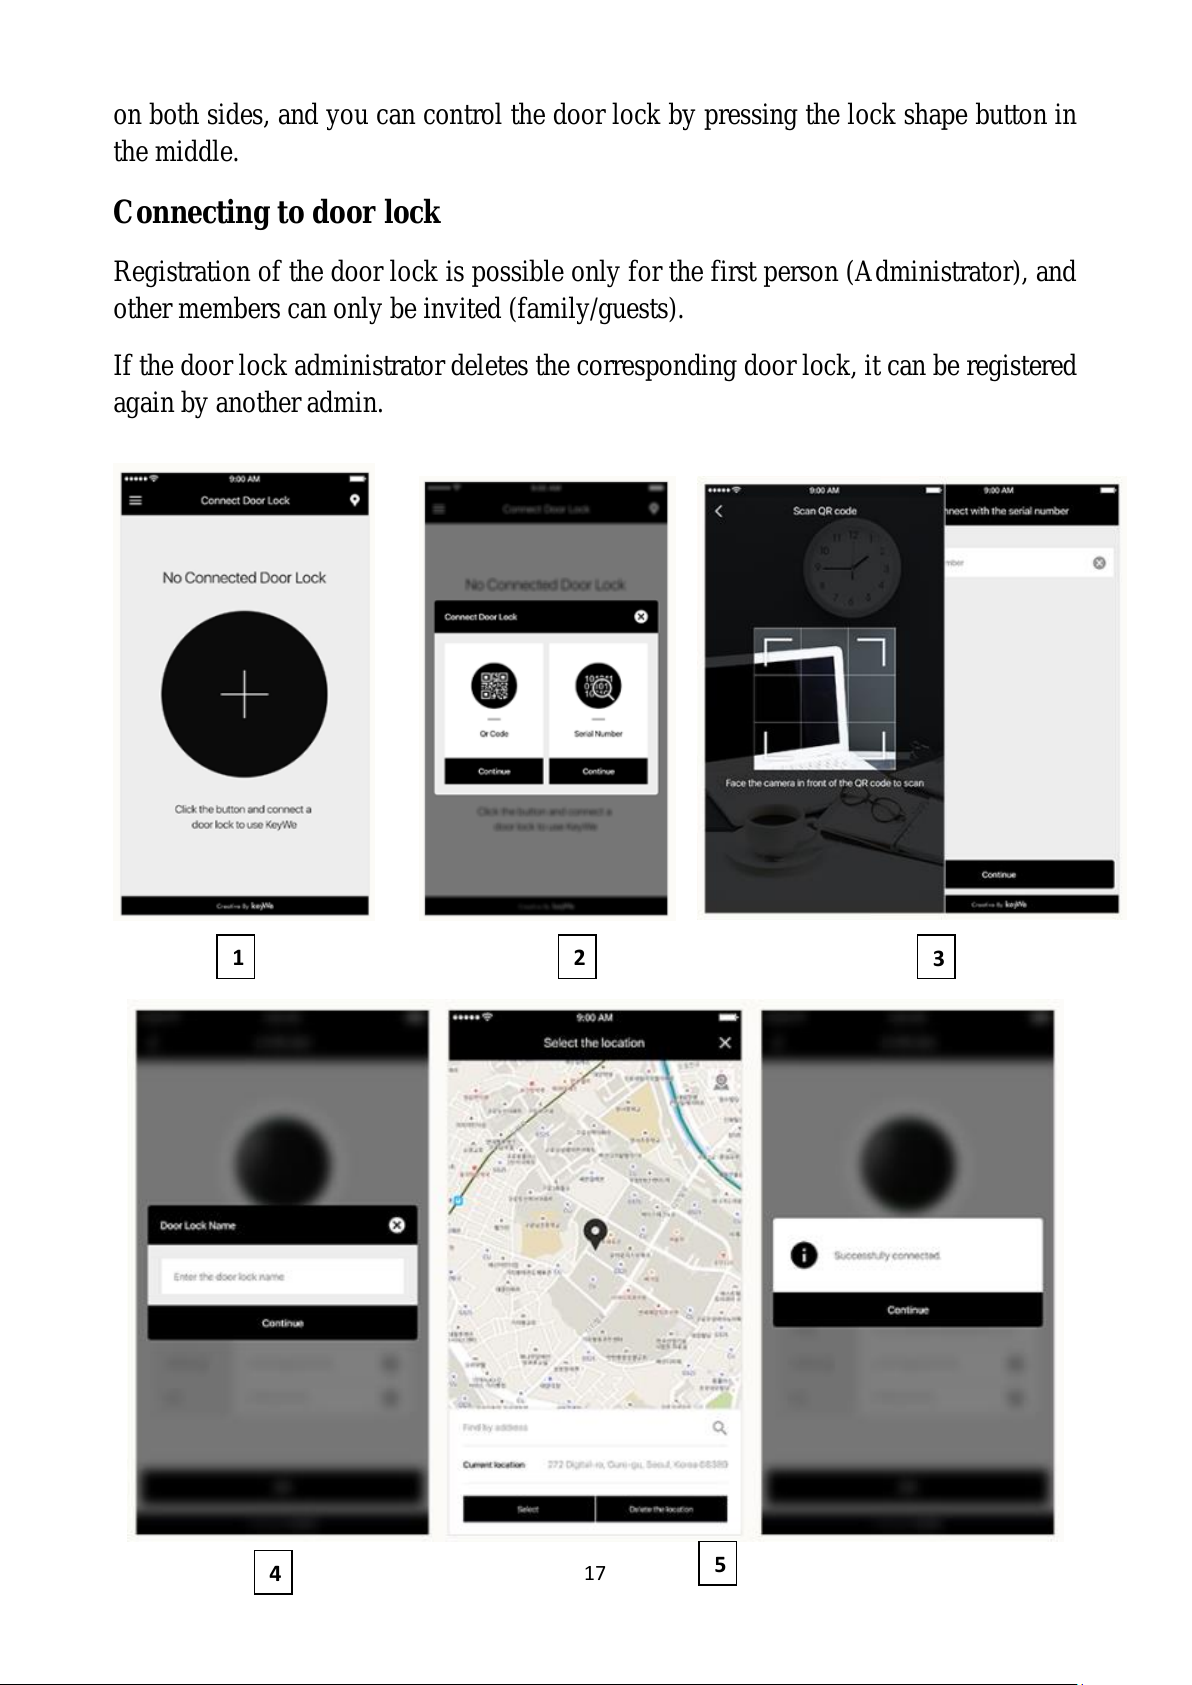
Connecting to door lock
Registration of the door lock is possible only for the first person (Administrator), and
other members can only be invited (family/guests).
If the door lock administrator deletes the corresponding door lock, it can be registered
again by another admin.
1
6
5
4
2
3
3
All manuals and user guides at all-guides.com

18
Please download the KeyWe mobile application on apple app store or android play
store, install on you iPhone or android smart phone respectively and sign up.
Now follow the below instructions to successfully setup the mobile app for your door
lock. (Refer the images above following the figure numbers and below corresponding
description)
1) Press the [+] button.
2) Please select the door lock registration method (QR code / serial number).
3) Please scan the QR code / enter the serial number found when you slide off the
top cover of the inside lock unit (battery cover). If the door lock is properly
registered, the door lock information screen will be displayed.
4) Enter an appropriate name for door lock.
5) Set the door lock location. (It is required in order to use Smart KeyWe
functions).
6) Door lock registration completed! Now you can control the door lock with
KeyWe App.
Remote Controller Registration
Open the battery cover on the indoor unit of the door lock (the indoor part)
with the door open, and press the registration button ②on the right bottom
side.
On the screen, the numbers 1, 2, 3, 7, 8, 9 are lit.
Press ‘2’.
All manuals and user guides at all-guides.com

19
Press the Open and Close buttons of the remote controller simultaneously
(continuous registration possible).
Press the registration button ②on the indoor unit (the remote controller
registration finished). (You can register up to 3 remote controllers).
Remote Controller Deletion
Open the battery cover on the indoor unit of the door lock (the indoor part)
with the door open, and press the registration button ②on the right bottom
side.
On the screen, the numbers 1, 2, 3, 7, 8, 9 are lit.
Press ‘8’ on the screen, ‘#’ is lit (the remote controller deletion ready).
When you press and hold ‘#’ for 3 seconds, all the remote controllers will be
deleted, with a notification sound.
All manuals and user guides at all-guides.com
20
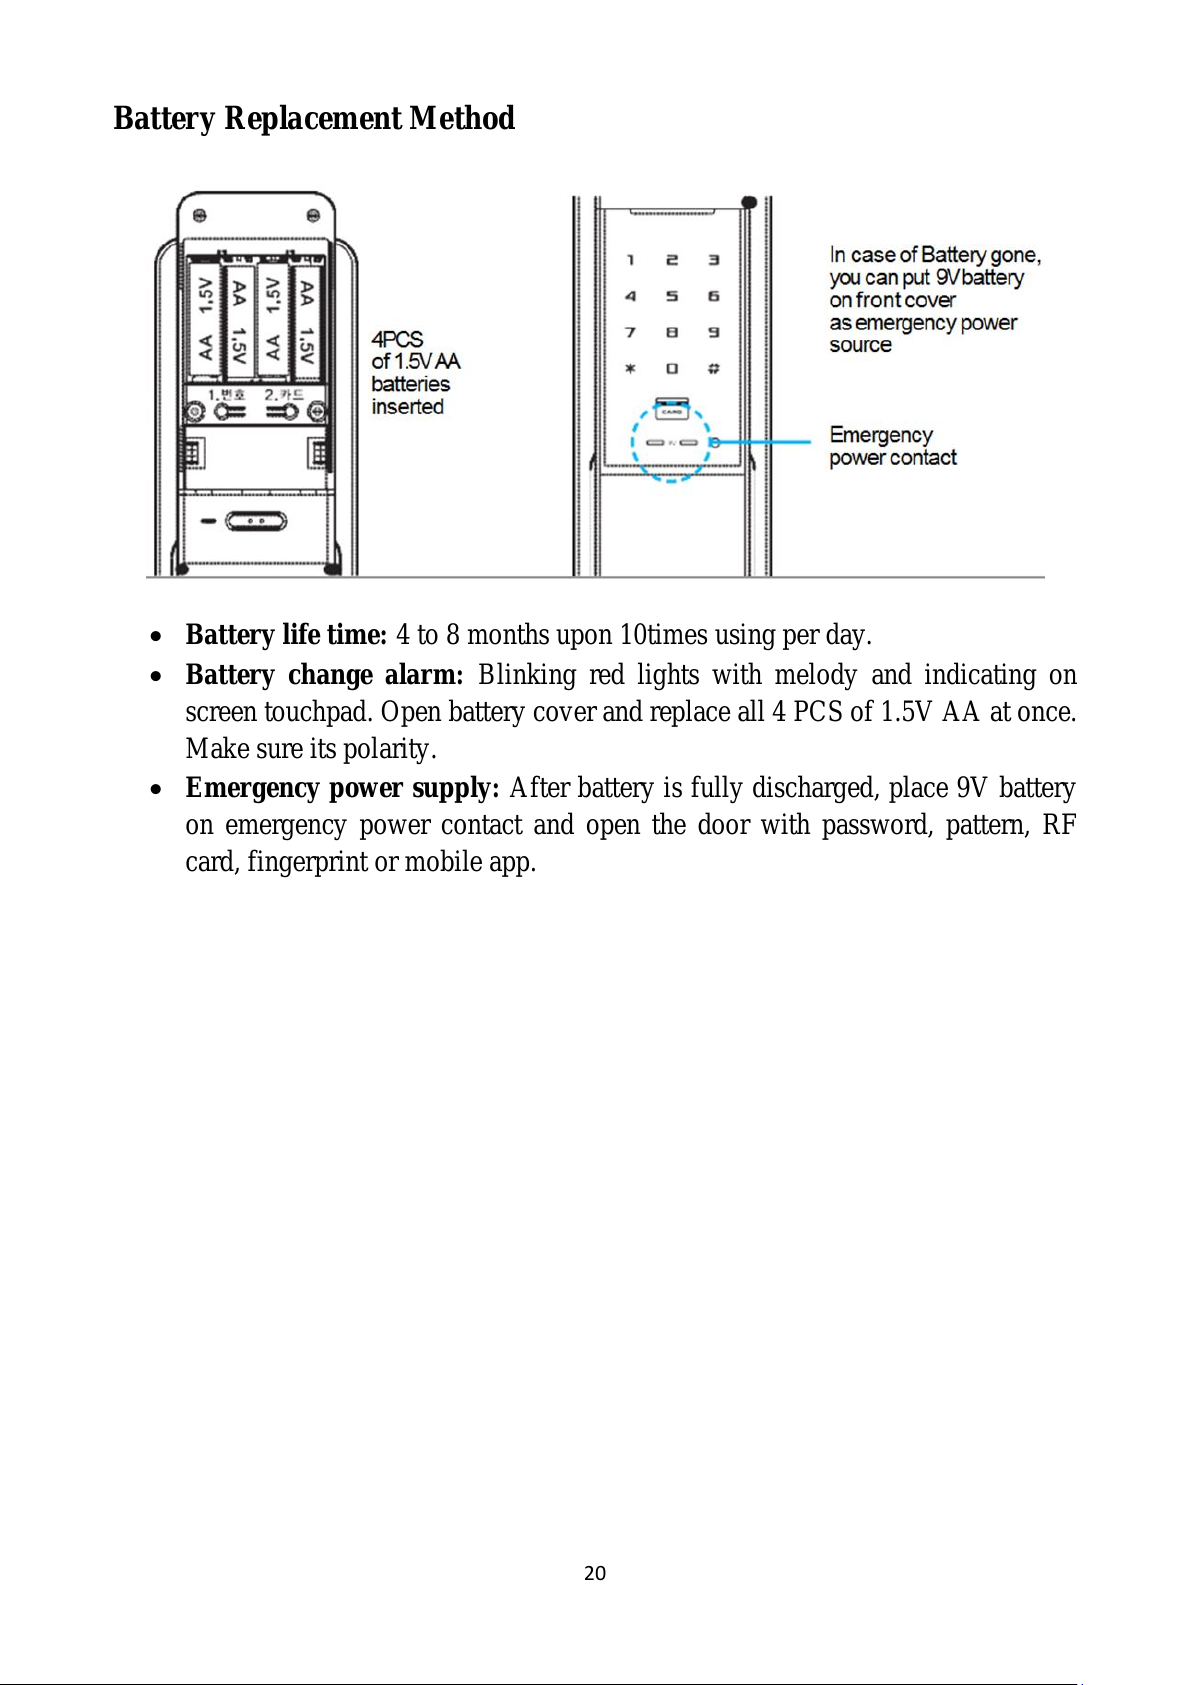
Battery Replacement Method
Battery life time: 4 to 8 months upon 10times using per day.
Battery change alarm: Blinking red lights with melody and indicating on
screen touchpad. Open battery cover and replace all 4 PCS of 1.5V AA at once.
Make sure its polarity.
Emergency power supply: After battery is fully discharged, place 9V battery
on emergency power contact and open the door with password, pattern, RF
card, fingerprint or mobile app.
All manuals and user guides at all-guides.com
Table of contents
Popular Door Lock manuals by other brands


Lockly
Lockly SECURE PRO installation guide

Dormakaba
Dormakaba RCI 4 Series installation instructions

Assa Abloy
Assa Abloy 179C Assembly instruction

Habo
Habo HaboTribe 17430 installation guide

Assa Abloy
Assa Abloy ADAMS RITE 4300 Series installation instructions

BANKSTON
BANKSTON Escutcheon installation instructions