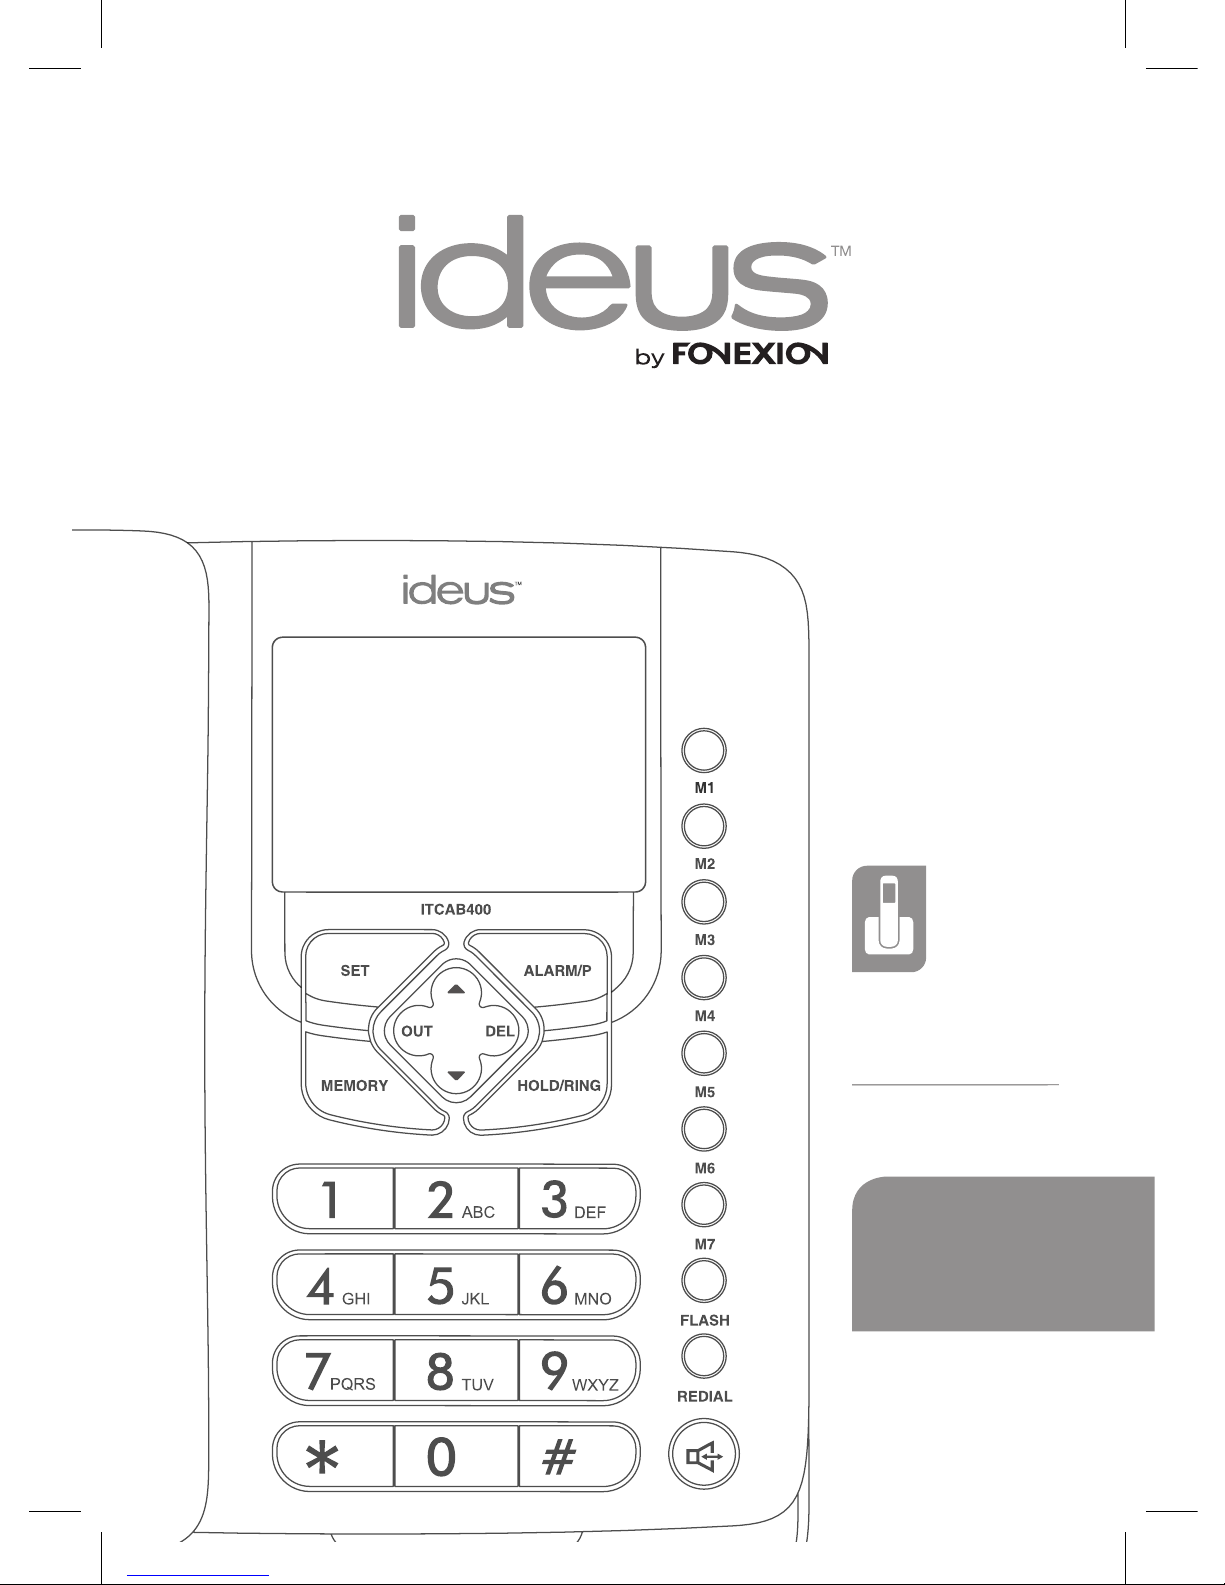
ideus ITCAB400 User manual
MANUAL DE USUARIO
USER GUIDE
GUIA DE UTENTE
GUIDE D’UTILISATION
ITCAB400
TELÉFONO AVANZADO
DE SOBREMESA
DESK CORDED TELEPHONE
WITH ADVANCED FEATURES

GUÍA DE USUARIO
ES
3
ITCAB400
1FAMILIARIZARSE CON SU TELÉFONO
Gracias por adquirir este teléfono de sobremesa ITCAB400. Para sacar el mayor rendimiento
posible a su nuevo teléfono, le recomendamos que lea con atención este manual antes de
empezar a usarlo.
Instrucciones de seguridad
Antes de comenzar con su teléfono, deberá tomar las siguientes precauciones para evitar el
riesgo de incedio, cortocircuitos o descargas eléctricas que puedan afectar a la salud de las
personas:
Lea, entienda y siga las instrucciones de este manual.
Desconecte el producto de la pared antes de limpiarlo. No use productos líquidos o
aerosoles para su limpieza. Con un trapo ligeramente humedecido bastará.
No coloque el aparato sobre supercies inestables.
No sobrecargue las conexiones eléctricas, evite el abuso de multiplicadores o ladrones.
No intente nunca introducir ningún tipo de objeto a través de la carcasa del teléfono,
ya que corre el riesgo de descargas eléctricas o de contacto con ciertas partes de la
circuitería del teléfono que podrían causar fuego o electro choque.
No rocíe el aparato o cualquiera de sus componentes con ningún tipo de líquido.
Intente evitar mover o desconectar el teléfono durante una tormenta intensa, ya que,
aunque remoto, puede existir riesgo de atraer rayos y truenos.
Los intentos por reparar un mal funcionamiento del teléfono, o la tentativa de explorar
su circuitería e interiores, además de acabar con su garantía de compra, pueden resultar
de riesgo. Para una exploración o reparación no dañina, llévelo a un servicio técnico.
Características de su ITCAB400
FSK/DTMF compatible con auto-detección
Pantalla retroiluminada de 16 caracteres retroiluminada y 8 niveles de contraste
Registro de las 66 últimas llamadas entrantes y 20 salientes
7 memorias de un toque y 10 de doble toque
16 melodías a elegir de tono de timbre
6 melodías de tono en espera
Función “No Molestar” con números VIP exentos
Pre-marcación, edición, rellamada
Hasta 5 alarmas
PABX congurable
Función ash y pausa
Marcación por Pulso/Tono
4 niveles de volumen para el manos libres
Función Baby Call
Marcación manos libres y altavoz
Indicador LED de llamada

ES
GUÍA DE USUARIO
4
ITCAB400
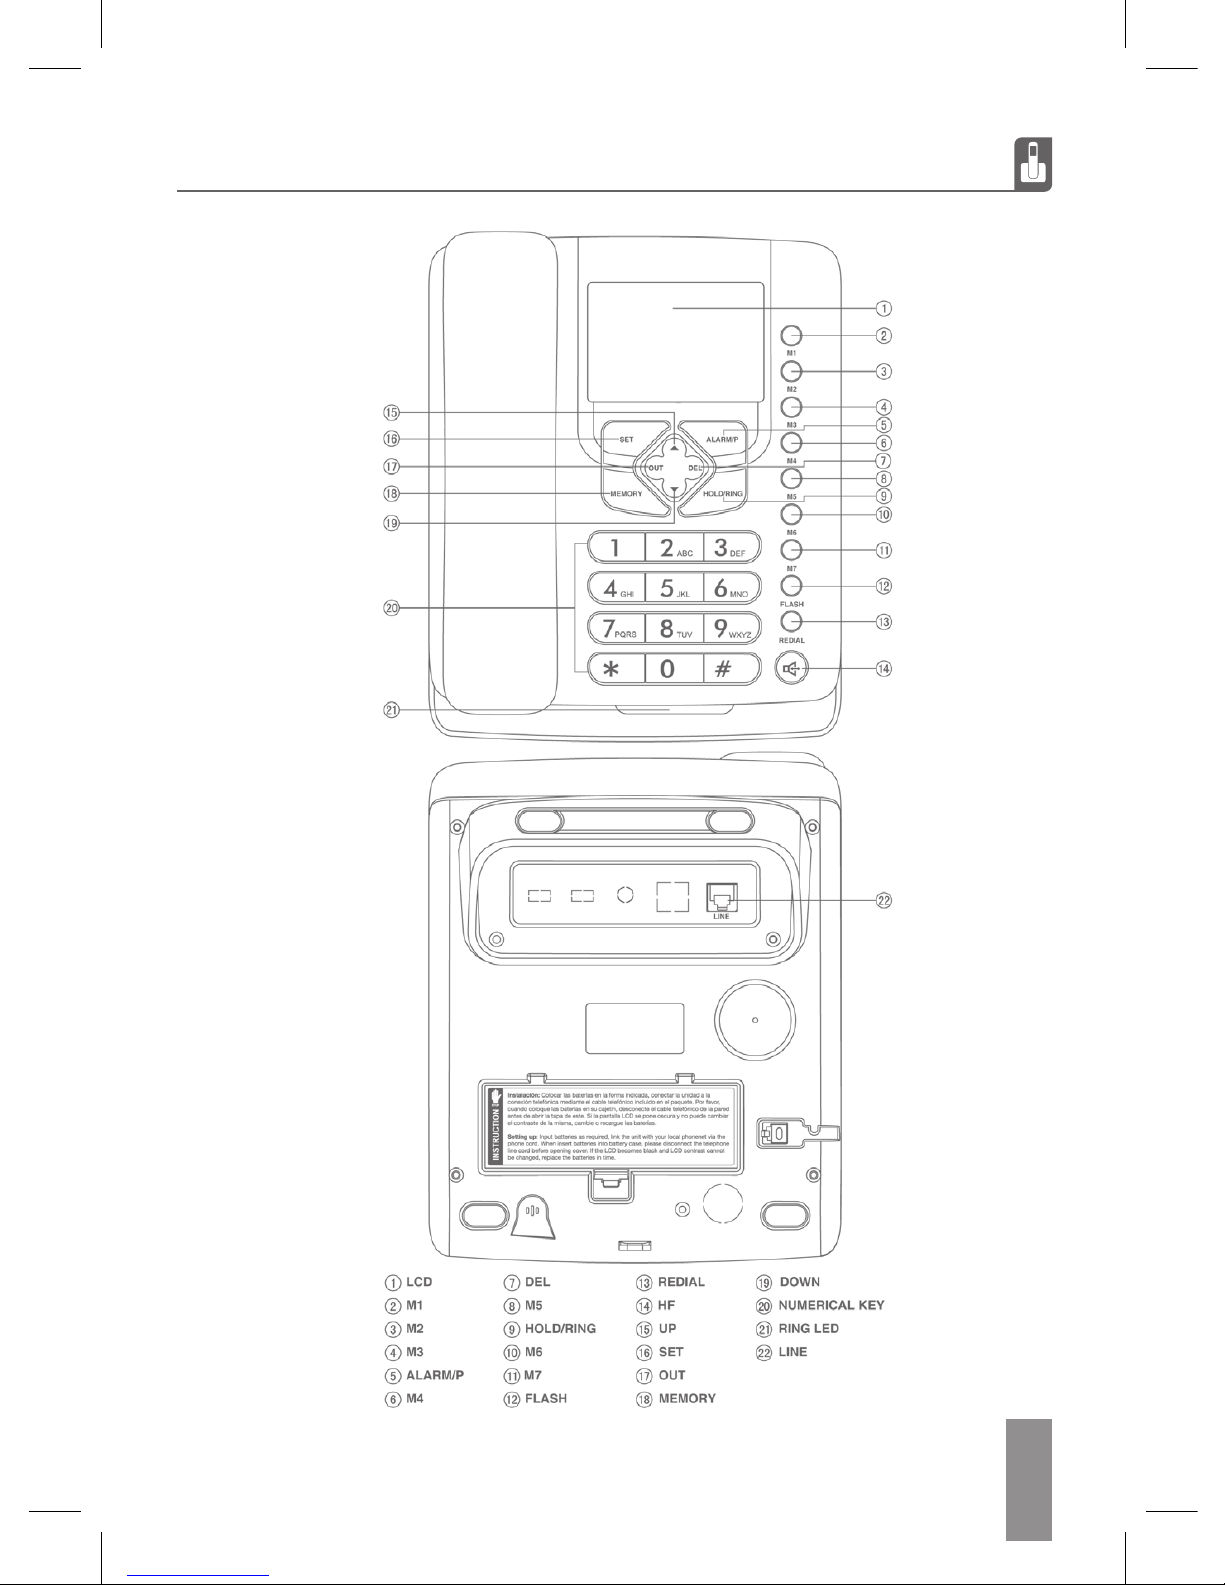
Esquema del teléfono
PANTALLA
M3
M4
ARRIBA
M5
BORRAR
M6
AURICULAR / TONO
FLASH
RELLAMAR
MANOS LIBRES
TECLADO
ESTABLECER
ABAJO
MEMORIA
LED LLAMADA
ENTRADA DE LÍNEA
M1
M2
ALARMA / PAUSA
M7
OUT

GUÍA DE USUARIO
ES
5
ITCAB400
La unidad requiere de 3 pilas 1,5V AAA para disfrutar de todas sus funciones. Abra el
compartimento de las baterías e insértelas con la polaridad adecuada. Cierre la tapa. Conecte el
cable de conexión telefónica a la base, y el cable del auricular a las entradas correspondientes.
Si el equipo viene acompañado de un adaptador de corriente, tenga en cuenta lo siguiente:
* El adaptador de alimentación es el dispositivo de desconexión del equipo, la base de toma de
corriente debe estar cerca del equipo y ser fácilmente accesible.
LED
Cuando reciba una llamada, el teléfono sonará, el LED de NUEVA se encenderá y en la pantalla
se mostará el número de la llamada entrante. También se mostrará la fecha, la hora y se activará
el icono “NUEVA”
Si se recibe una llamada del mismo número de nuevo, y la llamada previa no ha sido revisada
todavía, la pantalla mostrará el icono “REPEAT”.
Los números entrantes más recientes reemplazarán a los registros más antiguos en la lista
cuando ésta esté completa.
Nota: Para que el teléfono le muestre el número de teléfono entrante, su proveedor de telefonía
debe proveerle con ese servicio.
RECIBIR UNA LLAMADA
Desde el auricular: levante el auricular para aceptar la llamada entrante. Cuando nalice,
coloquelo de nuevo en la base.
Con función manos libres:
Pulse el botón manos libres para aceptar una llamada entrante a través de esa función y púlselo
de nuevo para nalizar la llamada. Puede alternar entre manos libres y llamada a través del
auricular pulsando alternativamente ese botón .
Nota: La distancia ideal para llevar a cabo una llamada manos libres es de 32cm o menos.
REALIZAR UNA LLAMADA
Desde el auricular:
Levante el auricular, y tras comprobar que la línea está activa, marque el número adecuado.
El teléfono comenzará a cronometrar la llamada transcurridos 6 segundos desde su inicio.
Desde el altavoz
Pulse el botón MANOS LIBRES y cuando escuche el tono de línea marque el número deseado.
Para nalizar la llamada, pulse ese botón de nuevo
Pre-marcación
Puede introducir el número y editarlo mediante la tecla DEL. Para lanzar la llamada levante el
aurivular o bien pulse la tecla “MANOS LIBRES”
2INSTALACIÓN
3PRIMERAS OPERACIONES

ES
GUÍA DE USUARIO
6
ITCAB400
Función RELLAMADA
Con la línea abierta, pulse la tecla “REDIAL”, y el último número de la lista de llamadas
realizadas será marcado.
REVISAR, DEVOLVER y EDITAR LLAMADAS ENTRANTES
Para revisar la lista, con el teléfono en reposo, pulse ▲ o ▼para moverse a través de la
lista de llamadas entrantes
Para borrar una entrada, pulse la tecla DEL. Si mantiene pulsada esta tecla durante al
menos 3 segundos, toda la lista de llamadas entrantes será borrada.
Para devolver la llamada a una de las entradas del registro, encuéntrela en la lista y pulse
REDIAL, MANOS LIBRES o levante el auricular. El número será marcado.
REVISAR, DEVOLVER y EDITAR LLAMADAS SALIENTES
Para revisar la lista, con el teléfono en reposo, pulse OUT para entrar en la lista, y de
nuevo OUT para avanzar a través de ella.
Para borrar una entrada, pulse la tecla DEL. Si mantiene pulsada esta tecla durante al
menos 3 segundos, toda la lista de llamadas salientes será borrada.
Para devolver la llamada a una de las entradas del registro, encuéntrela en la lista y pulse
REDIAL, MANOS LIBRES o levante el auricular. El número será marcado.
IMPEDIR QUE LA FUNCIÓN FSK AJUSTE LA HORA AUTOMÁTICAMENTE
Cuando una llamada con datos FSK es recibida, la unidad ajustará automáticamente
la hora.Para prevenir que esto suceda, mantenga pulsada la tecla ALARM/P
durante al menos 3 segundos.En la pantalla aparecerá el mensaje DATE ON.
Si quiere desactivar esta función, pulse de nuevo ALARM/P una vez para mostrar
DATE-OFF.
Pulse SET para guardar y salir.
4CONFIGURACIONES
ESTABLECER FECHA Y HORA
Con el teléfono en reposo, pulse SET. La pantalla mostrará “SET 1 DATE”, pulse SET de
nuevo hasta que el valor “año” parpadee.
Pulse ▲ o ▼para editar el año
Pulse SET para conrmar e introducir el valor “mes”.
Repita los pasos anteriores para introducir el resto de los valores.
Pulse SET para guardar y salir.
ESTABLECER EL CÓDIGO DE ÁREA LOCAL
Con el teléfono en reposo, pulse SET y ▲hasta que la pantalla muestre ”SET 2 CODE”,
pulse SET de nuevo para mostrar “CODE ------”. El primer campo parpadeará.
Pulse ▲ o ▼para editar este campo.
Pulse SET para conrmar y vaya al siguiente campo.
Repita los pasos anteriores para congurar todos los campos..
GUÍA DE USUARIO
ES
7
ITCAB400
ESTABLECER EL CÓDIGO DE LARGA DISTANCIA
En modo reposo, pulse SET y luego ▲dos veces, para mostrar “SET 3 LCODE”
Pulse SET de nuevo para mostar “---------------0” o los códigos que ya estén
almacenados. Pulse DEL si desea borrarlos.
Use el teclado para introducir el código en el campo, hasta un máximo de 16
caracteres.
Pulse SET de nuevo para guardar y salir.
AJUSTAR EL CONTRASTE DE LA PANTALLA
En modo reposo, pulse SET y ▲tres veces, hasta que la pantalla muestre “SET 4
LCD”, Pulse SET de nuevo y la pantalla mostrará SET LCD 5.
Pulse ▲ o ▼para ajustar el nivel de contraste. Puede elegir hasta 8 niveles.
Pulse SET de nuevo para conrmar y salir
*Cambiar el contraste mediante atajo de teclado: En modo reposo, pulse la tecla FLASH
para entrar en la conguración de contraste de pantalla directamente, y pulse luego la
misma tecla para seleccionar el nivel deseado.
ESTABLECER EL TIEMPO FLASH
En modo reposo, pulse SET y después ▲ cuatro veces. La pantalla mostrará “SET
5 FLASH” pulse SET y la pantalla mostrará el tiempo ash congurado (FLASH 100)
Pulse ▲ o ▼para editar y seleccionar entre 100, 300, 600 and 1000ms.
Pulse SET para conrmar.
Nota: Para volver al modo reposo dentro de un menú, puede pulsar la tecla DEL o
bien esperar 16 segundos para que el teléfono lo haga automáticamente.
ESTABLECER EL CÓDIGO PABX
En estado reposo, mantenga pulsada la tecla DEL para entrar en la conguración
PABX, La pantalla mostrará “PCODE -” y el guión parpardeará.
Pulse ▲ o ▼para seleccionar el PABX de 0 a 9 o seleccionar “-” (ninguno).
Pulse SET para guardar y salir.
CONFIGURAR LA ALARMA
En modo reposo, pulse ALARM/P, la pantalla mostrará “12-00 AL1”
Pulse ▲ o ▼para seleccionar ON (activo) u OFF (desactivado). Cuando la alarma esté
activada, el icono ALM será mostrado en pantalla.
Pulse SET, el primer número parpadeará.
Pulse ▲ o ▼para establecer la hora y SET para conrmar. Pulse de nuevo ▲ o ▼
y SET para establecer los minutos y salir a la siguiente alarma.
Existen 5 memorias de alarma, de las cuales las primeras 3 sonarán todos los días si están
activas, y las últimas 2 solo se efectuarán una vez.
FUNCIÓN “SECRET CODE” Y MONITOR REMOTO
La función “Secret code” impedirá que una llamada entrante suene en el ITCAB400 a menos
que la persona que llama desde el otro lado de la línea introduzca el código de seguridad
establecido para esta función. El emisor de la llamada solo podrá comunicarse con el
receptor si introduce el código.

ES
GUÍA DE USUARIO
8
ITCAB400
La función de monitor remoto amplía la función anterior haciendo que, en caso de que el emisor
de la llamada introduzca correctamente el PIN, ésta sea recibida automáticamente a través del
manos libres del ITCAB400. Para activar el “monitor remoto” solo tiene que establecer el valor
# como último número del código.
Estas funciones sólo son útiles cuando el tono de timbre del teléfono está desactivado.
En modo reposo, mantenga pulsada la tecla HOLD/RING durante 3 segundos, para que
la pantalla muestre “Pin ----”
Introduzca un PIN de 4 dígitos a su elección usando el teclado numérico
Pulse DEL para borrar o SET para conrmar el PIN.
Congure el tono de timbre a dB0
Cuando el último valor del PIN sea #, el teléfono activará la función de monitor remoto (manos
libres).
5OPERACIONES CON TELÉFONOS PARALELOS EN LA MISMA LÍNEA
NUMERAR EL TELÉFONO
Esta función permite identicar la unidad con un número a su elección. Se utiliza para funciones
avanzadas con varios teléfonos ocupando la misma línea.
En modo reposo, mantenga pulsado el botón SET, la pantalla mostrará “EL--”
Pulse “*” y el número deseado (por ejemplo“*1” y ”*2” )
Pulse SET para guardar y cerrar
TRANSFERIR UNA LLAMADA A OTRO TELÉFONO
Cuando una llamada entrante es recibida, use uno de los teléfonos en línea para aceptar.
Si desea transferir la llamada a otro de los teléfonos paralelos que están conectados a la
misma línea, pulse el botón“*” y después el número con el que ha identicado a la otra unidad
(consulte la sección anterior “numerar el teléfono”.
Nota: Es recomendable utilizar teléfonos de la misma serie para acceder a estas funciones
avanzadas, cualquier servicio especial de su operador de telefonía que se active pulsando
exclusivamente la tecla “*” puede no funcionar correctamente
BLOQUEAR LLAMADAS EN TELÉFONOS DE LA MISMA LÍNEA
En modo reposo, mantenga pulsado #. La pantalla mostrará “SPI OFF”
Pulse # de nuevo, para que la pantalla muestre “SPI ON”
Pulse SET key to conrm
Cuando ésta función esté activada, los usuarios que quieran marcar un número de teléfono
usando una extensión a través de la misma linea, serán impedidos a hacerlo por el sistema.
DEFINIR LA MELODÍA Y EL VOLUMEN DEL TIMBRE
Existen 16 melodías disponibles a su elección.
En modo reposo pulse HD/RING; la pantalla mostrará “ring 02 db3”
Pulse HOLD/RING para seleccionar la melodía deseada.
Pulse ▲ o ▼ para ajustar el volumen.
Pulse SET para guardar y salir.
Nota: El rango de volumen varía de dB0 a dB3, siendo dB3 el más alto y dB0 silencio.
GUÍA DE USUARIO
ES
9
ITCAB400
Si el teléfono está congurado en modo DND (do not disturb/no molestar), el timbre no sonará
durante una llamada entrante.
SILENCIAR EL TELÉFONO MOMENTÁNEAMENTE
Si durante una llamada entrante desea silenciar puntualmente el tono de timbre, pulse DEL.
AJUSTAR EL VOLUMEN DEL ALTAVOZ
En modo manos libres, pulse ▲ o ▼ para ajustar el volumen del altavoz. La pantalla le mostrará
el nivel de volumen actual de entre las 4 intensidades disponibles
SELECCIONAR ENTRE MARCACIÓN POR TONO O PULSO
Mantenga pulsado * durante 3 segundos con el teléfono en modo espera.
Para cambiar entre ambos modos, pulse *alternativamente. T (Tono) P (Pulso)
Pulse SET para guardar y cerrar.
MÚSICA EN ESPERA
Existen 6 melodías de música en espera para su selección
En estado descolgado o manos libres, pulse HOLD/RING.
Pulse OUT para seleccionar el tono deseado.
Pulse ▲ o ▼ para ajustar el nivel.
Cuando esté conversando a través del auricular,pulse HOLD/RING para dejar a su interlocutor
en espera con la música seleccionada. Para volver al modo normal, pulse de nuevo HOLD/
RING.
6OPERACIONES CON LAS TECLAS DE MEMORIA RÁPIDA
MEMORIAS DE UN TOQUE
Para congurar las memorias de un toque, almacenará el número deseado en cada memoria
disponible:
Marque el número deseado que desea almacenar o muéstrelo en la pantalla a través de
la lista de llamadas entrantes o salientes.
Pulse la tecla MEMORY
Pulse M1, M2, M3... hasta M7, teniendo en cuenta que será en esa tecla donde
almacenará el número que está editando.
REALIZAR UNA LLAMADA A TRAVÉS DE LAS TECLAS DE MEMORIA DE UN TOQUE
Pulse la tecla deseada para marcar de todas las M (hasta M), si desea llamar directamente.
Puede también pulsar la tecla MEMORY y a continuación el número de memoria al que
desea llamar. La pantalla le mostrará el número almacenado, y podrá enviar la llamada
pulsando el botón MANOS LIBRES, o pulsando el botón REDIAL. Ésta segunda opción
sólo está disponible con el auricular en la base.
MEMORIAS DE DOBLE TOQUE
Escriba el número deseado a través del teclado numérico o escójalo de la lista de llamadas
entrantes o salientes
Pulse la tecla MEMORY.
Pulse una de las teclas numéricas (0-9).
ES
GUÍA DE USUARIO
10
ITCAB400
REALIZAR UNA LLAMADA DESDE LAS MEMORIAS DE DOBLE TOQUE
Con el teléfono en espera, pulse la tecla MEMORY y después el número de memoria en el
teclado numérico al que desea llamar.
La pantalla le mostrará el número almacenado, y podrá enviar la llamada pulsando el botón
MANOS LIBRES, o pulsando el botón REDIAL.
Con el teléfono descolgado, pulse la tecla MEMORY y después el número de memoria en el
teclado numérico al que desea llamar. La llamada se lanzará automáticamente.
7OPERACIONES Y ACCIONES USUALES
FUNCIONES BABY CALL / BABY LOCK y FUERA DE LÍNEA
BABY CALL
Puede almacenar un número para que sea lanzada una llamada automáticamente, si el modo
BABY CALL está activado. Esta función permitirá que simplemente al descolgar el auricular o
bien al pulsar cualquier tecla (menos la tecla REDIAL) se lance automáticamente una llamada
al número establecido.
En modo espera, mantega pulsado REDIAL durante 3 segundos para entrar en el menú
de conguración BABY CALL.
La pantalla mostrará “BABYCALL OFF(ON)”.
Pulse ▲ o ▼ para activar o desactivar la función
Pulse SET para conrmar.
Si selecciona “ON”, la pantalla mostrará “NO CODE” (o el número que esté congurado
previamente para la función).
Introduzca el número que será contactado a través de la función BABY CALL usando el
teclado numérico y pulsando SET para conrmar.
A partir de ese momento, descolgar el teléfono o pulsar cualquier tecla -excepto
REDIAL- lanzará la llamada
Nota: Cuando esta función esté activa, podrá responder llamadas de forma normal.
BABY LOCK
La función BABY LOCK bloquea todas las llamadas salientes excepto los números de
emergencia 110,119,120 y 999.
En modo reposo, mantenga pulsado REDIAL durante 3 segundos.
La pantalla mostrará BABYCALL OFF(ON)
Pulse REDIAL una vez para entrar en el menú BABY LOCK
La pantalla mostrará BABYLOCK OFF(ON)
Pulse ▲ o ▼para activar o desactivar. Pulse SET para conrmar.
FUERA DE LÍNEA
Al activar esta función, usted será capaz de recibir llamadas cuando se haya dejado descolgado
el auricular. El teléfono detectara el estado de la línea y volverá al modo reposo de manera
automática, haciendo posible que reciba llamadas.
En modo reposo, mantenga pulsado REDIAL
La pantalla mostrará BABYCALL OFF(ON)
GUÍA DE USUARIO
ES
11
ITCAB400
Pulse REDIAL dos veces para entrar en “OFF LINE-2 “ La pantalla mostrará OFFLINE
OFF(ON), Pulse ▲ o ▼ para activar o desactivar. Pulse SET para conrmar.
AVISOS DE BATERÍA BAJA
Cuando el voltaje de las pilas sea inferior a 3.9V la pantalla mostrará el icono de la batería para
recordarle que cargue o reemplace las mismas.
RETROILUMINACIÓN DE LA PANTALLA
La retroiluminación de la pantalla LCD se activará cuando reciba una llamada, cuando llame
o utilice el teclado, o en el modo música en espera. Se apagará y devolverá al teléfono a su
estado de reposo al cabo de 6 segundos.
Nota: Si las baterías no están cargadas, la función de iluminación no funcionará.
FUNCIÓN FLASH
Si cuando marque un número éste no está disponible o la línea está ocupada, pulse FLASH y
después pulse REDIAL para re marcar de nuevo.
FUNCIÓN PAUSA
Si marca un número con extensión PABX, pulse PABX (normalmente “0” o “9”) + ALARM/P +
número deseado. Cuando se inicia una relllamada, no necesitará marcar de nuevo este código.
8SOLUCIÓN DE PROBLEMAS
No se escuchan las llamadas
Asegúrese de que las líneas están activas y bien conectadas.
Solo puedo recibir llamadas
Compruebe que el P/T esté colocado en la posición correcta.
Ruido
Compruebe que los cables no estén estropeados o en mal estado.
Compruebe que los conectores de red no estén húmedos u oxidados. Cambie los cabezales
si fuese necesario.
Cuando se recibe una llamada, solo suena una vez, aunque la función de marcado esté
disponible
Asegúrese de que los conectores no estén en un lugar húmedo. Compruebe que no se estén
sobrecargando las extensiones o duplicadores de la línea telefónica, y compruebe el estado
de los mismos.
La pantalla pierde contraste
Compruebe que el valor de contraste está congurado adecuadamente. Súbale el contraste al
máximo. Si aún así sigue sin ganar nitidez, reemplace las pilas.
La mayoría de las funciones está fallando
Compruebe que las baterías estén cargadas.
Desconecte el teléfono de su línea, retire las pilas de su compartimento, y vuelva a instalar de
nuevo el teléfono transcurridos 10 minutos.

ES
GUÍA DE USUARIO
12
ITCAB400
Distributed by
9DECLARACIÓN DE CONFORMIDAD Y GARANTÍA
FONEXION SPAIN S.A. declara que el teléfono con cable de sobremesa y pared ITCAB400
cumple con los requisitos esenciales y cualesquiera otras disposiciones aplicables o exigibles
de la Directiva 1999/05/CE. Puede descargar una copia de la declaración completa en: http://
www.fonexion.com/doc.
El ITCAB400 está garantizado por un periodo de 2 años a partir de la fecha que gure en su
recibo de compra. Guarde su recibo de compra, es su garantía. Sin embargo, esta garantía
no cubre ningún fallo provocado por accidente, uso incorrecto, desgaste, negligencias, rayos,
modicaciones realizadas en el equipo, o todo intento de ajuste o reparacion casera o a través
de agentes no aprobados.

USER GUIDE
ENGLISH
ITCAB400

EN
USER GUIDE
14
ITCAB400
1GETTING TO KNOW YOUR PHONE
Thanks for purchasing this ITCAB400 telephone. This manual is designed to familiarize you with
this phone. To get the maximum use from the phone, we suggest that you read this instruction
manual carefully before using it.
Safety Precautions
When using your telephone equipment, the following basic safety precautions should always be
followed to reduce the risk of re, electric shock and injury to persons:
Read, understand and follow all warnings and instructions.
Unplug the product from the electric connection before cleaning. Do not use liquids or
aerosol. Use a soft damp cloth for cleaning.
Do not place this product on unstable surfaces. The product may drop, causing serious
damage to the line, people around it and to the product itself.
Do not overload wall outlets and extension cords as this can result in re or electric shock.
Never push foreign objects of any kind into this product through cabinet slots as they
may affect dangerous voltage points or short circuit parts that could result in re or
electric shock. Never spill liquid of any kind on the product.
Avoid moving or disconnecting this unit during a heavy storm, as there may be a remote
risk of electric shock from lightning and thunder.
Unahuthorized persons should not open the telephone, nor try to x any problem that
may occur, please send to service center.
ITCAB400 FEATURES
FSK/DTMF compatible with auto-detection
16-digit LCD display
66 incoming and 20 outgoing number memories
7 one-touch and 10 two-touch memories
16 kinds of ringing tone for selection
6 kinds of hold on music for selection
Do Not Disturb function
Transfer function between parallelled phones
Secret code function in Do Not Disturb state to avoid missing VIP calls
Pre-dial and edit function
Redial function
5 sets of alarm clock
8 levels of LCD contrast adjustable
Set PABX code
Flash and pause function
Pulse/Tone dialing mode compatible
4 levels of hands free volume for selection
Ringing volume 4 steps for selection
Baby call function
LCD backlight function
Thunder-proof and anti-dialing from parallelled phones function
Hands free dialing and speaker function
Ring LED indicator
USER GUIDE
EN
15
ITCAB400
EN
USER GUIDE
16
ITCAB400
2GETTING STARTED
The unit requires 3×1.5V AAA batteries. Open the battery compartment cover and insert the
batteries in the right polarity, then close the cover (Proposal using alkali battery). There should
be time display on the liquid crystal screen after the batteries are inserted.
Insert one end of the line cord to the line jack of the base and the other end to the wall outlet
of exchanger.
Connect the handset and the unit with coiled line.
Setting the dialing mode to correct mode according to the directions from your local telecom.
Apply for the caller ID from your local telecom ofce.
3 RECEIVING A CALL
When a call comes, the telephone rings, the NEW LED ickers and La pantalla mostrará the seq.
number of the call, the date, time, incoming number and the NEW icon.
If the same number is received again, and the previous call has not been reviewed, the
La pantalla mostrará REPEAT icon.
If there is missed call has not been reviewed, the NEW LED will ash interval several
seconds in on-hook state.
When the incoming memory is full, the latest incoming number replaces the oldest
number in the memory.
In idle state, Pulse key or pick up handset, IN USE LED will be lighted.
Note: For the phone to display incoming number and other information, you must have an active
Caller ID subscription with your local telephone exchange company.
From handset
Pick up the handset and talk to the other party.
When nished, return the handset to the base.
Switching to speakerphone
When using the handset, Press the HANDSFREE key and return the handset to the base.
When nished, Press HANDSFREE key again.
From speakerphone
When the telephone rings, Press the HANDSFREE key and talk to the caller. For the other
party to hear your voice clearly, speak into the speaker from a distance of 32cm or less.
When nished, Press HANDSFREE key again.
Note: Generally telecom transmits the incoming message between the rst ring and the second
ring. So please answer the phone after the second ring.
MAKING A CALL
From handset
Pick up the handset.
When you hear the dial tone, dial the desired number.
The unit will start to time the conversation after 6 seconds.
When nished, return the handset to the base.
From Speakerphone
Press HANDSFREE key
When you hear the dial tone, dial the desired number.
The unit will start to time the conversation after 6 seconds.
When nished, Pulse the HANDSFREE key again.

USER GUIDE
EN
17
ITCAB400
PRE-DIALING FUNCTION
When the handset is on the base, dial the desired number.
If there are mistakes, use the DEL key to edit.
Pulse the HANDSFREE key or pick up the handset and the number will be dialed
automatically.
REDIAL FUNCTION
Pick up the handset or Pulse the HANDSFREE key,
Press REDIAL key, the last dialed number will be dialed again
REVIEWING, CALLING BACK AND DELETING INCOMING NUMBERS
Reviewing
In on-hook state, press ▲ or ▼ key to scroll and review the numbers.
Deleting
In on-hook state, when the desired number is shown, press DEL key, the number is deleted. Or
press and hold DEL key for 3 seconds, all the reviewed incoming numbers are deleted.
Calling back
In on-hook state, scroll to the desired number, press HANDSFREE or REDIAL key or pick up the
handset, the number is dialed out. Or press REDIAL key twice, the telephone will add the long
distance code ahead the number automatically and then dial back.
Note: If the PABX code is set, the telephone will detect and add the PABX code before the
number automatically and then dial back. It will dial the PABX code rst and then after a 2
second pause and then dial the number.
REVIEWING, CALLING BACK AND DELETING OUTGOING NUMBERS
Reviewing
In on-hook state, press OUT key, then repeat to press OUT to review outgoing numbers one
by one.
Calling back
In on-hook state, press OUT key to review the desired number, then press HANDSFREE or
REDIAL key or pick up the handset, and the number is dialed out.
Deleting
In on-hook state, press OUT key to scroll to the desired number.
Press DEL key and the number is deleted
Or press and hold DEL key for 3 seconds, all numbers will be deleted.
PREVENTING FSK MESSAGE TO AUTO-ADJUST REAL TIME
When a FSK message comes, the unit adjusts real time automatically, you can prevent real time
auto adjustment as follows:
In on-hook state, press and hold ALARM/P key for 3 seconds, LCD displays DATE ON,
Press ALARM/P key again, LCD displays DATE OFF,
Press SET key to quit.
Note: DATE OFF: Does not allow real time auto adjustment.

EN
USER GUIDE
18
ITCAB400
SETTING MENU
4
SETTING DATE & TIME
In on-hook state, press SET key, LCD displays SET 1 DATE and press SET key again, the value
for the year ashes.
Press ▲ or ▼ key to edit the year.
Press SET key to conrm and enter the next value month setting.
Repeat the above steps for month setting.
Repeat the above steps for date and time setting.
SETTING LOCAL AREA CODE
In on-hook state, press SET key and press ▼key, LCD displays SET 2 CODE, press SET
key again, LCD displays CODE ------ and rst “-” ashes.
Press ▲ or ▼key to edit the ashing code.
Press SET key to conrm and enter the next ashing code setting.
Repeat the above steps for the rest code setting.
SETTING LONG DISTANCE CODE
In on-hook state, press SET key and press ▲ key twice, LCD displays SET 3 LCODE, press SET
key again, LCD displays ---------------0 or preset codes, press DEL key to delete it.
Input the long distance codes using numerical keys, maximum 16 digits.
Press SET key to conrm and exit.
ADJUSTING LCD CONTRAST
In on-hook state, press SET key and press ▲ key three times, LCD displays SET 4 LCD,
press SET key again, LCD displays LCD 5
Press ▲ or ▼ key to adjust the LCD contrast, total 8 levels can be selected.
Press SET key to conrm and exit.
Shortcut key: At on-hook state, press FLASH key to enter LCD contrast setting directly, then
press FLASH key continuously to adjust the LCD contrast.
SETTING FLASH TIME
In on-hook state, press SET key and press ▲key four times, LCD displays SET 5 FLASH,
press SET key again, LCD displays FLASH 100
Press ▲ or ▼ key to edit the Flash time to 100, 300, 600 and 1000ms.
Press SET key to conrm.
Note: press DEL key, or no operation within 16s, it will exit setting mode and return to the on
hook state.
SETTING THE PABX CODE
In on-hook state, press and hold DEL key 3 seconds to set PABX code, LCD displays
PCODE - and the “-” ashes.
Press ▲ or ▼key to set PABX code from 0 to 9 or -.
If choose “-”, it means no PABX code has been set.
Press SET key to conrm and quit.

USER GUIDE
EN
19
ITCAB400
SETTING ALARM CLOCK
In on-hook state, press ALARM/P key once, LCD displays 12-00 AL1,
Press ▲ or ▼key to select ON or OFF. LCD displays ALM icon when the alarm is set
to ON.
Press SET key, value “12” starts to ash.
Press ▲ or ▼ key to set the alarm hour and press SET key to conrm and enter alarm
minute setting.
Press ▲ or ▼ key to edit alarm minute and press SET key to conrm and go to next
group alarm clock setting.
Repeat the above steps to set additional alarms.
Note: The rst 3 groups alarm clock will be repeated periodically every day while the last 2
groups alarm clock is effected one time.
SECRET CODE SETTING AND REMOTE MONITOR FUNCTION
Setting
In on-hook state, press and hold HOLD/RING key for 3 seconds, LCD displays Pin ----.
Input a 4-digit of PIN using the numerical keys.
Press DEL to edit the secret code, press SET to conrm.
When the last digit of secret code is #, the telephone will activate remote monitor function.
Set the ringing volume to dB0. (Please refer to section “SETTING RINGING TONE”).
Usage
Secret code: When caller calls this telephone, he/she will hear the usual ringing tone (when the
line gets through) three or four times from telephone line. However, the telephone unit will not
ring. Then the caller will hear a short “di” sound, which means that the caller need to key in the
secret code. Once the caller keys in the correct code, the telephone unit will ring. Press key or
pick up the handset to have the conversation with the caller.
Remote monitor: If the last digit of the secret code is #, after the caller keys in the correct secret
code, the telephone unit will go into hands free mode automatically. The caller can hear the
sound around the telephone unit.
If the caller keys in the wrong code, he/she will have to call again and key in the correct secret
code PIN.
Note: This function is useful only when the telephone ringer is set to OFF. The caller must know
the secret code in order to dial through the line.
TRANSFER BETWEEN PARALLEL PHONES
Setting paging number
In on-hook state, press and hold SET key, LCD displays EL--
Key in “*” and the paging number (example “*1”and ”*2” ), using DEL key to edit
Press SET key to conrm and exit.
Transferring the line from paralleled phones:
When a call comes, use one of paralleled phones to answer. Press “*” and the paging number
that was set in another telephone unit (the operation should be done within 30 seconds after
you answer the call using the parallel phone. If the time is more 30 seconds, the transfer
operation is not available), the unit rings, pick up its handset or press HANDSFREE key to
answer the incoming call.

EN
USER GUIDE
20
ITCAB400
Note: Please use same series phones to transfer as above operation. Any special services
starting with “*” offered by your Telephone company may not function properly.
To get the best effect of this function, you should load the batteries before using.
ANTI-DIALING FROM PARALLEL PHONES FUNCTION
In on-hook state, press and hold # key for 3 seconds, LCD displays SPI OFF.
Press # key again, LCD displays SPI ON.
Press SET key to conrm.
When the anti-dialing is set to ON, users who want to dial using an extension (parallel phone) via
the same line will hear a beep continuously and will not be allowed to make a call.
SETTING RINGING TONE AND ADJUST RINGING VOLUME
There are 16 kinds of ringing tone for selection:
In on-hook state, press HOLD/RING key, LCD displays ring 02 db3
Press HOLD/RING to select the desired ringing tone.
Press ▲ or ▼ key to adjust ringing volume.
Press SET to conrm and exit.
Note: The volume ranges from dB0-dB3, with dB3 being the loudest, and dB0 is “Do Not
Disturb” mode. If the phone is set at DND mode, the telephone will not ring when there is
incoming call.
DO NOT DISTURB AT REAL TIME
When a call comes and the telephone is ringing, press DEL key, it will stop ringing.
ADJUST HANDS-FREE VOLUME
In hands free mode, press ▲ or ▼key to adjust the hands-free volume. LCD displays the
volume level, total 4 levels for adjustment.
SELECTING PULSE OR TONE DIALING MODE
In on-hook state, press and hold * key for 3 seconds, LCD displays T, means the dialing mode
is set as Tone.
Press * key repeatedly to change to P (Pulse) or T. Then press SET key to conrm.
HOLD ON MUSIC
Hold music selection
There are 6 kinds of hold music for selection.
At off-hook or hands free state, press HOLD/RING key.
Press OUT key to select the desired hold music. It plays the music at same time.
Press ▲ or ▼ key to adjust the 4 steps volume of hold music.
When talking over handset, press HOLD/RING key to enter the hold mode and the hold
music is sent out. In hold mode.
Press HOLD/RING key to release hold mode and continue to talk over handset, or
Hang up handset, it enters hands-free hold mode.
When talking at hands-free mode, press HOLD/RING key to enter the hold mode and the
hold music is sent out. In hold mode.
Pick up handset to talk over handset, or HANDSFREE
Press HANDSFREE key to quit hold mode and talk at hands-free mode.
Table of contents
Languages:
Other ideus Telephone manuals


