IFB IFB-GS-60T-PL User manual
If any protective film is fixed on the product please peel off before using the product
Read the manual carefully before using the chimney
CALL ONLY IFB AUTHORISED PERSON TO SERVICE YOUR
CHIMNEY & USE ONLY GENUINE SPARES IF IN ANY CASE IT'S
REQUIRE
India's Finest Brand
Trusted by millions
The user manual
CHIMNEY
www.ifbappliances.com
www.ifbappliances.com
IFB-印度 说明书
编码:3070500647
备注:20150117更新
Trusted by millions
General Information
Please read carefully
This chimney is suitable to install on any rigid vertical space, over a gas or electric hotplate &
can be used either in Internal Recirculation mode or outside ducting mode depending on the
model . The installation must be carried out by qualified & competent person or IFB
authorized person with the thorough knowledge of the parameters concerning the evacuation
of the contaminated air. (In conformity to the rules concerning the evacuation of
contaminated air if any as of now or in future). The company disclaims all liability for any
damage or injury caused as a result of not following the Instructions for installation contained
in the text.
1
Dear customer,
We welcome you to the proud IFB owner club.
You have just purchased one of the products from our wide range. We thank & congratulate
you for your choice, expressing trust for IFB. We are convinced that, as time goes by, you will
agree your trust was motivated. The rigour quality standard we have set for our complete
range of the products from Washing machines/Cloth Dryers/Dishwashers/Microwaves ovens
Air conditioner & Refrigerator for Domestic use & Industrial Dishwashers & Launderette
for commercial use at Hotels, Restaurants, Canteens & Housing complexes. IFB is a trusted
brand,known for user friendly & convenient products, designed to combine technology and
simplicity besides Great Looks & Unbeatable Performance.
With IFB chimney you would enjoy every day, to make delicious food for your family with
out any hassle & will keep you as fresh as before the cooking, because IFB chimneys quickly
www.ifbappliances.com
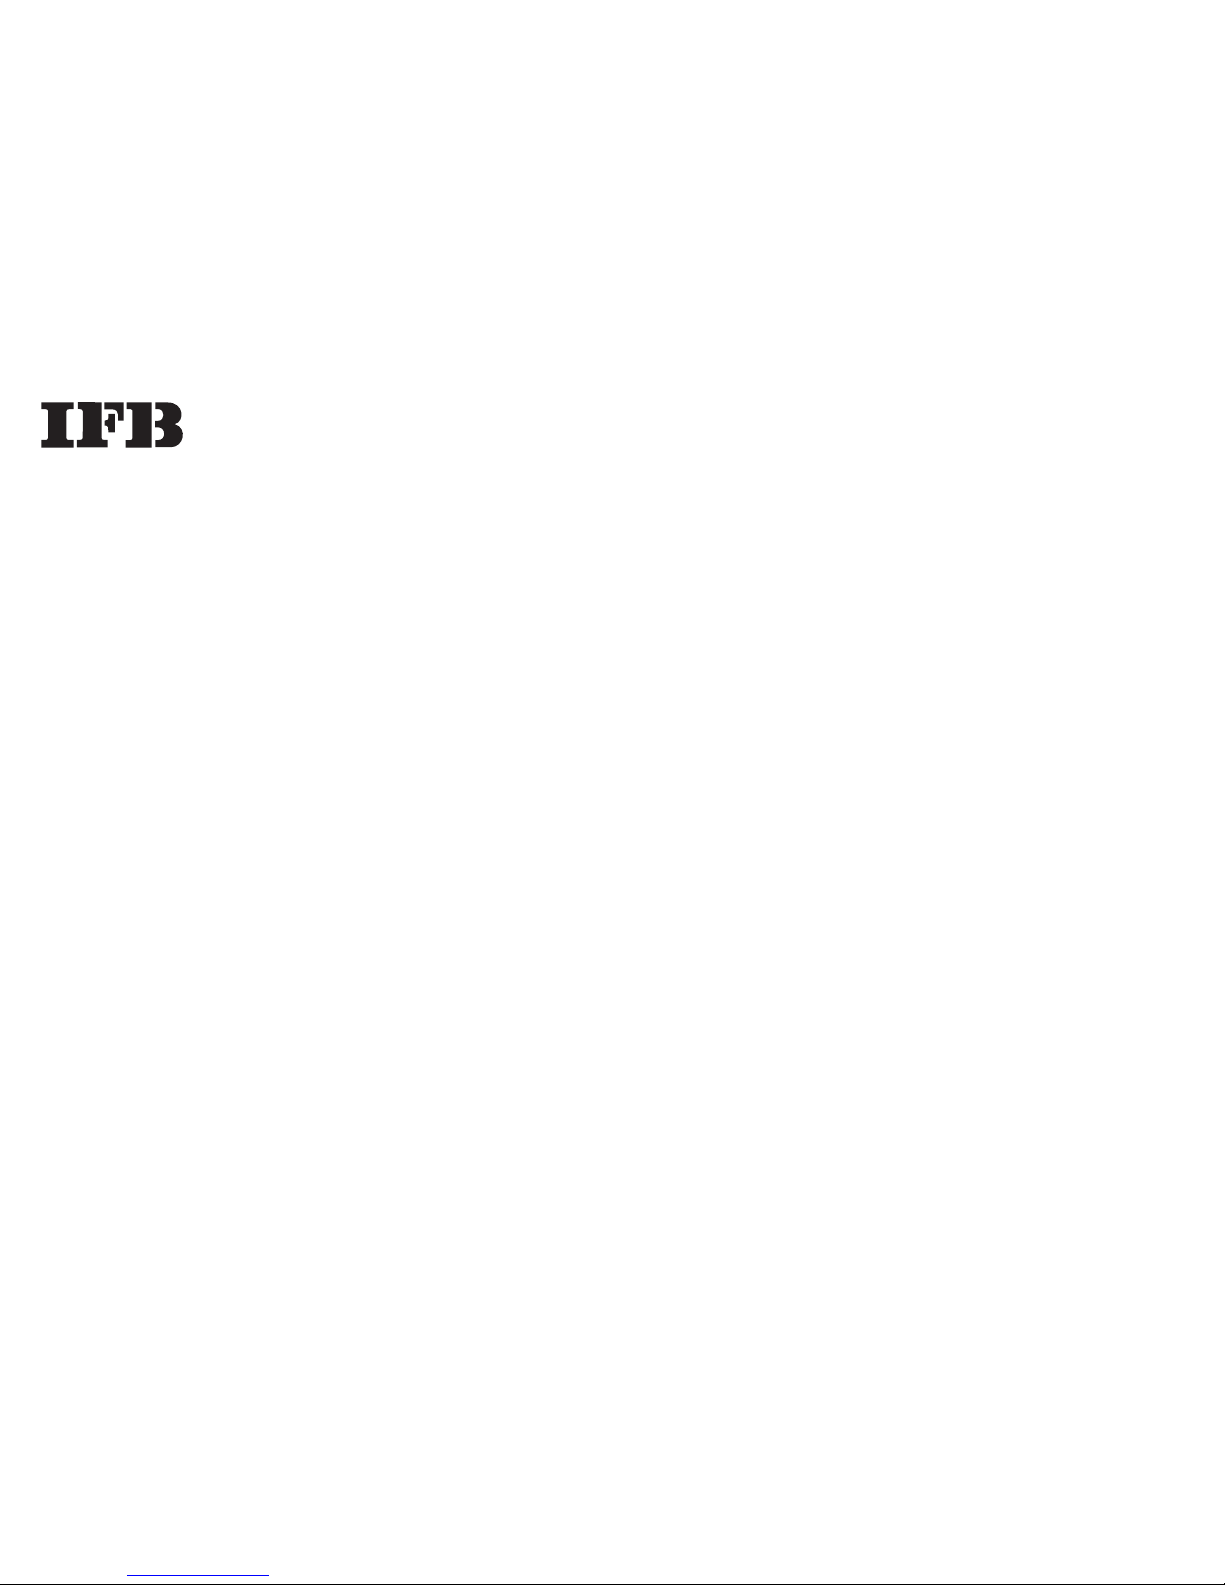
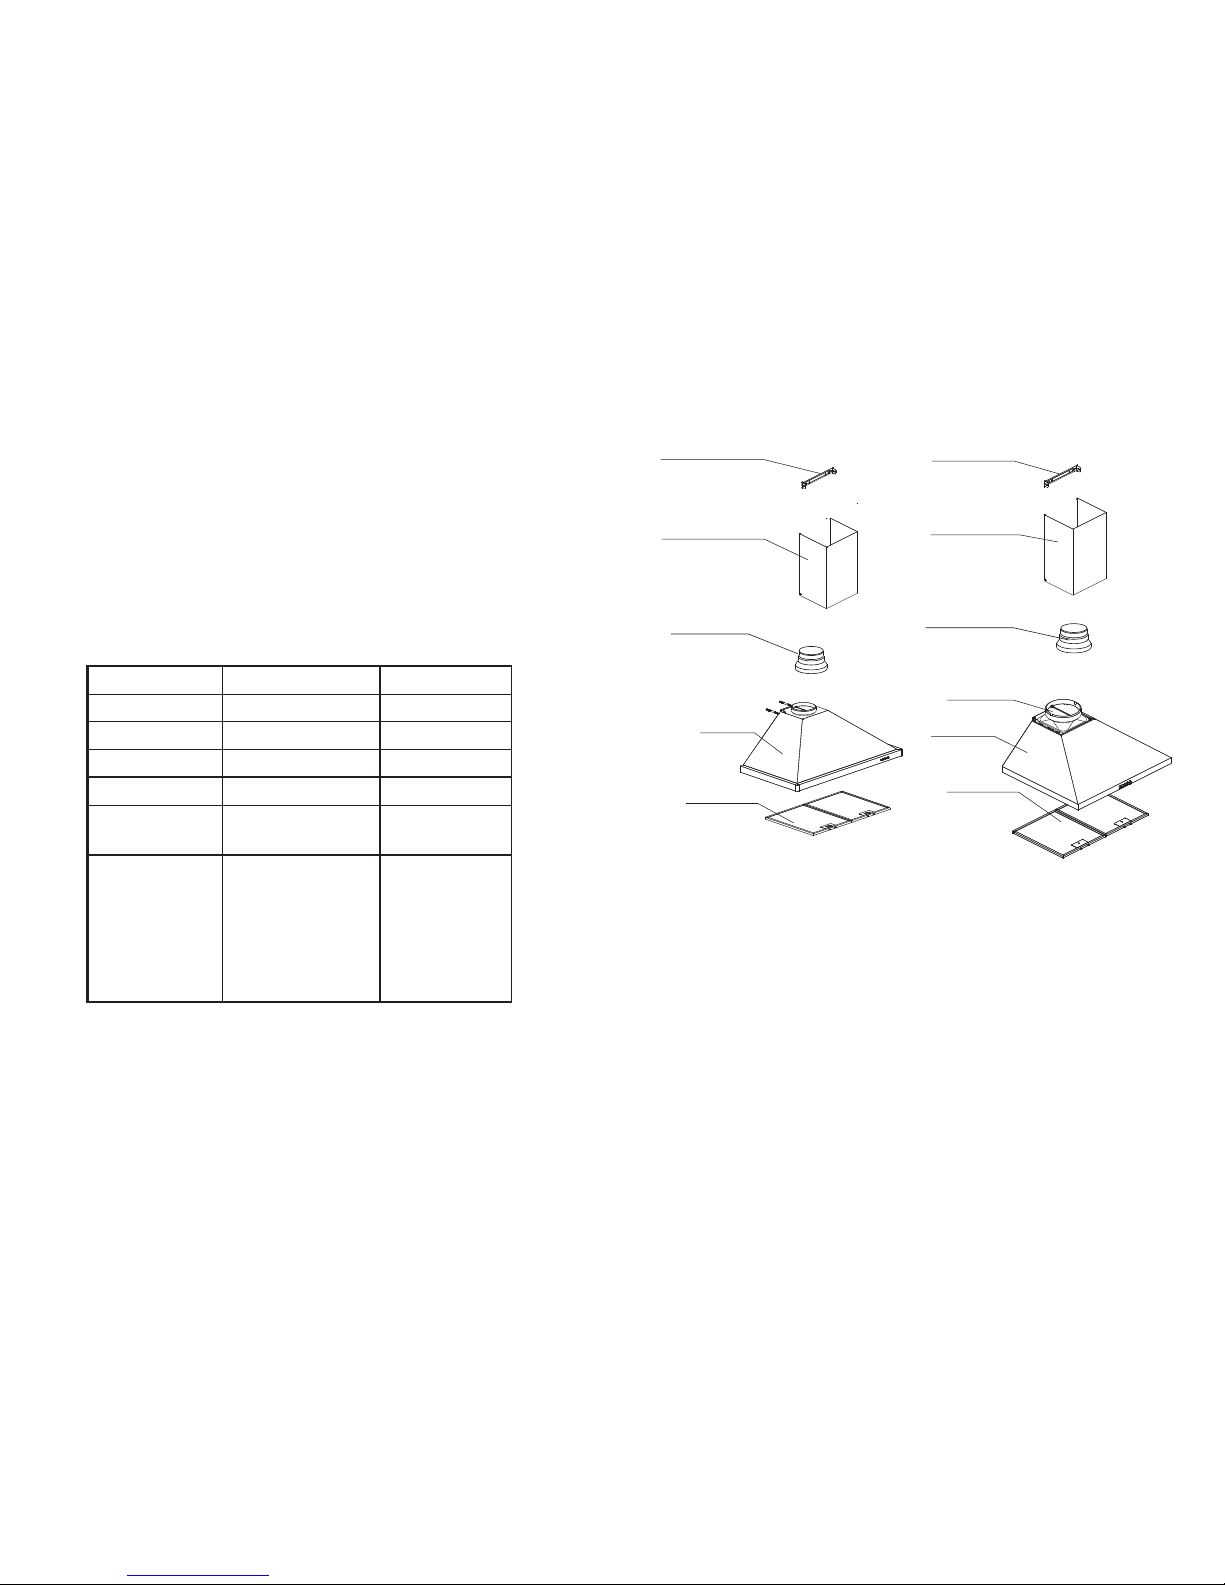
COMPONENTS
The chimney (Cooker Hood) is made up of the following components (fig. 1):
Hood canopy Complete (control switches, Lighting, Motor with Rotor & blower Box )
Duct Cover Low & Upper (model wise)
glass/
Filter
2
Reducer for
φ120 out-let
Upper duct cover hook
Upper duct cover
Low duct cover
Blower box
assembly
Glass
Filter
Reducer for
φ120 out-let
Upper duct cover hook
Upper duct cover
Hood hook
Low duct cover
IFB -GS-60T-PL/90T-PL IFB -GL- 6 P-60CM/90CM
Blower box
assembly
Filter
Hood hook
25
Customer Copy
Product………………………Model ……………………… Serial No ………………........
CustomerName ………………………………………………………………………….........
Address …………………………………………………………………………………..........
Area …………………………………………………… City …………………………...........
State……………………………………….Pin Code…………………………………….......
Telephone No. - Residence…………………………. Mobile………………………….........
E-mail……………………………………………………………………..............................
Dealer'sName ………………………………………………………………………...............
Invoice No. & Date……………………………………. Price………………………….........
Machine Delivered on………………………Machine Installed On………………….........
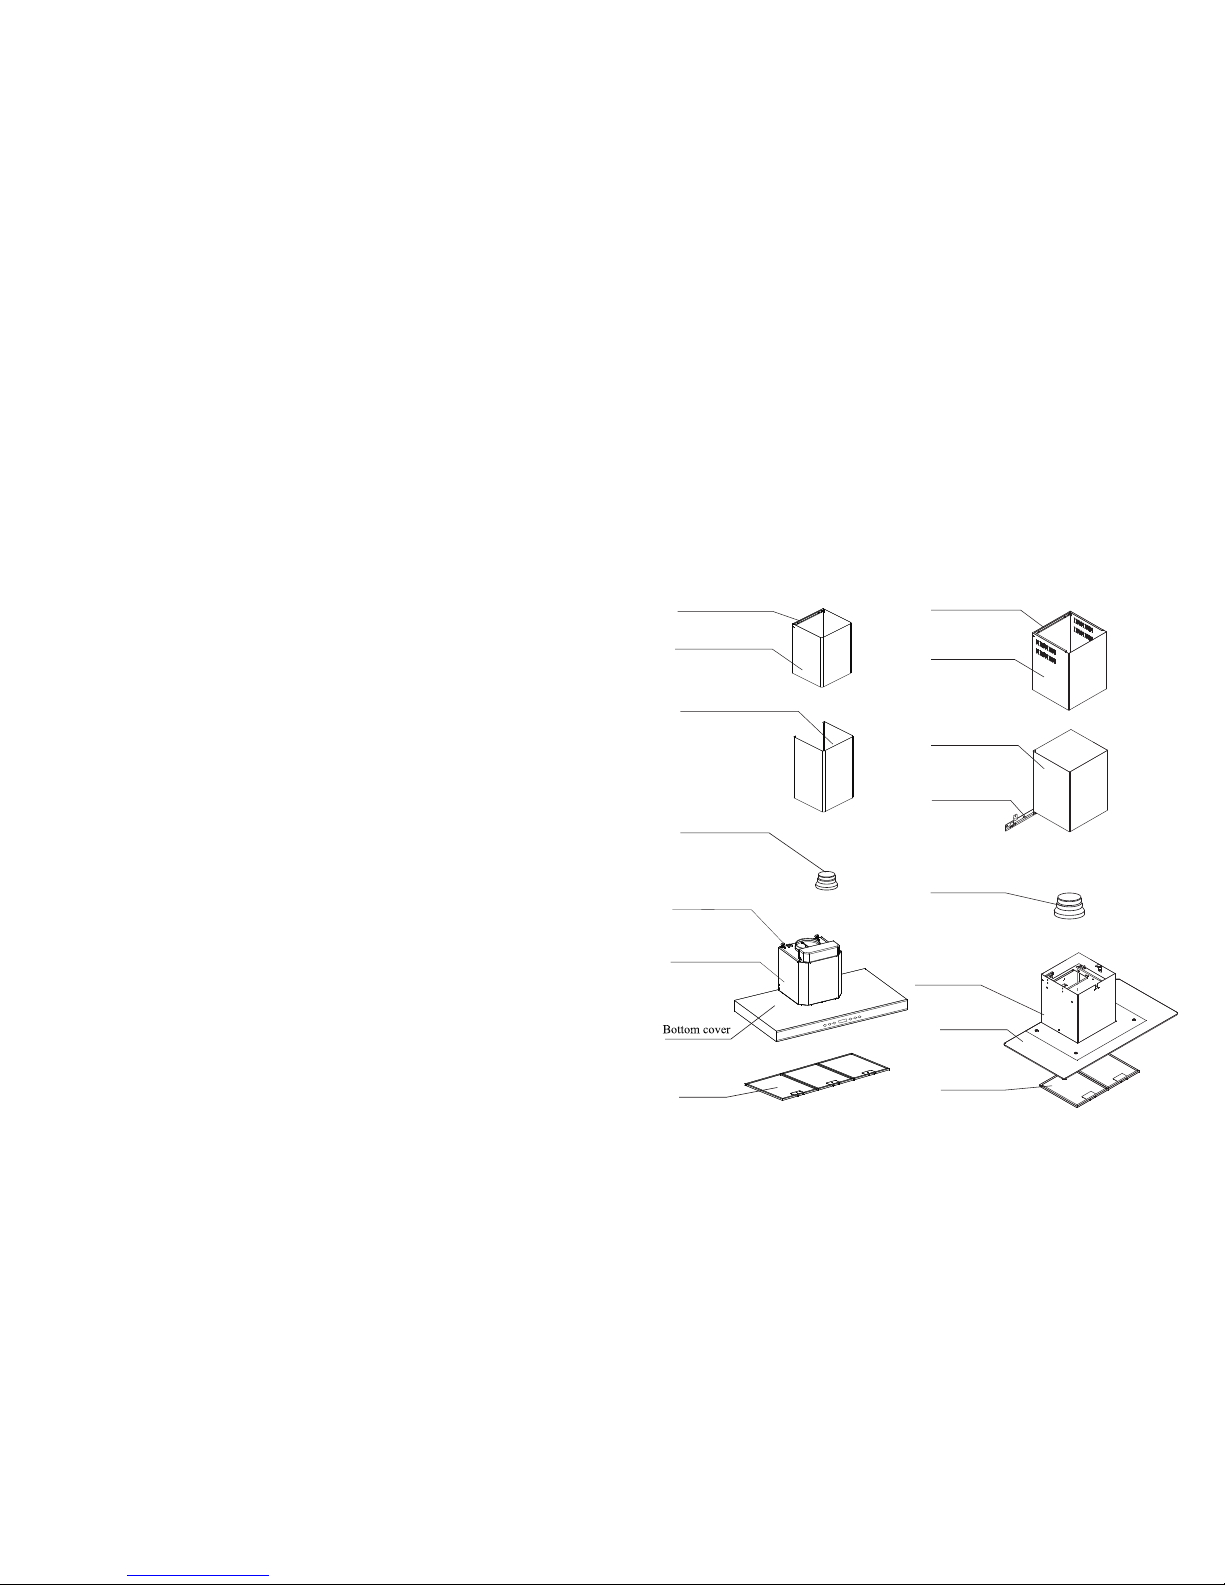
3
Upper support frame
Upper duct cover
Low support frame
Ceiling cover
Low duct cover
Blower box assembly
Filter
Glass
Reducer for
φ120 out-let
IFB GL-90 ISLAND-90CM
Upper duct cover hook
Reducer for
φ120 out-let
Upper duct cover
Low duct cover
Blower box assembly
IFB -GL- 14T-60CM/90CM
24
Customer Name & signature Date
Customer Response
1.The Installation Person was courteous & helpful Yes No
2.I would describe my experience with Installation as
Unacceptable Satisfactory Non satisfactory Very satisfactory
Note: - Installation work is done on chargeable basis & on the customer risk
Scope of Work: - Company will only install the product, fix the pipe and cut the
duct cover. Installation Material like pipe, elbows, clamps & masonry work/wood
work /glass cutting/granite cutting will be carried by customer at his cost & risk . I
certify that the above information and check has been done to my satisfaction & I am
fully satisfied with installation of the product.
Check Points-
1.
2.
Any major transit damage to the machine observed Yes No
Power point with MCB or other Automatic Yes No
Short Circuit Device
a. Condition of Earthing/ Plug/Power Point( 230V AC 6/16 Amp)
Depending on model.
b.If poor/faulty or not available ,Customer has been
advised to correct the same. Yes No
3.User manual
4.Warranty term explained.
5.Basic use demo.
6.Trouble shooting explained
7.Do’s&Don’t explained
8.Procedure to clean/filters/outer body/
Surface/burners/spark plugs/knobs
9.Status of Indicator LED(if applicable)
10.How to use Flame failure device if applicable
11.Status of gas supply tube /pipe/regulator.If not suitable or poor/
cracked/advice the customer to correct the same.
Yes No
Yes No
Yes No
Yes No
Yes No
Yes No
Yes No
Yes No
Yes No
Yes No
Product……………….... Model ……………………….. Serial No ………………….......
Customer Name ………………………………………………………..………..…..............
Address …………………………………………………………………………..….............
Area ………………………………………… City ……………………...…..…..…...........
State………………………………….Pin Code………………………………….............
Telephone No. - Residence………………………..... Mobile………………………........
E-mail………………………………………………………………................................ .
Dealer's Name ………………………………………………………………………....... ..
Invoice No. & Date…………………………………. Price………………………............
Machine Delivered on……………….....…Machine Installed On…………………........
.....................
....................
.....................
......................
........................
.......................
........................
........................
.......................
......................
Installed By ……………………………………Signature……………………….
Receipt/bill no. for Installation Charges ……………………………………................. .
................................................
...... ............................
Installation Report
Reducer for
φ120 out-let
Low duct cover hook
Low duct cover
Shutter
Filter
Body
IFB - SS 63P-60CM/90 CM IFB -GN-5P-60CM/90CM
4
Reducer for
φ120 out-let
Low duct cover hook
Low duct cover
Filter
Body
23
The decision of IFB with regards to the settlement of all claims under this warranty shall
be final. Any disputes subject to Calcutta court and or / other judicial/ or quasi judicial
forums having jurisdiction over the registered office of the Company.
These are the only warrantee terms and conditions given by the company for the respective
appliances.
Product Model Warranty period
Hob All models 1 year
Built-in-Oven All models 1 year
Cooking Range All models 1 year
Chimney Lumina ,Dama, Myro,
Noir, Miro, Astra Alea 1 year
Chimney
N-3/ Black / SS Olimpia ,
Arco,multipla,D-2,C-1
GS-60/90T-PL, GL- 14T-
60cm, SS 63 P-60cm, GL-
6 P-60cm GN-5 P-60cm,
GL-90 Island, GL-932-
60/90cm
5 year
This appliance is designed for domestic use by individuals at home only.
In case of change of city/ town from the original place of purchase at any given point of
time, then the product would attract a warranty transfercost of Rs . 300/-(The money needs
to be paid to the local authorizedservice franchisee).This does not include the cost of re-
installation charges . However, if the product is being shifted within the limit of the city
then warranty transfer charges will not be applicable.
This manual suits for next models
12
Table of contents
Other IFB Ventilation Hood manuals

Popular Ventilation Hood manuals by other brands

Gorenje
Gorenje S3 IHGC963S4X manual

KOBE
KOBE ISX2136SQB-1 Installation instructions and operation manual

U.S. Products
U.S. Products ADVANTAGE-100H Information & operating instructions

Kuppersberg
Kuppersberg DUDL 4 LX Technical Passport

Framtid
Framtid HW280 manual

Thermador
Thermador HGEW 36 FS installation manual


