iGenie HEGSMRV User manual

Instruction Manual
For Household Use Only
Model No.: HEGSMRV
Rev 1
Note: The specifications and/or components of this appliance are subject to change without prior notice.
If any Accessories should fail during use, please call 1300 105 888 (Australia) or 09 8870 447 (New Zealand)
for an immediate replacement. This will save you from returning the product to the store.
If we can assist you in any other way, please feel free to contact us.

Page 2 of 52

Page 3 of 52
1Warnings .........................................................................................................................................4
2Safety Direction ..............................................................................................................................4
3Please observe the following points ..........................................................................................8
4Components....................................................................................................................................9
4.1 Components Continued .........................................................................................................10
4.2 Components Continued .........................................................................................................11
4.3 Components Continued .........................................................................................................12
4.4 Components Continued .........................................................................................................13
5Transporting the Robot ...............................................................................................................14
6Robot Top Control Button...........................................................................................................15
7Remote Control.............................................................................................................................16
7.1 Time and Date Settings ..........................................................................................................17
7.2 Scheduling a Routine Clean ..................................................................................................18
7.3 Battery Installation / Replacement........................................................................................19
8Before Use.....................................................................................................................................20
8.1 Side Brush Installation ...........................................................................................................20
8.1 Charging Dock Setup .............................................................................................................21
8.2 Charging the Robot ................................................................................................................22
8.3 Environment ............................................................................................................................24
9Product Features ..........................................................................................................................25
10 Types of Floor Surfaces ..............................................................................................................25
11 Dry Vacuum Cleaning ..................................................................................................................25
11.1 Large Dust Canister ..........................................................................................................26
11.2 To set up for Dry Vacuum Cleaning: ..............................................................................27
12 Vacuum / Mopping Clean ............................................................................................................28
12.1 To set up for Vacuum / Mop Cleaning ............................................................................28
12.2 Setting the Intelligent Tank ..............................................................................................31
13 Virtual Barrier................................................................................................................................31
14 Removal / Installation of the Trailing Bar and Mop Pad .........................................................32
15 Using the Robot Cleaner .............................................................................................................33
15.1 Start / Pause / Sleep..........................................................................................................33
15.2 Manually Finishing a Cleaning Session .........................................................................34
16 Advanced Cleaning ......................................................................................................................34
17 User Maintenance.........................................................................................................................36
17.1 Dry Cleaning of the Large and Small Dust Canister.....................................................36
17.2 Cleaning / Replacing Filters.............................................................................................38
17.2.1 Mesh Filter......................................................................................................................38
17.2.2 Exhaust (White) Filter ...................................................................................................39
17.3 Cleaning Dust Canister ....................................................................................................39
17.4 Cleaning Robot Body and Accessories. ........................................................................39
17.5 Cleaning / Replacing the Robot Spinning Brushes......................................................40
17.6 Cleaning the Roller Brush................................................................................................40
17.7 Cleaning the Robot Sensors............................................................................................42
17.8 Cleaning the Wheels .........................................................................................................43
17.9 Cleaning the Charging Contacts Robot / Charging Stand ..........................................43
18 Robot Battery Replacement........................................................................................................43
19 Storage...........................................................................................................................................45
20 Troubleshooting ...........................................................................................................................45
20.1 Robot Speech ....................................................................................................................45
20.2 FAQ .....................................................................................................................................47
20.3 Operation Troubleshooting .............................................................................................48
21 Specifications ...............................................................................................................................50
21.1 Technical Specification for the Robot............................................................................50
21.2 Technical Specification for the Charging Dock ............................................................50
21.3 Technical Specification for the Remote Control...........................................................50
22 Warranty Against Defect .............................................................................................................51

Page 4 of 52
1 Warnings
Before using this appliance, read and follow all warnings and instructions in this
manual, even if you are familiar with this product.
This appliance is not intended for use by persons (including children) with reduced
physical, sensory or mental capabilities, or lack of experience and knowledge,
unless they have been given supervision or instruction concerning use of the
appliance by a person responsible for their safety.
Children should be supervised to ensure that they do not play with the appliance.
2 Safety Direction
Please read this instruction manual carefully before first use. It is advisable to keep
this instruction manual for future reference.
DO NOT vacuum water, wet objects, liquids, ashes, hot coals, cigarette butts,
matches or any hot, smoking or burning objects, etc.
DO NOT pick up flammable or combustible materials (i.e. lighter fluid, petrol,
kerosene, etc.) or use in the presence of explosive liquids or vapour.
DO NOT pick up toxic material (i.e. chlorine bleach, ammonia, drain cleaner, etc.)
DO NOT vacuum Toner (for laser printer, copy machines etc.) as there is a risk of
fire and explosion.
DO NOT vacuum plaster dust, cement dust etc. as the filter will block very quick.
DO NOT use the vacuum without all filters fitted.
DO NOT store or use the appliance near high temperature areas.
DO NOT run over the charger cable with the Robot cleaner.
DO NOT use the Robot cleaner if it is blocked. Turn off and clear all blockages
before continuing.
DO NOT use the Robot cleaner with a blocked filter. Clean filter before continuing.
(refer to User Maintenance section).
DO NOT use the Robot cleaner if the appliance malfunctions, abnormal noise,
smell, smoke, is dropped or damaged in any manner or any breakage is found
during operation.

Page 5 of 52
For electrical safety, any repairs to the product must be performed by a qualified
electrical person only, or the product must be disposed of.
DO NOT misuse the Charger Cable. Never pull the appliance by the cable or pull
to disconnect it from the outlet. Instead, grasp the charger body and pull to
disconnect.
DO NOT use with damaged Charger Cable or Charger Body.
DO NOT handle Charger or Robot cleaner with wet hands.
DO NOT sit or stand on this appliance.
DO NOT place any objects on top of this appliance.
DO NOT use in wet or moist areas such as bathrooms, showers, etc.
DO NOT place the appliance on tables or chairs etc. where it may fall off.
DO empty the Dust Canister regularly for optimal operation of the Robot.
DO keep hair, loose clothing, fingers, feet and body parts away from openings or
moving parts such as the wheels and spinning brushes.
DO disconnect the Charger from the power supply when not in use for extended
periods.
DO NOT use the Robot cleaner to pick up large objects, hard or sharp objects such
as glass, nails, screws, coins, etc. that are likely to cause damage.
DO NOT use with damaged Charger Cable or Charger Body.
DO NOT use Robot cleaner if it has been dropped, damaged, left outdoors, or
dropped into liquid (water etc.)
DO NOT put any objects into openings.
DO NOT use with any openings blocked and do not restrict airflow.
DO NOT use without the filter in place.
DO NOT attempt to modify this product in any way.
DO use extra care when vacuuming on stairs.
DO ensure children and babies cannot play with plastic bags or any packaging
materials
Page 6 of 52
DO use only on indoor surfaces. Not for Outdoor Use.
DO use only as described in this manual. Use only manufacturer's recommended
attachments.
DO Keep Charger Cable away from heated surfaces.
DO Keep all openings free of dust, lint. hair, and anything that may reduce airflow.
DO keep your work area well lit.
DO store your appliance indoors in a cool. dry area.
DO operate the Charger from a power source of the same voltage, frequency and
rating as indicated on the product identification plate.
DO Only use the Power Supply which was supplied with this appliance.
DO ensure appliance is switched off before handling or picking up.
When handling the appliance, to avoid injury take care that your fingers or other
parts of your body do not touch the wheels or spinning brushes.
Take care that your clothing or other items do not touch the wheels or spinning
brushes as damage may occur.
WARNING
Only use the Battery Charger which was supplied with this appliance.
Model No. ZD12D260050AU 100–240V~ 50-60Hz 0.5A Output: 26.0V 500mA
Battery Pack Specification:
Type: Li-ion, 18650 14.8Vd.c., 2200mAh
Consumers are cautioned against using and/or purchasing counterfeit and/or
inferior quality batteries. These batteries have the potential to cause fire, personal
injury, and/or damage to property. These batteries are typically found on online-
auction websites or from other retailers and are known to pose a potential safety
risk.
Never try to recharge Non-Rechargeable batteries as they may explode, catch on
fire or cause personal injury and/or damage to property.
- May explode if disposed of in fire.
- To prevent injury or burns, do not allow metal objects to contact battery
terminals.
- Do not use or store in temperatures above 40°C

Page 7 of 52
The Battery Pack must be removed from the Robot cleaner before disposal.
Contact your local waste management authority for more information on Battery
Recycling and disposal regulations in your area.
This symbol on the product or its packaging indicates:
Do not dispose of electrical appliances or batteries as unsorted municipal waste,
use separate collection facilities. Contact your local council for information
regarding the collection systems available. If electrical appliances are disposed of
in landfills or dumps, hazardous substances can leak into the groundwater and get
into the food chain, damaging your health and well-being. Please contact your local
council or regional authority for more information on collection, reuse, and
recycling programmes.
If this appliance is used by a third party, DO supply the instruction manual with it.
No liability can be accepted for any damage caused by non-compliance with these
instructions or any other improper use or mishandling of appliance.
This product has not been designed for any uses other than those specified in this
manual.
ONLY for domestic use. Industrial or commercial use invalidates the warranty.
Only use a genuine battery and other accessories/parts from the supplier, as using
a non-genuine battery and other parts may harm the product and could be a risk
to the user and bystanders.
Read and Save These Instructions
Page 8 of 52
3 Please observe the following points
Electrical devices are not for children
Never allow children to use electrical devices unsupervised.
If used, Batteries / rechargeable batteries can be extremely dangerous if swallowed,
therefore: keep the device and batteries out of reach of small children.
If a battery is swallowed, seek medical help immediately.
Proper Recycling
Batteries and packaging material should not be disposed of in domestic waste.
Contact your local authority for instruction on proper disposal and collection points.
Batteries must be handed in to a used-battery collection point.
Remove the battery from the remote control and from the appliance prior to recycling.
Ensure the battery in the appliance is not being charged when removing.
Separated disposal of packaging materials cares for the environment.
Moisture and Cleaning
This product is not waterproof! Do not immerse the unit in water or let it come in contact
with water.
If water penetrates the unit, it can cause serious damage.
Do not use cleaning agents which contain alcohol, ammonia, benzene or abrasives, as
these can damage the unit. Use a soft, damp cloth for cleaning.
Heat
Do not expose the unit to direct sunlight.
Ensure that the device is not exposed to any direct heat sources, such as radiators or
open fires. Ensure that the unit is not covered.

Page 9 of 52
4 Components
Note: The specifications and/or components of this appliance are subject to change without prior notice
1
Bumper / Sensor Window
7
Power Supply
2
Start / Pause Button
8
Magnetic Barrier Strip
3
Dust Canister / Water Compartment Cover
9
Spare Side Brushes.
4
Exhaust Air Vents
10
Cleaning Brush
5
Instruction Manual x 2
11
Spare Filter
6
Charging Dock
12
Remote Control
3
12
11
9
6
8
10
7
1
4
5
2
I.M.’s

Page 10 of 52
4.1 Components Continued
13 Trailing Bar 16 Water Tank
14 Mop Pad x 1 17 Small Dust Canister
15 Large Dry Dust Canister
13
14
15
16
17
Page 11 of 52
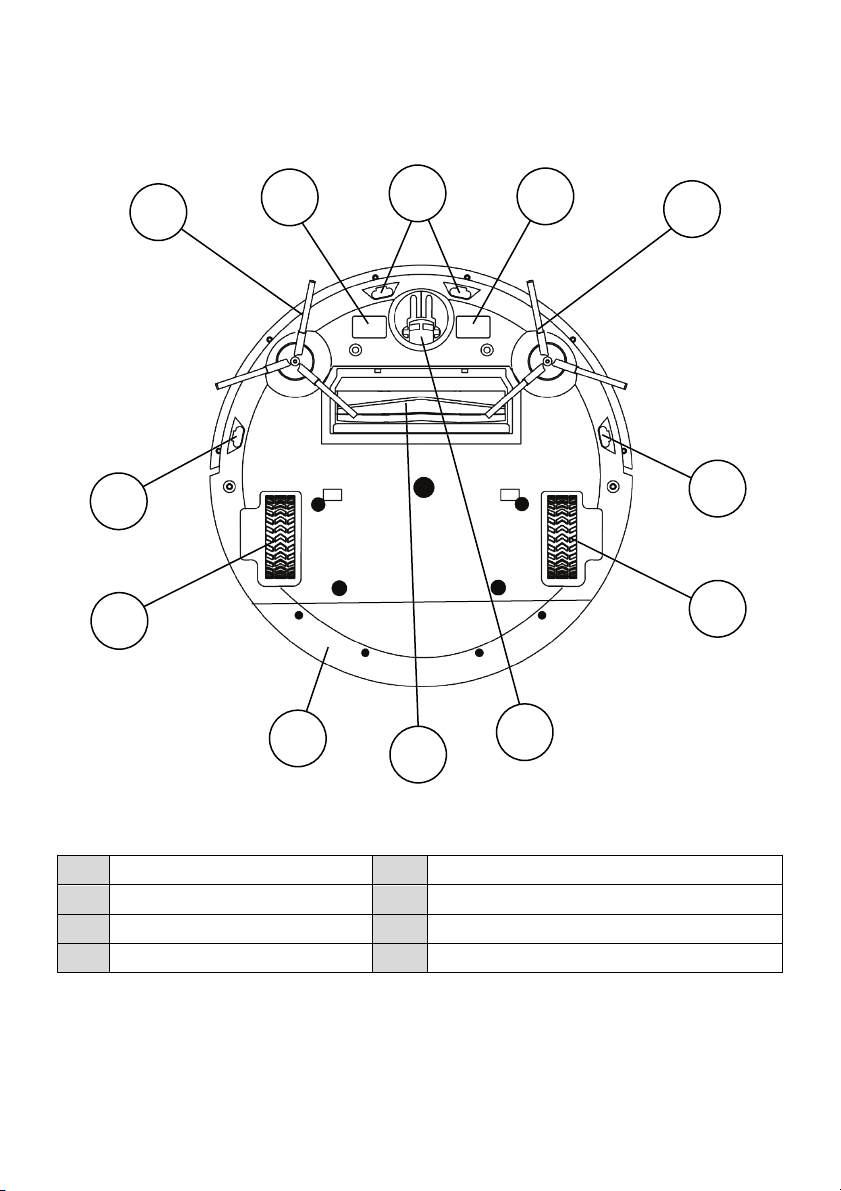
4.2 Components Continued
Robot Bottom View – Without Trailing Bar and Mop Fitted
18 Side Brushes 22 Front Castor Wheel
19 Charging Contacts 23 Roller Brush
20 Cliff Sensors 24 Battery Compartment
21 Left Drive Wheel 25 Right Drive Wheel
20
20
18
23
19
18
20
19
22
21
25
24
Page 12 of 52
4.3 Components Continued
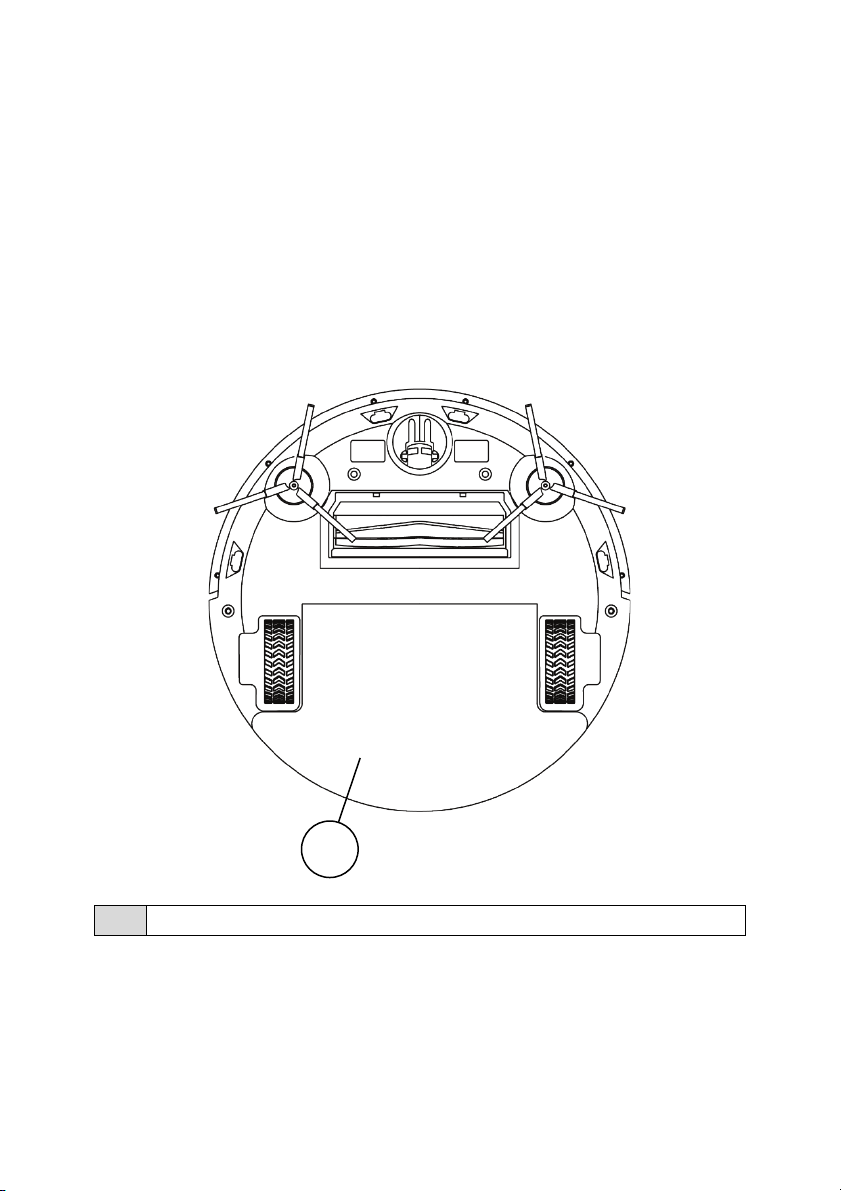
Robot Bottom View – With Trailing Bar and Mop Pad Fitted
Note: Robot comes with one of the mop pads and the trailing bar already
installed.
The trailing bar's main function is to attach the mop pad to the robot and is
located underneath the mop pad.
The Trailing bar and mop pad are to be removed when using the Vacuum
Cleaner function especially on carpet.
26 Trailing Bar Fitted to Robot with Mop Pad attached on top
26

Page 13 of 52
4.4 Components Continued
Charging Dock
27 Power Indicator Light (behind window) 30 Negative Charging Terminal
28 Power Supply Jack 31 IR Sensor Window
29 Positive Charging Terminal
29
30
31
27
28

Page 14 of 52
5 Transporting the Robot
When picking up the Robot, first ensure the On / Off Switch located on the side
of the Robot is in the “0” Off Position.
IMPORTANT:
Never grab or lift the Robot by the Bumper (which is shown in front of the lines
in the diagram below). Only Hold the body back from the bumper as suggested
where indicated by the arrows.
Bumper

Page 15 of 52
6 Robot Top Control Button
This Button is used to Start and to Pause the Robot.
•Press this button while in standby mode and the robot will begin to clean in
Normal Mode.
•The button will be lit Blue colour when in standby mode
Note: If the Robot is asleep (no Blue Light in the button) press this button to
wake the Robot, and then press again to start normal cleaning mode.
•Press this button while the robot is cleaning to pause the cleaning session.
•If you wish to cancel the cleaning altogether, you need to use the remote control
to send it back to the charging dock. Refer to the section “Remote Control” for
further instructions.
Note: This button is also used for Pairing the Robot with Wi-Fi.
•If the Blue light inside the button is blinking rapidly, this means the Robot is not
paired with your Wi-Fi network.
Refer to the separate Wi-Fi Instruction manual for more information.

Page 16 of 52
7 Remote Control
Schedule - Press this button and the robot
will enter schedule mode.
Return Home - Press for the robot to stop
cleaning and return to the charging dock.
Forward - Press while cleaning and the
robot will move a short distance in a
forward direction with each press.
Backwards - Press while cleaning and the
robot will move a short distance in a
backwards direction with each press.
Left - Press while cleaning and the robot
will turn in a circle to the left.
Right - Press while cleaning and the robot
will turn in a circle to the right.
Normal Clean - Press this button and the robot will enter Normal
cleaning mode until another button is pressed.
Turbo - Press this button and the robot will enter turbo cleaning and
the suction power will increase until another button is pressed.
Wall Following - Press this button and the robot will enter wall
following mode until finished or another button is pressed.
Spot Cleaning - Press this button and the robot will enter spot
cleaning mode until finished or another button is pressed.
Full Go - Press this button and the robot will enter full go cleaning
mode until finished or another button is pressed.
Press this button and the robot will confirm the entered settings for
schedule mode. In any cleaning mode, press this button to stop.
Water – When in Mop Mode, press this button to vary the water
flow rate, either Normal water seeping rate or Quick water seeping
rate.

Page 17 of 52
7.1 Time and Date Settings
a. Settings the current week day:
Note: The Days of the week are represented by Number 1 to 7.
1 = Monday, 2 = Tuesday, 3 = Wednesday, 4 = Thursday, 5 = Friday,
6 = Saturday and 7 = Sunday
Note: you will only have 15 seconds to adjust the settings before it returns to
standby. If it times out, press the button again and start over.
•In the standby mode, press the button to enter the setting for the
current week day. The Day Number at the top of the screen will blink;
•Press the or button to cycle through the day numbers;
•Press the button to save the current week day number and to enter the
next setting for current hour / minute.
b. Settings of current hour / minute:
Note: the time is in 24 Hour Format (e.g. 00.00 to 23.59)
After setting the current week day number, enter the setting for current hour
/ minute.
•Press the " " or " " button to switch between hour /
minute.
•Press the button to increase the current time, and press the button
to decrease the time;
•Press the button to save the current hour / minute.
Note: If you remove the batteries in the remote control, you will need to
reprogram the time.

Page 18 of 52
7.2 Scheduling a Routine Clean
Please note: From the time you schedule the Robot to start, there will be
up to a 1 minute delay to when the Robot will actually start to clean. e.g. If
you program the start time to be at 10.30am, the Robot will start at a time
between 10.30 and 10.31am.
a. Setting for Schedule week day:
Any week day or a selection of weeks days can be selected as follows:
Note: The Days of the week are represented by Number 1 to 7.
1 = Monday, 2 = Tuesday, 3 = Wednesday, 4 = Thursday, 5 = Friday,
6 = Saturday and 7 = Sunday
Note: you will only have 15 seconds to adjust the settings before it returns to
standby. If it times out, press the button again and start over.
Note: If the Robot’s battery is still charging at the same time you have set a
scheduled start time, the Robot will not start until the battery is fully charged.
With the Robot either Paused or in Standby mode, press and hold the
button on the remote controller for approximately 4 seconds to enter the
settings for schedule week day.
•Press the or button to cycle through the day numbers until you
reach the day number required then press the button to set the day
schedule. This is an important step so as to get the schedule to set.
Note: At this point, you can choose 1 day, or all 7 days or any combination in-
between.
•To do this, when you have selected the first day number you require, press the
button, then press the or button to
select the next day number, and press the button: repeat until all
the days (or just a day) are selected, then press the button to
enter the next setting for required hour / minute.
b. Setting for Schedule hour / minute:
Note: the time is in 24 Hour Format (e.g. 00.00 to 23.59)

Page 19 of 52
After setting the required week day number, enter the setting for required
hour / minute.
•Press the " " or " " button to switch between hour /
minute.
•Press the button to increase the required time, and press the
button to decrease the required time.
With the remote control pointed at the front of the Robot, Press the
button to save the required programmed time.
Another Clock Icon will appear on the display indication the Schedule has been
successful.
Note: If you remove the batteries in the remote control, you will need to
reprogram the time and schedule.
7.3 Battery Installation / Replacement
Note: The Remote control is not supplied with batteries.
To use the first time, you will need to install 2 “AAA” alkaline batteries.
NOTE: Do not dispose of batteries in the rubbish bin. Contact your local
authority for instruction on proper disposal and collection points.
To install / replace the batteries in the remote control, turn the remote control
over so that the back is facing you.
Slide the back cover off to access the
battery compartment.
Install / replace with new batteries
ensuring the polarity of the batteries match
the polarity marked inside the battery
compartment.
Important: Never mix old and new batteries and never mix battery types.
Slide the back cover back on to the remote control and push all the way on
until it locks in place.
The remote control must be pointed at the front or rear of the Robot and inline
of sight for it to operate just like a TV remote control.
+
+
+
+
Page 20 of 52
Note: If you try to use the remote control when the Robot is cleaning near
the charging dock, the Robot may not recognise the command as the
charging dock signals have priority to ensure the Robot does not hit the
charging dock.
8 Before Use
The following steps must take place before a cleaning session is to occur.
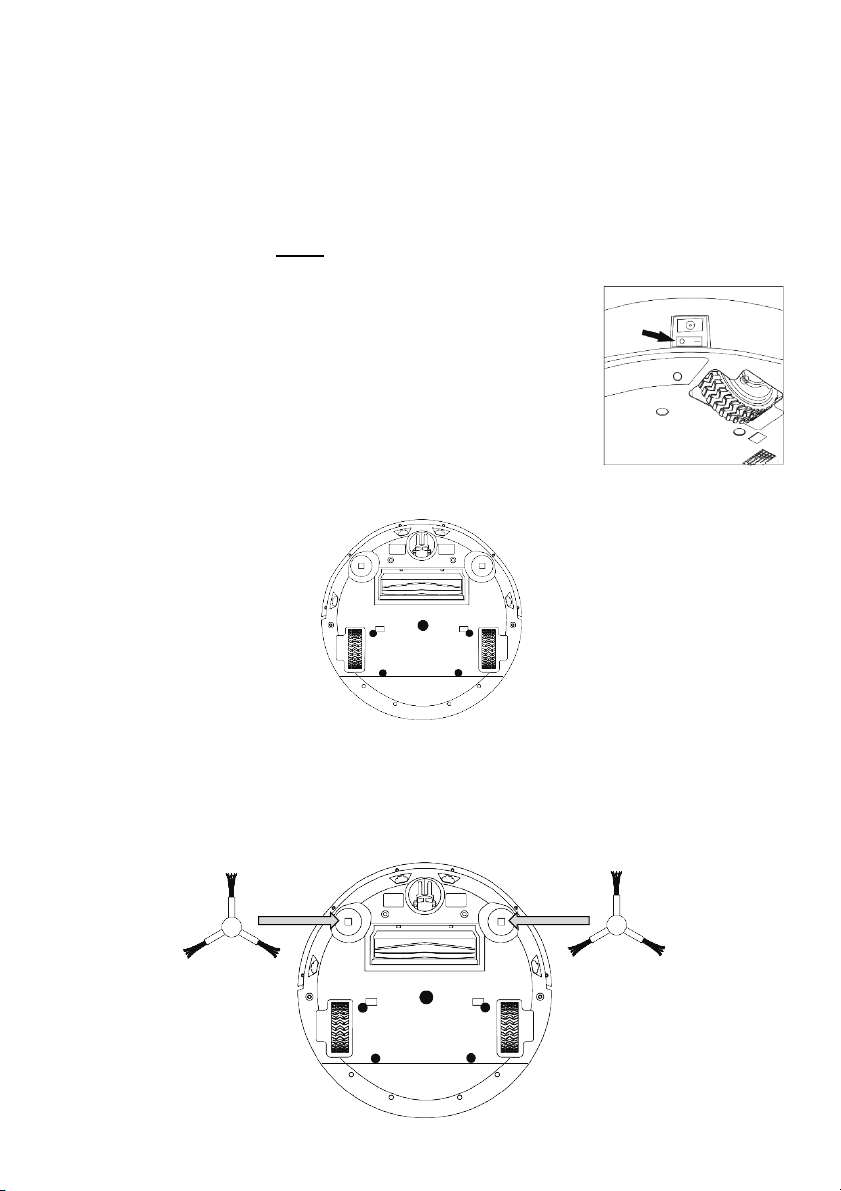
8.1 Side Brush Installation
IMPORTANT: The side brushes need to be installed
before any cleaning takes place.
•Ensure that the robot's power is off. Turn off the
power by flipping the power switch on the side of
the robot to “O”.
•Gently pick up the robot and lay it with its wheels facing up.
•Position the side brushes, with the square holes pointed down, and the
brush bristles angled up. Align the square hole, on the underside of the
side brush, over the square post, located inside the hollow semicircle next
to the front Castor wheel. Push down hard until it clicks in place.
Table of contents


